ATTACHING A COUNTERTOP TO A. BASE CABINET

![]()

An electronic stud finder will locate studs quickly and accurately. But if you don’t have one, there are other methods you can use. Look on the floor for keel marks that were used to locate the studs before drywall installation. Electrical-outlet boxes are nailed into studs. Tap gently on the wall and listen for a duller sound when you tap over a stud. Or drive nails behind the cabinet to locate a stud. When one stud is found, other studs should be 16 in. or 24 in. from it. Once the studs are found, mark their locations inside the cabinets on the mounting rail. Predrill screw holes in the cabinet mounting rail, set the cabinet in place, and drive a screw into each stud. If the screw misses the stud, check again for its location until you get it right. And feel free to use a few extra screws in wall cabinets. Just make sure they go into studs.
Many types of countertops are available these days, but the most common type of affordable countertop is plastic laminate applied over particleboard or MDF. Laminate countertops come in many colors and styles. Remember if you choose this type of countertop that scratches show up more on dark surfaces than on lighter ones. Also, be aware that very hot pans can leave burn marks on laminate countertops. Sometimes, a countertop is also needed in a bathroom, but often the bath vanity comes with a countertop and a sink already attached.
A countertop ends where it meets a wall or stove and extends 1 in. or so beyond the end of the last cabinet. When I’m ready to install a countertop, I go to a supplier, pick a color, and give the clerk the exact measurements of the base cabinets. I prefer the style of laminate countertop that comes with a backsplash. If you provide the size and location of the sink, the supplier can cut the hole for it, often at no additional cost (see the top photo on p. 257). Otherwise, a hole can be cut on the job site with a jigsaw or a reciprocating saw (sabersaw) equipped with a fine-tooth blade. Just follow the directions that come with the sink. Put some duct tape on the base of the saw to keep it from scratching the laminate surface.
In many Habitat houses, the kitchen layout provides for straight countertop surfaces rather than L-shaped countertops, which are more difficult to install. If you need an L-shaped countertop, the supplier will make the necessary miter cuts and provide special hardware for joining countertop sections from underneath. Before joining mitered sections, put waterproof silicone caulk on the two mating edges.
Test-fit each countertop section, placing it on top of the base cabinets and seeing whether the unit fits properly. If the backsplash doesn’t fit tightly against the wall, fill small gaps with silicone caulk after attaching the countertop. If necessary, especially on a crooked or wavy wall,
scribe a line on the backsplash and then use a belt sander to remove material from the back – splash to make it fit against the wall.
ATTACH THE COUNTERTOP WITH SCREWS. Usually, base cabinets are built so the top can be screwed directly to them. For some cabinet and countertop combinations, though, a supplier may advise you to put strips of 1 x material on top of the base cabinets so the countertop nosing won’t prevent cabinet doors and drawers from opening.
Prefinished countertops must be attached with screws from below. Attach the countertop by driving Р/4-in.-long screws up through the 1x mounting blocks installed by the cabinet manufacturer (see the illustration on the facing page). Predrill a screw hole through the mounting blocks, but be very careful not to drill or drive the screws so deeply that you break through the finish surface. It’s easy to strip a screw driven into a countertop’s particleboard or MDF substrate, so don’t try to drive installation screws extra tight. Complete the job by running a neat bead of silicone caulk between the back – splash and the wall.
STEP 6 INSTALL THE BASEBOARD AND CHAIR RAIL
The old house I grew up in had full 1×12 baseboards. In our part of the country, they were called mopboards. In those days, people used big mops to clean their floors with soap and water. The baseboard not only covered the joint between the plaster and the floor but also protected the walls from being banged by the mop.
Today, baseboard trim is made from real or manufactured wood, and there are many styles available. In the last Habitat house we built here on the coast, we used 1×4 baseboards made of preprimed MDF. Once it was installed and painted, it looked great, but it was so solid that you could hardly drive a nail through it by hand.

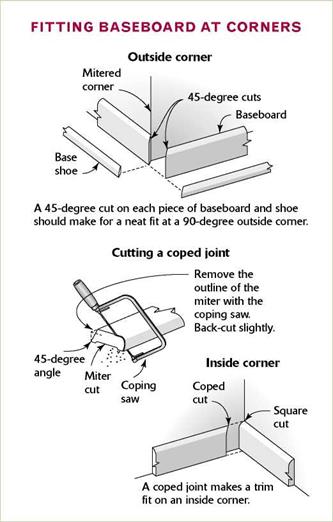
![ATTACHING A COUNTERTOP TO A. BASE CABINET Подпись: Inside baseboard corners are coped. The coped cut fits the profile of the trim piece that runs into the corner. [Photo © The Taunton Press, Inc.]](/img/1312/image822.gif)
makes it harder for dust to collect on the top. Baseboards still cover the joint between the drywall and the floor and keep the wall from getting banged by a vacuum cleaner. Order long stock from the supplier so you can eliminate joints on most walls.
Before installing baseboards, use a putty knife first to clean any excess joint compound from the corners. Then clearly mark (or re-mark) the location of the studs on the floor. If the gap between the bottom edge of the drywall and the floor is greater than 1 in., take the time to fill it with strips of ‘/i-in.-thick OSB or plywood. Otherwise, the bottom part of the trim can easily be canted inward during installation. If you’ll be nailing the baseboard by hand, protect your knees with a pair of kneepads.
Paint-grade MDF is a material commonly used in baseboard and door trim. It is not advisable to use this material in bathrooms, kitchens, or laundry rooms. MDF absorbs water easily, causing it to expand. It will then have to be replaced.
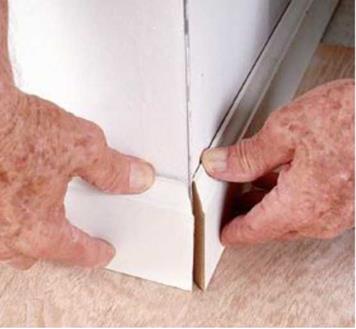
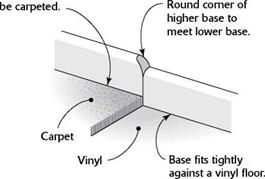
Right-handed people generally prefer to install baseboard counterclockwise (right to left), starting at a door. This makes it easier for righties to cut a coped joint. Lefties tend to install baseboard clockwise for the same reason. Set baseboard right on vinyl or wood flooring, but hold it up about Vi in. if you plan to install carpeting later so that you can slip the carpet under it. When working in rooms that will later be carpeted, use small blocks of OSB as temporary supports under baseboards as you nail them to the wall.
To get my trim skills up to speed, I like to start running baseboard in a closet. Try making a rough plan of each room on scrap paper and record the measured length of each wall. Drywall is often left a bit rough near the floor line, so it’s hard to measure accurately at that point. Hold the tape off the floor a couple of inches to get a more accurate measurement.
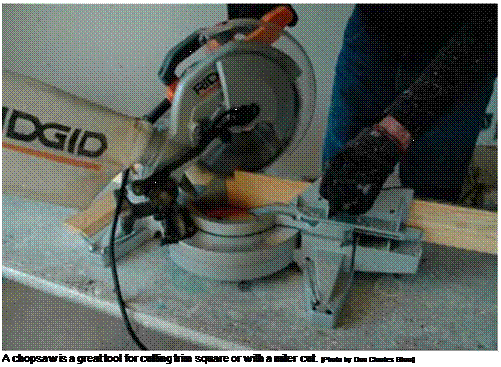
This will save you time walking back and forth to the chopsaw with a new measurement each time you want to make a cut.
The first piece right inside the door is measured to length from the door casing to the wall and cut square on each end. Often, that piece is quite short (2 in. or so). If it fits snugly in place, you may not need to nail it. Instead, spread some glue on the back and just press it into position. The next piece of trim will hold the short
|
|
|
|
|
|
|
|
|
|
|
|
|
|
|
|
|
|
|
|
![]()


Leave a reply