A WHOLE-HOUSE EXHAUST FAN
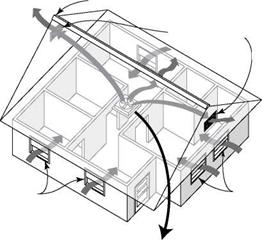
Although it is not ideal in all climates or seasons, a whole-house fan can be a very attractive alternative to air-conditioning. A simple fan is more reliable and less expensive than a single window – mounted AC unit, and it can effectively cool an entire house. As shown in the illustration at right, the principle is simple: A single, centrally located fan pulls in fresh air through open windows and blows hot indoor air outside. By turning the fan on in the evening and opening all major windows, it’s possible to quickly cool a house that has become hot during the day.
|
COOLING WITH A WHOLE-HOUSE FAN |
|
– Ridge vent |
|
Gable vents – |
|
Windows |
|
Windows |
|
A fan pulls in cool night air through the windows and pushes hot air that has built up during the day through the gable-end or ridge vents. |
|
Insulated fan cover for winter months |
|
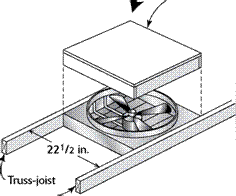
Placed in a central location, a whole – house fan can cool a small house quickly. |
|
chords |


![]()
stifr Habitat
"f 11 for Humanity
Polyethylene sheeting is also commonly used as a vapor barrier. Thin (6 mil), clear “poly” sheet material is stapled to the face of studs, attic joists, and (on cathedral ceilings) rafters. The barrier is kept continuous by overlapping adjoining sheets and sealing the overlap with silicone or another sealant.
It’s much easier to describe what a vapor barrier does than to explain why it is essential in some situations but not in others. I once had to tear out an entire wall that had rotted because the house had no vapor barrier. There was so much water trapped in the walls that you could literally wring it out of the insulation. A vapor barrier would have prevented such damage.
To understand why and where a vapor barrier is important, imagine what happens when someone takes a long, hot shower in your home when it’s freezing cold outside. The bathroom is foggy with water vapor, and some of that warm, humid air makes its way into the attic and the exterior walls. The air can easily pass through openings around electrical outlets and light fixtures and even through the gypsum board itself, which absorbs moisture readily. At some point, the temperature in the attic and the exterior walls drops enough to cause condensation. This dew point can occur in the middle of the attic or wall insulation or against roof and wall sheathing. Over the course of a cold winter, a steady supply of moist interior air can easily accumulate, causing soggy insulation, mold, and rotten wood.
A vapor barrier prevents the movement of vapor from a warm area to a cold surface. In cold climates, it should definitely be installed right underneath the drywall, paneling, or other interior wall finish material. Instructions for installing a poly vapor barrier are provided in the next section.
Vapor barriers are often eliminated in warm climates, especially in areas of low humidity, such as the Southwest. But you may want to consider installing a vapor barrier beneath the exterior siding if the house will be exposed to
warm, moist air outdoors and frequent airconditioning indoors.
In mixed-climate zones—the region that extends from the mid-Atlantic states through the Carolinas and west by southwest to northern Texas—the need for a vapor barrier is minimal. In those regions, where mild winters are the rule, any moisture that does enter the wall cavities can dry from the outside in during the summer and from the inside out during the winter.
Installing a polyethylene vapor barrier
To work effectively, a vapor barrier must be installed with care. Even the smallest holes in a poly or kraft-paper vapor barrier must be sealed with housewrap tape or its equivalent. Use a durable, high-quality tape; neither duct tape nor packing tape will hold over the long run.
A friend of mine is a carpenter in Fairbanks, Alaska. They’re serious about vapor barriers up there. They cut sheets of poly from rolls that are 10 ft. to 20 ft. wide and 100 ft. long, covering the entire ceiling and all the exterior walls (on the inside). They even make sure to put poly behind a bathtub installed against an exterior wall.
In any given room, there are two steps to installing a poly vapor barrier. This isn’t a job you want to do solo; have helpers so that some can spread the sheet out over framing members while others staple it fast. You can begin as soon as all the insulation is in place.
1. Install the ceiling poly. Cut a piece of poly to fit the ceiling. If you have to use several pieces, make sure they overlap by at least one joist (or rafter, if you’re working on a cathedral ceiling). Seal overlaps with a layer of mastic, acoustical sealant, or housewrap tape. At the edges of the ceiling, the poly should lap at least 3 in. down onto the walls. Begin stapling the poly to the joists or joist chords in the center of the room and work out toward the walls. My friend staples about 12 in. o. c. through small, precut squares of heavy paper. This keeps the poly from tearing. Fit the poly
|
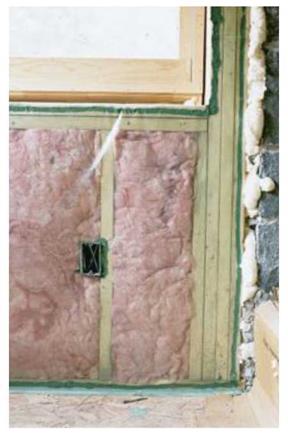
Seal the vapor barrier to an outlet box. A bead of caulk seals a poly vapor barrier around the rim of an outlet box to reduce air infiltration and maintain a continuous vapor barrier. [Photo by Scott Gibson, courtesy Fine Homebuilding magazine © The Taunton Press, Inc.] |
tightly into all corners so the drywall will go on easily. The drywall holds the poly tight against the studs and insulation.
2. Install poly on the walls. Make this sheet continuous so that it laps over the ceiling poly along the wall’s top plate and extends past the bottom plate to lap about 3 in. onto the subfloor surface. First staple the sheet along the top plate, working from the upper center of the wall and down and out to the edges of the wall. If you need to join one sheet of poly to another, overlap them by at least one stud and seal the lap as described previously.
You can sheet right over door and window
openings, then cut openings in the poly after it’s


Leave a reply