A JIG FOR MARKING PLUMB CUTS IN RAFTERS
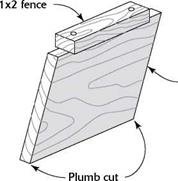
2. Then nail on a 1×2 fence.
|
|
|
|

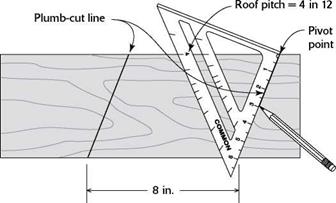
If you need to make a series of plumb cuts to match and align rafter tails along an eave, make a jig like the one shown here. Use a rafter square to mark the plumb-cut angle of the roof (4-in-12 or 5-in-12) on a short length of 1×4 or 1×6, depending on the rafter size. Cut a parallelogram-shaped template with
identical plumb-cut angles, then nail a short 1×2 fence to the upper edge of the template. Once a chalkline has been snapped across all the rafter tails, use this template to mark the plumb cut on them so that they can be cut to length.

 boards are less demanding. On this house, we installed gutter boards that were later clad with coil aluminum (see Chapter 7). CUTTING AND NAILING GUIDELINES FOR GUTTER AND FASCIA BOARDS.
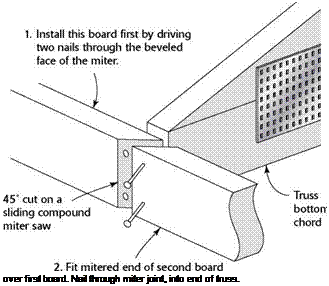
Use long, straight stock for gutter or fascia boards. Both types must butt together over the solid backing of a rafter tail. Gutter boards can meet in a simple butt joint; fascia boards should meet with a mitered joint, as shown in the illustration at left.
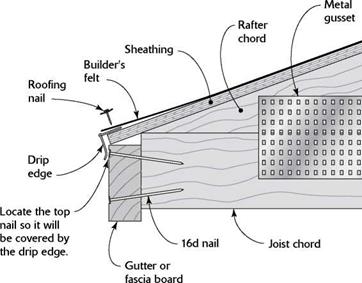
Nail gutter and 2x fascia boards to truss or rafter ends with 16d, hot-dipped galvanized nails. Nail fascia boards with a finish hammer, being careful not to miss the nail or you’ll leave hammer tracks in the wood. Have a partner hold the other end of the board. Hold the board down a bit on the rafter tail so that the roof sheathing just skims over it (see the illustration on the facing page). To line


up everything correctly, tack a piece of scrap wood on the top edge of a rafter and let it project downward, the way the roof sheathing will. Drive the topmost nail high enough so it will be covered by the drip edge that will be installed later.
At the bottom corner of the roof, the level eave trim meets the pitched barge rafter. If the exterior trim will be covered with cladding, as on this house, plumb-cut the barge rafter and nail it to the plumb-cut end of the gutter board. Install the gutter board so that it runs long, just like the lookout boards, then mark the correct overhang distance on the gutter board and on the topmost lookout. Be sure to take the barge rafter’s thickness into account. Snap a line between these two marks, then cut the gutter board and lookouts in place. Now you’re ready to cut and install the barge rafter.
The procedure is similar if you’re installing fascia instead of gutter boards; however, miter the end of the fascia board to fit a mitered plumb cut on the barge rafter (see the photo on p. 128). It’s easier to make both miter cuts before nailing the boards. Miter and install the fascia first, then snap the cutoff lines on the lookouts as described previously.


Leave a reply