Leveling a Doorsill
There are several ways to level an exterior doorsill. After you’ve installed a floor pan, place a spirit level across the bottom of the rough opening (RO) and insert pressure – treated wood shims under the tool till it reads level. Tack shims to plywood subflooring to keep them from drifting, and then install the prehung door unit. If the subfloor is concrete, use construction adhesive to spot-tack the shims. Or you can place the door frame into an unlevel opening, use a flat bar to raise the low end of the frame sill, and insert shims under the sill till it’s level. To prevent flexing between shims, space shims every 12 in. beneath aluminum/combination or oak sills, or every 6 in. beneath sliding-door sills.
The problem with any of these solutions is that many sills—especially hollow aluminum ones—are so thin that they may flex between shim points. If there’s 1/4 in. to V2 in. of space under the sill, use a Vf-in. tuck-pointing trowel (see the photo on p. 198) to push dry-pack mortar into the spaces between the shims, compacting the mortar as best you can. Or fill under the shimmed-up sill with nonshrinking mortar, such as an epoxy mortar/grout.
The only way to correct an out-of-level opening without shims is to rebuild it, which is rarely simple. For example, you can remove the subfloor and power-plane down the tops of joists till they are level and then install pressure-treated plywood atop them, but if nearby floors are out of level, you may need to level them next. Jacking is another option.


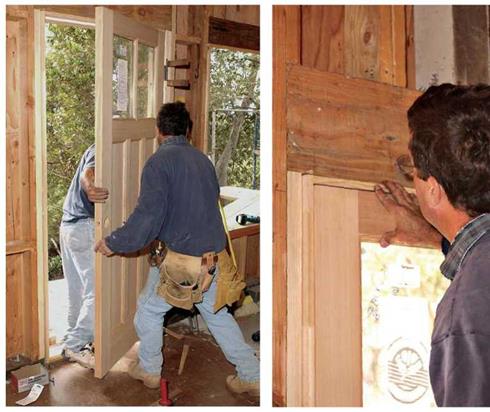
Once you’ve prepped the opening, place the door unit in it to see what needs tweaking. This is a dry run, so frame jambs needn’t be perfectly plumb or level—just close.
1. Test-fit the door frame in the opening. Center it right to left in the RO; then margin the frame. There should be!4 in. to h in. of clearance around the frame so it can be shimmed to the RO. Jamb edges should Vu in. proud of the interior wall surfaces to accommodate framing quirks.
2. Is the door frame square? If the frame is square, there should be an even space between the door and the frame jambs; if not, the frame is skewed. To resquare it, remove the frame from the opening, and— with the door still hung—tilt the frame to one side until acute corners (less than 90°) become square and the door fits evenly.
3. Remove the unit, make necessary final adjustments to the RO, and then caulk the bottom of the opening. If the door unit is precased, apply a bead of caulking to the exterior wall around the RO, inward about h in. from the edges of the opening. If the prehung door unit is uncased, don’t caulk around the opening yet, just caulk the bottom of the RO.
As with interior doors, there is no one right way to install a prehung exterior door. Some carpenters prefer to install door frames with doors hung. Others prefer to remove the door, plumb and attach the hinge jamb, rehang the door, then attach the other jambs. Though the accompany
ing photos show the second method, both methods are described here.
Method 1: The door stays hung. Pry off the
shipping blocks, remove the plastic plugs from the lock bore, and place the unit into the RO. (At this point, assume the doorsill is level.) Center the unit left to right in the opening; press the casing into the caulking; and then, while a helper keeps the unit from tipping, drive a 10d galvanized finish nail (or 3-in. screw) into each side jamb about 6 in. above the sill, or into nailing fins (flanges). Leave the nail heads sticking up so you can pull them if needed.
Hold a 6-ft. level against the inside of the hinge jamb to see if it’s plumb. If not, insert a flat bar between the frame and the RO near the top of the frame, and pry the frame out on one side till the jamb is plumb. Then drive a nail into the top of each jamb, about 6 in. below the top of the frame. Finally, eyeball the inside of the door frame to make sure there’s a uniform clearance (usually Иб in. to /8 in.) between the door and the frame. Use nails to draw the frame to the RO or adjust the shims until the clearance is uniform.
Speaking of shimming, precased units can be shimmed only from the inside. Unbacked by shims, frames can twist as the door swings. To shim from the inside, insert a shim, fat end first, till it butts
|
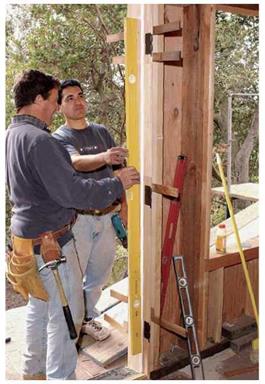
Shim and secure the hinge jamb first, checking for plumb often. Here, installers place shims slightly above and below the hinges so the hinge screws sticking through the jamb won’t snag on the shims. Screwing the jambs to the framing facilitates adjustments. |
against the back of the casing; then slide additional shims, thin edge first, till shims are tight. Nail or screw below each stack of shims; then close the door and see if it seats evenly against the frame. Once you’ve corrected that, secure the frame to the rough opening, and finish the exterior.
Method 2: Remove the door. After leveling and prepping the opening, pull the hinges and remove the door from the frame. Screw temporary cleats to the outside of the frame—or to the exterior sheathing itself—so that when the frame is placed into the RO, the outer edges of its jambs will be flush to the sheathing.
Center the frame left to right in the opening, and check the jambs for plumb and the sill for level. If it’s necessary to shim the doorsill to level, place the first shim under the jamb on the low side. Plumb and attach the hinge jamb first, inserting the first set of shims behind the top hinge. Remove the middle hinge screw(s) so you can slide the shims freely as you adjust them. Then drive a 10d galvanized finish nail or a 212-in. screw just below the shims, in the center of the hinge jamb; this holds the shims snugly, but you can still adjust them. Shim behind the bottom hinge, check for plumb, and then shim behind the middle hinge. Adjust the shims as needed to attain plumb; then shim behind the corners of the hinge jamb, top and bottom.
With the hinge jamb securely attached, rehang the door. (Get help; exterior doors are heavy.) Close the door and note how it fits the frame. Without weatherstripping, there should be an even gap, /и in. to ‘/ in. wide, around the door, and the corners of the frame should be square. If the door hits the edge of the latch jamb, that jamb may be bowing into the RO or the shims behind the hinge jamb may be too high.
Adjusting an uncased exterior door frame is very similar to “working” an interior door frame.


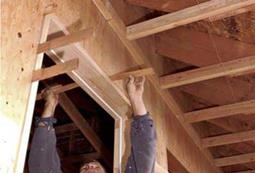
 Shim the latch jamb and then the head jamb. When all is okay, secure the frame with two
|
Shim the head jamb after plumbing the latch jamb. If the frame is uncased, you can insert shims from both sides and easily slide them in and out. The white line inside the jambs is kerf-in weatherstripping. |
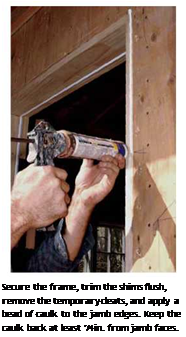
 16d galvanized finish nails spaced every 16 in. and in 1 in. from the edge. Then seal the frame to keep out weather, apply casing, and flash it, as described in the next section.
If you installed an uncased unit, now seal the outer jamb edges and install the casing.
1. If the unit’s sill has horns that extend beyond the side jambs, cut down each horn so that it is as long as exterior casing is wide plus /a in. for a reveal (the amount that the casing is set back from the inner edge of the frame jamb). Casing legs sit on horns, so cut casing bottoms at the same angle as the sill. (Use an adjustable bevel gauge to record the angle.)
2. Before attaching casing, however, run a single bead of siliconized acrylic caulking along the side and head jamb edges. Keep the caulking back at least J4 in. from the inner edge of the jambs so it’s not visible in the %-in. reveal.
3. Next, cut two fiberglass-reinforced flashing strips a in. to 6 in. longer than the length of the side jambs. Press a strip against the caulked jamb edge, again holding back the strip at least
h in. from the inner edge of the jambs. Staple the portion of the flashing strip that overlaps the sheathing so the strip doesn’t blow off.
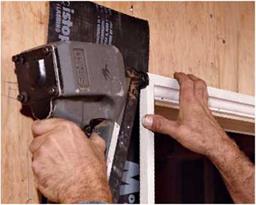
4. Attach casing to both sides of the jam. Create a reveal by setting back the inner edges of casing І4 in. from the jamb edges. Then nail up the head casing. If the corners are mitered, nail through the joint to draw the jambs together, as shown in the left photo below. Note. There’s no flashing strip under the head casing; it’s applied over the cap flashing to direct water away from the sheathing.
|
As you install casing, drive a finish nail through corner miter joints to keep them from separating. You can also glue the joint, but here, stucco will help keep the joint from moving. Note the ’/4-in. reveal between the casing and the edge of the jamb. |
5. Once the head casing is up, attach the cap flashing (head flashing), which is often prefabbed from vinyl or metal. It’s easy enough to make your own from 26-gauge aluminum or galvanized steel; use aviation snips to cut and fold it and a rubber mallet to shape it. Caulk the head casing/ sheathing joint, and then press the cap flashing down onto the casing. Use big-head roofing nails to nail the top flange of the flashing. Then staple strip flashing over the top flange of the flashing, and run housewrap and/or siding over that.
At this point, you’re ready to install hardware, insulate between the jambs and the RO (use a mild-expanding spray foam), and attach the interior casing.


Leave a reply