Use a drywall router to save time
Most of the time you can drywall right over door and window openings, attic access holes, and heating vents, then cut around the outlet boxes with an electric drywall router, as shown in the top photo at right. (Get a feel for this tool by making some practice cuts on scrap drywall.)
Make sure the electrical wires are shoved to the back of all the boxes, and double-check to be sure there isn’t power at any of the boxes for which you’re routing holes. Tack the sheet on the ceiling or wall, then mark on the sheet the location of each outlet with a line noting the edge of the box and an “X” showing the side the outlet is on. Don’t nail too near the outlet or you could break the drywall, but be sure to drive enough nails or screws into ceiling panels so they won’t fall down.
Set the router bit to extend aboutъ/ in. past the base plate. With the router running, insert the bit into the center of the box and gently move it until it hits the side of the box. Pull the bit out and reinsert it just to the outside of the box. Cut in a counterclockwise direction, maintaining slight pressure against the box.
The router generates some dust, so wear a good mask. A router or a large drywall saw can be used to cut larger openings as well.
Before you install the first panel on the ceiling, it’s important to understand how to fasten drywall to the joists, studs, and other framing members. Whether you’re using nails, screws, or both, yon must leave a dimple in the panel with every fastener you drive. This small recess will later be filled with drywall compound as the wall surface is filled and finished. Screw guns can be set to pull the drywall panel tightly against the framing members and drive the screw just below the surface
without breaking the face paper. If you’re driving nails instead of screws, your last hammer blow should push the drywall tightly against the wood and set the head of the nail in a shallow dimple without breaking the paper surface (see the bottom photo below).


 |
 |
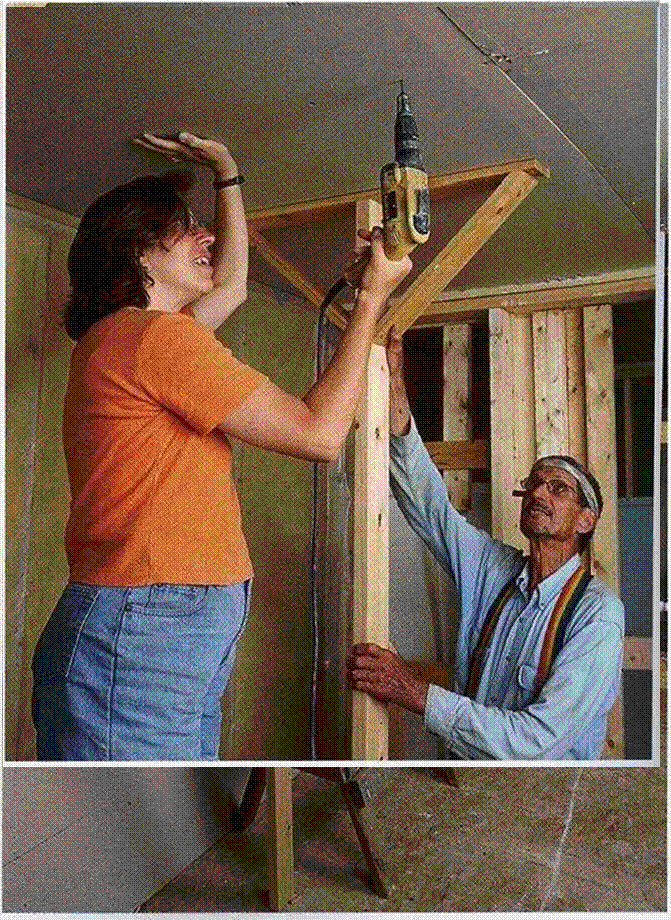
Whether you have one helper or several, you 11 find it useful to have a couple of drywall T-supports (also called preachers or dead men) to brace each panel against the framing while you drive enough screws to secure it. If possible, always start by installing a full-size sheet against one corner of the ceiling. Lift one end of the sheet into position, then raise the other end against the joists while holding the edge against the wall. Wedge the T-supports underneath the panel, then nudge the panel into its final position. Set up short ladders or sawhorses to stand on as you drive the fasteners (see the photos above).
Hold screws or nails back about % in. from the edges of the panel, and drive them in straight so you don’t break the paper. Follow the fastening schedule for drywall that applies in your area. When ceiling joists are 24 in. o. c., nails or screws are usually driven every 8 in. along the edge of the panel and every 12 in. in the middle.
Some builders use drywall panel adhesive when attaching sheets of drywall. The adhesive is applied with a caulking gun, just like caulk or sealant. With panel adhesive, the need for screws or nails is greatly reduced. Don’t use adhesive over a poly vapor barrier or kraft
|


Leave a reply