Drilling and Notching Studs and Joists

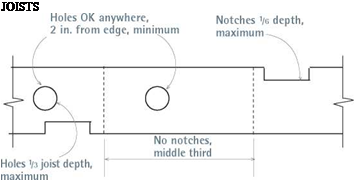
It’s often necessary to notch or drill framing to run supply and waste pipes.
If you comply with code guidelines, given in "Maximum Sizes for Holes and Notches," on p. 287, you’ll avoid weakening the structure. Although that table is based on the following rules of thumb, remember that local building codes have the final say.
Joists
You may drill holes along the entire span of a joist, provided the holes are at least 2 in. from the joist’s edge and don’t exceed one – third of the joist’s depth. Notches are not
allowed in the middle third of a joist span. Otherwise, notches are allowed if they don’t exceed one-sixth of the joist’s depth.
Studs
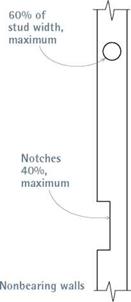
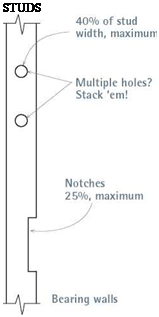
Drilled holes must be at least 78 in. from the stud’s edge. Ideally, holes should be centered in the stud. If it’s necessary to drill two holes in close proximity, align the holes vertically, rather than drilling them side by side. Individual hole diameters must not exceed 40 percent of the width of a bearing-wall stud, if those studs are doubled and holes don’t pass through more than two adjacent
doubled studs; hole diameters must not exceed 60 percent of the width of nonbearing-wall studs. Notch width may not exceed 25 percent of the width of a bearing – wall stud or 40 percent of the width of a nonbearing-wall stud.
Edge protection
Any pipe or electrical cable less than 11/ in. from a stud edge must be protected by steel nail plates or shoes at least Ум in. thick, to prevent puncture by drywall nails or screws.
Pipe Slope
DWV pipes slope, so before drilling or notching framing, snap sloping chalklines across the stud edges; then angle your drill bits slightly to match that slope. Drill holes 74 in. larger than the outside dimension of the pipe, so the pipe feeds through easily. Nonetheless, if DWV pipe runs are lengthy, you may need to cut pipe into 30-in. sections (slightly shorter than the distance between two 16-in. on-center studs) and join pipe sections with couplings. That is, it may be impossible to feed a single uncut DWV pipe through holes cut in a stud wall.
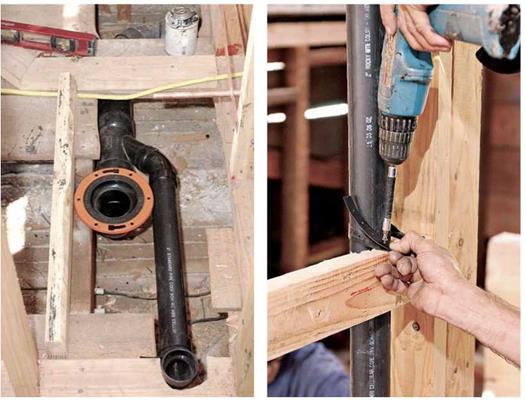
 When hole diameters exceed maximur allowed by code, reinforce framing wi1 a steel stud shoe.
|
_ |
|
|
tim: – |
W |
|
|
||
![]()
Once you’ve secured the closet bend, add pipe sections to the bottom of the bend, back to the takeoff fitting on the main drain that you installed earlier. Maintain a minimum of!4 in. per foot slope, and support drains at least every 4 ft. Dry-fit all pieces, and use a grease pencil to make alignment marks on pipes and fittings.
Other fixture drains. Next run the 1!4-in., 112-in., and 2-in. fixture drains up from the main drain takeoff. Drains must slope at least 14 in. per foot, and all pipe must be rigidly supported every 4 ft. and at each horizontal branch connection. Support pipes with rigid plastic pipe hangers or with plastic-pipe strap, securing pipes to wood blocks beneath them. Support stacks at the base, and in mid-story by strapping or clamping the pipe to a 2x block running between studs.
Run the tub branch drain to the subfloor opening where the tub trap arm will descend.
Pipe stub-outs for lavs and sinks should stick out into living spaces 6 in. or so; you can cut them off or attach trap adapters later. All branch drains end in a sanitary tee. The horizontal leg of the tee receives the trap arm from the fixture, and the upper leg of the tee is the beginning of the branch vent.
Vent runs. Next assemble vent runs, starting with the largest vent—often the 2-in. or 3-in. pipe rising from the combo fitting below the closet bend. Individual branch vents then run to that vent stack, usually joining it in an inverted tee fitting, typically 4 ft. to 5 ft. above the floor. Support all stacks in mid-story with clamps or straps. Horizontal runs of 112-in. branch vents must be at least 42 in. above the floor, or 6 in. above the flood rim of the highest fixture, and those runs typically slope upward at least 14 in. per foot. Continue to build up the vent stack, with as few jogs as possible, until it eventually passes through a flashing unit set in the roof. For code requirements at the roof, see "Vent Termination,” on p. 284.


Leave a reply