SIMPLE SYSTEMS

Simple septic systems consist of a tank, some pipe, and some gravel. These systems are common, but they don’t work well in all types of ground. Since most plumbers are not septic installers, I will not bore you will all of the sticky details for putting a pipe-and-gravel system into operation. However, I would like to give you a general overview of the system, so that you can talk intelli­gently with your customers.

THE COMPONENTS

Let’s talk about the basic components of a pipe-and-gravel septic system. Starting near the foundation of a building, there is a sewer. The sewer pipe should be made of solid pipe, not perforated pipe. I know this seems obvious, but I did find a house a few years ago where the person who installed the sewer used perforated drain-field pipe. It was quite a mess. Most jobs today involve the use of schedule-40 plastic pipe for the sewer. Cast-iron pipe can be used, but plastic is the most common and is certainly acceptable.

The sewer pipe runs to the septic tank. There are many types of mate­rials that septic tanks can be made of, but most of tanks are constructed of concrete. It is possible to build a septic tank on site, but every contractor I’ve ever known has bought pre-cast tanks. An average size tank holds about 1,000 gallons. The connection between the sewer and the septic tank should be watertight.

SIMPLE SYSTEMS

FIGURE 14.2 ■ Recommended minimum distances between wells and septic systems and septic tanks and homes.


SIMPLE SYSTEMS

SIMPLE SYSTEMS

SIMPLE SYSTEMS

CEILING & ROOF INSULATION

Compared to walls and floors, it is usually relatively simple to add insulation to the ceiling of a building. Insulation thickness can generally be increased without adding structure or other complications. Gravity holds the insulation in place, and the only disadvantage is a loss of attic space. In addition, the ceiling is where most of the heat is gained or lost from an insulated space, so the addition of insulation is especially effective.

CEILING & ROOF INSULATION

iNSULATiON THiCKNESS LiMiTED HERE DUE TO ROOF PLANE

The only complication occurs at the edge of the building where roof structure typically restricts the potential for insulation thickness. In standard construc­tion, it is common to compress the insulation in this area and allow for ventilation using vent channels made especially for this purpose (see 201). But for superin­sulated buildings, the compression of insulation in this area is not acceptable.

o

CEILING & ROOF INSULATION

THiCKNESS OF R-38 BATT

To overcome the problem, several strategies have been developed:

Rigid insulation—Because rigid insulation can have R-values approximately double that of batt insulation, it may provide thermal protection at the edge of the ceiling without any adjustments to the framing (see 199A). This strategy may not be feasible when the roof pitch is very low, when rafter depth is shallow, or when the ceiling insulation value is very high.

Raised-heel truss—It is quite common when ordering trusses to specify a truss that has extra depth at the ends to accommodate extra insulation. This is called a raised-heel truss. Raised-heel trusses require blocking to prevent rotation, but otherwise are installed just the same as standard trusses (see 199B).

Dropped ceiling—Full insulation thickness at the edge of the building can also be accommodated by dropping the ceiling below the top plate. To maintain a given ceiling height, this strategy would require extra­length studs, extra siding, extra framing material for the ceiling, and extra labor. When using rafters (not trusses), a balloon-framed ceiling/wall connection (see 41A & B) would allow ceiling joists to act as ties and not be redundant (see 199C).

Raised plate—Raising the rafters to the top of the ceiling joists can increase the insulation thickness by the depth of the joists. The depth of the joists and raf­ters combined can be sufficient for superinsulation.

The extra cost of this strategy would include an extra rim joist, an extra plate, extra siding, and labor. The raf­ters need to be tied directly to the joists to counteract the thrust of the rafters (see 199D).

Vaulted ceilings—Vaulted ceilings do not restrict insulation thickness at the edge of the building because the insulation follows the pitch of the roof. The insula­tion value of vaulted roofs is limited only by the thick­ness of the roof itself (see 204A & B).

REDUCTION OF R-VALUE IN ВАТТ INSULATION DUE TO COMPRESSION

Staining and Sealing: A Sampler

There should be a Ph. D. in stains. There are all-pigment stains that won’t fade (a good choice for window trim), water – and oil-based stains, liquid stains, penetrat­ing stains that both stain and seal, and gel stains that won’t run on vertical surfaces. Plus, there are wood conditioners, sanding sealers, presealers, and a plethora of putties and wood fillers. If you want to learn more, excellent resources are Michael Dresdner’s Painting and Finishing and Finishes and Finishing Techniques (both The Taunton Press).

► To achieve an even stain on softwoods such as fir, preseal them with a thinned coat of whatever the clear finish will be, say, 1 part oil-based polyurethane to 4 parts mineral spirits. Presealer soaks into the softer parts of the wood and seals them slightly. But once dry, the surface should still feel like wood.

► Oil-based polyurethane over water-based stains is okay, but do not use water – based polyurethane over oil-based stains. The polyurethane won’t stick.

Подпись: You can usually apply oil-based penetrating stains over previously varnished surfaces, but they can be tricky to work with. Test-stain an inconspicuous section. If the penetrating stain is compatible with the old finish, it should dry hard overnight.Подпись: After brushing stain on, use a clean, dry rag to remove any excess. You may need to apply several coats—over several days—to match existing stains. So be patient.image929

PROTIP

If you’re using water-based finishes, use damp rags to wipe dust off surfaces, rather than tack rags. Because tack rags are typically a piece of cheesecloth treated with varnish to make it sticky, tack rags leave a faint, oily film that water-based coat­ings may have trouble adhering to. Tack rags are fine, however, if followed by oil – or solvent-based finishes.

1111

After stripping with hand scrapers and a heat gun, if you decide that your old trim is too beat up or too plain to look good under a clear finish, don’t bother with chemicals. Sand down the remaining paint edges, prime the trim, paint it, and call it a day. It’ll look great.

Подпись: Sheet-peeling is caused by excessive moisture migrating through a wall—in this case, an unvented bathroom wall. 1111

drain into the can, allowing the lid to seat tightly into the recess. If the finish skins over, strain the finish or discard it.

Polyurethanes are favored for wood in kitchens, bathrooms, hallways, and other busy areas. Once cured, they’re tough and water resistant. And they’re easy to apply. Oil-based and water-based polyurethanes are equally durable but require slightly different application methods. For both types, apply at least two coats, preferably three.

► Water-based polyurethanes: Because water-based polyurethanes dry clear, use them if you want light-colored wood to stay light. Seal woodwork before application. Thereafter, brush on full strength. Although water-based poly dries quickly, tempting you to apply two coats in a day, wait a full day between coats so it can harden. There’s no need to sand between coats unless a week passes, in which case, use a fine nylon abrasive pad. If you want to add a wax finish, wait a month after application, mindful of the several-week curing time.

► Oil-based polyurethanes: Oil-based poly­urethanes impart a rich, amber color to wood. So use them if you favor dark wood or an historic look. They don’t need a preliminary sealer coat, but they will flow on better if you thin each coat with 10 percent mineral spirits.

Oil-based polyurethanes dry slowly, so apply only one coat per day, unless the manufacturer recommends otherwise. Here again, sanding between coats is not imperative unless you wait a week between coats—or you need to sand down imperfections. Before waxing an oil-based poly, be sure to wait a week after the last coat dries.

Shellac doesn’t have the water-resistance of polyurethane, but it dries fast; has a wonderful old-fashioned sheen; and, as noted earlier, adheres well to earlier shellac coats and can be touched up repeatedly. If wood is new or recently stripped, apply a sealer coat of thinned-down shellac: If you’ll be staining the wood, brush on a

1 part shellac to 4 parts denatured alcohol sealer first, allowing it to dry. Otherwise, brush or wipe on a coat of 1 part shellac to 2 parts alcohol, wip­ing off the excess and allowing the coat to dry

2 hours before sanding lightly with 320-grit sand­paper. Thereafter, apply two or three shellac coat­ings, thinned with 10 percent denatured alcohol. If the surface is smooth, there’s no need to sand between coats. Wait 1 day between coats and

3 days before waxing. Because shellac dries so quickly, don’t attempt to rebrush it.

Oil finishes include boiled linseed oil, tung oil, and the so-called Danish oils like Watco. Using a nylon pad or a rag, rub a generous amount of oil

Подпись: Although white pigmented shellacs like B-I-N® are terrific for blocking stains on interior surfaces, they're not advisable for priming exteriors. Hot sun softens and degrades shellac. llll Подпись: Alligatoring, or cross-grain cracking, is caused by too many layers of old, inflexible paint.

onto the wood. Let that soak in for 10 minutes or 15 minutes before rubbing off the excess with a clean, dry cloth. With each coat, the wood will darken slightly. Allow each coat to dry 24 hours and reapply the oil till you get the look you like; usually, two or three coats do the trick. Oil finishes offer the least protection but are easiest to reapply.

GUTTER/EAVE

Подпись: ROOFiNG LAPS

Snow guards, or snow clips, are metal protrusions that are integrated with the roofing to prevent snow from sliding off the roof. They are either clipped to the top edge of the roofing material (tiles and slate) or are nailed integral with it (shakes and shingles). Snow guards are used at the rate of 10 to 30 guards per square, depending on roof steepness.

SNOW GUARDS

GUTTER/EAVE

SEE 121-122

Most heat is potentially lost or gained through the roof, so ceilings and roofs are generally more heavily insulated than floors or walls. Building codes in most climates require R-30 in roofs. The temperature dif­ference between the two sides of a roof or ceiling can cause condensation when warm, moist interior air hits cold surfaces in the roof assembly. It is therefore important to place a vapor barrier on the warm side of the insulation (see the drawing above right) and, in most cases, to ventilate the roof (see 200).

Ceiling insulation—Ceiling insulation consists typi­cally of either fiberglass batts placed between ceiling joists before the ceiling is applied or loose-fill insula­tion blown (or poured) into place in the completed attic space. The loose-fill type has the advantage of filling tightly around trusses and other interruptions of the attic space and of being able to fill to any depth. With either type, the vapor barrier should be located on the warm side of the insulation.

When trusses or shallow rafters restrict the depth of insulation at the edges of the ceiling, ventilation channels may be needed (see 201). Baffles may also be required to keep insulation from obstructing roof intake vents or from being blown out of place.

Roof insulation—Roof insulation may be fiberglass batts or rigid insulation. If the rafters are deep enough, batts are the most economical. When the rafters do not have adequate depth for batts, rigid insulation must be fit between the rafters. In both cases, a 1-in. air space must be provided above the insulation for ventilating the roof.

GUTTER/EAVE

When the rafters are exposed to the living space below, the roof must be insulated from above. Rigid insulation is typically used because of its compactness and/or its structural value. Some roofing materials may be applied directly to the rigid insulation (e. g., mem­brane roofing on flat roofs); others require additional structure and/or an air space for ventilation.

GUTTER/EAVE

& Structural Support

GUTTERS & DOWNSPOUTS

Introduction

GUTTERS & DOWNSPOUTS

MiTERED iNTERiOR CORNER


WiRE MESH

KEEPS LEAVES
OUT OF GUTTER

END CAP


STRAiNER KEEPS DEBRiS OUT OF DOWNSPOUT.


HANGER TYPES SEE 195C


GUTTER WiTH EXPANSiON JOiNT EVERY 40 FT. OF STRAiGHT RUN


OUTLET (DROP)


STRAPS AT TOP & BOTTOM OF DOWNSPOUT AND AT JOiNTS iN DOWNSPOUT


ELBOWS AVAiLABLE iN 45°, 60°, 75°, OR 90


DOWNSPOUT FOR EVERY 40 LiNEAR FEET OF GUTTER (APPROX.)


GUTTERS & DOWNSPOUTSGUTTERS & DOWNSPOUTS

Подпись: NOTE ALUMiNUM GUTTER WiLL EXPAND 1/8 iN. OR MORE iN A 40-FT. RUN & GALVANiZED GUTTER WiLL EXPAND 1/16 iN. OR MORE iN A 40-FT. RUN WiTH A 100°F TEMPERATURE CHANGE. GUTTERS & DOWNSPOUTSSHOE (SHOWN) AT PAVED SURFACES OR SPLASH OR PLASTiC GUARD CAP (NOT SHOWN)

AT CONNECTiON TO DRAiN PiPE

SPLASH BLOCK AT LOCATiONS WHERE DOWNSPOUT iS NOT CONNECTED TO DRAiN PiPE. BEFORE RELYiNG ON A SPLASH BLOCK, VERiFY LACK OF NEED TO CARRY WATER TO STORM SEWER OR DRY WELL.

PARTS OF A GUTTER SYSTEM

Подпись: SAME AS OGEE, EXCEPT NOT so COMMON Подпись: HALF-ROUND GUTTER CANNOT BE SITE-FORMED; IT iS AVAiLABLE iN VINYL OR UNPAINTED GALVANIZED STEEL OR cOppER. GUTTERS & DOWNSPOUTSGUTTERS & DOWNSPOUTS

Подпись: Wooden Gutter

GUTTERS & DOWNSPOUTSПодпись: Concealed Gutter

OGEE iS THE MOST COMMON GUTTER SHAPE. AVAiLABLE iN SiTE-FORMED ALUMiNUM Or GALVANiZED iN A VARiETY OF SizES, iT iS Also Made iN unpAINTED GALVANizED STEEL OR cOppER.

wOODEN GuTTERS ARE used extensively IN THE NORTHEAST. THEY ARE DiFFicuLT TO JOIN AT cORNERS OR FOR LONG LENGTHS & ARE pRONE

to decay.

concealed gutters OF

VARIABLE SHApES & SizES MAY BE DESIGNED TO FIT BEHIND THE FASciA OR wiTHiN THE SLOpE OF A ROOF. THESE ARE ALwAYS cuSTOM MADE & ARE THEREFORE ExpENSIVE. upper edge of gutter is typically lapped by

ROOFING; LOwER EDGE

caps fascia.

GUTTERS & DOWNSPOUTS

^ GUTTER SHAPES

SPECIAL GUTTERS

GUTTERS & DOWNSPOUTS

bracket hangers are

AVAiLABLE FOR ALL TYpES OF GuTTER; ScREw TO FASciA OR (wiTH LONGER ScREwS) TO RAFTER TAILS.

spike & ferrule HANGERS ARE used with BEVELED OR OGEE gutters; spike TO fascia OR

TO RAFTER TAILS. THE NEED FOR expansion joints IS GREATEST with this type of connector (maximum run without JOINT IS 40 FT.).

strap hangers are used with

METAL HALF-ROuND GuTTERS; NAIL OR ScREw TO ROOF SHEATHING OR THROuGH SHEATHING TO TOp OF RAFTER.

uncommon, archaic.

GUTTERS & DOWNSPOUTSGUTTER HANGERS

NOTES

Подпись: GUTTER FASCIA IS SHOWN PLUMB FOR EASE OF INSTALLATION OF COMMON GUTTERS.

SQUARE-CUT RAFTER TAILS WORK WHERE THERE ARE NO GUTTERS OR WHERE HALF-ROUND GUTTERS ARE HUNG FROM STRAP HANGERS.

SEE 195C

FASCIA IS GENERALLY 2X MATERIAL FOR EASE OF INSTALLATION OF COMMON GUTTERS.

IN SOME AREAS. THE 2X IS USED AS A SUB-FASCIA AND COVERED WITH A HIGHER GRADE 1X FASCIA. GUTTERS MAY BE HUNG FROM A SINGLE – IX FASCIA. BUT SPIKES MUST BE LOCATED AT RAFTERS & FASCIA PREDRILLED TO PREVENT SPLITTING. BRACKETS SHOULD BE LOCATED NEAR RAFTERS.

METAL ROOFING TYPES

Подпись: 30-LB. FELT UNDERLAYMENTПодпись:Подпись: METAL ROOFiNG OVERHANGS FASciA 1 IN. (MIN.) FORMING DRip.Подпись: FASCIAMETAL ROOFING TYPESПодпись:Подпись: RAFTER OR TRuSSПодпись:Подпись:METAL ROOFING TYPES

Подпись: ROOF SHEATHING
Подпись: RAKE FLASHING LAPS HIGH POINT OF ROOFiNG METAL & LApS BARGE WiTH DRip; ATTAcH WiTH ScREWS OR NAILS WiTH NEOPRENE WASHERS.
Подпись: BARGE RAFTER OR VERGE RAFTER OR RAkE TRIM

Profiles

metal ridge

Подпись: FLASHiNG LAPS RooFiNG 6 iN. (MIN.)Подпись: METAL ROOFING Подпись: ROOF SHEATHING RAFTER oR TRUSS Подпись: RIDGE BOARD OR BEAM (OR BLOCKING BETWEEN TRUSSES) METAL ROOFING TYPESПодпись: TYPicAL VALLEY FLASHiNGПодпись: HiP FLASHiNG LAPS 6 iN. (MiN.) TO EACH SiDE OFMETAL ROOFING TYPESFLASHiNG MADE FRoM SAME MATERIAL AS

roofing

closure FLASHiNG at top of METAL roofing KEEPS out insects &

Подпись: ДЛ METAL-ROOF VALLEY & HIP
Подпись: METAL-ROOF RIDGE FLASHING

wiND-DRiVEN RAIN; FLASHiNG LAPS 30-LB. FELT uNDERLAYMENT.

Подпись: 30-LB. FELT UNDERLAYMENT EDXTENDS UP BEYOND END OF LOWER ROOFING PANEL. Подпись: LOWER ROOFING PANEL EXTENDS 3 IN. (MIN.) BEYOND INTERSECTION WITH TOP PANEL.METAL ROOFING TYPESBEAD of caulking or SEALANT AT TOP EDGE oF

lower roofing panel forms a dam against wind-driven rain.

top roofing panel nests AGAINST lower PANEL, forming tight seal.

SHEATHING

pitch-change FRAMING SEE 133B

METAL-ROOF PITCH CHANGE

GUTTER HANGER TYPES SEE 195C

Подпись: SNOW GUARDS SEE 196BПодпись: GUTTER SHAPES SEE 195A & BПодпись: NOTE SiZE GUTTER AND DOWNSPOUT ACCORDiNG To RAiNFALL iNTENSiTY & AREA OF ROOF. cONSULT LOCAL SHEET-METAL SHOP FOR RULES OF THUMB iN YOUR AREA. Подпись: DiVERTER AVOiDS SHORT GUTTER wiTH SEPARATE DOWNSPOUT AT SHORT EAVE. Подпись: SpLASH PAN pROTEcTS ROOFiNG WHERE DOWNSpOUT EMpTiES ON ROOF.Подпись: NOTE ALTHOUGH GUTTERS ARE cLOSE TO LEVEL FOR AppEARANcE; A SLOpE OF 1/16 iN. PER FT. iS PREFERRED FOR DRAiNAGE. METAL ROOFING TYPESconnect down­spout TO DRAiN pipE or to splash block.

SEE 194

Подпись: Vinyl gutters, although more expensive, are popular with owner-builders because they are more durable and can be installed without specialized equipment. Downspouts conduct the water from the gutter to the ground, where it should be collected in a storm drain and carried away from the building to be dispersed on the surface, deposited in a dry well, or directed to a storm sewer system. The problem of water freezing in gutters and down-spouts may be solved with heat tapes. Snow sliding off a roof can cause real problems— especially over porches, decks, and garages. The problem of sliding snow may be solved by keeping the snow on the roof with a low-pitched roof or with snow guards that project from the roofing surface to hold the snow mechanically in place (see 196B).
Подпись: The collection of rainwater by gutters at the eave of a roof prevents it from falling to the ground, where it can splash back onto the building and cause discoloration and decay, or where it can seep into the ground, causing settling or undermining of the foundation. Gutters also protect people passing under the eaves from a cascade of rainwater. In areas of light rainfall, gutters may be eliminated if adequate overhangs are designed and a rock bed is placed below the eaves to control the water and prevent splashback. Most wood-framed buildings are fitted with site- formed aluminum or galvanized steel gutters with a baked-enamel finish. Continuous straight sections of site-formed gutters are limited only by the need for expansion joints (see 194) and by the ability of workers to carry the sections without buckling them. Very long sections can be manufactured without joints, the most common location of gutter failures.

DOWNSpOUT FOR Every 40 FT. OF GUTTER

CROSS-SIGHTING A JAMB

CROSS-SIGHTING A JAMB

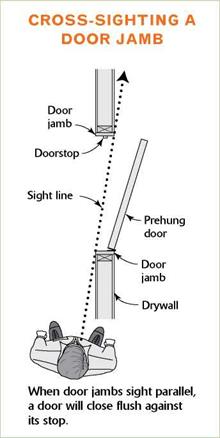
Once the jambs are installed, you need to cross-sight them—that is, check to see that they’re parallel or in the same vertical plane. Close the door and make sure it rests flat against the stops at both the top and the bottom. Sometimes the door hits the bottom of the stop, for exam­ple, but misses the top by 1/s in. or more. This may happen because the door is warped, but it can also occur when two jamb sides are out of parallel.

To check whether the two jambs are parallel, stretch two strings diagonally across the door frame to form an "X." If the strings just touch in the middle, the jambs are parallel. With experience, you can also learn to check for parallel jambs by eye.

Step back along the wall, about 3 ft. from the door opening, and sight across the jambs from one jamb to the other to see whether they’re parallel (see the illustration at near left).

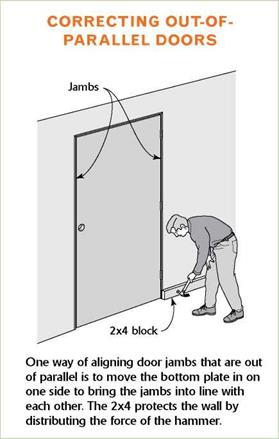
CORRECTING SKEWED JAMBS.

If the jambs are out of parallel, correct the problem by moving the bottom plate a bit. Sometimes the bottom plate is not nailed directly on the chalkline when the walls are framed, causing the jamb sides to be out of parallel. To fix it, place a 2x block on the floor against the bottom plate and use a big hammer to push it back on the line (see the illustration at far right).The method may sound a bit harsh, but it works.

If the door touches the stop on the strike side at the top of the jamb

but not at the bottom, the wall on the strike jamb needs to move in toward the door. If the door touches the stop on the strike side at the bottom of the jamb but not at the top, the wall on the hinge jamb needs to move a bit away from you. Normally, very little movement is needed, so even though you are using a hammer, be gentle.

As a last resort, you can use another, though less satis­factory, way to correct the problem. You can carefully pry off the doorstop trim on the lock jamb, close the door, and renail the trim snugly against the door.

CROSS-SIGHTING A JAMB

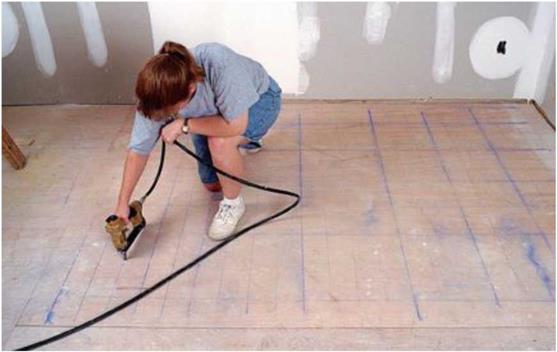
CROSS-SIGHTING A JAMBInstall underlayment with a nailer. The quickest and most efficient way to nail off vinyl-floor underlay­ment is with a pneumatic nailer. Chalklines snapped on the underlayment panels form a grid of 4-in. squares that indicate where to staple.

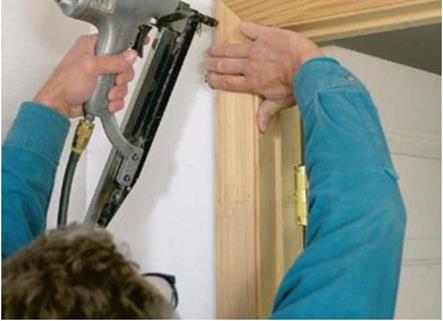
Подпись: Prehung doors are easy to install. Drive the first nail through the jamb and into the trimmer, near the top on the hinge side.

in an opening. Whichever style of prehung door you have, the installation process is basi­cally the same. If the floors will be carpeted, put a 7/i6 – in.-thick block of OSB or plywood (3/4 in. wide by 1 in. long) under each jamb side. The block will be hidden once the floor is carpeted. Otherwise, unless you have ordered shortened doors, you may have to trim the bot­tom of the door so it won’t drag on the carpet. The block, especially important when setting a heavy door, keeps the door assembly from set­tling and causing the door to stick.

Professional trim carpenters often order shortened doors from the supplier. That allows them to set the jambs right on the subfloor without having to raise them for carpeting. There is no need to buy shortened doors for thin vinyl floors. Check to see what other builders are doing in your area.

If a door is to work properly, its jamb needs to be set plumb, square, straight, and cross­sighted (both side jambs parallel to, or in plane with, each other), so pay attention to the steps in the sidebar on the facing page. Remove any nails or plugs installed at the factory to hold the jamb and door together. Set the prehung

Подпись: Leave enough operating clearance. Leave a 1/8-in. margin between the door and the jamb so the door can open and close freely. [Photo by Andy Engel, courtesy Fine Homebuilding magazine © The Taunton Press, Inc.] Подпись: Keep the jambs straight. A heavy door can bow a jamb inward at the top hinge. Straighten the jamb by lifting up the door on the lock side and then nailing the jamb securely in place. [Photo by Andy Engel, courtesy Fine Homebuilding magazine © The Taunton Press, Inc.]CROSS-SIGHTING A JAMBCROSS-SIGHTING A JAMB

CROSS-SIGHTING A JAMB

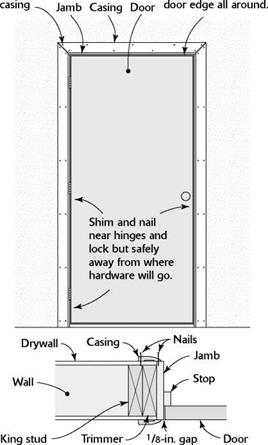
assembly in the opening and drive a 6d or an 8d finish nail through the jamb, about 3 in. or so from the top on the hinge side (see the bottom photo on p. 245).

With any luck, the trimmer on the hinge side will be plumb and you can nail the jamb directly to it without the use of shims. Use a 4-ft. level to check the hinge-side jamb for plumb and straight. Make sure the margin between the underside of the head jamb and the top of the door is at least ‘/8 in., about the thickness of a nickel, all the way across the top (see the photo below). If the margin at the top is too tight (less than ‘/8 in.) or too wide (more than XA in.), it can be corrected by raising a jamb side. The hinge side can be raised, even with a nail at the top, with a flat bar under the jamb.

Once the margin is correct, nail again near the bottom hinge. Remember to shim under every jamb that doesn’t rest directly on the subfloor.

When setting heavy doors, the weight on the top hinge can bow the jamb outward. If that happens, place a bar under the door and raise the strike (lock) side of the closed door until the hinge jamb is straight or even bowed back slightly. Then drive a nail through the jamb on the hinge side, both above and below the top hinge.

You don’t need to plumb the strike side of a prehung door. Just bring the jamb near the door so that the margin between the jamb and the door is consistent—and at least XA in.—all the way around the door. Once the margin is cor­rect, the strike-side jamb can be shimmed and nailed like the hinge side (see the illustration on the facing page). Keep all nails well above and below the lock area.

When jambs come with casing trim installed, drive 6d finish nails through the casing and into

Подпись:Подпись: їм їм їм їм їм и їм їм їм їм їм їм їм и їм їм їм їм їм їм їм и їм їм їм їм їм їм їм и їм їм їм їм їм їм и їм їм їм їм їм їм їм и їм їм їм їм їм їм їм и їм їм їм їм і SETTING A PREHUNG DOOR Подпись: Nails Maintain a 1/8-in. margin through between the jamb and CROSS-SIGHTING A JAMBПодпись: Take your time setting a prehung door. Make sure it opens and closes with ease. Shim and nail the jamb to the trimmers to hold it securely in place.the trimmer all the way around the door. Try not to drive nails into any grooves in the casing. This makes it hard to fill and sand nail holes.

Any space between the jamb and the trim­mer can be filled with a shim before you nail the jamb to the rough framing. I am not a fan of tapered shims, because unless you use a pair of them a jamb may not be installed flat and straight. I prefer using small pieces of plywood Є/8 in., 3/i6 in, /4 in., or thicker) for shims. I slide a 3-in.-sq. shim between the jamb and the trimmer to provide solid backing before nailing the jamb sides in place. If there is a wide gap between the jamb and the trimmer, don’t fill the space with a stack of tapered shims. Instead, use a single thick shim.

To strengthen the door assembly, remove a short screw from each hinge and drive an identical-looking but longer screw through the hinge and jamb and into the trimmer. This step helps anchor the hinges and hinge-side jamb to the wall framing.

Throughout the process, continually check the door to see that it opens and closes with ease and that the jamb sides cross-sight, as described
in the sidebar on p. 244. If a problem develops, it’s best to find out along the way, rather than after the last nail has been driven home. If you’re driving nails by hand, use a nail set to set them below the surface of the wood so they can be hidden with putty.

Install bifold and bypass doors

Bifold doors work well in small areas, such as closets and laundries. They are supported by top and bottom pivots or guided by an over­head track. I find bifold and bypass doors easy to install, but the less expensive versions are

Подпись:CROSS-SIGHTING A JAMBfor everyday use. But if it is installed properly and used carefully, a folding staircase works quite well.

Most folding staircases consist of three ladder sections that are hinged together and attached to a ceiling-mounted trapdoor. The door is hinged and held flush to the ceiling with springs. You pull on a cord to open the door and pull down the stairs. As the door swings down, you can unfold the two bottom sections of the staircase (see the photo at left). The entire unit fits into a rough-framed attic-access hole between ceiling joists. The opening is typically 221/2 in. wide by 54 in. long. Simply follow the installation instruc­tions provided by the manufacturer.

CROSS-SIGHTING A JAMB

Подпись: Temporary ledgers simplify installation. A pair of boards can be screwed to ceiling framing, supporting the ends of the drop-down staircase until it's secured. [Photo by Jefferson Kolle, courtesy Fine Homebuilding magazine © The Press, Inc.]

not very durable. Many of the cheaper models have fittings that just can’t take serious use. Good hardware costs more up front but may save you from having to replace the entire unit prematurely.

Step-by-step installation instructions come in every bifold and bypass door package. Once the trimmers and header have been wrapped in drywall, the opening for a bifold should be the size of the doors. A 3/0 bifold door is installed in a 36-in.-wide opening. The opening for bypass doors should be 1 in. less than the size of the doors. For example, a 5/0 bypass door needs a 59-in.-wide opening.

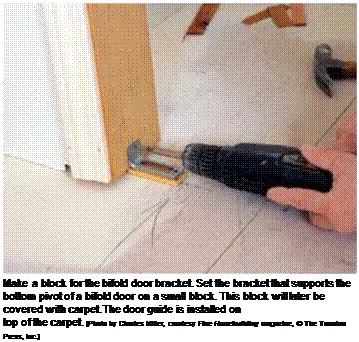
If the floor will be carpeted, nail a plywood block (usually about 1/2 in. or 3/4 in. thick) under the brackets that support the bottom pivot of bifold doors (see the photo on p. 247). If you are working on a slab, drill holes in the concrete and set sleeves in the holes. Then glue the block in place and screw it into the holes. The carpet will cover the block. A similar block needs to be placed in the center of bypass doors to hold the bottom door guide.

Install attic stairs

Some people like to install a folding staircase to give them access to attic space. A factory-made folding staircase doesn’t meet the code require­ments for a regular stairway, so it’s not designed

Подпись:Подпись: Practice using a chopsaw. For better results when cutting trim on a chopsaw, make some practice cuts in scrap material. Practice making the same miter, square, or beveled cuts you'll be making when installing trim. Test the results with a combination square to make sure your square and 45-degree cuts are accurate.CROSS-SIGHTING A JAMB

CROSS-SIGHTING A JAMB

The stair unit comes out of the box com­pletely assembled. When attaching it to the joist chords and header, use the screws that come in the package—not drywall screws. Drywall screws are relatively brittle, do not possess much shear strength, and can break under a heavy load. To support the unit during installa­tion, screw temporary ledgers (supports) to the ceiling joists that surround the opening. The ledgers should project about 1 in. into the rough opening. The ledgers hold the stair unit while you secure it in place.

The unit is installed much like a prehung door. You need to shim between the sides of the stair jambs and the supporting joists before driving the screws through predrilled holes. Once a few screws are in place, open and shut the door now and then to ensure that it opens easily and that the reveal, or space, between the door and the jambs is even all the way around.

The bottom section of the stairway must be cut to length, with the ends of the legs (or string­ers) cut at the correct angle so they rest solidly on the floor. To find the angle, swing the staircase down and unfold all but the last section. Extend a 1×4 board alongside an upper-section stair stringer so that the 1×4 reaches the floor. Place another board on the floor and against the 1×4, then mark the cutoff angle on the 1x 4. Once you cut that angle on the 1x 4, transfer it to measured cutoff lines on both bottom-section stringers and cut them to length.

WOOD-SHAKE VALLEY & HIP

Clay tiles have been used in warm climates for centuries. Their use is still common in the southern extremes of this country, but they have recently been superseded by concrete tiles, which cost less and have better quality control.

Concrete tiles are made from high-density concrete coated with a waterproof resin. They are available in a variety of shapes and colors. Most tile patterns fall in the range of 16 in. to 18 in. long and 9 in. to 13 in. wide. Tiles weigh from 6 lb. to 10V2 lb. per square
foot (psf), which is about 21/2 to 5 times the weight of asphalt shingles. This extra weight may require that the roof structure be bolstered in some situations.

The cost of concrete tiles themselves is high com­pared to other common roofing materials, but most concrete tile-roof systems have a 50-year warranty.

Most manufacturers recommend installing the tiles on solid sheathing with 30-lb. felt underlayment and pressure-treated nailing battens under each course. Course spacing is usually about 13 in., and can be adjusted to make courses equal on each slope of roof.

г-1 _. ~P

WOOD-SHAKE VALLEY & HIP

typical field tile profiles


WOOD-SHAKE VALLEY & HIPWOOD-SHAKE VALLEY & HIPWOOD-SHAKE VALLEY & HIP

CONCRETE-TILE ROOFING

Introduction & Types of Tile

30-LB. FELT

underlayment

OVER SOLiD SHEATHiNG; FELT LAPPED 21/2 iN. AT HORiZONTAL JOiNTS, 6 iN. AT JOiNTS PARALLEL TO SLOPE.

Подпись: TOp OF RAKE TiLES BUTT TO BOTTOM OF FiELD TiLES. RAKE TiLES LAp FiELD TiLES. SEE 189B
Подпись: TRiM HEAD OF BOTTOM RAKE TiLE SO THAT TiLE iS FLUSH wiTH EAVE.

Подпись: 2 NONCORROSiVE NAiLS AT TOP OF EACH TiLEПодпись:Подпись: 1x2 PRESSURE-TREATED OR CEDAR BATTENS NAiLED TOПодпись: BARGE RAFTERПодпись:Подпись: TiLE COuRSES LAP ABOuT 3 iN.Подпись:Подпись: EAVE DETAiL SEE 189AWOOD-SHAKE VALLEY & HIPSTAGGER JOiNTS BETWEEN TiLES ON ALTERNATE COuRSES.

дЛ CONCRETE-TILE ROOFING

BuTT HiP TiLES TO BOTTOM OF EACH COuRSE OF FiELD TiLES; NAiL EACH HiP TiLE AT TOP.


cut CONCRETE TiLES PARALLEL TO VALLEY.


MANuFACTuRED HiP TiLES CONFORM TO SLOPE OF ROOF.


HiP TiLES LAP EACH OTHER BY SAME AMOuNT AS FiELD TiLES.


VALLEY FLASHiNG SEE 170


CuT FiRST HiP OF TiLE TO LiNE OF EAVE.


NOTE

RiDGE TiLES ARE SiMiLAR TO HiP TiLES BuT ANGLE DiFFERS FOR STEEP PiTCHES.


EAVE DETAiL SEE 189A


WOOD-SHAKE VALLEY & HIP

CONCRETE-TILE VALLEY & HIP

WOOD-SHAKE VALLEY & HIP

WOOD-SHAKE VALLEY & HIP

TRIM BOARD


@ CONCRETE-TILE EAVE

CONCRETE-TILE RAKE

Tile Rake

Подпись: TRIM BOARD

FLASHING WITH EDGE TURNED UP FORMS CHANNEL UNDER EDGE OF FIELD TILES & WITH DRIP AT BARGE

CONCRETE-TILE RAKE

Metal Rake

Low-cost metal roofs of aluminum or galvanized steel have been used for some time on agricultural and industrial buildings. The rolled metal panels are light­weight, long-lasting, and extremely simple to install. New panel patterns and new finishes have made metal roofing popular for residential and commercial build­ings. A baked-on or porcelain enamel finish is often warranteed for 20 years, and the galvanized steel or aluminum over which it is applied will last for another 20 years in most climates.

Rolled-metal sheets are typically 2 ft. to 3 ft. wide and are factory-cut to the full length of the roof from eave to ridge. Because of the difficulty of field cutting at angles, metal roofs are best suited to simple shed or gable roofs without extensive valleys and hips. Small openings such as vents should be kept to a minimum and collected wherever possible into single openings. (Vents are best located at the ridge, where they are most easily flashed with the ridge flashing.)

The width of the roof itself should be carefully coor­dinated with the width of roofing panels so that rake

trim, dormers, skylights, and other interruptions of the simple system will be located at an uncut factory edge.

Because the metal roofing has structural capacity, it is possible to install the roofing over purlins, which are 2x’s spaced 2 ft. to 4 ft. apart. Most metal roofing panels will span 4 ft. or more, so the load on each purlin is great, and the design of the purlins that support the roofing is a critical factor.

A wide range of finish colors is available with coor­dinated flashing and trim metal. Translucent fiberglass or plastic panels that match the profile of some metal roofing patterns are also available as skylights.

Choose fasteners and flashing that are compatible with the roofing in order to avoid corrosive galvanic action. Care must also be taken to avoid condensa­tion, which can occur on metal roofs. In cold climates, where proper ventilation of the roofing system does not suffice, a fiberboard backing covered with 30-lb. felt (installed parallel to the roofing panels) will insulate the roofing from moisture-laden air and also provide pro­tection from what little condensation does occur.

PURLiN

OR

OPEN (SKIP) ROOF SHEATHiNG SEE 166

OR

SOLID SHEATHING WITH UNDERLAYMENT SEE 163-164


spacing between sheathing boards depends ON ROOF pitch, SNOW loads & type OF ROOFING.


valley (& Hip) DETAILS SEE 192A


pitch change SEE 192c


WOOD-SHAKE VALLEY & HIP

(g) PREFORMED METAL ROOFING

Ribbed Roofing

WOOD-SHAKE VALLEY & HIPWOOD-SHAKE VALLEY & HIPSCREW (OR NAiL) WiTH NEOPRENE WASHER LOCATED iN FLAT (VALLEY) PART OF ROOFiNG PROMOTES TiGHT SEAL OF wASHER.

Snap-Together Roofing

subsequent piEcE snap-fastens TO edge OF piEcE pREVIOuSLy NAILED. Flat-Head NAiL iS cOVERED SO neoprene washer is unnecessary. sections ARE NARROWER FOR this type.

Подпись:Corrugated Roofing

screw (OR NAIL) WiTH NEOpRENE WASHER IS LOcATED ON RIDGE OF corrugation because VALLEYS ARE NOT WIDE OR FLAT ENOuGH.

IT’S difficult to adjust

TENSION OF NAiL OR ScREW.

Colorful Character for a Colorful Home

Подпись: [Photo © Anna Carter.]Colorful Character for a Colorful Home

IN 1991, WE REHABBED A HOUSE

for a couple with seven children. The father, Eddie, had never had his own bed as a child. As we worked together fixing up the house that would become his family’s new home, it was clear that he was overwhelmed with pride.

Eddie had a colorful personality, and he loved color in every aspect of his life. Each room in his soon-to-be completed house was to be painted a happy color—hot pink for his girls, electric blue for his boys. And on the outside? Bright-yellow vinyl siding.

After the house was finished, Eddie and his family came to our church to thank the congregation for sponsor­ing the rehab of their new home.

Striding down the aisle with his wife, Shandra, and all their kids,

Eddie—whos at least 6 ft. 3 in. and rail-thin— was all smiles. What a happy man he was that day.

But he wasn’t the only one smiling. As Eddie and his family made their way to the front of the church, past the 900 people sitting in their pews, T couldn’t help noticing his shoes, and I smiled myself. They were fire-engine red. Color, obviously, is important to Eddie.

-Anna G. Carter

Measure and cut the casing

Often referred to as door and window trim, casing hides the joint between the drywall and the door or window jamb. Spend some time at your local lumberyard and you’ll see all the styles and grades of casing, including the type that’s installed at the factory on many prehung doors. Solid wood casing can be used if you want to leave the wood natural.

Paint-grade trim—made from MDF or from shorter pieces of wood that have been finger-jointed together—is also available and costs less. Some people prefer a plain, narrow, simple style, while others prefer wider, more complex profiles. Purchase 14-ft. lengths to
minimize waste. Another option is to buy 7-ft.-long pieces that have a 45-degree miter precut on one end.

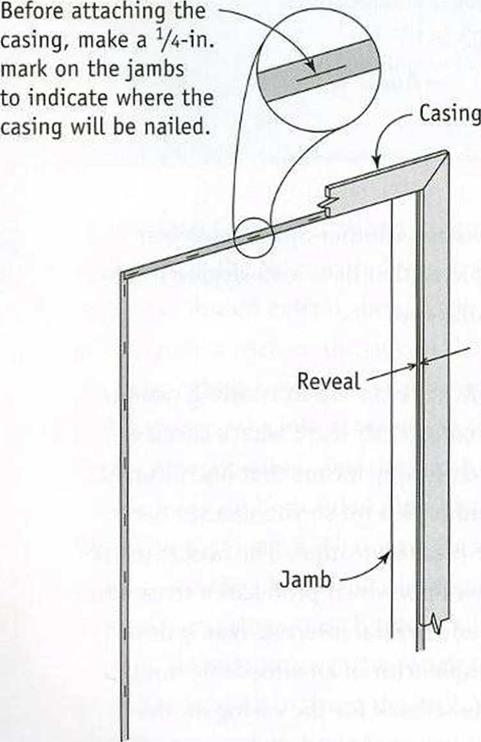
PLAN FOR A REVEAL. When running casing, carpenters commonly leave what’s called a reveal, which simply means that one piece of wood is held back a bit so you can see the edge of the piece beneath it. The idea is to cre­ate a shadow line, which produces a sense of depth and adds visual interest. ‘Phis is done even on simple trim in an affordable house.

To mark the setback for the casing on the jamb, use an adjustable combination square. Set it at about %6 in. to % in. in from the inside
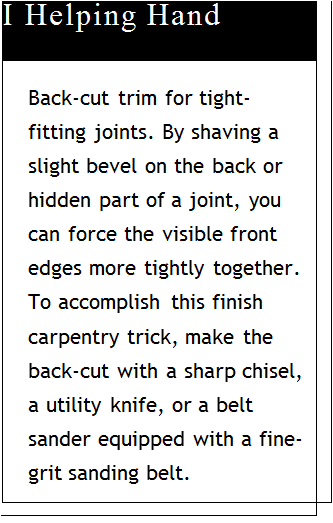
Подпись: I Helping Hand Back-cut trim for tight- fitting joints. By shaving a slight bevel on the back or hidden part of a joint, you can force the visible front edges more tightly together. To accomplish this finish carpentry trick, make the back-cut with a sharp chisel, a utility knife, or a belt sander equipped with a fine-grit sanding belt. Подпись: MARKING A REVEAL ON DOOR AND WINDOW JAMBS Colorful Character for a Colorful Homeedge of the jamb—whether it is on a door, a window, or an attic access—and mark a pencil line in several places (see the illustration below). With a little experience, you’ll be able to mark a setback by eye, without a square. The casing is cut and nailed to that line.

MARK AND CUT THE CASING. Now its time to cut the side and head casings to length. Cut and nail the casing with its thinner edge facing in, toward the door opening. The baseboard trim butts into the wide edge of the casing at the floor line. To find the length of a piece of side-jamb casing, measure from the floor to the horizontal reveal line at the top of the door or window. That measurement is the dis­tance to the short point of the miter cut.

Another way to obtain this measurement is to hold a piece of casing alongside the door or across the head jamb and mark the short end of the miter cut at the!4-in. reveal line (see the photo at left on the facing page). Make a diag­onal mark on the casing to show which way to make the cut. Just make sure the mark will be cut off, so it won’t be visible once the casing is installed. Take the casing stock to the chopsaw and make the cut. Side casings are cut in pairs, one for the jamb on the right and one for the jamb on the left. Take your time. Work slowly. Make sure you are cutting in pairs.

The same technique can be used for win­dows with sills and jambs. Measure from the sill to the horizontal reveal on the head jamb (for side casings) and from one vertical reveal line to the other on the side jambs (for head casings). All these marks are made from heel to heel, or short point to short point, of the miter cut.

In theory, once you know the length of one piece of casing, you should be able to set up at the saw and cut every piece for doors and windows of the same size. This can elimi­nate repetitive measuring and lots of time spent walking back and forth to your saw. In practice, side casings may vary slightly in length. But small gaps at the floor line will be hidden by carpeting or cut to uniform dis­tance to accommodate wood or other finish flooring. Find out what carpenters are doing in your area.

Nail the casing to the jambs

Nailing trim around doors and windows can be difficult when the wall extends past the jamb. If drywall edges protrude just a little, they can usually be knocked back enough by hitting them gently with a hammer. Just make sure the casing will completely cover the flat­tened, compressed drywall.

MARK THE CASING; DON’T MEASURE. Mark the short end of the casing’s miter cut by holding the casing in place on the jamb.

Sometimes, I start by installing door casing inside a closet, where people won’t readily notice mistakes. Think of it as a warm-up exercise. Begin by nailing a piece of side casing first, holding it to the reveal marks. (Other people start with the head casing first.) If you re nailing the casing by hand, drive a pair of nails at the top and then about every 16 in. down the casing. Drive 4d nails through the trim and into the jamb, and drive 6d nails through the thicker part of the trim and into the wall frame. A pneumatic finish nailer makes this job much easier, and you won’t have to use different size nails.

Next comes the head casing. Check the joint between the head and the side casing.

If it looks good, add a bit of glue to the ends

LEAVE A REVEAL. Install the casing so its inside edge sits back a uniform distance (У* in. or so) from the corner of the jamb. This creates a pleasing reveal.

of the two pieces, then nail the head casing to the wall along the horizontal reveal line (see the photo above right). If the joint is open a little, cut the miter again and fine-tune the angle of the chopsaw, if necessary, to get a better fit. If the joint is open more than a little, cut another headpiece; start a little long and make sure you have the angle right before cut­ting it to length. If all else fails, fill the joint with putty before painting. Repeat this process for the second piece of side casing.

Casing installed around an attic staircase or access hole can be cut and nailed in the same way. The only difference is that you’ll have miter joints at all four corners.

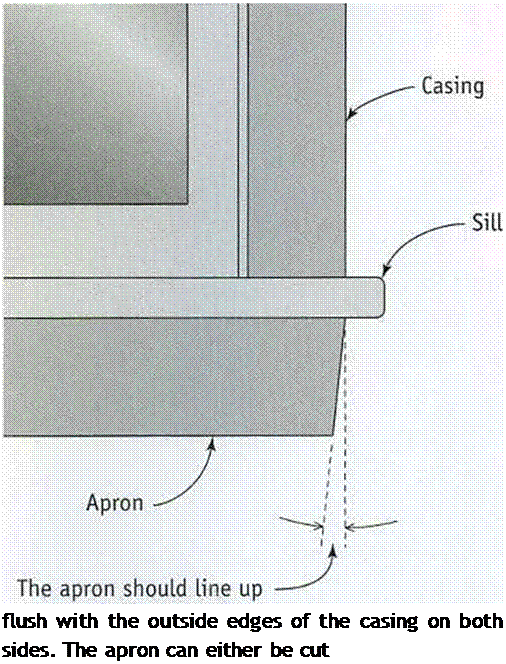
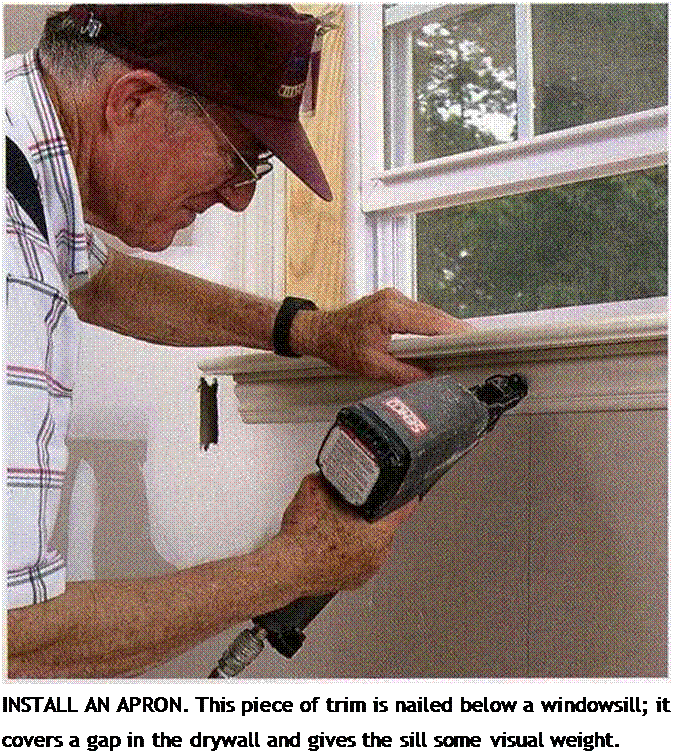
Подпись: INSTALLING A WINDOW APRON Подпись: flush with the outside edges of the casing on both sides. The apron can either be cut Подпись: square or have a б-in. back-cut.Подпись: INSTALL AN APRON. This piece of trim is nailed below a windowsill; it covers a gap in the drywall and gives the sill some visual weight. Install the window aprons

Just as you’d imagine, the piece of trim called an apron is installed beneath the windowsill. It covers the joint between the drywall and the sill and is usually cut from casing stock. Nail it in place with its wide edge up against the sill to support it.

The apron does not run the full length of the sill. If the window sides are covered with drywall, cut the apron 2 in. longer than the window opening. For windows with wood jambs and casing, the apron should line up with the outside edges of the casing on both sides of the window. You can cut the apron square or give it a slight back-cut of about 6 degrees (see the illustration at left). Then nail the apron directly below the windowsill (see the photo at left).

STEP 4 Install the Cabinets 1 started doing finish work as a helper to a cabinetmaker. In the ’50s, there were few factory-made cabinets available. Every cabinet that we installed in every house was built piece by piece on the job.

Today, there is no need to build cabinets on site. Home centers and cabinet shops carry many cabinet styles that are built to order. The price depends on a number of factors, includ­ing the amount of solid wood used in the construction; the style of doors and drawer fronts; and the quality of the hinges, handles, drawer slides, and other hardware. Most base cabinets are sized to provide a countertop height of 36 in. But other sizes and styles are available to accommodate wheelchair access and folks with special needs. A local wood­worker in his small shop builds the cabinets we use in Habitat houses here on the Oregon coast. They are made from pine or birch and particleboard. Although simple in style,

Подпись: Helping HandПодпись: Use only the best bit. You'll need to drill pilot holes for screws when fastening cabinets to the wall and to each other. A combination countersink/ counterbore bit (available at hardware stores and home centers) is the best bit to use when fastening together stiles. This type of bit is available in sizes that match common screw sizes. It is designed to bore the pilot hole for the screw, as well as the recess that will countersink or counterbore the screw head.Colorful Character for a Colorful Home

Colorful Character for a Colorful Home

they’re also beautiful and, thankfully, rather inexpensive.

Kitchen and bath cabinets can be installed any time after painting. Base cabinets should be installed after the underlayment and the vinyl floor are in place. That makes it much easier for the vinyl-floor installer. Just be careful not to mar the floor while installing the cabinets. Baseboard trim is installed after the cabinets because it butts into the base cabinets.

Today’s kitchens are filled with many appli­ances, such as a refrigerator, stove, microwave oven, garbage compactor, and dishwasher.

Most appliance suppliers are more than happy to look at your house plans and help you design a kitchen in which every cabinet and appliance fits into its allotted space. Once you settle on a cabinet style, you can choose differ­ent sections—one for dishes, one for pans, one for utensils, and so on. After cabinets are delivered to the job site, they are installed one section at a time.

Testing for Chemical Fumes

A barrage of chemical odors often assaults new homeowners as they enter their newly constructed home. Many people who have never before been affected by chemical sensi­tivities find they are bothered or made chroni­cally ill by prolonged exposure to the fumes in their new home. Sniffing finishing materials such as upholstery, carpets, and paint before they are installed will reveal important infor­mation. However, even if a building product or material passes the sniff test when sampled, the odor can become unbearable once the product is installed because chemical fumes accumulate inside the house and are emitted from a much larger surface area than that of the sample.

If you are unsure how you will tolerate a product once it is applied or installed in your house, we recommend that you test the prod­uct before purchase in a manner that will sim­ulate the level of concentration in the home. One method is to place a sample of the prod­uct in question in a large glass jar with the top screwed on tightly to allow fumes to accumu­late. The following day, open the jar and sniff the contents for unacceptable fumes. If the sample is too large to be placed inside a con­tainer, keep it next to your pillow while you sleep. Pillow testing should be done only if you are reasonably sure you will not have a severe reaction with prolonged exposure.

For some products it is important that the samples be new. For example, a carpet swatch that has been in a showroom for three years will not provide an accurate indication of what a freshly unrolled carpet will smell like in your home. Samples of other products — such as wet-applied finishes like paints, seal­ers, and adhesives — should be applied to an inert surface such as glass or foil and then be allowed to air out in an uncontaminated lo­cation for a few weeks to better simulate the cured or semi-cured state that the product will be in on move-in day.

This type of testing, although somewhat helpful, has obvious limitations. While the test gives information about the product in ques­tion, it does not indicate cumulative effects or synergistic effects with other chemicals. Since you cannot predict these effects in advance, the goal is to choose products with the lowest levels of odor and toxic emissions.

Further Reading

Floor Seal Technology, Inc. Concrete Vapor Emis­sions and Alkalinity Control. Available from 800-572-2344, 800-295-0221.

Institute of Inspection, Cleaning and Restoration Certification. ANSI/IICRC S500-2006 Standard and Reference Guide for Professional Water Dam­age Restoration.^ ed., IICRC, 2006. Available from 2715 East Mill Plain Blvd., Vancouver WA 98661,800-835-4624,360-693-5675, iicrc. org.

Institute of Inspection, Cleaning and Restoration Certification. IICRC S520 Standard and Refer­ence Guide for Professional Mold Remediation. IICRC, 2003. Available from 2715 East Mill Plain Blvd., Vancouver WA 98661,800-835-4624, 360-693-5675, iicrc. org.

Chart 13.1: Test Kits and Equipment

Manufacturer

Product

Contact points

Indoor air quality

AQS commercial building IAQ test kit forVOCs, formaldehyde, and mold

Air Quality Sciences, Inc.

Laboratory Services

1337 Capital Circle, Marietta, GA 30067

770-933-0638 info@aqs. com aqs. com

Formaldehyde,

microwaves,

radon

A variety of home test kits for radon, formaldehyde, and microwaves

AirChek Inc.

1936 Butler Bridge Rd., Fletcher, NC 28732 800-247-2435 radon. com

Lead

Lead Check Swabs #K910 turn pink if lead is present and can be used on ceramics, paint, soil, and solder

Professional Equipment

PO Box 5197, Janesville, Wl 53547

800-334-9291 professionalequipment. com

Mold

Easy-to-use mold test kit #K2400

Professional Equipment

PO Box 5197, Janesville, Wl 53547

800-334-9291 professionalequipment. com

Mold

Do-it-yourself mold test units with online instructions and telephone consultation for result interpretation and remediation advice

RCAnalytical

RestCon Environmental

3284 Ramos Circle, Sacramento, CA 95827

888-617-3266 916-736-1100

rcanalytical. com restcon. com

Pesticides

Agri-Screen Ticket, a do-it-yourself pesticide testing kit for various surfaces

Neogen Corporation

620 Lesher Place, Lansing, Ml 48912

800-234-5333 neogen. com

Pesticides in water

Watercheck water test kit that de­tects up to 20 pesticides

The Cutting Edge Catalog PO Box 4158, Santa Fe, NM 87502 800-497-9516 cutcat. com

Chart 13.1: Test Kits and Equipment (cont’d.)

Manufacturer

Product

Contact points

pH testing

Calcium chloride moisture and alkali test kit for concrete slabs

TaylorTools

303-371-7667 taylortools. com

pH testing

pH test pencil for measuring the alkalinity of concrete slabs

Sinak Corporation

1949 Walnut Ave., San Diego, CA 92101 800-523-3147 sinakcorp. com

pH testing

Surface pH test kit for concrete slabs

Vaprecision, Inc.

3211 W. MacArthur Blvd., Santa Ana, CA 92704 800-449-6194 kits@vaportest. com vaportest. com

Radioactivity

Radalert 100 device for measuring radioactivity

International Medcom

6871 Abbott Ave., Sebastopol, CA 95472

707-823-0336 medcom. com

Radon

Test kits for radon in water and long – and short-term test kits for radon in air

Professional Discounts Supply

1029 S. Sierra Madre, Suite B, Colorado Springs, CO 80903 719-444-0646 radonpds. com

Thermal

imaging

cameras

Thermal imaging cameras and training in their use

Restoration Consultants Inc.

3284 Ramos Circle, Sacramento, CA 95827 888-617-3266 916-736-1100 moistureview. com

Vapor emissions testing

Reusable calcium chloride moisture and pH dome test kit for concrete slabs

Sinak Corporation

1949 Walnut Ave., San Diego, CA 92101 800-523-3147 sinakcorp. com

Vapor emissions testing

Calcium chloride moisture and alkali test kit for concrete slabs

TaylorTools

303-371-7667 taylortools. com

Vapor emissions testing

Anhydrous calcium chloride vapor emissions test kit for concrete slabs

Plaza Hardwood, Inc.

219 W. Manhattan Ave., Santa Fe, NM 87501 800-662-6306 505-992-3260 plzfloor. com

Vapor emissions testing

Anhydrous calcium chloride vapor emissions test kit for concrete slabs

Vaprecision, Inc.

3211 W MacArthur Blvd., Santa Ana, CA 92704 800-449-6194 vaportest. com

Although do-it-yourself tests may indicate that a problem is present, consultation with a remediation specialist is often re­quired for accurate diagnosis and safe, effective remediation.

Conveying

Systems

This division is not used in most residential construction.