Category Habitat for Humanity International

Did You Know

Did You Know

ACCORDING TO A SURVEY in Builder

Magazine, Habitat for Humanity is the

15th largest house builder in the U. S.

a Since its founding in 1976, Habitat for Humanity has built or rehabilitated more than 40,000 houses throughout the U. S.

^ More than 350 Habitat houses have been built by all-women crews.

a According to The Chronicle of Philan­thropy Habitat for Humanity is the 23rd largest nonprofit organization in the U. S.

a The average Habitat house built in the U. S. costs just over $48,000, encom­passes 1,100 sq. ft. of living space, is held together with 20,000 nails, contains 650 pieces of lumber, and is finished with 40 gal. of paint.

a Habitat for Humanity has 1,621 affil­iates in the U. S. (including Guam and Puerto Rico) and 497 international affiliates in 83 countries.

Подпись: Helping HandПодпись: Change smoke detector batteries. Incorporate this maintenance task into your New Year's Day routine to make sure that all smoke detectors in the house receive fresh batteries at least once a year.

Smoke detectors and fire extinguishers save lives

Smoke detectors can and often do save lives, especially when a fire breaks out while you are sleeping. Most codes require that smoke detectors be installed in every bedroom and hallway. Some detectors are designed to be wired into your electrical system (with battery backup in case of power outages), while others work on battery power alone. You need to know the location of these units so you can check them every three to four months by pressing the test button that’s clearly visible

on each detector. If the unit is operating prop­erly, it will emit a high-pitched sound.

A while back, a friend was visiting and left a small towel on top of the stove not realizing that one of the burners was on. In just a minute or two, the towel was ablaze. A handy fire extinguisher quickly put an end to what could have been a major disaster. Fire extin­guishers are inexpensive and have been put in all the Habitat houses I have worked on. Install one in the kitchen where it is easily vis­ible and accessible so that anyone can locate it quickly. Drive the mounting screws into a stud so the fire extinguisher is securely attached.

[1] Clip the first nail by bending a second nail over it. Hammer the clip until both nails are fully em­bedded in the wood.

[2] Prepare for Truss Arrival and Installation

[3] Cover the inside and outside corners. This is an optional step, but one that I routinely take to provide extra protection in these crit­ical areas, especially if the siding will be installed directly over the studs. Fold a 2-ft.- wide wall-high length of wrap in half and staple it vertically over the outside corners and into the inside corners.

[4] Wrap the house from corner to corner.

If a 12-ft. roll is too tall for the house you’re working on, cut the roll roughly to length

STEP3 Get to Know Electrical and Mechanical Systems

Houses are a lot like automobiles. Both work well if they’re cared for and maintained. In order to maintain your car, you need to know simple things, such as where and how to add oil or brake fluid, how to put air in the tires, and how to check the radiator. Sure, you could have a mechanic take care of this rou­tine maintenance, but it can quickly get expensive—and besides, it’s satisfying to understand the basics of your daily trans­portation. The same goes for a house. There’s no need to call a plumber every time you have a leaky faucet or an electrician every time a circuit breaker needs to be reset. Now that you’ve finished building an affordable house, you can maintain it affordablv with a little basic know-how.

Do electrical checks

For safety’s sake, one of the first things you should check is that all switch, outlet, door­bell, and exhaust fan covers are securely in place. As a homeowner, you should also know the location of the main electrical circuit box.

It contains wires leading to every part of the house and the circuit breakers, which are the

STEP3 Get to Know Electrical and Mechanical Systems

switches that control the electricity on indi­vidual circuits. Open the box door covering the circuit breakers and make sure the electri­cal contractor has labeled what each breaker controls. This circuit map should be on the inside of the door. You should be able to iden­tify the separate breakers for the stove, refrig­erator, and furnace, as well as lighting and receptacle circuits for different parts of the house. There will also be a large single breaker that completely shuts down the current throughout the house. With well-labeled breakers, you’ll be able to shut off power when you need to do wiring work on a specific switch or outlet.

Подпись: BE SAFE WHILE WIRING. Always shut off an electrical circuit before you work on any outlets or switches included in that circuit.Подпись: і ~ іПодпись: Helping HandПодпись: Buy plug-in protection. To protect small children from tampering with electrical receptacles and being harmed by an electrical shock, install protective plug-in devices in unused receptacles that are within a child's reach. Referred to as receptacle covers, these small plastic inserts can be removed easily by an adult who needs to use a covered receptacle.If an outlet doesn’t work, one of the first things to check is whether it’s a ground-fault circuit interrupter (GFCI) outlet. GFCI pro­tection is required for outdoor receptacles (outlets) and electrical outlets in the kitchen and bathroom—places where the presence of moisture might pose an electrical shock haz­ard. If overloading or an electrical short is detected, a GFCI circuit breaker will shut down at the main service panel, cutting off power to all outlets on the circuit. GFCI pro-

Подпись: DON'T FORGET THE SHUTOFF VALVES. Located beneath a sink, these valves allow you to shut off hot and cold water lines going to the faucet so that repairs can be made. [Photo ® Larry Haun.] Подпись: Helping HandПодпись: Store a wrench near the gas line's shutoff valve. Shutting off the main gas line quickly can save lives during an earthquake or a hurricane. Buy a wrench that fits the gas line shutoff valve, and store the wrench right next to the valve so that it's immediately accessible should an emer-gency occur.tection can also be provided by a GFCI recep­tacle that’s wired to other receptacles. Both GFCI devices have test and reset buttons. Find out which type of GFCI protection you have, where the devices are located, and which out­lets they control. By pressing the test and reset buttons, you’ll see how they work.

Know the water and gas lines

In the same way that there’s a main electrical shutoff switch in the electrical circuit box, there are also shutoff valves for the water and, in some places, the natural gas supplies that come into a home. Find out from your plumber and heating contractor where these valves arc, and label them clearly. Water and gas lines can break, and being able to shut off the flow of water or gas could mean the difference between a minor problem and a catastrophe.

Turning a valve on the gas meter with a crescent wrench can often shut it off. There is a shutoff’ valve on the main water pipe coming into the house. There are also localized shutoff valves under sinks and toilets and near washer – dryer units (see the photo above). These allow you to turn off the water to a particular appli­
ance so that you can fix a dripping faucet or make other repairs.

Be familiar with heating and air-conditioning components

The filter is an inexpensive but very important part of most forced-air heating systems. A central air-conditioning system also relies on a filter to trap dust and dirt that may otherwise be blown into living spaces when the system is operating. Make sure you know where these filters are located and how to change them. Replacing a furnace or central AC filter usually takes no more than a minute or two. Always have one or two new replacement filters on hand. Check your working filter against a new one, and replace the old filter once it’s discol­ored by trapped material. A well-functioning filter is good for your health and the health of your HVAC system.

STEP 4 Prepare for the Worst

Earthquakes, tornadoes, and hurricanes don’t come our way very often, but their brute force can be devastating—even fatal—if we’re not prepared. Disasters don’t just strike uother people.” Sometimes they happen to us.

1 remember inspecting a house in Califor­nia after a moderate earthquake. The house hadn’t collapsed, but the hot-water heater had been thrown 20 ft. out into the street. Other heavy appliances were scattered throughout the house. A good HVAC contractor knows which measures are required for securing equipment in areas where the risk of natural disasters are higher than normal. Steel strap­ping and other hold-down hardware are avail­able at most home centers. Check with your building department to see whether there are special requirements in your area for securing heaters and other appliances.

Wood and plastic laminate floorings are very durable

When my family moved into our present home, the living room floor was covered with an ancient yellow shag carpet. There were things growing in that carpet that even our dog didn’t like. I replaced the carpeting with a nice, prefinished floor made from bamboo. The cost for the floor, not counting my labor, was less than the cost for a decent carpet.

We have a couple of area rugs that can be taken outside and given a good shaking now and then.

PREFINISHED WOOD FLOORING. In the old

Подпись: VINYL FLOORING OFFERS BEAUTY, DURABILITY, AND EASY MAINTENANCE. Available in roll or tile form, vinyl flooring offers all three advantages, making it a wise choice for kitchens. [Photo by Reese Hamilton, courtesy Fine Homebuilding magazine, ® The Taunton Press, Inc.] days, wood flooring was installed “in the raw,” one tongue-and-groove strip at a time. Then it was sanded and finished. T he sanding process covered everything with fine sawdust, and the oil-varnish finish filled the air with unpleasant (and often hazardous) fumes. While it’s still possible to install wood floors that way, more and more people are choosing prefinished wood flooring. The installed cost is about the same for both flooring treatments, but you don’t have to deal with dust or fumes. You also don’t have to wait for the multiple coats of

Wood and plastic laminate floorings are very durableENGINEERED WOOD FLOORING IS

Wood and plastic laminate floorings are very durableEASY TO INSTALL. Plied construc­tion, tongue-and-groove joints, and a factory-applied finish make engineered wood flooring easy to install and very durable. Different plank widths and a wide range of wood species are available. [Photo by Scott Phillips, courtesy Fine Homebuilding magazine, E The Taunton Press, Inc.)

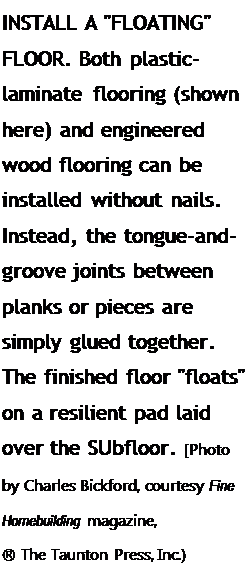
Подпись: INSTALL A "FLOATING" FLOOR. Both plastic- laminate flooring (shown here) and engineered wood flooring can be installed without nails. Instead, the tongue-and-groove joints between planks or pieces are simply glued together. The finished floor "floats" on a resilient pad laid over the SUbfloor. [Photo by Charles Bickford, courtesy Fine Homebuilding magazine, ® The Taunton Press, Inc.)

Ly*‘-. * * I F

….. Щ

finish to be applied. In addition, the factory – applied finishes on better-quality flooring are very durable.

I love wood floors, and it’s great to see such a wide selection of wood flooring available at home-improvement centers and flooring deal­ers. Good instructions are also available from manufacturers and in-store experts for installing prefinished flooring. As with tradi­tional solid wood floors, prefinished flooring is made to fit together with tongue-and – groove joints.

Prefinished hardwood floors come in many styles and woods. Some of the more popular choices are oak, maple, cherry, ash, and fir. You can also select the the stain or clear finish and the edge detail. Most prefin­ished wood flooring is made by gluing wood plies together. Referred to as engineered wood flooring, prefinished wood flooring is manu­factured in strip, plank, and parquet form. Strip flooring can be up to ЗА in. wide; planks are wider; and parquet flooring comes in square pieces. The overall thickness is usually ‘A in. or less. Some prefinished strips and planks have slightly eased or beveled edges to make handling and installation easier. Basic, square-edged flooring is also available.

Wood flooring can be installed with a pneumatic nailer, attached to the subfloor with adhesive, or glued together and allowed to “float” on a resilient pad. Manufacturers have even developed flooring that simply snaps together without glue. If you want to do the installation vourself, check with the manufacturer or with your flooring supplier to determine which type of installation is appropriate.

PLASTIC-LAMINATE FLOORING. Like engi­neered wood flooring, plastic-laminate floor­ing is a plywood construction, but the top, or

“show,” layer is man-made rather than natural. Different colors and patterns are available, including some very realistic wood tones. The surface is extremely durable, though it can’t be sanded and refinished like some types of wood flooring. Shop around and you’ll find plastic laminate flooring for about the same price as good-quality vinyl flooring. It’s easy to install, too. T his type of flooring works well in kitchens and bathrooms. I have it in my writing room. The supplier taught me how to lay it by gluing the edges, and I installed about 100 sq. ft. without driving a single nail.

Know the pros and cons of carpeting

Carpeting is not my first choice for a floor covering. In general, inexpensive carpeting doesn’t last long, so it tends to be a significant part of the waste stream clogging our landfills. Fortunately, efforts are now being made to recycle some of the millions of yards of car­peting that are replaced every year.

If you really like wall-to-wall carpeting, 1 recommend using it selectively—in bedrooms, for example. It’s not a good flooring choice in bathrooms, kitchens, and entryways. Don’t install wall-to-wall carpeting where it will get wet and be difficult to keep clean. In those situations, carpeting can collect dust and har­bor dust mites and mold, becoming a poten­tial health hazard. It’s worth it to buy good – quality carpeting that has been treated to resist staining. Avoid light colors, if possible.

Carpeting is most often purchased from a supplier and then installed by a subcontractor. Talk to your carpet subcontractor about the quality and durability of any carpet you’re considering. A tightly woven carpet with a low nap is the easiest type to clean. Find out whether your choice of carpeting and carpet padding are manufactured with low levels of volatile organic compounds (VOCs), which can adversely affect allergy-prone individuals. Low-VOC carpets, pads, and adhesives cost a bit more, but your health is on the line.

As with other types of finish flooring, car­peting should be installed only over a clean, dry substrate. When installing carpeting over a concrete slab, make sure the concrete has had a chance to cure and dry. Laying carpet on a damp slab is an invitation to mold and rot.

Vinyl floor coverings come in many designs

When 1 was growing up in my family’s prairie home, our kitchen floor was covered with a thick linoleum that was common years ago.

It had a beautiful floral pattern in bright colors—except in the high-traffic areas, where it had worn bare within six months of instal­lation. Fortunately, today’s vinyl floor cover­ings are much tougher than old-fashioned linoleum, and they come in a dazzling array of colors, patterns, and designs. I usually shy away from light colors because they tend to show dirt and require more cleaning.

Vinyl works well in kitchens, bathrooms, mudrooms, dining areas, and entryways because it’s durable, waterproof, and easy to clean. Whatever you install should be able to withstand the wear and tear of a family for at least a few years. Better grades are usually worth the extra money because they last longer.

As with wall-to-wall carpeting, vinyl floor­ing is usually installed by a subcontractor. In most cases, an underlayment of A-n.-thick plywood or OSB is installed over the subfloor to provide a flat, firm base for the vinyl.

Make sure the adhesive the contractor uses to bond the vinyl to the underlayment has a low VOC content.

Once the vinyl flooring is in place, take care when moving the refrigerator, stove, or other heavy object across the floor. The feet on those appliances can scrape or tear a vinyl floor.

Know the pros and cons of carpeting

Install the interior-door hardware

Interior-door handles and locks are installed in essentially the same manner as those used on exterior doors. Most interior doors just require a handle and a latch, or what is com­monly known as a passage-door lockset. However, for bedroom and bathroom doors, you may want a privacy lock—an interior lockset that locks when you push or turn a button.

Install the bathroom hardware and fixtures

One of your primary concerns when installing fixtures in a bathroom is to make sure they won’t come loose in a month or two. A toilet paper holder, for example, should be screwed into solid wood and not into drywall alone. This is why we installed backing in the bath­
room walls when we framed the walls (see chapter 4). if, for whatever reason, there is no backing in the wall, try to mount items by screwing them into studs. If you simply can’t avoid fastening into drywall alone, use an expansion, or toggle, bolt that goes through the drywall and opens in the back.

A recessed medicine cabinet is installed in the hole left in the drywall, which is usually directly over the sink. If the cabinet is surface mounted, position it so the bottom edge is 4 ft. from the floor, then screw it into studs or backing.

The toilet-paper holder should be screwed either into backing near the toilet, at 24 in. o. c. above the floor, or into a nearby vanity cabinet at the same height. Towel bars should be installed near the tub and vanity at 54 in. o. c. above the floor (see the photo on p. 272). If you want to install a toothbrush and cup holder, they should be located 4 in. above the

Подпись: INSTALL BATHROOM FITTINGS AT THE RIGHT HEIGHT. The toilet-paper holder should be about 24 in. from the floor. Towel bars, which are usually placed near the tub and vanity, should be 54 in. from the floor. [Photo by Roe A. Osborn, courtesy Fine Homebuilding magazine, ® The Taunton Press, Inc.] Подпись: Helping HandПодпись: Childproof latches are inexpensive lifesavers. If you plan to store poisonous compounds, such as drain cleaner and bleach, under the sink or in any base cabinet, keep them out of children's hands by installing childproof latches on cabinet doors. sink or 40 in. from the floor. It’s also a good idea to put a small clothes hook or two on the back of the bathroom door.

Various types of shower curtain rods can be installed in different ways. I like the ones that mount in sockets that are screwed into wall studs, much like the pole in a clothes closet. Or you can use the type of rod that is held by pressure between the two walls that surround the tub-shower. Cut the rod to length with a hacksaw, locate it just above the top of the shower walls, then expand it until it holds itself in place. Don’t forget to hang a beautiful shower curtain to add some color to your bathroom.

STEP 2 Select and Install the Finish Flooring

Things are looking good. The house is painted; the doors, cabinets, and countertops have been installed; and all your faucets and light switches are working. But one major transfor­mation remains—the finish flooring.

Installing finish flooring is one of the last jobs to do or have done, and for good reason. Now that you’re down to the detail work, fewer workers will be coming through the house, so there is less chance that the flooring will be damaged. There are many options, even for affordable homes, so this is a great opportunity to make choices that express your personal style.

Choose and install exterior-door locksets and deadbolts

These days, security is a concern in many areas. When a house is first closed in, it’s a good idea to buy an inexpensive door lock to seal it off. That way, you can have a bunch of keys made and give a key to any contractor who needs to get in. There is no need to install the finished locks until after the painting is done and just before the final inspection.

With door locksets, you’ll find a wide range of prices for different products. The quality range is just as broad. You don’t need to buy the best lock on the shelf, but you shouldn’t buy the cheapest, either. The exte­rior lock-set is used many times every day, and a bargain-basement lock won’t hold up over the long haul.

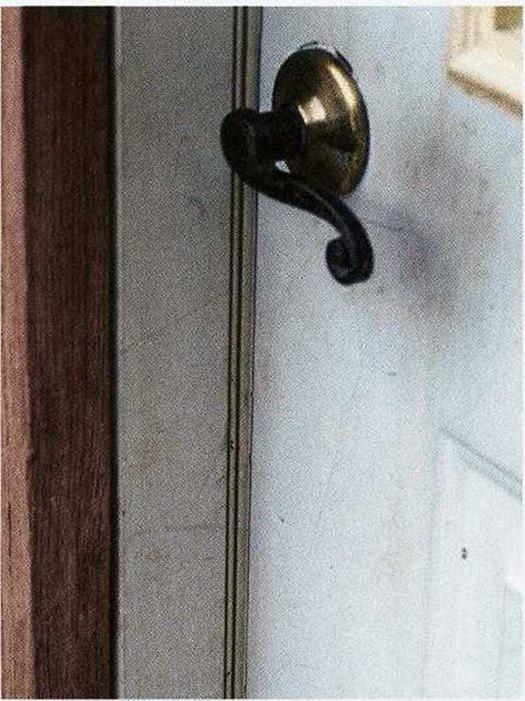
LEVERS, KNOBS, AND KEYS. Instead of buying a lockset that opens with a round knob, con­sider one that opens with a lever, as shown in the left photo below. This type of lockset and handle is much easier on the hands of older folks and people with arthritis. Also, be sure to buy exterior locks and deadbolts that open with the same key. If a supplier doesn’t have enough identical key locksets in stock, order them. This will eliminate the hassle of having different keys for all the exterior doors.

For good reason, fire-safety code requires that deadbolts open with a lever (not a key) from the inside. You wouldn’t want to look for a key with fire licking at your heels.

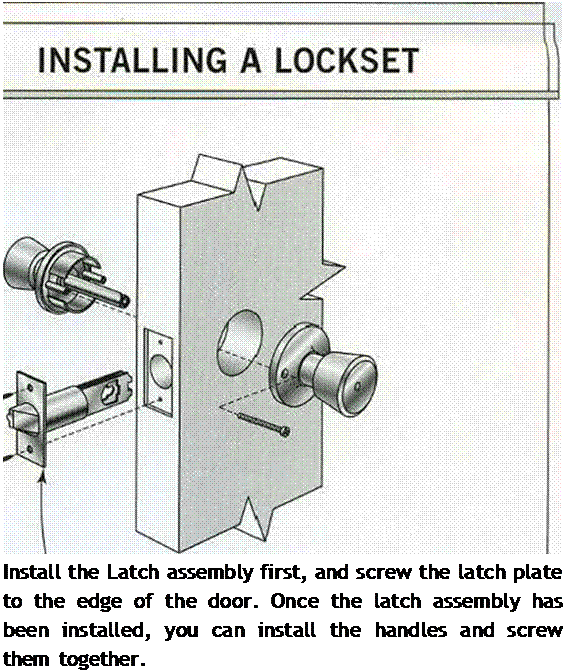
INSTALLATION DETAILS. Prehung exterior doors are drilled at the factory to receive both a lockset and a deadbolt. If you buy your doors this way, you should have an easy time installing the lockset. The installa­tion instructions that come with each unit aren’t difficult to follow (see the illustration on the facing page). When installing locksets,

USE AN EASIER HANDLE.

A lever-type door handle is easier to open than a round knob is, especially for older folks and those with arthritis or carpal-tunnel pain. [Photo € Rex Cauldwell. j

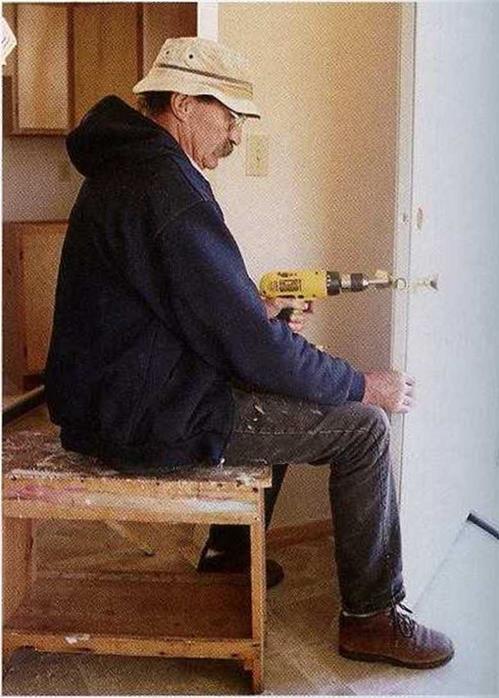
FIND A COMFORTABLE SEAT. A small workbench comes in handy when installing latches and locksetS. [Photo

Choose and install exterior-door locksets and deadboltsChoose and install exterior-door locksets and deadbolts– Larry Haun.]

270 I FINAL DETAILS


Подпись: Install the Latch assembly first, and screw the latch plate to the edge of the door. Once the latch assembly has been installed, you can install the handles and screw them together.

I like to sit on my workbench with my tools and hardware on the shelf below. This is easier and more comfortable than kneeling or bending over (see the photo at right on the facing page).

The spring-loaded latch assembly and deadbolt are installed first. The factory-cut mortises for the latch and deadbolt plates, as well as those in the door jamb for the strike plates, all have rounded corners. If the plates in your hardware set aren’t rounded also, you’ll need to cut the mortised corners square with a sharp chisel to make the plates fit.

Once the latch and deadbolt plates have been screwed to the door edge and the strike plates have been screwed to the jamb, you can install the knobs or handles. On exterior doors, standard practice is to orient the key­hole so that the key can be inserted with the smooth side down. Most folks find that this makes it easier to fit the key in the lock when unlocking a door in the dark.

From Locks to Smoke Detectors

IT WAS THE GREAT YANKEE CATCHER, Yogi Berra, who said of baseball, “It ain’t over ’til it’s over.” The same is true of building a house. Even as you finish the interior painting, install the cabinets, and complete all the plumbing and electrical work, there’s still plenty to do before a new house is ready to welcome its first inhabitants. Although most of these final tasks are small compared to the major construction stages that have already been done, there are a surprising number that belong on what some contractors refer to as punchlist. Such tasks range from installing the toilet-paper holder and mounting a fire extinguisher to nailing up house numbers and putting in the medicine cabinet. Taken together, these little assignments can demand just as much of your time—and possibly more—than some of the bigger jobs you did ear­lier. The step-by-step format in this chapter will help you divide these details into manageable chunks of work.

STEP 1 Install the Hardware and Fixtures

Most finish hardware will be seen and used for the life of the house, so take your time installing items such as door locks, drawer pulls, and towel bars. Once they’re

Подпись: STEP BY STEP

1 Install the Hardware and Fixtures


3 Get to Know Electrical and Mechanical Systems

4 Prepare for the Worst


2 Select and Install the Finish Flooring


/.-■S’). • ■

s-i-4-

•і

v’ ;

Ш ‘ ‘-‘«к %*>*

• v& – ’ 1 •* 1 j

– • ;

1 •/::■• «./лі j

ШЬЖ

J/7% ‘•:••’

[…………. – ~

■ * ‘” " Wj^/v ^ .. -«.v — ;:■•■”■ *• ■•■ **v;.’ – У-У–

…………………. 1


From Locks to Smoke Detectors

Подпись: Helping HandПодпись: Buy your welcome mat early! To reduce the amount of dirt that gets tracked into a house after new carpeting and vinyl and wood flooring have been installed, set up some sort of dirt-catching mat. Put it by the front door near a sign that says '"Please wipe your feet or remove your shoes."

installed neatly and accurately, they’ll look attractive and work well for a long time. Keep in mind that safety items, such as grab bars, also need to be installed securely so that they’ll be safe to use.

Chair rail adds character

Chair rail is another type of traditional trim that is installed horizontally and often used in kitchens, dining rooms, and sometimes hall­ways. In days past, chair rail protected the wall

from being marred by the backs of chairs. Today, it is mainly used to add character to a room. Chair rail is cut and installed just like baseboard (see the photo below). Join two pieces with a coped joint at inside corners and a mitered joint at outside corners. Nail the chair rail directly to the wall studs, with the top of the rail 36 in. from the floor.

STEP 7 Trim Out the Closets

Most closets in affordable houses get nothing more than a shelf and a pole. It’s my opinion that we can do much better without a lot of effort or expense. Very little extra material is needed to add shelves for socks and under­wear, to make a place to hang belts and ties, and to make cubbyholes for shoes. Experience tells me that people like and use such storage. Even if you don’t want to build special storage bins, you can buy them. Many people now use the wire shelving available at home centers.

Install shelves and poles

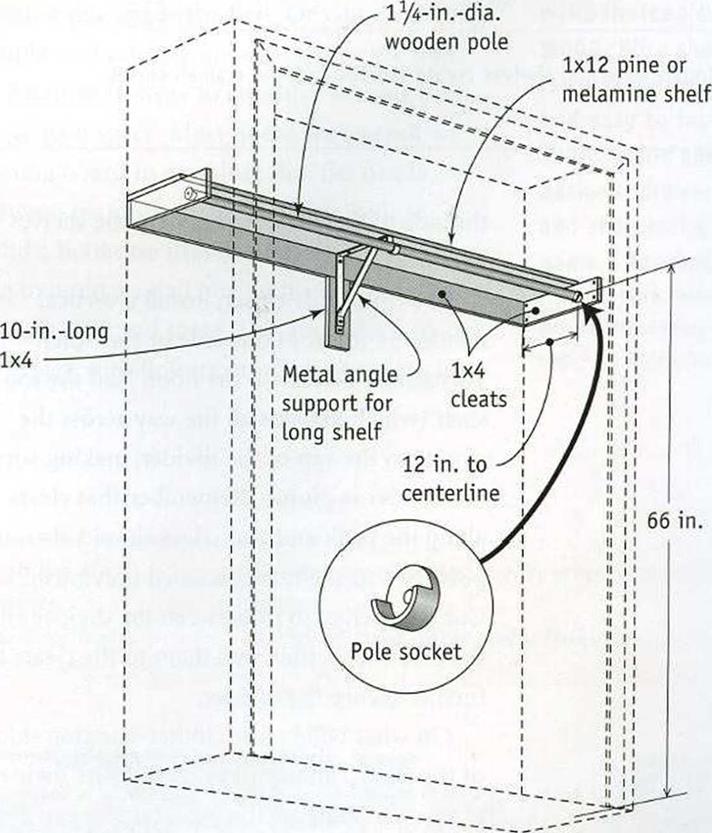
To install a basic shelf and a pole in a closet, measure 66 in. from the floor and mark the back and sides of the closet (see the illustra­tion on the facing page). Then cut cleats (also called rails or ledgers) from 1×4 stock, and nail each cleat so its top edge is on a line. Drive two 8d finish nails through the lx rails and into each stud.

Cut the shelves from 1×12 pine or mela­mine (particleboard covered with white plastic laminate). A standard closet shelf extends from wall to wall. I like to secure the shelf with a couple of nails driven into the cleat. It’s a good idea to predrill the nail holes.

In a small closet, where the shelf and pole are just 3 ft. long or so, no mid-span support for the shelf or pole is necessary. Each end of the pole rests in a socket that is screwed to a side cleat.

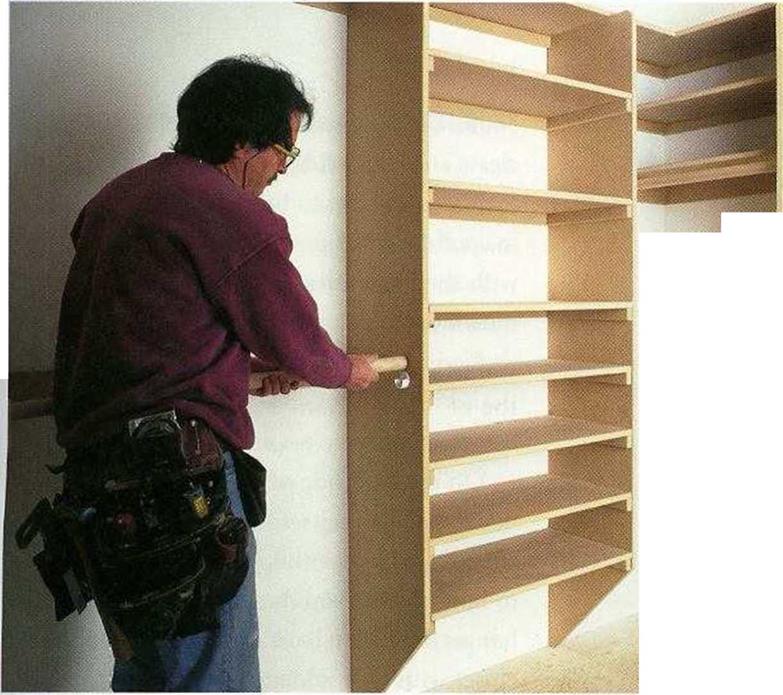
Подпись: ■ У-Шг'-Подпись: <хлПодпись: '.-У-ЛПодпись: ■ш ■ЙМ Подпись: ■ ■>.Подпись: ■•■Л-'ЖПодпись: ...Chair rail adds characterSHELVES CUSTOMIZE A CLOSET. Attaching shelves to a closet wall creates more storage space whi*le giving you more flexibility in locat­ing the closet pole.

[Photo by Roe A. Osborn, cour­tesy Fine Homebuilding maga­zine, © The Taunton Press, Inc.]

In a larger closet, both the shelf and the pole need additional support from metal brackets. Place a bracket against a side cleat to determine the location of the pole sockets.

This ensures that the sockets and brackets will support the pole at the same level. Attach the top part of the bracket to the 1×4 horizontal cleat on the back wall, then nail a 10-in.-long piece of 1×4 perpendicular to the cleat and over a stud to support the bottom of the bracket (see the illustration at right).

Add smaller shelves to a closet

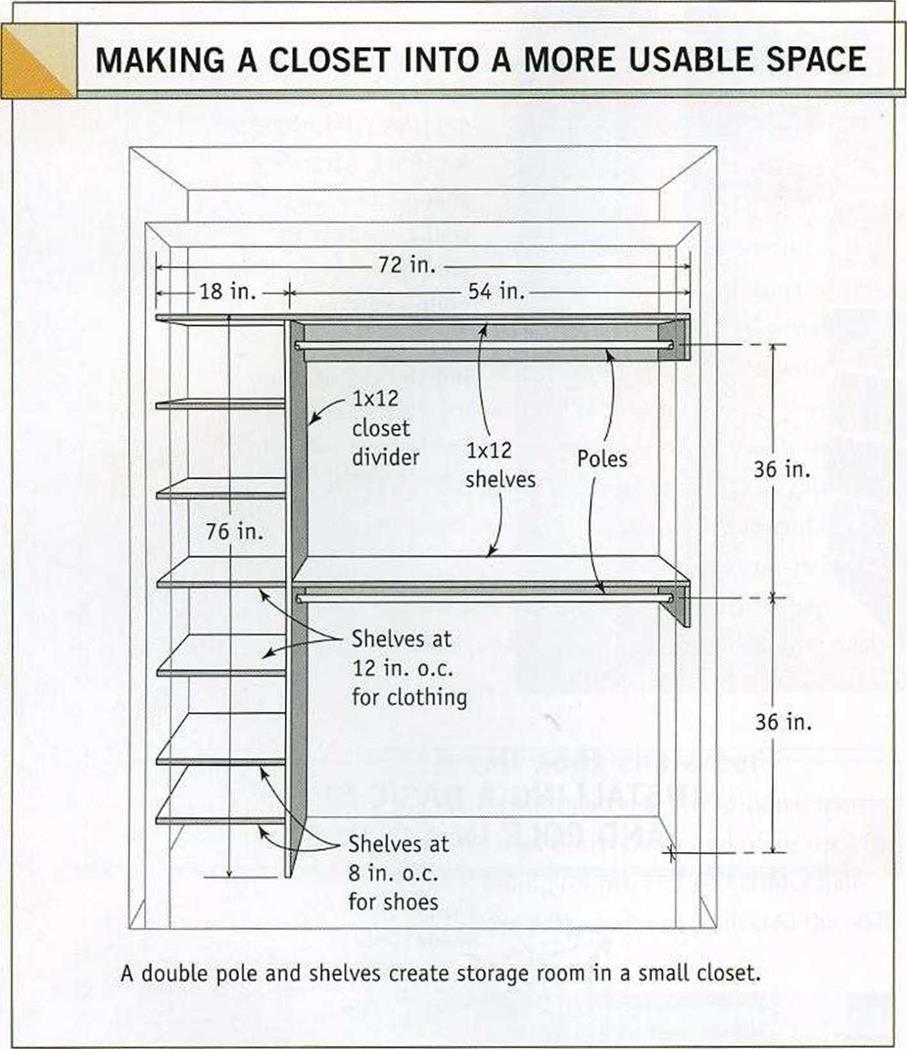
Rather than always running a shelf pole all the way across a closet, you can shorten the pole and add a column of shelves at one end, as I shown in the illustration on p. 266. With this design, you can make a typical 6-ft. closet much more useful for storing all kinds of clothes, including shoes. Cut the 1×12 divider 76 in. long, lay out the shelf locations, then attach 1×2 shelf-support cleats to the divider.

Подпись: INSTALLING A BASIC SHELF AND POLE IN A CLOSET Chair rail adds characterI usually place the two lowest shelves 8 in. and 16 in. off the floor for shoes. For socks and underclothes, I place a shelf every 12 in. above the first two. Fasten corresponding cleats to
Chair rail adds character

the side of the closet wall where the shelves will be installed.

In a 6-ft.-wide closet, install a vertical divider 54 in. from one side or the other. Toenail the divider to the floor. Nail the top shelf (which extends all the way across the closet) to the top of the divider, making sure the divider is plumb. Remember that cleats along the back and end edges should also sup­port the top shelf, as discussed previously.

Cut the shelves to fit between the divider and the closet wall, then nail them to the cleats to further secure the divider.

On what will be the clothes-hanging side of the closet, attach a 1×4 cleat to the divider at 66 in. to support the pole. Or you can install two poles, one at 72 in. and one at
36 in. The pole sockets are attached to the cleats and the divider.

If you’d prefer to buy shelving rather than make it, you can find plastic-coated 1x12s with shelving holes already drilled in them at most home centers. The shelves sit on small shelf pins that fit into the holes drilled into the divider. This allows you to adjust the height of shelves, just as in a kitchen cabinet.

On the pole side of the divider, put a few hooks to hang belts. On the cleat holding the shelf on the other end, install a hook or two to hold clothes you don’t want to put on a hanger. Now you have a much more usable closet with little added expense or labor.

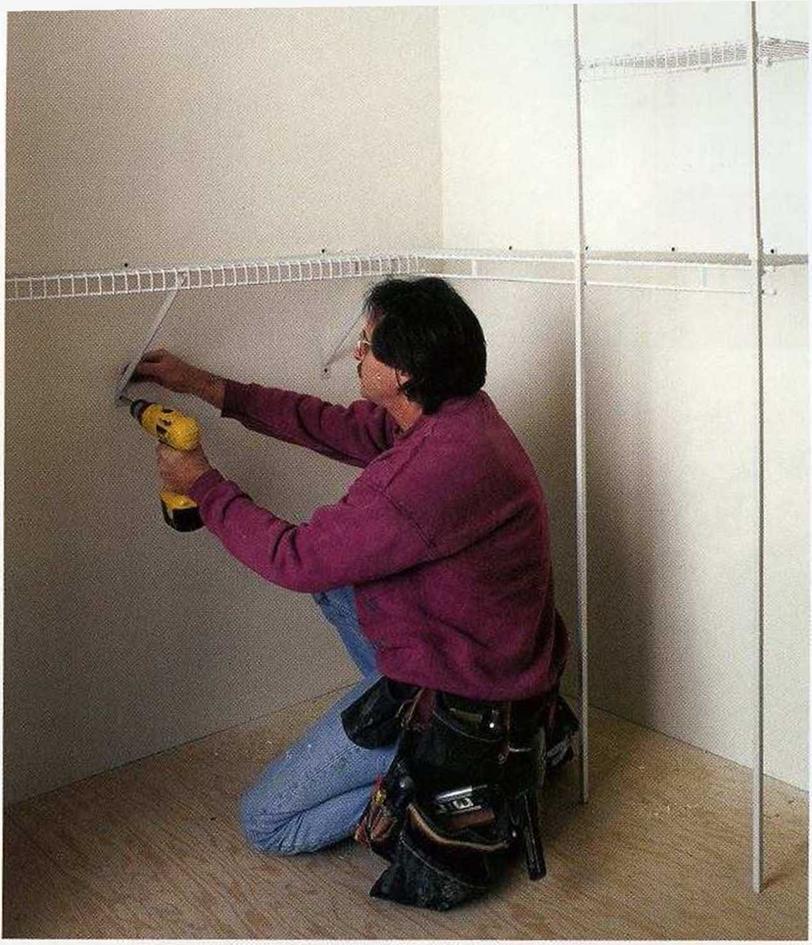
Trim out a closet with coated-wire shelving

The rubberized wire shelving found at home centers offers many accessories to help orga­nize a clothes closet. The wire frames are strong and open, and you don’t have to paint them (see the photo on the facing page). Besides the traditional shelf-and-pole setup, you can install baskets, drawers, and tie, belt, and shoe racks. The possibilities for arranging your closets with these components are really endless. The only drawback is that they’re more expensive than building simple storage spaces with wood.

1 haven’t installed a lot of this type of shelving, but it isn’t difficult. The instructions that come with the components are easy to follow. Just be sure to make accurate measure­ments so the shelving is installed straight and level. Some people put backing in the wall frame before drywall is installed so the hooks that hold the wire units can be screwed into solid wood. Otherwise, you can screw the hooks into studs and then use the drywall anchors that come with the shelving units in places where you need support but don’t have a stud.

Chair rail adds characterInstall shelves in linen closets and the laundry room

A complaint I hear from many homeowners is that they just don’t have enough places to store their belongings. Certainly, most of us could stand to reduce the clutter in our lives, but adequate storage space is in short supply in small, affordable houses. For that reason, it makes sense to get the most out of whatever storage space you do have.

Just as in a clothes closet, you can do a lot with a linen closet by building shelving like that shown in the illustration on the facing page. I like to install the first shelf at 18 in. to 20 in. off the floor, then place shelves every 12 in. to 16 in. up from there. Use 1×2 cleats on each side of the closet, and attach the shelving to the cleats.

Take advantage of all the space in a linen closet (usually around 24 in.) by using full – depth shelves. Melamine shelving is available in various standard widths up to 24 in., or you can buy 4-ft. by 8-А. sheets of the material and cut it to the desired width.

Laundry rooms are oAen just large enough to hold a washer and dryer. Few affordable houses have a large utility room with space for lots of shelves. In a small laundry room,

I install a couple of shelves over the washer and dryer for items such as soap and bleach.

I install the first shelf at 5 ft. off the floor and

Chair rail adds character

another one above the first. Or you can buy a simple wall cabinet and attach it to the wall.
Подпись: Bringing pipes and electrical wire through the back of a base cabinet calls for careful measurements . . . We tackle the baseboard trim after all the cabinets have been installed . . . Подпись: Cutting exact angles is easy when you have a chopsaw . . . A tight-fitting miter really looks nice.

Подпись:Chair rail adds character

Chair rail adds character

Another strategy to consider is using built – ins to gain space. Most home centers sell an ironing board in a cabinet that fits neatly between two wall studs. You may want to build a bookcase that fits into the wall. I often like to build a small box with a shelf to place in walls here and there. This provides a place for a vase with flowers or other knickknacks.

Techniques FITTING BASEBOARD IN IMPERFECT CORNERS

Techniques FITTING BASEBOARD IN IMPERFECT CORNERSTHE JOINTS IN BASEBOARD SHOULD BE CLOSE TO PERFECT. Minor touchups with latex caulk can be done before painting. Unfortunately, it’s not so easy to make perfect joints at corners when the drywall is not straight or a corner is not square.

On inside corners, drywall can be tipped back, caus­ing a coped or mitered baseboard joint to open.

This can be remedied by putting a shim behind the tipped trim so that it sets straight up and down.

Instead of a shim, I sometimes drive a drywall screw into the bottom plate to hold the baseboard square (see the illustration below).

I use two short pieces of baseboard with mitered

Подпись: rywall, especially in the corners, an taper inward, causing the iseboard to pull away from іе wall at the top.Подпись: To prevent this, drive a drywall screw into the bottom plate behind the baseboard to hold the baseboard plumb.Techniques FITTING BASEBOARD IN IMPERFECT CORNERS

PREVENTING BASEBOARD FROM TOEING IN

Techniques FITTING BASEBOARD IN IMPERFECT CORNERS

Drywall

Baseboard

(45-degree) ends to check outside corners for square (see the photo above). If the mitered joints fit per­fectly, the corner is square. If not, note whether the joint is open at the heel (the back corner of the baseboard) or at the toe (the front edge). If it’s open at the heel, set the chopsaw at a 44-degree angle (or less, if necessary) before making the cut.

If it’s open at the toe, set the saw at a 46-degree angle (or more, if appropriate). Rather than waste long pieces of material, make practice cuts on scrap until you get the right fit.

FINISH UP. Pieces of baseboard will be at slightly different elevations where carpeting meets vinyl flooring. Join the two pieces of baseboard with a square cut, and use sand­paper to round the corner of the higher piece so that it meets the lower one (see the illustra­tion on the facing page).

Other situations require a bit of finesse.

For example, you can’t run baseboard in front of a heat register that goes all the way to the floor. In that situation, bevel each end cut 15 degrees instead of making a right-angled cut (see the illustration on the facing page).

Cabinet manufacturers sometimes supply a prefinished baseboard that matches their cabi­
nets. This base material is cut and nailed under the front of the cabinets in the toekick space. Once installed, it hides the joints between the cabinets.

If that cabinet trim is not available, you can cover the toekick area with a regular piece of baseboard trim. You may also want to install base shoe, or shoe trim, a small, quarter- round type of molding that is often used with baseboard trim (see the illustration on the fac­ing page). Shoe trim hides any space that may exist between the baseboard and hardwood or vinyl flooring. Because it’s so small, it’s quite flexible (much more so than baseboard), so it can be bent to fit the contour of a wavy wall

Подпись: I •— IПодпись: Helping HandПодпись: Offset closet doors make sense. Instead of framing a closet doorway in the center of the closet space, consider offsetting the doorway. This will make it easier to customize your closet space with cubbyholes, drawers, and poles.Подпись: CHAIR RAIL PROVIDES VISUAL INTEREST. Running horizontally at chair rail height, this trim can add a bit of character to a room. In this installation, the chair rail also serves as apron trim beneath the windowsills. or floor. It is not needed with carpeting because carpeting fills the space between the baseboard and the floor.

If you’ve hand-nailed all the interior trim, you now need to drive all the finish nails below the surface of the wood with a nail set. Once set, the holes can be filled with putty and sanded in preparation for painting. Caulk along the top edge of the baseboard trim and along the casings to fill any gap between the trim and the wall. Remember that caulk shrinks, so some gaps may need a second application. Take your time when caulking baseboard. Leave joints looking neat, not messy.


Hold base up г/г in. from floor that will

INSTALLING BASEBOARD ON THE WALLS. ABOVE CARPETED AND VINYL FLOORS


Baseboard

Base shoe


On a vinyl floor, a base shoe can be nailed at the bottom of the baseboard.


Г


Heat register


Where baseboard runs into a heat register, cut the baseboard back 15 degrees on both sides to soften the ends.


INSTALLING BASEBOARD ON THE WALLS. ABOVE CARPETED AND VINYL FLOORSINSTALLING BASEBOARD ON THE WALLS. ABOVE CARPETED AND VINYL FLOORS