The appearance of the chamber lock

The chamber lock, with two gates, is invented in the Song Dynasty at the end of the 10th century. In 983, a civil servant named Chiao Wei-Yo is in charge of transport in the Huai region. At this time barges were transferred from the canal to the Huai, at the northern extremity of the Shangyang traverse, by dragging them on an inclined ramp. This oper­ation often damaged the heavily-loaded barges and their cargo. To remedy this difficul­ty, Chiao Wei-Yo conceived the concept of the chamber lock, the very first such device in the history of man:

“Chiao Wei-Ho therefore ordered the construction of two gates at the third dam along the west river. The distance between these two gates was a little more than 50 paces (75 m) and the entire space was covered with a large roof. [….] When the gates were closed, water accumu­lated like the tide until the desired level was attained, then, when the right moment arrived, it was allowed to flow out.”[430]

Additional evidence of the appearance of the chamber lock comes from the magic canal, linking the basins of the Yangtze and the Xi to the south. Joseph Needham notes that up until the 9th century, written accounts mention 18 single gates on this canal, and that from the year 1178 the number increases to 36. He interprets this doubling as the replacement of the single-gate flush locks by chamber locks with two gates. A later account dating from the 16th century also suggests the existence of chamber locks on this canal:

“On the Ling Chhh (Lingqu – magic canal) north to south there are 32 lock-gates, i. e. from the Li to the Thung-Ku Shui. From east to west, entering Yung-fu, there are 6. In the winter (the canal) dries up and one cannot pass through. But when I made the passage through these lock – gates there was plenty of water, and under the moonlight they looked like steps leading up to some high platform, or like tiers of walls and terraces coming down one behind another from the sky.”[431]

The chamber lock is a Chinese invention that does not appear in Europe until the 14th century. In China itself this invention will have a somewhat murky future, since, as we will see, the old principle of the flush lock will remain in broad use on the Grand Canal for some time to come.

Painting the Exterior

Exterior paint jobs can last 10 years or more if you’re fastidious about prep work and attentive to water-related building details. Key factors include proper flashing of windows, doors, and roof junctures; maintaining gutter systems; caulking gaps in exterior siding; and adequately venting excess moisture from interior spaces.

WHY PAINT FAILS

Before you sand or scrape anything, figure out why the paint is failing. . . and where.

Blistering is usually caused by painting over damp wood or an earlier coat of paint that isn’t dry. Blisters often contain water vapor, although "temperature blisters” are largely hot air, caused by painting a surface that was too hot. Scrape and sand blisters, allow the wood siding to dry thoroughly; then spot prime.

Peeling off in sheets, is blistering on a grand scale—sometimes an entire wall. Such peeling is most common on older homes lacking vapor barriers and occurs especially on siding outside bathrooms or kitchens, when excessive moisture migrates through the wall. If your old house has been retrofitted with insulation and a vapor barrier, peeling may indicate moisture trapped inside the walls and, possibly, rotted framing.

At the very least, add ventilator fans to exhaust water vapor. And on outside walls, drive thin plastic wedges behind the lap siding to help moisture escape.

Intercoat peeling, a new coat of paint separat­ing from the old, is a classic case of poor prep work. Typically, chalky old paint was not scrubbed or sanded, and thus new paint could not adhere. Or, less often, the painter waited too long between the prime and finish coats. Scrape failed paint, sand, and wash the surface well, letting it dry before repainting.

Wrinkling is caused by applying paint too thick­ly, painting an exterior that is too cold, failing to thin paint sufficiently, applying paint before earli­er coats are dry, or letting the paint get rained on before it cured adequately. Use a power sander to even out the surface before repainting.

Alligatoring or cross-grain cracking, is caused by too many layers of paint, usually old, oil-based paint. The thicker the paint, the less it can flex as siding expands and contracts. So the paint cracks—sometimes, all the way down to bare wood. Alligatoring may also be caused by paint­ing over an undercoat that didn’t dry completely. In either case, it’s big trouble, because you’ll need to strip the paint down to bare wood and seal it with a primer-sealer before repainting. It may be easier to replace the siding

Chalking is a normal occurrence and isn’t a problem unless it’s excessive, usually the result of cheap paint. Because new paint won’t adhere well to a powdery residue, you must scrub and rinse the old surface and allow it to dry before repainting.

Rusty nail stains are common where siding nails were not galvanized. The fastest fix is sand­ing each stain lightly and priming with a rust- inhibiting primer like Kilz® stain blocker. For a longer-lasting repair, sand till you expose each nail head, use a nail set to sink each one Уз in. below the surface, prime with stain blocker, and fill with wood filler. Then sand and spot-prime before painting.

Tannin bleed through, a widespread brown staining, occurs when waterborne resins in woods, such as cedar and redwood, bleed through porous latex primers. Scrub the surface well and prime it with one or two coats of an oil-based (alkyd) primer like Kilz or Benjamin Moore Fresh-Start®. Paint what you like—latex
Подпись: Although power washing is widely used to clean stucco, brick, aluminum, and vinyl siding, it's not appropriate for wood siding. It can gouge and even shred wood, force water into gaps around doors and windows, soak insulation inside walls, and inject water into wood that will take weeks to dry. Certainly, never use power washers to strip paint: They'll scar wood and scatter paint flecks to the ends of the earth. Подпись: 1111

or oil-based—over that. At this writing, stain­blocking acrylic latex primers show promise but don’t yet have the track record of oil-based stain-blocking primers. Get a second opinion from an up-to-date paint supplier.

Graying wood is a natural response to sunlight when siding is left unfinished or has been sealed with a clear finish that degrades. Never leave wood siding exposed to the elements—both because bare wood quickly degrades and because paint or clear finishes don’t adhere well to degraded wood. Sand and wash the surface, and reapply a clear finish with a UV-blocking agent. Clear finishes need to be reapplied every 2 years to 4 years. If that sounds like too much mainte­nance, prime the siding with an oil-based primer, and then switch to paint.

Mold and moss are common in damp climates, on north-facing and foliage-shaded walls and where lawn sprinklers hit the house. Siding that’s constantly damp can lead to structural rot. For starters, cut back foliage and the adjust sprin­klers. Scrub moss off by hand, using a wire brush. Remove mold by applying a cleaner/ mildewcide such as Zinsser Jomax® before scrubbing or power washing the surface (but see the cautions later in this section). After the exterior has dried for about a week, prime as needed, and repaint with a paint containing a mildewcide.

PREPARING THE EXTERIOR

Before you start prep work, be sure to review this chapter’s earlier sections on equipment and lead – paint safety. Even though you’re working outside, wear a respirator mask when sanding or scraping paint and when working with solvents or paints of any kind. Likewise, when applying cleaning solutions (which can be caustic), wear rubber gloves and eye protection.

Prep work is prodigiously messy, so spread dropcloths out 8 ft. from your house to protect your lawn and shrubs. Otherwise, you’ll be pick­ing paint scraps out of your grass for years or— even worse—exposing kids and pets to old lead-based paint. If it’s hot and sunny don’t cover your plants with plastic drop cloths; the plants will cook. Instead use fabric drop cloths, which shade plants, won’t tear, and are far less slippery to walk on. But if tests indicate lead paint, capture the debris in heavy 6-mil plastic tarps, which you can roll up and discard at the end of each day.

Washing surfaces. Before installing new wood siding, apply primer-sealer to front and back faces and to all edges. When that coat is dry, scuff-sand it with 100-grit sandpaper, and dust it
off with a whisk broom. Then install the siding before applying the top coats.

However, if the siding is already painted— even if the paint is in good shape—first wash it. Start by applying a house-cleaning solution, using a garden pump-sprayer. A dilute solution of TSP is often recommended, but urban houses may need a cleaning agent with a degreaser that will cut soot, automobile exhaust, and the like.

As noted earlier, if there’s mold present, use a cleaner with a mildewcide. Once the cleaner has had time to work, rinse it off with a garden hose and allow it to dry thoroughly for a week or so before painting. That’s a minimal wash.

To thoroughly wash and rinse an exterior, rent a pressure washer, which has a small boiler and a high-pressure electric pump. The rental company will recommend a detergent suitable for the unit and explain how to use it safely. For most clean­ing jobs, 1,800 psi to 2500 psi (pounds per square inch) is specified—for softwoods like cedar or redwood, 1,000 psi to 1,500 psi. Tip sizes range from 0° (concentrated pressure that can easily damage siding) to 40° (a wider fan of water favored for light cleaning). In general, start with a low-pressure setting till you are familiar with the machine, and keep the spray wand moving. Note: Always spray downward if you’re cleaning lapped siding. Otherwise, you’ll force water underneath.

Scraping, sanding, spot-priming, caulking.

Once the siding has dried, hand-scrape the loose paint. For this, use a large scraper with 3-in.-wide blade, preferably one with a forward grip over

image932

SAFETY

If you’re painting a whole house, the job will go much faster if you rent scaffolding. However, if you decide to use an extension ladder or two, follow these safety rules:

► Don’t place ladders near incoming electric service lines. When the air is moist, electricity can arc to nearby objects or people; so keep your distance.

► Securely position the ladder feet. Never ascend a ladder that lists to one side. On uneven ground, use a ladder with adjustable leveling feet, as shown on p. 36.

► Place the ladder bottom out from a building no more than one-quarter the ladder’s height.

► Wear hard-soled shoes so your feet won’t tire quickly on the ladder rungs.

image934

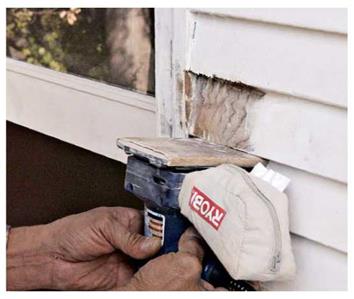
Where a random-orbit sander won’t fit, use a palm sander, as shown, with 60-grit or 80-grit sandpaper. A palm sander is also handy for scuff-sanding old paint in good condition so new paint will adhere better.


image933

Hand-scrape nooks and crannies that power tools can’t reach or could damage. Here, heat guns and chemical scrapers also make sense.


image935

Подпись:image936Подпись: M-

the blade. Be sure to scrape the lower edges of the clapboards and beneath the windowsills.

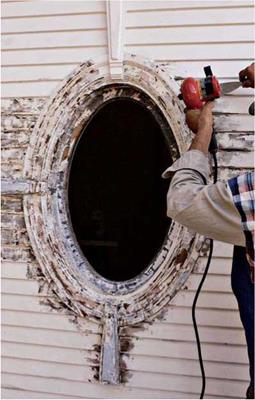
For hard-to-reach areas when siding abuts trim or where trim is curved or intricate, use a hand scraper with interchangeable blades. If paint doesn’t come off easily, that’s a good sign—it’s well adhered. However, if isolated areas of paint are too thick or obscure ornamental details, use a chemical stripper or a heat gun to remove more paint.

After scraping loose paint, use 80-grit sand­paper to feather out the edges of the remaining paint, smooth uneven surfaces, and scuff up surfaces so new paint will adhere well. For this work, an electric palm sander or random-orbit sander is a good tool, powerful yet light enough to use all day. If you’re prepping painted stucco, brick, or concrete, instead use a wire brush. When you’re done, brush off the dust with a hand broom.

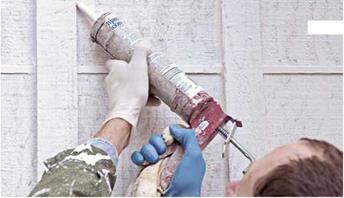
If the paint is largely intact, you may not need to prime it, but you should spot-prime all areas you’ve scraped down to bare wood; exposed nail heads; and cracks, gaps, and holes you intend to fill or caulk. Spot-priming blocks nail stains, seals wood from moisture, and provides a better surface for filler or caulk to adhere to. Use either an exterior-grade polyurethane, a paintable

acrylic, or a multipolymer caulk; don’t use silicone caulk because paint won’t stick to it.

This is also a good time to set and fill nail heads. Because wood filler shrinks as it dries, slightly overfill the holes. When the filler’s dry, sand it flush.

Where wood is badly deteriorated, you should replace it. If the trim has only localized rot and would be difficult to replace, scrape the loose matter away and impregnate the remaining area with an epoxy filler, such as the one shown in the photos on p. 134.

Stripping exterior paint. Stripping exterior paint is a nasty job. Fortunately, only a few paint conditions require stripping. One of those condi­tions is alligatoring, in which many layers of old,

cracked, oil-based paint resemble the skin of an alligator (see the photo on p. 457). In that case, before stripping to bare wood, get a bid to replace the siding. Labor costs should be less, to say nothing of the cost, mess, and health con­cerns of stripping lead-based paint. But if you decide to strip, wear a respirator mask, eye pro­tection, and other apparel related to lead safety

Basically, stripping exterior paint becomes a choice between mechanical scrapers and chemi­cals. Sandblasting is too dirty, damaging, and dangerous to be done by anyone but an expert. Sanding and hand scraping a whole house is impossibly slow. And whereas heat guns are okay for small areas, the snail’s pace of stripping a house and the real risk of starting a fire make it a distant third option. So, in the end, some combi­nation of mechanical scraping, chemicals, and limited hand scraping will probably serve best.

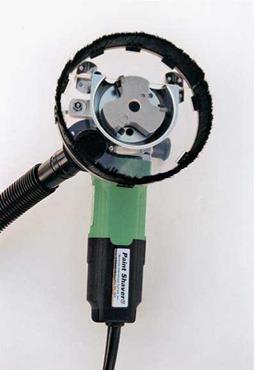
Mechanical scrapers such as AIT’s Paint Shaver® are serious, two-handed tools. Mechanical scrapers look somewhat like angle grinders, but have carbide-tipped rotary cutter – heads that shave paint from the clapboard faces and edges. The better models have vacuum attachments that collect most of the debris. Nonetheless, have tarps in place before starting; and to prevent cutter damage, set siding nails well below the surface. Thus, as you strip, you’ll need a hammer and a nail set to set the nails you missed. Also, be sure to install scaffolding so you can focus on the tool and not your footing.

To minimize damage to the siding, first set the tool’s depth adjustment so you need several passes to strip a surface. Finding the right cutting depth is largely a matter of trial and error, so first test the tool on an inconspicuous section. Beyond that, the real trick to mechanical scraping is keep­ing the steel shoe/guard flat to the surface so the tools strips evenly. Where a Paint Shaver won’t reach, use hand scrapers, a chemical stripper, or small mechanical scrapers like the Metabo™ Lf714S. When finished stripping, use a palm sander or a random-orbit sander with 50-grit to 80-grit sandpaper to smooth out the rough spots before washing, caulking, dusting, and priming.

Chemical strippers are most appropriate where trim is intricate or where you want to remove lead paint without dispersing particles into the air and soil. Strippers vary in strength, environmen­tal impact, working time (4 hours to 48 hours), and method of application. Most often, chemi­cals are brushed on ‘/ in. to І4 in. thick, but it’s possible to apply some strippers with modified paint-spraying equipment. (If you spray, wear a full-face mask, gloves, and disposable coveralls.)

image937

A mechanical scraper with a vacuum attachment is the tool of choice when you’ve got to strip exterior paint. But set the nail heads first, or you’ll chew up expensive scraper blades. Eye protection is a must.

Given enough time to work, chemical strip­pers should remove all paint layers in one appli­cation. To keep its stripper from drying out while working, Dumond Chemical’s Peel-Away® system comes with plasticized paper that’s pressed directly onto stripper-coated surfaces. Peel – Away’s active agent is lye, which is extremely caustic, so after stripping surfaces, you need to apply a special neutralizing solution before priming or painting. Another product, Back to Nature’s Multi-Strip™, is biodegradable, non­caustic, and water soluble. Thus it doesn’t need a neutralizing agent.

Green—and Unseen

When I show my clients a typical CFL— the type shaped like swirly soft ice cream— they immediately hate it. It doesn’t matter if the light it produces has a beautiful color, if it operates quietly, or if it’s dimmable. They just have a visceral, negative reac­tion because they can see that the source
of light is fluorescent. I’ve learned to apply a technique I call stealth lighting. Stealth lighting simply means hiding the bulb be­hind a diffusion material such as a shade, an architectural detail, or a lens. If they can’t see that it’s a fluorescent source, most people assume the light is incandescent and find it perfectly acceptable.

When selecting a decorative fixture—for example, a pendant light—find a bowl­shaped one that hides the bulbs; in the case of a drum-shaped fixture, look for one with a lensed (translucent) bottom. The CCFLs that are now on the market are available in shapes that are closer to traditional "A" lamps and flame-tipped bulbs that are eas­ily accepted as incandescent without any disguise.

Green—and UnseenПодпись: Layers of efficiency. All four basic layers of light combine in this open-plan living room/ kitchen. The Flotation pendant fixtures by Ingo Maurer® are fitted with dimmable cFLs, providing both decorative and ambient light. Reading lamps flanking the sofa provide task light, and the square aperture recessed lights add ambient light.Подпись: High on efficacy. ambient light for this kitchen comes from linear fluorescent lighting mounted on top of the kitchen cabinets. the lighting over the counters comes from warm- colored fluorescent puck lights, made by tresco international.Green—and Unseen
Another good way to create energy – efficient ambient light for a space is to in­stall the light source within an architectural

Подпись: 1 sources for Energy-Efficient Decorative Fixtures The Basic Source®: with LED and GU-24 options; Faux and real alabaster www.hansduusblacksmith.com pendants with fluorescent JH Lighting: lamp options; traditional and transitional alabaster www.thebasicsourcexom fixtures with hardwired cFL options; Birch & Willow: www.jhlighting.com Light fixtures made of natural Juno Lighting: materials with flu°rescent lamp Recessed, track, undercabinet, op^ons,; www.birchandwillow.com and decorative lighting; Boyd Lighting: www.junolightinggroup.com High-fashion fixtures with fluorescent Kalco®: lamp options; www.boydlighting.com Decorative lighting, much of which Dave Meeker Art: is available in hardwired fluorescent pendants, wall sconces, and portable versions using GU-24 technology; fixtures made of plastic straws, using www.kalco.com cFLs; www.davemeekerart.com Lightspenn: Elice®: sculptural fixtures with GU-24 lamp pendants with integrated fans; options; www.lightspann.com wwwelicacom Schmitt Design: Hens Duus Blacksmith: Bamboo pendants with GU-24 lamp traditional and transitional fixtures options; www.schmittdesign.com Green—and Unseen
Stealth lighting. Energy-efficient light sources can be unobtrusive: The Lightspann pendant fix­tures in this living room conceal dimmable cFLs. Art and tabletops are lit by Juno® track fixtures using Led MR16s, and Led strips by edge lighting mounted on top of the trusses provide ambient light.

detail that runs the perimeter of the room or on top of cabinetry that does not go all the way to the ceiling. Here, a dimmable linear fluorescent source can do an excel­lent job, as well as some of the newer LED strip lights now available. In these cases, the light is bounced off the ceiling, so you want to make sure that the actual light source is completely hidden from view and that the paint on the ceiling is a flat or matte finish. A gloss, semigloss, or eggshell finish reflects an image of the light source onto the ceiling and ruins the effect.

Green—and Unseen

Randall Whitehead is a San Francisco-based lighting designer.

Hydrograph Attenuation

Normally, rain falling on impermeable surfaces, such as a road surface, quickly enters the drainage system, arriving at the outfall to river or stream very soon after falling from the sky. It is estimated (Interpave, 2005) that in a fully forested, lowland catchment only 5% of rainfall will flow across the ground surface, the remainder will be delayed by the vegetation to such an extent that it will soak into the ground. For agricultural land with less vegetation 30% may flow across the surface. However for an urban environment with piped stormwater drainage systems 95% is carried to the surface water bodies. For this reason, in an urban environment the water arrives much more quickly than if it had taken a natural route (movement over vegetated surfaces and by percolation through the ground). Thus the flow pattern in the river or stream rises and falls much more quickly, and reaches higher maximum flow values and lower minimum flows, than it would in a non-built-up area (see Fig. 13.11, explained in more detail below). This “peaky” flow leads to increased frequency of flooding and to reduced irrigation flows in times of drought as there is less water soaked into the ground to provide dry weather seepage supplies to surface water bodies. For these reasons, if a rapidly filling, but slowly emptying store can be provided in the pavement then this undesirable effect will be reduced.

In the example illustrated in Fig. 13.11, three rainfall events occur within a two – day period. It is assumed that this particular pavement can hold 20 mm of rainfall (i. e. 201 per m2). The first storm (0-8 h), which peaks at 5mm/hour, almost causes the pavement to fill with water. The pavement has drained back to half full when

Time (hours)

Fig. 13.11 Sample rainfall, storage and outflow hydrograph

the next storm (18-22 h) arrives. This storm, with peak loading of 8mm/hour does cause the pavement to fill for a short time, whereas by the time the third storm arrives (40-44 h) the pavement has drained further and the 5 mm/h peak intensity storm is just handled by the system. Note how the maximum outflow (egress) is about 1.5 l/m2 when the pavement storage is full (21-23 h) very much less than the peak rainfall of 8 l/m2 which would otherwise arrive into the drainage system and be fed to a stream or river.

This benefit is well illustrated by the performance of car park drainage pavements six years after initial construction reported by Brattebo & Booth (2002). Two of their pavements had grassed unbound surfaces (sand and gravel) held in a plastic grid arrangement while another two used concrete block surfacing with about 40% and 10% open area. Figure 13.12 shows rainfall and run off for a grass-sand and a reference asphalt pavement. Even for the heavy rainfall event (121 mm in 72 h) only 3% of this ran-off the surface of the permeable pavement whereas run-off from the asphalt pavement closely follows rainfall. The other three permeable pavements gave even less run-off.

Kjellbase

Colored asphalt surfacing is an aesthetically pleasing option. Colored wearing courses can also be executed with fine-graded SMAs (Blazejowski and Styk, 2000) using special synthetic (colorless) binders. Besides their aesthetic appeal, colored surfacing can also be used to mark pedestrian crossings or other safety-related features.

When making colored SMA, it is important to remember to carefully clean the asphalt plant, mixer, and silos, removing “black” mix remains. Loose fibers, specifi­cally those containing no binder additives and bright aggregates, should be applied.

Kjellbase

The strong mineral skeleton applied in SMA has attracted some followers. After all, nothing stands in the way of using similar mixes in intermediate courses or base layers. Kjellbase makes such a mix. The concept, drawn on the “real SMA” idea, came into being in the beginning of 1997, when it was created by Kjell Sardal and S. Gouw. The first trial section was placed in 1997 (Sluer, 2001, 2002; Sluer et al., undated). In fact, Kjellbase is a 0/25 mm gap-graded mix. Now let us have a look at

a

Подпись:Подпись:image161a

’K "e3

CD

a

Figure 13.7, which depicts the grading curve of the Kjellbase mix. The gap grading between the 2 mm and 8 mm sieves is clearly visible.

Kjellbase consists of the following (Sluer et al., undated):

• 79% chippings of 8/11 mm, 11/16 mm, and 16/22 mm

• 15% crushed sand

• 6% filler

• 5% modified binder

A small content of fine aggregates (made of only about 5-6% filler and about 15-17% sand fraction) leads to a high void content. Relatively high binder contents close the mix structure, leaving up to 5% (v/v) air voids in the compacted pavement. Since the mix has a large quantity of binder, a mastic stabilizer (e. g., fibers) is required.

Some problems may occur in the laboratory when selecting the right method for the evaluation of mixes of that type. The inventors of the Kjellbase mix concept have estimated that the triaxial compression test may be the proper method.

To summarize the information on Kjellbase, the mineral skeleton of the mix (shown in Figure 2.4.b) is similar to the vision of Figure 2.5. The increased quantity of binder and lower contents of voids in the Kjellbase layer, compared with those of conventional base layers, improves fatigue durability. Thus the mineral skeleton gives that course a higher resistance to permanent deformation.

STEP 3 INSTALL THE WINDOW AND DOOR CASINGS

If you’ve installed prehung doors with the cas­ing (trim) attached, then some of your trimwork has already been done. If not, then the time to trim the windows and doors is now. Remember: Accuracy is critical for good finish work. All joints between pieces of wood should be tight, with no space showing.

Doing a good job depends on having the right tools, measuring carefully, and using a few finish carpentry tricks. Make sure you have a
good chopsaw that is fitted with a finish­cutting blade. A pneumatic nailer is a tremen­dous time-saver when installing trim, and it ensures that installed pieces won’t be marred by hammer blows (see the photo above). However, you can still do the job the old-fashioned way if you have to—with a hammer, finish nails, and a nail set. If you cut a joint that doesn’t fit well, cut it again and make it right. Don’t rely on putty or caulk to fill any but the smallest of gaps. Caulk shrinks as it dries, so relying on it to hide shoddy work isn’t a good solution.

Install windowsills

When trimming around a window, it’s fine to cover the trimmers and header with drywall, as described in Chapter 9. But don’t use drywall for the sill; it won’t hold up. Besides, a wood sill adds a bit of warmth and style to a house. It looks even nicer when you surround the win­dow with a wood jamb and casing.

WOOD AND MDF SILLS HAVE DIFFERENT ADVANTAGES. Standard, 3/4-in.-thick stock works fine as a sill, but I

Подпись:Подпись:STEP 3 INSTALL THE WINDOW AND DOOR CASINGSthink thicker stock—1 in. or even 1/4 in.—looks better. If you want to see natural wood and your budget allows it, trim with oak, pine, or spruce, and seal it with clear finish. If you prefer a painted finish or your budget is very tight, choose medium-density fiberboard (MDF).

Like wood, MDF can be shaped into many styles of trim. It cuts much like wood does and, once painted, looks like solid wood but with­out an evident grain pattern. Just remember: MDF must be kept away from moisture, which can cause it to swell and come apart, so don’t use MDF in the bathroom or utility room, or around the kitchen sink area.

CUT THE SILL TO SIZE. When a window is trimmed on the sides with drywall, each end of the sill should extend about 1/4 in. beyond the drywall corner on the side of the window open­ing. When a window is trimmed with wood casing, take into account the width of the
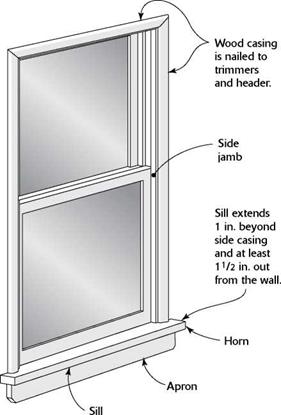
window opening, plus the width of the wood casing on both sides, plus 2 in., then cut the sill to that length. That way, the side casings rest on the sill and the sill extends 1 in. beyond the casing on each side. A sill should be wide enough to cover the rough sill and extend at least 1/4 in. from the wall. You can vary the projec­tion distance to suit your needs. The sill I have by my writing desk extends 3/4 in. beyond the wall; it’s wide enough to hold a book or a vase. NOTCH THE SILL. Once the sill is cut to length, cut a notch in from each corner to leave what’s known as a horn for the casing to rest on (see the illustration below). For the depth of the notch, measure in from the edge of the drywall to the window frame and mark your cut lines on the sill. Or you can hold the sill at the window opening and mark the cut lines with a combination square. That will give you an accurate cut line, even if the jamb sides are not square.

Whether you make the cut with a handsaw or a jigsaw, clamp the workpiece securely to a sawhorse or workbench so that it will be easier to make exact cuts. Remember that this is finish work. Take your time and do it accurately. The sill should fit snugly against the window frame. If there are small gaps between the sill and the dry – wall on the sides, fill them with paintable caulk.

Don’t leave the front edges and corners of the sill sharp. Instead, use a block plane to make a bevel or chamfer on the edges, or round them over with a bit with sandpaper. This will improve the look and feel of the sill. It also makes the trim less hazardous to small children. Secure the finish sill to the rough sill with con­struction adhesive and drive two 6d or 8d nails at each end.

Once the sill is in place, cover the trimmers and header with /4-in.-thick stock, as shown in the illustration at left. The side (and head) jambs are cut flush with the plane of the wall, set on the wood sill, and nailed in place. The head jamb fits snugly between the two side jambs. Make sure all your cuts are square and fit tightly together. Nail them in place with 6d finish nails.

The Grand Canal

The Grand Canal of the Sui, the Tang, and the Song (6th to 11th century)

In 581 AD, Yang Jian founded the Sui Dynasty at Chang’an. He reunifies China in 589, and in 604 the country sees its new master enthroned as emperor. An imperial necessi­ty appears immediately: to establish a safe communication route between the north of China where the reconstructed capital Chang’an is located, and the Yangtze basin to the south. This need reflects a fundamental change in the relations between north and south

The Grand Canal

Figure 8.12 The Grand Canal of the Sui, the Tang and the Song.

1. Shanyang traverse (renovated in 587)

2. Tongji canal (605)

3. Yongji canal (608)

4. Jiangnan canal (610)

5. Northern detour of Hongze lake (about 735)

since the Han period. The north was inflicted with a series of wars and barbarian inva­sions, whereas the lower basin of the Yangtze had begun to develop, propelled by the rapid growth of rice cultivation. The cities of the lower Yangtze, where Chinese intel­lectuals took refuge, had become the cultural centers of the land. The communication route therefore had high political and economic stakes: cementing the unity of the coun­try and, at the same time, generating tax revenues.

In 587, even before the fall of Nanjing, Yang had restored the canal that connected the Huai and the Yangtze. The ancient Han canal had filled this role in olden times, and its course had already been shortened in 350. The north branch of the old 4th or 5th cen­tury Hong canal had linked the Huai to the capital region. But this canal, subsequently called the Bian canal (or Pien), had become clogged with sand. It was decided to con­serve the approximate original layout to the west of Kaifeng, but then to depart from the Bian River in cutting more to the south to end up on the Huai to the west of the present – day Hongze lake.[428] Since the emperor wanted to proceed quickly, he acted radically. He mobilized five million people, men and women alike, to dig 1,100 km of this new sixty-meter wide canal in just five months. The new canal is called the Tongji.

The next step involved renovating the communication route toward the north for essentially strategic reasons. Indeed, the threats of barbarian invasions were from the northeast, and there were also plans for a military incursion into Korea. The Yongji canal, some 1,000 km long, is finished in 608. This canal is at first a derivation of water from the Qin (a river that flows into the Yellow River a little downstream of Luoyang), but later ends up connecting to another small river oriented toward the north, and called the Wei (this is not the large Wei that is near Chang’an). This river then joins the Jiang (that occupies the course of the Yellow River prior to 602 BC) near Tianjin. Two years later in 610 the new Jiangnan canal links the Yangtze to the port of Hangzhou to the south. These works are completed with an access canal to the newly reconstructed city of Luoyang (which becomes a second capital) as well as by a complete renovation of the old canal that links Chang’an to a bend of the Yellow River. The ensemble constitutes the first Grand Canal in the form of a gigantic Y with the capital at its base. For four cen­turies this will be the spinal column of the empire.

But these massive projects exhausted the population, and there are floods in the Shandong. Moreover Emperor Yang suffers several military reverses at the hands of the barbarians. In 618 he is eliminated and immediately replaced by the Tang Dynasty under which China enjoys a sort of golden age for two centuries. Chang’an, the capital and terminus of the Silk Road, becomes a cosmopolitan city in this period. Around 700 the last Sassanide Persian sovereign comes to Chang’an to finish his life in exile. Canton is inhabited by numerous Arab merchants.

The Grand Canal is of course maintained and further developed. A derivation to the north of the present Hongze lake in 735 allows southbound boats to bypass the rapids of the Huai. Management of the canals is facilitated by the construction of gates near their outlets into the large rivers; dikes and rockfill protect the canals at vulnerable locations. In this period some 165,000 tons of grain are carried annually on the Grand Canal; it is under the Tang that the blossoming of rice cultivation in the Yangtze basin is the most pronounced. Immense granaries are built at the nodal points of the navigable waterway system.

The gorges of Sanmen remain troublesome for navigation as far as Chang’an. The rapids are dangerous and the channel contains dangerous rocks. From 733 a roadway was used to transport merchandise over a land detour of several kilometers. But in 741 a new 300-m long canal was dug through solid rock to cut across the river bend having the most dangerous rapids. In the south, the magic canal is improved in 825, as we have seen earlier, and then again in 868.

Between 960 and 1127 the Song set up their capital at Kaifeng (called Bianling at this period). Since ancient times Kaifeng, along with the old Hong canal, had been an important communication node, not far from the junction of the two branches of the Y of the Grand Canal. The Bian, tributary of the Si, flows naturally into the Tongji canal whereas the Cai, flowing toward the south, connects to the Tongji through a canal called the Huimin. In 1071 major work is done to redo the connection between the Yellow River and the Tongji canal.[429] The entire Song period is marked by a very important expansion of navigation on the large rivers and along the coasts.

The Pavement as a Water Reservoir

A book on Water in Road Structures would not be complete without a brief descrip­tion on the use of the pavement as a water store. Pervious pavements (see Chapter 5, Section 5.7) can be taken one step further and not only used to convey water away from the surface, but can also be used to temporarily store the water in the pavement. There are two principal reasons for doing this

• hydrograph attenuation and

• water quality improvement.

Here, the use of pervious pavements may only be briefly discussed, but inter­ested readers may find out much more in the book devoted to the topic by Ferguson (2005). Typically they comprise highly permeable surfaces (e. g. of concrete blocks or stone cobbles) with a coarse, open-graded layer underneath that will act as a water storage and transport layer. It may also retain water that will, ultimately, soak away into the subgrade.

Mechanical

Water Supply and Waste

Polyvinyl chloride (PVC) is the standard for residential supply and waste piping. PVC plas­tic piping has been shown to outgas diethyl phthalate, trimethylhexane, aliphatic hydro­carbons, and other harmful gases. It should not be used for water supply piping in a healthy home. Because of the pollution resulting from both the manufacture and the disposal of PVC piping, we recommend seeking alternatives for waste lines as well.

Water Supply Pipe

Although we can choose the type of supply pipe we want in a new home, we have no con­trol over how water is delivered to our prop­ertyline. Well water is often delivered through PVC piping. Municipal water supply can be piped through a variety of unsavory piping, including PVC and asbestos cement. We rec­ommend whole house water purification at the point where water enters the house. In Division n we outlined several whole-house water purification strategies. From the point at which water is purified, it makes sense to distribute it in piping that will not have an adverse affect on water quality. Your specifi­cations could include one of the following ac­ceptable alternatives for supply piping:

• Type L or Type M copper: Solder shall be lead-free silver solder. The system shall be flushed prior to occupancy to eliminate any flux from the soldering operation.

• Wirsbo Aquapex: A crosslinked polyethy­lene that shall be installed by a certified installer.

Waste Drain System

Waste drain systems do not have the same wa­ter quality concerns as supply piping does and are almost always plastic because it is most economical. We prefer to specify ABS pip­ing because of the problems associated with the production and burning of PVC piping. Pipe assembly glues are highly volatile and

toxic and their use onsite should be carefully managed to reduce pollution. You may wish to specify the following:

• Assemble pipes with the longest pieces possible to minimize the amount of glue or solder required.

• When possible, glue waste pipe assembly outside the building envelope.

• Wipe up excessive glues and protect all surfaces from glue drips and spills.

• Whenever glue is being used inside the structure, provide adequate ventilation until all odors are dissipated.

Floor Drains

Appliances containing water, such as water heaters and washing machines, can malfunc­tion and leak. You can avoid the subsequent water damage and mold if you plan for this possibility If floor drains or drain pans are strategically located, the water from acciden­tal spills can be diverted to the sewer line or to the outdoors. Drains that lead to the sewer line should be installed with a trap to prevent un­wanted sewer gases from entering the home. It is important that the traps be “primed,” or kept filled with water, which creates a physical barrier against the entry of sewer gases. Self­priming drains can be installed so that the trap will remain filled with water without ad­ditional maintenance.

Plumbing Penetrations

Where plumbing penetrates walls and ceil­ings, the air space created around the open­ing must be completely sealed to prevent unwanted air infiltration. Consider specifying the following:

Wherever plumbing penetrates the wall, aquarium-grade 100 percent silicone caulk­ing shall be applied to create an airtight seal.

Backflow Protection

In some communities, sewage systems peri­odically back up and flow into homes, leading to devastating contamination. Backflow pre­vention devices installed on the home waste line will usually prevent this. The local plan­ning department may be able to help you de­termine if backflow prevention devices are advisable. In many communities, claims for sewage damage will not be paid unless such devices were in place prior to the incident.

Optimal Risk-Based Design of Hydrosystem Infrastructures

Reliability analysis methods can be applied to design hydrosystem infrastruc­tures with or without considering risk costs. Risk costs are those cost items incurred owing to the unexpected failure of structures, and they can be broadly classified into tangible and intangible costs. Tangible costs are those measurable in terms of monetary unit, which include damage to property and structures, loss of business, cost of repair, etc. On the other hand, intangible costs are not measurable by monetary unit, such as psychological trauma, loss of lives, social unrest, damage to the environment, and others. Without considering risk costs, reliability has been explicitly accounted for in the design of storm sewer sys­tems (Yen and Ang, 1971; Yen et al., 1976; Yen and Jun, 1984), culverts (Yen et al., 1980; Tung and Mays, 1980), and levees (Tung and Mays, 1981a; Lee and Mays, 1986). Cheng et al. (1986) demonstrated how to apply the AFOSM method to calculate the risk reduction associated with freeboard in dam design. Melching et al. (1987) suggested different flood peak-risk curves for forecasting and for design. However, it is the risk-based least cost design of hydrosystem infrastructure that promises to be potentially the most significant application of reliability analysis.

The risk-based design procedure integrates the procedures of uncertainty and reliability analyses in the design practice. The procedure considers the tradeoff among various factors such as failure probability, economics, and other per­formance measures in hydraulic structure design. Plate and Duckstein (1987,

1988) list a number of performance measures, called the figures of merit, in the risk-based design of hydraulic structures and water resource systems, which are further discussed by Plate (1992). When risk-based design is embedded into an optimization framework, the combined procedure is called the optimal risk-based design.