DRINKING FOUNTAINS

Drinking fountains installed for handicap use shall be installed so that the spout is no more than 36 inches above the finished floor. The spout must be located in the front of the fountain. It is required that the flow of water from the spout shall rise at least 4 inches. Controls for operating the fountain may be mounted on front of the fountain or to the side, so long as the control is side-mounted near the front of the fountain. All handicap fountains require a minimum clear space of 30 inches in front of the fixture. The measurement is made from the front of the unit by 48 inches wide. If a fountain protrudes from a wall, the clear space may be reduced from a width of 48 inches to a width of 30 inches. Handicap fixtures require more attention than standard fixtures. Keeping all the clearances straight in your head can be confusing. Refer to your local codebook whenever you need clarification on a measurement.

hen the door to pipe, tubing, and fittings is opened, there is a lot to learn. Some of the information is used on a frequent basis, and some of it turns up only in remote situations. We are going to open that door in this chapter. You are going to learn about various types of pipe and tubing. I expect that you will find some of the data fascinating and some of it boring. Use what you want. I will present the details in the most user-friendly manner that I can. Tables will be used to make the reference material fast and easy to see and understand. There’s much to learn, so let’s get started.

Warranting Conditions

The potential traffic safety benefits of lighting are due to an increase in driver comfort and confidence resulting from enhanced vision. This reduces driving stress and tension, increases roadway capacity, and reduces the potential for traffic accidents. The eco­nomic return of roadway lighting is greatest in urban and suburban areas with high traffic volumes. Rural locations can also benefit from full, or partial, lighting of decision points such as at isolated intersections, on – or off-ramps, and ramp terminals [3]. For some lighting applications there are warranting criteria that can be used to help determine when lighting should be installed.

Warranting conditions are based on minimum conditions which signify that providing lighting would be beneficial. Satisfying the warrants does not obligate an agency to provide lighting, since warrants are not the only criteria that should be considered. Local conditions such as frequent fog, ice, snow, roadway geometry, ambient lighting, sight distance, and signing could justify modifying the warrants either positively or negatively [3]. Judgments on lighting need should include an assessment of the antici­pated benefits, traffic volume, speed, road use during the night, night accident rate, road geometrics, and general night visibility. Some agencies justify lighting based on an economic analysis. This requires placing monetary value on the expected reductions in personal injuries, fatalities, and property damage accidents, in addition to other societal benefits estimated to be realized from illumination.

Warranting conditions have been established for freeways. However, due to the wide diversity of conditions that can exist, there are no established warrants to assist the designer in determining when lighting should be provided for urban streets, high­ways, walkways, and bikeways. The justification for urban lighting is left to engineer­ing judgment, coupled with perceived user needs and user benefits.

Types of Water Purification Systems

We recommend a whole-house water puri­fication system as an essential feature of the healthy home for most locations. Choosing the proper system will depend on several fac­tors including location, budget, water use, and taste preference. No single filtration medium can remove all contaminants from all water.

Because water quality and individual needs vary, no single combination of systems will provide a universal solution.

Choosing a system can be a complex and confusing process. The average homeowner typically does not know the right questions to ask in order to get accurate information. Water filtration systems have become popular internet marketing products and many people selling them are not much more knowledge­able than potential customers about the range of needs and possibilities. We recommend that you consult with an individual who has the following credentials:

• a broad-based, longstanding experience with water quality in your area

• a wide variety of equipment from several manufacturers

• the ability to provide you with several op­tions at various prices

• the ability to explain the pros and cons of each system

Water Conditioning

Water conditioners are used to improve the aesthetic quality of water, including color, cor­rosiveness, clarity, and hardness. They use a process of ion exchange to eliminate from the water undesirable substances (such as calcium and magnesium) that may precipitate scale on fixtures, laundry machines, hot water heaters, dishwashers, shower stalls, sinks, and skin. Water conditioners can also be effective in re­moving sediment, chlorine, and certain met­als, such as low levels of manganese and iron (both of which can cause stains) as well as odor from hydrogen sulfide. Flow rate is affected by both the size and the design of the water soft­ener and must be appropriately specified on an individual basis. Conditioned water is of­ten referred to as “soft” water.

In the ion exchange process, calcium or magnesium ions are exchanged with either sodium or potassium. Sodium chloride is the more common regenerate for water condi­tioning, but many water treatment companies have switched to potassium chloride, which is widely believed to be a healthier and more ecologically sound choice. Potassium chlo­ride is essentially a refined potash, and when returned to the ground water it can serve as a fertilizer for many plants. The small amount ingested daily from water conditioned with potassium is about equivalent to what you would gain by eating half a banana and can be a positive addition to your diet.

For those with a medical condition affect­ing electrolyte balance, blood pressure, or kid­ney function, we suggestyou consult a physician before you consider purchasing a water-condi­tioning system with salt-based regenerates. Po­tassium chloride may also contain traces of nat­urally occurring gross beta radiation.

Because of chloride discharge into city sys­tems and the subsequent impact of chlorides on rivers and agriculture, some municipali­ties are moving to ban new salt-regenerating water conditioners and give rebates to custom­ers who switch to salt-free systems. Municipal water and sewer systems are not configured to remove chlorides. This issue is of particular concern in dense metropolitan areas, but since the ion exchange process is also commonly used to remove water contaminants in private domestic wells, chlorides also are discharged into septic systems and ultimately into shallow aquifers.

One of the most promising developments in water treatment is the advent of chemical-free, nonelectrical, nonbackwashing, salt-free sys­tems to treat hardness as an alternative to soften­ing. In one system, which uses template-assisted crystallization, hardness minerals are attracted to a media nucleation site, which then sloughs off seed crystals that travel through the plumb­ing system in a molecular configuration not prone to accumulation as scale.

The single best source for verifying a man­ufacturers claims about any water treatment product is National Sanitation Foundation In­ternational (NSF), which is the industry’s gold standard for the testing and certification of wa­ter treatment systems and components. Before buying water treatment equipment, we recom­mend that you visit nsf. org and look up indi­vidual products and manufacturers to verify certification for efficiency and contaminant re­duction.

Type of system

How it works

What is eliminated

What is not eliminated

Comments

Carbon filters:

There are countless varieties of carbon filters. The two most commonly used filters in water purification are described here. Granulated activated carbon (GAC) has an amazingly large surface area (up to 1,000 square meters per gram) for adsorptive activity. Carbon filters are not bacteriostatic and will become contaminated with use. Inexpensive sediment prefilters will extend life. Inexpensive chlorine tests can indicate when to change the filter if it is used with chlorinated water. These filters can themselves become a source of contamination if not changed frequently enough. Locate the tank away from inhabited areas when used to filter radon. Although carbon filters are less expensive than aeration systems, they can collect radio­activity and may require special methods of hazardous waste disposal. Aeration is preferable to carbon filtration for radon removal.

GAC (granulated activated carbon)

Carbon is steam-treated so that the surface becomes pitted, thereby increasing surface area and adsorption capacity.

Trihalomethanes, dis­solved gases including chlorines, most pesti­cides, many chemical pollutants, radon gas

Heavy metals, sedi­ment, fluoride, viruses and bacteria, dissolved solids, and particulates, including radioactive particulate matter

Requires that water have sufficient contact time with the filter. Because GAC can breed bacteria, it is most effective when used with treated mu­nicipal water.

Carbon block

Powdered carbon is glued together to form a matrix structure that adsorbs contaminants.

Trihalomethanes, dis­solved gases including chlorine, most pesti­cides, many chemical pollutants, radon gas, particulate matter; can be used for heavy met­als under some limited conditions

Fluoride, nitrates, viruses, and bacteria

Considered more effec­tive than GAC if water conditions are within certain parameters. Will remove heavy metals only for a limited time. Periodic retesting is essential. Not recom­mended for most heavy metal removal. Glue content is a concern. Whole-house or point – source available.

Reverse Osmosis (RO)

RO involves forcing water through a semipermeable membrane with extremely fine pores from a more concentrated solu­tion (ultimately becoming the reject water) to a more dilute solution (the product water). The water’s direction of movement is the opposite of what would be experienced during osmosis and is achieved by applying water pressure to the solution on the more concentrated (contaminated) side of the membrane. RO will remove a variety of ions and metals as well as some bacterial contaminants (cysts), but not coliform bacteria. RO systems will remove some arsenic (arsenic V but not the more toxic arsenic III). Reverse osmosis is well documented in the literature and in post-treatment testing proves to be effective in removing uranium, but N5F does not certify for uranium reduction. RO membranes eject the bulk of almost any dissolved and suspended contaminant including ionic, organic, and silica compounds.

One criticism of reverse osmosis-filtered water is that it is stripped of essential minerals. Although this is true, it is a tradeoff for overall water quality. Most consumers do not depend on water for their nutritional needs but elect to take vitamin supplements or remineralize their RO water. Savvy water treatment companies use a crushed limestone (calcite) post-RO filter to impart a pleasant taste to the water. Parents sometimes express concern that RO removes fluoride added to municipal water for dental health purposes. This is true, but water fluoridation in general is a controversial issue and today most children under professional dental care receive whole-mouth fluoride treatments.

Type of system

How it works

What is eliminated

What is not eliminated

Comments

The most valid criticism of RO is that anywhere from 3.5 to 5 gallons of water are rejected for every gallon of purified water produced. Many inexpensive, noncertified RO systems have much higher rejection rates, are extremely wasteful, and still do not deliver verifiable contaminant reduction, the primary reason for using reverse osmosis. While reject water is routed to the drain, it is not lost but reenters the hydrologic cycle. In many cases, the RO reject water may be collected and redirected for irrigation purposes. Seek out a five-stage RO system. Plastic parts can be problem for individuals with petrochemical sensitivities.

When selecting a reverse osmosis system, look for certification by National Sanitation Foundation (NSF) International (www. nsf. org) to ensure materials quality, system performance, and contaminant reduction. Be wary of self-proclaimed lists of contaminant reduction and verify the certification for the specific unit you are considering on the NSF website under Drinking Water Treatment Units.

СТА (cellulose triacetate) RO membrane

Water is forced under pressure through a fine membrane that screens out dissolved solids.

Dissolved solids (60 to 90%), heavy metals, asbestos, radioactive particles, some bacteria; NSF certified under­counter RO removes 99.99% of cysts

Dissolved gases, some biological contaminants, sediment

Most suitable for pre­treated municipal water in which biological con­taminants are already low. Filter requires chlo­rinated water supply to prevent bacteriological decay.

TFC (thin film composite) well membrane

Same as above.

Dissolved solids (60 to 98%), heavy metals, asbestos, radioactive particles, some bacteria, limited amount of bio­logical contaminants

Dissolved gases, sedi­ment

Cannot be used with chlorinated water supply unless prefiltered with carbon.

Sterilization

Ultraviolet (UV) purification

UV radiation penetrates membrane of microbe and inactivates it.

Biological contaminants

Dissolved gases, sedi­ment, radiologicals (note that protozoan cysts such as Giardia and Cryptosporidium may not be completely eliminated if there is any shadowing effect caused by hardness or sediment)

Does not provide residual disinfection. Sediment, hardness, minerals, iron, manga­nese, or turbidity will make system ineffective because a shadowing effect shields bacteria from UV.

Oxidation with ozone, hydrogen peroxide, chlo­rine, or injected air

Oxidation can change the valence state of water contaminants so that they can be physically filtered.

Clarifies, deodorizes, and precipitates metals; oxidizes and eliminates bacteria, viruses and organic matter

VOCs, pesticides, chlo­rine; does not remove anything from water

Use of chlorine as oxidiz­ing agent not recom­mended from ecological and health standpoints. Post-system carbon fil­tration is recommended.

Type of system

How it works

What is eliminated

What is not eliminated

Comments

Others

KDF (kinetic degradation fluxation)

Zinc/copper alloy causes chemical transformation of contaminants as they pass through KDF, which disrupts metabolic func­tion of bacteria.

Controls bacterial growth; removes some heavy metals, chlorine, and biological contami­nants

Trihalomethanes, bacteria, radiologicals

Very effective when used as prefilter, followed by carbon filter and then reverse osmosis. Does not work well in all pH conditions; requires 150 ppm of total dissolved solids (TDS) to be effective. Is bacteriostatic but not a bactericide. Suitable for water with very low bacteriological count. Works best on hot water. Testing after installation is advised.

Shower-head

filters

Small filter/shower head combination that threads into existing plumbing.

Chlorine. Some filters may have other proper­ties. Verify contaminant removal potential at www. nsf. org.

Radiologicals, pesticides, gasoline, bacteria. Do not remove trihalo­methanes, pesticides, or VOCs because of lack of contact time. Not considered effective treatment for most bio­logical contaminants or chemical contaminants of health concern.

Very inexpensive and often very limited in scope. Do not require plumber to install. See May 2007 Consumer Reports for reviews of shower head, pitcher, carafe, and other inline filters.

Distillation

Water is turned to vapor, condensed, and then collected.

Dissolved solids, mi­croorganisms, nitrates, heavy metals, sediment, radioactive particulate matter

VOCs, dissolved gases, including chlorine

Effective when used with carbon postfilter. High maintenance, low production, and high energy consumption. Flat taste. Metal-bodied distillers may add alu­minum or other heavy metals to water.

Sediment filters

Can be a filter medium in cartridge or tank ap­plications. Can be a set­tling tank where water is siphoned off the top after particulates sink.

Particulate matter, sand, dirt

Remove only particulate matter; strictly a physical process

Most often used as pre­filter for other systems. Backflushing models use additional water for self-cleaning.

Type of system

How it works

What is eliminated

What is not eliminated

Comments

Aeration

Water is run over a series of plates, where it is de­pressurized and blown with a fan so that gases and odors can escape. It is then repressurized.

Radon, odors, dissolved gases

Bacteria, solids, heavy metals, and dissolved radiologicals

Aeration is the EPA – preferred method for radon removal.

Centralized Water Purification

Ultrafiltration

Water pressure pushes water molecules toward the hollow center of fiber membrane tubes. Large particles and microorganisms are trapped within the fiber and then flushed out during automatic back­washing.

Removal of chlorine by activated carbon and physical blocking of bacteria, parasites, and viruses greater than 0.02 microns

Heavy metals, radioac­tive particles, arsenic, and nitrates

Ultrafiltration is touted as eliminating the need for bottled water, but it is far less effective for contaminant removal than RO. Ultrafiltration systems do not soften water and do require water backwashing.

Authors note: This table has been created by Steven Wiman of Good Water Company for this edition of Prescriptions for a Healthy House.

Residential Equipment

Much has been written about the energy effi­ciency of appliances. Since appliances account for as much as 30 percent of household energy usage, choosing wisely can greatly reduce en­ergy consumption. Because many sources of information are available on appliance energy values, we have limited discussion in this book to health issues related to appliance selection. (See the end of this chapter for books about re­ducing appliance energy consumption.)

Reflective Cracking

Reflective cracking is a well-known weak point of semirigid pavements. It advances upward from a rigid base through the asphalt layers. Various techniques for coun­tering reflective cracking (e. g., Stress Absorbing Membrane Interlayer (SAMI) and Stress Absorbing Membranes (SAM) membranes, geogrids) have been used. But their effect usually comes down to more or less effectively slowing the growth of cracking, not preventing it from occurring. Asphalt courses with increased crack resistance are characterized by considerable shear and tensile strength. These properties may be achieved through the appropriate selection of the gradation of an aggregate mix, the type of binder and possibly the mastic strengthening additives.

12.2.3 Test Methods for Crack Resistance

Different methods for testing crack resistance have been used, and so far there has not been one commonly regarded as the dominant standard. There are some popular methods such as the thermal stress restrained specimen testing (TSRST; discussed later), local procedures used by specific research centers (e. g., Judycki, 1990), and methods under standardization, such as the semicircular bending test (Krans et al., 1996; Molenaar and Molenaar, 2000). Test methods for asphalt binders (e. g., the BBR method) have also opened up some new possibilities. In addition, the oldest engineering method—namely, observation of test road sections—is still in use.

PROnP

Tape dispensers hold paper or mesh tape and clip to your belt, so your tape is always ready to roll. Bigger dispensers hold a 500-ft. roll.

image7371111

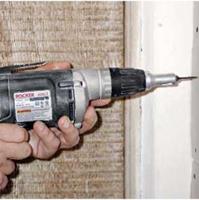
image738Подпись: Adjust your screw gun so that it sets screws just below the surface of the drywall.

Finally, tape up sheet plastic to isolate the rooms you’re sanding, especially if you’re living in the house. Painter’s tape will do the least dam­age to trim finishes and paint.

MATERIALS

This chapter began with sizes and types of dry – wall. Now let’s look at screws, joint tape, corner beads, and joint compound before planning and estimating supplies.

Drywall screws have all but replaced nails.

Here are the three principal types:

► Type-W screws have a coarse thread that grips wood well. They should be long enough to penetrate framing at least 58 in. In double­layer installations (two h-in. panels), use type-W screws at least 1 /4 in. long.

► Type-S screws have fine threads and are designed to attach drywall panels to light-steel framing and steel-resilient channels. At least

% in. of the screw should pass through metal studs, so 1-in. type-S screws are commonly used for single-ply li-in. or 58-in. drywall installations. If you’re attaching drywall to heavy-gauge (structural) steel, use self-tapping screws.

► Type-G screws are sometimes specified to attach the second panel of a fire-rated,
double-layer installation. That is, the first panel is the substrate to which the second panel is screwed and glued with construction adhesive. Ideally, screws should also penetrate framing, so ask building inspectors about installation requirements if your local code specifies type-G screws.

Nails are still used to attach corner bead and to tack panels in place. Ring-shank drywall nails hold the best in wood; don’t bother with other nail types. Nails should sink M in. into the wood.

Wet -SANDING

Using a large sponge to wet-sand drywall joints will definitely reduce dust, but wet-sanding isn’t feasible for a project of any size because you must rinse the sponge and change the water continually. Also wet-sanding soaks the paper facing, sometimes dislodges the tape, and tends to round joint compound edges rather than taper them. That said, if you’re drywalling a small room and don’t like moving the furniture out of the room, wet-sanding is a cleaner way to go.

Подпись:image739Подпись: METAL CORNER BEAD FLEXIBLE VINYL BULLNOSE

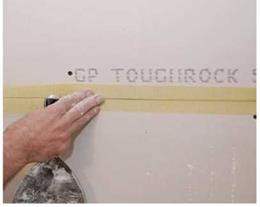
Joint tape is used to reinforce drywall seams and is available as 2-in.-wide paper tape and 1/2-in.- or 2-in.-wide fiberglass mesh tape. Self­adhesive mesh tape is popular because it’s quicker. You can apply it directly to drywall seams and then cover it with joint compound in one pass. Whereas, with paper tape, you must first apply a layer of joint compound, press the paper tape into it, and then apply a coat of compound over that. If there’s not enough compound under paper tape, it may bubble or pull loose.

Still, many professionals swear by paper tape because it’s cheaper than fiberglass mesh, it’s stronger than mesh and less likely to be sliced by a taping knife, it won’t stretch, and it is lightly creased up the middle, making it easier to install and align in an inside corner. Consequently, pros use mesh tape only with setting-type compounds, which cure harder and stronger than drying-type compounds, described on p. 358.

However, self-adhesive mesh is perfect for drywall repair. If you press the mesh over a crack or small hole, you may be able to hide the prob­lem with a single layer of joint compound.

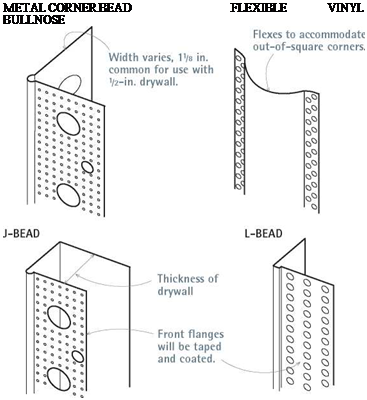
Comerbeads and trim beads finish off and pro­tect drywall edges. They’re available in metal, vinyl, PVC plastic, and paper-covered variations. Most attach with nails or screws.

Cornerbeads are used on all outside corners to provide a clean finish and protect otherwise vul­nerable drywall corners from knocks and bumps. (As noted earlier, inside corners are formed with just tape and compound.) Cornerbeads come in a number of different radii; larger bullnose vari­eties give you a dramatic curve. Whatever type you choose, though, install it in one piece.

J-beads keep exposed ends of drywall from abrading. These beads are typically used where panels abut tile or brick walls, shower stalls, or openings that won’t be finished off with trim—in other words, where the edge of the drywall is the

I Corner and Edge Treatments

Drywall Fasteners

ATTACHING TO™

FASTENER USED

DRYWALL THICKNESS (in.)

MINIMUM FASTENER LENGTH (in.)

Wood studs, ceiling joists, rafters

Type-W drywall screws (coarse thread)

38, У2, 5/

1, 1‘/8, 1‘/4

(penetrate framing У in.)

Wood studs only

Ring-shank drywall nails

38, ‘/2, У

1‘/8, 1/4, 138

(penetrate framing 5/8 in.)

Light-gauge metal framing

Type-S drywall screws (fine thread)

38, ‘/2, 5/

3/4, 7/8, 1

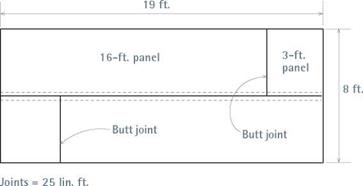
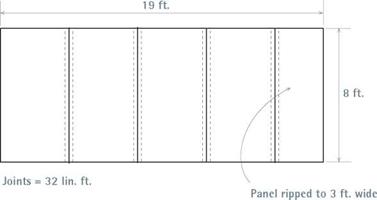
Подпись: Store premixed joint compound at room temperature (60°F to 70°F) so it's ready to apply. At lower temperatures, it doesn't spread as easily. Never allow it to freeze; throw it out if it does because it won't bond well after freezing. Added tip: Store self-adhering mesh tape in a plastic bag so its adhesive won't dry out. 1111 Подпись: I Minimizing Drywall Jointsimage741"image742Подпись: Hanging wall panels horizontally often reduces the number and length of the joints. With studs a standard 16 in. o.c., you could reduce the total lineal feet of taping by running panels horizontally instead of vertically. For the room dimensions shown, however, the upper layout also creates two butt joints, which can be tedious to feather out.

finished edge. L-beads are similar; they’re used where panels abut windows, suspended ceilings, paneling and so on. In general, L-beads are easier to install on panels already in place. J – and L-beads are sized to drywall panel thickness; some types require joint compound, some don’t.

Flexible arch beads often come in rolls that are presnipped, so as you unroll them, they assume the shape of the arch you’re nailing or stapling them to. Apply joint compound and finish them as you would any drywall seam.

Joint compounds can be broadly divided into drying types and setting types. They differ in ease of use, setting (hardening) time, and strength.

Drying-type joint compounds are vinyl based and dry as water evaporates from them. They usually come premixed and are easy to apply and sand. Typically, you can apply a second coat 24 hours after the first, if you maintain a room temperature of 65°F. There’s little waste with
drying-type compound. And, once opened, it will keep for a month if you seal the bucket tightly.

Setting-type joint compounds, which contain plaster of paris, are mixed from powders. They set quickly and so allow you to apply subsequent coats before the compound is completely dry. In general, they bond better, shrink less, and dry harder than drying types. They harden via a chemical reaction, hence their nickname, "hot mud.” Depending on additives, they’ll set in 30 minutes to 6 hours. However, setting-type compound sets up so quickly and so hard that it can be a monster to sand. Once it’s mixed, you’ve got to use it up. It won’t store.

So, unless you’re a drywalling whiz, use a pre­mixed, all-purpose, drying-type joint compound. A 5-gal. bucket will cover 400 sq. ft., roughly, a 12-ft. by 12-ft. room. with 8-ft. ceilings. The com­pound is ready to use right out of the bucket. It’s reasonably strong, and each application should dry in a day.

One further distinction: Drying-type and set­ting-type joint compounds are further formulated as either taping compounds—used for the first coat, in which you embed the tape—or topping compounds, used for the second and third coats because it feathers out (thins) better and dries faster. Again, all-purpose compound can be used for all three coats, but you might want to experi­ment with the two types once you’ve had some practice. Some pros use setting-type joint com­pound for the first and second coats and drying – type for the third (and last) coat.

PLANNING THE JOB

Before estimating materials, walk each room and imagine how best to orient and install panels. These five rules, known to drywall pros, will save you a lot of pain.

Rule 1: Use the longest panels possible. This minimizes the number of joints. A 4-ft. by 14-ft. or 4-ft. by 16-ft. panel is heavier and less wieldy than a 4-ft. by 8-ft. panel. But hanging larger panels is relatively fast, compared to the time it takes to tape, coat, and sand the joints of the smaller panels.

Rule 2: Think spatially. Running panels hori – zontally—perpendicular to studs and ceiling joists—can reduce the number of joints and pro­mote stronger attachments. For example, two 4-ft. by 12-ft. wall panels run horizontally will reach an 8-ft. ceiling and create only one hori­zontal seam to be filled. Two 54-in.-wide (4/2-ft.) panels run horizontally will reach a 9-ft. ceiling. However, if ceilings are higher than 9 ft., you may be able reduce the number of joints by installing wall panels vertically (parallel to studs).

image743

Rule 3: Minimize butt joints. Long edges of pan­els are beveled to receive tape joints, but the short edges (butt edges) are not. Consequently, butt joints are difficult to feather out, and they are likely to crack. So try to minimize the number of butt edges. Where you can’t avoid them, position them away from the center of a wall or ceiling. Last, always stagger (offset) butt joints; never align them. Otherwise, you may need to feather joint compound out 3 ft. wide to get a barely acceptable joint.

Rule 4: Install drywall that’s thick enough.

Otherwise spans may sag between ceiling joists and bow between studs. For example, if you’re running panels parallel to ceiling joists spaced 24 in. on center, 58-in. drywall is much stronger and less likely to sag than ’/2-in. panels. For this, be sure to comply with local codes.

Rule 5: Don’t scrimp on panels. Expect a cer­tain amount of waste, especially if you’re installing around stairs or sloping ceilings. It’s a mistake to try to piece together remnants, because that creates a lot of butt joints and looks awful. Likewise, scrimping on screws or joint compound results in weak joints and screw pops.

Installing gable-end studs

Gable-end studs come built into gable trusses, but they have to be cut and fitted on the job site when building a conventional roof so that exterior wall coverings can be nailed on. Often, a 14-in.-wide vent is placed in the gable ends. To accommodate this vent (or other opening), measure over half the distance of the rough opening from the center of the ridge board and mark this distance on a gable-end rafter. Measuring down from this point to the plate gives you the length of the longest gable-end stud.

Notches cut to receive 2x lookout


Gable-end

rafters


Ridge board


Barge

rafters


2×4 lookouts 32 in. o. c.


The 2×4 lookouts that support the barge boards are fitted into notches cut in the gable-end rafters. Make sure the gable-end rafters are straight. Then, using two 16d nails, fasten the lookouts into the notches. These notches can be cut into the end rafters before they are installed.


2×4

stud


Top plates


Installing gable-end studs

Rather than measuring the length of each individual gable-end stud, I use a little math to calculate the common difference in length of each successive stud. Divide the rise (4 in this case) by 3 and add the result and the rise together (44-3 = 1.33 + 4 = 5.33, or 53/s in.). So, for example, if the first gable-end stud is 47 in. long, the next one will be 415/s in. (47 – 53/s = 415/s). The next will be 36Va in. long and so on. The tops of these gable-end studs are cut at an 18° angle, the pitch of the roof (consult rafter tables for this angle).

Nail the gable-end studs in plumb, trust­ing your eye or using a level (see the photo on the facing page). Be careful to
nail down through the rafter into the gable-end studs to keep from pushing the end rafter up. Don’t inadvertently put a crown in this straight rafter.

Finishing the overhang

There are many ways to finish an over­hang, from simple to ornate. Houses in the Southwest may have a stucco soffit. A Victorian beauty may be trimmed out with fancy gingerbread. But the trend in most areas of our country today is toward simplicity and economy.

The next step in finishing the overhang part of this big puzzle is to install the barge rafters. Lay the 2×4 lookouts into the notches cut in the gable-end rafters.

Nail them with two 16d nails into the first inboard rafter (see the drawing on p. 149). Sight down the end rafter to make sure it is straight, then nail the lookouts into the notches with two more 16d nails.

The gable-end rafter forms the upper part of the exterior wall and needs to be plumb and straight. I once got a callback on a house that had a badly bowed gable-end rafter that no one noticed until the shingles were on. While we were able to cut the nails that held the rafter to the roof sheathing with a reciprocating saw and correct the mis­take, it took time and money. Like most building mistakes, it was correctable, but it would have been far cheaper to make sure the rafter was straight in the first place.

Next, check the plans to determine the length of the overhang. If it’s 20 in. at the gable end, for example, subtract 1 Vi in. for the barge rafter and snap a chalkline at 18Vi in. across the lookouts and across the ridge board if it extends into the overhang. This will ensure a straight barge rafter. Cut the lookouts and ridge board with a circular saw.

Nail through the barge rafters into the ends of the lookouts with galvanized 16d nails. Because this framing will be exposed, make sure that the plumb cut at the ridge board fits tight and looks good.

CRACK RESISTANCE

Low temperature cracking and reflective cracking will be discussed next. More infor­mation on the theory and origin of cracking can be found in the literature (Arand, 1996; Jacobs et al., 1996; Rigo, 1993).

12.2.1 Low Temperature Cracking

Low temperature cracking induced by a drop in temperature has been well-documented (e. g., Fabb, 1973; Isacsson et al., 1997; Marasteanu et al., 2004; Tuckett et al., 1969). Cracking of an asphalt course appears when the thermal stress, which increases with a drop in the temperature, exceeds the mixture’s tensile strength. It originates at the surface of the wearing course and advances downward.

An overview of factors influencing the development of low temperature cracking has been presented in the literature (Isacsson et al., 1997). Although binder proper­ties have commonly been regarded as responsible for a pavement’s susceptibility to this type of cracking, there are actually many other, though less common, contribut­ing factors (e. g., the content of voids and mastic).

Finish Surfaces

image728Подпись:image729

People have Idings since

prehistoric times. Archaeologists have unearthed plaster walls and floors dating to 6000 B. C. in Mesopotamia. And the hieroglyphics of early Egypt were painted on plaster walls. In North America, plaster had been the preferred wall and ceiling surface until after World War II, when drywall entered the building boom. Although drywall represents a historic shift in building technology, the shift was more one of evolution than revolution because drywall’s core material is gypsum rock—the same material used since ancient times to make plaster.

Drywall

Sometimes called Sheetrock® after a popular brand, drywall consists of 4-ft.-wide panels that are screwed or nailed to ceiling joists and wall studs. Sandwiched between layers of paper, dry – wall’s gypsum core is almost as hard and durable as plaster, though it requires much less skill to install. Appropriately, the term drywall contrasts these dry panels with plaster, which is applied wet and may take weeks to dry thoroughly.

Panel joints are concealed with tape and usu­ally three coats of successively wider layers of joint compound that render room surfaces smooth. Each panel’s two long front edges are slightly bev­eled, providing a depression to be filled by joint tape and compound. Note: Each layer of joint com­pound should be allowed to dry thoroughly before sanding smooth and applying the next coat.

DRYWALL TYPES

Drywall’s paper facing and core material can be manufactured for special purposes to make it more flexible, water resistant, fire resistant, sound isolating, scuff resistant, and so on. The upcoming pages will help you determine the size and type of drywall you choose.

► Where it will be used. Local building codes may require water-resistant (WR) dry – wall in high-humidity rooms or fire-resistant (type-X) panels elsewhere to retard fires.

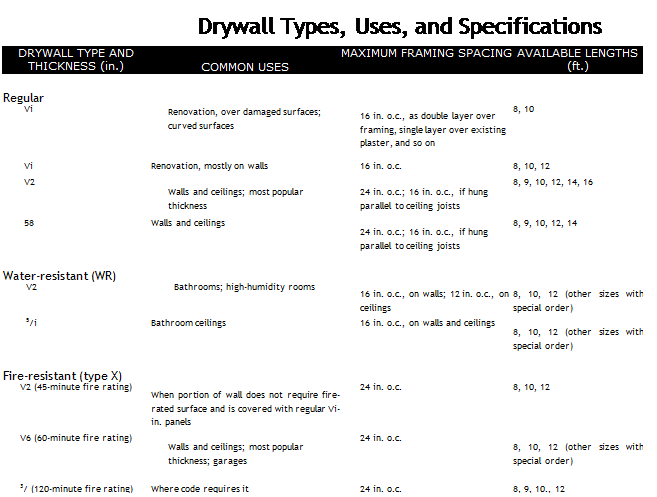
► Distances it must span. Because gypsum is relatively brittle, the drywall must be thick enough to span the distance between ceiling joists without sagging and between wall studs without bowing (see "Drywall Types, Uses, and Specifications," on p. 352).

► Skill and strength of installers. The longer the sheets, the heavier and more unwieldy they are to lug and lift, especially

a concern if you’re working alone or if ceilings are high.

► Access to work areas. Using sheets longer than the basic 8 ft. reduces the number of end joints that need taping. But these jumbo 14-ft. and 16-ft. panels are practical only if your doors and stairwells are large enough to admit them.

Regular drywall comes in four thickness:

‘A in., 58 in., ‘A in. and 58 in; and in sheets 8 ft. to 16 ft. long, in 2-ft. increments. There are also 4-ft. by 9-ft. sheets. To minimize wall joints when installing drywall horizontally, regular drywall also comes in 54-in. widths.

The most commonly used thickness is ‘A in., typically installed over wood or metal framing.

A sheet that size weighs about 70 lb., still man­ageable for strong people working solo.

To increase fire resistance and deaden sound, you can double up 52 in. panels, but that may be overkill. More often, a single layer of 58-in. dry – wall is used for those purposes. Being stiffer, 58-in. panels are harder to damage, so they’re a smart idea in hallways if you’ve got kids. And they’re less likely to sag between ceiling joists and bow between studs.

Renovators commonly use ‘/4-in. and 58-in. sheets to cover damaged surfaces and thereby avoid the huge mess of demolishing and remov­ing old plaster. For best results with this thin dry – wall, use both construction adhesive and screws to attach it. However, neither thickness is sturdy enough to attach directly to studs in a single layer.
Finish Surfaces
Because they’re thin and flexible, two layers of ‘4-in. drywall are routinely bent to cover curving walls, arches, and the like. Attach the second layer with construction adhesive and screws. If the curved area has a short radius (5 ft. to 5 ft.), wet the drywall first (discussed in detail later in this chapter). There’s also a ‘4-in. flexible drywall with
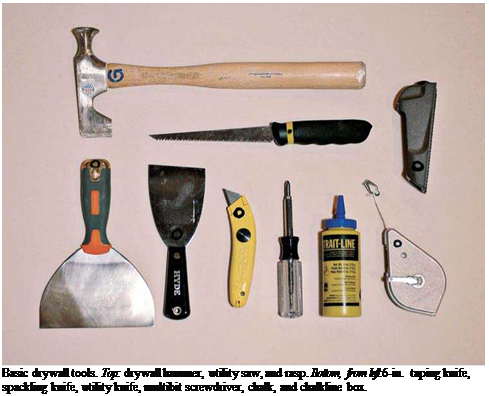
Подпись: Basic drywall tools. Top: drywall hammer, utility saw, and rasp. Bottom, from left:6-in. taping knife, spackling knife, utility knife, multibit screwdriver, chalk, and chalkline box. heavier paper facings designed for curved sur­faces, but this usually needs to be special-ordered.

Water-resistant drywall (WR board) is also called greenboard, after the color of its facing. Its water-resistant core and water-repellent face are designed to resist moisture in bathrooms, behind kitchen sinks, and in laundry rooms. In general, it is a good base for paint, plastic, or ceramic tiles affixed with adhesives, and for installation behind fiberglass tub surrounds.

Although WR board can cover most bathroom walls, it should not be used above tubs or in shower stalls. In particular, it’s not recommended as a substrate for tile in those areas because sus­tained wetting and occasional bumps will cause the drywall to deteriorate, resulting in loose tiles, mold, and water migration to the framing behind. As a substrate for tile around tubs and showers, cementitious backboard is a far more durable and cost effective. Mortar is also durable there, but more expensive.

For the reasons just cited, don’t install WR board over a vapor barrier, especially if this drywall will later be painted with oil-based paint, papered with vinyl wallpaper, or otherwise covered with a vapor-retarding membrane. Sandwiched between two impervious layers, the drywall will deteriorate.

Fire-resistant drywall (also called type X) is specified for furnace rooms, garages, common walls between garages and living spaces, shared walls in multifamily buildings, and so on. The thicker the type-X drywall, the higher the fire rat­ing: 45 minutes for 14 in., 1 hour for 58 in., 2 hours for 54 in. Fire-resistant drywall has a core rein­forced with glass fibers, making it more durable and somewhat harder to cut.

Most codes specify 558-in. drywall for single­family residences—a thickness also adequate to span garage ceiling joists spaced 24 in. on center.

Other specialty drywalls are available. Foil – backed drywall is sometimes specified in the Cold Belt to radiate heat back into living spaces and prevent moisture from migrating to unheated areas. Abuse-resistant drywall, sound-mitigating drywall, and vinyl – and fabric-covered panels with prefinished edges are also manufactured.

Blueboard is a base for single – or two-coat veneer plastering and is now widely used instead of metal, wood, or gypsum lath. It is available in standard 4-ft.-wide panels.

Gypsum lath is specified as a substrate for traditional full-thickness, three-coat plastering.

Its panels are typically 16 in. by 48 in.

Cementitious backerboardhas a core of cement rather than gypsum. Used as a tile sub­strate, it is installed much like drywall (see Chapter 16 for details).

TOOLS

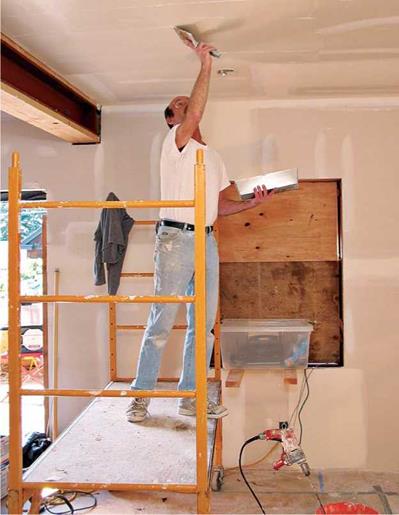
You can install drywall with common carpentry tools—framing square, hammer, tape measure, utility knife, and chalkline. Still, a few special­ized, moderately priced tools will make the job go faster and look better. If you’ve got high ceil­ings, rent scaffolding.

Layout tools include a 25-ft. tape measure, which will extend 8 ft. to 10 ft. without buckling; a 4-ft. aluminum T-square for marking and cutting panels; a chalkline box for marking cut­lines longer than 4 ft.; a compass or a scriber to transfer out-of-plumb wall readings to inter­secting panels; and a 2-ft. framing square to transfer the locations of outlet boxes, ducts, and such onto the panels.

Cutting and shaping tools may be simple, but must be sharp. Drywall can be cut with one pass of a sharp utility knife, a quick snap of the panel, and a second cut to sever the paper backing, as shown in the center photo on p. 562. Buy a lot of utility-knife blades and change them often; dull blades create ragged edges. Use a Surform® rasp to clean up cut drywall edges. The sharp point of a drywall saw enables you to plunge cut in the middle of a panel without first drilling, though the edges of the cut will be rough.

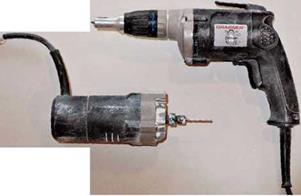
A drywall router or a laminate router with a drywall bit is the pro’s tool of choice for quick, clean cuts around electrical outlet boxes, ducts, and the like. With a light touch and a little prac­tice, you can use this tool to cut out boxes
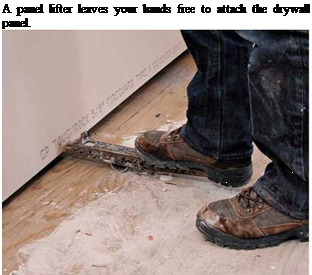
Подпись:Подпись: A panel lifter leaves your hands free to attach the drywall panel.

image733

already covered by drywall panels, as shown in the photo on p. 363.

Similarly, you can use a utility saw to cut out the waste portion of a drywall panel that you’ve "run long” into a doorway or window opening.

Lifting tools will help get you or the drywall up into place. Two lifting tools can be handmade: A panel lifter is just a first-class lever inserted under the bottom of a panel to raise it an inch or so, leaving your hands free to attach the drywall. Metal lifters are not expensive, but 1×2 scraps work almost as well.

The second homemade tool, a T-support, temporarily holds a panel against ceiling joists while you attach it. Cut a 2×4 T-support about h in. longer than the ceiling height so you can wedge it firmly against the panel. Or you can rent a hydraulic stiff arm, an adjustable metal version of a T-support.

For taping and sanding, some pros swear by stilts, but they’re awkward and ill-advised for amateurs. Already off-balance from working over your head, you could easily fall backward and injure yourself. For that reason, stilts are banned by many state regulatory agencies and excluded from most workers’ insurance coverage.

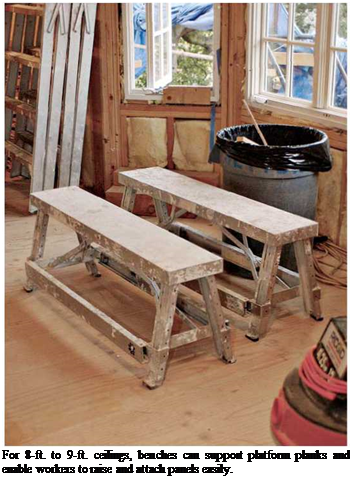
Adjustable drywall benches should enable you to reach 8-ft. or 9-ft ceilings easily. Alternatively, you can lay planks across sturdy wooden saw­horses.

Ultimately, renting a drywall lift and/or scaf- foldingis the safest way to go, especially if ceil­ings are higher than 10 ft. If there’s no danger of falling off your work platform, you can focus on attaching drywall. Scaffolding is also indispen­sable during the taping and sanding stages.

Attachment tools are typically a corded screw gun or a drill with screw bits to attach drywall.

A cordless drill with screw bits is fine for a drywalling a room, but pros who have thousands of screws to drive use corded screw guns, which have clutches and depth settings that set the screws heads perfectly—just below the surface. The pros also use a drywall hammer for incidental nailing. A standard carpenter’s hammer will do almost as well, but the convex-head of a drywall hammer is less likely to damage the paper facing of a panel, should you need to drive down a nail.

Adding a self-feeding screw attachment to the screw gun would probably speed up the job, but few pros use them. Finally, if you’ll be installing double layers of drywall, use a caulking gun to apply construction adhesive to the outer face of the first layer.

Taping and finishing tools are used to apply joint compound through to sanding the joints. The workhorse of taping is the 6-in. taping knife, perfect for filling screw holes, spreading a first layer of joint compound, and bedding tape.

To apply the successively wider and thinner second and third coats of joint compound, you’ll need wider taping knives or curved trowels.

Taping knives typically have straight handles and blades 10 in. to 24 in. wide; a 12-in.-wide knife will suffice for most jobs. Trowels have a handle roughly parallel to the blade and a slightly curved blade that "crowns” the compound slightly. Trowel blades run 8 in. to 14 in. long.

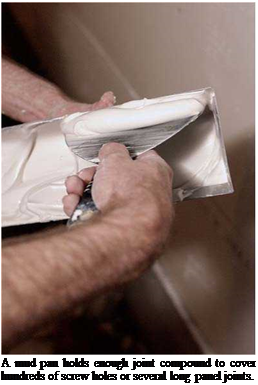
Applying "mud” (joint compound) takes finesse, so most pros use a mud pan or a hawk to

Подпись: Drywall router (bottom) and screw gun.image734"Подпись: A mud pan holds enough joint compound to cover hundreds of screw holes or several long panel joints. the vanishing Nail

Drywall screws install faster than drywall nails. They also hold better and are less likely to damage a panel’s paper facing. Ring-shank nails are used to tack up panels, but screws take over from there. Besides, screws are quiet and nonconcussive, so installers are less likely to disturb finish surfaces, tottering vases, or feisty next-door neighbors.

hold enough mud to tape several joints. As they work, drywallers are constantly in motion: scoop­ing mud, centering it on the knife blade, scraping off the excess, and returning it to the pan or onto the hawk.

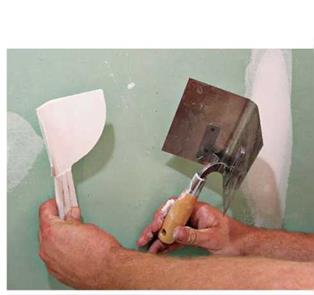
Comer knives enable you to apply mud to both sides of an inside comer simultaneously. To finish outside corners (those that project into a room) consider making your own tool.

Boil a plastic flat knife, and once it’s soft, bend into the shape you need, as shown in the photo at right.

For high-volume jobs, you can rent taping tools that dis­pense tape and compound simultaneously. See “Mechanical Taping Tools,” on p. 369, for more information.

Sponges and a pail of water will keep tools clean as you go.

Even tiny chunks of dried com­pound will drag and ruin freshly applied layers, so rinse tools often, and change water often.

A perfectly clean 5-gal. joint compound container is a great rinse bucket. Use a second one to store and transport delicate trowels and knives.

Sanding equipment starts with special black carbide-grit sandpaper, which resists clogging by gypsum dust; it comes precut to fit the rubber­faced pads attached to poles and hand sanders. Sandpaper grit ranges from 80 (the coarsest) to 220 (fine); 120-grit paper is good to start sanding with. Finish-sand with 220-grit or a rigid dry – sanding sponge (a special sponge that is never wetted).

A sanding pole with a pivoting head enables you to sand higher—8 ft. ceilings are a snap— and with less fatigue because you use your whole upper body.

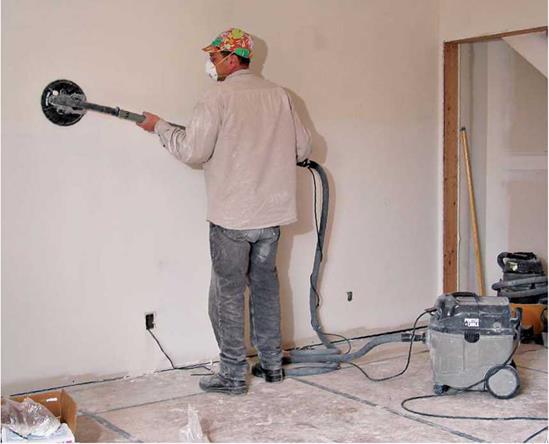
Sanding joint compound generates a prodi­gious amount of dust, so buy a package of good – quality paper dust masks that fit your face tightly; they’re cheap enough to throw out after each sanding session. If you’re sanding over your head, lightweight goggles and a cheap painter’s hat will minimize dust in your eyes and hair.

Подпись: Left:a home-bent knife for shaping outside corners. Right:an inside-corner knife.Подпись: PRO"ГIP New taping knives and trowels may have burrs or sharp corners that can tear the drywall's paper facing. Before you use a new tool, sand its edges and corners lightly with very fine emery paper. Rinse these tools repeatedly with warm water as you work, dry them when you're done, and store them apart from heavy tools so their blades won't get nicked. 1111 image736A shop vacuum with a fine dust filter is a must; vacuum at each break so you don’t track dust all over the house. Dust-free sanding attachments are available for shop vacuums (as shown in the top photo on p. 356). Although they virtually eliminate dust, they’ll sand through soft topping coats and expose the joint tape in a flash if you’re not careful. For best results, run them at low speed settings and use fine, 220-grit sandpaper.

A dust-free sander attached to a shop vacuum cuts dust dramatically, but in unskilled hands it will oversand soft topping coats.

ENERGY-SAVING TIPS

While you’re thinking about insulation and ventilation, you should also pay attention to a few other details that relate to energy conservation. Taken together, these small improve­ments can make a big difference in how well your house works.

■ Locate the water heater near the kitchen and bathroom.

This avoids long runs of pipe that increase plumbing costs and dissipate heat between the water heater and the faucets or showerheads.

■ In cold climates, keep water-supply lines out of exterior walls.

■ Use an insulated wrap for the water heater. New water heaters typically come with built-in insulation, which helps keep your energy costs low. Another money saver is water heaters that come with timers. This allows you to activate the unit during specific times of day when heated water

is needed.

■ Insulate all hot-water lines, and insulate cold-water lines in a crawl space. Both foam and fiberglass-wrap pipe – insulation kits are available at building-supply outlets and home centers.

■ Install low-flow showerheads. A showerhead with a built-in shutoff valve provides even more savings, allowing you to shut off the water while soaping up.

■ Consider using a small solar panel to preheat your water. The sun’s energy is free. With a solar panel, you can reduce the energy used by your hot-water heater.

Habitat for Humanity has developed many guides to help homebuilders and homeowners save energy and money. They are available online and from HFH International (see Resources on p. 279).Take advantage of these resources and increase your understanding of how to build durable, energy-efficient houses with good indoor-air quality.

Подпись: completely stapled in place. If the windows and doors have already been installed, cut the poly along the inner edge of the jambs. If the windows and doors haven’t been installed yet, wrap the poly around the trimmers, headers, and sills. Avoid loose flaps that can catch the wind and cause tearing. To prevent leakage at electrical outlets, use airtight boxes. Available at most electrical- supply stores, airtight boxes have a broad, flexible gasket around the front edge, where a poly barrier can be sealed easily. Alternatively, you can simply cut a box-size opening in the poly and seal the poly to the electrical box with a bead of caulk (see the photo on p. 209). STEP 4 PROVIDE ADEQUATE VENTILATION Подпись: Now that we have a tight, well-insulated house, what do we do when we want a breath of fresh air? And how can we rid the house of kitchen odors and steam from cooking, showers, and the like? Indoor-air-quality problems are magnified in a new house because of fumes from new carpets, vinyl flooring adhesive, and paint. Obviously, you can open a couple of windows to get some fresh air, as long as the weather is cooperative. But what if you’re not comfortable opening windows in your neighborhood? That’s a problem. And what if it’s —15°F outside? What if its 105°F and humid? Opening windows when the weather is extreme or unpleasant undermines the effort you put into creating an energy-efficient house. There is a better solution, and it’s called mechanical ventilation. All houses need at least a few small fans in critical locations where large volumes of vapor are created. A mechanical ventilation system can help maintain good indoor-air quality without making a lot of noise or costing a fortune. Unfortunately, my experience is that many local building codes (and building Avoid single-speed fans. You’ll appreciate having a vent fan that can operate at more than one speed. Multiple-speed and variable-speed models cost a little more, but they enable you to use a lower, quieter speed during extended operation.

Подпись: Improve air circulation in your house by cutting off door bottoms so they don't touch the floor. Even better, you can install a through-wall grill over a door. This allows air to move from room to room.

inspectors) have some catch-up work to do when it comes to understanding house ventila­tion. You’re better off finding a knowledgeable and reliable HVAC (heating, ventilation, and air-conditioning) contractor with up-to-date knowledge of home ventilation requirements. That said, proper ventilation for small, afford­able houses isn’t all that difficult to obtain.

Source ventilation is the key to reducing moisture and odors

You can start by installing adequate spot, or source, ventilation wherever moisture or odors are created. Venting moist air directly to the outside prevents it from escaping through the walls or ceilings, where it can cause damage.

At a minimum, showers and stoves should have exhaust fans that are controlled by simple on-off switches or wired to come on automati­cally when a bathroom light is turned on or the stove is being used. For a stove installation, mechanical ventilation is usually provided by a vent hood equipped with a fan. In a bathroom, a variety of ceiling-mounted fans are available, including models with built-in lights.

Exhaust fans in moisture-producing areas should always be vented directly outdoors.

That means out through a wall or up through the roof and not into an eave soffit or a crawl space. When we moved into our home in Oregon, I discovered that the clothes dryer was vented into the crawl space. Some pretty creepy looking stuff was growing down there in the dark. Even worse is venting moist kitchen or bathroom air into the attic.

Try to keep vent runs short—less than 10 ft., if possible. Avoid running vents through the attic, if possible; install them in interior soffits and dropped ceilings instead. If you can’t avoid running a vent through the attic, then make sure it is well insulated. This is cru­cial in cold climates, where heat inside the attic can cause ice damming along the eaves. This is serious business, so pay attention to the details.

Good indoor-air quality requires air exchange

We all need fresh air to stay healthy, and in a tightly built house, some form of mechani­cal air exchange is essential. You can provide air exchange fairly inexpensively by using a bathroom exhaust fan controlled by an auto­matic timer. Look for a fan that moves air at 80 CFM (cubic feet per minute) to 120 CFM.

Set the timer to run the fan about two-thirds of the time that people are generally home (it doesn’t make much sense to exchange air when no one’s home). The fan we have in our home is centrally located in a hallway, but check with your HVAC contractor to locate yours. Beware of bargain-priced fans. Those models are almost always noisier than other vent fans. An expe­rienced HVAC contractor can advise you on which models run quietly and reliably.

Whenever fans are blowing indoor air out­side the house, fresh air must come in to replace it. This ensures a healthy supply of fresh air and prevents negative air pressure from draw­ing exhaust gasses from the fireplace or furnace flues, which is a serious safety hazard. The simplest way to provide replacement air when exhaust fans are running is to open a window or two. It’s not necessary for the window to be fully open; just a crack will usually do. If it’s cold outside, open a window in a utility room, unused bedroom, or somewhere away from the main living area.

If you’re building a house where the winters are long and very cold (in Maine or Minnesota, for example), it may be necessary to have an HVAC contractor install a heat recovery ven­tilator (HRV) or an air-handling unit to bring replacement air into the house at a more com­fortable temperature. Those devices typically work by blowing warm indoor air outdoors while pulling an equal volume of outside air in­doors. Because only a thin membrane separates the passing airstreams, some of the interior’s warmth is transferred to the fresh incoming air.

ENERGY-SAVING TIPS

Test Results

Rutting resistance is one of the most widely tested properties of asphalt mixes, including SMA, and various methods of testing are conducted all over the world.

The impact of side support during creep tests of SMA and AC have been com­pared in Swedish research (Said et al., 2000). Results have explicitly shown the great significance of that feature to SMA, while the results from testing AC with and without side support have not changed considerably (Figure 12.3). Other research (Ulmgren, 1996) on the comparison of the dynamic creep test (RLAT 100/100 mm) and the modified one (IRLAT 100/150 mm) with the results of a wheel-tracking test have demonstrated a very good relationship between IRLAT and the wheel-tracking test, with R = 0.91, while the relationship between RLAT and the wheel-tracking test was much worse, with R = 0.36.

U. S. research (Cooley and Brown, 2003) on SMA mixtures used for thin wearing courses has proved the advantages of conforming with requirements for resistance

image148

Time, sec

FIGURE 12.3 Comparative results of SMA and AC with and without side support during the creep tests RLAT 100/100 and IRLAT 100/150. (From Said, S., Jacobson, T., Hornwall, F., and Wahlstrom, J., Proceedings of the 2nd Eurasphalt & Eurobitume Congress, Barcelona, 2000. With permission.)

to deformation (based upon APA testing), despite the maximum gradation of the SMA not exceeding 9.75 mm. British results (Obert, 2000) concerning the com­parison of SMA with hot rolled asphalt (HRA) have confirmed a higher resistance to deformation more for the former than the latter. Other research undertaken in Finland on test sections (Kelkka and Valtonen, 2000) compared SMA with AC, graded 0/18 mm with various binders. This time SMA turned out to be the win­ner again. Polish research (Sybilski and Horodecka, 1998) has acknowledged that creep tests are not appropriate for determining SMA resistance to deformation and also that better SMA rutting resistance has been proved in comparison with AC on road sections and in wheel-tracking testing (large device—French LCPC type).

Briefly, to sum up this short review of test results with regard to rutting resistance, it may be concluded that they reflect SMA’s superior properties over those of AC.