Finish Surfaces


People have Idings since
prehistoric times. Archaeologists have unearthed plaster walls and floors dating to 6000 B. C. in Mesopotamia. And the hieroglyphics of early Egypt were painted on plaster walls. In North America, plaster had been the preferred wall and ceiling surface until after World War II, when drywall entered the building boom. Although drywall represents a historic shift in building technology, the shift was more one of evolution than revolution because drywall’s core material is gypsum rock—the same material used since ancient times to make plaster.
Sometimes called Sheetrock® after a popular brand, drywall consists of 4-ft.-wide panels that are screwed or nailed to ceiling joists and wall studs. Sandwiched between layers of paper, dry – wall’s gypsum core is almost as hard and durable as plaster, though it requires much less skill to install. Appropriately, the term drywall contrasts these dry panels with plaster, which is applied wet and may take weeks to dry thoroughly.
Panel joints are concealed with tape and usually three coats of successively wider layers of joint compound that render room surfaces smooth. Each panel’s two long front edges are slightly beveled, providing a depression to be filled by joint tape and compound. Note: Each layer of joint compound should be allowed to dry thoroughly before sanding smooth and applying the next coat.
Drywall’s paper facing and core material can be manufactured for special purposes to make it more flexible, water resistant, fire resistant, sound isolating, scuff resistant, and so on. The upcoming pages will help you determine the size and type of drywall you choose.
► Where it will be used. Local building codes may require water-resistant (WR) dry – wall in high-humidity rooms or fire-resistant (type-X) panels elsewhere to retard fires.
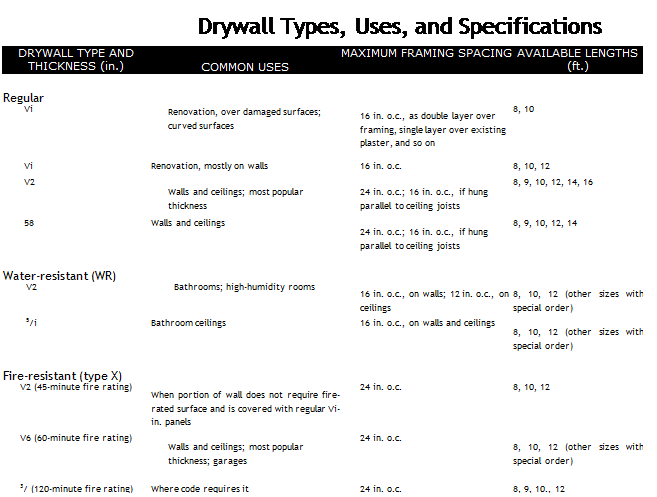
► Distances it must span. Because gypsum is relatively brittle, the drywall must be thick enough to span the distance between ceiling joists without sagging and between wall studs without bowing (see "Drywall Types, Uses, and Specifications," on p. 352).
► Skill and strength of installers. The longer the sheets, the heavier and more unwieldy they are to lug and lift, especially
a concern if you’re working alone or if ceilings are high.
► Access to work areas. Using sheets longer than the basic 8 ft. reduces the number of end joints that need taping. But these jumbo 14-ft. and 16-ft. panels are practical only if your doors and stairwells are large enough to admit them.
Regular drywall comes in four thickness:
‘A in., 58 in., ‘A in. and 58 in; and in sheets 8 ft. to 16 ft. long, in 2-ft. increments. There are also 4-ft. by 9-ft. sheets. To minimize wall joints when installing drywall horizontally, regular drywall also comes in 54-in. widths.
The most commonly used thickness is ‘A in., typically installed over wood or metal framing.
A sheet that size weighs about 70 lb., still manageable for strong people working solo.
To increase fire resistance and deaden sound, you can double up 52 in. panels, but that may be overkill. More often, a single layer of 58-in. dry – wall is used for those purposes. Being stiffer, 58-in. panels are harder to damage, so they’re a smart idea in hallways if you’ve got kids. And they’re less likely to sag between ceiling joists and bow between studs.
Renovators commonly use ‘/4-in. and 58-in. sheets to cover damaged surfaces and thereby avoid the huge mess of demolishing and removing old plaster. For best results with this thin dry – wall, use both construction adhesive and screws to attach it. However, neither thickness is sturdy enough to attach directly to studs in a single layer.
Because they’re thin and flexible, two layers of ‘4-in. drywall are routinely bent to cover curving walls, arches, and the like. Attach the second layer with construction adhesive and screws. If the curved area has a short radius (5 ft. to 5 ft.), wet the drywall first (discussed in detail later in this chapter). There’s also a ‘4-in. flexible drywall with
 heavier paper facings designed for curved surfaces, but this usually needs to be special-ordered.
Water-resistant drywall (WR board) is also called greenboard, after the color of its facing. Its water-resistant core and water-repellent face are designed to resist moisture in bathrooms, behind kitchen sinks, and in laundry rooms. In general, it is a good base for paint, plastic, or ceramic tiles affixed with adhesives, and for installation behind fiberglass tub surrounds.
Although WR board can cover most bathroom walls, it should not be used above tubs or in shower stalls. In particular, it’s not recommended as a substrate for tile in those areas because sustained wetting and occasional bumps will cause the drywall to deteriorate, resulting in loose tiles, mold, and water migration to the framing behind. As a substrate for tile around tubs and showers, cementitious backboard is a far more durable and cost effective. Mortar is also durable there, but more expensive.
For the reasons just cited, don’t install WR board over a vapor barrier, especially if this drywall will later be painted with oil-based paint, papered with vinyl wallpaper, or otherwise covered with a vapor-retarding membrane. Sandwiched between two impervious layers, the drywall will deteriorate.
Fire-resistant drywall (also called type X) is specified for furnace rooms, garages, common walls between garages and living spaces, shared walls in multifamily buildings, and so on. The thicker the type-X drywall, the higher the fire rating: 45 minutes for 14 in., 1 hour for 58 in., 2 hours for 54 in. Fire-resistant drywall has a core reinforced with glass fibers, making it more durable and somewhat harder to cut.
Most codes specify 558-in. drywall for singlefamily residences—a thickness also adequate to span garage ceiling joists spaced 24 in. on center.
Other specialty drywalls are available. Foil – backed drywall is sometimes specified in the Cold Belt to radiate heat back into living spaces and prevent moisture from migrating to unheated areas. Abuse-resistant drywall, sound-mitigating drywall, and vinyl – and fabric-covered panels with prefinished edges are also manufactured.
Blueboard is a base for single – or two-coat veneer plastering and is now widely used instead of metal, wood, or gypsum lath. It is available in standard 4-ft.-wide panels.
Gypsum lath is specified as a substrate for traditional full-thickness, three-coat plastering.
Its panels are typically 16 in. by 48 in.
Cementitious backerboardhas a core of cement rather than gypsum. Used as a tile substrate, it is installed much like drywall (see Chapter 16 for details).
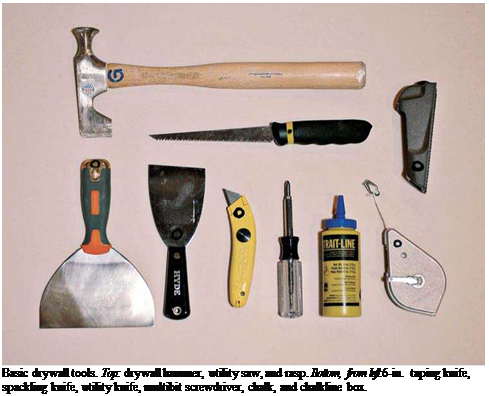
You can install drywall with common carpentry tools—framing square, hammer, tape measure, utility knife, and chalkline. Still, a few specialized, moderately priced tools will make the job go faster and look better. If you’ve got high ceilings, rent scaffolding.
Layout tools include a 25-ft. tape measure, which will extend 8 ft. to 10 ft. without buckling; a 4-ft. aluminum T-square for marking and cutting panels; a chalkline box for marking cutlines longer than 4 ft.; a compass or a scriber to transfer out-of-plumb wall readings to intersecting panels; and a 2-ft. framing square to transfer the locations of outlet boxes, ducts, and such onto the panels.
Cutting and shaping tools may be simple, but must be sharp. Drywall can be cut with one pass of a sharp utility knife, a quick snap of the panel, and a second cut to sever the paper backing, as shown in the center photo on p. 562. Buy a lot of utility-knife blades and change them often; dull blades create ragged edges. Use a Surform® rasp to clean up cut drywall edges. The sharp point of a drywall saw enables you to plunge cut in the middle of a panel without first drilling, though the edges of the cut will be rough.
A drywall router or a laminate router with a drywall bit is the pro’s tool of choice for quick, clean cuts around electrical outlet boxes, ducts, and the like. With a light touch and a little practice, you can use this tool to cut out boxes
already covered by drywall panels, as shown in the photo on p. 363.
Similarly, you can use a utility saw to cut out the waste portion of a drywall panel that you’ve "run long” into a doorway or window opening.
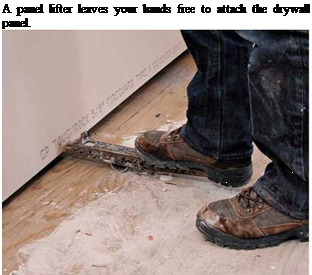
Lifting tools will help get you or the drywall up into place. Two lifting tools can be handmade: A panel lifter is just a first-class lever inserted under the bottom of a panel to raise it an inch or so, leaving your hands free to attach the drywall. Metal lifters are not expensive, but 1×2 scraps work almost as well.
The second homemade tool, a T-support, temporarily holds a panel against ceiling joists while you attach it. Cut a 2×4 T-support about h in. longer than the ceiling height so you can wedge it firmly against the panel. Or you can rent a hydraulic stiff arm, an adjustable metal version of a T-support.
For taping and sanding, some pros swear by stilts, but they’re awkward and ill-advised for amateurs. Already off-balance from working over your head, you could easily fall backward and injure yourself. For that reason, stilts are banned by many state regulatory agencies and excluded from most workers’ insurance coverage.
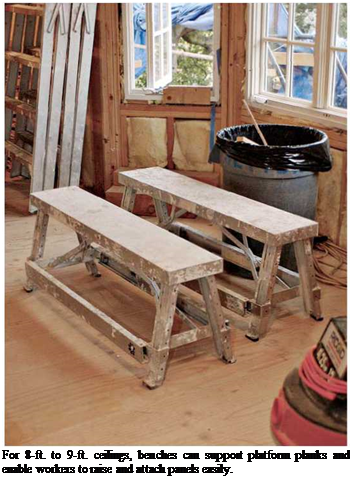
Adjustable drywall benches should enable you to reach 8-ft. or 9-ft ceilings easily. Alternatively, you can lay planks across sturdy wooden sawhorses.
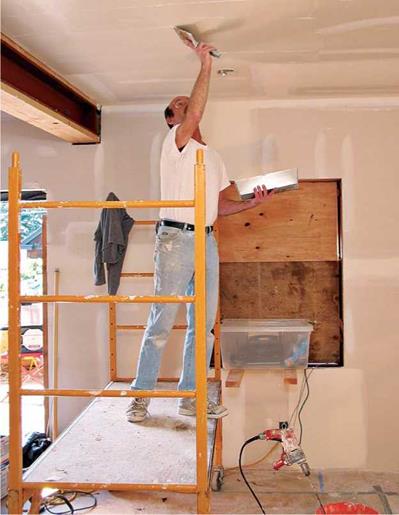
Ultimately, renting a drywall lift and/or scaf- foldingis the safest way to go, especially if ceilings are higher than 10 ft. If there’s no danger of falling off your work platform, you can focus on attaching drywall. Scaffolding is also indispensable during the taping and sanding stages.
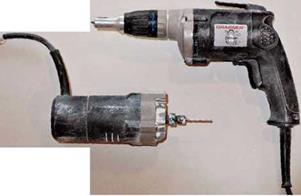
Attachment tools are typically a corded screw gun or a drill with screw bits to attach drywall.
A cordless drill with screw bits is fine for a drywalling a room, but pros who have thousands of screws to drive use corded screw guns, which have clutches and depth settings that set the screws heads perfectly—just below the surface. The pros also use a drywall hammer for incidental nailing. A standard carpenter’s hammer will do almost as well, but the convex-head of a drywall hammer is less likely to damage the paper facing of a panel, should you need to drive down a nail.
Adding a self-feeding screw attachment to the screw gun would probably speed up the job, but few pros use them. Finally, if you’ll be installing double layers of drywall, use a caulking gun to apply construction adhesive to the outer face of the first layer.
Taping and finishing tools are used to apply joint compound through to sanding the joints. The workhorse of taping is the 6-in. taping knife, perfect for filling screw holes, spreading a first layer of joint compound, and bedding tape.
To apply the successively wider and thinner second and third coats of joint compound, you’ll need wider taping knives or curved trowels.
Taping knives typically have straight handles and blades 10 in. to 24 in. wide; a 12-in.-wide knife will suffice for most jobs. Trowels have a handle roughly parallel to the blade and a slightly curved blade that "crowns” the compound slightly. Trowel blades run 8 in. to 14 in. long.
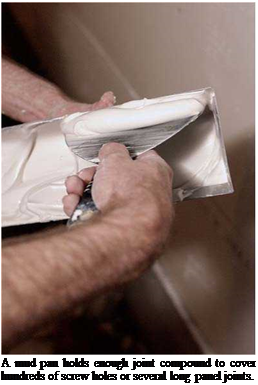
Applying "mud” (joint compound) takes finesse, so most pros use a mud pan or a hawk to
![]()
 the vanishing Nail
Drywall screws install faster than drywall nails. They also hold better and are less likely to damage a panel’s paper facing. Ring-shank nails are used to tack up panels, but screws take over from there. Besides, screws are quiet and nonconcussive, so installers are less likely to disturb finish surfaces, tottering vases, or feisty next-door neighbors.
hold enough mud to tape several joints. As they work, drywallers are constantly in motion: scooping mud, centering it on the knife blade, scraping off the excess, and returning it to the pan or onto the hawk.
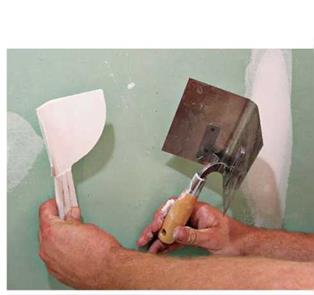
Comer knives enable you to apply mud to both sides of an inside comer simultaneously. To finish outside corners (those that project into a room) consider making your own tool.
Boil a plastic flat knife, and once it’s soft, bend into the shape you need, as shown in the photo at right.
For high-volume jobs, you can rent taping tools that dispense tape and compound simultaneously. See “Mechanical Taping Tools,” on p. 369, for more information.
Sponges and a pail of water will keep tools clean as you go.
Even tiny chunks of dried compound will drag and ruin freshly applied layers, so rinse tools often, and change water often.
A perfectly clean 5-gal. joint compound container is a great rinse bucket. Use a second one to store and transport delicate trowels and knives.
Sanding equipment starts with special black carbide-grit sandpaper, which resists clogging by gypsum dust; it comes precut to fit the rubberfaced pads attached to poles and hand sanders. Sandpaper grit ranges from 80 (the coarsest) to 220 (fine); 120-grit paper is good to start sanding with. Finish-sand with 220-grit or a rigid dry – sanding sponge (a special sponge that is never wetted).
A sanding pole with a pivoting head enables you to sand higher—8 ft. ceilings are a snap— and with less fatigue because you use your whole upper body.
Sanding joint compound generates a prodigious amount of dust, so buy a package of good – quality paper dust masks that fit your face tightly; they’re cheap enough to throw out after each sanding session. If you’re sanding over your head, lightweight goggles and a cheap painter’s hat will minimize dust in your eyes and hair.
![]()
 A shop vacuum with a fine dust filter is a must; vacuum at each break so you don’t track dust all over the house. Dust-free sanding attachments are available for shop vacuums (as shown in the top photo on p. 356). Although they virtually eliminate dust, they’ll sand through soft topping coats and expose the joint tape in a flash if you’re not careful. For best results, run them at low speed settings and use fine, 220-grit sandpaper.
A dust-free sander attached to a shop vacuum cuts dust dramatically, but in unskilled hands it will oversand soft topping coats.


Leave a reply