FATIGUE LIFE

Fatigue is an effect consistent with the formation of cracks in material caused by a series of repetitive tensile stress cycles that do not exceed the tensile strength of the material. (For more information on fatigue, refer to the many publications with descriptions of this phenomena [e. g., SHRP Reports A-312 or A-404].)

12.3.1 Test Methods

There are many methods for testing fatigue; for example, the European standard on testing fatigue EN 12697-24 has quoted the following ones:

• Two-point bending test on trapezoidal-shaped specimens (2PB-TZ)

• Two-point bending test on prismatic-shaped specimens (2PB-PR)

• Three-point bending test on prismatic-shaped specimens (3PB-PR)

• Four-point bending test on prismatic-shaped specimens (4PB-PR)

• Indirect tensile test on cylindrical-shaped specimens (IT-CY)

Note: the standard EN 12697-24 has clearly stipulated that results obtained with various methods are not comparable; also, the standard EN 13108-20 has limited fatigue tests exclusive to AC mixtures (as a part of initial type testing).

Extended comparisons of fatigue test methods can be found in the literature (di Benedetto et al., 1997; Said and Wahlstrom, 2000).

Fatigue tests are carried out under one of the following modes of loading:

• Stress controlled

• Stress is induced in a specimen and is held throughout the test; strain steadily increases with the loading cycles until failure of the specimen occurs, which signals the end of testing.

• The fatigue limit is proportional to the mixture’s stiffness.

• Strain controlled

• Strain is induced in a specimen and is held throughout the test; stress steadily decreases with the application of loading cycles until the speci­men’s stiffness reaches 50% of its initial level.

• The fatigue limit is inversely proportional to the mixture’s stiffness.

Drywall over Plaster

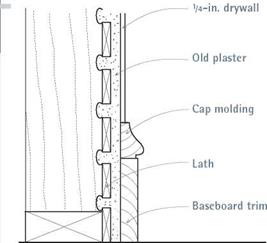
Подпись: Trim Considerationsimage746"Подпись: New drywall over old plaster can reduce the visible profile of existing molding it abuts so much that the molding looks undersize. In this case, you have two alternatives: Use molding to build up (increase the thickness of) trim where drywall abuts it. Or remove the trim and reinstall it over the drywall.Drywalling over plaster is a cost-effective way to deal with plaster that’s too dingy and deteriorated to patch or too much trouble to tear out. But this requires some important prep work.

► If you see discoloration or water damage, repair the cause of the leak or excessive indoor moisture before attaching drywall.

► Locate ceiling joists or studs behind the plaster. Typically, framing is spaced 16 in. or 24 in. on center, but you never know with older houses.

If ceiling joists are exposed in the attic above, your task is simple; otherwise, use a stud finder or drill exploratory holes. Once you’ve located the joists or studs, snap chalklines to indicate the centerlines you’ll screw the drywall into.

► Use screws and plaster washers to reattach loose or sagging plaster sections before you install drywall. To minimize the number of such fasteners, apply adhesive to the back face of the drywall, and be sure the screws grab framing—not just lath. Plaster washers are shown on p. 373.

► For ceilings, use 2-in. type-W drywall screws, which should be long enough to penetrate 3/s-in. drywall, 1 in. of plaster and lath, and 5/s in. into joists. On walls, ‘/4-in. drywall is a better choice because drywall sagging

is not an issue, and thin drywall doesn’t reduce the visible profile of existing trim as much. Otherwise, you may either need to build up existing trim or remove the trim and reinstall it over the drywall.

► If there’s living space above the plaster ceiling, attaching resilient channel may be a good move. These channels bridge surface irregularities and deaden sound. Screw the channels perpendicular to the joists. Then screw drywall panels perpendicular to the channels (see the photo on p. 376).

CUTTING DRYWALL

Drywall over Plaster

image747

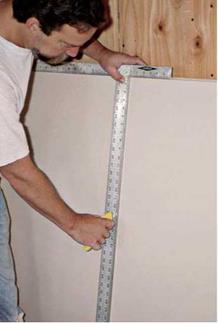
1. In one pass, score the paper face of the panel using a utility knife guided by a drywall T-square.


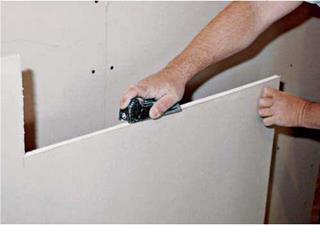
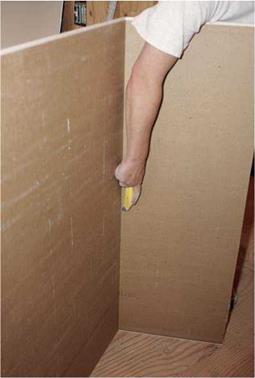
2. Snap the panel sharply away from the face cut (here hidden), to break the gypsum core along the scored line. Then cut through the paper backing along the break.


image749

3. If the cut is rough, clean it up with a drywall rasp.


image748

image750

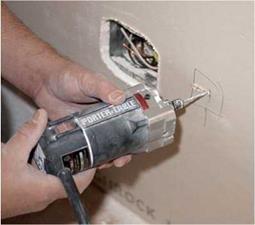
A drywall router quickly cuts out holes around outlet boxes. Beforehand, shut off the electricity to that circuit, and tuck wires well into the box so they can’t get nicked.

can use them like a workbench, cutting them in place.

Start by tearing off the end papers that join pairs of panels face to face, allowing you to move panels individually. In this manner, you’ll cut every other panel from the back.

Most professionals would rather score the front face first, but it doesn’t truly matter which side you cut first, as long as your blade is sharp, your snap is clean, and you don’t rip or snag the paper on the front face.

If the gypsum edge is a bit rough or the panel is a little long, clean up the edge with a drywall rasp. But be careful not to fray the face paper.

Outlet box, switch, and duct cutouts can be

made before or after you hang the drywall.

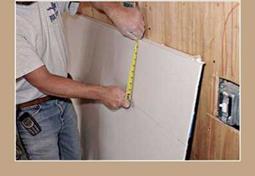
To make cuts before, measure from a fixed point nearby—from the floor or a stud, for example— and transfer those height and width measure­ments to the panel. A framing square resting on the floor is perfect for marking electrical recepta­cles. That done, use a drywall saw to punch through the face of the panel and cut out the opening, being careful not to rip the paper facing as you near the end of the cut.

That’s one way to do it. Problem is, the cutout rarely lines up exactly to the box.

Using a drywall router is quicker and more accurate. О e the power is off

and push any electrical wires well down into the box so the router bit can’t nick them. The router bit should extend only!4 in. beyond the back of the drywall.

Next, measure from a nearby stud or the floor to the (approximate) center of the box, and trans­fer that mark to the drywall. Then tack up the panel with just a few nails or screws—well away from the lumber the box is attached to. Gently push the spinning bit through the drywall and move it slowly to one side till you hit an edge of the box. Pull out the bit, lift it over the edge of the box, and then guide the bit around the outside of the box, in a counterclockwise direction. This method takes a light touch—plastic boxes gouge easily—but it’s fast and the opening will fit the box like a glove.

ATTACHING DRYWALL

Most professionals use drywall screws exclusive­ly, although some use a few nails along the edges to tack up a panel temporarily. Corner bead is often nailed up, too.

When attaching drywall, push the panel firm­ly against the framing before driving in the screw. Fasteners must securely lodge in a framing mem­ber. If a screw misses the joist or stud, remove the screw, dimple (indent) the surface around the hole, and fill it later.

The screw (or nail) head should sink just below the surface of the panel, without crushing the gypsum core or breaking face paper. You will later fill the resulting dimple with joint compound.

A Ripping GOOD TIME

Cutting along the length of a drywall panel— ripping a panel—is fast and easy if you know how. Extend a tape measure the amount you want to cut from the panel. If you’re right-handed, lightly pinch the tape between the index finger and thumb of your left hand to keep the tape from retracting. Your right hand holds the utility – knife blade against the tape’s hook. Using your left index finger as a guide along the edge of the panel, pull both hands toward you evenly as you walk backward along the panel. Remember, the blade needs only to score the paper, not pene­trate the core, so relax and keep moving.
image751

Подпись: When sizing screws or nails, see "Drywall Fasteners," on p. 357. Fasteners that are too short won't support the panel adequately. On the other hand, fasteners that are too long are more likely to drive in cockeyed or pop the drywall if the framing shrinks. 1111

Fastener Spacing

FRAMING

MEMBERS

FRAMING

SPACING

MAXIMUM

FASTENER

FRAMING*

Ceiling joists

16 in. o. c.

12 in.

24 in. o. c.

10 in.

Wall studs

16 in. o. c.

16 in.

24 in. o. c.

16 in.

* Fasteners should not be closer than 3k in. to the panel’s edge.

Screws are generally spaced every 12 in. along panel edges and "in the field,” for ceiling joists or studs 16 in. on center. Drywall edges are a bit fragile, so place screws back at least % in. from the edges. Where butt edges meet over framing, space screws every 8 in. along both sides of the butt joint.

Screws driven in crooked don’t hold as well, are more likely to tear the face paper, and can be tricky to fill with compound. That said, you sometimes need to angle screws slightly when securing both sides of a butt joint to a shared stud or joist. Just go easy.

Nails follow the spacing guidelines in "Fastener Spacing,” except that you should double-nail in the field. Paired nails are 1T2 in. to 2 in. apart, so the center of each pair of nails is spaced every 16 in. on wall panels. Along panel edges, do not double-nail. Instead, space single nails every 8 in. For best holding, use ring-shank nails.

Adhesives are most often used to affix drywall where nails or screws can’t—say, over concrete— but it’s sometimes used in tandem with them. Adhesive applied to wood studs allows you to bridge minor irregularities and to use about one – third the number of fasteners. And adhesive cre­ates a stronger bond than screws or nails alone.

Because adhesive adds a step and requires 48 hours to dry before you can tape the joints, it’s usually more practical to use adhesive only on butt joints. Apply two parallel 18-in. beads of adhesive down the middle of the joist or stud edge. Don’t make wavy, serpentine beads because that allows adhesive to ooze out onto the dry – wall’s back face, wasting adhesive. On such glued butt joints, space screws every 10 in. to 12 in. on both sides of the joint.

If you’re applying a second sheet of drywall over a first, you can apply construction adhesive or roll-on thinned joint compound. Myron Ferguson’s excellent book Drywall (The Taunton Press), discusses adhesives at greater length.

TIP

Mark joist centers onto the top of the wall plates before you install the first ceiling panel. That will enable you to sink screws into the joist centers when they’re covered by drywall. The pencil marks will also help you align screws across the panel, simply by eyeballing from those first screws to the uncov­ered joists on the other side.

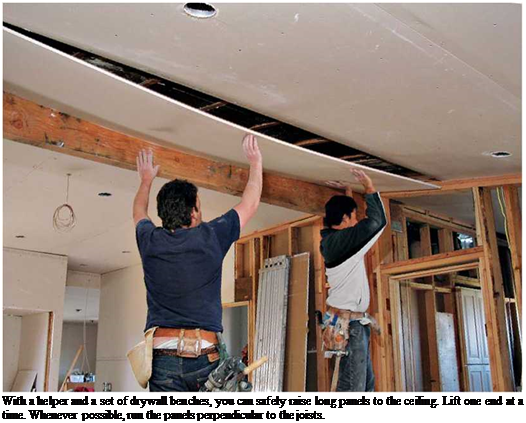
Подпись: With a helper and a set of drywall benches, you can safely raise long panels to the ceiling. Lift one end at a time. Whenever possible, run the panels perpendicular to the joists. ini

image753

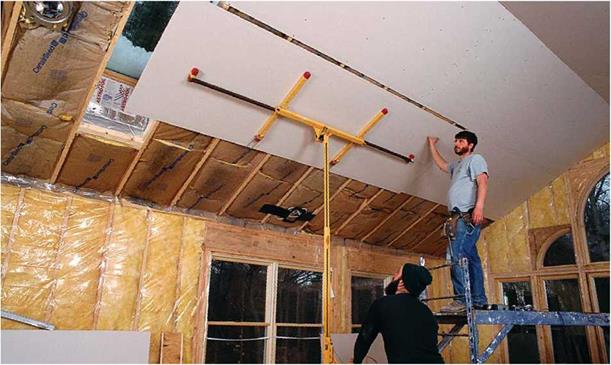
If the ceiling is higher than 9 ft., and especially if it’s a cathedral ceiling, rent a drywall lift.


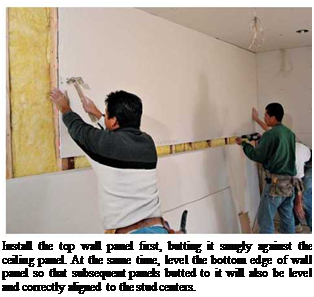
Подпись: Install the top wall panel first, butting it snugly against the ceiling panel. At the same time, level the bottom edge of wall panel so that subsequent panels butted to it will also be level and correctly aligned to the stud centers.

HANGING DRYWALL PANELS

Ceilings. Attach ceiling panels first. It’s much easier to cut and adjust wall panels than ceiling panels, should there be small gaps along the wall-ceiling intersection. Also, wall panels can support the edges of ceiling panels.

First, ensure there’s blocking in place to nail the panels’ edges to. In most cases, you’ll run panels perpendicular to the ceiling joists, thereby maximizing structural strength, minimizing panel sag, and making joists easier to see when fastening panels.

The trickiest thing about hanging ceiling pan­els is raising them into position. If your ceilings are less than 9 ft. high, drywall benches will ele­vate you enough to work. As you raise each panel end, keep its other end low. In other words, allow one worker to raise one end and establish footing before the second worker steps up onto the bench. Then, while both workers support the panel with heads and hands, they can tack the panel in place.

If the ceiling is higher than 9 ft., rent a drywall lift. Because the lift holds the panel snugly against ceiling joists, it allows you to have both hands free to drive screws.

Flying solo. If you can’t find an adjustable lift or friends to help, you can hang ceiling panels solo by using two tees made from 2x4s. Lean one tee against a wall, with its top about 1 in. shy of the ceiling joists. (The tee should be h in. to 1 in. taller than the ceiling is high.) Raise one end of
the panel up, onto that tee. Then, being careful not to dislodge the first end, position and raise the lower end of panel with the second tee until the entire panel is snug against the ceiling joists. Gradually shift the tees until the panel’s edges are aligned with the joist centers. Be patient.

Walls. It’s easier to hang drywall on the walls than on ceilings. Although one person can usually manage wall panels, the job is easier and goes faster with two. Be sure there’s blocking in the corners to receiver fasteners before you begin. To help you locate studs once they’re covered with dry – wall, mark stud centers on the top plates (or ceiling panels) and sole plates at the bottom.

When hanging wall panels, always start at the top, butting the first panel snugly to the dry – wall on the ceiling. That way, you’ll minimize gaps and sup­port ceiling edges better.

Important: If you’re installing wall panels hor­izontally, the top panel edge must be level and the butt ends, plumb. Otherwise, subsequent panels may be cockeyed and butt ends may not be cen­tered over the studs.

Once the upper wall panel is secured, raise the lower panel(s) snug against it. A homemade
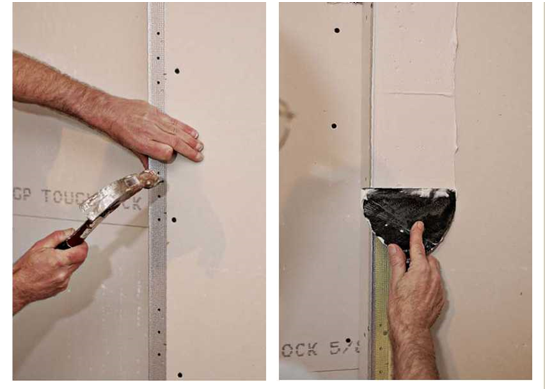
image755
panel lifter is handy because it frees your hands to align the panels and sink the screws. A panel lifter is simply a first-class lever of scrap wood set on a fulcrum. Pressing down on one end of the lever with your foot, raises the other end, which lifts the panel, as shown in the bottom photo on p. 354.

Doors and windows. Joints around doors and windows will be weak and likely to crack if panel edges butt against the edges of the opening. That is, run the panel edges at least 8 in. past door or window jambs, and cut out the part of the panel that overlaps the opening. Pros do this because the wall framing twists and flexes slightly when doors or windows are opened and closed, which stresses the drywall joints.

Finally, expect to waste a lot of drywall when cutting paneling for doors and windows. Old houses are rife with nonstandard dimensions and odd angles, so don’t fight it. You can use some of the larger cutoffs in inconspicuous places like closets, but remember that the more joints, the more taping and sanding. Anyway, drywall panel isn’t expensive. So, when in doubt about reusing a piece, throw it out.

Curves. Curved walls are easy to cover with dry – wall. For the best results, use two layers of!4-in. drywall, hung horizontally. Stagger their butt – and bevel-edged joints. For an 8-ft. panel run horizontally, an arc depth of 2 ft. to 3 ft. should be easy. Sharper curves may require back-cutting
panels (scoring slots into the back so that the panels bend more easily), wetting (wet-sponging the front and back of the sheet to soften the gypsum), or using special flexible drywall, which has heavier paper facings that are better suited for bending.

Corners. Cornerbead reinforces and protects outside corners, uncased openings, and the like. It’s available in many materials. For best results, install it in a single piece. Cut the bead for out­side corners about h in. short: Push it snugly to the corner and slide it up till it touches the ceiling. The /2-in. gap at the bottom will be hidden by baseboard trim.

Galvanized metal bead was at one time the only type available, and it’s still widely used. To cut it, use aviation snips (also known as tin snips). The metal bead goes on the outside corners before the tape and joint compound are applied. Nail it up, spacing nails 8 in. apart, on both legs of the bead. Then cover it with compound.

Vinyl bead is less rigid than metal and able to accommodate outside corners that aren’t exactly 90°. Attach vinyl bead either by stapling it directly to the drywall, spraying the drywall corner with vinyl adhesive before pressing the bead into the adhesive and then stapling, or using a taping knife to press the bead into a bed of joint compound.

Paper-faced beads are embedded in joint com­pound. One of the best is the Ultraflex structural corner, which comes in varying widths and has
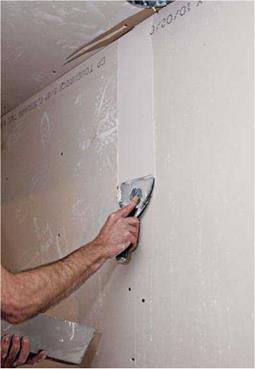
image756a plastic spine that flexes in or out so it can rein- BEDDING THE TAPE force inside or outside corners. Because they’re flexible, such tapes are great for corners of just about any angle.

Ordering Drywall and Associated Supplies

Ordering Drywall and Associated Supplies

LIKE SHINGLES, SIDING, and insula­tion, drywall amounts are calculated by the square footage of the area to be covered (in this case, the walls and ceilings). Rather than measuring the ceiling and walls in every room, experienced drywallers use a shortcut calculation. They simply multiply the total square footage of a house by 3!! (3.5). For instance, a 24-ft. by 36-ft. house has 864 sq. ft. of floor space, and 864 times 3.5 equals 3,024 sq. ft. of drywall coverage.

DRYWALL IS HEAVY! Carrying a long sheet, like this 12 footer, is definitely a two-person job.

[Photo ® The Taunton Press, Inc.]

Your drywall order

For the modest-size houses that Habitat builds, it s best to make up most of your drywall order with 12-ft. drywall panels. A 4×12 sheet of dry – wall is more difficult to carry than a 4×8 sheet, but it covers more area and often eliminates the need for butt joints on a wall or ceiling. To fine – tune your drywall order, subtract any greenboard you will be using in the bathroom. Also, if you decide to go with %-in. drywall on the ceiling, sub­tract the floor area (864 sq. ft. in our example) from the square-foot total, then order that amount of %-in. dry – wall for the ceiling.

Have the drywall delivered several days before you plan to hang it. If you’re using any %-in. drywall, stack those sheets on top of the %-in. sheets. Storing all the drywall in one room creates a lot of weight on a few floor joists. Therefore, make a neat pile in each room, with the drywall flat on the floor, finish side facing up.

Screws and nails

Professional drywall hangers rarely use drywall nails. Screws hold better than nails, and a screw gun automati­cally drives the screws just the right distance, dimpling the drywall surface without breaking the paper.

If you’re not a seasoned drywall hanger, you’ll probably find it useful to drive a few nails to hold a panel in place against the studs or ceiling joists. Then you can finish installing the panel with screws. A 5-lb. box of dry – wall nails and a 50-lb. box of l!4-in. drywall screws should give you all the fasteners you need for a l,200-sq.-ft. house. If you’re hanging %-in.-thick panels, order 1 %-in.-long fasteners.

Joint tape, corner beads, and drywall compound

You can order these finishing supplies when you order your drywall. Joint tape comes in rolls; order 400 ft. for every 1,000 sq. ft. of drywall.

Every outside corner covered with drywall requires a corner bead. These steel or plastic trim pieces are typi­cally sold in 8-ft. or 10-ft. lengths. When estimating the amount of bead to order, make sure you account for corners where drywall wraps around window and door openings.

As far as drywall compound goes, the typical Habitat house requires about nine 5-gal. buckets. For the Charlotte house, we used an all-purpose compound called Durabond®, which comes in powdered form and is mixed with water at the job site. Other folks prefer to buy premixed compound, which comes in buckets or boxes.

Ordering Drywall and Associated Supplies

UTILITY KNIVES AND SPARE BLADES. Most straight cuts in drywall are made with a utility knife. Have a good supply of new blades handy. A sharp blade cuts cleanly through a panel’s paper facing, while a dull blade can tear the paper.

DRYWALL SQUARE. This large, aluminum, T-shaped square enables you to quickly and easily make straight, square cuts in drywall.

SCREW GUN. A screw gun takes the guesswork out of fastening drywall because it sinks dry- wall screws just the right distance into the panel. This tool resembles an electric drill and holds a replaceable Phillips-head bit.

DRYWALL HAMMER. This hammer looks like a small hatchet with a convex hitting surface.

The curved face allows you to set the nail below the surface of the drywall without breaking the paper. The hatchet end is not sharp and can be used for levering or wedging drywall into place.

SURFORM® TOOL. Designed to function like a handplane, this shaping tool is very useful for trimming small amounts off the edge of a panel to improve its fit on the wall or ceiling. Avoid large Surform tools; the smaller ver­sions are more maneuverable and fit in a pouch on your tool belt.

WITHIN

Drywall and Painting

I’m not sure when drywall—also known as gypsum board, wallboard, and Sheetrock®—was first used in construction. I have seen drywall on pre—World War II houses, but we definitely didn’t have drywall in my old prairie home. It wasn’t until the late 1950s in California, where I was working, that drywall be­came the preferred wall covering in residential housing. “Knock on the Wall! Demand Genuine Lath and Plaster!” was the rallying cry of the once-mighty plaster industry, as they struggled against the newcomer—drywall.

Big plaster fought a losing battle. It took two or three weeks to cover walls with layers of plaster, and the process left the house frame waterlogged. In the winter, it could take a month or more for a house to dry out well. Cabinets installed after plastering often had sticky drawers. In addition, passage doors were hard to open, and hardwood floors expanded and buckled. It’s no wonder the construction indus­try switched to drywall. It allowed builders to complete houses in record time.

Drywall installation can begin once you’ve passed all your inspections— electrical, plumbing, heating, framing, insulation, and vapor barrier. Drywall is not difficult to secure to ceilings and walls, but it takes more skill to leave the finished walls straight and smooth. This chapter will tell you how to order and store drywall, which tools and methods you need to cut and “hang” it, how to tape and finish the joints, and how to paint the walls and trim. By the time you’re done with these jobs, your house will look a lot more like a home.

STEP 1 GET READY TO INSTALL DRYWALL

Подпись:There’s some important prep work to be done before you take delivery of your drywall order and before any installation work can begin. In addition

. The south of Morocco and the Saharan oases

In 1031 the caliphate of Cordova breaks down, fragmenting into small kingdoms. Alphonse VI of Castilla seizes the opportunity to take Madrid in 1083, then Toledo in 1085. The Andalusians call for help from the only powerful Occidental Arab dynasty of the time, the Almoravides of Morocco. Their chief Youssef ben Tachfin puts an end to the advance of Alphonse VI when he passes through Spain, and he brings Morocco and Andalusia under his unified command. His son Ali, raised in an Andalusian culture, suc­ceeds him in 1106. Andalusian scholars and literati follow him to Marrakesh, capital of the Almoravides. This contact probably explains the appearance of the qanat technolo­gy in Morocco.

The Almoravides, Berbers from the south, had occupied Sijilmassa, the great cara­
van center of Tafilalet, in 1055, and then conquered all of Morocco and founded Marrakesh in 1060. The construction of the first qanat of Marrakesh is documented thanks to al-Idrissi. Ali decided to build it in 1107, and the project was completed by a certain Obeyd Allah ibn Younous (that is, son of Jonas) al-Muhandes (which means the engineer).

“At the time there was only one garden [….]. Obeyd Allah went to the highest point of land overlooking this garden. There, he had a very large rectangular pit dug, from which he had dug a single outlet that gradually descended (.) to the garden for which it supplied water in a continuous fashion. With the naked eye, one cannot detect, on the ground, any slope that would enable the water to flow from the bottom of the pit to the surface of the garden. To understand this, one must understand the clever trick that was used to supply the water. This trick consisted in evaluating the difference in ground level (from the bottom of the pit to the garden). The Emir of the Muslims, who very much appreciated the work of the engineer Obeyd Allah, paid him with silver and clothing. [….] After that, inspired by the example pro­vided by this man of art, the inhabitants of Marrakesh set about capturing water and bringing it to their gardens, to the point that many of them could only increase in size, buildings grow­ing up around them, embellishing the skyline of Marrakesh.” [348]

According to the text, this Obveyd Allah ibn Younous well understood the technique of the qanats when he came to install them in Marrakesh. If one juxtaposes the dates (the event was 80 years after the taking of Madrid, one year after the birth of Ali, who was raised in contact with the Andalusian literati) and the facts (according to al-Idrissi, it was Andalusian engineers that Ali called upon to build the first bridge on the wadi Tensift), it seems reasonable to presume (as did Henri Goblot) that this engineer came from Spain.

Over a thirty year period some fifty qanats are built on the plain of Marrakesh (the Haouz), where they are called khettaras, bringing 5,000 hectares under irrigation. The Almohades took over from the Almoravides after 1160. They built new qanats and con­structed an extended network of canals supplied by the rivers to increase this irrigated land area to 15,000 hectares. After some retrenchment in the 16th century, the irrigated area grows to about 20,000 hectares in modern times. There are some 600 identified qanats, 500 of which were still in service in the middle of the 20th century. These qanats are generally quite shallow, for the water table issuing from the Upper Atlas mountains is only about 20 meters below the ground surface. The qanats are limited by the land slope to only from 500 m to several kilometers long, and the wells are closer together than those of Iran. The average discharge of a qanat at Marrakesh is of the order of 40 m3/hour.[349]

Sugar cane is grown on the plain of Sous and in the haouz of Marrakesh. This crop requires considerable water. Sugar processing is also water-hungry, both in its need for hydraulic energy (mills to grind the cane) and for preparation of sugar bread. This water is most often taken from the rivers, but it can also come from the qanats – both those of

Marrakesh as well as others on the plain of Sous, particularly in the region of Aoulouz and the surroundings of Agadir. The sugar industry quickly grows to play a significant role in the economy of Morocco, a role it maintains up until the 17th century. Important hydraulic infrastructure is developed to support this industry, particularly by the Merinides at the end of the 14th century and then by the Saadians in the 16th century, on the plain of Sous and at Chichaoua in the Haouz.

Fez was established toward the end of the 8th century on a site that was at the cen­ter of an agricultural plain and naturally well supplied with water, the terminus of the route that crosses the Atlas near Sijilmassa. In the 11th century the Almoravides build canals to irrigate the gardens of Fez, and also build water mills. Al-Idrissi observed in the 12th century that in the district with the best water supply, al-Qarawiyyin, the deliv­ery and drainage networks were particularly well developed:

“Al-Qarawiyyin has an abundance of water that circulates through all the streets and allyways, in conduits that the inhabitants can open when they wish to wash the neighborhoods during the

night and have them perfectly clean in the morning. In each house, be it large or small, there

53

is a pipe for both clear or dirty water.”

Norias appear in Fez in the 14th century, and numerous water-based activities devel­op in the city. In the 16th century Leon the African enumerates over a hundred public baths and nearly 400 water mills supporting all sorts of industrial uses.[350] [351] [352]

Sijilmassa is, with Marrakesh and Fez, another grand center of activity in medieval Morocco up to the 14th century:

“Sijilmassa is an important capital, located some distance from a watercourse that disappears to the south of the city. [….] This city is rich in dates, fresh and dry grapes, fruits, cereals, pomegranates and diverse other agricultural products; the city pleases foreigners who come from all directions in large number. [….] The canton possesses mines of gold and silver. [….] Sijilmassa is surrounded by the sands of the desert, its inhabitants use water holes.”[353]

This ancient city was founded in the middle of the 8th century. Recently discovered vestiges have been the focus of American-Moroccan research efforts between 1988 and 1996. The city is located in the Tafilalet, one or two kilometers to the west of the pres­ent Rissani (which is some 200 km east of Ouarzazate) near the wadis Ziz and Rheris that descend from the High Atlas. Sijilmassa is a node of communication with the Orient (via Ouargla) and especially with Sudan, a source of gold. Ancient texts present an image of grand agricultural prosperity, the remains being seen in present-day palm groves:

“She (Sijilmassa) has a series of castles, houses and buildings along an abundant water course that comes from the east, i. e. from the desert, and whose flow increases in the summer (with the snowmelt of the High Atlas), much like the Nile. Its waters provide for irrigation of crops,

which along with the use of Egyptian peasants leads, as everyone knows, to very good har­vests. In certain years, following floods of this river, water is so abundant that the grains har­vested in the previous year grow again without any need to replant the fields.”[354]

This text suggests a practice of flood-recession agriculture, certainly as in Egypt, but also in conditions that would appear to be close to those that we have described in Chapter 3 for the east of Arabia Felix (Yemen). Similarities in architecture between the ancient cities of Yemen and the ksar (fortified villages) of Tafilalet suggest another pos­sibility -that the hydro-agricultural techniques used at Sijilmassa have their origin in a Yemeni migration. Field studies [355] indeed show that small dams were constructed on the wadi Rheris, to be destroyed several times by floods but then rebuilt in other loca­tions. But it is especially the wadi Ziz that is developed and managed. Initially, the Ziz ran much more to the east, along a course that is today called the wadi Amerbou. At some undetermined time, the course of the Ziz was changed by a dam situated some 15 km to the north of Sijilmassa (opposite the present-day Erfoud, where traces of a stone structure still exist). The wadi was diverted into a canal that runs along the western side of the city of Sijilmassa (Figure 7.17). This canal is in its own right the source of sec-

. The south of Morocco and the Saharan oases

Figure 7.17 The principal hydraulic developments of Sijilmassa (after Messier, 1997).

ondary derivations for irrigation of the oasis and subsequent return flow to the original course further to the south. This original course (the Amerbou of today) handles the drainage of excess flood waters. Over the centuries this canal becomes the source of the modern watercourse of Ziz.

To complete this broad-brush painting of the water resources of Tafilalet, we should note that along with Marrakesh, this region constitutes the second flowering of qanats of Morocco. Remains of 300 qanats are identifiable today, half of them still in service. Their dates of construction are unknown.

Another very important blossoming of qanats is located in the oases of Gourara, Touat and Tidikelt in present-day Algerian Sahara, south of the western Grand Erg. This is a chain of palm groves clustered around the foot of the Tadema’tt plateau (Figure 7.16).

These oases were undoubtedly populated by migrations of Jewish Berbers from Cyrenaic, the Zenata, fleeing Roman colonialism of the 2nd century AD. But in gener­al we assume that the history of the Saharan qanats reaches back only to the 9th or 10th centuries AD, and that their history is unconnected to that of the old Roman qanats of Libya and Tunisia (Chapter 6), at this time a forgotten technique.[356] The introduction of qanats grew out of new immigration waves from the Orient – we must remember that at this period, the Sahara was not nearly as water-starved as it is today. But without these thousands of qanats the grand oases would not have survived to the present. At the beginning of the 20th century some 400 active ones were known in Gourara (especially on either side of Timimoun); 440 in the Touat chain of oases between Adrar and Tauourirt, where they are the sole source of water; and 125 in the Tidikelt, especially around Aoulef and In Salah. They are from 2 to 15 km long, with very closely spaced wells.[357]

Test Results

A significant impact of mixture type on cracking temperature for newly made mixtures or after a short time of aging has not been observed with TSRST test­ing mixtures of AC, SMA, and porous asphalt (Isacsson et al., 1997). Not until a longer aging period (i. e., more than 25 days) has elapsed has a difference in favor of AC and SMA been observed. Porous asphalt is more susceptible to aging, and the recorded difference of crack temperatures has reached 6°C and 25°C after 25 and 100 days of aging, respectively. Test results (Judycki and Pszczola, 2002) con­cerning a comparison of low temperature properties of various mixtures have not revealed essential differences between AC and SMA. In a U. S. site investigation (Schmiedlin and Bischoff, 2002), the comparison of capabilities to slow down the advancement of reflective cracking in various mixtures concluded that SMA is superior to AC. The impact of aggregate size and its resistance to crushing has also been noted. Those conclusions are based on a 5-year observation of test sec­tions. Similar results have been achieved on a test section in Australia (Pashula, 2005) where, among other things, the abilities of various mixtures to slow down the advancement of reflective cracking were compared. It was stated after a 10-year observation that SMA’s distinctive feature is that it possesses the greatest potential of slowing the occurrence of reflective cracking.

Laundry Appliances

Washers and dryers with porcelain-on-steel or stainless steel interiors are preferable to those with plastic interiors. Although gas dryers are more energy efficient than electric dryers, they cause the same pollution problems as gas ranges. By planning a laundry room with easy access to a drying yard, you can take advan­tage of the most energy efficient of all dryers: the sun.

Dryers should be vented directly to the out­doors. Some heat recovery devices are avail­able that recirculate the hot air from the dryer back into the house. We do not recommend these because they do not sufficiently filter fine particles and, if a gas dryer is being used, combustion gases can be released into the in­door air instead of being vented outdoors.

Vacuum Cleaners

Conventional portable vacuum cleaners suck air through a filter bag and then pump the “cleaned” air back into the room. The air that is returned is only as clean as the filtering mechanism is efficient. In fact, conventional vacuuming can stir up dust and pollen to such an extent that the ambient air is more polluted with small particulate matter than it was be­fore the cleaning. Several brands of HEPA vacuums are available and are far superior to conventional vacuum cleaners. Their “high – efficiency particulate air” filter effectively traps microscopic particulate matter. Water – filter vacuums were popular before the avail­ability of HEPA vacuums. They can become a

reservoir for mold and bacteria unless thor­oughly dried after each use.

If you are building a new home, you have the opportunity to install a central vacuum system. When the motor and dirt receptacles are located remotely in a basement, garage, or utility room, central vacuums avoid the pollu­tion problems associated with most portable models. Although more expensive than con­ventional portables, central vacuums cost only slightly more than a good HEPA or water-filter model. They are convenient and easy to op­erate. The hose is simply plugged into a wall receptacle and there is no machinery to lug around. We recommend central vacuums that exhaust air directly to the outdoors as this will prevent any small particles missed by the col­lection bag from being exhausted back into the home.

Further Reading and Services

American Institute of Architecture, Denver Chap­ter, and Architects/Designers/Planners for So­cial Responsibility. Sustainable Design Resource Guide. AIA/ADPSR, 2005. See aiasdrg. org. In­formation about energy efficiency and appli­ances.

Ao, Lono Kahuna Kapua. Don’t Drink the Water:

The Essential Guide to Our Contaminated Drink­ing Water and What You Can Do About It. Kali Press, 1998.

Bower, Lynn Marie. 77re Healthy Household. Healthy House Institute, 1995. Has a useful section on household cleansers.

Conacher, Duff. Troubled Waters on Tap: Organic Chemicals in Public Drinking Water Systems and the Failure of Regulation. Center for Study of Re­sponsive Law, 1988.

EPA Safe Drinking Water Hotline, 800-426-4791, e p a. gov/ s afe water.

Goldbeck, David, The Smart Kitchen: How to Design a Comfortable, Safe, Energy-Efficient, and Envi­ronment-Friendly Workspace. Ceres Press, 1994.

The Good Water Company, Stephen Wiman, 2778 Agua Fria, Bldg. C, Ste. B, Santa Fe, NM 87501, 800-471-9036,505-471-9036, goodwaterglobal. com. Water filtration and consultation.

Hague Quality Water International, 4343 South Hamilton Road, Groveport, OH 43125, 614-836-2115. Excellent whole-house water purification system.

Ingram, Colin. The Drinking Water Book: A Com­plete Guide to Safe Drinking Water. Ten Speed Press, 1991. A guide for safe drinking water.

National Testing Laboratories, Inc., 6555 Wilson Mills Road, Cleveland, OH 44143,800-458-3330, watercheck. com. Comprehensive water testing.

Ozark Water Service and Air Services, 114 Spring Street, Sulphur Springs, AR 72768, 800-835-8908, ozarkwaterandair. org. For air and water testing and consultation regarding toxic gases, molds, asbestos, volatile organic compounds (VOCs), pesticides, gas leaks, EMFs, and radon.

Laundry Appliances

Refrigerators and Freezers

There are many styles of refrigeration units available. Self-defrosting models have a drip pan located somewhere under the unit. Some units have drip pans located in the back or mounted internally, where they are inacces­sible. When purchasing a unit, make sure the drip pan is easily accessible from the front and has adequate clearance underneath for easy cleaning. The pan should be cleaned monthly to prevent odors or the growth of microorgan­isms. It is also important to keep the cooling coils clean of dust. Not only will this improve your air quality but it also will save energy be­cause the unit will not have to work as hard to stay cold.

Cook Tops, Ovens, and Ranges

All electric cook tops, ovens, and ranges produce elevated magnetic fields. Surpris­ingly, it is frequently the built-in electric clock that is the largest source, regardless of whether the equipment is gas or electric. Use a gauss – meter to determine the distance of the field.

The act of cooking generates significant amounts of indoor air pollution through va­pors and airborne particulate matter such as grease. In addition, food particles left on burn­ers are incinerated and release combustion by­products.

Gas-fueled appliances are a significant source of indoor air pollution as they can re­lease carbon monoxide, carbon dioxide, ni­trogen dioxide, nitrous oxides, and aldehydes into the air. In Why Your House May Endan­ger Your Health, Alfred Zamm describes how gas kitchen ranges have been the hidden cul­prit in many cases of “housewives’ malaise.” According to Zamm, “A gas oven operating at 350°F for one hour, because of the inevita­ble incomplete combustion, can cause kitchen air pollution, even with an exhaust fan in op­eration, comparable to a heavy Los Angeles smog. Without the fan, levels of carbon mon­oxide and nitrogen dioxide can zoom to three or more times that.”4

For chemically sensitive individuals, any combustion appliance may be undesirable and we recommend choosing electric over gas for a range/oven. Many cooks, however, pre­fer to cook with gas because it allows for better timing and temperature control. Ifyou choose a gas range, the following measures will help reduce the amount of pollution:

• Have flames adjusted to burn correctly. They should burn blue. A yellow flame in­dicates incomplete combustion and the subsequent production of carbon mon­oxide.

• Choose an appliance with electronic ig­nition instead of a pilot light. Any model built in the US after 1991 will be equipped with electronic ignition.

• Follow the guidelines for proper ventila­tion discussed below.

If your preference is to cook with gas, consider purchasing a gas-fired cook top with an elec­tric oven, since it is not necessary or even de­sirable from a chef’s standpoint for the oven to be a combustion appliance.

Various smooth cook top surfaces are available, including magnetic induction and halogen units. Because they are much easier to dean than coiled elements, they produce less pollution from the burning of trapped food particles. These units should be tested with a gaussmeter to determine the extent of their magnetic fields while in operation.

Oven cleaning is another source of pollu­tion generated in the kitchen. Continuous – cleaning ovens contain wall coatings that con­tinuously outgas noxious fumes. Self-cleaning ovens produce polynuclear aromatic hydro­carbons, which are a source of air pollution. Most brand-name oven cleaners are toxic. The safest way to clean an oven is with baking soda and elbow grease. Ifbaking soda is poured over the spill shortly after it occurs, the spill can be easily cleaned up after the oven has cooled.

Kitchen Ventilation

Because the kitchen generates significant in­door pollution and moisture, the ventilation of this room should be given special consid­eration above and beyond general home ven­tilation. Range hoods must be vented to the outside. There are models available that sim­ply circulate the air through a carbon filter and

Refrigerators and Freezers

A central vacuum system is convenient and dust free. Photo: Paula Baker-Laporte.

back into the room. These do not remove cook­ing pollution sufficiently, but unfortunately many kitchens come equipped with them be­cause they are inexpensive and do not require a roof penetration.

We recommend the largest range hood available, with variable speed control so that you can adjust speed according to your re­quirements. Some models come equipped with remote fans, which are quieter. When ventilation fans are in operation, especially at higher speeds, it is important that make-up air be supplied. If a home is not equipped with a whole-house supply system, you should open a window to supply make-up air. If a clean source of air intake is not provided by design, the exhausting of air can create enough nega­tive pressure that air will then be sucked into the house through the path of least resistance.

This path could be through a chimney flue for a furnace or water heater, causing dangerous backdrafting of air many times more polluted than that being replaced.

Time Integration – Solid Mechanics

For solid mechanics problems, the constitutive law form (Eqs. 11.3 and 11.4) is an incremental one and differs from the ones for diffusion problems (Eq. 11.7). The knowledge of the stress tensor at any time implies that a time-integrated constitutive law is required. The stress tensor is a state variable that is stored and transmitted from step to step based on its final/initial value, and this value plays a key role in the numerical algorithm.

Then, in nearly all finite element codes devoted to modelling, equilibrium is ex­pressed at the end of the time steps, following a fully implicit scheme (t = 1), and using the end of step stress tensor value.

However, integrating the stress history with enough accuracy is crucial for the numerical process stability and global accuracy. Integration of the first order differ­ential equation (Eq. 11.4):

tB

ctb = cta + J Eeps dt (11.31)

tA

can be based on similar concepts as the one described in the preceding paragraph (the superscripts of ct here indicating the time at which ct is evaluated). Various time schemes based on different т values may be used for which similar reflections on stability and accuracy can be made.

When performing large time steps, obtaining enough accuracy can require the use of sub-stepping: within each global time step (as regulated by the global numer­ical convergence and accuracy problem) the stress integration is performed at each finite element integration point after division of the step into a number a sub-steps allowing higher accuracy and stability.

Thermal Stress Restrained Specimen Test Method

The TSRST method consists of attaching the ends of a specimen (250 mm long and 60 mm in diameter or 50 x 50 mm cross section) to the frame of a device situ­ated in a cooling chamber. The frame is rigid to keep the length of the specimen unchanged. As the temperature falls (at a rate of -10°C/hr), the specimen contracts and the tensile stress in the specimen rises because it is being held by the frame. The temperature at which the specimen cracks is the test result. This method has been standardized in AASHTO TP 10 and prEN 12697-46.

12.2.3.1 Semicircular Bending Test

The semicircular bend test method is described in prEN 12697-44. A half cylinder sample of compacted asphalt mixture is loaded using a three-point bending scheme. As a result, tensile stress is created at the bottom of sample. This test can be used either for testing fracture toughness (when the half cylinder has a crack sawed at the bottom center with a notch width of 0.35 ± 0.10 mm and a depth of 10 ± 0.2 mm) or for tensile strength (unnotched cylinder).