Learning from Your Fellow Volunteers

WHEN VOLUNTEERS SHOW UP to

build a Habitat house, they often find themselves being assigned to jobs they’ve never done before. Still, with the proper training and supervi­sion, they’re almost always capable of rising to the challenge and making a significant and meaningful contribu­tion to providing another family a decent home. And sometimes in the process stereotypes are broken and we learn from one another.

On the second day of a six-day blitz in 1993, during which we built 20 houses, I was roofing with Bunny Church and her friend, Stuart Phillips, it was a hot, steamy day,

and we had just half a day to start and finish shingling a roof, so we set to the task energetically and with great focus. After a couple of hours of hard labor up on that roof, the temperature rising all the while we were working, we were tired, dirty, and thirsty. Sud­denly, Stuart stopped our roofing production line, sighing, Tm sorry, but I just have to put on some lipstick. Lipstick always makes me feel better.” She excused herself, climbed down the ladder to the ground, pulled her lipstick out of her pocket, then went to the Porta Potti. A moment later, Stuart emerged, still dirty and dusty, but also smiling and radiant, her lips
perfectly covered with pink lipstick.

It did help!

Despite being something of a tomboy, I appreciated the lesson Stuart had unintentionally taught me—that it’s okay to assert your femi­nity on the job. And that’s one of the wonderful things about Habitat— everyone is welcome. How many roofers wear lipstick? If your heart is open, the diversity you encounter while working on a Habitat house just might enrich your life. And remem­ber: Lipstick can make you feel better!

-By Anna G. Carter

[Photo e’Anna G. Carter.]

Learning from Your Fellow Volunteers


Подпись: іПодпись: MAKE CUTOUTS WITH A ROUTER. Equipped with a narrow straight bit, this power tool cuts holes around electrical outlet boxes after a drywall panel has been tacked in place.Learning from Your Fellow VolunteersПодпись: MAKE A DIMPLE. Use a dry- wall hammer when nailing panels in place. The curved hitting surface is designed to dimple the drywall surface, setting the nail and creating a depression that can be filled with drywall compound.Learning from Your Fellow VolunteersПодпись: Helping HandПодпись: Snap lines to locate studs. If you miss framing members when driving fasteners near the center of a panel, you can snap lines to locate studs and joists. Use white chalk, which will not bleed through finish coats of paint. Or you can draw a pencil line along a straightedge.

Furnishings

Residential furniture is rarely included in the construction contract. The owner will typi­cally select the furniture and have it installed on her or his own or with the guidance of an architect or interior designer. Nevertheless, we are including some guidelines and resources for the selection of healthful furniture because new furnishings can have a major impact on indoor air quality.

Most standard furniture is built like most standard housing. It is mass-produced with little or no thought about the health of the buyer. For those of you who have gone to great effort to create a healthy home, shopping wisely for healthy furnishings is the next logical step. Once again you will find yourself in the role of a pioneer. Most furniture salespeople will not understand what you mean when you speak of healthy furniture. Yet formaldehyde and other chemical levels can soar when new fur­nishings are brought into the home. Tbe furni­ture can continue to pollute the environment throughout its life.

As with the production of building ma­
terials, there are many broader environmen­tal concerns pertaining to the manufacture of furniture. These include the use of endan­gered wood species, toxic waste produced at the manufacturing facility, factory workers’ exposure to hazardous chemicals, wasteful packaging, and the exploitation of exporting countries. These factors are discussed in depth in other publications. We will concentrate on health concerns for the homeowner.

Wood Furniture

Most newly constructed wood furniture is actually veneered wood attached to a core of particleboard or plywood. These manufac­tured sheet goods are often bound with urea – formaldehyde glues, which will outgas for many years. Even so-called solid wood pieces may contain hidden plywood or particleboard components in order to save on production costs. When selecting wood furnishings, keep the following recommendations in mind:

• Purchase solid wood furniture that does

Furnishings

Furnishings

Above: I nterior of Daryl Stanton Residence features solid wood antique furniture, custom made organic cotton and wool upholstered furniture and area rugs. Kitchen has solid wood cabinets and open shelving. Architect: Baker-Laporte Associates; Builder: Econest Building Co. Photo: David Hoptman.

Below: Interior of Baker-Laporte Residence features solid wood furniture — formaldehyde free built-in window seat and custom made cotton uphostery with organic cotton stuffing. Photo: Lisl Dennis.

not make use of veneers or sheetgoods. Hardwoods are preferable because they emit fewer terpenes than softer woods. Nu­merous farmed hardwoods are available. Old-growth forest need not be destroyed by your furniture selection. Although the initial purchase price for solid wood furni­ture may be higher, you will be investing in heirloom quality.

• If veneered wood is all your budget will al­low, consider sealing all surfaces and edges with one of the low-VOC vapor-barrier sealants listed in Division 9. In addition, consider materials such as wrought iron and glass for tables and wicker or rattan for seating. Examine cane furniture prior to purchase to make sure it is free of mildew and mold.

• Furniture imported from tropical coun­tries is often sprayed with pesticides while in transit. Furniture imported from Eu­rope will meet Ei emissions standards and is often constructed with low-emissions sheetgoods. Look for furniture that meets GreenGuard emissions standards, which are more stringent. This furniture must achieve formaldehyde emission rates of less than 0.05 part per million. Chemically sensitive individuals should test for indi­vidual tolerance to these amounts of form­aldehyde.

Following are sources for solid wood or low – emissions furniture:

• Casa Natura: Solid wood furniture

• Ikea: Solid wood and veneered wood fur­nishings sourced from sustainably man­aged forestry operations and meeting Ei emissions standards

• Pacific Rim: Handcrafted, solid western maple furniture made from wood grown in managed forests in Washington and Oregon

• Pottery Barn: Solid wood furniture

• Smith and Hawken: A variety of sustain­ably harvested teak and cedar solid wood furniture

• Eco-terric: Green and healthy furnishings for the home

• H3 Finishes for wood furnishings

Durability, not health, is the criterion used by manufacturers when choosing finishes for wood furniture. The majority of commercial wood sealers are solvent-based and will out – gas harmful chemicals. We offer the following suggestions:

• Look for furniture with low-VOC, water – based natural oil or wax finishes.

• Buy unfinished furniture and finish with low-VOC finishes.

• If you purchase furniture with a standard finish, air it out before placing it in your living space.

Upholstery

Most commercially available upholstered fur­niture is stuffed with synthetic foam or latex. Many foams will initially have a strong odor. They will break down over time and emit fine particles of chemical dust into the air. Polyure­thane foams are extremely hazardous when burned. Furniture stuffing can be made with natural ingredients such as wool, natural la­tex, down, kapok, and organic cotton batting. Although these alternatives are not widely available in readymade form, you may find an upholsterer in your vicinity who is willing to work with you. A hardwood frame made for
a futon, or solid hardwood benches, can be turned into healthy couches with the addition of custom-made pillows. Down and kapok stuffings can be allergens for some people.

Upholstery textiles are often synthetic and treated with toxic chemicals to improve stain resistance. Look for natural, untreated uphol­stery fabrics such as organic cotton, wool, or silk. AFM Safe-Choice Lock Out can be used on some fabrics to help repel dirt and stains. Materials must be tested for shrink resistance and color fastness prior to application.

Some sources for all-natural upholstered furniture are:

• Cisco Brothers: FSC certified furniture

with water-based glues and environmen­tally friendly manufacturing processes

• Eco-terric: Green and healthy furnishings for the home, healthy-home consultation, and interior design

• Furnature: Manufacturer of natural, or­ganic furniture line, mattresses, and bed­ding for people with multiple chemical sensitivities

Window Dressings

Most window dressings are made of syn­thetic fabrics treated with chemicals to make them wrinkle resistant. The recommended

Tiling

Tile surfaces arable,

and—if you’re patient—fairly easy to install. Yet although tile has a hard finish, the ultimate dura­bility of the installation depends on the integrity of what lies beneath.

Choosing Tile

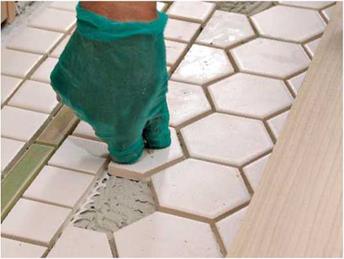
There’s a riot of tiles to choose from, including slate, white porcelain hexagonals, ruddy Mexican pavers, tumbled marble, glass mosaic, brick veneer, cast cement, limestone quarry tile embed­ded with fossils, and so on. You can even paint your own designs on unglazed tiles and then have them kiln-fired. Although some types of tile are better suited to certain uses than others, finding a tile you like is rarely a problem.

SEVEN TIPS FOR SELECTING TILE

► Where will you use it? Does it need to be waterproof? Does it need to withstand kitchenware?

► Sketch the area to be tiled. Include dimensions, fixtures, corners, odd jogs, and adjoining surfaces such as wood flooring or carpet. This sketch is a systematic first step in assembling a materials list.

► Choose a tile store with knowledgeable staff that will take the time to answer your questions. Plan to visit the shop on a weekday, which is likely to be less busy and thus a good time to get extra help. High-end tile stores have room mockups and may also have a Web site showing a wide selection of tiled kitchens and baths. Stores will also display many types of tile in 2 ft. sq. or 3 ft. sq. panels. Such visual expanses of tile convey much more than single-tile samples.

Подпись: ► If you like a particular tile, have your salesperson determine the manufacturer’s specs, which should tell you its suitability for various uses. For example, you wouldn’t want to install a wall-rated tile on a floor. ► At some point, reconcile the tiles you like with your budget. Some tile is breathtakingly Подпись: і ,6 : Щ, ; T/~ ^ FT? Hr Decorative and durable, tile can handle high humidity and heavy use-making it a great choice for kitchens and baths. A little Mexican, a little Moorish, this bathroom is always sunny.
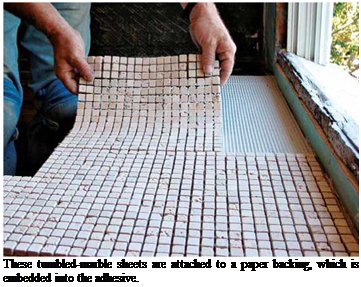
Подпись: These tumbled-marble sheets are attached to a paper backing, which is embedded into the adhesive. Подпись: Field and Trim Tileimage781image782expensive. Also check on availability. Will specially ordered tile arrive in time to meet your renovation schedule?
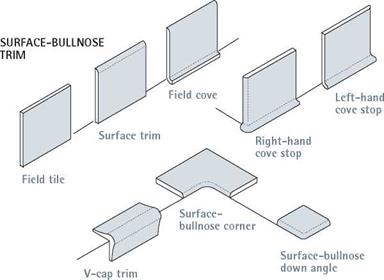
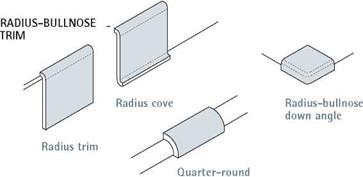
► Determine if trim tile is available for the pattern or type of field pattern you select. Trim tile is used to finish edges and corners and is especially important for counter installations.

► Test a tile sample at home. Here, you want to determine its suitability for your intended location by simulating actual use; for example, by scuffing it with shoes, banging it with pots, or dribbling it with water to check for absorption. Does the tile clean easily?

Color and size. In general, smaller tiles are bet­ter suited for small areas, such as counters. Larger tiles are more appropriate for larger areas, such as patio floors. Because light-colored tiles reflect more light, they make a room seem larger. Conversely, dark tiles make a room seem smaller. However, light colors tend to show dirt more readily. Vivid colors or busy designs can provide nice accents, but when used to cover large areas, they may seem overpowering.

Grout is a specialized mortar that seals the joints between tiles. Its color can make a big impact on the overall look. The closer the grout color matches the tile color, the more subdued and formal the surface. The more contrast between grout and tile, the busier, more festive, or more geometric the tile job will appear and the more it will highlight your tiling skill.

Manufactured vs. handmade. Mass-produced ceramic tile is popular because it has a clean classical look, and its uniform size makes it easy to install. Most smaller (й-in. to 2-in.) mass – produced tiles come evenly spaced and pre­mounted on paper sheets or fiberglass mesh, allowing you to simply to align the sheets’ edges.

image783

Trim tile is specially shaped to trim or finish off surface edges, corners, and the like and is thus distinguished from the main body of common, or field, tile. Trim tile is further classified as surface (or surface bullnose) and radius (or radius bullnose). Surface trim is essentially flat tile with one rounded edge. Radius trim, also known as quarter-round, curves dramatically to conceal the built-up bed on which it is set. Both types of trim include a range of specialty pieces that finish inside corners, outside corners, wall joints, and so on.

Подпись: PRO"ГIP Ask your tile supplier about appropriate adhesives each time you buy tile. The correct choice is not always obvious. Vitreous porcelain tile, for example, is not porous and so requires a strong, polymer-modified thinset. 1111 Подпись: Classic vitreous porcelain tile is widely used in bathrooms because it resists stains and sheds water.image784

Handmade tiles offer unique color and a handsome, handcrafted look. But these irregular tiles take greater patience and skill to lay out and install. Often handmade tiles need thinset adhe­sive applied to each back, as well as a thinset layer-troweled onto a setting bed. Because they are irregular, handmade may also need to be arranged with plastic spacers to align their edges with the underlying layout lines.

Sheet-mounted tiles. Some tile comes either face mounted or back mounted, typically on 12-in. by 12-in. sheets. You install face-mounted tiles by leaving the paper facing on till the adhe­sive dries. Then dampen the paper and remove it. Disadvantage: Paper facing obscures tile joints, making them tougher to align. Back-mounted sheets are easier to align, but the bond between the tile and the adhesive may be compromised slightly because the backing remains stuck in the adhesive.

STEP 2 INSTALL THE CEILING PANELS

It’s best to drywall the ceiling before you do the walls. This way, the top edges of the wall panels can butt up against the ceiling panels, support­ing them along the edges. The long edges of ceiling panels run perpendicular to the joists or joist chords. In bedrooms and other small rooms, you’ll probably be able to cover the full length of the ceiling with 12-ft. panels. If the ceiling is more that 12 ft. long, stagger the end joints where the panels butt together, just as you do on floor and roof sheathing panels. Try not to have a drywall joint land on an electrical or heat outlet, because this makes it harder to tape and hide the seam.

Measuring and cutting drywall panels

If you watch professional drywall installers measure and cut panels, you’ll be impressed with the speed and accuracy of their work. Although you may not achieve speed right away, accuracy is possible from the start if you use some of the tips explained here. With accurate cuts, you’ll have a much easier time mudding and taping the panels.

MAKE STRAIGHT CUTS. Instead of cutting a panel to the exact dimensions you measure on a wall or ceiling, cut it ‘/4 in. short. This leaves a ‘/s-in. gap on both sides of the panel, allowing you to fit the piece without binding on neighboring walls or panels. Make a straight cut by scoring along the cut line; snap the cut open so the panel folds back on itself and slice through the resulting crease on the back. Mark and cut on the “good” side of the panel.

If you have a drywall T-square and need to make a square cut, guide the knife against the edge of the square (see the top left photo on p. 21s). Take care not to let the knife slip and cut the hand that’s holding the T-square. Just cut through the paper and slightly into

Thermo-Hydro-Mechanical Coupling

The phenomena considered in this section are much more complex as they associate multiphase fluid flow and hydro-mechanical coupling (cf. relevant sub-sections of Section 11.3.2) as well as temperature effects. All the features described in the pre­ceding section are to be considered here, associated with some new points.

Heat diffusion has to be modelled. Temperature variation affects fluid flow, by a modification of the fluid specific weight or viscosity. Moreover, if the two fluids concerned are a liquid and a gas (e. g. water and air), then equilibrium between the phases has to be modelled: dry air – vapour equilibrium.

Heat transfer is governed not only by conduction but also by advection by the liquid and gas movements. Similarly, transfers of vapour and dry air in the gas phase are not only governed by diffusion and gradient of species density, but also by advection of the global gas movements.

In such an analysis, the total number of d. o.f. per node is 5 for a 2D problem: 2 displacements, 2 fluid pore pressures and the temperature.

Soundproofing

Most noise-related problems can be solved inex­pensively, without major architectural remedies. Basically, you can install materials that absorb sound or try to reduce the sound’s transmission by isolating it.

SOUND-ABSORBING MATERIALS

Within a room, use materials that absorb sound. Absorbent materials are often soft, porous, or bulky, such as carpet, cork, cloth drapes, furni­ture, or a shelf full of books. Conversely, avoid hard, highly finished surfaces that reflect soundwaves.

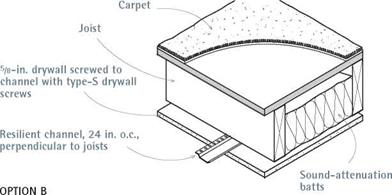
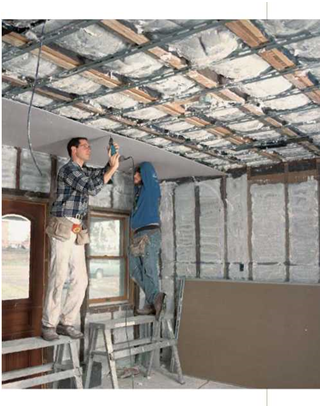
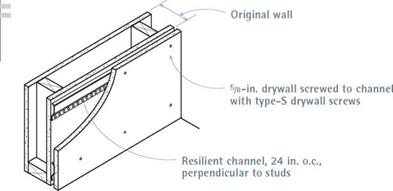
Fiberglass batts stapled between wall studs and ceiling joists are perhaps the most common means of absorbing sound. Two layers of 58-in. drywall, 358 in. of fiberglass, and the air trapped in the wall will muffle sound effectively. You can also insulate between ceiling joists with fiber­glass batts, nail up resilient channels, and then attach 58-in. drywall to the channels with 154-in. type-S drywall screws. Metal resilient channels are commonly used to hang ceilings and even walls. The resilient channel allows the surface to float, so it can move imperceptibly as sound­waves strike it.

A less common option is cellulose and mineral fibers troweled or sprayed onto walls and ceil­ings, somewhat like an acoustical plaster—the thicker the better. By using a special sprayer, you can apply these compounds up to 3 in. thick. Rigid-foam insulation panels are another option, but because the panels must be carefully fit and caulked to stud and joist bays, most installers opt for friction-fit fiberglass batts instead.

ISOLATING SOUND

Isolating sound, such as constructing double walls, generally takes more work and expense.

In addition, wherever sound can be transmitted through the building structure, you should add resilient materials.

If you have a central hot-air heating system, fans can be annoying sources of noise, causing vibration along ductwork. In this case, try to

image775Подпись: OPTION A To reduce sound transmission through an existing wall, attach resilient channel and a layer of 5/8-in. drywall. image776Подпись: Deaden noise between floors by carpeting the floor, insulating between joists, and installing a ceiling of resilient channel and drywall underneath. For optimal sound deadening, insulate with special sound-attenuation batts.Подпись: Original wall New framing Sound-attenuation batts Apply sealant around wall edges. Подпись: 5/8-in. drywallПодпись: 1/2—in. cut through subflooring interrupts sound path.Подпись: OPTION C Double walls with discontinuous flooring is effective but eats up living space.

image777

Options for Deadening Sound

attach flexible collars (neoprene or canvas) to isolate ductwork vibration. Likewise, if your bedroom is plagued by a noisy fan in a heating system, you can reduce the noise either by remounting or replacing the fan or by packing insulation where the ductwork passes through a wall.

Double walls effectively isolate sound, but they require a lot of material and dramatically reduce room space. To further deaden (and literally cut off) the transmission of sound, say, between floors and walls, you can also cut a kerf through the flooring and subflooring between two walls. The kerf should stop short of the floor joists, however. (^) Note: If either of the double walls contains electrical outlets, turn off the elec­tricity and check with a voltage tester before cut­ting such a kerf.

Resilient neoprene or foam-rubber pads above the stud-wall top plates and below the sole plates can further deaden sound transmission. Any opening in a wall will allow sound to enter. If you need an extremely quiet room, minimize the number of doors and windows, and weatherstrip them. Installing weatherstripping gaskets around interior doors also cuts sound. Finally, minimize the openings that run through walls, such as ducts, back-to-back electrical outlets, and so on.

Soundproofing

Flow of Two Fluids in Rigid Porous Media

The coupled flow of two, different, fluids in a partly saturated rigid media is now considered. Unsaturated soils provide a common example, where the two fluids are water and air. Often, the air phase is considered to be at constant pressure, which is generally a relevant approximation as air pressure doesn’t highly affect the water flow. In such an arrangement only one d. o.f. per node is sufficient, and the classical diffusion equations (see Eq. 6.10) are relevant, with parameters depending on the suction or saturation level.

Mixing between different fluids is sometimes possible. Then two or more d. o.f. per node are to be considered. The permeability and storage equations of each phase depend on the suction or saturation level, and so the problem may be highly non­linear. However, it is not difficult to numerically develop coupling, as the formula­tion is similar for each phase.

11.3.2.2 Diffusion and Transport Coupling

Heat and single fluid flow in a rigid porous media are considered here. The fluid specific weight and viscosity are dependant on the temperature or salt concentration, and the heat or salt transport by advection-diffusion process is dependant on the fluid flow. Then a diffusion process and an advection-diffusion process have to be solved simultaneously. In this case there are 2 d. o.f. per node: fluid pore pressure and salt concentration or temperature.

Results of SMA Compactability Tests

SMA is a hard-to-compact mixture, and as a gap-graded mixture, it is characterized by a higher compaction resistance than materials with continuous gradation. The conclusions of tests carried out in Germany (Renken, 2004) on an SMA mixture revealed the following:

• An increase of the filler content brings about a drop in compaction resistance.

• An increase of the coarse aggregate content (particles larger than 2 mm) causes a sharp rise in compaction resistance.

• An increase of the binder content slightly reduces the compaction resistance.

Additionally, practice has proved that an increase in the manufactured sand content results in an increase in compaction resistance and that the opposite is true for the quantity of binder (those are commonly known relations). SMA mixtures with a low content of voids (1.5-2.5% v/v) are compacted more easily than those with a content greater than 4% v/v (Schroeder and Kluge, 1992).

When producing an SMA mixture, substantial deviations in batching the filler, binder, and coarse aggregate fraction also promote changes in compaction resis­tance, in addition to alterations in other properties.

RESTORING PLASTERWORK

Think twice before trying to restore damaged crown molding, medallions, or other plaster ceil­ing ornaments. Plastic or composite reproductions of plaster elements are good-looking, lightweight, easy to install and—once painted—indistinguish­able from plaster ornaments. Given the hourly rates of a skilled plasterer, replacing plaster with plastic repros is often more cost-effective.

However, if your plaster ornament has a repet­itive pattern with only a few damaged sections, you can cast replacement sections by creating a mold from an original, undamaged section.

Removing an ornamental section. If you want to make a casting, you need to remove an undamaged ornamental section. First, support the section that you will remove. To do this, posi­tion a 2×4 tee, its head covered with rubberized floor padding, under the ornament to cushion and protect its delicate details. Then use a circu­lar saw with a carborundum blade or a recipro­cating saw with an 18-teeth-per-inch (TPI), bimetal demolition blade to cut around the sec­tion. The section should include a complete pat­tern repeat plus 2 in. on each end to allow for some damage when you remove the piece. This is dusty work and you’re sure to hit nails, so wear a respirator mask and goggles.

О Note: There may well be wires or pipes run­ning through the ceiling, so explore beforehand after turning off the electricity to the area. In many cases, ceiling joists will be exposed in the attic above. Plan cuts so they miss wires and pipes. Replacing the section will be easier if you don’t cut through the lath, but that’s sometimes impossible to avoid. After cutting around the sec­tion, you can often slide a chisel behind it, and try to break off the plaster keyed into lath spaces.

Casting replacement sections. To reproduce replacement sections, you must first create a mold. After you’ve removed an original section in good condition, use a toothbrush to remove flak­ing paint; then repair any small damage with plaster of paris. Shellac the section so its surface will be slick. Then let it dry.

Casting Larger I Replacement Molding

image773

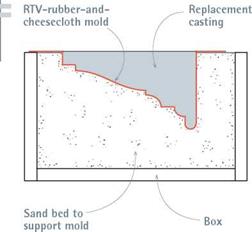
When a repetitive plaster pattern is damaged, replace damaged sections with castings made from sections that are intact.

image774Подпись: YOUR FINGERSПодпись: To mix plaster, pour it into water as you wiggle your fingers in the bottom of the pan. Mixed that way, the plaster will set slowly and will be usable longer. If you pour water into plaster, on the other hand, it will start setting within 5 minutes. Plaster is easier to clean up if you mix it in a plastic tub. Allow it to dry, and then strike or twist the bottom of the tub to make the plaster fall out in chunks. To make the mold, paint on a coat of RTV rub­ber and allow it to dry. Thereafter, alternate strips of cheesecloth and rubber, allowing each RTV – and-cloth layer to dry before applying the next coat. Three or four layers should give you a mold that’s sturdy enough. When the final coat is dry, peel the RTV mold off the original plaster sec­tion, and pour a new casting into the mold.

Here are some thoughts on casting materials. Although plaster is a suitable casting material, it’s heavy. If the original object is large—for example, a ceiling medallion—consider casting with a lightweight polymer like polyurethane or poly­styrene, which won’t shrink, paints well, and is available in different densities. Or you may need to support the mold in a bed of sand, so the new casting material doesn’t distort the mold. For such larger casts, fill a large enough box with sand, and—before peeling the mold from the original plaster section—press the mold into the sand. Then lift out the mold, and peel the rubber carefully from the original plaster. Return the empty mold into the impression it made in the sand. Pour the new plaster (or polymer), and level it off to the top of the mold. When the cast­ing is completely dry, lift it and the mold out of the box, and peel off the mold.

Installing new castings. Once you have cast replacement sections, measure both the damaged and replacement sections carefully so the repeti­tive pattern will match exactly when you install each replacement section. Then cut out the dam­aged ceiling sections, leaving the lath intact and being careful to cut the ends as cleanly and squarely as possible.

Before cutting the new casting to length, mini­mize fragmentation by first scoring the cutting line with a utility knife and then cutting with a fine-toothed hacksaw.

How you attach the replacement piece depends on its composition. If your casting is plaster, use Durabond 90 quick-setting com­pound to adhere the plaster ornament to the lath. Dampen the replacement piece so it doesn’t leach moisture from the Durabond, and use the 2×4 tee to support it till the compound sets—about 90 minutes. For good measure, predrill holes at a slight angle, every 10 in. along the edge of the casting to receive drywall screws with plaster washers. But if your replacement casting is a lightweight polymer, you won’t need screws. A few beads of construction adhesive or white glue will do the job. Before setting the replacement piece, dry-fit it to make sure it’s the same thick­ness as the old plaster; you may need to build it up slightly. Last, fill the cracks or flaws where the new sections join old, before painting the restored ornaments.

FREEWAY LIGHTING CONSIDERATIONS

Freeway lighting can substantially reduce accident frequency and increase capacity. Lighting is of additional benefit in freeway operations by providing motorists addition­al warning time of stalled or disabled vehicles on the roadway. A listing of the specific conditions considered by most authorities to warrant lighting is included below.

7.16.1 Warranting Conditions for Continuous Freeway Lighting

Continuous lighting along the freeway is warranted in the following cases:

Case CFL-1. On those sections in or near cities where the current average daily traffic (ADT) is 30,000 or more.

Case CFL-2. Where three or more successive interchanges are located with an average spacing of 1!/> mi (2.4 km) or less and adjacent areas outside the right-of – way are substantially urban.

Case CFL-3. Where for a length of 2 mi (3.25 km) or more the freeway passes through a developed suburban or urban area in which at least one of these conditions exists: (1) local traffic operates on a complete street grid having some form of street lighting, parts of which are visible from the freeway; (2) the freeway passes through a series of developments that are lighted; (3) separate cross streets with or without connecting ramps occur with an average spacing of L mi (0.8 km) or less, some of which are lighted as part of the local street lighting system; (4) the freeway cross­section elements, such as median and borders, are substantially reduced in width.

Case CFL-4. Where the ratio of night accidents to day accidents is at least 2.0 or higher than the statewide average for all unlighted similar sections and lighting may be expected to result in a significant reduction in the night accidents [3].