RESTORING PLASTERWORK
Think twice before trying to restore damaged crown molding, medallions, or other plaster ceiling ornaments. Plastic or composite reproductions of plaster elements are good-looking, lightweight, easy to install and—once painted—indistinguishable from plaster ornaments. Given the hourly rates of a skilled plasterer, replacing plaster with plastic repros is often more cost-effective.
However, if your plaster ornament has a repetitive pattern with only a few damaged sections, you can cast replacement sections by creating a mold from an original, undamaged section.
Removing an ornamental section. If you want to make a casting, you need to remove an undamaged ornamental section. First, support the section that you will remove. To do this, position a 2×4 tee, its head covered with rubberized floor padding, under the ornament to cushion and protect its delicate details. Then use a circular saw with a carborundum blade or a reciprocating saw with an 18-teeth-per-inch (TPI), bimetal demolition blade to cut around the section. The section should include a complete pattern repeat plus 2 in. on each end to allow for some damage when you remove the piece. This is dusty work and you’re sure to hit nails, so wear a respirator mask and goggles.
О Note: There may well be wires or pipes running through the ceiling, so explore beforehand after turning off the electricity to the area. In many cases, ceiling joists will be exposed in the attic above. Plan cuts so they miss wires and pipes. Replacing the section will be easier if you don’t cut through the lath, but that’s sometimes impossible to avoid. After cutting around the section, you can often slide a chisel behind it, and try to break off the plaster keyed into lath spaces.
Casting replacement sections. To reproduce replacement sections, you must first create a mold. After you’ve removed an original section in good condition, use a toothbrush to remove flaking paint; then repair any small damage with plaster of paris. Shellac the section so its surface will be slick. Then let it dry.
Casting Larger I Replacement Molding
|
|
When a repetitive plaster pattern is damaged, replace damaged sections with castings made from sections that are intact.
![]()

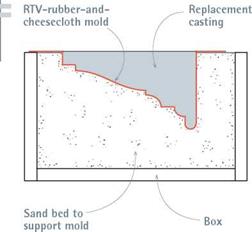
 To make the mold, paint on a coat of RTV rubber and allow it to dry. Thereafter, alternate strips of cheesecloth and rubber, allowing each RTV – and-cloth layer to dry before applying the next coat. Three or four layers should give you a mold that’s sturdy enough. When the final coat is dry, peel the RTV mold off the original plaster section, and pour a new casting into the mold.
Here are some thoughts on casting materials. Although plaster is a suitable casting material, it’s heavy. If the original object is large—for example, a ceiling medallion—consider casting with a lightweight polymer like polyurethane or polystyrene, which won’t shrink, paints well, and is available in different densities. Or you may need to support the mold in a bed of sand, so the new casting material doesn’t distort the mold. For such larger casts, fill a large enough box with sand, and—before peeling the mold from the original plaster section—press the mold into the sand. Then lift out the mold, and peel the rubber carefully from the original plaster. Return the empty mold into the impression it made in the sand. Pour the new plaster (or polymer), and level it off to the top of the mold. When the casting is completely dry, lift it and the mold out of the box, and peel off the mold.
Installing new castings. Once you have cast replacement sections, measure both the damaged and replacement sections carefully so the repetitive pattern will match exactly when you install each replacement section. Then cut out the damaged ceiling sections, leaving the lath intact and being careful to cut the ends as cleanly and squarely as possible.
Before cutting the new casting to length, minimize fragmentation by first scoring the cutting line with a utility knife and then cutting with a fine-toothed hacksaw.
How you attach the replacement piece depends on its composition. If your casting is plaster, use Durabond 90 quick-setting compound to adhere the plaster ornament to the lath. Dampen the replacement piece so it doesn’t leach moisture from the Durabond, and use the 2×4 tee to support it till the compound sets—about 90 minutes. For good measure, predrill holes at a slight angle, every 10 in. along the edge of the casting to receive drywall screws with plaster washers. But if your replacement casting is a lightweight polymer, you won’t need screws. A few beads of construction adhesive or white glue will do the job. Before setting the replacement piece, dry-fit it to make sure it’s the same thickness as the old plaster; you may need to build it up slightly. Last, fill the cracks or flaws where the new sections join old, before painting the restored ornaments.


Leave a reply