Warranting Conditions for Complete Interchange Lighting

Complete lighting of freeway interchanges is warranted under the following circumstances:

Case CIL-1. Where total current ADT ramp traffic entering and leaving the freeway within the interchange area exceeds 10,000 for urban conditions, 8000 for suburban conditions, or 5000 for rural conditions.

Case CIL-2. Where current ADT on the crossroad exceeds 10,000 for urban con­ditions, 8000 for suburban conditions, or 5000 for rural conditions.

Case CIL-3. Where existing substantial commercial or industrial development, which is lighted, is located in the immediate vicinity of the interchange; or where the crossroad approaches are lighted for at least L mi (0.8 km) on each side of the inter­change.

Case CIL-4. Where the ratio of night accidents to day accidents within the inter­change area is at least 1.5 times higher than the statewide average for all unlighted similar interchanges and lighting may be expected to result in a significant reduction in the night accident rate.

7.16.2 Warranting Conditions for Partial Interchange Lighting

Partial lighting of freeway interchanges (Fig. 7.58) is warranted when the following circumstances exist:

Case PIL-1. Where the total current ADT ramp traffic entering and leaving the freeway within the interchange area exceeds 5000 for urban conditions, 3000 for suburban conditions, or 1000 for rural conditions.

Case PIL-2. Where the current ADT on the freeway through traffic lanes exceeds 25,000 for urban conditions, 20,000 for suburban conditions, or 10,000 for rural conditions.

■ c Safety

Clearance

Paved Shou der

Shou der Nose

Safety

Cearance

=-____

Optional

Unit

(b) ENTRANCE RAMP

FIGURE 7.58 Typical luminaire locations for partial interchange lighting.

Case PIL-3. Where the ratio of night accidents to day accidents within the inter­change area is at least 1.25 times higher than the statewide average for all unlighted similar sections and lighting may be expected to result in a significant reduction in the night accident rate.

Classification of systems

From the reliability computation viewpoint, classification of the system depends primarily on how system performance is affected by its components or modes of operation. A multiple-component system called a series system (see Fig. 7.1) requires that all its components perform satisfactorily to allow satisfactory performance of the entire system. Similarly, for a single-component system involving several modes of operation, it is also viewed as a series system if satisfactory performance of the system requires satisfactory performance of all its different modes of operation.

A second basic type of system is called a parallel system (see Fig. 7.2). A parallel system is characterized by the property that the system would serve its intended purpose satisfactorily as long as at least one of its components or modes of operation performs satisfactorily.

For most real-life problems, system configurations are complex, in which the components are arranged as a mixture of series and parallel subsystems or in the form of a loop. In dealing with the reliability analysis of a complex system, the general approach is to reduce the system configuration, based on the ar­rangement of its components or modes of operation, to a simpler situation for which the reliability analysis can be performed easily. However, this goal may not always be achievable, in which case a special procedure would have to be devised.

SETTING BEDS

Tile can be set on a variety of setting beds. Keep in mind that the substrate below the setting bed must be securely attached to the framing mem­bers. That assembly must be thick and stable enough to support loads with minimal deflection (J4(> of the span). And when used in damp or wet areas, it needs to remain unaffected by sustained exposure to water.

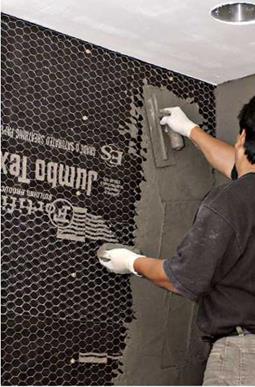
Mortar beds. Where walls aren’t plumb, floors aren’t flat, and corners aren’t square, mortar beds are usually the best setting bed. They can easily be screeded level or plumb to create a flat sur­face. In fact, a mortar bed is the only practical choice if you’re tiling the sloping floors of a shower stall. But few novices have enough skill to float a mortar bed. If your surfaces are badly out

image792

Applying mortar beds takes strength and a lot of skill. After installing a curing membrane and attaching wire mesh, you must carefully mix and trowel the mortar on, level or plumb float strips, and screed off excess mortar till the bed is uniformly flat. Then, after it has set a bit, use a wood float to roughen its surface slightly, which improves the adhesion for the thinset to follow

of whack and you’re not experienced in floating mud, hire a pro for this job.

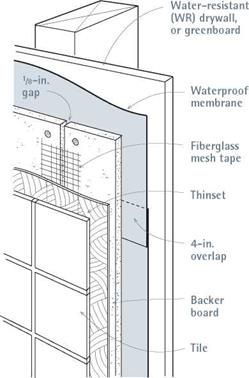
Backer board. If walls and floors are reasonably plumb and level, backer board is a durable set­ting bed for wet and dry installations. It’s stable, unaffected by moisture, and easily cut and attached. Backer board is also called cementi­tious backer units (CBUs), HardiBacker®, Durock®, and WonderBoard—the last three being popular brands. These products feature a cement-based core, reinforced by fiberglass mesh or integral fibers. Because there’s considerable variation among brands, always consult product literature for details on installation.

Glass-mat gypsum board. This board (one brand is DensShield®) has a water-resistant core and heat-cured acrylic coating. It’s not as rugged as backer board, but it’s an acceptable setting bed in tub surrounds and other light-duty wet areas. Don’t confuse this product with drywall. Glass – mat gypsum board is specifically designed to be a tile backer.

Unpainted drywall. Drywall is an acceptable setting bed where walls stay dry. Caution: Never bond tile directly to drywall in damp or wet installations. Water-resistant (WR) drywall (or greenboard) is an acceptable substrate in damp or wet installations only when it is covered with a waterproofing membrane and then a mortar bed or backer board.

Tile applied directly to drywall in wet installa­tions invariably fails sooner or later, often because people showering bump the walls, com­pressing the drywalls gypsum core. No longer supported evenly by the core, the grout loosens, water enters and soaks the paper, and—all too often—the framing rots.

Exterior-grade plywood. It’s usually a mistake to use plywood, even exterior grade, as a setting bed. Exposed to moisture, plywood tends to swell and delaminate. If you must use it as a setting bed for floor or countertop installations, be sure to cover it with a continuous waterproofing membrane; the base should be at least 1 Ys-in. thick (for example, h-in. plywood underlayment laminated to a %-in. plywood subfloor). On walls, %-in. plywood is the minimum. Never use parti­cleboard, oriented strand board (OSB), or interi­or-grade plywood as setting beds.

Self-leveling compounds. Self-leveling com­pounds (SLCs), such as LevelQuik®, have many of the virtues of a mortar bed but require few of the skills needed to float one. Basically, SLCs are fortified mortar powders mixed thin and poured onto out-of-level floors. With a small amount of troweling, they spread across the floor and, with­in minutes, start to set. Just 2 hours later you’ve got a hard, almost perfectly level mortar-setting bed ready to tile.

That’s the short list of common setting beds. For other materials see "Odd or Problematic Setting Beds,” on p. 392.

ADHESIVES

Once you’ve chosen a suitable setting bed for your wet or dry installation, choose a compatible adhesive. Adhesives vary greatly from brand to brand, so again, always follow the manufacturer’s mixing and application instructions exactly.

There are three major groups of adhesives: mas­tics, which come ready mixed; thinset adhesives, which are cementitious powders generally mixed on-site just before setting the tile; and epoxy thin – sets that, like most epoxies, require your mixing a hardener and a resin.

Organic mastics are the least expensive of the three adhesive options. Because they come premixed, they’re the most convenient option, but they’re also the weakest. They are okay for attaching tiles to dry counters or walls—over dry- wall, for example—but they’re inappropriate

Подпись:

where there’s water, heavy use, or heat. Mastics just don’t have the strength of thinsets.

Mastics require a nearly flat setting bed. That is, when they are applied thickly to fill voids, they neither cure completely nor bond thoroughly. Mastic cleans up well with water or solvent if you remove the excess material at once. Opened con­tainers don’t keep well, so throw away any left­over mastic after you’ve set the tiles.

Thinsets have great bonding and compressive strength. Being cement based, they bond best with mortar beds or backer board but are appropriate for virtually all setting-bed materials. Thinsets are also used to laminate rigid setting beds to sub­strates in order to create an inflexible substructure for tiling. (Construction adhesive is also used in such laminations, but it is flexible and so doesn’t achieve the rigidity of a thinset lamination.)

Despite the cement ingredients they have in common, thinsets vary widely, depending on their additives. Water-based thinsets are the weakest of the group, although they are generally stronger than mastics. Latex – and acrylic-based thinsets (also known as polymer-modified thin – sets) are strong and somewhat water resistant and are, all in all, the best choice for bonding tile to backer board, mortar beds, SLCs, drywall, and concrete slabs. And they’re a close second for bonding almost everything else.

Most thinsets are mixed from powder. After mixing, they have a "bucket life” of about 2 hours. After being troweled onto a setting bed, they start to set in 15 minutes to 20 minutes.

Epoxy thinsets have excellent compressive and tensile strengths. They also bond well and yet retain flexibility when cured. After drying, they are unaffected by moisture and so are suitable for all situations and substrates. There’s a catch, of course: Epoxies are four or five times more expensive than other thinsets and quite tempera­mental. You must mix the liquid resins and hardeners in exact proportions with the dry ingredients. Setting times are similarly exacting. If directions say 20 minutes, you can set your watch by them. Above all, clean up epoxy before it sets; some types sponge clean with water, others with solvents.

GROUT

Grout is a specialized mortar that seals the joints between tiles. Most grouts contain sand, cement, and a coloring agent. Grout may also contain additives to stabilize color, increase water and stain resistance and increase strength and flexi­bility. Most grouts and premixed additives are sold as a powder, which is subsequently mixed with liquid and allowed to stand (or slake) for

Waterproofing a Tub Surround

image794

This tub surround would be sufficiently rigid without the WR drywall. But installers frequently add a drywall layer to build up the wall thickness when they’ll be using bullnose edge trim.

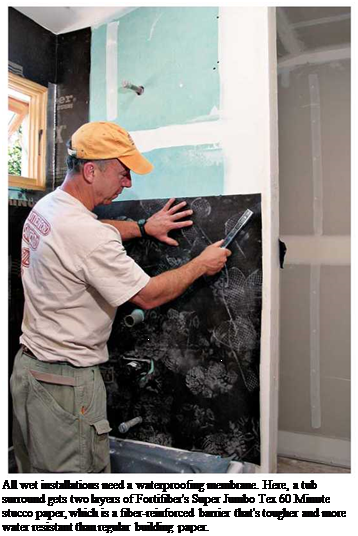
Подпись: Manufacturers frequently change their grout colors, so buy 10 percent more than you need for your current installation. Once the job is done, wrap the extra grout in a plastic bag, label it as to where it was used, and store it in a dry place. While you're at it, buy caulking the same color as your grout; many tile stores carry color-matched caulk, both sandless and sanded. llll Подпись: All wet installations need a waterproofing membrane. Here, a tub surround gets two layers of Fortifiber's Super Jumbo Tex 60 Minute stucco paper, which is a fiber-reinforced barrier that's tougher and more water resistant than regular building paper.

10 minutes before final stirring to the correct consistency.

Use sandless grout for joints narrower than ‘/ in. Use sanded grout for joints Z in. and wider.

Most tile suppliers carry grout in hundreds of colors. Whatever the color, remember that the greater the contrast between grout and tile, the more obvious the joints and workmanship.

MEMBRANES

Tile, grout, and many setting beds are unaffected by water. But they are porous, so water can migrate through them, potentially damaging plywood sub­strates or wood framing. To prevent such damage in damp or wet areas, install a waterproofing membrane first. Even areas that are normally dry, such as entryways, should have a modest building – paper membrane if the floors will be subject to wet mopping and dripping umbrellas.

For walls above the water line in wet areas and for countertops subjected to occasional water, a 15-lb. building-paper membrane is stan­dard, but installing a 60-minute stucco paper
(which is impermeable for 60 minutes) makes sense. It’s stronger, less likely to tear, and more water resistant. When installing such membranes, overlap the lower courses and vertical seams of paper by 4 in. Although some builders recom­mend 4-mil. polyethylene as a waterproofing membrane, stucco paper has one big advantage: Unlike plastic, it is semipermeable. Therefore, it allows water to escape should any get behind the barrier.

Below the water line, such as in a shower pan, you need to protect wood substructure with an impervious membrane. Thus most shower pans are lined with sheet rubber, such as 30-mil, fiber-reinforced chlorinated polyethylene (CPE), whose seams are overlapped and chemically bonded with a solvent. Of course, you don’t want to puncture CPE shower-pan membranes with screws or nails. Instead, roll the membrane onto a fresh layer of latex thinset adhesive, and cover it with a mortar bed.

Note: The comments in this section are gener­alizations. Follow the manufacturer’s installation instructions for specific adhesives, membranes, and setting-bed materials.

SETTING AND GROUTING

Setting means positioning and adhering tile to a substrate. Grouting means sealing the joints between tiles with a special mortar.

A notched trowel spreads adhesive. Two edges of the tool are flat, designed to spread the adhe­sive initially. Then on subsequent passes, use the notched edges to comb a series of parallel ridges, which will spread evenly when the tile is pressed into it. Notch height should be about two-thirds the thickness of the tile.

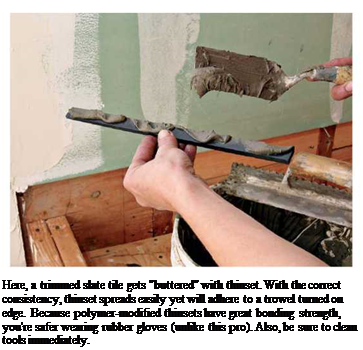
A margin trowel is a utility tool that’s great for mixing small batches of powdered adhesives, cleaning mortar off other trowels, buttering indi­vidual tiles with adhesive, and removing excess grout or adhesive that oozes up between tiles.

Plastic spacers and wedges enable you to shim individual tiles so their edges align to your layout lines.

A beater board is just a flat board placed over tile sections and rapped gently with a rubber mallet to seat the tiles in the adhesive. Not all tilesetters use a beater board. Many just press tiles in firmly or use a fist to seat them better.

image791

A grout float (rubber-faced trowel) applies grout in a process that takes at least two passes. Holding the face of the grout float at about 30°, sweep the grout generously over the tile and pack it into the joints. Then, holding the float almost perpendicular to the surface, remove the excess grout, unloading it periodically into a bucket. To avoid pulling grout out of the joints, make your passes diagonally across the tile joints.

Round-cornered, tight-pored sponges are less likely to pull grout out of tile joints. After grout starts to haze over, wipe lightly with a dampened sponge, rinsing the sponge often. Get several types of sponges. Kitchen sponges with scrub pads on the back are useful for removing stub­born grout.

A mixing bit in an electric drill can mix large amounts of powdered adhesives or grout. Slow mixing speeds of 300 rpm to 400 rpm work best. And keep the bit immersed to minimize mixing in air, which weakens the batch. Wear a respira­tor mask.

Materials

Here’s a quick survey of materials you might use to create a durable tiling job.

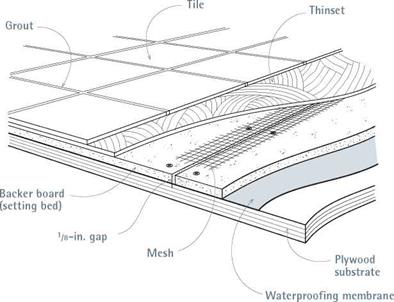
Think of the job as if it were a layer cake. For example, in floor tiling, the bottom layer (concep­tually the table under the cake) would be the floor joists. Nailed to the joists, in most cases, is a plywood substrate. For a wet installation such as a shower wall, next comes a waterproofing mem­brane, followed by a setting bed of cementitious backer board or a mortarbed. Troweled onto the setting bed is a setting material, typically thinset adhesive or organic mastic. Tiles are applied to the setting bed, and once the bed has hardened, tiles joints are grouted. Later, a sealer may be

Mastering the mess

Controlling the mess is a big part of successful tile setting. If you’re tiling a tub surround, cover floors with builder’s paper or plastic, mask off cabinets, and line the bathtub with a heavy can­vas drop cloth before you start. Masonry debris is very abrasive, so vacuum as it accumulates. Also, keep a clean 5-gal. plastic bucket (joint compound pails are perfect) full of clean water for sponging mortar, adhesive, or grout off tools. Last, a bundle of clean dry rags is useful for buffing dried grout haze off tile and soaking up messes.

I Typical Wet Installation Floor applied to make tile and grout more water or stain resistant.

Methods and materials are rarely predictable in renovation, so it’s a good idea to survey the back or underside of the surface you’re about to tile, both to see how many layers there are and to check if they’re in good condition. You can pull out a heating register to see a cross-section of the flooring, for example. Or test-drill a small hole in an inconspicuous spot to determine the thickness and composition of an existing wall, floor, or countertop.

Use a drywall router to save time

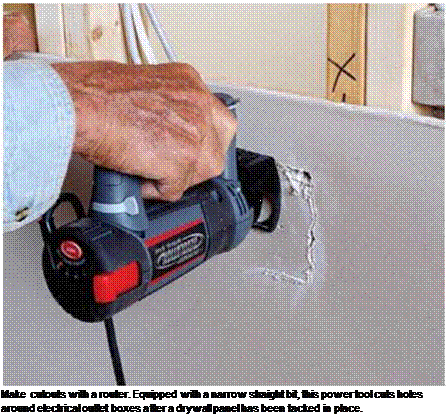
Most of the time you can drywall right over door and window openings, attic access holes, and heating vents, then cut around the outlet boxes with an electric drywall router, as shown in the top photo at right. (Get a feel for this tool by making some practice cuts on scrap drywall.)

Make sure the electrical wires are shoved to the back of all the boxes, and double-check to be sure there isn’t power at any of the boxes for which you’re routing holes. Tack the sheet on the ceiling or wall, then mark on the sheet the location of each outlet with a line noting the edge of the box and an “X” showing the side the outlet is on. Don’t nail too near the outlet or you could break the drywall, but be sure to drive enough nails or screws into ceil­ing panels so they won’t fall down.

Set the router bit to extend aboutъ/ in. past the base plate. With the router running, insert the bit into the center of the box and gently move it until it hits the side of the box. Pull the bit out and reinsert it just to the outside of the box. Cut in a counterclockwise direction, maintaining slight pressure against the box.

The router generates some dust, so wear a good mask. A router or a large drywall saw can be used to cut larger openings as well.

Dimples are essential

Before you install the first panel on the ceiling, it’s important to understand how to fasten drywall to the joists, studs, and other framing members. Whether you’re using nails, screws, or both, yon must leave a dimple in the panel with every fastener you drive. This small recess will later be filled with drywall com­pound as the wall surface is filled and finished. Screw guns can be set to pull the drywall panel tightly against the framing members and drive the screw just below the surface

without breaking the face paper. If you’re driv­ing nails instead of screws, your last hammer blow should push the drywall tightly against the wood and set the head of the nail in a shallow dimple without breaking the paper surface (see the bottom photo below).

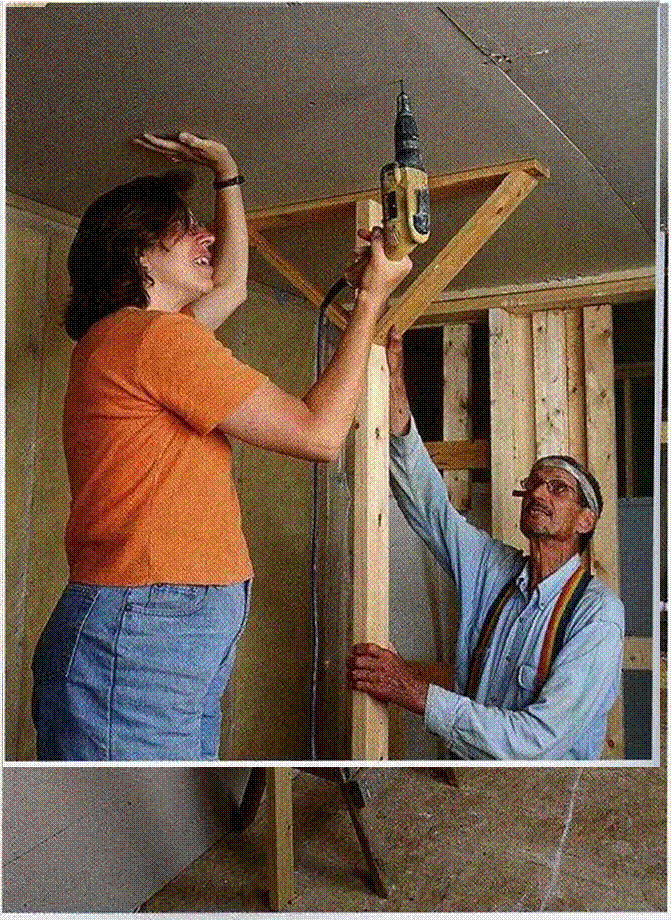
Подпись: Helping HandПодпись: Rent your equipment. You can buy or rent a com-mercial lifter that holds drywall against the ceiling as you fasten it in place, or you can make your own inexpensive supports from some scrap lx stock. The braces, sometimes referred to as dead men or preachers, are extremely useful; I don't hang drywall without a pair of them.

Подпись: T-SUPPORTS ARE HELPFUL HOLDERS. Easily made on the job site, T-supports hold ceiling panels in place, allowing you to concentrate on driving nails or screws.
Use a drywall router to save time

Dead men are useful

Whether you have one helper or several, you 11 find it useful to have a couple of drywall T-supports (also called preachers or dead men) to brace each panel against the framing while you drive enough screws to secure it. If possible, always start by installing a full-size sheet against one corner of the ceiling. Lift one end of the sheet into position, then raise the other end against the joists while holding the edge against the wall. Wedge the T-supports underneath the panel, then nudge the panel into its final position. Set up short ladders or sawhorses to stand on as you drive the fasteners (see the photos above).

Fasten according to code

Hold screws or nails back about % in. from the edges of the panel, and drive them in straight so you don’t break the paper. Follow the fas­tening schedule for drywall that applies in your area. When ceiling joists are 24 in. o. c., nails or screws are usually driven every 8 in. along the edge of the panel and every 12 in. in the middle.

Some builders use drywall panel adhesive when attaching sheets of drywall. The adhe­sive is applied with a caulking gun, just like caulk or sealant. With panel adhesive, the need for screws or nails is greatly reduced. Don’t use adhesive over a poly vapor barrier or kraft

г


STARS

Подпись: Even complicated stairs become easy when broken down into simple tasks. (Photo by Roger Turk.)

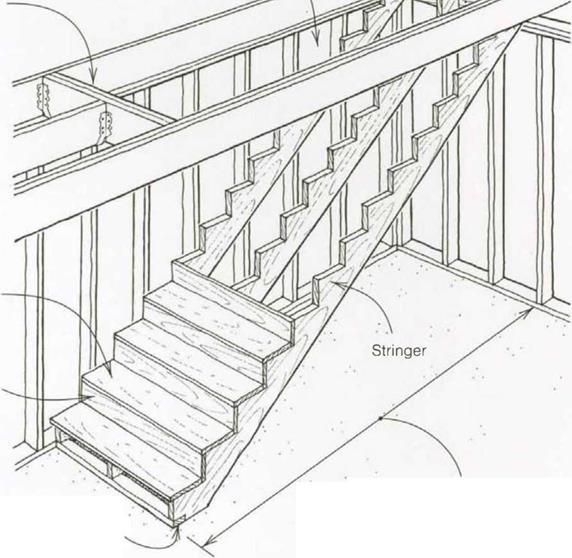
Stairs, like roofs, come in many different styles and shapes. There are straight stairs, L-shaped or U-shaped stairs, winders (stairs that change direction over the course of several steps), and even circular stairs. They can be as basic as treads attached to a couple of stringers or as ornate as a double-helix beauty that spirals upward toward the sky. From the simple to the complex, every stair has the same basic purpose: to get us safely from one level to another.

What’s more, every stair uses the same basic layout principles. So building stair­ways, like framing roofs, is actually quite easy to understand if you break the job down into simple tasks. In fact, you don’t need many special skills or tools to build most stairs. What you will need to know are the names of stair parts, the codes regulating stairs so that they’re safe for people to use, and a bit of math to calculate the number and size of steps. This knowledge, coupled with the ability to use a framing square to lay out the stair stringers, will allow you to cut and assemble the stair parts into a strong and durable stairway that is safe and comfortable to use. (To learn basic stair vocabulary and codes, see the side – bar on the facing page.)

Stairwell The hole in a floor through which a stair passes on its way from one level to the next.

Headroom The vertical distance from stair treads to ceiling joists. Must be at least 6 ft. 8 in.

Stringers The wooden members that run diagonally and support the treads and risers (also called carriages and horses). Three are required for most 3-ft.-wide stairs.

Riser The vertical part of a step. For safety, keep this figure near 7 in.

Tread The horizontal portion of a step (where you set your foot). Each tread needs to be at least 10 in. wide.

Landing A level place at the top and bottom of stairs (can also be a platform separating stairs).

Total rise The distance a set of stairs travels verti­cally from one finish floor level to the next.

Total run The total horizontal distance of a set of stairs from first tread to last.

Kicker A 2×4 secured to the floor that helps hold the bottom of the stair stringer in place.

Straight-flight stairs

Blocking


Stairwell


Header joists


Tread


Riser


Total run


Kicker


Landing


STARS

ORDERING DRYWALL AND ASSOCIATED SUPPLIES

Like shingles, siding, and insulation, drywall amounts are calculated by the square footage of the area to be covered (in this case, the walls and ceilings). Rather than measuring the ceiling and walls in every room, experienced drywallers use a shortcut calculation. They simply multiply the total square footage of a house by 31/2 (3.5). For instance, a 24-ft. by 36-ft. house has 864 sq. ft. of floor space, and 864 times 3.5 equals 3,024 sq. ft. of drywall coverage. A 4×12 sheet of drywall covers 48 sq. ft. of wall. Dividing 3,024 sq. ft. by 48 proves that you need 63 sheets of drywall for this particular house.

Your drywall order

For the modest-size houses that Habitat builds, it’s best to make up most of your drywall order with 12-ft. drywall pan­els. A 4×12 sheet of drywall is more difficult to carry than a 4×8 sheet, but it covers more area and often eliminates the need for butt joints on a wall or ceiling. To fine-tune your drywall order, subtract any greenboard you will be using in the bathroom. Also, if you decide to go with 5/8-in. drywall on the ceiling, subtract the floor area (864 sq. ft. in our example) from the square-foot total, then order that amount of 5/8-in. drywall for the ceiling.

Have the drywall delivered several days before you plan to hang it. If you’re using any 5/8-in. drywall, stack those sheets on top of the V2-in. sheets. Storing all the drywall in one room creates a lot of weight on a few floor joists. Therefore, make a neat pile in each room, with the drywall flat on the floor, finish side facing up, or lean the sheets against the wall.

Screws and nails

Professional drywall hangers rarely use drywall nails. Screws hold better than nails, and a screw gun automati­cally drives the screws just the right distance, dimpling the drywall surface without breaking the paper.

If you’re not a seasoned drywall hanger, you’ll probably find it useful to drive a few nails to hold a panel in place against the studs or ceiling joists. Then you can finish installing the panel with screws. A 5-lb. box of drywall nails and a 50-lb. box of 1i/4-in. drywall screws should give you all the fasteners you need for a 1,200-sq.-ft. house. If you’re hanging 5/8-in.-thick panels, order 1 г/2-in.-long fasteners.

Joint tape, corner beads, and drywall compound

You can order these finishing supplies when you order your drywall. Joint tape comes in rolls; order 400 ft. for every 1,000 sq. ft. of drywall.

Every outside corner covered with drywall requires a cor­ner bead. These steel or plastic trim pieces are typically sold in 8-ft. or 10-ft. lengths. When estimating the amount of bead to order, make sure you account for corners where drywall wraps around window and door openings.

As far as drywall compound goes, the typical Habitat house requires about nine 5-gal. buckets. For the Charlotte house, we used an all-purpose compound called Durabond®, which comes in powdered form and is mixed with water at the job site. Other folks prefer to buy premixed compound, which comes in buckets or boxes.

ORDERING DRYWALL AND ASSOCIATED SUPPLIES

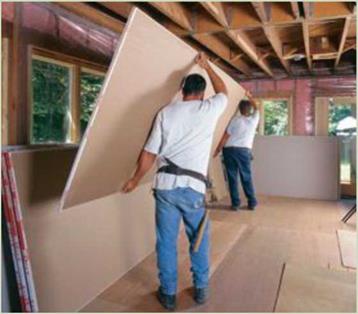
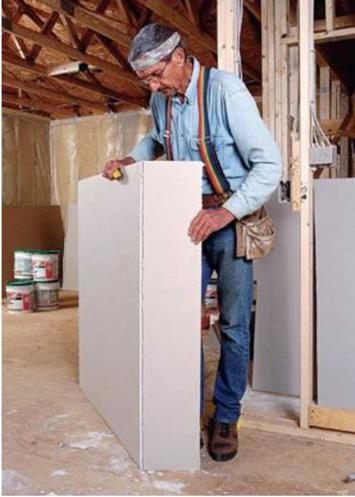
Drywall is heavy! Carrying a long sheet, like this 12 footer, is defi­nitely a two-person job. [Photo © The Taunton Press, Inc.]

ORDERING DRYWALL AND ASSOCIATED SUPPLIESORDERING DRYWALL AND ASSOCIATED SUPPLIESRemove fasten­ers that miss the framing. It’s easy to tell when a drywall screw or nail misses a stud, joist, or other framing mem­ber. When that happens, remove the fastener and make a dimple (a concave mark with a drywall ham­mer) at the spot so the hole can be filled and hidden with joint compound.

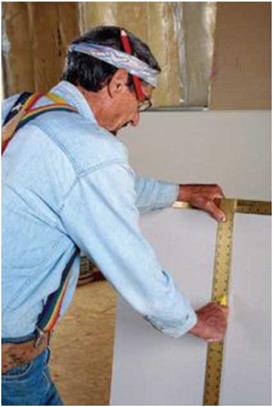
Cut the drywall panel to length. First score the sheet with a sharp utility knife. A large T-square, held to the measurement mark, guides the cut (see the photo at left). Once scored, the drywall breaks right along the cut line (see the photo at right). Cut the piece free by slicing along the crease on the back.

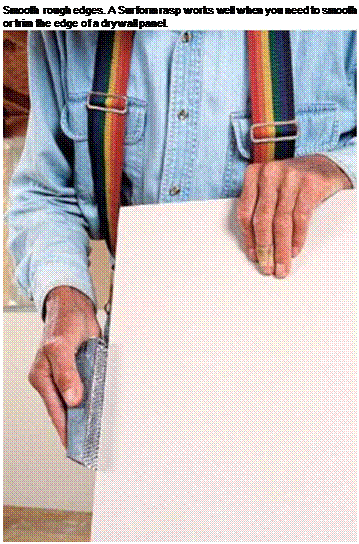
the gypsum core—about ‘/s in. or so. There’s no need to force the blade deep into the panel. Once the panel has been scored, snap it away from the cut, as shown in the photo above right. Running a utility knife along the crease on the back of the panel will separate the pieces. If the cut edges are rough or uneven, smooth them with a Surform rasp (see the bottom left photo on the facing page).

CUT ACCURATE HOLES IN PANELS

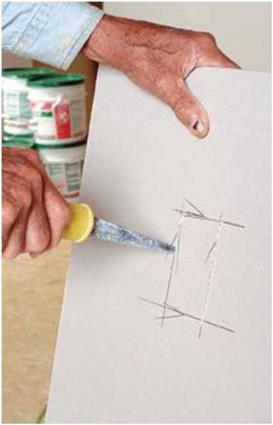
Holes for electrical outlet boxes, heating vents, and pipes must be laid out and cut accurately. Take your measurements from a wall, ceiling, floor, or sheet of drywall already in place. I like to transfer these measurements to the drywall panel with a T-square. For electrical outlets and heating vents, use a T-square to outline the hole, then make the cut with a small drywall saw. Plunge the point of the saw into the panel from the “good” side and saw along the cut line
(see the top right photo on the facing page). The finished cut should be within l/s in. of the outlet.

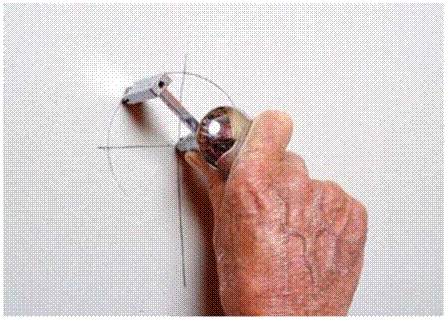
For a dryer vent or a round electrical outlet, measure and mark the center of the cut. Then use a compass or another round electrical box as a template to outline the hole. To make the cut, use a small drywall saw, a utility knife, or a circle-cutting tool made specifically for this job (see the bottom right photo on the facing page).

Another method for marking the location of an electrical box, regardless of its shape, is to rub the face of the box with chalk or a keel, place the sheet in position on the wall, and press the sheet against the outlet. The chalk will show you where to cut. Cut gently so you can avoid tearing the paper facing on the “good” side.

Use a drywall router to save time

Most of the time you can drywall right over door and window openings, attic access holes,
and heating vents, then cut around the outlet boxes with an electric drywall router, as shown in the bottom photo on p. 220. (Get a feel for this tool by making some practice cuts on scrap drywall.)

Make sure the electrical wires are shoved to the back of all the boxes, and double-check to be sure there isn’t power at any of the boxes for which you’re routing holes. Tack the sheet on the ceiling or wall, then mark on the sheet the location of each outlet with a line noting the edge of the box and an “X” showing the side the outlet is on. Don’t nail too near the outlet or you could break the drywall, but be sure to drive enough nails or screws into ceiling panels so they won’t fall down.

Подпись: Smooth rough edges. A Surform rasp works well when you need to smooth or trim the edge of a drywall panel.
ORDERING DRYWALL AND ASSOCIATED SUPPLIES

Подпись: A drywall saw is made for the job. This small saw has a pointed end for making plunge cuts in drywall. It also works well for making small rectangular cutouts to fit electrical outlet boxes.ORDERING DRYWALL AND ASSOCIATED SUPPLIESПодпись: When you are working with volunteers, be sure to be organized and have lots of tasks ready to go. Most volunteers come wanting to work. It is disheartening for them to arrive at the job site and have to stand around for two hours waiting for materials to arrive.Set the router bit to extend about /4 in. past the base plate. With the router running, insert the bit into the center of the box and gently move it until it hits the side of the box. Pull

Подпись:Подпись: Make cutouts with a router. Equipped with a narrow straight bit, this power tool cuts holes around electrical outlet boxes after a drywall panel has been tacked in place. Подпись:ORDERING DRYWALL AND ASSOCIATED SUPPLIESthe bit out and reinsert it just to the outside of the box. Cut in a counterclockwise direction, maintaining slight pressure against the box.

The router generates some dust, so wear a good mask. A router or a large drywall saw can be used to cut larger openings as well.

FENCL

The Fend (pronounced fen-sel) is a combination of the Tarleton and the Weebee. There is a tall cathe­dral ceiling over the great room and lofts over the bathroom, kit­chen and doorway. Like the Wee – bee, this house has a bump-out to accommodate a fold-out bed or a table.

Square feet: 261

With add-on: 356 House width: 14’ House length: 24’ Porch: 6’ x 13%’

Great Room: 9’ x 13%’ Kitchen: 73/V x 8’

Bathroom: 7%’x5’

Addition: 7’ x 93%’

Ceiling height: 7’ 6”

Loft height: 7’ 6”

-sizes are approximate

WATER RESISTANCE AND DURABILITY

There are almost as many physical distinctions among tiles as there are tile types, but the most important traits to consider are water resistance and durability.

Water resistance. Here, three of four official categories of tiles include the word vitreous, which means glasslike, and suggest how much the tile will resist or absorb water. The categories are nonvitreous, semivitreous, vitreous, and impervious. Nonvitreous is the most absorptive, and impervious the most water resistant.

Use nonvitreous tiles on dry areas, such as interior fireplace surrounds and hearths. Use semivitreous or better on shower walls, tub sur­rounds, backsplashes, and areas that are inter­mittently wet. Use vitreous and impervious tiles for wet installations like pools, hot tubs, and outdoor surfaces in rainy cli­mates. In general, the less water a tile absorbs, the less hos­pitable it will be to bacteria and mold. That’s why hospitals and laboratories usually use imper­vious tiles.

Durability. Tile durability rat­ings, based on structural strength and surface imperfec­tions, typically assign softer, weaker tile to less demanding areas and harder, impervious tile to heavily trafficked, wet, and outdoor areas. In like man­ner, tiles are rated for walls, floors, and counters. A reputable

tile supplier will give you good advice on appro­priate uses and durability and will stand behind the tiles you buy.

Tools

Many tile suppliers sell or rent tiling tools and offer workshops on techniques and tool use.

Tools and safety. Tiling is deliberate, methodical work and is not as inherently dangerous as some remodeling tasks. Still, it poses hazards; so for starters, please note these minimal safety rules:

► o Use a voltage tester to ensure that power has been shut off to outlets, fixtures, switches, and devices you’ll work near. In addition, ensure that bathroom and kitchen receptacles have ground-fault circuit interrupter (GFCI) protection, as spelled out in Chapter 11. Corded power tools should be double insulated and grounded with a three – prong plug. Or use cordless tools instead.

► Rubber gloves reduce the risk of electrical shock and prevent skin poisoning from prolonged handling of mortar, adhesives, sealers, and the like.

► Wear goggles when cutting tiles, whether making full cuts with a wet saw or nibbling bites with a tile nipper. Tile shards can be as sharp as a scalpel.

► Wear a respirator mask when mixing masonry materials, applying adhesive, cutting cementitious backer board, and so on.

► Knee pads will spare you a lot of discomfort. Buy a pair that’s comfortable and flexible enough to wear all day. Flimsy rubber knee pads won’t protect your knees.

► Open windows and turn off pilot lights on gas appliances when using volatile adhesives or admixtures. Closely follow manufacturer’s instructions.

Подпись: Straightedges are an indis-pensable part of tile layout and installation. They tell you whether surfaces are flat and help you align tile edges, as shown.BASIC TOOLKIT FOR TILE

► Safety equipment: rubber gloves, goggles, respirator mask, voltage tester, and knee pads.

► Measuring and layout: straightedges, framing square, spirit level, pencil or felt – tipped pen, chalkline, tape measure, story pole, and scribe (or an inexpensive student’s compass).

► Setting and grouting: notched trowel, margin trowel, plastic spacers and wedges, beater board, rubber mallet, grout float, round-cornered sponge, and clean rags.

► Cutting: snap cutter, tile nippers, utility knife with extra blades, and wet saw.

► Cleanup: sponges, rags, plastic buckets, plastic tarps, and shop vacuum.

► Miscellaney: hammer and wire cutters.

MEASURING AND LAYOUT

Substrates are never absolutely flat or perfectly plumb, so layout is a series of reasonable approx­imations. Clean tools give the most accurate readings, so wipe off mortar or stray adhesive before it dries.

► A 4-ft. spirit level is long enough to give you an accurate reading. It’s indispensable for checking plumb and leveling courses of wall tiles. If a 4-ft. level proves unwieldy on the short end walls of a bathtub, use a 2-ft. level or a torpedo level instead.

► A tape measure lets you measure areas to be tiled, triangulate diagonals for square, and perform general layout.

► Snap a chalkline to mark tile layout lines before applying adhesive.

► Straightedges are useful for aligning tile courses, marking layout lines on substrate, and guiding cuts on backer board and plywood. Professional tilesetters have metal straightedges of different lengths, but wood’s okay if it’s straight and sealed to resist water.

► A framing square establishes perpendicular layout lines on floors, walls, and countertops.

► A story pole is a long straight board marked in increments representing the average width of a tile plus one grout joint (see "Storytelling," on p. 395). With it, you can quickly see how many tiles will fit in a given area, as well as where partial tiles will occur.

► Use a scribe to fit sheet materials (cementitious backer board, plywood) to a bowed wall or to transfer the arc of a toilet flange to a tile.

CUTTING

Always wear goggles when cutting or nipping tile, especially when using power tools.

A snap cutter works well on manufactured vitreous and impervious tile. This tool has a little cutting wheel—make sure it’s not wobbly or
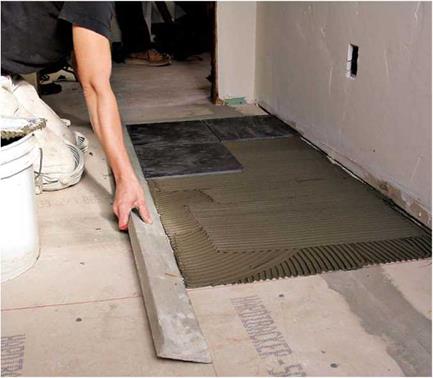
image785

image786

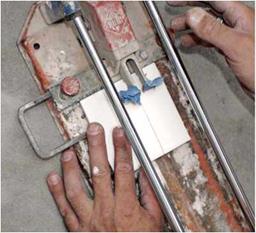
Snap cutters work great for straight cuts on vitreous tile. With this model, you score the tile in one pull and then push down on the tool’s wings to snap the tile along the scored line. Here, blue painter’s tape keeps the cutter’s wings from scratching the tiles.

image787

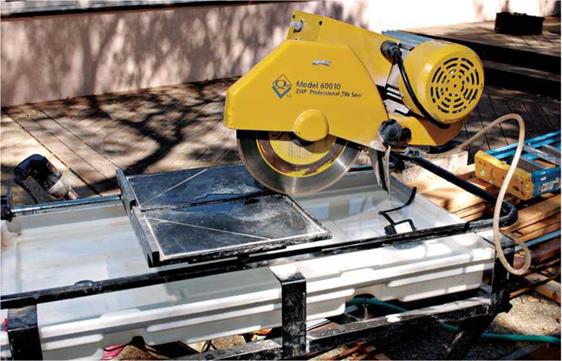
Wet saws are relatively cheap to rent, and they cut almost any type of tile cleanly. Wear safety glasses and hearing protectors when using one. To extend blade life, change the water often.


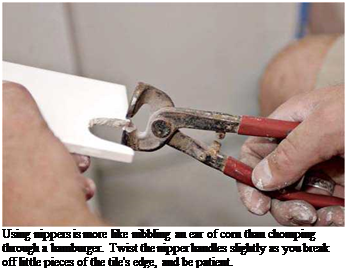
Подпись: Using nippers is more like nibbling an ear of corn than chomping through a hamburger. Twist the nipper handles slightly as you break off little pieces of the tile's edge, and be patient.

chipped—that should score the tile in one pull. Then reposition the handle so the "wings” of the tool rest on the scored tile, and press sharply to snap it. Note: When using a snap cutter, it’s tough to get a clean break on nonvitreous tile, tiles with textured surfaces, and floor tiles. For those you’ll need to rent a wet saw.

A wet saw, which you can rent, is especially use­ful when cutting nonvitreous or irregular tiles or trimming less than 1 in. off any tile. It cleanly cuts all tile types. To make U-shaped cuts around soap dishes and the like, make a series of parallel cuts with the wet saw before removing the waste with tile nippers.

Tile nippers allow you to cut out sections where tiles encounter faucet stems, toilet flanges, and the like. Nippers require some practice and lots of patience. Take small nibbles—use only part of the jaws—nibbling away from the sides of a cut into the center, gradually refining the cutout.

As you approach your final cut-lines, go slowly.

A carbide-tipped hole saw is perfect for cutting holes for faucet stems and pipe stubs. To be safe around pipes and water, use a cordless drill with this saw.

A handheld grinder with a diamond blade can cut curved lines in tile (make a series of shallow passes) or plunge cuts for holes in the middle of a tile. Be sure to stop the cuts short of your cut-lines and remove the waste with a pair of
nippers. Because a grinder is noisy and throws lots of dust, use it only outdoors, and wear a respirator mask and eye protection.

A utility knife scores cementitious backer board (which you snap like drywall), marks off tile joints in fresh mortar, cleans stray adhesive out of joints, and so on. However, if you’ve got much backer board to cut, instead use a handheld grinder with a diamond blade.

Keep tile from overheating and cracking as you drill by immers­ing it in a water-filled box just larger than the tile—build the box from scrap wood and caulk it so it won’t leak. If countertop tile is already installed, build a dam of plumber’s putty around it and add water before drilling. Mexican and other handmade tiles tend to crack when drilled without mortar support under­neath, so install them before drilling. To avoid electrical shocks, use a cordless drill.
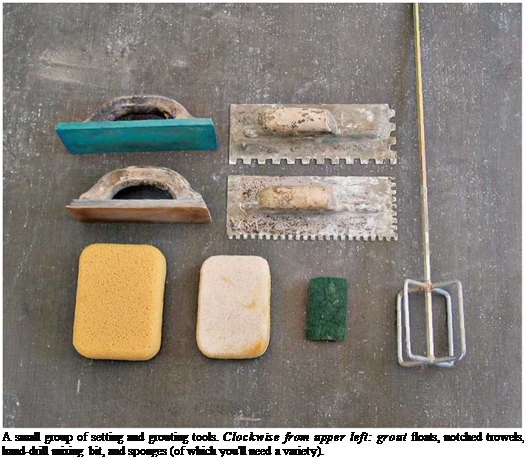
Подпись: A small group of setting and grouting tools. Clockwise from upper left: grout floats, notched trowels, hand-drill mixing bit, and sponges (of which you'll need a variety). 1111

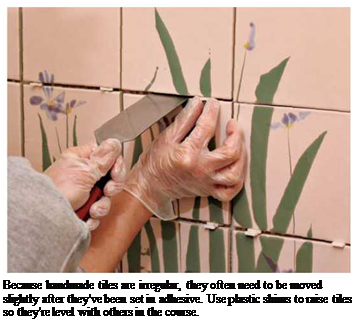
Подпись: Because handmade tiles are irregular, they often need to be moved slightly after they've been set in adhesive. Use plastic shims to raise tiles so they're level with others in the course.

Trimming rafter tails

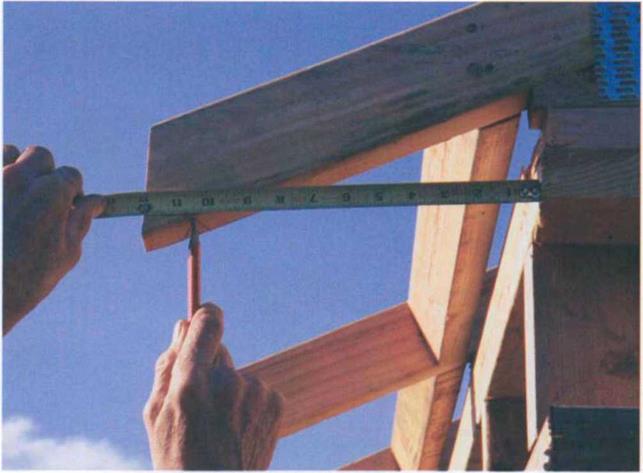
Before the fascia can be nailed in place, the rafter tails must be marked and cut to length. The overhang can be easily measured out from the wall. If, for example, the overhang is 12 in. and the fascia stock is a 2x (1 Vi in. thick), mea­sure straight out from the building line

Trimming rafter tails

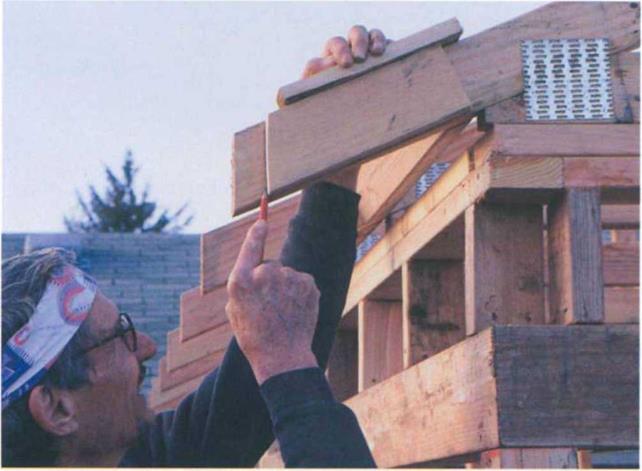
Measure straight out from the building on the gable-end rafters ЮУ2 in. and make a mark. This will be the cut line. (Photo by Roe A. Osborn.)


101/2 in. and mark this point on the bottom edge of the rafters at both ends of the building (see the photo on the facing page). Snap a chalkline across the rafters, including the barges, to connect the marks. Use the rafter-cutting tem­plate you made earlier to mark the plumb cut on the rafter tails (see the photo below).

A professional carpenter can walk the plate and cut off the rafter tails. If this is too scary for you, then cut the tails from below while standing on a stable sur­face, such as a ladder or scaffold. Barge rafters are often mitered at a 45° angle along their plumb cut to receive the fas­cia. The mark on the barge rafters is the short point of this cut. This guarantees that the barge will be long enough to receive the fascia, which is nailed hori­zontally to the rafter tails.

Try to cut all trim material from the back side. Saw teeth tend to pick up wood grain and leave the upside of a board a bit shattered. This is finish work, so make every cut as clean as possible.

Also, try to use long, straight stock for the fascia, just as you did with the barge rafters. Start by making a square cut with a 45° miter to fit into the barge rafter. The other end of this first board is cut at 45° also, with the cut falling over a rafter tail so that the next piece can be securely nailed to it with an overlap.

Now, working with a partner, nail the fascia into the barge rafter with 16d galvanized nails (see the left photo on p. 152). Because this is exposed, use a finish hammer, try not to miss the nail, and leave a nice, tight miter joint. Hold the fascia down a bit as you nail it to the rafter tails so that the roof sheathing can extend out over it and be nailed flush with the outside of the fascia. To find

Trimming rafter tails

Place the fence of the rafter-cutting template on each rafter and scribe a plumb-cut line at the mark. (Photo by Roe A. Osborn.)


Trimming rafter tails

Drive two 16d hot-dipped galvanized nails through the barge rafter and into the fascia. Make sure the miter joint is tight because it will be seen. (Photo by Roe A. Osborn.)


Trimming rafter tails

Place a piece of scrap wood on the top edge of a rafter extending beyond the rafter tail. Put the fascia snug against this scrap and drive one 16d galvanized nail high and another low. (Photo by Roe A. Osborn.)


exactly how high to place the fascia on the rafter, first place a scrap of wood on the rafter’s top edge and extending beyond the end of the tail. Place the fascia snug against this scrap and nail it to the first rafter, driving the first nail high and the second nail as low as possi­ble (see the right photo above). Then continue nailing the fascia to the remaining rafters, being sure to join fas­cia boards together over rafter tails with a 45° lap joint.

Preparation for building a soffit

Building other types of simple soffits is covered in Chapter 8, but sometimes preparation for building soffits can be done as the fascia is installed. The first type of soffit needs a subfascia (see the top drawing on the facing page). Cut the rafter tails back an extra 1У2 in. Before nailing on the finish fascia, nail the subfascia to the rafter tails using the same stock as the rafters.

For the second type of soffit, cut a 3/4-in.-wide by V2-m.-deep groove into the back side of the fascia (before it is

installed) just below the rafter tails (see the bottom drawing at right). You can cut this groove with a table-saw – mounted dado blade or with a router.

Sheathing the roof

Years ago, when wood shingles were the norm, we used to sheathe roofs with 1×6 boards. Often, a roof was strip – sheathed (sometimes called skip – sheathed), where the builders left 4-in. or 5-in. gaps between each board to allow the wood shingles to breathe. If you live in an older house, look in the attic and you can often see this type of sheathing. But today, because composi­tion shingles are more common than wood shingles and need a solid base, most roofs are sheathed with plywood or oriented strand board (OSB).

Sheathing a roof is much like sheathing a floor. Begin by measuring up 48Уд in. from the fascia on each end and snap a control chalkline across the rafters. You can work off the straight fascia edge, but I find it easier to use a chalked con­trol line that’s right in front of me.

On steep roofs, you can usually sheathe the first row or two while standing on the joists. If using OSB sheathing, take care to put the slick side down. I have stepped out on a frosty roof in the early morning and started skiing (for other safety tips, see the sidebar on p. 1 54). That’s the way it is with the slick side of OSB.

Подпись: TWO WAYS TO FRAME A SOFFITПодпись: With subfasciaПодпись: Roof sheathingПодпись: Soffit joistПодпись: 2x nailerПодпись: Exterior wall Подпись: FasciaTrimming rafter tailsПодпись: ExteriorПодпись: wallПодпись: FasciaПодпись: Groove cut in fascia to hold soffit boardПодпись: RafterПодпись: Without subfasciaПодпись: Soffit board Roof sheathingTrimming rafter tailsThe first sheet is always a bit difficult to get squared away on the roof and nailed directly on the control line, mainly because you don’t have a good place to stand. As with floor and wall sheathing, make sure the edge of each sheet falls in the middle of a rafter. The ends can extend out over the barge rafter and be cut later.
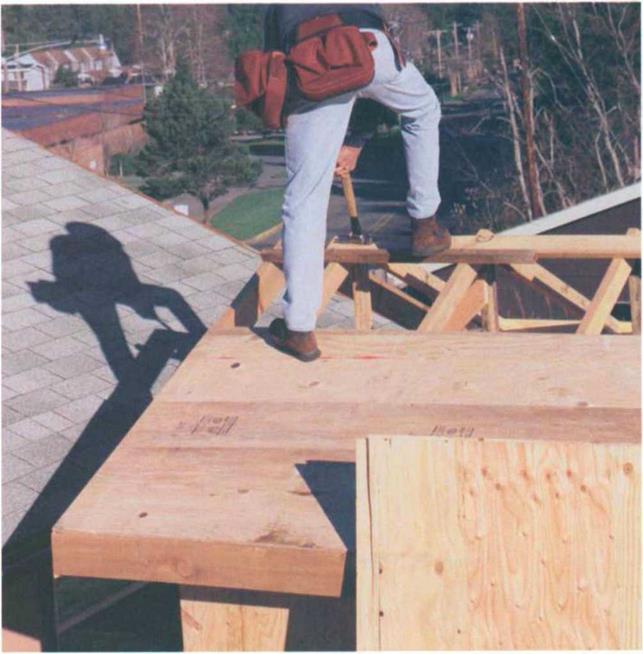
Safety roles for sheathing a roof

• Roofs with pitches over б-іп-12 are too steep to stand on.

• When necessary, use approved safety lines to hold you when sheathing a roof.

• Don’t wear slick-soled shoes.

• Be extra careful when working near the edge of the building.

• Sweep sawdust off sheathing panels because the dust will make the panels slippery.

• Stay off plywood that has ice on it, and be espe­cially watchful early in the morning before the sun warms things up.

• When using sheathing that has one slick side, put the slick side down.

• Don’t carry sheets in a strong wind because they’ll act as a sail.

• On windy days, nail each sheet with enough nails to hold it securely until final nailing.

• Secure your tools so they won’t slide off the roof.

• Never throw scrap wood off the roof without checking to see that no one is below.

Because composition shingles need a solid base, most roofs today are sheathed with plywood or OSB. (Photo by Roe A. Osborn.)


Trimming rafter tails

Trimming rafter tails

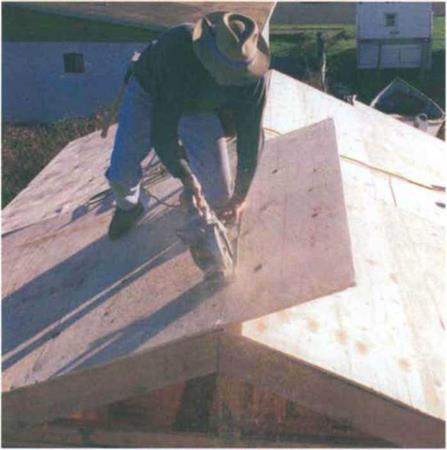
To cut the sheathing at the ridge on the roof, snap a chalkline along the ridge, set the saw to cut 3A in. deep, and make the cut. The sheathing doesn’t have to fit perfectly here because it will be covered by paper and shingles. (Photo by Roe A. Osborn.)


Trimming rafter tails

A last step in the roof-sheathing process is to trim the sheathing flush with the barge rafters at the gable ends. (Photo by Roe A. Osborn.)


A common nailing schedule for a roof is 6-6-12 (6 in. o. c. at the edges and joints and 12 in. o. c. in the field). When you nail sheathing on the gable end and overhang, take special care not to miss the rafters. Missed nails can be seen from below, and they don’t draw the sheathing tight against the rafters.

Once you have the first row of sheathing down, start sheathing the second row. If you are using Win. plywood or OSB and the rafters are 24 in. o. c., you have to place metal clips on the edge of the panel between each rafter. The clips link the two sheets together so that any load between the two rafters is carried by the two sheets. Just like on a subfloor, remember to stagger the vertical joints. And remember to work safely, especially on steep roofs, nailing up 2x cleats as you go up and/or using safety lines as necessary to keep from sliding off.

Once the last row of sheathing is in place, snap a chalkline along the ridge and cut, with your sawblade set about 3A in. deep (see the left photo above). Sheathing doesn’t have to fit perfectly at the ridge because it will be covered with roofing paper and shingles. In some regions, the sheathing is held back from the ridge from 1 Vi in. to 3 in. so that a ridge vent can be run the length of the building to ventilate the attic.

Once you have one side sheathed, move to the other side and work the same way. When the entire roof has been sheathed, trim the plywood flush along the gable ends (see the right photo above) and finish nailing. Not long after the roof has been sheathed, builders in wet areas like to cover it with felt roof­ing paper to protect the entire structure from the elements until the finished roof can be installed.