If the substructure beneath the tile isn’t sturdy and stable, the job won’t last. Likewise, if walls aren’t plumb or floors aren’t level, tiles may adhere, but they may not look good. Start by assessing the existing surfaces. And that will inform your next steps, which can range from merely sanding finish surfaces to tearing out and reframing with studs and joists. The condition of existing floors, walls, and counters will also determine which setting bed you choose—and whether you should tile at all.
ASSESSING AREAS TO BE TILED
To check whether floors or countertops are level, use a long spirit level or a shorter level atop a perfectly straight board. Take several readings and use a pencil to mark individual high spots and dips. If variations from level exceed ‘A in. in 10 ft., floating a mortar bed or pouring SLC may be your best bet for establishing a flat setting bed. If the surface irregularities are less than that or the substrate just needs stiffening, adding a single layer of backer board may be all you need.
If room corners aren’t square or facing walls aren’t parallel, you may need to angle-cut floor tiles around the room’s perimeter. This is not ideal, especially in narrow alcoves or hallways, but baseboard trim will partially cover those angled cuts. Similarly, at the back of counters, blacksplashes will cover angle-cut tiles.
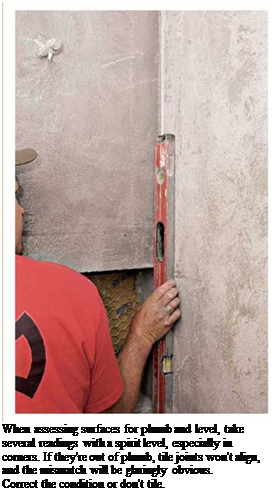

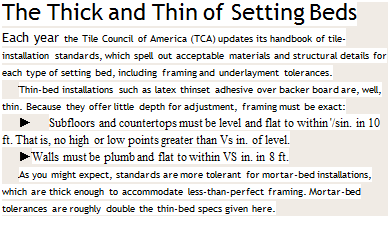
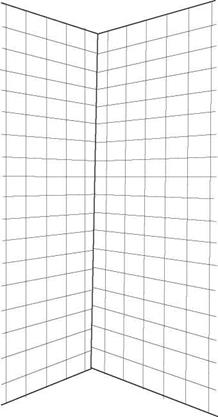
To check walls for plumb, use a long spirit level or a plumb bob; a taut string is also handy to detect high and low spots. Begin by surveying the entire wall. Unless the tiled corners are plumb, you’ll have tapering cuts or mismatched grout lines where the planes converge, especially noticeable on outside corners. To correct out-of-plumb walls, your choices are floating a mortar bed, reframing the walls, or not tiling. Note: A wall that’s plumb in the corner may have a twisted stud elsewhere that throws another section out of plumb.
Finally, survey surfaces for water damage, deflection, and other factors that could affect a tile job. Examine the bases of bathroom and kitchen fixtures for discoloration, delamination, and springiness, especially under toilets and tubs. Crumbling grout atop a tub often means that water has gotten behind the tile. Open kitchen and bath cabinets and examine the undersides of sinks and countertops. If you see discoloration, probe it with an awl to determine whether materials are solid. Particleboard countertops often deteriorate from sink leaks and dishwasher steam. If there’s extensive rot or subfloor delamination, replace failed sections, as described in Chapter 8. To test for deflection, thump walls
with your fist, or jump on the floors. If you see or feel movement, there may be structural deterioration or, more likely, the substructure may be undersize for the span.
PREPPING THE ROOM
Tiling will go faster and look better if you first remove fixtures and other obstructions so that you can lay a continuous field of tile. This is a good time to upgrade or replace electrical boxes, install thresholds, and cut a little off the door bottoms so they don’t scrape when tiling raises the floor level. For information on disconnecting and installing plumbing fixtures, see Chapter 12.
Removing the toilet lets you reinstall it on top of the new tile. Some people mistakenly leave the toilet in place and so need to make a lot of unsightly tile cuts around its base, which can also be troublesome to caulk and maintain.
Begin by turning off the shutoff valve to stop incoming water, disconnect the supply line, flush the toilet and remove the remaining water, and disconnect the anchor bolts holding the base to the floor.
Because toilets are heavy, find someone to help you move the toilet out of the way. To block septic gases and keep objects from falling through the closet flange into the closet bend, stuff a plastic bag filled with crumpled newspaper into the pipe; of course remember to remove it before reinstalling the toilet.
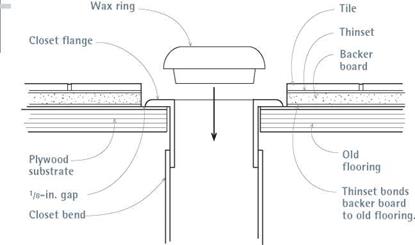
With the waste pipe temporarily sealed, consider the toilet’s closet flange atop the closet bend. Ideally, the top of the flange should be the same height as the finish floor. If your tiling increases the height of the floor h in. or less, the height of the flange shouldn’t be a problem. Just run tiles to within!/ in. of the flange. When you apply a new wax ring to the bottom of the toilet horn, the



 wax will compress and seal the joint adequately. In fact, you can buy extra-thick wax rings for such situations.
But if the tiled floor will be more than И in. higher than the closet flange (which may result if you install a mud bed or backer-board setting bed) replace the flange and set the new one higher. If waste pipes are plastic, cut off the existing bend-and-flange section and cement on new components to give you the flange height you need. This is easier said than done, however: If there’s no room to maneuver new pipes, you may need to cut into flooring or framing. Thus many plumbers prefer to build up existing flanges by stacking И-in. plastic flange extenders (the same diameter as the flange), caulking each with silicone, and using long closet bolts to resecure the toilet base. But check your local plumbing code to see if this method is allowed.
If drainpipes are cast iron, whose sections join with band clamps, you may want to hire a plumber to replace flanges that are too low or waste pipes that have deteriorated. Often, there’s not enough room to attach band clamps adequately, or the substructure may need replacing as well.
Removing a sink may be a good idea, too. The method depends on the sink type: whether countertop, pedestal, or wall mounted. For each, shut off the water, and then disconnect supply lines and drainpipes.
Countertop sinks vary in their attachment. Most are held in place with clips on the underside of the counter and sealed with a bed of caulking or plumber’s putty between the sink lip and the counter. After disconnecting the pipes, unscrew the clips and, if necessary, break the caulking seal by running a utility knife between the sink lip and the counter. If the new sink is smaller than the old one, you’ll need to reframe the opening in the counter.
Remove in-counter faucet assemblies. Then tile within!4 in. of the holes, and caulk the spaces with silicone or plumber’s putty. If your installation will involve just thinset and tile, the old valve stems should be long enough to reuse. But if you’re building up the setting bed with backer board or mud, buy new faucet assemblies with longer valve stems.
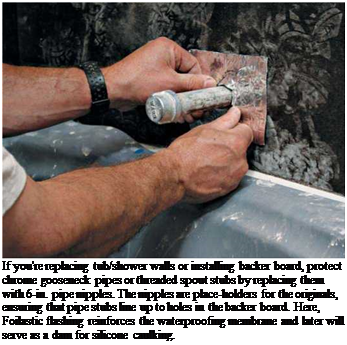
Shower and tub hardware can be masked off with plastic bags if you’re not tearing out the shower walls or building up setting beds, but do remove chromework so it doesn’t get discolored by mortar or adhesive.
To remove a showerhead assembly, gently pry the escutcheon from the wall (it may be seated in plumber’s putty). Then wrap a rag around the chrome gooseneck pipe and use a pipe wrench to


unscrew it. (The rag prevents the wrench’s teeth from gouging the chrome finish.) Removing valve handles is slightly more complex because you must first unscrew valve handles from valve stems, and those screws are frequently hidden behind decorative caps. Once you’ve removed handles and escutcheons, wrap the exposed valve stems with plastic so their threads don’t get fouled with mortar.
The last item on the shower wall, the tub spout, can often be unscrewed by hand. If not, you can usually gain some leverage by inserting a rubberized pliers handle into the spout opening.
Tile to within ‘/ in. of the valve stems and pipe stubs, and caulk the gaps with silicone so water can’t get behind the wall. Escutcheons will cover the cut tiles.
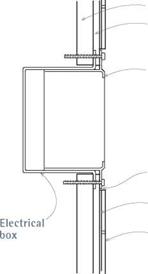
Build up electrical boxes so they’re flush with new tiled surfaces. О After turning off electricity to the box—and using a voltage tester to make sure it’s off—remove the outlet faceplate, unscrew the device from the box, and screw in a box extender. Run tiles to within /б in. of the extender; the faceplate will cover tile cuts. Note: All bathroom receptacles and all those within 4 ft. of a kitchen sink must be GFCIs.
Move appliances so the floor they’re sitting on can be tiled. Where those appliances are under-
Extending I Electrical Boxes
|
Old drywall
‘/4-in.
backer board Box extender
|
|
‘/їв-in. gap
Thinset
Tile
|
A box extender is usually a plastic sleeve that screws to an existing electrical outlet box, so that the box face is flush to a new tiled surface.
I Tile Height at Toilet
counter, anticipate the additional height of the new flooring and raise or alter countertops accordingly so appliances can be returned to their nooks.
Cut door bottoms so there’s about!4-in. clearance between the bottom and the highest point of the tiled floor or the threshold. Do this after the tile and threshold are set because it’s difficult to know beforehand exactly how thick the floor will be.
Choose a threshold that reconciles floor heights and materials on either side. For this, you’ll need to think through its installation, such as scribing and cutting it to the door jambs and the adhesives or fasteners.
Installing Setting Beds
This section addresses mainly the most common setting beds and mentions only briefly those that are less common or problematic. Backer-board brands vary, so follow manufacturer-specific recommendations about waterproofing, connectors, installation procedures, and so on.
Expansion
All tile substrates and setting beds need V«-in.- wide expansion joints where they abut walls, fixtures, and cabinet bases. This keeps grout joints from compressing and cracking when materials expand. These joints are usually caulked with flexible sealants, such as silicone.

 COMMON SETTING BEDS
Here you’ll find additional details on backer board, mortar beds, SLCs, drywall, and concrete slabs. Setting tile directly on plywood is not recommended. But it’s widely done, so that’s addressed, too.
Installing backer board. Backer boards are cementitious backer units. They are strong, durable, and unaffected by moisture—and so are superb setting beds for wet and dry installations. However, because moisture will wick through CBUs, install a waterproofing membrane first in wet applications in order to protect wood substructures from damage.
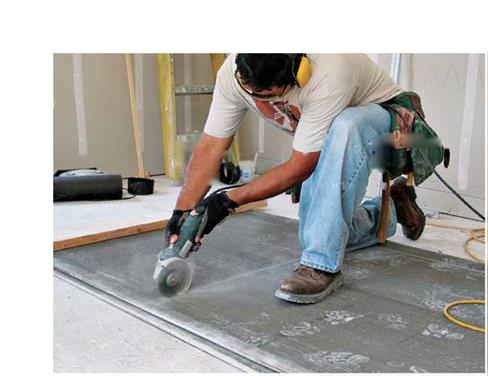
Wear a respirator mask and eye protection when cutting and drilling backer-board panels, which can be scored and snapped much like drywall, though many installers score both sides. Although a utility knife can do the job, a drycutting diamond blade in a handheld grinder leaves other methods in the dust—literally. Wear a face mask when using this grinder, as well as hearing and eye protection. To drill holes for pipes, use a carbide-tipped hole saw.
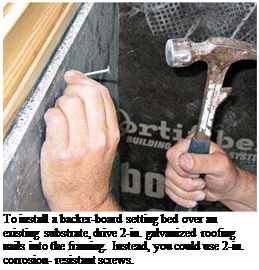
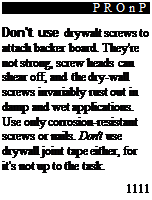
For most backer-board installations, space galvanized roofing nails or corrosion-resistant screws every 6 in. to 8 in. Screws are more expensive and slower to install, but some tilesetters swear by them; Rock-On® cement-board screws cut their own countersink so the heads will be flush. Nail advocates argue that nails are less likely to crush panel edges and are easy to drive flush. To attach 58-in. backer-board panels directly to studs, use lh-in. screws or nails. If installing panels over drywall or plywood substrates, use 2-in. screws or nails.
Backer-board panels are available in a variety of widths (32 in. to 48 in.), lengths (3 ft. to 10 ft.) and thicknesses (14 in., 58б in., 58б in., 58 in., and 58 in.). Thinner panels are typically installed over plywood or drywall. Use at least 58-in. backer board if you’re attaching it to bare studs; otherwise it will flex too much and crack the tile joints. For a floor rigid enough to tile, install 58-in backer board over 54-in. tongue-and-groove plywood, with joists spaced 16 in. on center. For all installations, leave a 58-in. gap between the backer – board panels. Cover those joints with 2-in.-wide, self-adhering fiberglass mesh tape before covering the tape with thinset adhesive—the same material used to set the tiles.
Feather out the thinset as flat as possible, but it doesn’t have to be perfect because the joints will be covered by adhesive and tile. Finally, leave a 54-in. expansion gap where the panels abut the base of walls, tubs, and plumbing fixtures; you’ll fill those gaps later with flexible sealant. Keep the bottom edge of backer board 54 in. above the tub so water doesn’t wick into panels; caulk the gap later with silicone.
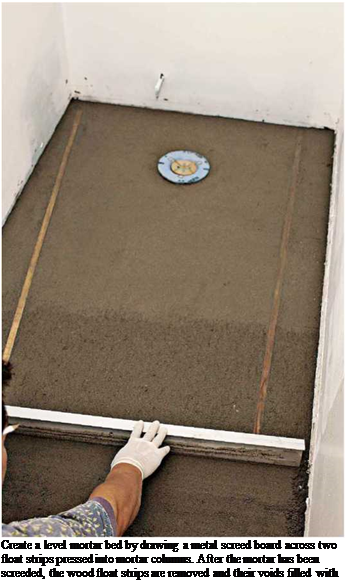
 Installing the mortar bed. Mortar beds make a superb substrate but are complicated to install. First attach a curing membrane (a waterproofing membrane beneath the mortar) over the framing or drywall; then add reinforcing wire mesh. Next apply two or more parallel mortar columns, and place a wooden float strip atop each column. Checking frequently with a spirit level, tap the float strips into the mortar until the floor strips are level or the wall strips are plumb. Then fill between the strips: Dump mortar onto floors between the strips or trowel it onto walls. Flatten
|
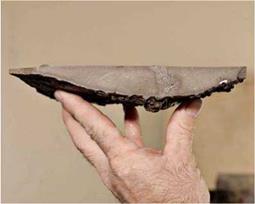
Note how well self-leveling compound levels itself when accidentally dumped onto the ground of a work site. Even its thin tapered edge is strong. When used to level floors, its optimal thickness is about 1 in.
|
the mortar by placing a screed board across the float strips and drawing it side to side in a sawing motion. Dump excess mortar into a bucket as the screed board accumulates it.
Once the mortar bed is more or less flat, remove the strips, and fill the float-strip voids with mortar. Then trowel out the irregularities.
To help the thinset coat adhere, lightly roughen it by rubbing the surface with a wood float or a sponge float. Allow the mortar to set about an hour before using a margin trowel to clean up the mortar beds edges. Some veteran tilesetters set tile immediately thereafter, but most mortals should allow the mortar to cure for 24 hours before tiling.
Mixing mortar in correct proportions is an art. Floor mud, or deck mud, is dry and rather crumbly: 1 part portland cement, 5 parts sand, and 1 part water. However, once screeded, compacted, and well cured, deck mud can support great loads. Wall mud is wetter and more like plaster because it must be spread onto vertical surfaces; it contains lime to improve its adhesion. Wall muds proportions: 1 part portland cement, 4 parts sand, / part lime, and 1 + parts water; use enough water so the mud trowels on easily. Add water slowly because mud won’t stick if it’s too wet.
Applying leveling compound. SLCs can level isolated low spots or even whole floors. Application requires few skills beyond opening 50-lb. sacks of SLC powder, mixing the powder with water, and pouring the mix onto a floor. You don’t even need to spread it around much. It flows like water, levels itself, and starts to harden in about 15 minutes. Well, that’s a bit oversimplified, but not much.
 First, be sure the substructure is sturdy enough to bear the weight. Specs for one popular

SLC, LevelQuick, recommend at least a 54-in. exterior-plywood subfloor over joists spaced up to 24 in. on center; use two 52 -in.-thick pours to achieve a 1-in. optimal thickness. Wait 24 hours between pours. Whatever the substrate, it should be clean, dry, and free of chemicals—such as curing compounds in concrete slabs—that might prevent a good bond.
Before pouring, install a waterproof membrane and reinforcing mesh, which is usually wire, although a self-furring plastic lath called Mapelath® shows promise. One essential prep detail: Completely seal and dam off the section of floor you’re leveling, or the free-flowing SLC mix will disappear down the smallest hole and form a heavy mortar pad where you least want one. Pay close attention to board joints, baseboards, and the like; caulk or seal joints with duct tape, pack them with fiberglass insulation—whatever it takes to contain the liquid till it hardens. SLCs are expensive but, in most cases, less expensive than floating a mortar bed. As important, they’re great setting beds.
Preparing masonry surfaces. Concrete walls, slabs, and block are good setting beds as long as they’ve cured for at least a month and as long as they’re clean (no chemical residues), dry, free from active cracks, and level or plumb within ‘/ in. in 10 ft. (If it’s an out-of-level floor, see "Applying Leveling Compound,” on p. 391.)
If you’re tiling basement surfaces, the big issue is cracks. If masonry cracks expand and contract seasonally, it’s unwise to tile over them because the tiles will crack. Likewise, if one side of a crack is higher than another, it’s probably caused by soil movement. (If the crack is inactive and both sides of it are in the same plane, you can vacuum out the crack, dampen it, and fill it with a latex thinset adhesive before applying the thinset setting bed.)
Dry installations. Unpainted drywall is an acceptable setting bed for dry installations. (In damp or wet installations, never adhere tile directly to drywall.)
In dry installations, use at least 58-in. drywall if attaching it directly to studs 16 in. on center. Or sandwich two layers of drywall, with a layer of adhesive between, to create a more rigid lamination. But if you install a double layer of drywall, offset the panel edges by at least 16 in.
In either case, leave a 58-in. gap between panel edges, cover the joints with self-sticking fiberglass mesh tape, and then apply a layer of latex thinset adhesive over the tape. Drywall tools are fine for this application—but not drywall joint tape or compound. When installing drywall as a setting bed, you don’t need to fill screw holes or
feather out joints perfectly smooth because you’ll be covering them with thinset and tile.
Plywood beds. Plywood is not recommended as a setting bed, but if you must use it, use only exterior grade and leave 58-in. gaps between the panel edges. Plywood substrates for floors and countertops must be at least 158 in. thick—best achieved by laminating a h-in.-thick plywood underlayment panel to a 58-in. plywood subfloor. To prevent squeaking and to stiffen the assembly, trowel construction adhesive between the panels. Offset the panels so their edges don’t align. In addition to the adhesive, use 1-in. corrosion – resistant nails or screws spaced every 6 in. on center. To secure this laminated plywood to the joists, drive 16d galvanized nails into the joist centers. To avoid high spots that might crack the tiles, sink all screw or nail heads below the surface of the top layer. Sand and vacuum the plywood before notch-troweling on an epoxy thinset adhesive.




 wax will compress and seal the joint adequately. In fact, you can buy extra-thick wax rings for such situations.



 Installing the mortar bed. Mortar beds make a superb substrate but are complicated to install. First attach a curing membrane (a waterproofing membrane beneath the mortar) over the framing or drywall; then add reinforcing wire mesh. Next apply two or more parallel mortar columns, and place a wooden float strip atop each column. Checking frequently with a spirit level, tap the float strips into the mortar until the floor strips are level or the wall strips are plumb. Then fill between the strips: Dump mortar onto floors between the strips or trowel it onto walls. Flatten

 First, be sure the substructure is sturdy enough to bear the weight. Specs for one popular
 Naturally finished wood shutters, louvers, metallic Venetian blinds, or bamboo roll – downs can be attractive solutions that avoid the problems associated with fabric window dressings. Pella Corporation produces a line of windows with retractable shades sandwiched between double windowpanes. New on the market, Eagle Window and Door Company offers the Eagle System 3 tilt-and-raise blind system. Blinds are sandwiched between insulating glass for dust-free and odorless