Conception and Drainage Criteria

13.3.1 Road Alignment and Routing

For new roads, before drainage can be considered, the routing of the road must be fixed. Road routing is a complex procedure that involves very many factors including social, economic, engineering and environmental criteria as well as pub­lic acceptance. However, proper selection of the road corridor is one of the most important factors in the protection of water bodies. Technical measures aimed at mitigating a problem provide a poor substitute for efficient routing and alignment which could have avoided the occurrence of the problem altogether. Nevertheless, in those cases where conflicts between roads and water bodies cannot be avoided,

design of the road’s elements, together with technical measures, plays an important role. The design of the road’s alignment has a major influence on the inclination of the road surface. Although the main criterion for road surface dewatering is usually traffic safety (e. g. to prevent aquaplaning) water protection criteria must also be included into design practice. The selection of the longitudinal and transversal cross fall of the road can

• Direct the water from different parts of the highway surface and sub-surface to different drainage outlets, thus allowing “isolation” of spillage-affected run-off to localised collection points rather than allowing the contaminant to affect an entire drainage system,

• Lead water to less sensitive ground – or surface-water zones where it is more easily handled,

• Be an influence on the recharge area and, at the same time, on the total pollutant loads flowing from the particular section of the road.

Horizontal alignments can be selected to take a road away from a place where it may be expected to have an undesirable impact. Vertical alignments can permit the drainage of water collected from above the pavement’s formation level (e. g. water deriving from cutting slopes and from pavement runoff) to be led out of a local catchment where it might be undesirable, to another location where it can be handled with less risk to the environment (Fig. 13.1). Less obviously, but more practical in many situations, horizontal curves may be introduced into a road’s alignment in order that the pavement has to built with some super-elevation. This will then provide a cross-fall across the pavement to the margin on the inside of the bend (Fig. 13.2). By carefully choosing the road’s horizontal and vertical alignments, both surface and sub-surface waters can be moved to a desired outlet point where the impacts will be minimised.

Design

Подпись:■ BY RANDALL WHITEHEAD

T

alk about energy-efficient lighting these days, and there are two technologies that are sure to dominate the discussion: fluorescents (usually compact fluorescents) and light-emitting diodes, or LEDs. As a lighting designer in California—where energy regulations are the strictest in the nation—I have a lot of these conversations. And I can tell you that rather than get­ting turned on by these newer, watt-saving technologies, most people are immediately turned off.

Why? Because most people have already had a lifetime of bad experiences with flick­ering, buzzing fluorescents and know little about LEDs, except that they’ve become ubiquitous as strings of the latest must-have holiday lights.

It’s not that these new light sources aren’t as good—or better—than the incandescent bulbs they’re designed to replace. But here is a classic example of trying to fit a square peg in a round hole (or in lighting terms, a pin
connector into a screw-in socket). We keep expecting these new lighting technologies to act (and cost) the same as the old ones. The problem is that they don’t.

A prime example is the typical screw-in compact fluorescent lamps ("lamp" is the industry term for "bulb") offered at big-box stores. Technology-wise, they are the worst examples of what’s currently available. But marketers wanted to provide a CFL at rough­ly the same price as an incandescent lamp. What you end up with is a cheaply made bulb that can buzz, produce an off-color light, and is not dimmable. So what hap­pens? CFLs in particular, and energy – efficient lighting in general, gets a bum rap. The fact is that many manufacturers (see "Bulb Sources," p. 154) are making efficient lamps that perform well. Yes, they do cost more up front, but in the long run, they offer greater energy savings and let you be earth friendly and design savvy at the same time.

Evocative and efficient. In the

Designauthor’s living room, a collection of photo­graphs is uplit with LED festoon lamps from phantom™ light­ing. Ambient light is provided by recessed fixtures from lucifer® lighting that are outfit­ted with Led MR16s from Focus lighting®.

It’s my job to practice what I preach.

My house is filled to the brim with energy – efficient light sources. In fact, the only two incandescent lamps I own are in my refrig­erator and oven. Other than that, it is all high-efficacy all the time. Is it warm and in­viting? Absolutely. You don’t have to change every lamp in your house, as I did. Start slowly. Maybe put A-lamp shaped CCFLs (cold-cathode compact fluorescent lights) in your exterior lanterns and CFLs in the basement and the attic. Try using daylight – colored CFLs in your closets for better color matching for articles of clothing. Every little bit helps—but it helps the most when each of these different light sources is used to its best advantage.

Objectives

There are two aspects, which must be addressed in answering the question: “Why is road drainage so important?”. They are:

• A road’s infrastructure is an engineering work, aimed at the establishment of a platform on which vehicle circulation is possible under safe conditions, with proper traffic flow, utility, and economy, independent of the region’s climate con­ditions; and

• Water, along with heavy traffic, is one of the greatest causes of road deterioration. As previous chapters have shown, even relatively small increases in water con­tent can often result in significant reductions in the mechanical properties of the aggregate and soil layers in and under the road, thereby speeding up pavement failure.

The overall objective is, therefore, to keep the pavement and the subsoil dry enough to avoid any potentially harmful effects of the water and to control the envi­ronmental effects of that drainage water. This is done by decreasing the infiltration through the pavement platform’s surface by adopting integrated solutions. These should simultaneously

• permit the re-establishment of natural groundwater patterns,

• avoid the access of runoff water from nearby land areas to the road platform,

• reduce the risk of erosion due to surface and subsurface flow on/in the nearby slopes, and

• provide preventive measures against soil and/or the aquifer’s contamination ei­ther as a consequence of an accident or due to regular traffic and the construction.

Hydraulic development and rise of the Qin kingdom (4th and 3rd centuries BC)

The kingdom of Qin, rising from the western valley of the Wei, begins to grow from 350 BC. Its leaders are tough, uninterested in moderate discourse and Confucian scholarship. In 417 BC they had occupied Lin-Tsin, one of the centers of the cult of the Yellow River at its confluence with the Luo (the other center of the cult was at Ye where Ximen Bao had put an end to the human sacrifices at about the same time). Since the Qin desired the river god’s protection for their family, each year they sacrificed a princess in “marriage.”[396] [397] The methods of the Qin were radical, one could even say bloodthirsty. But their leaders well understood the importance, to their own power, of economic development of the regions under their control. They had a marvelous understanding of how to com­bine development with territorial expansion.

The three projects that we describe below are destined to have an extraordinary future – they remain in service today after more than 2,000 years of uninterrupted use.

Single-objective versus multiobjective programming

The optimization model defined by Eqs. (8.1a-c) is for a single-objective problem. On the other hand, multiobjective programming deals with problems in­volving several noncommensurable and often conflicting objectives simultane­ously. Among the objective functions involved, no single one has an importance that is overwhelmingly dominant over all others. Under this circumstance, the ideological theme of optimality in the single-objective context is no longer appropriate.

Mathematically, a multiobjective programming problem can be expressed in terms of vector optimization as

Maximize f (x) = [ f 1(x), f 2(x),…, fM(x)] (8.2a)

subject to g(x) = 0 (8.2b)

in which f (x) is a vector of M objective functions, g(x) = 0 are vector of con­straints, and x is a vector of decision variables.

The solution to a multiobjective programming problem is a best compromis – able solution according to the decisionmaker’s preference among the objectives and the noninferior solutions to the problem. A noninferior solution to a multi­objective programming problem is a feasible solution to which there is no other

Single-objective versus multiobjective programming

(a)

Single-objective versus multiobjective programming

(b)

Figure 8.1 Schematic diagrams of (a) convex and (b) non-convex spaces.

feasible solution that will yield an improvement in one objective without caus­ing degradation to at least one other objective (Cohon, 1978). The collection of such noninferior solutions allows the assessment of tradeoff among conflicting objectives.

To obtain the solution to a multiobjective programming problem, the pref­erence of the decisionmaker among the conflicting objectives must be known. Information concerning the decisionmaker’s preference is commonly called the utility function, which is a function of the objective function values. Geomet­rically, the utility function can be depicted as a series of indifference curves (Fig. 8.2). The utility of a decision maker will be the same for a combination of solutions that fall on the same indifference curve. The best compromise solu­tion to a multiobjective programming problem is a unique set of alternatives that possesses the property of maximizing the decisionmaker’s utility, and the alternatives are elements of the noninferior solution set.

fj(x)

Single-objective versus multiobjective programming

Many methods have been proposed to derive the solution to a multiobjec­tive programming problem. Basically, they can be classified into two categories (Cohon, 1978): generating techniques and techniques incorporating knowledge of the decisionmaker’s preference. The purpose of generating techniques is to provide decisionmakers with information about the noninferior solution set or feasible tradeoff to the multiobjective problem. System analysts play the role of information providers and do not actively engage in decision making. On the other hand, techniques in the other category explicitly incorporate the de­cisionmaker’s preference to search for the best compromise solution. Detailed descriptions of various techniques for solving multiobjective problems can be found elsewhere (Cohon, 1978; Goicoechea et al., 1982; Chankong and Haimes, 1983; Steuer, 1986). Regardless of the approach to be used for solving a mul­tiobjective programming problem, the basic solution technique is still one of single-objective optimization algorithms.

ATTACHING THE STOOL AND APRON

Lightly sand and prime the stool, including its underside and ends to prevent its absorbing moisture from condensation or driving rains. After the paint is thoroughly dry, apply water­proof glue to the underside of the stool, level it, and nail it to the rough sill using two or three 6d galvanized finish nails. Try not to lean on the only partially supported stool till it’s nailed to the top of the apron, which will steady the stool.

Next cut the apron, which is generally the same casing used for side and head casing, although here its thicker edge is butted to the underside of the stool. The apron should be as

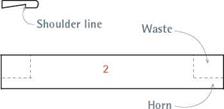
Подпись: 1. After transferring the interior dimensions of the window frame to the stool stock, cut across the stock till the sawblade reaches the stool shoulder.

long as the head casing so that it lines up visually with the outside edges of the side casing. If the apron is molded, cope each end to accentuate its profile or miter-cut it and glue on a return. If you’ll be painting the casing, caulk along the underside of the stool to prevent drafts. Then butt the apron to the underside of the stool. Nail up the apron, driving 6d finish nails into the rough opening beneath the sill. Finally, nail the

Cutting a Window Stool

INSTALLING A

WINDOW STOOL AND APRON


image870

Waste


image869

Start casing a window by installing its stool. Use a combination-square level or a torpedo level to level it, then 8d finish nails to secure it to the rough sill underneath. However, the stool won’t be stable till it is also nailed and glued to an apron under its inside edge.


2. Following the shoulder line, cut in from the ends of the stock to create horns.


3. Rip down the stock so its beveled portion butts the inner window sash, less Via in.


3


Final bevel width


Waste


4. Trim the horns of the stool so they protrude 3/4 in. beyond the side casings.


4


image871image872

Windowsills, STOOLS, AND APRONS

Windowsills have both an inner and outer life-one half is interior, and the other is exterior. It makes sense to pitch the outer portion of a sill so it can shed water.

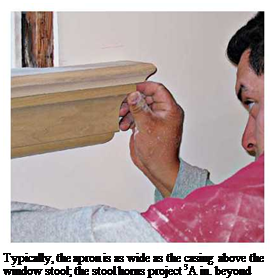
Подпись: Typically, the apron is as wide as the casing above the window stool; the stool horns project 3A in. beyond both. But in the old days, windowsills were pitched all the way, front to back, which created a uselessly pitched interior section that had to be covered with a stool piece, as shown in "Window Trim," on p. 421. To fit a pitched sill, usually set at 14° to 20°, the underside of a stool must be partially rabbeted at the same angle, so that when the stool is nailed on top of the sill, the top face of the stool will be level. It’s an archaic design but, surprisingly, it survives in some new window designs.

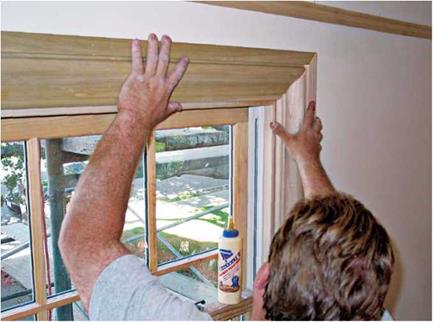
Many modern windows, however, have a sill whose interior portion is flat on top and flush to the insides of the window frame. Consequently, there’s no need for a stool or an apron. Such windows may be "picture framed." That is, the casing can be mitered around all four sides of the window frame.

If your windows have traditional stools and aprons, the trickiest part of casing the windows will be fitting the stools. Typically, a stool’s outer edge almost abuts the inside of the lower window sash (allow a 1/i6-in. space for the thickness of paint), and its interior edge overhangs the apron beneath it. And note that the stool’s "horns" extend 3/4 in. to 1V2 in. beyond the width of the side casings. You can still buy replacement stools for window renovations in older houses.

INSTALLING MITERED JAMB AND HEAD CASING

Подпись: 1. After installing stop-strips inside the window frame and scribing reveal lines on all three jamb edges, cut and tack up the first piece of jamb casing, in this case, a miter cut. image875
TIP

If yotlTe installing new or reattaching old door casing or baseboards, wait till the floors are finished. Otherwise, floor sanders and carpet knee kickers can bash the dickens out of trim.

ini

image876Подпись: 3. Set nails, fill holes, and touch-up sand all surfaces before finishing the wood casing. Generally, there won't be many nails to set if you've used a pneumatic nailer.2. Although many carpenters install both jamb casings before measuring the head casing, this carpenter chose to dry-fit the second jamb and head as a pair, so he could adjust the miter joint in place. An unglued biscuit held the pieces of casing together as he finessed the joint.
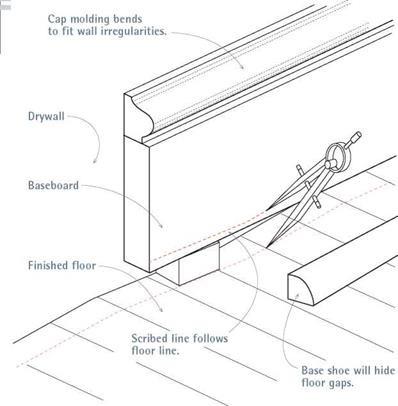
Подпись:image877Подпись: If you can't scribe and cut the bottom of the baseboard, use base shoe to cover gaps.Подпись: Arched Window Casing There's something inspiring about arched windows. Restoration carpenter Jim Spaulding (shown on the following pages) offers this advice: "Order all the casing from the same shop so that the same knives cut the arches and the legs (side casing). That way, all the profiles will sweep continuously around the frame." Arched casings are different from casings for other windows, and so installing them takes some flexibility. After setting the stool and apron, for example, you install its head casing next. Side casings are last. Although modern window makers offer a limited selection of prefab casing for the arched windows they sell, plan on custom-ordering casing for older arched windows. Correctly determining the radius of the arch is challenging: One method is to tack Vs-in.-thick plywood (also called doorskin) to the inside edge of the arched frame head-run it about 1 ft. below the "spring line" of the arch, where the frame becomes straight. Go outside and trace the arch, tracing lightly so you don't bow the plywood. Make templates for each arched window, and take them to a local shop that mills trim. Note: The inside edge of arched casing must be revealed (set back) from the arch you traced of the frame's inside edge.

stool to the top of apron, using three or four 6d galvanized finish nails. Set and fill those nails.

Install the side and head casing in the same order that you would case a door: side casing, head casing, and second side casing. The main difference is that window side casing sits on the stool horns. If you’re casing side-by-side windows with flat trim, you can run a single piece of head casing over both windows and butt the middle and side casings to the underside of the head casing, as shown, in in the top photo on p. 419.

Construction

Swimming Pools and Hot Tubs

If you wish to include a swimming pool or hot tub inside your home, the two major health concerns to consider are water sterilization and humidity-related mold infestation. Пае standard disinfectants used to kill microbes and algae in swimming pools are chlorine or other halogenated compounds, which are easily absorbed through the swimmer s skin as well as inhaled into the lungs. Піеге are sev­eral alternatives to chlorination. Ozonation is a popular method used in Europe for steriliz­ing water. Other methods include electrolysis, ultraviolet light, and filtration through char­coal and pesticide-free diatomaceous earth. Pools using these alternate methods need to be frequently monitored for the presence of bacteria. Occasionally a small amount of harsher chemicals may be required.

Nonchlorine-based systems for pool dis­infection include:

• AquaRite Saline Generator: Uses com­

mon salt and converts it to free chlorine with none of the side effects of standard chlorination

• ClearWater Tech, Inc.: Ozone generator system for pool disinfection

• DEL Industries: Water ozonation for pools, wells, and spas

• Real Goods: Source of the Floatron, a solar-powered pool purifier combining solar electric power with mineral ioniza­tion and reducing chlorine usage up to 80 percent

Enclosing a large body of heated water within a living space will create a humid micro­climate, which is an invitation to mold growth and can result in damage from condensation. Design measures can prevent mold growth and condensation damage. The following fea­tures should be integrated into the design:

• fitted covers that remain in place to pre­vent evaporation when the pool or hot tub is unoccupied

CASE STUDY 13.1

Preparing the Girders

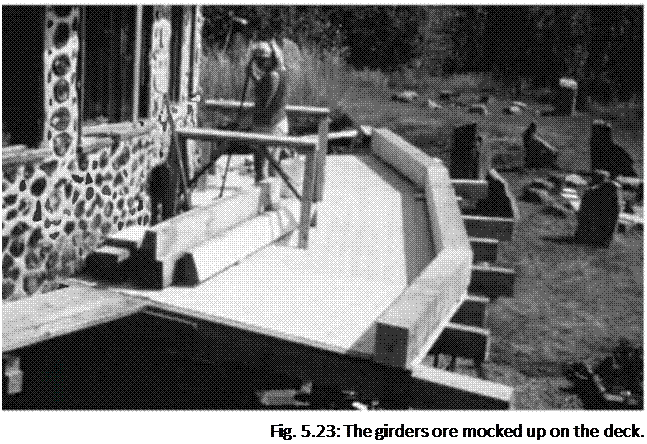
Once the floor was complete, I transposed the plans onto the deck with a black marker, at full scale. Now the position of every post could be seen clearly on the deck, and 1 could even show how the major south wall girders could abut with each other over the posts. See Fig. 5.22. I could check with the structure below to make sure that the line of thrust was transferred directly on compression to the post below, and not just missing them, as per Fig. 2.9 on page 24.

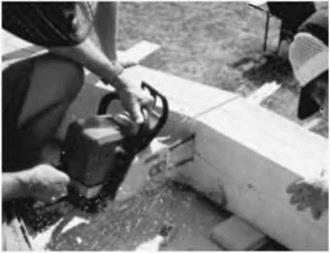
Before installing the posts, my family and I laid the girders out on the deck, supported on little blocks of wood. Then, the corresponding ends of the girders were cut at an angle so that they joined together fairly well. This was done by marking with a pencil and with judicious use of both an angle square and a regular framing square. Each piece was cut with a chainsaw. Now the girders were repositioned on the little blocks of wood, as in Fig. 5.23 and Fig. 5.24.

Подпись: Fig. 5.23: The girders ore mocked up on the deck. Подпись: Fig. 5.24: Passing a chainsaw down through the joint, maybe more than once, will eventually give a pretty good fit. Make sure the chain is sharp. If you shorten the central girder by a half-inch or so, thats okay. There is plenty of space on top of an eight-by-eight post. Let the shorter girders run long. They con be trimmed later.image131Unless one is a very skilled chainsaw carpenter, the chances are that the butt join between the two girders won’t be all that great. Good, possibly, but not great. You can make it great by butting the two girders together as closely as possible, and then passing the chainsaw down between them, as in Fig. 5.24. Helpers can lend their weight to the project, one on each girder. You may have to do this two or three times, butting the girders again after each cut. Pretty soon, you’ll have a great butt joint, and this joint will be ready for use when the girders are assembled permanently on top of the six – foot-high (1.8-meter-high) posts. It is just much easier to get these girders to match up well on the deck, than to do the work overhead. Be wary of chainsaw “kickback,” both while cutting and when the saw completes the cut.

Fill holes and gaps

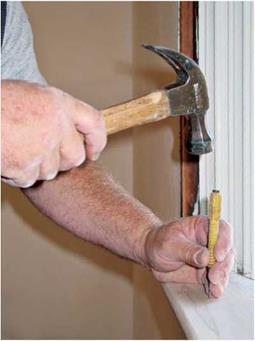
Once the trim has been installed, the next step is to set all the nails, then fill and sand the nail holes. Any nails that are above the surface of the wood must be driven below the surface with a nail set (see the photo at left on the facing page). If you plan to stain or polyure­thane the trim, fill the holes with matching wood putty. For paint prep, you can use painter’s putty or ordinary Spackle™ applied with a small putty knife or your finger.

Sometimes the miter joints (where the door and window trim meet) are not tight so you need to fill the gaps. There also may be slight gaps between the wall and sections of door and window casing or baseboard trim.

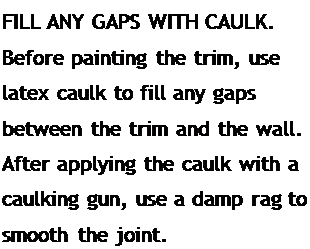
In addition, check for gaps between shelving and walls and around cabinets and other built-ins. All these gaps can be filled with latex caulk, which is paintable and has enough elasticity to move as wood trim expands and contracts with changes in temperature (see the photo at right on the facing page). Wipe off any excess caulk with a damp cloth.

Before painting any trim that has been nailed in place, take the time to remove all the doors and cover the cabinets with paper and painter’s masking tape. I like to use what is called painter’s tape, because it pulls off easily and doesn’t leave a glue residue. Cover finished floors with a paint-absorbing drop cloth. Unscrew the hinges from the door jambs and store them in a box or plastic bag.

Some people paint the trim with the same paint they use on the walls. In that case,

Подпись: there are no cutting-in problems between the wall and the trim. However, you may want to use semigloss paint on the trim and doors or semigloss on the trim and gloss on the doors. Surfaces that are finished with semigloss and gloss are more stain-resistant and easier to wipe clean than flat-finish surfaces. In addition, higher gloss paint sets off the trim nicely. Whichever kind of paint you choose, learn to trust yourself with a brush rather than masking between trim and wall surfaces. Masking a wall when painting the trim can be a disaster. When you remove the tape, you could also very easily remove new paint. Instead of masking off, try using the drybrush method when cutting in. Dip about one-third of the bristles in the paint, then wipe one side of the brush on the lip of the paint container. Place the dry side of the brush toward the surface that will not be painted and draw a straight “cut” line. Even if you get a little trim paint on the wall, all you have to do is touch up the wall. If a little bit of wall paint gets on the trim at that point, just repaint the trim. Fill holes and gapsПодпись:Fill holes and gapsSTEP 8 Paint the Exterior Siding and Trim

On our Charlotte house, we didn’t have a lot of exterior painting to do. We installed vinyl siding, soffits, and windows and covered fascia and rake boards with aluminum cladding. But we still needed to do a bit of exterior painting (door casings and doors, for example). On houses with more exposed wood, you should know how to paint the exterior correctly. Here are some guidelines you can use to make sure your exterior finishing work will look good and hold up well.

Control of Pavement Water and Pollution Prevention

Jose Santinho Faisca[28], Jose Baena, Susanne Baltzer, Beata Gajewska, Antero Nousiainen, Ake Hermansson, SigurOur Erlingsson, Mihael Brencic and Andrew Dawson

Abstract This chapter sets out the requirements, possible problems concerning sur­face and subsurface water flow for pavements and offers some technical solutions to control these waters. It presents the general principles for the design and choice of a drainage system, the measures to adopt during construction and maintenance phases and considers the control of surface and subsurface water contamination, in order to minimize the possible detrimental effect to existing aquifers and habitats. This is achieved by a thorough review of available drainage measures, including many illustrations.

Keywords Road drainage ■ sub-soil drainage ■ filter criteria ■ drainage layers ■ trenches

13.1 Introduction

The objective of this chapter is to set out the requirements, possible problems and to give some technical solutions to the control of surface and subsurface water flow for pavements.

The proper management of a pavement is needed to maintain the strength of the road structure, to provide long service life, safe traffic conditions and the environmentally acceptable treatment of pavement water. The increase of moisture in the pavement and in the subsoil or in the pavement foundation can decrease the bearing capacity (as discussed in Chapter 8) and stability, and contributes to physical and chemical phenomena, which modify the pavement’s structure and further may increase erosion, expansion, dilution, cracking, risk of collapse and frost damage (Hall & Correa, 2003).

This chapter presents the general principles for the design and choice of a drainage system, the measures to adopt during construction and maintenance phases, and considers the control of surface and subsurface water contamination, in order to

minimise the possible detrimental effect to existing aquifers and habitats. In partic­ular, the aim should be to guide excess water out of the higher construction layers in such a way that the water beneath the pavement doesn’t weaken the pavement structure or allow subterranean water to enter the structure.