The two basic techniques for painting both ceilings and walls are cutting in and rolling. uCutting in” means brushing paint onto areas that can’t be reached with a roller. Painters usually begin working from a ladder, cutting in the corners where the ceilings meet the walls. Use a З-in. or 4-in. brush to make a cut-in band all around the ceilings and walls, as shown in the top photo on p. 234. This band will be overlapped when the large open spaces are painted with a roller. Professional painters prefer to use a brush for cutting in, but it can also be done with a paint pad, which is basically just an absorbent sponge on a handle.
Take your time. Good brushes are easy to load with paint. Rather than painting with a

 full can of paint, painters like to use a bucket that’s about half full. This allows them to dip the bristles about halfway into the paint, then fill the inner part of the brush with a few gentle slaps of the brush against the inside of the can (see the photo at bottom left). Apply paint in relaxed, even, gentle strokes.
Use a roller to fill the field
Once you’ve finished cutting in, switch to a roller to paint the rest of the ceilings and walls. Ask at the paint store which roller to use for your type of paint and wall surface. Many painters use a good-quality 9-in. roller frame fitted with a Yz-in. synthetic-nap roller. An extension pole that attaches to the frame makes it easy to reach the ceiling. Paint can be loaded on a roller from either a paint pan or from a 5-gal. bucket with a roller screen hooked to the inside. Don’t overload either the pan or the bucket with paint. Dip the roller into the paint several times to saturate the nap. Then unload the excess paint on the pan or roller screen (see the photo on p. 236).
Rolling paint on ceilings and walls must be done slowly and methodically, using long strokes. It must be done slowly because pushing a roller rapidly scatters paint far and wide. It must be methodical so that every square foot of drywall receives full and equal coverage. Try painting in З-ft. squares, running the roller back and forth in a tight “M” or “W” formation, with each stroke overlapping the previous one by a few inches. Blend the main ceiling paint into the corners by overlapping the cut-in sections by an inch or so, but be careful not to touch the other side. In hot, dry climates, try to keep the working edge wet with paint. If you overlap a dried edge, you’ll often see a lap mark after the paint has dried.
When rolling paint on walls, you can reduce the splatter by painting on the
upstroke. Watch out for paint ridges left at the ends of a roller. Try tipping the roller to the side to squeeze out the excess paint as you roll. Then go back over the ridge and even out the coat. Apply a uniform, thick coat, but not so thick that the paint begins to run. When painting near the floor, turn the bend in the roller frame toward the floor to keep the roller from picking up dust and dirt. With care, you should be able to cover the walls and ceilings with one coat on top of the primer, especially I if you’re using good-quality paint. But don’t I despair if one coat looks a little thin. Paint is 1 not all that expensive, so just roll on another I coat, if necessary.
STEP 7 Prepare and Paint the Interior Trim
One nice aspect of new construction is that you can paint all the walls and ceilings before installing the cabinets, shelving, doors, and interior trim. Even though you’ll have more wall surface to cover, the work can go quickly because you don’t need to worry about getting paint on all the other finished surfaces. In the next chapter, we’ll see how trim and cabinets are installed. Just ahead, we’ll cover what you need to know about applying finish paint or stain on interior trim.


There are several finishing options for interior trim. Instead of paint, the wood can either be stained or finished with clear


 polyurethane. Both options allow the grain of the wood to show. If you like the look of natural wood against painted walls and ceilings, plan to install solid stain-grade trim rather than less expensive finger-jointed, paint-grade stock. Wood doors can also be stained or coated with polyurethane or another clear finish. An application of wood stain is usually followed by a coat or two of clear finish to give the wood added protection and make it easy to clean. Tinted polyurethane finish provides the benefits of both stain and clear finish in a single application. For recommendations on stain and clear finish treatments for interior trim, consult a knowledgeable paint supplier.
With painted trim, it s a good idea to prime-coat the pieces before installing them. You can apply paint quickly when the trim
pieces are set up on sawhorses. Brush primer on the back of the trim (known as back – priming) as well as on the front. It doesn’t take a lot of extra time, and this technique makes the trim more resistant to warping, swelling, and shrinking in response to moisture fluctuations.


 One nice aspect of new construction is that you can paint all the walls and ceilings before installing the cabinets, shelving, doors, and interior trim. Even though you’ll have more wall surface to cover, the work can go quickly because you don’t need to worry about getting paint on all the other finished surfaces. In the next chapter, we’ll see how trim and cabinets are installed. Just ahead, we’ll cover what you need to know about applying finish paint or stain on interior trim.
 There are several finishing options for interior trim. Instead of paint, the wood can either be stained or finished with clear polyurethane. Both options allow the grain of the wood to show. If you like the look of natural wood against painted walls and ceilings, plan to install solid stain-grade trim rather than less expensive finger-jointed, paint-grade stock. Wood doors can also be stained or coated with polyurethane or another clear finish. An application of wood stain is usually followed by a coat or two of clear finish to give the wood added protection and make it easy to clean. Tinted polyurethane finish provides the benefits of both stain and clear finish in a single application. For recommendations on stain and clear finish treatments for interior trim, consult a knowledgeable paint supplier.
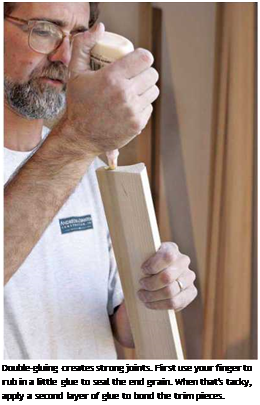

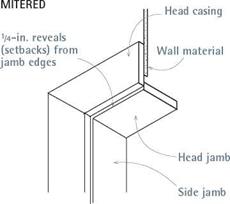
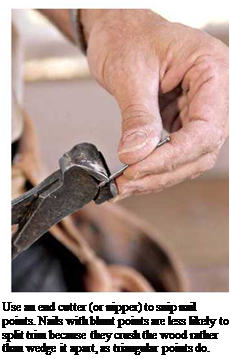
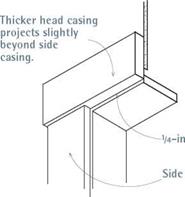
 wood trim or nailing the ends of boards, predrilling is smart. Use a drill bit whose shank is thinner than the nail’s. Alternatively, you can minimize splits by using nippers to snip off the nail points, as shown in the photo at right. It’s a bit counterintuitive, but it works.


 full can of paint, painters like to use a bucket that’s about half full. This allows them to dip the bristles about halfway into the paint, then fill the inner part of the brush with a few gentle slaps of the brush against the inside of the can (see the photo at bottom left). Apply paint in relaxed, even, gentle strokes.


 polyurethane. Both options allow the grain of the wood to show. If you like the look of natural wood against painted walls and ceilings, plan to install solid stain-grade trim rather than less expensive finger-jointed, paint-grade stock. Wood doors can also be stained or coated with polyurethane or another clear finish. An application of wood stain is usually followed by a coat or two of clear finish to give the wood added protection and make it easy to clean. Tinted polyurethane finish provides the benefits of both stain and clear finish in a single application. For recommendations on stain and clear finish treatments for interior trim, consult a knowledgeable paint supplier.
