Posted by admin on 12/ 11/ 15
The procedure for the quantitative selection of a stabilizer in a mix is simple, although it may be a little laborious. One of the draindown testing methods described in Chapter 8 may be adopted here. A series of SMA samples of the same composition should be prepared, but with different quantities of stabilizer. If the procedure is carried out with a proven product (e. g., cellulose fibers), testing may be limited to 0.2%, 0.3%, and 0.4% (m/m). If it is a product that has not yet been used, the testing series ought to cover a somewhat wider range based on the expected behavior (e. g., 0.1%, 0.2%, 0.3%,
0. 4%, and 0.5% [m/m]). Draindown should be determined for each stabilizer content, and the results should be plotted as shown in Figure 4.10. An important remark—the test temperature should be as close as possible to the real production temperature of the mix in the asphalt plant (see Chapter 8). The amount of stabilizer required for complying with the contract specifications may then be read off the diagram.
|

0
0 0.1 0.2 0.3 0.4 0.5 0.6
Stabilizer (drainage inhibitor) content in SMA, % (m/m)
|
FIGuRE 4.10 Example relationship between draindown and stabilizer content used for the selection of an effective content of stabilizer in an SMA mix.
The optimal content of a stabilizer is the one that produces less than 0.3% by mass draindown material (recommended value is less than or equal to 0.2% m/m), unless otherwise specified.
Posted by admin on 12/ 11/ 15
lumbing and pipe fitting are similar, but not always the same. Modern plumbers usually work with copper tubing and various forms of plastic piping. Cast-iron pipe is still encountered, and steel pipe is used for gas work. Finding a plumber working with threaded joints is not nearly as common as it once was. But, threaded pipe is still used in plumbing, and it is used frequently in pipe fitting. Figuring the fit for a pipe where threads are to be inserted into a fitting is a little different from sliding copper or plastic pipe into a hub fitting. However, many of the calculations used with threaded pipe apply to other types of pipe.
Many plumbers don’t spend a lot of time using mathematical functions to figure offsets. Heck, I’m one of them. How often have you taken a forty-five and held it out to guesstimate a length for a piece of pipe? If you have a lot of experience, your trained eye and skill probably gave you a measurement that was close enough for plastic pipe or copper tubing. I assume this because I do it all the time. But, there are times when it helps to know how to use a precise formula to get an accurate measurement.
   The need for accuracy is more important when installing threaded pipe. For example, you can’t afford to guess at a piece of gas pipe and find out the hard way that the threads did not go far enough into the receiving fitting. The need for accuracy is more important when installing threaded pipe. For example, you can’t afford to guess at a piece of gas pipe and find out the hard way that the threads did not go far enough into the receiving fitting.
In the old days, when I was first learning the trade, plumbers taught their helpers and apprentices. Those were the good-ole days. In today’s competitive market, plumbing companies don’t spend nearly as much time or money training their up-and-coming plumbers. As the owner of a plumbing company, I understand why this is, but I don’t agree with it. And, the net result is a crop
17
of plumbers who are not well prepared for what their trade requires. Sure, they can do the basics of gluing, soldering, and simple layouts, but many of the new breed don’t possess the knowledge needed to be true master plumbers. Don’t get me wrong; it’s not really the fault of the new plumbers. Responsibility for becoming an excellent plumber rests on many shoulders.
 ideally, plumbing apprentices and helpers should have classroom training. Company supervisors should authorize field plumbers some additional time for in-the-field training for apprentices. Working apprentices should go the extra mile to do research and study on their own. When I was helper, I used to spend my lunch break reading the codebook. There is no single individual to blame for the quality of education that some new plumbers are, or are not, receiving. Money is probably the root of the problem. Customers are looking for low bids. Contractors must be competitive, and this eliminates the ability to have a solid on-the-job training program. Many helpers today seem to be more interested in getting their check than getting an education. So, here we are, with a lot of plumbers who don’t know the inner workings of the finer points of plumbing. ideally, plumbing apprentices and helpers should have classroom training. Company supervisors should authorize field plumbers some additional time for in-the-field training for apprentices. Working apprentices should go the extra mile to do research and study on their own. When I was helper, I used to spend my lunch break reading the codebook. There is no single individual to blame for the quality of education that some new plumbers are, or are not, receiving. Money is probably the root of the problem. Customers are looking for low bids. Contractors must be competitive, and this eliminates the ability to have a solid on-the-job training program. Many helpers today seem to be more interested in getting their check than getting an education. So, here we are, with a lot of plumbers who don’t know the inner workings of the finer points of plumbing.
   I was fortunate enough to be what might have been the last generation of plumbers to get company support in learning the trade. Plenty of time was spent running jackhammers and using shovels, but my field plumber took the time to explain procedures to me. I learned quickly how to plumb a basic house. Then I learned how to run gas pipe and to do commercial buildings. As a part of my learning process, I read voraciously. Later I became a supervisor, then the owner of my own company, and eventually an educator for other plumbers and for apprentices. I could have stopped anywhere along the way, but I’ve taken my interest in the trade to the limits, and I continue to push ahead. No, I don’t know all there is to know, but I’ve worked hard to gain the knowledge I have. Now is the time for me to share my knowledge of pipe fitting math with you. I was fortunate enough to be what might have been the last generation of plumbers to get company support in learning the trade. Plenty of time was spent running jackhammers and using shovels, but my field plumber took the time to explain procedures to me. I learned quickly how to plumb a basic house. Then I learned how to run gas pipe and to do commercial buildings. As a part of my learning process, I read voraciously. Later I became a supervisor, then the owner of my own company, and eventually an educator for other plumbers and for apprentices. I could have stopped anywhere along the way, but I’ve taken my interest in the trade to the limits, and I continue to push ahead. No, I don’t know all there is to know, but I’ve worked hard to gain the knowledge I have. Now is the time for me to share my knowledge of pipe fitting math with you.
45° OFFSETS
Offsets for 45° bends are common needs in both plumbing and pipe fitting. In fact, this degree of offset is one of the most common in the trade. I mentioned

|
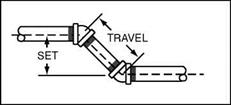
FIGURE 2.1 ■ Calculated 45° offsets.
|
|
earlier that many plumbers eyeball such offset measurements. The method works for a lot of plumbers, but let’s take a little time to see how the math of such offsets can help you in your career.
To start our tutorial, let’s discuss terms that apply to offsets. Envision a horizontal pipe that you want to install a 45° offset in. For the ease of vision, think of the horizontal pipe resting in a pipe hanger. You have to offset the pipe over a piece of ductwork. This will have a 45° fitting looking up from your horizontal pipe. There will be a piece of pipe in the upturned end of the fitting that will come into the bottom of the second 45° fitting (Fig. 2.1: offset drawing).
 As we talk about measurements here, they will all be measured from the center of the pipe. There are two terms you need to know for this calculation. As we talk about measurements here, they will all be measured from the center of the pipe. There are two terms you need to know for this calculation.
Travel, the first term, is the length of the pipe between the two 45° fittings. The length of Travel begins and ends at the center of each fitting. The distance from the center of the lower horizontal pipe to the center of the upper horizontal pipe is called the Set. Now that you know the terms, we can do the math.
To make doing the math easier, I am including tables for you to work from (Fig. 2.2: 45° offset math tables). Let’s say that the Set is 563/4 inches. Find this measurement in the table in Fig. 2.2. This will show you that the Travel is 80.244 inches. Now you can use the table for converting decimal equivalents of fractions of an inch (Fig. 2.3: decimal equivalents of fractions of an inch) to convert your decimal, the 80.244 inches. Finding the decimal equivalent of a fraction is a matter of dividing the numerator by the denominator. The chart in Fig. 2.3 proves the measurement to be 80V4 inches. You can find the Set if you know the Travel by reversing the procedure.
If the Travel is known to be 80V4 inches, what is the Set? We both know that it is 563/4 inches, but how would you find it? Use the table in Fig. 2.2 and look under the heading of Travel. Find the 80.244 listing that represents 80V4 inches. Refer to the Set heading. What does it say? Of course, it says 563/4. It’s that easy. All you have to do is use the tables that I’ve provided to make your life easier in calculating 45° offsets.
|
Set
|
Travel
|
Set
|
Travel
|
Set
|
Travel
|
|
2
|
2.828
|
У,
|
15.907
|
Vh
|
28.987
|
|
‘/4
|
3.181
|
y2
|
16.261
|
3/4
|
29.340
|
|
y2
|
3.531
|
%
|
16.614
|
21
|
29.694
|
|
3/4
|
3.888
|
12
|
16.968
|
Va
|
30.047
|
|
3
|
4.242
|
У4
|
17.321
|
y2
|
30.401
|
|
‘/4
|
4.575
|
У2
|
17.675
|
3/4
|
30.754
|
|
‘/2
|
4.949
|
%
|
18.028
|
22
|
31.108
|
|
3A
|
5.302
|
13
|
18.382
|
У,
|
31.461
|
|
4
|
5.656
|
У4
|
18.735
|
y2
|
31.815
|
|
‘/4
|
6.009
|
y2
|
19.089
|
3/4
|
32.168
|
|
y2
|
6.363
|
%
|
19.442
|
23
|
32.522
|
|
3A
|
6.716
|
14
|
19.796
|
y4
|
32.875
|
|
5
|
7.070
|
y4
|
20.149
|
Уа
|
33.229
|
|
У.
|
7.423
|
y2
|
20.503
|
3/4
|
33.582
|
|
y2
|
7.777
|
%
|
20.856
|
24
|
33.936
|
|
3A
|
8.130
|
15
|
21.210
|
y4
|
34.289
|
|
6
|
8.484
|
‘/4
|
21.563
|
y2
|
34.643
|
|
У.
|
8.837
|
y2
|
21.917
|
3/4
|
34.996
|
|
y2
|
9.191
|
%
|
22.270
|
25
|
35.350
|
|
3/>
|
9.544
|
16
|
22.624
|
У4
|
35.703
|
|
7
|
9.898
|
•Л
|
22.977
|
y2
|
36.057
|
|
У.
|
10.251
|
Vz
|
23.331
|
%
|
36.410
|
|
Vz
|
10.605
|
%
|
23.684
|
26
|
36.764
|
|
%
|
10.958
|
17
|
24.038
|
У4
|
37.117
|
|
8
|
11.312
|
V4
|
24.391
|
y2
|
37.471
|
|
‘/4
|
11.665
|
У2
|
24.745
|
%
|
37.824
|
|
‘/2
|
12.019
|
3/4
|
25.098
|
27
|
38.178
|
|
%
|
12.372
|
18
|
25.452
|
1/4
|
38.531
|
|
9
|
12.726
|
‘/4
|
25.805
|
y2
|
38.885
|
|
y4
|
13.079
|
y2
|
26.159
|
3/4
|
39.238
|
|
‘/2
|
13.433
|
%
|
26.512
|
28
|
39.592
|
|
3/4
|
13.786
|
19
|
26.866
|
У4
|
39.945
|
|
10
|
14.140
|
%
|
27.219
|
y2
|
40.299
|
|
‘/4
|
14.493
|
y2
|
27.573
|
3/4
|
40.652
|
|
‘/2
|
14.847
|
3/4
|
27.926
|
29
|
41.006
|
|
%
|
15.200
|
20
|
28.280
|
У4
|
41.359
|
|
11
|
15.554
|
У4
|
28.635
|
y2
|
41.713
|
FIGURE 2.2 ■ Set and travel relationships in inches for 45° offsets.
Posted by admin on 12/ 11/ 15
JUST LIKE HITTING A SOLID-LINE DRIVE or
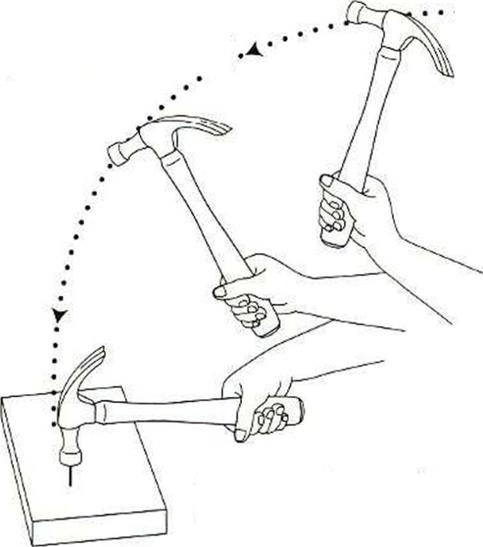
delivering a blazing tennis serve, driving nails quickly and accurately takes time and practice to master. Like most athletic endeavors, efficient nailing has at least as much to do with rhythm and coordination as it does with power and force. Learn to nail using your entire body; make a fluid shoulder, elbow, and forearm movement that ends with a decisive snap of the wrist (see the illustration at right). Practice your technique. Grasp the handle near the end with an easy, firm grip, making sure your thumb is wrapped around it. Buy a box of 8d or 16d framing nails, find a hunk of wood, and start driving nails. In time, you’ll be amazed at the speed and force with which you can drive nails.
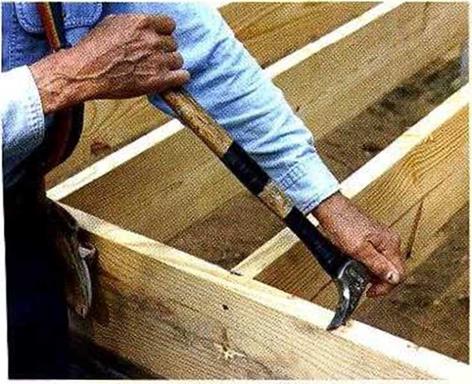
When pulling nails with a wooden-handled hammer, hook the nail and push the hammer to one side and then the other, rather than straight
back (see the photo at left). Otherwise, you could break the handle right at the hammer’s head. To pull nails with a metal-handled hammer, you can lever the hammer sideways or backward. To increase your leverage, put a block under the head of the hammer.
  і і
Helping Hand
Shrink-wrap strengthens a wooden handle. Available from electrical suppliers, plastic shrink-wrap can add strength to a wooden hammer handle right where it counts—where the handle meets the head. Slip a 6-in.-long piece of the plastic wrap onto the handle, then shrink it in place with a hair dryer.
strength, feel well balanced, and be comfortable in vour hand. When I brine a new ham – mer home, I usually reinforce the upper part of the wooden handle by wrapping it with electrical tape.
Utility knives and tinsnips
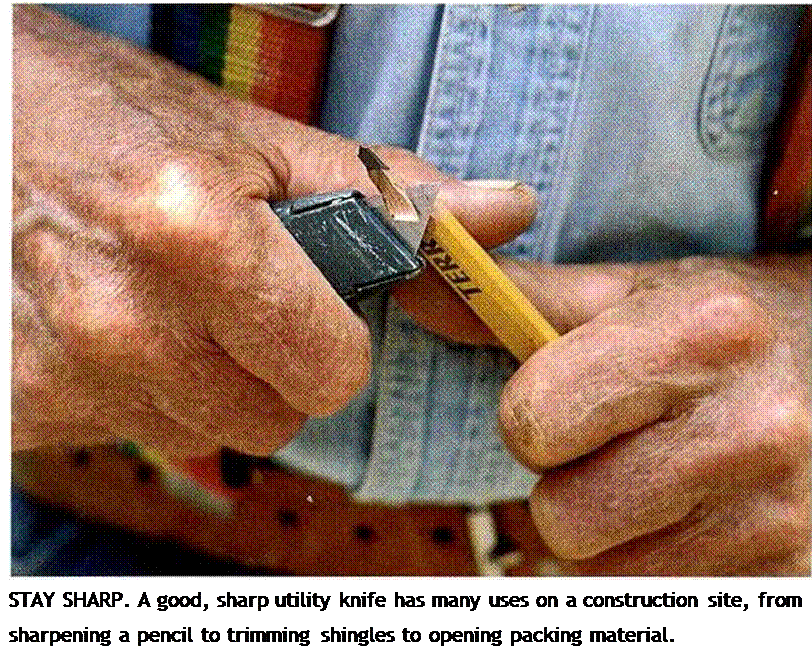
A few more essential tools round out a carpenter’s basic, must have kit. Perhaps foremost on this list is a utility knife. On the job site, a utility knife may be used to open packages or cut building paper, fiberglass insulation, shingles, vinyl, or drywall. You’ll also need it several times a day to sharpen a carpenter’s pencil (see the photo at right). 1 recommend using a knife with a retractable, replaceable blade and a handle with space inside to hold several replacement blades.
When a blade becomes dull, replace it or restore its edge with a whetstone. A dull blade doesn’t cut as neatly and is dangerous because of the extra force required to make it cut.
You’ll need a good pair of tinsnips to cut steel packaging bands around lumber. Snips are also essential when working with aluminum cladding and vinyl siding. Be careful
when using these cutting tools. Accidents with utilitv knives are common.
Cat’s paws and flat bars
These prying tools really come in handy during new construction and remodeling work. Your hammer’s claw vvi 1 generally work fine for removing exposed nails. When a nail is buried, though, a cat’s paw is the tool to use. With a couple of hammer blows, you can sink
     the cat’s paw into a board, grab the head of a nail, and lever it above the surface. From there, your hammer takes over to completely remove the nail. the cat’s paw into a board, grab the head of a nail, and lever it above the surface. From there, your hammer takes over to completely remove the nail.
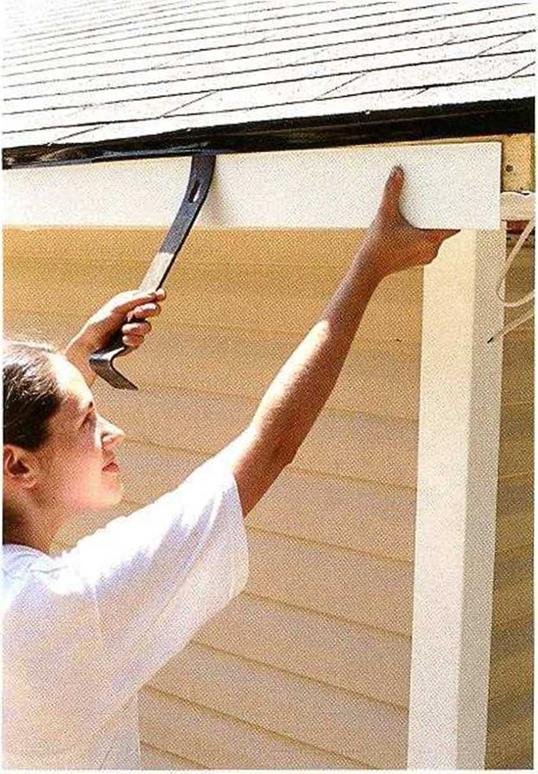
A flat bar can also be used to pull nails, or it can be used as a prybar. In new construction, I often use a flat bar to separate boards that have been temporarily nailed together and to slip aluminum or vinyl trim under a drip edge (see the photo above).
Tool Carriers
Once you have a few tools, you’ll need to carry them with you as you frame walls and install siding or shingles. It doesn’t work well to carry a measuring tape in your jeans and to fish nails from a shirt pocket. Fifty years ago, when I started working as a carpenter, we wore white carpenter’s overalls with a lot of little pockets for nails and tools. Those soon gave way to cloth aprons, which were replaced by heavy leather aprons with a wide leaner bclt. Today, nylon pouches seem to be taking over, and for good reason: The best versions are lighter than leather and just as durable.
As with tools, the selection of tool belts,
pouches, and holders can be confusing. There are good bell and pouch systems for both men and women. Inexpensive versions are available for novice and occasional builders.
If you’re serious about construction work, consider some of the tool belt systems that allow you to add pouches and holders as you need them.
For larger items, or for tools that are used only occasionally, the traditional carpenter’s toolbox has given way to the carpenter’s tool bucket (see the photo below). This is іust a 5-gal. bucket fitted with a bag insert that
allows vou to carry manv individual tools. For
/ * і
organizing specialized tools (collections of drill bits, chisels, or screwdrivers, for example), inexpensive storage boxes in many sizes are available from supply stores. Label the boxes so you know what’s inside.
|
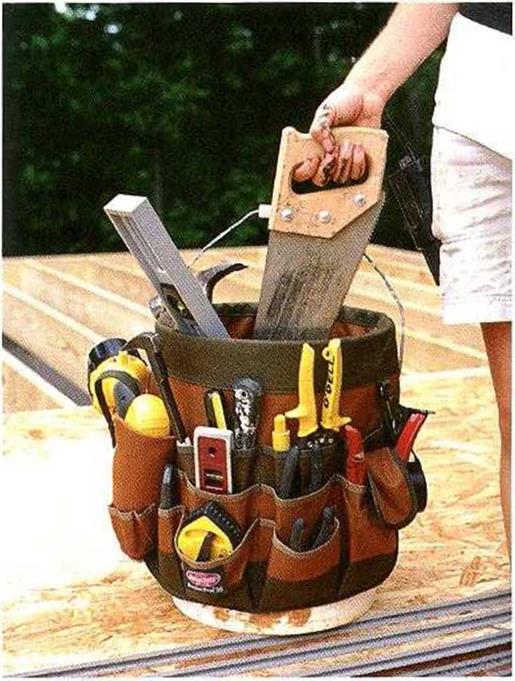
CREATE A TOTE FOR TOOLS. Fitted with a pouch – covered canvas or nylon insert, a 5-gal. plastic bucket replaces an old-fashioned carpenter’s toolbox.
|
Posted by admin on 12/ 11/ 15
 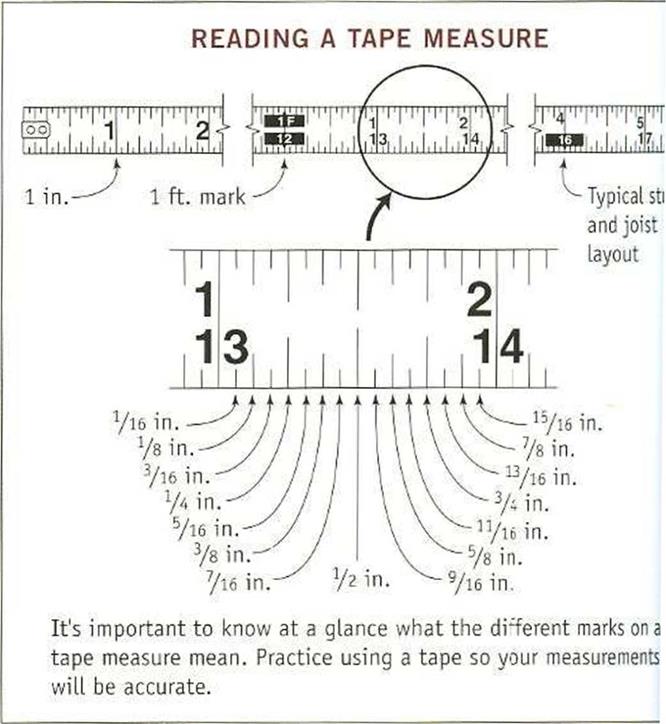
A MEASURING TAPE IS SIMPLY a long ruler in a convenient easy-to-use package. Just like a ruler, a tape is laid out in feet, inches, and fractions of inches. Knowing how to read a tape quickly and accurately is an essential skill for anyone involved in the building trades.
The key to being able to read a tape is learning and understanding all the subdivisions of an inch (see the illustration at right). Each inch is divided into halves, quarters, eighths, and sixteenths. Once you can discern the meaning of all these little marks, you’ll have no problem measuring 13 ft., 9}/is in., or any other odd dimension. Study the drawing and your own tape until you can rattle off accurate readings at a glance.
In addition to feet and inches, a tape also has special marks at 16 in., 32 in., and so on to indicate the layout of most floor joists and wall
studs. Some tapes also have decimal equivalents and a metric conversion scale on the back.
 
cause rust and friction, which can shorten the tape’s life span.
Levels
Checking for level (horizontal) and plumb (vertical) are construction tasks that carpenters do every day. both 2-ft. and 4-ft. levels are
4 4
good to have around. The 2-ft. model allows you to get into tighter spaces—to check a header or rough sill for level, for example. A 4-ft. or 6-ft. model provides greater accuracy across longer distances, such as when checking walls for plumb. More so than perhaps any other carpentry tool, a level must be treated with loving care to remain useful (an inaccurate level does you no favors). Check your
levels for accuracy before you put them to work (see the tip at left).
Squares
Most things a carpenter builds are either square or rectangular. With a good square or two, you can mark square lines exactly and make square cuts precisely. These days, the most useful square is a small rafter square, often called a Speed square™—the brand name of a popular model (see the top right photo on the facing page). This triangular square fits conveniently inside a nail hag. It’s rugged and easy to use and lets you lay out almost any desired angle, in addition to 45-degree and 90-degree angles.

|
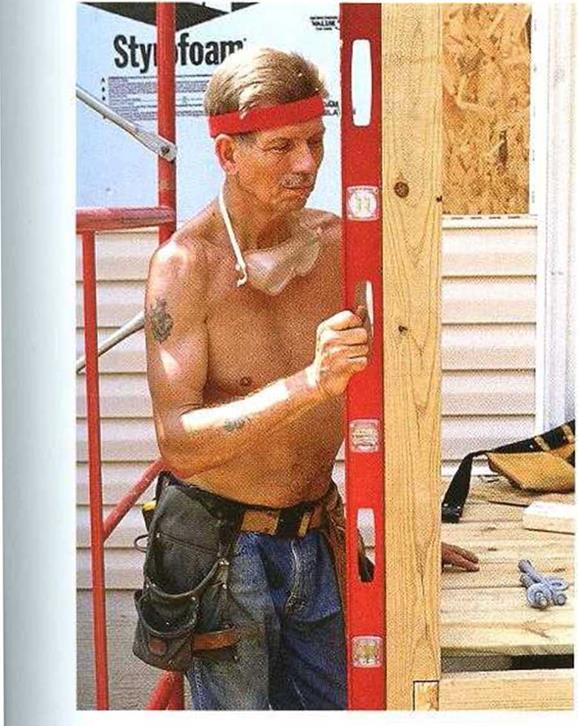
HORIZONTAL AND VERTICAL. Available in different lengths, levels can quickly test for plumb (vertical) and level (horizontal).
|
|
|
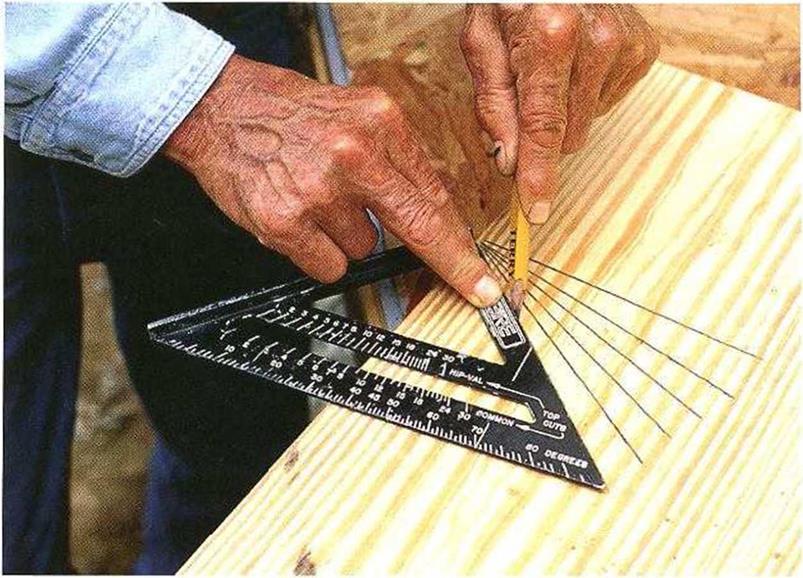
GET THE RIGHT ANGLE. A small, triangular rafter square is designed to lay out 90-degree and 45-degree angles quickly, but it’s also capable of laying out just about any angle you might need.
|
|
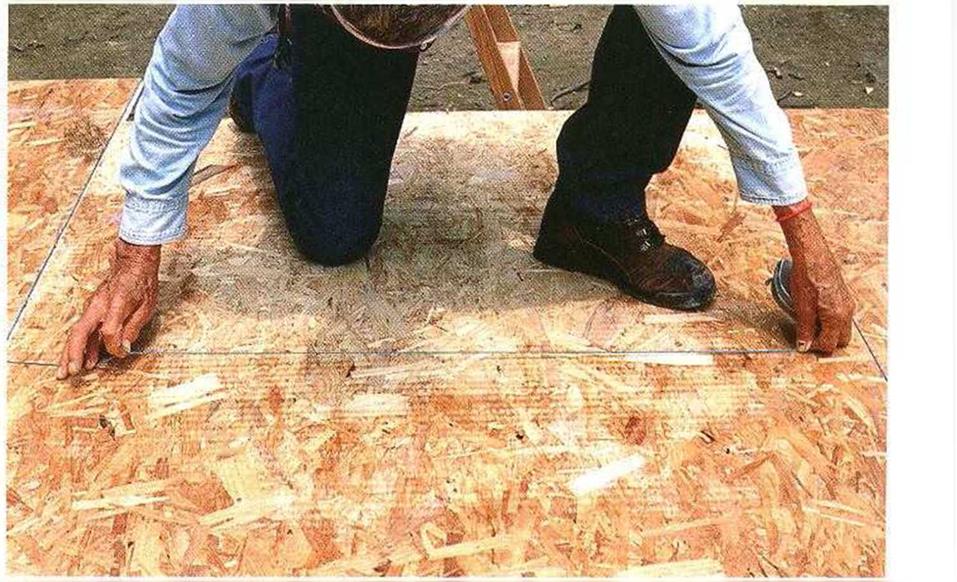
Marking tools
Once you’ve measured* its hire lo mark. A carpenters pencil and a lumber crayon, or keel, are the two most common marking tools you’ll need. A carpenter’s pencil is flat (so it won’t roll away if you set it down), and it’s less apt to break than a regular pencil. Keel marks easily where pencils can’t—on materials such as tarpaper, housewrap, and concrete. It’s waterproof, loo.
A chalkline is also essential. The first chalkline 1 used was simply a string pulled through a solid chunk of chalk. Today’s chalklines come in cases or reels that hold both a string and a supply of powdered chalk. You pull the chalk-covered string out of the case, snap your line, and then rewind the string inside the case, where it becomes covered in chalk again, ready for the next line. The chalk comes in many colors, including a few neon shades.
  Chalk that leaves a permanent line is good for working in rainy weather. Chalk that leaves a permanent line is good for working in rainy weather.
Hammers
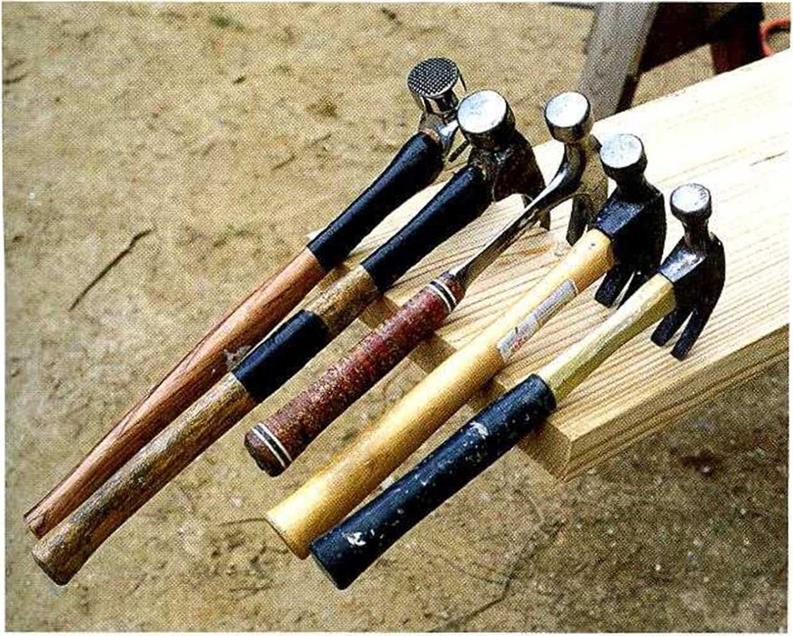
Carpenters can be a bit touchy about their hammers. You may have more luck borrowing a carpenters pickup truck than a favorite hammer. These days, most framers west of the Mississippi prefer a 21-oz. hammer with a serrated face and a 16-in.- or 18-in.-long wooden handle. My preference is the well-balanced Dalluge® hammer. Women friends in the trade tell me they like the Stiletto®, a 14-oz.
framing hammer made of titanium with a steel face. East of the Mississippi, Ї see carpenters mostly using smooth-faced hammers with metal or fiberglass handles.
Hammer faces and weights vary greatly (see the top photo on the facing page). The best advice I can give is to select a professional – grade hammer that feels good to you. Definitely check out a hammer in person before you buy it. It should match your pnysical
Posted by admin on 12/ 11/ 15
The second way to counteract the draindown phenomena is to use a binder viscosity promoter. The most common agents used to be polymers, either plastomers or elastomers. Test results show, however, that the efficiency of polymers is not as good as that of fibers. Currently in many countries, regardless of the type of applied binder (modified or paving grade), fiber stabilizers are required. Binder modified with special materials may be considered, except for polymers directly metered into a pugmill at an asphalt plant. Polymer stabilizers also have a higher viscosity over the preferred range of production temperatures. This is when the use of a classic stabilizer is indispensable because, as a number of failed attempts have shown, modified binder itself does not protect an SMA mix from segregation.
The application of viscosity promoters acting at temperatures of 100-160°C may also increase problems with compaction on site because an SMA mix is hard to compact, even without an additive that stiffens the binder and makes compacting the mix even more difficult. This fact should not be forgotten when choosing a stabilizer to use.
Posted by admin on 12/ 11/ 15
A 10-in. sliding compound-miter saw is the ultimate tool for a wide range of finish work. The extended crosscut length, combined with adjustable angle and bevel settings, allows complicated cuts in larger materials such as 6-in. by 6-in. deck posts, 10-in.-wide siding boards, and large crown molding.
POWER PLANERS
Moderately priced and incredibly useful, a power planer can plane down studs to create a flat plane for drywall, trim a little off an exterior door, and quickly cut a slot so the nailing flange of an electrical box is flush to the edge of a stud (see the photo on p. 167).
RIGHT-ANGLE DRILL
Renting a h-in. right-angle drill will let you avoid burning out your own drill while roughing in plumbing and electrical runs. The right-angle drill is a godsend in the tight spaces between framing members, and the drill’s long handle gives you more leverage to control the torque of this slow-drilling powerful machine.
When drilling through framing, self-feeding, double-spiral bits clear wood well, but use a hole-cutting bit when bigger holes are required. Whatever bit you use, wear goggles and watch for nails. The better right-angle drills will have a clutch that disengages if the bit meets a certain level of resistance.
PNEUMATIC NAILERS
It may take 20,000 to 30,000 nails just to sheath an average house. Add to that the nails needed
   for framing, roofing, and shingling, and you can begin to imagine the number of hammer strokes required. Pneumatic nailers, commonly called nail guns, can reduce those strokes to a small fraction. for framing, roofing, and shingling, and you can begin to imagine the number of hammer strokes required. Pneumatic nailers, commonly called nail guns, can reduce those strokes to a small fraction.
Control of the workpiece is the other big advantage of these nailers—with a hammer and nail, you need one hand for each. A pneumatic nailer delivers the nails, giving you a free hand to hold a stud or top plate in place. The nail goes in quickly without requiring hammer blows that cause the wood to “drift.”
And unlike hammer heads, pneumatic nailers won’t slip and ding expensive pieces of trim. Consequently, among professionals, pneumatic finish nailers have all but replaced the hand nailing of door and window casings.
There are framing nailers, finish nailers, and brad nailers (also called pin tackers). These nailers are powered by air hoses running to a compressor and calibrated by a pressure adjustment on the nailer. Staff at rental companies can explain such adjustments as well as safety features and correct operation.
Hard hats, safety glasses, and hearing protection are musts.
POWDER-ACTUATED TOOLS
Potentially very dangerous, powder-actuated tools are useful for shooting nails into concrete, as when framing an interior wall on a concrete slab or securing pressure-treated lumber to a foundation wall. But such connections need to be nonstructural. Engineers specify bolts instead for all structural connections to concrete.
A reputable rental company will demonstrate the tool’s safe use, describe (and rent) safety equipment, answer your questions, and supply appropriate cartridges and drive pins. Some local codes prohibit renting powder-actuated tools to nonprofessionals.
When using this tool, wear safety glasses, hearing protection, and a hard hat.
ROTARY HAMMERS
A rotary hammer is also known as a hammer drill or RotoHammer®, after a brand name. On
the hammer setting, the tool punches as it turns, somewhat like a jackhammer.
Smaller hammer drills (И in.) typically offer two settings: rotation only and hammering with rotation. Such drills are adequate to drill small holes in concrete, for anchoring door thresholds to slabs and for predrilling pilot holes for masonry screws.
Larger hammer drills (U2 in.) usually offer only hammering with rotation. If you need to drill dozens of M-in. holes for standard %-in. anchor bolts, this is the tool. Get a model with padded handles as well as vibration reduction.
Wear safety glasses, hearing protection, heavy gloves, and hard hat.
CONCRETE BREAKER AND COMPRESSOR
Whenever you need to replace defective concrete, change the configuration of foundations, or get down to soil level to put in new drainage, rent a concrete breaker (see the photo on p. 215) and special high-volume compressor.
SOIL TAMPER
Use a gasoline-powered soil tamper tool before you pour a concrete slab, lay a brick walk, and so on.
DUMPSTERS
Although you can rent Dumpsters by the day or week, carefully plan (and stick to) demolition schedules so you fill and get Dumpsters removed as quickly as possible. Other people’s debris has a way of filling your Dumpster when it sits too long, so don’t even order one until you’re well into tearout and have accumulated a half week’s worth of debris.
If you’re demolishing masonry, rent a “low boy,” which is a small unit (10 cu. yd.) specially built for the great weight of concrete, brick, and the like. For other jobs, rent the largest size available, usually 20 cu. yd. Be advised that you’ll also pay for the dumping fee the company must pay to your municipality.
Nailer TRIGGERS
Pneumatic nailers have several types of triggers. The safest is a restrictive trigger, which you must squeeze and release to shoot a nail. A second type, a bounce-fire trigger, shoots a nail each time you depress the gun’s nosepiece. Bounce-fire triggers are usually favored for sheathing, which requires a lot of 8d nails (2У2 in. long) spaced relatively close to one another. Until you become accustomed to nailers, restrictive triggers are far safer.
Posted by admin on 12/ 11/ 15
The conditional probability is the probability that a conditional event would occur. The conditional probability P (A | B) can be computed as
P(AI B) = PAA <2.6)
in which P (A | B) is the occurrence probability of event A given that event B has occurred. It represents a reevaluation of the occurrence probability of event A in the light of the information that event B has occurred. Intuitively, A and B are two independent events if and only if P (A | B) = P (A). In many cases it is convenient to compute the joint probability P (A, B) by
P (A, B) = P (B) P (A | B) or P (A, B) = P (A) P (B | A)
The probability of the joint occurrence of K dependent events can be generalized as
Example 2.3 Referring to Example 2.2, the probabilities that tributaries i and 2 would overflow during a major storm event are 0.5 and 0.4, respectively. After examining closely the assumption about the independence of overflow events in the two tributaries, its validity is questionable. Through an analysis of historical overflow events, it is found that the probability of tributary 2 overflowing is 0.6 if tributary i overflows. Determine the probability that at least one tributary would overflow in a major storm event.
Solution Let Ei and E2 be the events that tributary i and 2 overflow, respectively. From the problem statement, the following probabilities can be identified:
P(Ei) = 0.5 P(E2) = 0.4 P(E2 | Ei) = 0.6
in which P(E2 | Ei) is the conditional probability representing the likelihood that tributary 2 would overflow given that tributary i has overflowed. The probability of at least one tributary overflowing during a major storm event can be computed by
P(Ei U E2) = P(Ei) + P(E2) – P(Ei, E2)
in which the probability of joint occurrence of both tributaries overflowing, that is, P(E1, E2), can be obtained from the given conditional probability, according to Eq. (2.7), as
P(E1, E2) — P(E2 | E1)P(E1) — (0.6)(0.5) — 0.3
The probability that at least one tributary would overflow during a major storm event can be obtained as
P(E1 U E2) — P(E1) + P(E2) – P(E1, E2) — 0.5 + 0.4 – 0.3 — 0.6
| |

 Materials matter. Builder’s felt, sometimes called tar paper, is rolled over the roof sheathing before asphalt shingles are installed.
![PRESSURE-TREATED LUMBER Подпись: Make sure that every window and door has proper flashing and caulking before setting them in place. [Photo by Don Charles Blom]](/img/1312/image130_0.gif)


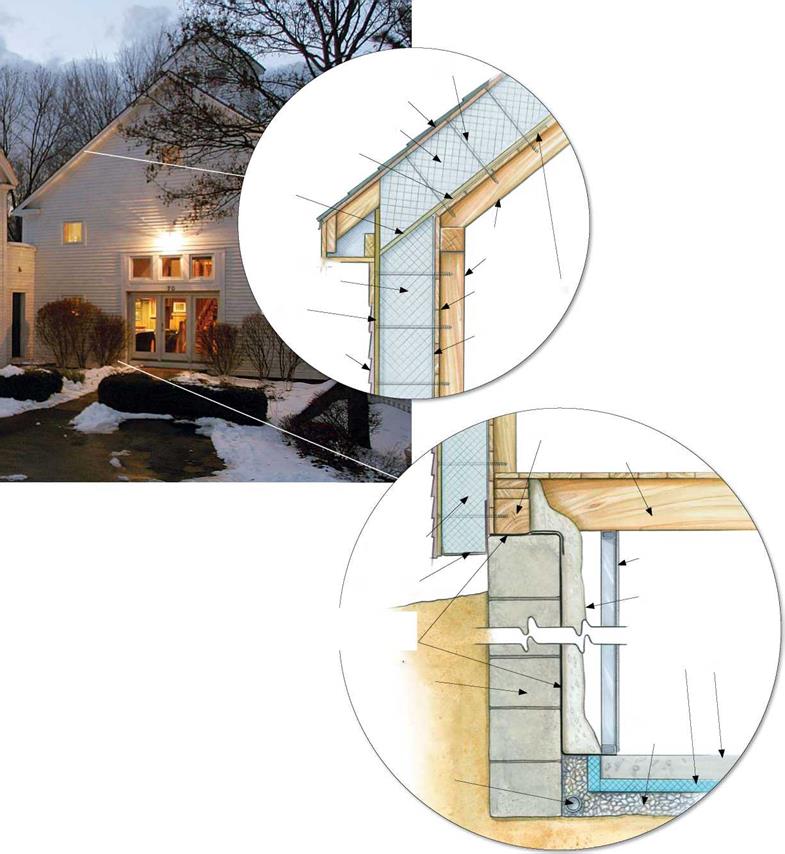
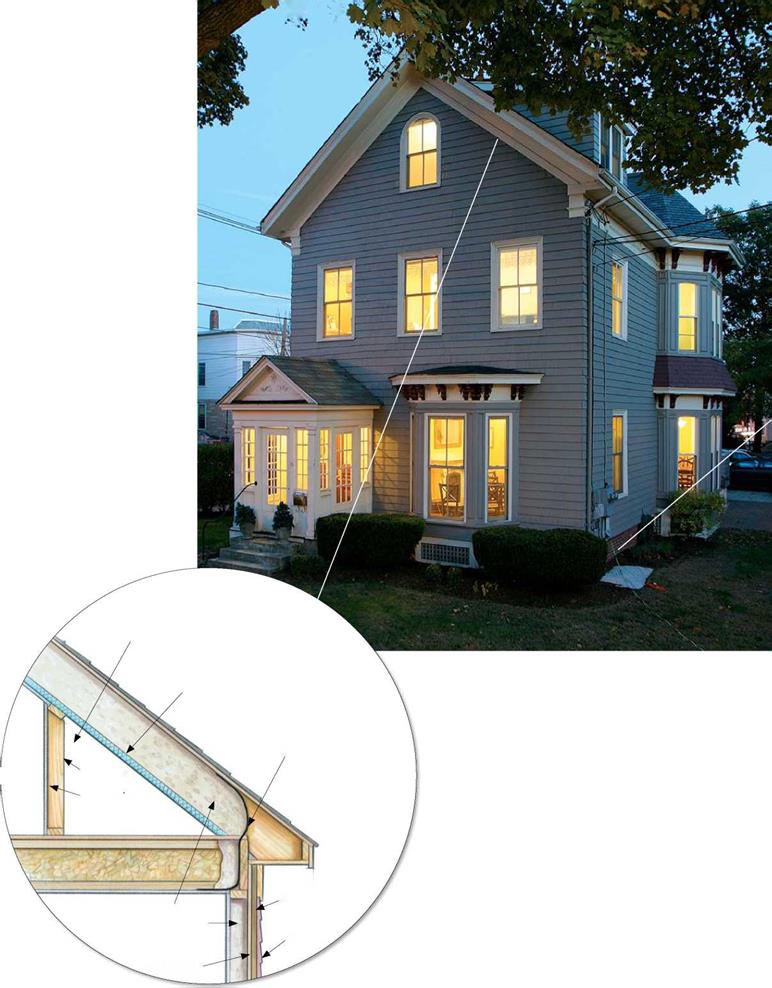
 3-in. closed-cell spray foam (R-21)

 To get a high R-value (R-40) without disrupting the roof or increasing the 2×6 rafter size, we combined insulation types. We could have used only closed-cell spray foam to fill the rafters, but at the time, it was too expensive. Instead, we used 3 in. of spray foam to create an air barrier and fiberglass batts to fill the rest of the rafter bay. A layer of rigid foam under the rafters is a thermal break.




 The need for accuracy is more important when installing threaded pipe. For example, you can’t afford to guess at a piece of gas pipe and find out the hard way that the threads did not go far enough into the receiving fitting.
 ideally, plumbing apprentices and helpers should have classroom training. Company supervisors should authorize field plumbers some additional time for in-the-field training for apprentices. Working apprentices should go the extra mile to do research and study on their own. When I was helper, I used to spend my lunch break reading the codebook. There is no single individual to blame for the quality of education that some new plumbers are, or are not, receiving. Money is probably the root of the problem. Customers are looking for low bids. Contractors must be competitive, and this eliminates the ability to have a solid on-the-job training program. Many helpers today seem to be more interested in getting their check than getting an education. So, here we are, with a lot of plumbers who don’t know the inner workings of the finer points of plumbing.
 I was fortunate enough to be what might have been the last generation of plumbers to get company support in learning the trade. Plenty of time was spent running jackhammers and using shovels, but my field plumber took the time to explain procedures to me. I learned quickly how to plumb a basic house. Then I learned how to run gas pipe and to do commercial buildings. As a part of my learning process, I read voraciously. Later I became a supervisor, then the owner of my own company, and eventually an educator for other plumbers and for apprentices. I could have stopped anywhere along the way, but I’ve taken my interest in the trade to the limits, and I continue to push ahead. No, I don’t know all there is to know, but I’ve worked hard to gain the knowledge I have. Now is the time for me to share my knowledge of pipe fitting math with you.

 As we talk about measurements here, they will all be measured from the center of the pipe. There are two terms you need to know for this calculation.


 і
і


 the cat’s paw into a board, grab the head of a nail, and lever it above the surface. From there, your hammer takes over to completely remove the nail.


 Chalk that leaves a permanent line is good for working in rainy weather.
 for framing, roofing, and shingling, and you can begin to imagine the number of hammer strokes required. Pneumatic nailers, commonly called nail guns, can reduce those strokes to a small fraction.