HIGHWAY LOCATION,. DESIGN, AND TRAFFIC

Larry J. Shannon, P. E.

Highway Technical Manager ms Consultants Columbus, Ohio

This chapter begins with a description of the overall transportation development process, and then presents comprehensive information on the various elements of high­way location and design. Included is the determination of horizontal and vertical align­ment, with attention to obtaining proper sight distance and superelevation. The design of roadway cross sections, intersections, ramps, and service roads is addressed. Traffic aspects include an introduction to intelligent vehicle highway systems and the use of high-occupancy vehicle lanes. A presentation on preparation of highway construction plans and organizing CADD drawings is also provided. A list of references, which are noted in the text, concludes the chapter. Some design issues related to roadside safety are also discussed in Chap. 6.

BARS

Bars are solid-steel leverage tools. Depending on the size, a bar can be used for pulling nails, for prying open windows, or for demolition work. A carpenter uses several types of bars, such as the cat’s paw, the flat bar, and the wrecking bar.

After the hammer, the nail puller most often used is the cat’s paw. The cat’s paw has a nail slot between two sharp claws, which are designed to dig into the wood around a flush-driven nail.

To pull a nail with the cat’s paw, place the claws on the wood in front of the nail head. If you need to, drive the claws straight in for a couple of licks to get them below the head. Once the claws are under the head, pull back on the handle to lift out the nail (see the photo at right). The striking face of a cat’s paw is soft steel, so it’s okay to hit it with a hammer. But wear safety glasses.

The flat bar is simply a flat piece of steel with a right-angle bend at one end. It comes in various lengths, but most fit easily in a toolbucket. The one I use is

13/4 in. wide and 1 ft. long.

Подпись:Each end of a flat bar is sharpened and has a nail-pulling slot. I often use a flat bar to pry boards apart (see the photo below), to lift cabinet sections during
BARS

A flat bar can be used to pry apart two boards, but wear safety glasses when striking the bar with a hammer.


installation, and to scrape away old caulk. It is also handy for prying open windows that have been painted shut.

Don’t leave a flat bar lying around with the right-angle bend facing up.

Someone can step on it and get a hard rap on the shins.

The wrecking bar, which looks like a large cat’s paw, is the tool I reach for when I’m doing demolition work. Wrecking bars are made of hardened steel, and most types have nail slots in both the flattened end and the curved end. Wrecking bars come in various sizes and styles. In general, the longer the bar, the more leverage you gain. The one I use is 3 ft. long. I keep it in my pickup with my sledgehammer and use it to remove flooring, siding, or roof
sheathing, to pull large nails, to jack up heavy objects, and to pull apart con­crete formwork.

SQUARES

Most things a carpenter builds are either square or rectangular. So having a square or two around is just as impor­tant as having a hammer. The question is, which square among the many do you need? I have five types of squares that I find helpful: a small rafter square, a framing square, a combination square, a T-bevel square, and a drywaller’s square.

Small rafter square

The small rafter square is a triangular square—90° on one side, 45° on the other—used to mark both square and angled cuts. It is available in two sizes: The small one measures 7 in. along a

BARS

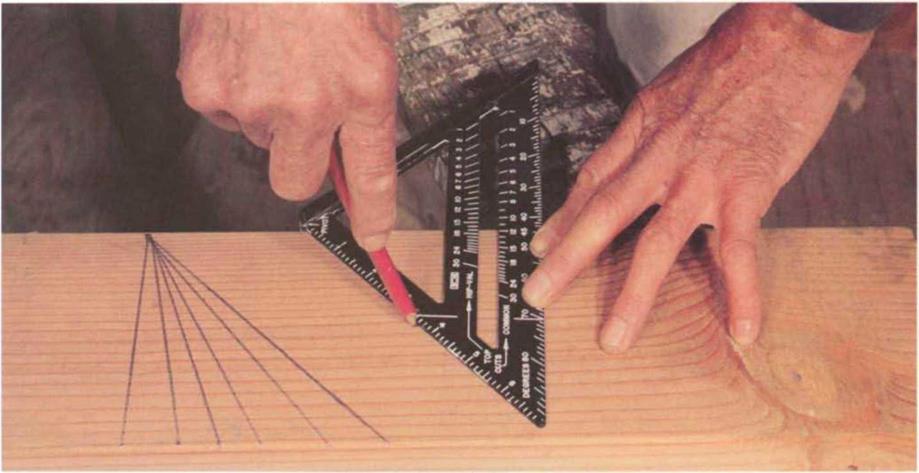
You can rapidly mark boards for angled cuts using a small rafter square. Simply align the degree of cut you want with the edge of a board, and scribe a line along the inch scale.


side, and the larger one measures 12 in. While I own both sizes, I prefer the smaller one because it is easy to carry in a toolbelt or toolbucket. You’ll also have a choice between metal or plastic. I pre­fer the metal small rafter square because it is almost indestructible; mine is still legi­ble and accurate even after years of use.

A small rafter square is very easy to use. On one side of the square is a scale in inches. Adjacent to this scale is a pivot point, and opposite the pivot point on the base of the square is a degree scale. To find any angle, say 20°, place the pivot point against the straight edge of a board and pivot the square until the 20° mark aligns with the edge. Then simply scribe a line along the inch-scale side, and the line will be 20° to the edge (see the photo on the facing page).

End Uses in Highways

It is apparent that there are many uses of recycled materials in highway construction and related applications. Table 1.19 provides a summary of these uses for reference.

1.6.1 Recycling Hazardous Wastes

Under Subtitle C of RCRA, EPA has the authority to regulate recyclable hazardous waste material. It is critical to determine the type of waste and the proposed method of recycling in determining whether it is regulated under Subtitle C. The definition of solid waste under Section 261.2 identifies four types of recycling activities for which recycled wastes may be subject to Subtitle C regulation: use constituting disposal, burning waste-derived fuels for energy recovery, reclamation, and speculative reclamation.

Use Constituting Disposal. Use constituting disposal is defined as placing or applying a solid waste or a material contained in a product that was a solid waste on the land in a man­ner constituting disposal. In this case, land disposal regulations under RCRA Parts 264 and 265 apply. Use constituting disposal may include the following uses involved in the con­struction of highways or maintenance of highway landscaping: fill material, cover mater­ial, fertilizer, soil conditioner, dust suppressor, asphalt additive, and foundation material.

Burning and Blending of Waste Fuels. Burning and blending would be the applicable method for recycling used oil for fuel in asphalt plants. Used oil is not currently considered a hazardous waste unless it has a characteristic of ignitability, corrosivity, reactivity, or extraction procedure toxicity (ICRE characteristic). If the used oil is mixed with a haz­ardous waste, it is regulated as a hazardous waste fuel under RCRA, Part 266, Subpart D. Specifications for nonhazardous used oil fuel are described in Table 1.20. Used oils that do

Asphalt: Crop waste and other cellulose material may be reduced to an oil suitable for asphalt extender. Asphalt paving aggregate: Incinerator ash.

Asphalt mineral filler: Sewage sludge ash, fly ash, baghouse fines, cement kiln dust, lime waste. Asphalt-rubber binder: Scrap tires.

Asphalt stress-absorbing membranes: Scrap tires.

Asphalt rubberized crack sealant: Scrap tires.

Asphalt aggregate: Mill tailings, phosphogypsum, slag.

Asphalt fine aggregate: Glass and ceramics.

Asphalt cement modifier: Plastic waste.

Asphalt plant fuel: Used motor oil.

Asphalt paving: Bottom ash, boiler slag, blast furnace slag, steelmaking slag, nonferrous slag, reclaimed asphalt pavement, foundry sand, roofing shingle waste, petroleum-contaminated soils (after thermal treatment).

Base course: Glass and ceramic waste, construction and demolition debris, nonferrous slags, reclaimed asphalt pavement, reclaimed concrete pavement, mill tailings.

Pipe bedding: Foundry sand, glass, and ceramic waste.

Borrow material: Quarry waste, construction and demolition material.

Slope stabilization and erosion control: Sawdust and wood waste.

Mulch: Wood waste, paper waste (especially slick, magazine-type paper), compost.

Fertilizer: Animal manure and farm waste.

Embankments: Lumber and wood waste, sawdust and wood chips, recycled sanitary landfill refuse, fly ash, bottom ash, construction and demolition waste, sulfate waste, waste rock, mill tailings, coal refuse.

Cement stabilized base: Incinerator ash, fly ash, bottom ash, advanced SO2 control by-products, cement kiln dust, reclaimed asphalt pavement, petroleum-contaminated waste (after thermal treatment), coal refuse, and rice husk ash may be used as supplementary cementing material. Concrete: Incinerator ash from sewage sludge cake as vitrified aggregate or palletized aggregate. Lightweight fill material: Wood waste, sawdust, chipped wood, scrap tires.

Geotextile: Plastic waste.

Sealant: Scrap tires.

Safety hardware, fencing, signposts: Plastic wastes.

Flowable fill and grout: Quarry waste, fly ash.

Soil stabilization: Fly ash, advanced SO2 control by-product, cement kiln dust, lime waste. Antiskid material: Bottom ash, steelmaking slag.

Blasting grit: Nonferrous slags.

TABLE 1.20 Specification Levels for Used Oil Fuels

Specification

Maximum allowable level

Arsenic concentration

5 ppm

Cadmium concentration

2 ppm

Chromium concentration

10 ppm

Lead concentration

100 ppm

Flash point

1000°F

Total halogen concentration (unmixed)

4000 ppm

Total halogen concentration (mixed)

1000 ppm

Source: Adapted from Travis Wagner, Complete Handbook of Hazardous

Waste Regulation, Perry-Wagner Publishing, Brunswick, Maine, 1988, p. 46.

not meet one or all of these specifications and are not mixed with hazardous waste may still be burned in industrial boilers, but they must have an EPA identification number for this activity and must meet a higher standard of reporting than used oil meeting the specifica­tions. A burner of either specification or off-specification used oil fuel must notify EPA of its used-oil-fuel activities and state the location and a general description of the used-oil – management activities. Copies of invoices and waste analysis conducted on the used oil must be maintained for at least 3 years.

Reclamation. Reclamation is the recovery of materials with value from a waste material and involves regeneration of waste material from the reclamation activities. Recovering precious metals from a waste stream (such as silver from x-ray film) is an example of reclamation. When the lead plates from lead-acid batteries are recovered, the activity is regulated under RCRA as reclamation. Use of material as feed stocks or ingredients in the production of a new product is not considered reclamation.

Speculative Accumulation. Any hazardous secondary material is considered a solid waste if accumulated before recycling unless 75 percent of the stockpile is recycled during a calendar year.

Water Flow Theory for Saturated and Unsaturated Pavement Material

SigurOur Erlingsson[3], Mihael Brencic and Andrew Dawson

Abstract This chapter describes the relation between road structures and water giving the general water balance equation for the pavement structure. Aquifers are briefly introduced. The pavement and its associated embankment are divided into the saturated zone and the unsaturated zone. Porous media are also described briefly together with their grain size distributions and fundamental properties related to wa­ter movements. A short summary of water flow theory for saturated and unsaturated soils is then presented, including relevant discussion of the soil water characteristic curve and permeability of unsaturated soils.

Keywords Roads ■ water flow ■ porous media ■ saturated ■ unsaturated ■ permeability ■ soil water characteristic curve

2.1 Introduction

During the planning, design, construction, operation and maintenance of roads, wa­ter can be an important environmental and constructional constraint that can signif­icantly influence the bearing capacity of the pavement, the safe operation of traffic and have a large influence on the operational costs of roads.

Due to their length, roads interact with various water phenomena. Interaction between roads and water phenomena can be conceptualized on the basis of the recharge area of the water that intercepts the road. These phenomena of water road interaction can be divided into three groups:

(i) the road’s own waters;

(ii) hinterland waters; and

(iii) remote waters.

The road’s own water is the runoff that arises as a consequence of precipitation falling onto the carriageway and onto the associated embankment. Hinterland waters come from the near-road environment (e. g. slopes from a cutting) and those which are flowing towards the road embankment. Remote waters have recharge areas far away from road but are crossing the line of the road (e. g. rivers, lakes, subterranean groundwater flow, etc.).

FINDING THE AREA AND VOLUME OF A GIVEN SHAPE

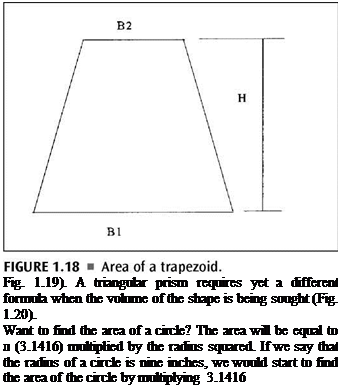
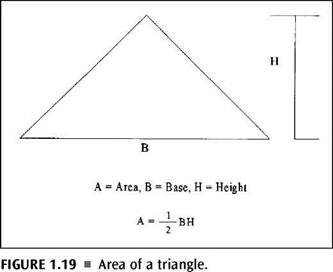
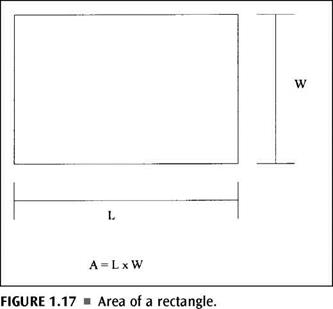
Finding the area of a given shape is also done with the use of formulas. It’s no more difficult than what we have already been doing. In some ways, finding the area is easier than finding the perimeter. Most anyone in the trades knows how to find the square footage of a room. When you multiply the length of the room by the width of the room, you arrive at the square footage (Fig. 1.17). Well, this is exactly how you find the area of a rectan­gle or a square. There is no mystery or trick. Just multiply the length by the width for a rectangle or multiply one side by another side for a square, and you will have the area of the shape. To find the volume of a rectangle, you simply multiply the length by the width by the height. Different formulas are needed to find the area of trapezoids and triangles (Fig. 1.18 and

FINDING THE AREA AND VOLUME OF A GIVEN SHAPE

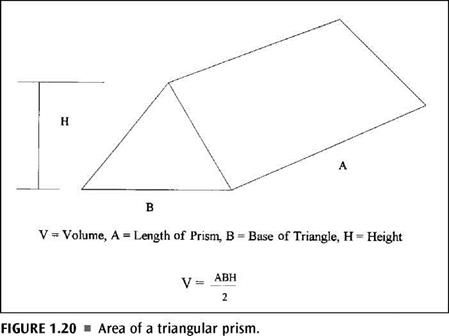
Подпись: Fig. 1.19). A triangular prism requires yet a different formula when the volume of the shape is being sought (Fig. 1.20). Want to find the area of a circle? The area will be equal to л (3.1416) multiplied by the radius squared. If we say that the radius of a circle is nine inches, we would start to find the area of the circle by multiplying 3.1416

FINDING THE AREA AND VOLUME OF A GIVEN SHAPE

FINDING THE AREA AND VOLUME OF A GIVEN SHAPE

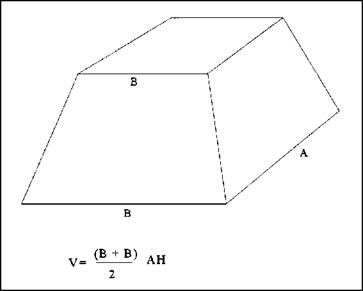
(тс) by 9 inches by 9 inches. This would advance up to multiplying 3.1416 by 81 square inches (9 X 9 = 81). The area of the circle would turn out to be 254.47 square inches. If you are looking for the volume of a cube, you simply multiply the three sides, as is illustrated in Figure 1.21. For a trape­zoidal prism, the volume is found by using the formula in Figure 1.22.

FINDING THE AREA AND VOLUME OF A GIVEN SHAPE

FINDING THE AREA AND VOLUME OF A GIVEN SHAPE

FIGURE 1.22 ■ Volume of a trapeziodal prism.

The math that is used in plumbing and pipe fitting is not very difficult to understand if you will accept the fact that it is necessary and that you need to understand it. What may appear daunting on the surface is actually pretty prac­tical in principle. With a combination of reference tables, a good calculator, and a little effort, you can accomplish your needs for math within the trade quickly.

Nail Let-in Bracing

Nail Let-in Bracing

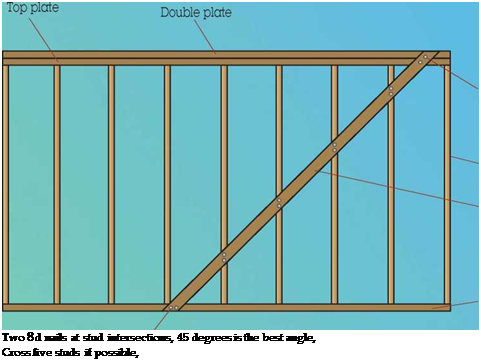
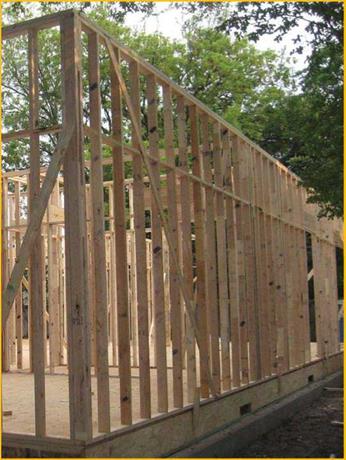
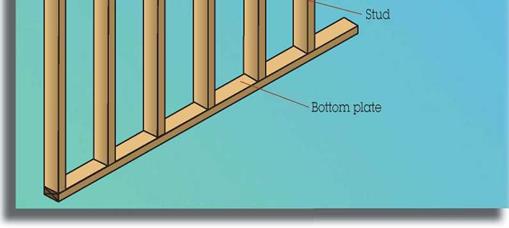
Подпись:Подпись: Let-in bracing is installed to prevent "racking" of the wall. Racking in a wall frame occurs when the top plate moves independently from the bottom plate.
Two 8d common nails or 3” x,131" nails each stud

Stud

Nail Let-in Bracing
1 x 4 let-in brace Bottom plate

Nail Let-in BracingNail End of Joist

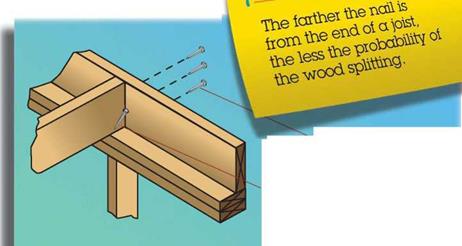
Подпись: Three 16d common nails or four 3" x ,131" nails through rim joist Two 16d nails, or 3" x .131" nails toenail. One on each side of joists. Nail Let-in Bracing

Nail Let-in Bracing

This illustration shows the installation of a floor joist on top of the double plate. The rim joist provides not only a good nailing surface, but also a structural component as it spans the space between the studs and prevents lateral rotation of the joists.

Nail Rim Joist

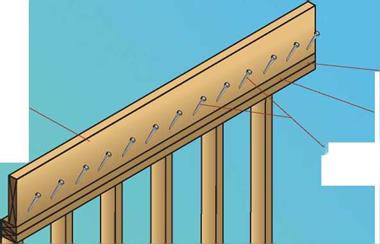
Here the rim joist is being installed. It is a structural component that provides an edge for the building and an attachment for the joists to prevent lateral rotation.


Top plate


Rim joist


Double plate


16d at 6” O. C. or 8d at 6” O. C. or 3” x .131" at 6" O. C.


Nail Let-in Bracing

Oversize AC Units Can Hide Many Big Problems

Oversize air-conditioning systems are the norm, not the exception. It’s easier to pick a huge system based on erroneous rules of thumb than to spend time designing a more suitable but smaller system. Oversize systems have the added problem of masking many
of the problems I’ve discussed here. Poor insulation, duct leaks, and more can be cov­ered up by blasting twice as much cold air through the ductwork as would be necessary if things were done correctly.

If you double the size of the AC unit, you can lose 50% of the performance and still provide enough comfort so that the home­owner won’t call you back. But a behemoth AC unit short-cycles (turns on and off too

1

Oversize HVAC Is Overkill

hen it comes to air-conditioning units, oversize air han­dlers waste energy, burn out faster, and leave the house cold and clammy. Unfortunately, many HVAC contractors still rely on rules of thumb to determine system size. The best way to get the right-size HVAC unit is to model your home’s energy features with one of the many software programs available (such as the one at www. hvaccomputer. com; $49 for home­owner version).

To calculate whether an existing AC unit is too big, measure the number of minutes per hour that the AC unit runs on the hottest afternoons in the summer. Then divide 60 by the number of minutes to determine the amount that the unit is oversize. For example, 60 f 30 = 2x oversize; 60 f 20 =

3x oversize.

quickly), which hurts its energy efficiency, degrades its ability to dehumidify the air, and shortens its life. A larger unit is also noisier and costs more to install (both sys­tem and ducts). The solution is simple: Pay for the load calculations, and size the unit correctly. In fact, according to the Air Con­ditioning Contractors of America (ACCA), it’s often better to undersize an AC system a little bit.

Water Heaters and Windows Are the Next Savings Opportunities

Water heaters store hot water all day long. They keep it hot on the off chance that you’ll need it. Tankless, or on-demand, water heat­ers, on the other hand, convert cold water into hot water when you turn on the tap.

You’ll notice that windows aren’t on this list. Only after you correct all the things I’ve mentioned will your windows start to look bad. If you’re building a home, upgrading the windows at the design stage to at least Energy Star (preferably beyond) is a lot less expensive than buying substandard win­dows now and replacing them later. Even so, windows are not usually the first place to start looking for big savings, because the other nosebleeds are running hard.

Bruce Harley is technical director of Conservation Services Group (www. csgrp. com) in Westborough, Mass.

Pelletized Loose Fibers

Loose fibers may be pressed into pellets to keep the fibers together without bind­ing agents. Their shape makes metering of the SMA mix during production easier. Pelletized fibers are formed into different shapes; one example is presented in Figure 4.5. Automatic loading with pneumatic feeders is also possible and easy. The pellets are usually supplied in large packages (big-bags) and stored in silos. All other features of loose fibers remain unchanged.

When performing tests of SMA mixtures in a laboratory, pelletized fibers may be treated without any special preparations. A mechanical mixer is usually not required;

image33

FIGURE 4.5 An example of pellets—loose formed fibers. (Photo courtesy of J. Rettenmaier & Sohne GmbH + Co. KG, Germany.)

(a) (b)

image34

FIGURE 4.6 Examples of granulated fibers (a) made of waste paper with wax coating (Photo courtesy of Excel Industries Ltd., U. K.) and (b) made of cellulose with binder coating. (Photo courtesy of J. Rettenmaier and Sohne GmbH + Co. KG, Germany.)

however, in the case of very dense pellets, it is better to use one to ensure that the pellets are broken up and thoroughly mixed.

HVAC Ducts Can Leak One-Third of the Air They Transport

From 20% to 40% of the air that comes out of furnaces and air conditioners never gets to the rooms it’s supposed to heat or cool. When you consider that most of the ducts are in attics, garages, and vented crawlspaces, the effect of that loss is huge: We’re heat­ing and cooling the outdoors. Sometimes whole rooms are disconnected, as when the ductwork isn’t connected to the register and the duct spews conditioned air into the attic or crawlspace. Return ducts often leak more than supply ducts; although they cause less energy loss, these leaks lead to moisture problems and pressure imbalances that pose health and durability risks by contributing to mold, ice dams, and even carbon – monoxide poisoning.

Required by code, duct-sealing is rarely completed and even more rarely tested. Houses more than 10 years old didn’t have this code requirement. Every connection in every duct run should be sealed with mastic (not tape), and the system should be pressure-tested, just like your plumbing. Holes in the air handler can be sealed with aluminum-foil tape because mastic would render the cabinet unserviceable. After you seal the ducts and the cabinet, insulate them carefully.

Retrofits can be more difficult. If you can access the ducts, you can use mastic under the insulation (put the insulation back when you’re done). If the ducts are inaccessible, they can be sealed from the inside with a product like Aeroseal® (see www. aeroseal .com for local contractors), or you can move the insulation and the air barrier to bring the ducts inside the thermal boundary.

Putting the Air Handler Outside the House Is Not a Good Idea

Many air handlers and ducts are in attics. This location is a lot more costly than people realize. Putting an air handler and ductwork in the attic, garage, or crawlspace is like putting it outside the house. In winter, attics are almost as cold as the outdoors; in the summer, attics are much hotter than the outside temperature.

If you must place the air handler and ductwork in the attic, you can do a few things to minimize energy losses: Seal everything with mastic; insulate the air han­dler carefully; and keep the ducts low and covered with blown insulation. Even better, use spray foam on the whole roof and gable ends so that the attic space is within the house’s thermal envelope.

The best idea, though, is to run the me­chanical system inside the house. You can use smaller mechanical equipment with smaller ducts in shorter runs; it’s easier to design space for them within the house. The payoff is a much more efficient HVAC sys­tem that increases comfort while decreasing operating costs. For more information, go to www. toolbase. org/Design-Construction- Guides/HVAC/forced-air-system.

How Durable Is Spray Foam?

Подпись:HVAC Ducts Can Leak One-Third of the Air They TransportQ: Spray foam is touted as a “superior” insula­tion material. I’ve been building for nearly 20 years, however, and I’ve occasionally found spray foam that has settled in the wall cav­ity and/or disintegrated enough to lose all its effectiveness. How do we know today’s spray foams won’t do the same thing in 30 years?

—Mike Connors, Beacon, N. Y.

A: The failed foam you’re describing is likely urea-formaldehyde foam insulation (UFFI). It was installed in many homes in the 1970s, but eventually was banned in Canada and the United States due to concerns about chemical off-gassing. UFFI also tended to become brittle, shrink, and crumble over time, affecting durabil­ity and performance.

The current generation of spray-polyurethane foams is based on a different chemistry, so the cured foam is much more stable. This quality suggests that spray-polyurethane foams will last much longer than UFFI and will retain their flex­ibility and mechanical integrity.

I wouldn’t worry about the durability of the foams that are currently available. In fact,

I believe that in some applications today’s spray foams add to the durability of the overall structure by reducing air leakage and vapor diffusion.

—Bruce Harley

My Air Smells Bad! What Can I Do?

Подпись: r

Identifying the cause of smelly indoor air can be a complex process. The English language is not a good tool for describing smells and there is of­ten little agreement about what an odor smells like, making it difficult for a professional to iden­tify the offending substance from a description of the smell. To make identification even more difficult, there are tens of thousands of synthetic compounds and thousands of naturally created compounds that produce odors. Complicating matters still further, many compounds in the air are broken down by the natural process of oxida­tion to form new compounds. The new material may smell when the old one did not, or the new material may smell completely different from the original. Identification can be simpler with more common odors such as mold, gasoline, natural gas, or alcohol.

There are sophisticated approaches and in­struments for identifying the chemical composi­tion of an odor. Once the chemical is identified, potential sources can then be determined and the building can be searched for these sources. How­ever, this approach uses expensive equipment in a lab, costs hundreds of dollars per air sample, and may require multiple types of samples.

Luckily, most of us come equipped with an ex­quisitely sensitive instrument — the noselThe hu­man nose is incredibly effective fortracking smells. The olfactory sensitivity of most people is at a part per million level. In other words, people can smell one part of the offending substance in a million parts of air. A few individuals can detect odors at a part per billion level, the level normally reserved foranimalssuch as dogs. So tracking the odor back to its source can be done by using your nose.

Employing a Climate-Based Understanding for Construction Detailing

The building industry in the United States, a country with vast climatic variations, is pri­marily regulated by a handful of building codes. These codes do not sufficiently ad­dress the fact that in each climatic zone there are particular concerns about how moisture, temperature, wind, vegetation, and wildlife will impact the building envelope. Histori­cally, regional building types throughout the world evolved over time as local materials were fashioned into a perfect response for the surrounding climatic conditions. Much of this indigenous wisdom has been cast aside in our lifetime. Residential building techniques have undergone sweeping experimentation since

World War II. With the introduction of mass produced and transported building compo­nents and the increased dependence on mech­anized heating and cooling, our homes are for the most part constructed in the same man­ner regardless of location. The need for energy conservation has led to tight, highly insulated envelope construction.

As a result of these factors, we have placed greater performance demands on the building envelope than ever before. A new suburban home in Cincinnati may look identical to one built in Los Angeles. In spite of vastly differ­ent climatic conditions, the two buildings will be mechanically equipped to provide the oc­cupant with an interior temperature of 70 de­grees Fahrenheit 24 hours a day, 365 days a year.

A word of caution: some strong chemical va­pors can be a health threat. People who are al­ready sensitive or allergic to smells should not be involved in this type of investigation. Other peo­ple should not continue tracking odors that be­come too strong to be comfortably tolerated. You should stop following solvent fumes, gasoline fumes, or natural gas odors when they become uncomfortably strong. If this happens, it would be a good idea to call for help and air the space out. Note that natural gas, propane, and other house­hold fuel sources contain odorants to alert you if they are leaking. These gases are an explosion haz­ard, so if you suspect that a dangerous gas leak may be the cause of the odor, call for help immedi­ately. The gas company will provide a free leak de­tection service.

If the entire house smells, it may be helpful to air it out first and then close it up again to see if the formerly pervasive smell can be detected closer to the point of origin. Because people experience what is called olfactory fatigue, becoming less and less sensitive to the smell with prolonged expo­sure, you may need to give your nose a rest from time to time.

Moldy smellsare common. The source ofthese smells can sometimes be located by looking for places where waterintrusion hasdampened build­ing materials, decorative items, or other household goods. Water intrusion can be located by looking for water stains on drywall, baseboard, carpets, or corrugated boxes stacked on a concrete floor. In homes built on a concrete slab, problems with wa­ter movement through the slab can cause mold growth in the carpet and pad, particularly along outside walls or under furniture with skirting that

However, the interaction between the climate and the building envelope in these cities will be very different. Professionals in the building industry are now discovering that certain as­sumptions made 30 years ago about how the new products would interact with climate and mechanized space conditioning were short­sighted. As a result, we are experiencing wide­spread envelope failure. To further complicate matters, similar buildings will fail in different ways in different climates. These failures affect not only the longevity of buildings but also their ability to support human health.

Architects, builders, and homeowners must become familiar with the localized con­ditions of the potential homesite. An inquiry into the kinds of problems that have devel­oped in local buildings because of the natu­ral environment would be beneficial. The local building lore can potentially be a rich source of information. Listed below are a few exam­ples (by no means inclusive) of differing re­gional conditions and respective challenges:

• The air of coastal locations is typically characterized by high salt content, result­ing in metal corrosion.

• Areas experiencing alternating freeze/ thaw conditions will be subject to ice dam­ming problems. Buildings will also be much more susceptible to deterioration caused by water seeping into cracks and then expanding as it turns to ice.

• Wood products exposed to the elements in southwestern deserts will suffer from ac­celerated drying due to extreme UV expo­sure and low humidity.

• Moisture and mold problems associated with condensation caused by air condi-

prevents air circulation. You may be able to smell this mold by getting close to the carpet.

Mold growth inside the walls that results from water intrusion can sometimes be located by re­moving the electrical wall outlet faceplates and smelling the air in the outlet boxes, particularly those mounted in the outside-facing walls. The smell from a moldy basement or crawl space will move upstairs because rising warm air exiting at the top of the house draws replacement air from the basement and through other holes in the build­ing suchasoutletandswitch boxesand heating/air conditioning ducts. Also look for water leakage in cabinetsundersinks. lt is always prudent to call in a mold specialist in cases of suspected mold and 1 do not advise a homeowner to open wall cavities or baseboards. You can, however, lead the inspector to places where you have noticed moldy smells.

Less common but sometimes problematic are bacterial smells. An example is the odor of dirty socks, or locker-room odor. Wet building materials and fabrics in a home can create a problem with bacterial as well as mold growth.

Another approach to tracing an odor is to think about everything that happened prior to its detec­tion. When did you first notice it? Did this coincide with something being brought into the house or a precipitating event? This might include one or more of the following:

• painting and decorating

• new clothing or household goods

• pest control treatments

• new furniture, carpeting, or drapes

• a change in cleaning products or housekeep­ing services

• new asphalt-type roofing, yours or neighbor’s

tioning are typical in climates with high temperatures and humidity.

• Fire safety is a major concern in wooded areas.

• Nearly every region has specific insect and vermin problems.

Certain conditions unique to your building location will not be remedied or addressed by building codes, standard building practices, or materials manufacturers. Architects and builders must be jointly responsible for inves­tigating specificities. To this end, we highly recommend the Builders Guides by Joseph Lstiburek (see Further Reading at the end of this chapter).

Furthermore, there is undeniable evi­dence that global warming is changing our cli­mate and increasing the incidence of extreme weather events. Building designs and prac­tices that were once considered adequate for a given region may now need to be more strin­gent as the incidence of floods, hurricanes, tornados, ice damming, and other destruc­tive events increases. For more information on measures to be taken to adapt to increased climatic impact, refer to John Bantas book Extreme Weather Hits Home: Protecting Your Buildings from Climate Change (see Further Reading).

Reducing Toxic Emissions Through Choice of Building Materials

As we explained previously, modern building techniques have created sick buildings in part by using building materials that outgas toxic emissions. It stands to reason that to create healthy buildings we must find ways to reduce

– significant rain, with or without high winds, causing building leakage

• house painting, yours or neighbor’s

• lawn treatments, yours or neighbor’s

• long periods of non-use for sinks, bathtubs, or showers, leading to drying of water in the drain trap

• spills or leaks that could enter your basement from nearby industries or gasoline stations

• septic tank wastewater system failure

The "house detective" process can be time con­suming and lengthy, but you know your home better than anyone else. You can save time and money by giving the situation careful attention and thought before your professional arrives. If all else fails, you can call a specialist to help identify the source by collecting a sample of the offend­ing airfor lab identification of its chemical compo­nents. Good sniffing!

Larry Gust is a Building Biology Environmental Consultant (BBEC) certified by the International Institute for Building Biology & Ecology (building biology. net). He holds a degree in electrical en­gineering and is a Certified Mold Remediator through the Indoor Air Quality Association (iaqa. org) and a Certified Electromagnetic Radiation Safety Advisor through the Science and Public Pol­icy Institute Safe Wireless Initiative. Since achiev­ing the BBEC certification in 1992, he has been operating an indoor environmental consultancy covering all aspects of the built environment, in­cluding mold, chemical, and electromagnetic pol­lution (healbuildings. com ). He lives in Southern California and practices nationwide.

the sources of pollution generated by these materials.

The following products and materials are common sources of indoor pollution in stan­dard construction:

• insecticides, mildewcides, herbicides, and other biocides found in building materials or applied onsite

• composite wood products that are bound with formaldehyde-emitting glues, includ­ing particleboard, chipboard, plywood, and manufactured sheathing

• building products, finishes, cleaning products, and additives that emit harm­ful VOCs, including solvent-based paints, sealants, finishes, and adhesives

• asphalt and products containing asphalt, including impregnated sheathing, roofing tars, and asphalt driveways

• building materials containing mold

• materials that are absorbent, are hard to clean and maintain, and require frequent replacement (such as carpeting)

There are several strategies for reducing the chemical load introduced into a home. In or­der of effectiveness, these strategies are:

1. Eliminate sources of pollution.

2. Substitute healthier materials.

3. Exercise prudence when using unavoid­able toxic substances.

4. Cure materials before they are installed within the building envelope.

5. Seal materials so that they outgas less.

Elimination

If all toxins could simply be eliminated from buildings, we would have the basis for an ideal environment. In many instances, this is not only possible but also cost-effective. For ex­ample, countertop materials can often be at­tached to cabinets with mechanical fasteners, thereby eliminating the need for toxic adhe­sives, and exposed woods maybe left unsealed in locations where sealing is unnecessary.

Substitution

Where chemicals must be used, it is almost always possible to substitute a less toxic sub­stance in place of a standard one. For exam­ple, paint with no harmful emissions, VOCs, or preservatives can be specified in substitu­tion for a standard paint that contains harm­ful chemicals such as formaldehyde. Since the first writing of this book, awareness of and demand for healthier building materials have increased and there are many more healthy alternatives on the market to choose from.

Prudent Use

In a few cases, the use of a toxic substance is unavoidable. For example, there is no accept­able substitute for the solvent-based glues used to join plastic plumbing lines. However, the specifications outlined in this book pro­vide guidelines for reducing the amount of exposure to these products.

Curing

In cases where toxic substances are chosen for reasons such as cost or durability, the impact of the product will be reduced if it is properly cured. For example, in the specifications we explain how to cure plywood before it is ap­plied. Many materials can be purchased with factory-applied finishes that have been heat – cured. Such finishes, which may have been quite noxious in their liquid state, are safely applied and cured under controlled condi­tions. Many factory applied finishes will have

Подпись: The Problem: Exterior gypsum board sheathing has been installed on this home during the rain. Building paper is now being installed over the wet sheathing. This will trap the moisture and is likely to result in a moldy wall. Recommendation: Building materials should be protected from the elements and rapidly dried if they do become wet. Photo: Restoration Consultants.

little or no impact on air quality by the time they are installed in the home.

Sealing

If a toxic building component cannot be elim­inated or substituted, then sealing it will help to reduce the rate of outgassing. Although this approach is far from perfect, there are cases where we recommend vapor sealants or barriers for this purpose. For example, pre­manufactured wood windows are routinely dipped in fungicides. As it is almost always cost-prohibitive to have custom windows made, sealing the windows with a special clear sealer or primer will help limit pesticide ex­posure.

Throughout the planning of a healthy home, you will be weighing the health risks,

costs, time, and aesthetics of the above five strategies to find the solutions that are best for you.

Introducing Quality Control Measures During Construction

Even a home with the finest design and most careful materials selection can become a home that does not support health if quality control is lacking on the jobsite. Typically, the qual­ity control measures that a homeowner might expect or wish to have performed will not be carried out unless they are clearly specified and included as part of the building contract. To ensure that the design intent and the writ­ten and drawn instructions are properly ex­ecuted, certain procedures and tests should be agreed upon and required. Quality control

Подпись: The Problem: Construction debris was not properly removed from this site. A wall cavity was used for debris disposal and then covered over. When there was an accidental flood in this building the hidden material became wet and could not dry out quickly. A serious mold problem resulted. Recommendation: Building cavities should be left clean and free of debris. Photo: Restoration Consultants.

measures are discussed throughout this book (particularly in Division 1 and in the environ­mental testing section in Division 13) and in­clude:

• clear contractual agreements between the owner and the builder regarding both stan­dard and special project procedures, pro­tocols, materials, and contract close-out

• procedures, inspections, and tests to be performed during construction and upon commissioning of the building to assure that the building will perform as intended

Providing Occupant Education

A home that is well conceived and well built as described above will provide a healthy en­vironment initially. However, the home will
continue to nurture the optimum health of its occupants only if they are fully educated about the healthy maintenance of their home.

Owner’s Manual

The contractor should provide the owner with a manual that contains the following informa­tion:

• a description of the building construction materials and components, including up­dated drawings and specifications with any “as built” changes clearly marked

• maintenance schedules and manuals for household and mechanical appliances

• a checklist outlining the owner’s respon­sibilities in overseeing the regular and pe­riodic maintenance and inspection of the

CASE STUDY 7