Nail Lapping Joists

![]()
 |
|
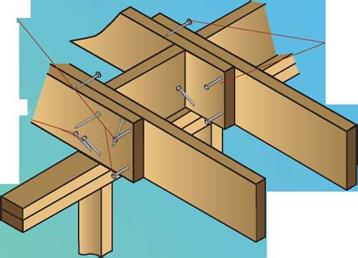
 Two 16d or 3” x,131" nails on the end of each joist,
|


![]()
 |
|

 Two 16d or 3” x,131" nails on the end of each joist,
|

|
A |
foundation system has two functions. First, it supports the building structurally by keeping it level, minimizing settling, preventing uplift from the forces of frost or expansive soils and resisting horizontal forces such as winds and earthquakes. Second, a foundation system keeps the wooden parts of the building above the ground and away from the organisms and moisture in the soil that both eat wood and cause it to decay.
The foundation is the part of a building that is most likely to determine its longevity. If the foundation does not support the building adequately, cracks and openings will occur over time, even in the most finely crafted structure. No amount of repair on the structure above the foundation will compensate for an inadequate foundation; once a foundation starts to move significantly, it will continue to move. We now have developed the knowledge to design and construct durable foundations, so there is no reason to invest in a modern building that is not fully supported on a foundation that will endure for the life of the structure.
In the United States, there are three common foundation types. Each performs in different ways, but all rely on a perimeter foundation, i. e., a continuous support around the outside edge of the building.
slab-on-grade foundations
Slab-on-grade systems are used mostly in warm climates, where living is close to the ground and the frost line is close to the surface. The footing is usually shallow, and the ground floor is a concrete slab. Many slab-on-grade systems allow the concrete footing, foundation, and subfloor to be poured at the same time.
crawl spaces
Crawl spaces are found in all climates but predominate in temperate regions. In this system, the insulated wooden ground floor is supported above grade on a foundation wall made of concrete or concrete block. The resulting crawl space introduces an accessible zone for ductwork, plumbing, and other utilities, and allows for simple remodeling.
basements
Basements are the dominant foundation system in the coldest parts of the country, where frost lines mandate deep footings in any case. Like crawl spaces, basements are accessible, and in addition they provide a large habitable space. Basement foundation systems are usually constructed of concrete or concrete-block foundation walls. Drainage and waterproofing are particularly critical with basement systems.
|
|
||

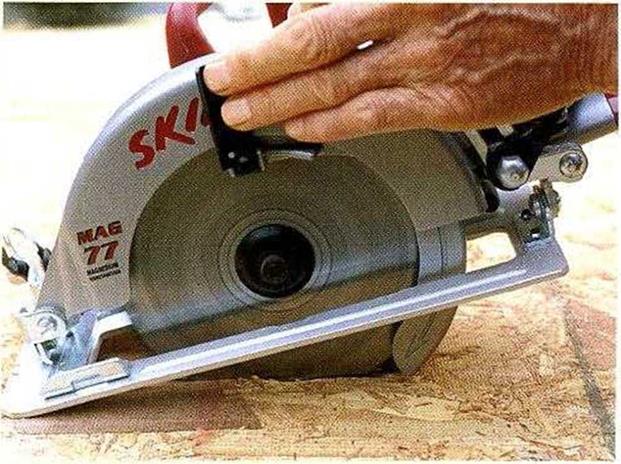
SOMETIMES IT’S NECESSARY to cut a hole in the middle of a board or a panel. You can do this with your circular saw if you know how to make a plunge cut. (Don’t attempt this unless you’re an experienced circular-saw user.) Start by leaning the saw forward over the cut line. Rest the front edge of the saw base on the wood, and hold the blade about 1 in. from the surface. Use the lever on the blade guard to lift the guard and expose the blade. Make sure that the blade is aligned over the cut line. Start the saw and use the front edge of the base as the pivot point. Lower the blade into the wood, using both hands to control the saw and complete the cut. When you are finished, turn off the saw and let the blade stop spinning before pulling it out. Another way to make a plunge cut is to loosen the lever that controls
the cutting depth and raise the blade completely above the board. Set the saw base in position over the cut line, loosen the depth adjustment lock, and slowly lower the blade into the material.
![]() WORM-DRIVE SAW. Larger and heavier than a sidewinder saw, a worm-drive saw has its motor in front of the blade.
WORM-DRIVE SAW. Larger and heavier than a sidewinder saw, a worm-drive saw has its motor in front of the blade.


![]()


a Make sure the blade guard works (reelу before using the tool.
ж Use the right blade for the job, and replace dull blade with a new one. Carbide-tipped blades are best for most wood-cutting work.
^ To reduce friction when culling, apply paste wax lo both sides of the blade, or spray it with silicone.
^ Adjust the saw s cutting depth according to
the thickness of the material. If vou are cut-
/
ting /: in.-thick material, set the culling
depth at no more than >- in. (see the photo at left). The less amount of blade that’s exposed, the less potential for injury should something go wrong.
ж Always unplug your saw when changing blades and adjusting the cutting depth or angle.
a. Make sure the stock is adequately supported With proper support, the cut won’t bind on the blade and the cut-off end will fall free.
a To begin a cut, place the saw base on the stock with the blade about 1 in. from the edge of the wood, aligned with the cut line. Hold the saw with both hands, pull the switch, and slowly push the blade into the wood, following the cut line. Go slowly, guiding the saw, and let it do the work. Eventually, you will learn to cut with one hand on the saw and the other hand on the material.
a Don’t try to hold a short or small piece with one hand while guiding the saw with the other. Instead, use a clamp to secure the workpiece while you make the cut.
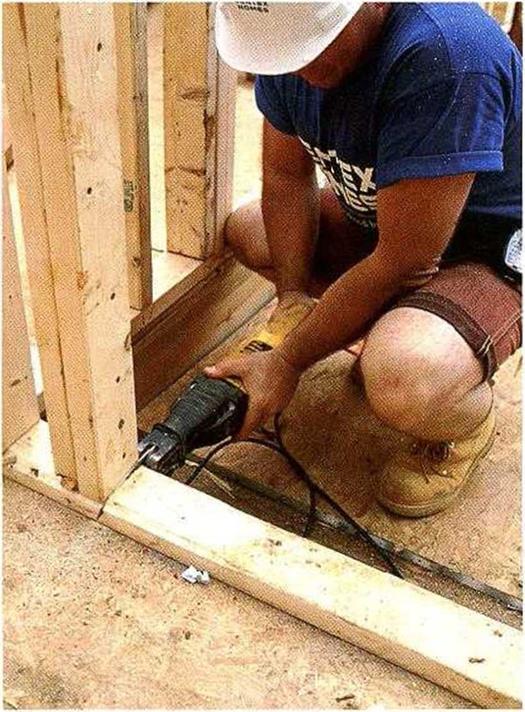
Another frequently used tool is the reciprocating saw, also called a sahersaw or a SawzalD— the name given to Milwaukee’s popular saw (see the photo at left). This tool allows you to cut in tight places and make curved cuts. Different blades are available for cutting through wood, metal, plaster, and plastic. For general use, I buy 6-in. bimetal blades, which cut through both wood and metal.
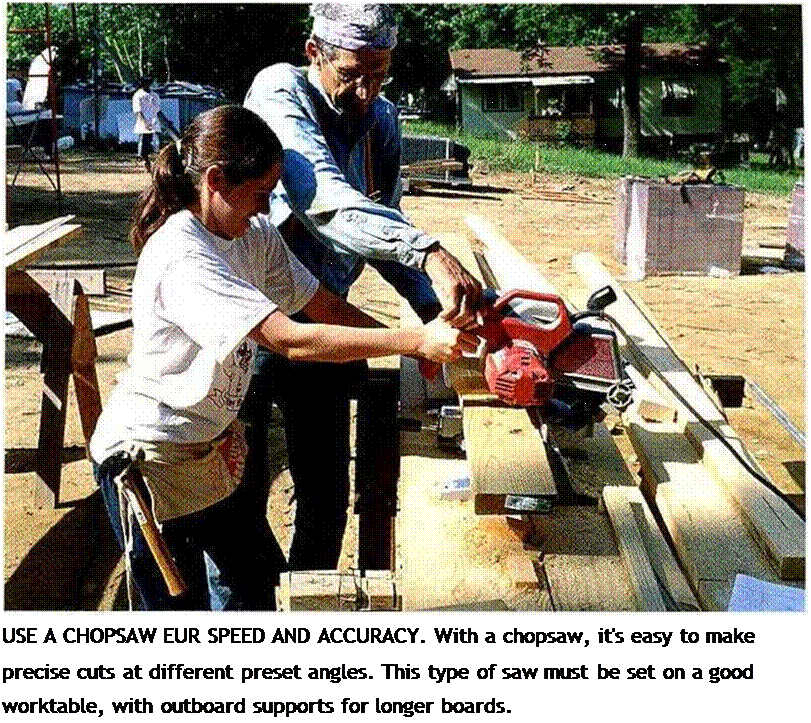
The power-miter saw (generally referred to as a chopsaw) has revolutionized finish carpentry іust as the circular saw revolutionized
4 *
rough-framing carpentry. With a chopsaw, you can make precise square and angled cuts in framing lumber, door and window casings,
and baseboard trim. These saws are rugged and easy to use. When equipped with a fine blade, thev can make glass-smooth cuts.
An electric drill is a versatile tool on any job site. It’s capable of boring holes in all sorts of material and can also be used for driving screws and mixing paint or dry-wall compound. Most carpenters have at least two drills on a jobsite. A corded drill is best for mixing paint and drywall compound and boring holes in concrete, framing lumber, and metal.
A cordless drill-driver is great for driving screws and light-duty boring.
 Whether corded or cordless, a drill is usually described by the maximum capacity of its

|
л°0°аОгя^*« ) „О» "nOLr Од a іе&9’"в?0да |
![]()


 |
|
 |
|
 |
|
Based on their ambient material, aquifers can be classified into three types, i. e. open, A confined aquifer is bounded both above and below by relatively impermeable materials or confining beds (such as clay or unfractured rock.) The confined water is under pressure thus a tube extended from the surface down into the aquifer would allow the water to rise inside the tube to a level above the top of the aquifer.
• An open aquifer is one without a confining bed above so it can be directly recharged by rainfall.
• A semi-confined aquifer is a confined aquifer where one of the confining beds is saturated material with low permeability which, thus, impedes the movements of the water.
Most road structures or road embankments can be considered open aquifers. Only under some special circumstances do they act as a semi-confined or confined aquifers.
For pavements and their relation to groundwater (from the geometrical point of view) perched-type aquifers are of importance. These aquifers are the consequence of some lower permeable lenses (e. g. clays) inside a permeable aquifer. As a consequence of a high coefficient of permeability of the aquifer material and favourable infiltration into the ground, water mounds appear above the lenses. These aquifers have no direct connections with lower lying groundwater. Usually they are very near the surface and may cause several problems for the construction and maintenance of the roads.
According to the literature, various definitions of groundwater exist. For some authors, groundwater is defined as water only in those pores that are completely
saturated, but for others a more general definition is acceptable with the groundwater being all the water below the ground surface either in the saturated or in the unsaturated part.
A geological medium containing groundwater is defined as an aquifer. Aquifers can be described as rock or soil (sediment) of high permeability that are able to store and transmit significant quantities of groundwater. In hydrogeological terms, the limit between an aquifer and less permeable geological media is frequently defined with a coefficient of permeability, K, of 10-6 m/s.
Figure 2.2 shows a schematic view of the regions of subsurface water in a pavement structure. The upper part represents the unsaturated or the vadose zone and the lower part represents the saturated or the phreatic zone. The groundwater table, defined as the surface where the water pressure is equal to the atmospheric pressure, separates them. The water content within the vadose zone is at saturation near its base while at its upper extent it is dependent on the characteristics of the soil. The vadose zone is divided into:
• a capillary zone. Above the groundwater table is the capillary zone or the capillary fringe because water is pulled upward from the water table by surface tension. The capability is linked to the pore size distribution of the material, the smaller the pores the greater the extent of the capillary rise. The thickness of the capillary fringe can vary from a few centimetres in coarse grained soils to a few metres in fine grained soils. The pores are saturated but the water pressure is less than atmospheric.
•
 |
 |
an intermediate vadose zone. The second sub-region of the vadose zone is the intermediate vadose zone where water is held by capillary forces. In sealed pavements in good conditions, the surface layer is relatively impermeable and the water held here should be relatively stable with water content at or near
field capacity (the remaining water content held by a soil after it has been allowed to drain freely), but through spring thaw or wet periods water could migrate inwards from the shoulders resulting in temporary higher water contents. In cracked pavements, on the other hand, water can move downward from the surface through the intermediate vadose zone to the capillary zone resulting, spatially, in periods of higher water content than the field capacity stipulates.
• a surface water zone. The layer closest to the surface is the surface water zone. Again, as for the intermediate vadose zone for sealed pavements in good conditions the water content should be relatively constant close to the field capacity or lower depending on atmospheric conditions. In cracked pavements on the other hand water can enter to the granular layer through cracks or other openings during periods of rainfalls and part of the layer may, therefore, include high water content or even become fully saturated.
In the unsaturated zone pore spaces are only partially filled with water and the direction of the groundwater flow is predominantly vertical. In the saturated zone, pores are completely filled with water and groundwater flow is nearly horizontal. The saturated aquifer zone is underlain by a low permeability basement stratum, known as the confining bed, which acts as a hydrogeological barrier. This is a necessary condition for the aquifer existence: without the barrier there would be no saturated zone.

Until recently, most crawl-space foundations were built with vents to promote air circulation and help prevent damaging levels of moisture from building up beneath the house. In northern states, builders often install vents that can be closed in the winter to keep out cold air. The same is done on the Oregon coast to keep out moist air. Many local building codes require crawl-space ventilation, so be sure to check with your building department to find out which requirements are in effect.
Codes requiring vents usually stipulate that a vent be installed 2 ft. from each corner of the foundation and every 6 ft. on at least three sides of the building. For appearance’s sake, most builders try to leave vents off the front of the building.
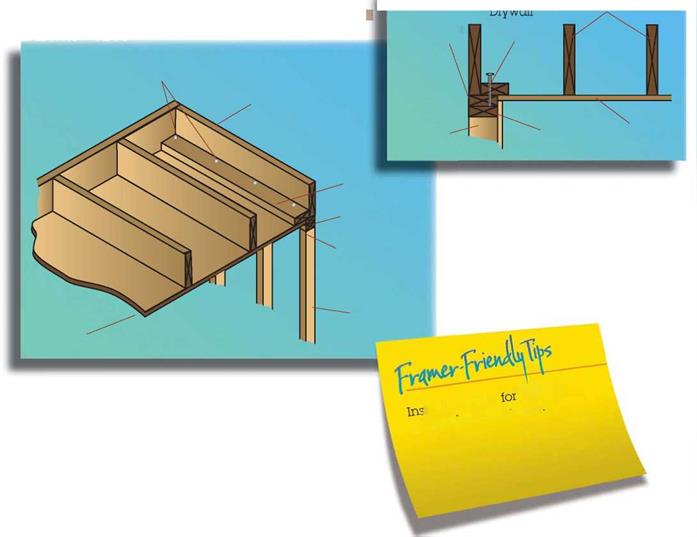
If you need to install crawl-space vents, there are several ways to do so. Some factory-made vents are designed for installation in openings formed in a poured concrete wall. Others are sized to fit in concrete block walls. For a simple, inexpensive, and attractive vent, cut sections of 3-in.- or 4-in.-dia. plastic pipe and put them in the foundation wall forms before pouring the concrete. Use adhesive to secure pieces of 1/4-in. wire mesh (also called hardware cloth) over indoor pipe sections to keep out animals. Still another way to ventilate a crawl space is by cutting openings in the rim joists, as shown in the illustration at right.
Unvented Crawl Spaces
Based on relatively new research, builders in some regions are beginning to eliminate vents and treat crawl spaces like small basements. The idea behind this type of construction is
that you start with a dry crawl space and keep it that way. Sealing off a wet crawl space can lead to a moldy disaster, but it is possible to create a warm, dry crawl space by preventing moisture and air from entering. Follow the good drainage guidelines explained in the sidebar on p. 54.
Dirt floors must be sealed with a sheet of 6-mil plastic that laps up onto the foundation and is fastened against it with mastic. Rigid insulation should be used on foundation walls, eliminating the need for insulation in the joist spaces under the floor. With the help of a heating contractor, you can even supply a crawl space with a small heating duct to help keep it dry. You can create access to the crawl space through a trap door framed in the floor of a closet.
The joint distribution and conditional distribution, analogous to the concepts of joint probability and conditional probability, are used for problems involving multiple random variables. For example, flood peak and flood volume often are considered simultaneously in the design and operation of a flood-control reservoir. In such cases, one would need to develop a joint PDF of flood peak and flood volume. For illustration purposes, the discussions are limited to problems involving two random variables.
The joint PMF and joint CDF of two discrete random variables X and Y are defined, respectively, as
px, y(x, y) = P(X = x, Y = y) (2.14a)
Fx, y(u, v) = P(X < u, Y < v) = px, y(x, y) (2.14b)
x<u y<v
Schematic diagrams of the joint PMF and joint CDF of two discrete random variables are shown in Fig. 2.8.
Px, y(x, y)
|
Fx, y(x, y)
 |
|
The joint PDF of two continuous random variables X and Y, denoted as fx, y( x, y), is related to its corresponding joint CDF as
Similar to the univariate case, Fx, y(—TO, —to) = 0 and Fx, у(то, to) = 1. Two random variables X and Y are statistically independent if and only if fx, y(x, y) = fx(x) x fy(y) and Fx, y(x, y) = Fx(x) x Fy(y). Hence a problem involving multiple independent random variables is, in effect, a univariate problem in which each individual random variable can be treated separately.
If one is interested in the distribution of one random variable regardless of all others, the marginal distribution can be used. Given the joint PDF fx, y(x, y), the marginal PDF of a random variable X can be obtained as
For continuous random variables, the conditional PDF for X | Y, similar to the conditional probability shown in Eq. (2.6), can be defined as
fx (x | y) = ff (*f (2.17)
fy(y)
in which fy( y) is the marginal PDF of random variable Y. The conditional PMF for two discrete random variables similarly can be defined as
, , ч px, y(x y) ,Q1{n
px(x | y) = —, (2.18)
py(y)
Figure 2.9 shows the joint and marginal PDFs of two continuous random variables X and Y. It can be shown easily that when the two random variables are statistically independent, fx(x | y) = fx(x).
Equation (2.17) alternatively can be written as
fx, y(x, y) = fx(x | y) X fy(y) (2.19)

which indicates that a joint PDF between two correlated random variables can be formulated by multiplying a conditional PDF and a suitable marginal PDF.
Note that the marginal distributions can be obtained from the joint distribution function, but not vice versa.
Example 2.7 Suppose that X and Y are two random variables that can only take values in the intervals 0 < x < 2 and 0 < y < 2. Suppose that the joint CDF of X and Y for these intervals has the form of Fx, y(x, y) = cxy(x2 + y2). Find (a) the joint PDF of X and Y, (b) the marginal PDF of X, (c) the conditional PDF fy(y | x = 1), and (d) P(Y < 11 x = 1).
Solution First, one has to find the constant c so that the function Fx, y(x, y) is a legitimate CDF. It requires that the value of Fx, y(x, y) = 1 when both arguments are at their respective upper bounds. That is,
Fxy(x = 2, y = 2) = 1 = c(2)(2)(22 + 22)
Therefore, c = 1/32. The resulting joint CDF is shown in Fig. 2.10a.

|
|
|
|
|
|
|
|
|
|
|
|
|


(a)
To derive the joint PDF, Eq. (2.15a) is applied, that is,
A plot of joint PDF is shown in Fig. 2.10b.
(b) To find the marginal distribution of X, Eq. (2.16) can be used:
f2 3(x2 + y2) 4 + 3×2
![]()
![]() fx(x) = —– —— dx = ——— for 0 < x < 2
fx(x) = —– —— dx = ——— for 0 < x < 2
0
|
fy( y 1 x = 1) = |
(c)
The conditional distribution fy(y | x) can be obtained by following Eq. (2.17) as
(d) The conditional probability P(Y < 11 X = 1) can be computed as
P(Y < 11 X = 1) = £ fy(y | x = 1) dy = £ 3(1+4y2} dy = 7
WORKING ON A CONSTRUCTION SITE is not a * Don’t drink (or do drugs) while doing construe-
sunny stroll in lhe park. There are all kinds of tion work.


unusual, uncomfortable, and potentially hazardous conditions you may encounter—uneven ground, troublesome weather, boards with protruding nails, and sloped roof surfaces that challenge your balance. Learning how to work safely and effectively in a construction environment is just one more skill that you need to acquire, such as hammering a nail or sawing a board. Here are some basic suggestions to keep you safe and productive:
a Wear good shoes, clothes that fit well, long – sleeved shirts, long pants, a hat with a brim, and sunscreen. Protective clothing is also available for those who are particularly sensitive to the sun (see Resources on p. 278). Leave jewelry at home, and bunch up long hair, so it doesn’t get caught in a power tool.
^ Protect your eyes with safety glasses or goggles when sawing or nailing.
Protect your ears. Hearing damage is cumulative and permanent; once you’ve damaged your ears, you can’t undo it. I keep a few sponge earplugs in a 35mm film canister stored in my tool bucket. Place a set of good earplugs or earmuffs by the chopsaw and table saw if you have those tools on the job site.
a Protect your lungs with a dust mask, which will keep large particles from entering your lungs.
^ To prevent back injuries, remember to lift with your legs, not your back. If you’ll be working on your knees for a long period, wear kneepads.
* To reduce the risk of tripping or stepping on a nail, keep your work area clean.
a If you see any nails sticking out of boards, either bend the nails or remove them.
ж Never throw anything off a roof without looking to see whether anyone is below.
a Work with a clear head and pay attention to what you and others around you are doing. Be especially careful toward the end of the day, when you are physically tired.
a Pay attention to your inner voice. If you feel that something might be dangerous, ask for help or figure out a better way to do it.
^ Take care of your body. Don’t forget to rest and drink plenty of water. Your body can become dehydrated rapidly on a hot, dry day. If you aren’t visiting the Porta Potti® regularly, you aren’t drinking enough water.
a Keep your tools sharp and clean, take care of them, and Heal Lliem well.
* Take a course in basic first aid.


Although power tools can’t replace hand tools, they sure do make construction work easier. Power tools make work move along more efficiently. 1 wouldn’t want to be with- out them.
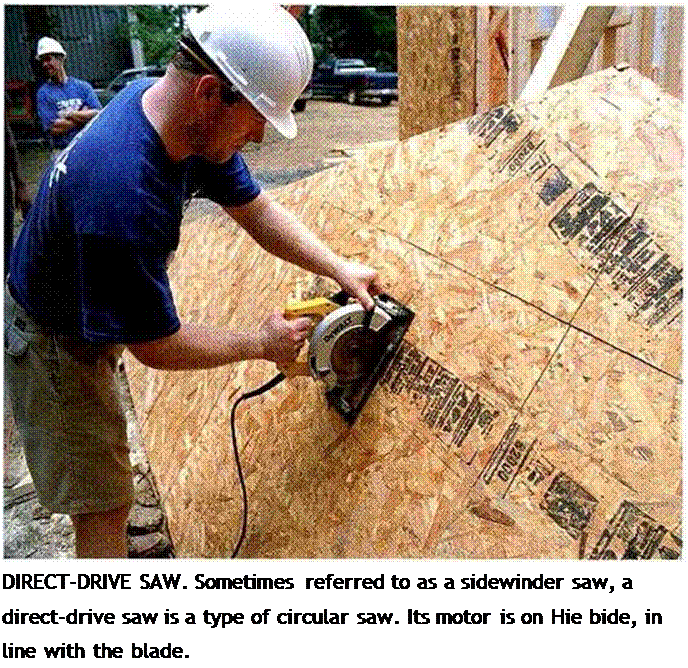
T he circular saw has been around since the 1920s, but it didn’t really catch on until the housing boom began after World War II. These davs, manv homeowners have one in the garage. For a builder, this portable power tool is indispensable. The most popular circular saws are designed to hold 7l4-in.-dia.
blades. In the eastern part of the U. S., most carpenters prefer direct-drive saws, often referred to as sidewinders (see the bottom left photo on the facing page). In the West, carpenters mainly use the heavier worm-drive models (see the bottom right photo on the lacing page). Check out both to see which one you prefer. Above all, buy quality. Light, low – priced homeowner models aren’t in the same league with professional models.
Tips for using your saw safely and accurately are listed on p. 34. Some of them apply to other power tools as well. As wit i any power tool, be sure to study and follow the instructions in the manual.
Safety on the Job AVOIDING KICKBACK


WHEN THE BLADE OF A CIRCULAR SAW gets pinched by the wood, the power of the motor can force the saw backward—a safety hazard called kickback. In extreme cases, the saw can jump away from the material with the blade still spinning, harming anything in its path. To prevent kickback when using a circular saw, follow these guidelines:
a Use a sharp, carbide-tipped blade. a Cut in a straight line.
^ Let the saw do the cutting—don’t force it. Forcing the cut can cause the blade to bind and kick back.
a Always provide proper support for the stock.
Avoid setups that allow the material being cut to pinch the blade (see the illustration at right).
* If a kickback does occur, release the saw trigger immediately and let the blade stop. As long as the blade guard is working properly, there is little danger of injury. Don’t resume cutting until the cause of the kickback is determined and corrected.
SUPPORTING STOCK PROPERLY WHEN CUTTING
WITH A CIRCULAR SAW
Not enough support
|
|
|
Not enough support |
|
The stock sags at bon ends, pinching the blade. |
Proper support
When you are cutting wood, support it properly. Unsupported wood can pinch the blade and cause the saw to kick back.
I use the term “traditional” timber framing to describe the system of joining timbers to each other without benefit of metal or mechanical fasteners. Typically, posts, girders, rafters, king and queen pins, etc., are connected to each other by the use of time-tested joinery such as mortise and tenon joints, scarf jointing, dovetails, rabbetting, etc. A good example of traditional timber framing is seen in Figure 2.17, in the next chapter.
In most cases, one or more people will lay out the various sides, gable ends, and “bents” (internal wall framing or other internal structural assemblies) on the ground. Time and care are taken to join the various heavy timbers by one of the many clever and intricate joints that have evolved over the centuries. Sometimes, particularly with owner-builders, a completed section will be raised with the help
of friends, so that there is room on the site (or foundation slab) to build the next component. Alternatively — and this is more common with experienced timber frame builders — the entire barn or house frame may be erected in a single day Professionals often manufacture all of the components in a shop environment, making sure that the pieces fit together properly, and then reassemble the frame on site.
Although traditional timber frames are sometimes used with natural infill alternatives, they are more commonly built to support pre-made insulated panels on the exterior, with wooden siding installed later. The fine joints are in evidence on the internal skeleton of heavy timbers, a beautiful and impressive effect. Spacing of vertical members is more critical when applying manufactured stress skin panels than it is when a natural infilling is used between posts. See Appendix C and the Bibliography for resources about stress skin panels, and structural insulated panels.
Done professionally, traditional timber framing can be quite expensive because of the labor and materials cost, but good timber framers are worth every cent they get in terms of quality. Owner-builders can do the work, too, but developing and using the required skills will add very much more time to the project. I am an experienced owner-builder, but I would certainly take a two-week course at one of the building schools before embarking on a traditional timberframing project.
Timber Framing for the Rest of Us
Strong, functional, and attractive timber-framed buildings are made by farmers, carpenters, and owner-builders throughout the world, and only a small proportion of these projects involve traditional timber framing. Most of these rural buildings — even houses, when heavy timbers are used — involve the use of truss plates, joist hangers, pole-barn nails, log cabin spikes, gravity, screws, bolts and ingenuity. These builders learn from their neighbors, family, local builders, and sometimes just by asking advice at the local sawmill or lumberyard. It’s sort of like the way beavers and other building species learn their trade.
But sometimes it’s hard to find someone to help on the project, so here we are. Now we need to talk about some basic structural principles.
Taking measurements has radically changed since I started building. My everyday measuring tool used to be a 6-ft. folding ruler. Imagine the time it took to measure and cut a board to length, especially one over 6 ft. long.
First I had to unfold the ruler, section by section, then measure out the distance on the board. Then I had to fold up the ruler and put it away. It’s no wonder that steel tape measures are now much more common on job sites everywhere.
Tape measures get used a lot and so require special care. Here are some maintenance tips to ensure that your tapes continue to work smoothly for a long time.
• Don’t leave an extended tape lying around on the floor. If someone steps on the tape, it will be creased and will never work properly again.
• Don’t let a tape reel in too fast.
If the hook on the end hits the case at full speed, the hook can break off. Slow the tape down with your fingers.
• Keep the tape clean, or it will be difficult to pull out and reel in. Tapes gummed with wood pitch, tar, or caulk can be cleaned with a soft rag and some mineral spirits (paint thinner).
• When working in wet conditions, wipe the tape dry with a cloth before reeling it back into the case.

A tape measure has a hook on the end of a flexible steel blade that grabs the edge of a workpiece. The blade can be locked in place so that measuring becomes a one-person job.
Many sizes are available, but the two most commonly found on a job site are 16 ft. and 25 ft. Longer tape measures (up to 100 ft. or more) made of steel or cloth are also available. They work well to lay out long distances like the foundation of a new house or when measuring the exact location of a building when siting it on a lot.
Most tape measures used for general construction have an extra mark at 1 б-in. intervals (see the photo at left). Because this spacing is often standard for studs in a wall, joists in a ceiling, or rafters in a roof, these marks are helpful when laying out a house frame. Some tapes have decimal equivalents and metric conversion charts on the back.
To snap a chalkline for a short distance, hold one end of the line with one hand and the other end with the little finger of the second hand. Pick up the taut line with the thumb and forefinger of your second hand and snap it.