Mean, mode, median, and quantiles

Подпись:Подпись: (2.30)

Mean, mode, median, and quantiles Mean, mode, median, and quantiles Подпись: [1 — Fx (x)] dx

The central tendency of a continuous random variable X is commonly repre­sented by its expectation, which is the first-order moment about the origin:

This expectation is also known as the mean of a random variable. It can be seen easily that the mean of a random variable is the first-order L-moment Л1. Geometrically, the mean or expectation of a random variable is the location of the centroid of the PDF or PMF. The second and third integrations in Eq. (2.30) indicate that the mean of a random variable is the shaded area shown in Fig. 2.11.

The following two operational properties of the expectation are useful:

1. The expectation of the sum of several random variables (regardless of their dependence) equals the sum of the expectation of the individual random

Fx(x)

Mean, mode, median, and quantiles

Figure 2.11 Geometric interpretation of the mean.


variable, that is,

Подпись: (2.31)( K K E akXk = ^2 akMk

k = і k = і

in which pk = E(Xk), for k = 1,2,…, K.

2. The expectation of multiplication of several independent random variables equals the product of the expectation of the individual random variables, that is,

E П Xk = П Mk (2.32)

k = 1 k = 1

Подпись: Fx (xmd) Подпись: •^md fx(x) dx = 0.5 — TO Подпись: (2.33)

Two other types of measures of central tendency of a random variable, namely, the median and mode, are sometimes used in practice. The median of a ran­dom variable is the value that splits the distribution into two equal halves. Mathematically, the median xmd of a continuous random variable satisfies

The median, therefore, is the 50th quantile (or percentile) of random variable X. In general, the 100pth quantile of a random variable X is a quantity xp that satisfies

P (X < xp) = Fx(xp) = p (2.34)

The mode is the value of a random variable at which the value of a PDF is peaked. The mode xmo of a random variable X can be obtained by solving the

Подпись: dfx(X) д X Подпись: — 0 x — Xmo Подпись: (2.35)

following equation:

Referring to Fig. 2.12, a PDF could be unimodal with a single peak, bimodal with two peaks, or multimodal with multiple peaks. Generally, the mean, median, and mode of a random variable are different unless the PDF is symmetric and unimodal. Descriptors for the central tendency of a random variable are summarized in Table 2.1.

Example 2.10 (after Tung and Yen, 2005) Refer to Example 2.8, the pump reliability problem. Find the mean, mode, median, and 10 percent quantile for the random time to failure T.

Solution The mean of the time to failure, called the mean time to failure (MTTF), is the first-order moment about the origin, which is /xt —1250 h as calculated previ­ously in Example 2.8. From the shape of the PDF for the exponential distribution as shown in Fig. 2.7, one can immediately identify that the mode, representing the most likely time of pump failure, is at the beginning of pump operation, that is,

Подпись:

Подпись: t

mo

Подпись: fx(x)
Ш

Mean, mode, median, and quantiles

Figure 2.12 Unimodal (a) and bimodal (b) distributions.


To determine the median time to failure of the pump, one can first derive the expression for the CDF from the given exponential PDF as

rt e-u/1250

Ft(t) = P(T < t) = ————– du = 1 – e-t/1250 for t > 0

к 1250 –

in which u is a dummy variable. Then the median time to failure tmd can be obtained, according to Eq. (2.33), by solving

Ft(tmd) = 1 – exp(-tmd/1250) = 0.5 which yields tmd = 866.43 h.

Similarly, the 10 percent quantile t0.1, namely, the elapsed time over which the pump would fail with a probability of 0.1, can be found in the same way as the median except that the value of the CDF is 0.1, that is,

Ft(t0.1) = 1 – exp(-0.1/1250) = 0.1 which yields t0.1 = 131.7 h.

The Parts of a House

When vou decide to build a house, there’s a

/

whole new vocabulary you have to master. Every part of a house has a name and, ns with most endeavors, learning the lingc will take you a long way toward getting the job done. There are plenty of terms that intuitively make sense, such as header, footing, cladding, brace, and sheathing. In other cases, you’ll find that some parts have several names. The illustra­tion on the facing page, combined with the definitions on the following pages, will give you a good basic working vocabulary that we’ll build on in later chapters.

Sill or sole plates

These are generally pressure-treated (PT) 2x4s or 2x6s that are bolted to the concrete founda­tion and support the floor joists.

The Parts of a House

Posts, girders, and beams

Posts are vertical supports for horizontal pieces, which are called girders or beams. These major horizontal members support floor joists. Posts that sit on concrete piers are often made of PI’ wood.

the entire house, running from one outside sill, across any interior girders, to the other outside sill. Most often thev are made from 2x-dimension lumber (such as 2x8s, 2×1 Os, or 2x12s) or from manufactured, wooden I-beam joists.

Joists

Typically spaced 16 in. or 24 in. o. c., joists are installed parallel to each other and support the subfloor and rough plumbing. They span

Floor sheathing

Floors are usually sheathed with %-in.- or M-in.-thick, 4-fl. by 8-ft. sheets of tongue-and – groove plywood or oriented strand board

Подпись: Helping HandПодпись: Nominal vs. actual size. When you shop for lumber, remember the difference between nominal and actual measurements. If you buy a 2x4, you'll get a lV?-in. by ЗУИп. board. If you buy a 2x6, you'll get а 11Л-іп. by 5Уг-іп. board.Подпись: Safety on the Job PRESSURE-TREATED LUMBERThe Parts of a HouseПодпись: IN AREAS WHERE THE TERMITES ARE ESPECIALLY HUNGRY (Hawaii and some southern states), entire house frames can be built of pressure-treated (PT) wood. Pressure-treatment technology was developed to repel termites and inhibit rot, and it does so effectively. During the treatment process, a preservative compound is forced under pressure into raw lumter, penetrating deeply into each board. Most PT lumber has a distinctive green or brown color. To avoid injury when handling and cutting PT lumber, it's important to follow these safety precautions: Подпись: A Use gloves when working with PT wood.Подпись: A If you handle PT wood with bare hands, wash your hands before eating.Подпись: A Don't burn scrap PT lumber in your woodstove or anywhere else.Подпись: ^ When cutting more than a few PT boards, wear a dust mask.(OSB). Better sheets have their edges treated with paint to inhibit moisture absorption in wet weather.

Wall plates

These are the 2×4 or 2×6 horizontal members that hold together the parts of a wall. Each wall has three plates—one on the bottom and two on the top. The two uppermost plates are called the top plate and the double top (or cap) plate. When framing on a concrete slab, the bottom plate is made of PT wood.

Studs

Studs are the vertical wall members nailed to the plates, and they are typically spaced either 16 in. or 24 in. o. c. The standard, precut stud

length in many parts of the country is 924 in. That stud, along with three 114-in.-thick wall plates, creates a framed wall that is 96% in. high. That leaves room for ’/-in. or /-in. dry – wall on the ceiling and full 8-ft. sheets on the walls. In addition lo solid 2x lumber, vou may also encounter finger-jointed studs, which are manufactured from shorter pieces of wood glued end to end. Increasingly, houses are being built with metal studs.

Headers, trimmers, and cripples

The weight from above a window or door opening is transferred around the hole by a header nailed horizontally between studs. Trimmers nailed to the studs at both ends of the header support the header. Cripples, or jack studs, extend from the top of a header to the top plate, as well as from the bottom plate to the underside of rough windowsills.

Roof trusses

Each of these factory-made assemblies typi­cally consists of a bottom chord (or joist chord), a top chord (rafters or rafter chords), and interior webbing. Trusses areoflen engi­neered to carrv the entire weight of a roofs load, transferring it to the exterior walls. That load can be considerable in snowy parts of the country. Trusses allow roof construction to be

4

done quickly and easily. Most trusses for resi­dential construction are spaced 24 in. o. c.

Fascia and gutter boards

These terms are often used interchangeably,

v «

but a gutter board is technically distinct from a fascia board. Both parts are installed over the ends of the rafter tails. Л gutter board is nailed directly to the rafter tails, and it is covered by aluminum or vinyl cladding or by a fascia board that serves as the finished exteriors trim surface, for more details, see chapter 6.

The Parts of a House

CONSTRUCTION BASICS. Joists are the framing members that lie across a foundation and support the subfloor (above left). The wall frame is made up of studs, plates, headers, and rough sills. Walls are usually framed on the subfloor, then tilted into position (above right).


Roof and wall sheathing

Roofs and walls arc usually sheathed with И-in.- or M-in.-thick OSB. In some parts of the country, exterior walls, along with their gable trusses, arc sheathed before they are raised upright.

Housewrap and felt paper

Housewrap or fell paper is placed under sid­ing and shingles to prevent wind and water from entering stud cavities or the attic.

Sealants

Подпись: MATERIALS MATTER. Builder's felt, sometimes called tar paper, is rolled over the roof sheathing before asphalt shingles are installed (above left). A caulking gun is used to apply the different adhesives, caulks, and sealants employed in house construction (above right). Construction adhesives, caulk, and other sealants are ever present on job sites. Most of those products come in cylindrical cartridges that fit inside a caulking gun, which is used to apply the caulk or sealant. Construction adhe­sives can be used to bond different materials together—floor sheathing to floor joists, for example. To prevent water leakage, caulks are used to seal around windows and doorframes, at siding joints, and where a bathtub meets the floor. They can be used under wall plates and around pipe holes to block out cold air. Gaps between baseboards and walls or door casings can be filled with caulk before painting.

Nails

The most commonlv used framing nails are 8d (the “d" stands for “penny”) and I6d sinkers, or vinvl-coated nails. The vinvl coat – ing makes the nails drive easier and hole bet­ter, but don’t hold them in your mouth. In wet areas or near the ocean, use hot-dipped galva­nized or stainless-steel nails.

Screws are typically described by head type (main types include Hat, round, pan, and hex); length (given in inches); gauge, or shank, diameter (usually between *1 and 10); and typ­ical use (drmall, wood, sheet metal, and so on). Although popular for general-purpose use, drvwall screws aren’t strong enough to support heavy loads, such as wall cabinets.

Screws

Drvwall screws are the most universally used

4 4

screws in house construction. But thanks to the popularity of cordless drill-drivers, all kinds of screws are now being used to build houses. Corrosion-resistant screws are avail­able for deck construction and other outdooi

Other fasteners

Toggle bolts, molly bolts, hollow-wall anchors, and other fasteners are used to help secure items, such as wire shelving to drvwall panels. When something must be fastened to a masonry surla. ee, masonry expansion shields and bolts can be used.

applications. Other types of screws are used to install cabinets, built-ins, and hardware.

Materials DEALING WITH SUPPLIERS AND SCHEDULING DELIVERIES

The Parts of a House

ESTIMATING LUMBER AND MATERIALS for a small, affordable house is fairly simple, but it does take some experience to get it right. If you are building a Habitat house, you can call or e-mail affiliates and ask them to share their lists with you (check the Habitat Web site for the affiliate in your area). You can also take a set of plans to a local supplier. Most building-supply outlets will create a materials list and give you a bid on what everything will cost. Always get bids from more than one supplier. Just make sure every supplier understands the type and grade of each item.

If you don’t make your own list, take the oppor­tunity to inspect the plans closely. Get acquainted with the house and all its parts before you start. Remember that a lumber list is only an estimate of material that will be needed for a particular job. You may need to order a few more items as you build, or
you may need to send some materials back to the supplier. Find out ahead of time whether your suppli­ers charge a restocking fee for returned materials.

Most builders have materials delivered as needed, rather than all at once. You should do the same. That way, you won’t have to worry as much about storage problems. Also, ask your supplier to stack the lumber load in the order in which it will be used.

Some materials (especially trim, doors, and unpainted siding) should be stored indoors. When storing material outside, set it on blocks above the ground and cover it with plastic to keep it dry. Be specific about where you want the lumber company to drop the wood, and pick a level, accessible location close to where it will be used. Hauling lumber by hand from any distance is hard, time – consuming work.

ш


Economics

"Economical” means doing only what is necessary to getting a job done. Anything more would be wasteful and contrary to the inherent simplicity of good design. An economical home affords what is essential to the comfort of its occupants without the added burden of unused space. Excess and economy are mutually exclusive. We can have exorbitance, or we can have the serenity that a sensibly-scaled home affords, but we cannot have both. Like anything else that is not essential to our happiness, extra space just gets in the way. It requires maintenance and heating, and ultimately demands that we exchange a portion of life for the money needed to pay for these extras.

For most Americans, big houses have come to symbolize the good life; but, all symbolism aside, the life these places actually foster is more typically one of drudgery. Mortgage payments can appropriate thirty to forty percent of a household’s income not counting taxes, insurance, or maintenance ex­penses. When every spare penny is going towards house payments, there is nothing left over for investments, travel, continued education, more time with the kids, or even so much as a minute to relax and enjoy life. At this rate, an oversized house can start to look more like a debtor’s prison than a home.

In 2008, a used house in the U. S. averaged about $244,000. That is far more than the average American can afford. Affordable housing has, in fact, be­come the exception. How seldom one hears of moderately-priced real estate

Подпись: 28A cabin at The Whidbey Institute’s Chinook Conference & Retreat Center (right)

image18

image19

image20

image21

referred to simply as "hous­ing” and the pricier stuff as "unaffordable housing. "

image22The perception of afford­able housing as something below par is not solely the result of this skewed ter­minology. The structures produced under the banner are usually as elephantine as the more expensive option, but with shoddier materials and even worse design. Through the eyes of the housing industry, square footage pays; qual­ity does not.

Square footage is really the cheapest thing that can be added onto a house. The electrical system, plumbing, heating, appliances and structural compo­nents of most any dwelling are similar in at least one key way. They are all expensive. This costly core is housed by the relatively cheap volume that surrounds it.

In light of all this, it might seem that you really can’t afford to buy anything less than the most house you can get your hands on. At first glance, it ap­pears that the more you buy the more you save, but it’s the hidden costs that get people into trouble. After all, more house than you need comes with more debt in total, more utility bills, more maintenance than you need and more foreclosures and more bailouts than any of us needs ever again.

Houses in Langly, WA, Bodega, CA and Mendocino, CA (pages 29, 30 & 31, respectively) 32 Taos Pueblo (above) and a house on Highway 550 in New Mexico (right)

image23

Water in the Vadose Zone

The groundwater table is defined as the locus of points at atmospheric pressure. Below the water table the pore water pressure is positive and in a hydrostatic state, while the pore water pressure increases linearly with depth. Above the groundwater table, in the vadose zone, water only remains in the pores due to capillary action. The water pressure is then negative or less than the atmospheric pressure and capillary pressures, known as matric suctions, exist. Large matric suctions correspond to large negative water phase pressures and soils under such conditions usually have low wa­ter saturations. Furthermore, both the water content and therefore the permeability are nonlinear functions of these capillary conditions.

In unsaturated soils, pore spaces are filled with both water and air. The water is held in the soil pores by surface tension forces. These lead to a pressure dif­ference between the air and water in the porous medium, as long as the interface is curved. As the curvature of the interface between the two phases – the air and the water – changes with the amount of water (or moisture content) in the soil, the matric suction is dependent on the water content. This relationship is non-linear, greatly complicating analyses of water flow through unsaturated soils.

The capillary conditions are described by the matric suction, 5 (expressed in pres­sure terms) or can be described in terms of the matric potential, Ф, which represents the height (head) of a column of water that could be induced by such a suction. Although negative with respect to zero (i. e. atmospheric pressure), Ф and 5 are usually expressed as positive quantities and are simply related as follows:

Water in the Vadose ZoneWater in the Vadose Zoneу

V = (2.26)

Pw g

where pw is the density of water and g is the acceleration due to gravity. Matric suction is related to the phase pressures and interface curvature by the relationship:

2оі

s = ua — u = – (2.27)

Гс

where ua and u are the air and water pressures, respectively, ai is the interfacial energy or the surface tension and rc is the average radii of curvature as illustrated in Fig. 2.8.

In the unsaturated zone, because part of the soil pores are filled with water while the rest is filled with air, therefore the sum of the volumetric water, в, and air, 9a, contents must be equal to the total porosity, n:

Подпись: (2.28)в + в a = П

This equation may also be written in terms of water saturation, Sr, that is

Sr + Sa = 1 (2.29)

where Sa is the air saturation content.

To understand the distribution of water in the unsaturated soils we may consider a soil mass that is initially dry. Upon addition of water, the water is first adsorbed as film on the surface of the soils grains. This thin skin of adsorbed water is usually called pellicular water (Bear, 1972) and is held strongly by van der Waal’s forces and can hold very high matric suctions. Thus even if a matric suction of tens of atmospheres were applied this water would not be removed from the soil.

If water is further added, water starts to accumulate at the contact point between the grains that represent the smallest pore space openings. This water is referred to as the pendular water. The pendular water is held at the contact points by capillary forces. Capillary forces are caused by the presence of surface tension between the air and the water phases within the soil voids and causes water to move into the

Fig. 2.8 (a) Distribution of water in a porous media. (b) Curved interface separating water and air phases

smallest pores. At this stage water movement through the soil skeleton is slow even under large hydraulic gradients because the water is forced to move along the thin film of adsorbed water. As the water content increases the film get thicker and water moves more easily.

As the water content continues to increase the water saturation reaches the stage where air becomes isolated in individual pockets in the larger pores and flow of air is no longer possible. This saturation is called insular saturation. These air pockets may dissolve leading to full water saturation of the soil.

CROSS-SECTION DESIGN

This article provides information to assist the designer in determining lane widths, pavement cross slopes, shoulder widths, interchange cross-section elements, medians, curbs, pedestrian facilities, and grading and side slopes. The number of lanes for a given roadway facility is best determined using principles and procedures contained in the “Highway Capacity Manual” (Ref. 10). This manual analyzes roadways to determine an appropriate “level of service,” by which a letter value (A through F) is assigned depending on the volume of traffic and other geometric features. Table 2.20 provides a design guide for level of service for various facilities by functional classification and terrain or locale. The table includes a brief description of the characteristics of each level of service.

TABLE 2.20 Guide for Selecting Design Service Level As Determined by Function and Terrain or Locale

Minimum level of service for area and terrain or locale

Functional

classification

Level

Rolling

Hilly

Urban and suburban

Interstate, other

B

B

C

C

freeways, and

expressways

Arterial

B

B

C

C

Collector

C

C

D

D

Local

D

D

D

D

A: Free flow, with low volumes and high speeds.

B: Stable flow, speeds beginning to be restricted by traffic conditions.

C: In stable flow zone, but most drivers are restricted in freedom to select own speed.

D: Approaching unstable flow; drivers have little freedom to maneuver. E: Unstable flow; short stoppages may occur.

F: Forced or breakdown flow.

Source: Location and Design Manual, Vol. 1, Roadway Design, Ohio

Department of Transportation, with permission.

The Affordable Housing Demonstration

In the Affordable Housing Demonstrations, actual housing developments were built in 27 cities and communities in 24 states throughout the United States, with local public officials and the designated builder cooperating to reduce the cost of the completed homes. All the developments built in the program were subject to the ultimate test of the marketplace when the homes were completed and sold. Costs and savings in each demonstration project were carefully monitored, and each project was described and analyzed in a Case Study prepared by the NAHB National Research Center and published by HUD. A list of the projects appears in Appendix

The central theme of the demonstrations was that builders and local officials can, together, identify ways to reduce the cost of housing and to modify or interpret local building codes and site development regulations to promote efficiency and affordability. No Federal funds were provided either to the builder or to the community to support the projects. In each case, HUD asked for a formal commit­ment from the highest elected official that the local government would give its strong support.

The experience of the Joint Venture for Affordable Housing demonstrates that the answer to the question, "Can affordable housing be built on a substantial scale through widely-replicable procedures?’, is YES. Thousands of dollars can be shaved off the cost of new homes – enough to broaden the audience of buyers, to reverse the ominous economic and social trends described above, and to place America once more on the path toward increasing fulfillment of the overwhelming wishes of its citizens. The two keys are knowledge and commitment.

The Joint Venture for Affordable Housing has greatly increased our understanding of how it can be done. Knowledge gained from the Demonstration Projects has been distilled in this two-volume report.

The Khanouqa dam and the Semiramis canal

At the Khanouqa gap on the Euphrates some 80 km upstream of its confluence with the Khabur, are the remains of hydraulic works.[69] This includes a rock weir, built of loose natural basalt blocks, damming the Euphrates so as to provide all-season water to a canal whose offtake is immediately upstream of the dam (Figure 2.13). The left-bank canal is called the canal of Semiramis[70] in the writings of the Greek traveler Isidore of Charax, dating from the first century AD:

“There is found the canal of Semiramis; the Euphrates is blocked by rocks so that, in its nar­rowed state, it floods the plain; but in the summer boats run aground there.” [71]

Подпись: Figure 2.13 The weir at the Khanouqa pass and the canal of Semiramis (after Calvet and Geyer, 1992).
The Khanouqa dam and the Semiramis canal

Remnants of the canal are partially visible in the vicinity of Khabur, along about 80 km. Navigation is clearly the main purpose of the canal, but it could obviously have also been used for irrigation. It is not possible to assign a precise period to these remains. Yves Calvet and Bernard Geyer suggest that the most likely period is from the end of the IIIrd millennium BC until the beginning of the IInd millennium BC. This is a period of prosperity for Mari, but does not exclude the possibility that the works date from a later time, in the Ist millennium BC (but the construction does not appear to be of Assyrian workmanship, and therefore we are inclined to favor the earlier hypothesis.)

The Khanouqa dam and the Semiramis canal

Figure 2.14 The Euphrates at the Khanouqa gap. The path of the canal of Semiramis passes at the foot of the cliff in the background, on top of which one can distinguish the ruins of the Hellenistic city of Zalabiyya. The photo is taken at the location indicated by a V on Figure 2.13 (photo by the author).

Foundation wall insulation

Foundation insulation isn’t used in mild cli­mates. But in areas with frigid winter months, it can improve interior comfort and save on heating costs. Even though it’s not required by code in many areas, it’s definitely worth install­ing wherever prolonged freezing temperatures are expected. You can install insulation on the inside or outside of a crawl-space or basement wall. Exterior insulation, in the form of rigid foam boards, is glued to the foundation walls before backfilling. Where they’re exposed above the finished grade on the exterior, insulation boards must be protected with siding material or stucco. It’s important to remember that any type of foundation insulation can provide a hid­den passageway for termites and other insects to enter the house. Make sure you cut off this passageway by installing a termite shield beneath the sill. As shown in the illustrations on pp. 50—51, the shield should be installed between the top of the foundation and the sill.

Drainage around the foundation

After you’ve taken care of the details, you can begin backfilling around the foundation. Along the footing, install perforated drainpipes in a bed of gravel several inches thick. Cover the pipe with at least several more inches of gravel. To prevent the drainage channel from silting up, cover the top layer of gravel with filter fabric before backfilling it with soil.

STEP 4 ATTACH THE SILLS

Подпись:Подпись: COMPENSATING FOR OUT-OF-PARALLEL WALLS Foundation wall insulationПодпись:Some important carpentry work is about to begin. Whether you are building on a concrete slab, over a crawl space, or over a full basement, the first wooden member that is laid down is called a sill, mudsill, or sole plate. This sill is commonly a pressure-treated 2×4 or 2×6 at­tached directly to the foundation with anchor bolts embedded in the concrete. Occasionally, it is attached with hardened concrete nails or steel pins shot through the sill and into the concrete by a power-actuated nailer.

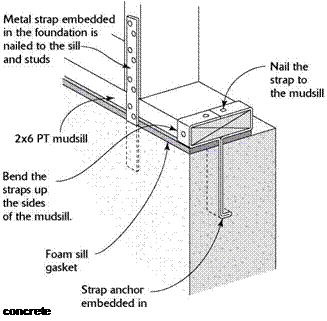
Подпись: IIII III III III III III III III II III III III III III III III II III III III III III III III II III III III III III III II III III III III III III III II III III III III III III III II III III III III III III III II III FASTENING MUDSILLS WITH METAL STRAPS Подпись: concrete Подпись: Metal straps can be embedded in the concrete foundation. After the bottom plate is down, the straps are nailed to it. Metal hardware creates a positive connection between the foundation and the house frame. This is especially important in earthquake and high-wind areas.Подпись: Take special care when working in a trench or around a basement wall. Dirt can cave in, fill a trench, and trap you under tons of earth. The rule of thumb is to never get in over your head!Подпись: Snap chalkline to lay out the sill. The line shows where the sill's inside edge rests. If the foundation isn't perfectly square, adjust the line's position so that the sills will be. [Photo by Roe A. Osborn, courtesy Fine Homebuilding magazine © The Taunton Press, Inc.] Most codes require that anchor bolts be located 1 ft. from each corner of the founda­tion, 1 ft. from the ends of each sill plate, and a maximum of 6 ft. o. c. everywhere else. These are minimum requirements. Builders living in earthquake or high-wind areas often use 5/8-in.-dia. anchor bolts rather than ‘A-in. bolts and reduce the spacing to 4 ft. o. c. or less. As mentioned in Chapter 1, it’s important to check with the local building inspector to ensure that the house you’re building meets or exceeds code.

Check the foundation first

Unfortunately, you can’t assume that your foundation is straight, parallel, square, and level. But here’s some good news: If you know how far off it is, you can usually make the appropriate corrections when installing the sills (see the sidebar on p. 55). It’s worth it to make the sills as straight, parallel, square, and level as possible. Otherwise, the mistakes made at this preliminary stage tend to become even more troublesome further down the line. Here’s how to check the foundation:

STRAIGHT. Check the walls for straightness by stretching a dry line (string) from corner to corner. At this point, you just need to know how straight the top outside edge of the foundation is, because you’ll be measuring in from this edge to locate the sill.

PARALLEL. Measure across the walls at both ends and in the middle. All three measurements should be the same. I use /4 in. over 20 ft. as the tolerance limit for parallel.

SQUARE. Plus or minus ‘/2 in. over 20 ft. is the tolerance that I use for square walls.

You can check any rectangular foundation for square simply by comparing the diagonal measurements, which should be equal. When that isn’t possible, use the 6-8-10 rule to check for square corners. Measure 6 ft. in from a corner on one side and 8 ft. on the other side (see the photo on the facing page). Then measure between those two points. If the corner is square, the hypotenuse of the triangle should be 10 ft. For smaller buildings, 3 ft. on

Подпись: Test for square. One way to test foundation corners for square is to measure 6 ft. from the outside corner along one side and 8 ft. along the other. If til e til ird side of the triangle measures exactly 10 ft., you have a right angle. [Photo © Roger Turk]

one side and 4 ft. on the other should yield a 5-ft. hypotenuse. On a large building, use measurements of 12 ft., 16 ft., and 20 ft.

LEVEL. I like to check a foundation for level with a builder’s level (especially one with a laser beam) set on a tripod. If you don’t have one of these available, an inexpensive water level will work fine (see the illustration below). The walls should be level to within V4 in. over 20 ft.

A Mishandled Spill

Early in his career as an environmental consultant, John Banta received a frantic call from a woman with chemical sensitivities who was in the process of having a home built. Theclient had painstakingly detailed plans and specifications with the help of John and her architect. The project had proceeded virtually without problems, and was entering the final interior painting and sealing process when a worker for the subcontracting painter accidentally kicked over a bucket of nontoxic paint, spilling it on the unfinished floor. The worker ran to his truck and grabbed a can of mineral spirits, which he used to clean up the spill. The solvent soaked into the floor and the fumes filled the house. John’s cli­ent became distraught because her new house was making herfeel sick.

Discussion

In spite of all the best efforts, accidents still happen. The subcontractor failed to educate his worker. The spilled paint was water-based, which meant that the use of mineral spirits was unnec­essary and inappropriate. The painter should have wiped upas much as possible using clean rags and then scrubbed the rest with water. Since the floor was unfinished, any remaining paint could have been removed with sanding.

Many attempts were made to remove the noxious mineral spirit odor from the home, but the solvent had been absorbed by the construction materials. Even pulling up the contaminated por­tion ofthefloor was insufficient to fix the problem. The cleaning substance used by the painter was clearly in violation of the job contract and it ap­peared that a lawsuit was imminent. Fortunately, the house was quickly sold to a less sensitive person who wanted an ecologically constructed home and who was not affected by the residual odor of mineral spirits.

• The contractor shall verify that all materi­als are undamaged, uncontaminated, and free of acquired odors prior to installa­tion. Any products found to be defective shall not be used unless approved by the owner or architect.

Signage

Even if your contractor is well aware of your intentions, he or she will probably not have the chance to personally speak to every person who will work at your site during the course of construction. It is important that the spe­cial rules that apply to your home be posted

Подпись: A sign, posted in a prominent place on the job site, alerts everyone as to the special project procedures. Photo: Paula Baker-Laporte

in a prominent spot where all who enter will read them. You can specify that a job sign be made and posted. Sample wording that can be placed in your specifications follows:

The following sign is to be made and promi­nently posted on the jobsite. It is the respon­sibility of the general contractor to ensure that the labor force, all subcontractors and their labor forces, all suppliers, and all other visitors are made aware of these rules and fol­low them at all times.

SIGN TO BE POSTED:

This house is being constructed as a healthy home. Only specified products and proce­dures may be used. If in doubt, contact the general contractor.

The use of any toxic substances such as insec­ticides, fungicides, or noxious cleaning prod­ucts is prohibited anywhere on this site.

Smoking within or near the building and its garage or outbuildings is strictly prohibited.

No gasoline-generated machines or open combustion heaters shall be used inside or
near the house after the foundation is com­pleted.

Spills of fuels, solvents, or chemicals must be avoided. If a spill occurs, report it to the gen­eral contractor immediately.

Alternatives to specified materials must be approved in writing by the owner and/or ar­chitect prior to use.

Prohibited Products

Because it is difficult to foresee every single product application that will be required in a project, it is prudent to list the major catego­ries of prohibited materials that are the worst health offenders. This gives the general con­tractor and subcontractors the “big picture” in terms of materials. Sample language contain­ing such a list follows: [3]

• asphalt or products containing asphalt or bitumen

• commercial cleaning products other than those specified

• adhesives, paints, sealers, stains, and other finishes except as specified

• any building materials contaminated by mold or mildew

• any building materials or components that have been contaminated while in storage or during shipment

Contact the architect for further instructions about any application where these substances would normally be used if information for a substitution is not in this document.

Metal Connectors

If wood is the universal building stock, metal is the universal connector. Nails of many types as well as screws and bolts are discussed in this sec­tion. Specialty plates that reinforce structural members are also described. Later in this chapter is a review of construction adhesives, which, some say, are destined to supplant metal connectors.

NAILS

As they’re driven in, nail points wedge apart wood fibers. The ensuing pressure of the fibers on the nail shank creates friction, which holds the joint together. Nails also transmit shear loads between the building elements they join. Where nails join major structural elements, such as

Подпись: Specialty nails. 1, Simplex nail for roofing underlayment and thin foam insulation; 2, copper flashing nails; 3, galvanized roofing nails; 4, gasketed nail for metal roofing and some skylight flashing; 5, duplex nails; 6,finish nails (the middle one is vinyl coated); 7,furring nails for stucco wire; 8, ring-shank nail; 9,stainless-steel nail color matched to wood siding; 10,joist-hanger nails (Teco® nails); 11, case-hardened masonry nail. Nail Sizes

1

2

112

4

2

6

212

8

3

10

314

12

312

16

4

20

412

30

5

40

6

60

rafters and wall plates, the loads can be tremen­dous; where nails attach finish elements, such as trim, loads are usually negligible.

There are hundreds of different nails, which vary in length, head size, shank shape, point, composition, and purpose.

Length. Length is reckoned in penny sizes, abbreviated as d. The larger the nail, the greater the penny rating. Nails 20d or longer are called spikes.

Heads. The shape of a nail’s head depends on whether that nail will be exposed or concealed and what type of material it’s designed to hold down. Smaller heads—such as those on casing, finish, and some kinds of flooring nails—can eas­ily be sunk below the wood surface. Large heads, like those used to secure roofing paper or asphalt shingles, are needed to resist pull-through.

Shanks. Nail shanks are usually straight, and patterned shanks usually have greater holding strength than smooth ones. For example, spiral flooring nails (with screw shanks) resist popping, as do ring-shank nails. (By the way, it takes more force to drive spiral nails.) Spiral and ring-shank nails are well suited to decks and siding because changes in wood moisture can reduce the friction between wood fibers and straight shanks.

Points. Nails usually have a tapered four-sided point, but there are a few variations. For exam­ple, blunt-point nails are less likely to split wood than pointed nails because the blunt points crush the wood fibers in their path rather than wedging
them apart. You can fashion your own blunt points by hammering down a nail point.

However, the blunt point reduces the withdrawal friction on the nail shank.

Composition. Most nails are fashioned from medium-grade steel (often called mild steel). Nail composition may vary, according to the following situations:

► Material nailed into. Masonry nails are case hardened. That’s also true of the special nails supplied with joist hangers and other metal connectors. Do not use regular nails to attach metal connectors.

► Presence of other metals. Some metals corrode in contact with others because of galvanic action (see "Galvanic Action," on

p. 70). So try to match nail composition to the metals present. The choice of nails includes

image124

HOLES

Whenever you need to avoid bending nails in dense wood like southern pine and when you’re worried about splitting a joist because you’re nailing too close to the end, simply predrill a pilot hole. There’s no absolute rule to sizing pilot holes: 50 percent to 75 percent of the nail shank diameter is usually about right, letting the friction between nail and wood provide adequate grip.

Подпись:aluminum, stainless steel, brass, copper, monel metal, and galvanized (zinc coated).

► Exposure to weather and corrosion. Neither stainless-steel nor aluminum nails will stain wood. However, stainless is very expensive, and aluminum is brittle and somewhat tricky to nail. Galvanized nails, which are reasonably priced, will stain only a modest amount where the hammer chips the coating off the head. Therefore, you should seal galvanized nails as soon as possible with primer. Galvanized nails are also specified when framing with redwood
or treated lumber, both of which will corrode common nails. If you’re installing costly redwood or cedar siding, use stainless steel, especially if you’ll be sealing walls with a clear finish.

► Holding power. Nails that are rosin coated, cement coated, or hot-dipped galva­nized hold better than uncoated nails. Vinyl – coated nails both lubricate the nail shaft as you drive it in (friction melts the polymer coating) and acts as adhesive once the nail’s in place.

Sizing nails. Common sense dictates the size of most nails. Generally, length should be about three times the thickness of the piece being nailed down. For sheathing J2 in. to M in. thick, use 8d nails (which are 2J2 in. long). Use 6d nails if the sheathing is ъ/ in. thick or less. Nail points should not protrude through the second piece.

The workhorse of framing is the 16d common, although 12d or 10d nails are good bets if you need to toenail one member to another. Use 10d or 12d nails to laminate lumber, say, as top plates, double joists, and headers.

When nailing near the edge or the end of a piece, avoid splits by using the right size nail, staggering nails, not nailing too close to the edge, blunting nail heads, or drilling pilot holes. Box nails, which have smaller-diameter shanks than common nails, are less likely to split framing dur­ing toenailing.

Pneumatic framing nails. When you’ve got a lot of nailing to do, say, to sheathe an addition, you may want to rent a pneumatic nailer. As noted earlier, it’s best to set nailer pressures so that nail heads stop just shy of a panel’s face ply. Then use a framing hammer to drive each nail flush. Most pneumatic framing nails are vinyl coated to make them hold well. And some pneumatic nail heads are colored, so you know immediately which size you’re loading.

Pneumatic nails differ slightly from common nails, however, so you may want to check your local building code before you rent a nailer. For example, pneumatic nailers load either coils of nails (coil nailers) or nails aligned in diagonal strips (stick nailers). Both work well, but some stick nailers accept only nails whose heads have been partially clipped. (Clipped-head nails pack more tightly.) Clipped-head nails are rarely a problem when nailing 2x lumber together, but plywood secured by the smaller nail heads is more likely to pull through under stress.

Second, pneumatic nail shanks are often thin­ner than those of common nails. In fact, some pneumatic 16d nail shanks are roughly the same thickness as 8d common nails used for nailing by hand.

Подпись: Nail Names ► Common The workhorse of construction. Basic uncoated nail; flat head. ► Spike A common nail "on steroids," 40d or 60d. Rarely used these days. ► Box Same length and head size as a common nail but with a thinner shank. ► Sinker Shank about the same size as a box nail; flat head, countersunk. Usually cement coated. ► Cooler A sinker with a bigger head. ► Finish Same length as box nail but with a thinner shank. Brad head (not much wider than shank). ► Casing Similar to a finish nail, but shank is thicker, head is slightly larger; countersunk. ► Duplex Double-headed nail for temporary nailing to depth of first head which holds wood down. Protruding top head is easily gripped for removal. Подпись: A sampling of screws. 1, Structural screws long enough to join timbers; 2, Torx-head structural screws with integral washers; 3, hex-head structural screw; 4, square-drive deck screw with two different thread pitches; 5, deck screws; 6, one-way screw; 7, galvanized drywall screw; 8, standard drywall screws; 9, square-drive sheet metal screw; 10, stainless-steel square-drive flathead screw; 11, stainless-steel square-drive trim screw; 12, brass Torx-head trim screw; 13, concrete screws. SCREWS

Screws have revolutionized building. Thanks to a flood of specialized screws, builders can now quickly attach, detach, adjust, and reattach almost any building material imaginable. This is especially important in renovation, when you are scribing cabinets or setting door casing to walls that aren’t plumb—jobs that require patience and test positionings.

Heads. The increased use of cordless screw guns has made slotted screws almost obsolete. That’s because screws with traditional slot-drive heads let the driver blade slip out of the slot when torque is applied, but drive heads with centered patterns completely surround the point of the driver tip, holding it in place. Among the most popular drive heads are Phillips, square-drive, and six-pointed Torx®.

These days, screws are often engineered to specific uses. Trim-head screws have small heads like casing nails so they can be countersunk easily. Drawer-front screws have integral wash­ers so they won’t pull though. Deck-head screws are designed to minimize “mushrooming” of material around the screw hole. Some structural screws have washer heads with beveled under­sides so the screws will self-center in predrilled hinges or connector plates.

Threads. Screw threads are engineered for the materials they join. Traditionally, screws for join­ing softwoods are made of relatively soft metal with threads that are steep pitched and relatively wide in relation to the screw shaft. Screw threads for hardwoods and metal tend to be low pitched and finer. (The steeper the thread pitch, the more torque needed to drive the screw.) If you’re screwing into dense particleboard or MDF, predrill and then use Confirmat® screws, which have thick shanks and wide, low-pitched threads.

Many screws now feature self-tapping tips, in which a slotted screw tip drills its own pilot hole. Another ingenious design is a W-cut thread in which the threads nearest the tip are serrated like tiny saw points, so they cut through wood fiber as they advance. Such self-tapping features make it easy to drive in screws, without compromising holding power.

There are even screws that cut into concrete. Granted, you need to use a hammer drill to predrill an exact pilot hole, but once the pilot is drilled, you can use a 12-volt or 18-volt cordless screw gun, a standard!2-in. screw gun, or an impact screw gun to drive the screw the rest of the way. The threads grab the concrete and hold fast; the trick is not overtightening and breaking screws. Coatings. Coatings matter most on screws used outdoors or in high-humidity areas. Although
galvanized screws do resist rusting and are rela­tively inexpensive, don’t expect them to last much more than 8 years to 10 years on a deck—fewer years if used near saltwater. GRK Fasteners® promises “25 years in most applications” for its Climatek® coated screws. Makers of epoxy-, polymer-, and ceramic-clad screws offer varying life spans. The king of exterior screws is stainless steel—expensive, by far the most corrosion resist­ant, and the only suitable screw to prevent stains after attaching cedar or redwood.

BOLTS

Bolts are used to join major structural members, though with the advent of structural screws, the differences between the two are blurring. In gen­eral, machine bolts and carriage bolts have non­tapering, threaded, thick shanks. Some bolts are more than 1 in. in diameter and longer than 2 ft. Allthread (threaded) rod comes in lengths up to 12 ft. and can be used with nuts and washers at each end. Carriage bolts have a brief section of square shank just below the head. Lag screws (also called lag bolts) have a hex head, but the lower half of the shank tapers like a wood screw.

WALL ANCHORS


Drywall SCREWS

Type W drywall screws are ubiquitous in renova­tion. (They are commonly called Sheetrock®, screws, after a popular brand of drywall.) Snug in a magnetic bit, drywall screws are also perfect for one-handed chores like centering door jambs before shimming. They’re especially loved by urban renovators because they can eliminate the need for hammering—the bane of neighbors. Also, where hammering might otherwise frac­ture existing wall surfaces, drywall screws join materials gently but firmly.


image126

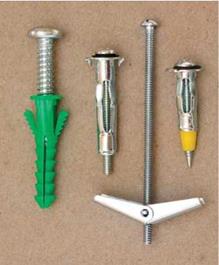
Anchors and bolts for light loads. From left: plastic anchor with screw, molly bolt, toggle bolt, and drive anchor.


Wall anchors employ small bolts or screws to attach light to medium loads (towel racks, mir­rors, curtain rods) to drywall and plaster walls. None is designed for structural use. With the exception of drive anchors, most require a predrilled hole, and all expand in some manner so they won’t pull out easily. Molly bolts, drive anchors, and toggle bolts are best for attaching a light load to hollow walls. Wedge anchors, on the other hand, expand in solid masonry walls.