United States

The requirements for SMA binders used in the United States are related to the Superpave system prevailing in the country. The basis for the selection of binders for wearing courses, in principle their functional type (performance grade [PG]), is the climate of the given area of application. So all binders have to meet the same requirements for deformation resistance, fatigue, and low temperature cracking, but they meet those limits at different temperatures that relate to the climate in various parts of the United States. In specified situations, such as low-speed traffic or very high-traffic loads, the system additionally allows increasing the upper (high tem­perature) grade of the binder. Finally, a binder that meets the specific climatic and traffic requirements for the construction location is then specified or selected.

So there are no special nationwide requirements for SMA binders. The rules for binder selection from Superpave are generally followed for all mixtures. Readers interested in the PG system can find detailed information in SHRP or Asphalt Institute publications (e. g., SP-1 Superpave Performance Graded Asphalt Binder Specifications and Testing).

TOOLS FOR CHECKING LEVEL AND PLUMB

Checking for level and plumb are jobs a carpenter has to do every day. You don’t want floors running downhill or walls that lean. The tools used to check for level and plumb are levels and the plumb bob.

Levels

Although today there are many high- tech leveling devices that rely on lasers or microchips, the old standbys work quite well for most carpentry work.

Many carpenters carry at least two or three different sizes of spirit levels, and some still swear by water levels.

Spirit level The spirit, or carpenter’s, level is the best known of all. It is a sim­ple tool consisting of a straight length of wood or metal with two or three glass vials located on it. Each vial is filled with spirit (like alcohol) so it won’t freeze, has a bubble in it, and is usually protected by a glass lens.

I have two spirit levels: a 2-ft. one and a 6-ft. one. If I need to check a surface that is larger than 6 ft. for plumb or level, I simply attach my 2-ft. level to a long straightedge with duct tape to make a plumbstick (see the sidebar on the facing page). I use an 8-ft. piece of aluminum from an old sliding door, but a 2×4 could be used too, provided that it is straight.

A spirit level needs a bit of loving care. Don’t leave this tool leaning against a wall or on the floor of a work area. Instead, hang it from a nail or place it flat on the ground, away from the work area. I carry each of my spirit levels in a carrying case made from a length of 3-in.-dia. plastic plumbing pipe cut to fit. I simply cap one end of the

Подпись: A plumbstick is useful for checking a wall for plumb. It is made of a straight 2x4 and a 2-ft. level.

Carpenters often make a plumb – stick for checking that walls are straight up and down. What’s great about making a plumbstick is that you can use your old, battered level, even if it’s inaccurate.

Take an 8-ft. 2×4 stud and nail a 16-in. 1×2 strip on each end. Let the 1x overhang the stud ends 3 in. or 4 in. Attach a 2-ft. level to the opposite edge with rubber bands or duct tape. Now you have a long level.

To check this tool for accuracy, hold it flat against a wall. Move the top of the stick back and forth until the bubble is centered exactly in the tube and make a pencil mark on the wall along the 1x exten­sions. Now turn the plumbstick side for side—not end for end—so that the same edge is on the opposite side of the line flat against the wall. Line the extensions up with the marks on the plates. If the bubble returns to the exact center of the vial, the plumbstick is accurate.

If the bubble is not centered in the tube, the level needs to be adjusted. Stick a wooden shim, a folded piece of paper, or even an 8d nail under one end of the level and check the plumbstick again. Keep adjusting the shim until the bubble is centered both ways.

Подпись:

pipe with duct tape and slide the level in. You can also buy carrying cases at most tool centers.

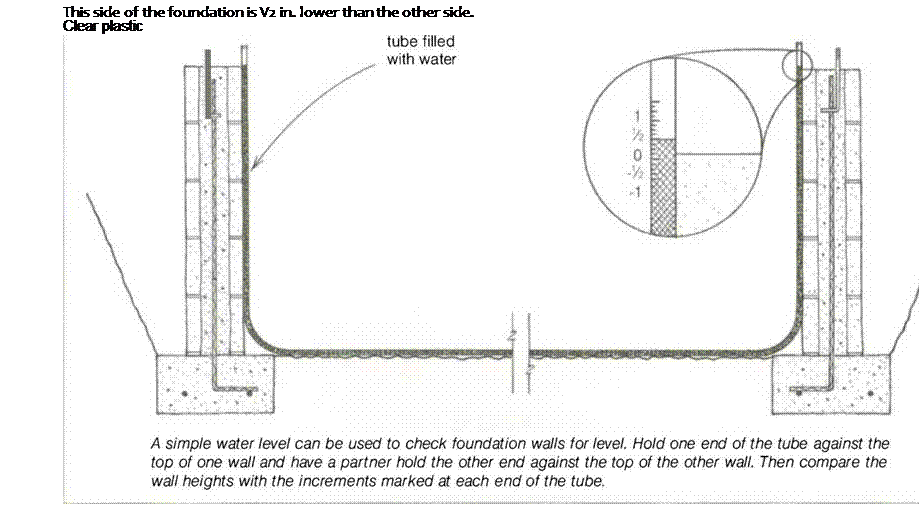
Water level One of the easiest and least expensive ways to determine level over long distances or around corners is with a water level (see the drawing above). This tool, which is simply a plastic tube filled with water, relies on the fact that water seeks its own level. I used to make my own, but now I find it’s easier to buy them. Water levels are available from Zircon (see Sources on p. 198).

Requirements According to European Standards

In Europe, road binders (paving grade) according to EN 12591 and modified binders according to EN 14023 have been used in SMA mixtures. Normally, road binders of 50/70 and 70/100 are used; however softer 160/220 types have also been cited in the regulations for roads with light traffic. The properties of each type of paving grade binder are fully specified in EN 12591; Table 5.6 shows selected properties of 50/70, 70/100, and 160/220.

European Standard EN 14023 for polymer modified binder (PMB) is similar to EN 13043 for aggregates. It comprises two tables with PMB properties to be chosen by any CEN country. In this way, PMB with the same designation could vary sig­nificantly from one country to another. Table 5.7 provides examples of some PMBs specified for SMA.

Recently, a technology utilizing the simultaneous application of modified binder with a viscosity-reducing additive at high temperatures (e. g., F-T wax) has achieved great popularity.

TABLE 5.6

Selected Properties of Paving Grade Binders (Unmodified) according to EN 12591

paving binder grade

properties

Method

50/70

70/100

160/220

Penetration at 25°C, 0.1 mm

EN 1426

50-70

70-100

160-220

Softening point R&B, °C

EN 1427

46-54

43-51

35-43

Fraass breaking point, °C

EN 12593

OO

1

VI

ІЛ

1

о

< -15

Retained penetration at 25°C

EN 12607-1,

> 50

> 46

> 37

after RTFOT, %

EN 1426

Note: R&B = Ring and Ball; RTFOT = Rolling Thin Film Oven Test.

NAILING STRUCTURAL PANELS

Your local building code will have the final say on sizing structural panels. To accommodate heavy loads, choose a panel rated for a higher span. A span rating of 32/16 indicates that the panel is strong enough to sheathe rafters spaced 32 in. on center and studs 16 in. on center and, therefore, can support far greater live loads than a 24/16-rated panel, even though a 32/16 panel is only & in. thicker.

Nailing schedules for different uses of ply­wood are the same: Nail every 6 in. around the perimeter, not closer than 3з8 in. to the edge; else­where, nail every 12 in. For subflooring, annular ring or spiral nails hold best; use hot-dipped galvanized nails for all exterior purposes. An 8d nail is sufficient for h-in. to M-in. plywood. For

Подпись: PROTIP Just one fragment from a nail head can blind you. So buy a pair of impact-resistant safety glasses that are comfortable— and then wear them. 1111 Подпись: Nail types. Top row from left: 60d galvanized spike, 40d common, 20d common, 16d galvanized, 16d common, 12d vinyl-coated sinker, 12d galvanized box, 10d galvanized common, 8d galvanized box, and 4d galvanized siding. Bottom row, from left: concrete nail and six joist-hanger and metal-connector nails (also called Teco™ nails). Longer nails may be required when sheathing covers framing. structural shear walls, follow the engineer’s speci­fications for nailing. Shear walls often require tighter nailing around the edges of the panel— and, sometimes, thicker nails (10d).

Leave a gap of Уи in. between sheets, for expansion; more where humidity is high. (Tongue-and-groove panels may not need gaps.) For greatest strength, run the length of a 4×8 sheet perpendicular to the structural members you are nailing to, and always stagger the butt ends of the sheets. In the intervals between fram­ing, support plywood edges in floors and walls with solid blocking; on roofs, place blocking clips (also called ply-clips or H-clips) between the sheets’ edges unsupported by solid wood.

Pneumatic nailers (also known as nail guns) are widely used to nail down plywood, and they save a lot of time. But one thing a nailer won’t do is "suck up” a piece of plywood to framing. This is worth noting because almost all plywood is warped to some degree. So after you nail down plywood with a pneumatic nailer, go back over the surface and give each nail an additional shot with a 20-oz. framing hammer. The hammer head, being larger than the striker of the nailer, will help drive the plywood down as well.

As important, don’t drive a nail too deeply. If the nailer’s pressure is set too high, the nail may be driven through the face ply, diminishing the shear value and holding capacity of that nail.

Thus set the nailer’s pneumatic pressure a little lower than would be needed to drive the nail flush. Then finish each nail with a hammer blow.

HARDWOOD PLYWOOD

Hardwood plywood is not intended to be struc­tural, but since you may need some during reno­vation, here’s a brief overview. As with softwood plywood, there’s a great variety, classified by species, face plies (appearance), core material (MDF, LVL, particleboard), and glues. The range of uses is suggested by the many thicknesses— from h6-in. aircraft plywood to 2-in. door stock.

Most hardwood plywood is used indoors, so appearance grading and careful handling are cru­cial. Be sure to specify the grade of both faces, and check the stock carefully for damage. Because this plywood is extremely expensive, sheets are often used right up to the edges. Thus check to ensure that edges aren’t damaged or frayed. Here’s a list of hardwood grades:

► Specialty. You can special order closely matched flitches (veneer surfaces that can be laid together in sequence) that allow repetitions of face grain for visual effect.

► Premium (A). Grain patterns and colors are matched precisely.

► Good (No. 1). Colors of matched veneers on a face do not vary greatly, but patterns are less closely matched than premium grade.

► Sound (No. 2). Although colors and pat­terns are not matched, there are no open flaws.

► Utility (No. 3). These may have small flaws, tight knotholes, discoloring, and splits that can be filled, but no rot.

► Backing (No. 4). Defects are allowed as long as they don’t weaken the sheet or prevent its use; the backing side may be from a differ­ent tree species than that of the exposed face.

REQUIREMENTS FOR BINDERS

SMA mixtures are chiefly laid as wearing courses. Binders for them should therefore have suitable properties for asphalt mixtures applied to that layer.

The majority of SMAs are placed in moderate climates. Therefore the SMA binder is usually an unmodified binder, or sometimes a polymer-modified one, with a penetration between 50 and 100 (0.1 mm) at 25°C. In several countries, multigrade

TABLE 5.5

Requirements for SMA Aggregates (Coarse, Fine, and Filler) in the United States

properties requirement comments

coarse aggregates

Подпись: Crushing resistance: LA abrasion test, % loss (AASHTO T 96) Подпись: Shape of particles: Flat and elongated, % (ASTM D 4791) Подпись: Particle surface. Crushed content:, % (ASTM D 5821) Absorption in water, % (AASHTO T 85) Susceptibility to weathering: Soundness, 5 cycles, % (AASHTO T 104) Подпись: Susceptibility to weathering: Soundness, 5 cycles, % (AASHTO T 104) Angularity, % (AASHTO T 304, method A) Atterberg Limits Tests Liquid limit, % (AASHTO T 89) Plasticity index (AASHTO T 90) <30 There is a suggestion to use additional test
methods like Micro-Deval or SGC degradation test. Despite experiences with aggregates of LA 30-45%, their use is not recommended due to possible grain crushing during compaction both in the laboratory and on the road.

<20 at 3:1, Aggregates that have a high percentage of

<5 at 5:1 flat and elongated particles:

• Tend to break down during compaction

• Have higher voids within the aggregate

Requirements apply to a whole coarse aggregates fraction in SMA but not to individual materials (fractions).

100% one face, Property is important for interlocking of >90% two faces aggregates skeleton.

<2

<15 in sodium Tests show that there is good correlation

sulfate, <20 in between magnesium sulfate soundness and

magnesium sulfate micro-Deval abrasion test.

Fine aggregates

<15 in sodium See Coarse Aggregates.

sulfate, <20 in magnesium sulfate

>45 Indication of interlocking potential of fine

aggregates

<25 The liquid limit is the water content at

which the material passes from a plastic Nonplastic to a liquid state. The plasticity index is

the numerical difference between the liquid limit and the plastic limit; it is the moisture content at which the material is in a plastic state. The goal is to eliminate aggregates with clay or silt particles.

(Continued)

TABLE 5.5 (CONTINUED)

Requirements for SMA Aggregates (Coarse, Fine, and Filler) in the United

states

properties

requirement

comments

Absorption, %

<2

Used in airfields [ETL 04-8]

(ASTM C 128)

Sand equivalent, %

>45

Used in airfields [ETL 04-8]; the goal is

(ASTM D 2419)

Filler

to eliminate aggregates with clay or silt particles. Shows the relative proportion of plastic fines (and dust) to sand fraction.

Plasticity index

<4

See Fine Aggregates.

(AASHTO T 90)

Modified Rigden voids

<50

Recommended value

content, %

Note: AASHTO = American Association of State Highway and Transportation Officials; ASTM = American Society for Testing Materials; LA = Los Angeles; SGC = Superpave Gyratory Compactor; SMA = stone matrix asphalt.

binders are also used. Under special circumstances, especially in countries with a cold climate, soft binders (with penetration higher than 100 at 25°C) are used. A steady increase in the percentage of polymer-modified binders in SMA mixtures has been observed recently. Considerable research (see Chapter 12) has proved that a polymer-modified binder substantially improves the characteristics of a finished SMA layer.

Special Project Procedures

Healthy home building does not permit many behaviors and practices that are commonly accepted at standard jobsites. The procedural expectations must be clearly stated by the owner and upheld by the contractor. Some basic rules that you may wish to include and expand upon in your specifications are: [1] [2]

contamination and moisture damage dur­ing storage and after installation.

Pads are poured

It’s common practice to pour any pads required in the plans at the same time the footings are poured. In a crawl-space foundation that includes a post-and-girder framework, poured concrete pads provide a base for concrete piers and wood posts (see the illustration on p. 48).

A common size for these pads is 16 in. square by 8 in. deep. If you’re building a basement founda­tion, pads are also required to support each post or Lally column. These pads are poured below the level of the basement floor and will be cov­ered when the slab floor is poured. If a wall will provide midspan support for joists, a continuous footing is poured instead of separate pads.

STEP 2 BUILD THE FOUNDATION WALLS

The house shown here has concrete block walls. With a crew of helpers to move blocks and mix mortar, an experienced block mason can erect a simple crawl-space foundation wall in just a couple of days. However, in many parts of the country, poured concrete walls have surpassed concrete block walls in popularity. Subcontractors—specialists who have the equip­ment and experience to do the job quickly and, hopefully, with a high degree of accuracy— often form and pour concrete walls. If a foun­dation contractor arrives in the morning with a truckload of wall forms and rebar, he or she will probably have everything erected before the end of the day. Don’t forget to have the forms inspected before the ready-mix truck arrives to fill them with concrete.

Forms are usually stripped a day or two after the pour. It takes about a week for concrete to get its first hard set, but you can begin to lay out and install the sills as soon as the forms come off. Even though you may not be forming and pour­ing the walls yourself, it’s useful to know about some aspects of the process. This applies whether you’re building the foundation walls with con­crete block or with insulated concrete forms.

Anchor bolts and tie-downs

Regardless of the type of foundation, anchor bolts are required around the perimeter to hold the sill plates and the walls securely in place.

In earthquake and hurricane zones, the build­ing code may call for additional hold-downs, such as metal straps that are embedded in the concrete and extended to the sills, rim joists, and wall framing (see the illustration on p. 56). Most codes require that a long piece of rebar be planted in the concrete near the planned loca­tion of the main electrical panel so that it can be used as a ground for the electrical system.

Beam pockets

Beams or girders that tie into the foundation usually do so by means of pockets built into the foundation walls (see the illustration on p. 48). If a post-and-girder system is planned for a basement or a crawl-space foundation, the beam pockets are located in the end walls, in line with the concrete piers where the posts will be installed. It’s critical for the pockets to be correctly sized and located as the foundation walls are built. To hold a 4×6 girder, the pocket should be 41/2 in. wide and 51/2 in. deep. This provides clearance between the girder and the concrete so that moisture in the concrete doesn’t seep into the wood, potentially damaging it.

The 51/2-in. depth also allows a pressure-treated 2x 4 shim to be installed beneath the girder, bringing its top edge flush with the sill.

Подпись:Pockets are cast into poured concrete walls by fastening pocket-size wood or rigid foam block­ing inside the forms. In a concrete block or ICF wall, pockets are created as the walls are laid up.

MARKING TOOLS

A carpenter uses many different tools to mark all kinds of materials: wood, Formica, drywall, concrete, tile, you name it. Most of this can be done with a few basic marking tools, such as pencils, keel, pens, chalklines, and dryline.

Pencils, keel, and pens

While many lumberyards give away standard pencils, flat-sided carpenter’s pencils are more durable, easier to sharpen with a utility knife, and won’t roll away when set down on a board.

Keel (commonly known as a lumber crayon) is easier to see than a pencil on some surfaces, making it better for some kinds of layout work. Blue and red keel show up well on rough lumber and concrete; white works best on new concrete.

A few specialty pens are also useful on the job site. I use mechanical pens for laying out fine cuts on finish work, no-blot pens on wet wood, and felt-tip pens on dry wood.

Chalklines

Chalklines have been around about as long as carpenters and are used about as often as a saw. Anytime you want to

mark from one point to another—if you wanted to rip 1 ft. from an 8-ft. piece of plywood, for instance—you can do it with a chalkline.

Chalklines are available in lengths of 50 ft. or 1 00 ft. and are wound inside a box filled with powdered chalk. I buy chalk by the gallon and refill the box as needed. Years ago I used a teaspoon to fill the box with chalk, but now I use a plastic squeeze bottle with a nozzle, making the process easier and quicker.

Using a chalkline is pretty simple. To ensure that the snapped line will be straight, stretch the line taut before pulling it up and snapping it. Also, snap perpendicular to the surface to be marked, or you may leave a curved line.

For short distances, hold one end of the line with your foot, stretch out the line to the measuring point, and snap it. Or you can hold one end of the line with one hand and the other end with the little finger of your other hand. Pick up the taut line with the thumb and fore­finger of your second hand and snap it (see the photo on p. 33).

On long runs, secure the line at both ends, go to the center of the line, hold down the line at that point, and snap each side individually.

Dryline

A dryline is simply a stringline without chalk. It is often made of yellow or orange nylon for visibility. I buy dryline in 250-ft. lengths and use it for laying out house foundations. [2]

Requirements

Statement of Intent

Clear communication among contractor, owner, and architect is a key factor in the suc­cess of any building project. When creating a healthy home, there are many special project procedures that must be communicated with even greater clarity than in standard construc­tion. The owners intentions and instructions for special procedures can be formally trans­mitted in the statement of intent, thus making them part of the construction contract.

Here is a sample of specifications language that succinctly states the owners wish to cre­ate a special project:

This house is being constructed as a healthy house. The following specifications outline special project procedures and acceptable building products. The products specified herein are intended to be as free of harmful chemicals as is presently possible and rea­sonably attainable. In using these products and following these procedures, we are safe­guarding to the best of our ability the health of future inhabitants and of the workers in­volved in this construction. Our concern extends also to the workers involved in the manufacture of these products.

Coordination

Building a healthy home can be a pioneer­ing endeavor. Choosing the right architect and contractor is of paramount importance. Creativity, intelligence, common sense, and commitment to the ideals of healthy house building are essential qualities for each of the participants. At times you and your team will be experimenting with products that have not been on the market long enough to have a performance history or wide distribution. At other times you may find yourself partici­pating in a revival of materials and techniques that were used successfully for centuries but have been replaced in standard construc­tion by commercialized products containing harmful chemicals.

The contractor will need to allow more time for locating special materials, scheduling their use, and supervising their installation. You may encounter initial resistance from sub­contractors who are reluctant to do things that are unfamiliar to them. Some of the healthier products might be harder to work with be­cause they do not contain certain harmful ad­ditives that make application easier. For these reasons, the general contractor will need to su­pervise the project more closely than in stan­dard construction.

During the construction of a healthy build­ing, the owner may wish to hire subcontractors to carry out specific environmentally related testing, quality control inspections, proce­dures, or installations. Included in standard contracts from the American Institute for Ar­chitecture (AIA) is document A201, “General Conditions for Construction,” which acknowl­edges the owner s right to hire his or her own subcontractors. Careful coordination with the contractor is necessary, however, because any delays and expenses incurred by the contrac­tor because of this work will be the responsi­bility of the owner. Some of the additional test­ing and inspections are described in Division 13. Other quality control procedures will be outlined where appropriate throughout the text. If you do not use a standard AIA contract, you may need to add language to your contract to outline the parameters for specialty subcon­tractors to be hired by the owners.

In summary, a healthy home can take more time and effort to build, which may be re­flected in the contractors scheduling and pric­ing. Once committed to the project, however, the contractor is like the symphony conduc­tor, who must lead all players to a successful performance regardless of the difficulty of the piece. You will wish to clearly state this expec­tation in your specification document. An ex­ample of such language follows:

• The contractor shall be responsible for ob­taining all specified materials or approved substitutes and for performing all special project procedures within the contract time, as stated within the construction contract.

• The contractor shall be responsible for the general performance of the subcon­tractors and tradespeople and for any necessary training, specifically with re­gards to the special project procedures, materials, and prohibitions as outlined in these specifications.

CHOOSING A FOUNDATION

Foundation types vary by region. When deciding which type of foundation to use, consider the cost, climate, and local preferences. The three major foundation types are discussed here.

Concrete Slab

Подпись: SLAB WITH INTEGRAL FOOTINGПодпись: PT sillПодпись: 4-in. (minimum) reinforced slab, continuous with footingПодпись: Footing extends below frost line.Подпись: Moisture barrier Подпись: 4 in. (minimum) of compacted gravel CHOOSING A FOUNDATIONПодпись: Termite shield Slab foundations are popular throughout southern sections of the country and in regions where winter temperatures are mild. A concrete slab is more than a foundation; the slab also serves as the rough or finished floor for the first level of the building. This explains why slab foundations are less expensive than other types. Because concrete has poor in – sulative qualities, slab foundations are often insulated with rigid foam. Plumbing waste lines are typically cast into the slab, so they must be carefully laid out and installed first. Plumbing supply lines can be placed under a slab, and tubes for radiant floor heating can be cast into a slab.

Подпись:Подпись: Wall framing Подпись: Termite shield Подпись: Anchor boltПодпись: PT sillПодпись:Подпись: Vertical rebar Подпись: Footing rebar Подпись:CHOOSING A FOUNDATIONTypes of Slab Foundations

Concrete slabs can be poured inside stem walls that bear on conventional footings. Another construction method is to form and pour the floor and footings together. With this type of slab, the floor is simply thickened at the perimeter of the house (and beneath any load-bearing walls or interior posts) to form the footings. As with other foundations, the footings should extend below the frost line.

Crawl Space

Crawl-space foundations are very compatible with afford­able housing. In humid, high-moisture areas (such as the Southeast and Pacific Northwest), this type of foundation raises the living space off the ground, away from wet soil.

A house built on floor joists over a crawl space provides a more resilient and more comfortable floor than a slab. It also allows for easy access to plumbing pipes, under-floor insula­tion, and electrical wiring. If you are planning a crawl-space foundation, decide whether you want the crawl space to be ventilated (see the sidebar on p. 49).You’ll also need to decide between poured concrete walls and concrete block.

CHOOSING A FOUNDATION

POURED CONCRETE BASEMENT FOUNDATION

Slope away from – y

the foundation 6 in. min.

PT sill

Horizontal rebar 1/2-in. anchor bolt Vertical rebar Foundation coating

4-in. perforated drainpipe

Footing

Horizontal

rebar

Gravel

CHOOSING A FOUNDATION
Подпись: 18 in. minimum between joists and dirt Подпись:Подпись: Vertical rebarCHOOSING A FOUNDATIONПодпись: Floor joist Mudsill Anchor bolt Backfill
Подпись: Slope the top of footing with mortar to shed water.Подпись:Concrete Block versus Poured Concrete Walls

If you have a large crew, like we do on most Habitat projects, it makes sense to build foundation walls with concrete block. All you need are a couple of experienced masons and enough volunteers to keep them supplied with blocks and mortar as they work their way around and up, course by course. A crawl-space foundation can be completed in just a couple of days. When building walls with concrete block, it’s easy to form beam pockets and openings for vents, doors, and windows. And by switching to a smaller block just below the planned grade level, you can create a ledge for brick veneer on the outside.

If you want a full basement and you don’t have a Habitat-size crew, poured concrete is the way to go. Most basement foundations are built with poured concrete walls that are formed and poured by foundation contractors.

Подпись: ENSURING PROPER DRAINAGE We need water. We just don't need it in our basements or under our floors, causing dampness, mold, and rot. We may not be able to hold back the Mississippi when it floods, but we can control most of the rainwater that falls around our homes. Follow the guidelines below and you'll stand a good chance of keeping water on the out-side of your foundation. Подпись: Don't build on the lowest part of the lot. Seal all holes around the pipes that go through the concrete. Install perforated drainpipes at the bottom of the concrete foot-ings around the outside of the foundation (see the photo below). Coat the foundation walls with a suitable damp-proofing or wa-terproofing treatment. Check with builders in your area or the local building department to find out which foundation coatings are recommended.Tar coatings are inexpensive but not as effective as more recently developed waterproofing treatments. Compact loose fill as you backfill around the foundation, but be careful, because excessive compaction can damage masonry walls. Make sure that the finished grade (ground level) slopes away from the foundation. But remember that loose fill can settle. A finished grade that slopes away from the house may later slope toward the house should settling occur. ■ Use gutters and downspouts to manage high roof water run-off. Make sure you keep gutters unclogged and install down-spouts to direct water away from the house. ■ Get advice from your building department.The time to protect your house from water infiltration is while you are building. Fixing a leaky basement or a damp crawl space after the house has been built can be Подпись:CHOOSING A FOUNDATION

an ICF system, laying up foundation walls doesn’t demand back-breaking labor. Even so, many homebuilders still prefer to hire a foun­dation contractor to take on this phase of the construction project, and there’s nothing wrong with that choice. The important thing is to begin building on a base that’s level, square, and guaranteed to remain solid and stable for many years to come.

STEP 1 FORM AND POUR THE FOOTINGS

Thick, solid, and strong, footings evenly spread the weight of the house (and everything inside it) over a wide area, ensuring that the finished house does not settle. With some slab foundations, it’s possible to pour the footings and the slab at the same time. In other cases, the footings and the slab must be formed and poured separately. In many areas, a footing inspection by the building department is required; this must be done before the foundation walls are built.

Footings must be set on solid, undisturbed earth, not on fill dirt. Local soil conditions determine the depth and design of footings. In areas of the country where the ground freezes solid in the winter, footings must extend below the frost line, which can be 4 ft. or deeper in northern regions. This prevents the freeze-thaw cycle from moving the foundation, cracking it, and causing damage throughout the entire house. The building department in your area will know the footing depth that is required. They’ll also know about local soil conditions that may require a larger size footing or the use of rebar (steel reinforcing rod) in the footing.

Forms for footings

Footings are typically poured in temporary forms constructed from plywood or 2x lumber. Wood stakes and braces hold the forms in posi­tion. The top edges of the footing forms must be level, and the footings must be set to the dimen­sions specified on the plans. A ready-mix truck is called in to fill the footings with concrete. If
the site conditions make it difficult or impos­sible for the truck to get close to the forms, a mobile concrete pumper can be brought in to pump the concrete from the truck to the forms. Check with your building department about code requirements for footings. It also may be necessary to embed vertical rebar in the footings so that the upper part of the reinforcing rods can extend into the foundation wall.