It’s Difficult to Compare U-Factors

The U-factors reported by European window manufacturers—whether given in European units (W/m2^K°) or North American units (Btu/ft2^F°)—are difficult to compare with U-factors reported by North American man­ufacturers. European and North American laboratories use different protocols to test window U-factors, and most glazing experts agree that European U-factors would look worse if the windows were tested according to NFRC requirements.


A core of cork increases thermal performance.


The interior of the frame, — which is made of either fir or spruce, is left exposed.


Zertifikat


Triple glazing with warm-edge spacers is filled with argon or krypton.

  It’s Difficult to Compare U-Factors

OPTIWIN

U-factor: 0.137

SHGC: 0.53

VT: 0.72 (glass only)

  It’s Difficult to Compare U-Factors

Kerfed-in bulb — weatherstripping


U,0.85 W/(m*K)

It’s Difficult to Compare U-Factors


Aluminum cladding increases durability


Locking hardware that’s been compared to that of a bank vault helps to compress extensive weatherstripping to limit air infiltration.——————————


Mta tahto

R*rc;<w

World’s Best Window Co.

Millennium 2000+

Vinyl Clad Wood Frame Double Glazing * Argon Fll • Low E Product Type: Vertical Slider

/energy performance ratings

U-Faaor(USyi-P)

( 0.35)

Solar Heat Gain Coefficient

0.32

XqDITIONAytRFC

VisibieTransfiflttance

0.51

3RMANCE RATINGS

Air Leakage (Ui/I-P)

0.2

Condensation Resistance

51

UwAOBW Ш »«« ПИГ9» ronlorm * *ptene NIRC Wfliw for drterrwrp urtik jnAttpariorminca. VR:rata*nc*w«(*4fori(«4wto’*r*roir>*<i ardentvdi юєсґі: pt>4jQ see Consji пмЛкмг s nera jre ler «ічг praJur partareeaa rfnm wwihcorf


Cork acts as a——–

thermal break.


It’s Difficult to Compare U-FactorsIt’s Difficult to Compare U-FactorsIt’s Difficult to Compare U-Factors

It’s Difficult to Compare U-Factors

U. S. distributors of European windows don’t follow a consistent method for report­ing U-factors. Some use European metric units, while others report North American U-factors or even R-values. Although the NFRC requires U-factors and SHGC to be based on the performance of the whole win­dow, including the frame, many European manufacturers report U-factor and SHGC numbers that measure the performance of the glazing alone.

There is a straightforward conversion fac­tor for converting a European U-factor in W/m2^K° to a North American U-factor in Btu/ft2^F°: Simply divide by 5.678. Unfortunately, while this method converts the units, it doesn’t account for the fact that the European protocol tests windows of a different size from the size used in North American testing, or for the fact that European windows are tested at different temperatures than required for North American tests.

An American Standard

To appreciate the performance of the win­dows featured here, it’s helpful to look close­ly at a typical window made by an American manufacturer. The argon-filled, double – paned window made by Marvin (above) is an example of a unit suitable for houses built to code minimums.

The European Difference

For the most part, the glass in European Pas­sive House windows is quite similar to the glass used in the best Canadian windows: argon – or krypton-filled triple glazing with two low-e coatings and warm-edge spacers. That’s why many energy experts report that the thermal performance of the best Euro­pean windows is about the same as that of fiberglass-framed, triple-glazed Canadian windows. Katrin Klingenberg, founder of the

MARVIN

ULTIMATE

PUSH-OUT

CASEMENT

U-factor: 0.28 SHGC: 0.25 VT: 0.42 Cost: $670

Passive House Institute US, gives a bottom­line analysis: "Our experience has been that the overall performance of the fiberglass­framed Canadian and U. S. windows is al­most as good as the German Passive House windows if you look at the overall systems design [using Passive House Planning Pack­age software]."

However, European window manufac­turers continue to push the performance envelope, and glazing manufacturers are always striving to improve their products. The latest versions of low-U triple glazing from Europe may have a higher SHGC than comparable low-U triple glazing available in North America. According to some window experts, European manufacturers are already selling windows with better insulated frames and glazing with a slightly lower U-factor than any frames or glazing available from North American manufacturers.

Typical European Passive House windows have composite frames, often including a wood lamination on the interior, a core of foam or cork to act as a thermal break, and a weather-resistant exterior cladding of alumi­num or rot-resistant wood.

Although the wide frames on European windows reduce the windows’ thermal performance—especially their potential for solar heat gain—compared to narrow-framed

Подпись:Подпись:Подпись:Подпись:It’s Difficult to Compare U-FactorsNorth American fiberglass windows, the thermal breaks incorporated in European frames are usually more effective than those used by North American manufacturers.

North American Products Rely on Narrow Frames and Synthetic Materials

Although European triple-glazed windows are well built and attractive, they cost far more than North American windows with similar performance specs. (For an operable triple-glazed casement window measuring 8 sq. ft., you can expect to pay between $400 and $520 for an Inline, Fibertec, or Thermotech® window. A Serious window with Heat Mirror™ glazing will have a lower VT rating, but it will cost about the same—$400 to $560, depending on the glazing chosen.) Windows from Europe also have a long lead time—anywhere from 10 to 12 weeks.

Unlike almost all U. S. manufacturers, Ca­nadian manufacturers of fiberglass windows offer full-thickness (13/s in.) triple-glazing. Even when U. S. manufacturers offer triple glazing, it’s usually thin (1 in. or 7/s in.), low-performance glazing. While Canadian window manufacturers offer both low-solar – gain and high-solar-gain triple glazing, it’s difficult to buy high-solar-gain triple glazing from a U. S. manufacturer.

Canadian fiberglass windows have other attributes that make them more attractive than European offerings. Canadian windows have narrower frames than European win­dows. Because frames have a lower R-value than a superinsulated wall, narrower frames mean better thermal performance overall. Also, narrow-framed windows allow more light and more solar heat gain than wide­framed windows.

When looking for high-performance win­dows made domestically, you’ll come across the following materials.

Подпись:Подпись:Подпись:Подпись:It’s Difficult to Compare U-FactorsPULTRUDED FIBERGLASS FRAMES

The pultruded fiberglass used for the best Canadian window frames is similar to the fiberglass used to make stepladders, only denser and smoother. Even when left un­painted, pultruded fiberglass is extremely durable and weather resistant. Because it has a coefficient of thermal expansion that closely matches that of glass, it’s a much more suitable material for window frames than vinyl.

HEAT MIRROR GLAZING

Heat Mirror glazing has only two panes of glass; the performance of the glazing is improved by one or more stretched plastic films suspended between the two panes. The plastic films create two or three separate air spaces between the inner and outer panes of glass, mimicking the performance of triple or quadruple glazing but with less weight.

The best-known manufacturer of Heat Mirror windows is Serious Materials. Serious offers windows with lower U-factors than any triple-glazed window. Its best-performing operable window (a 1125 series casement or awning window with three plastic films) has a whole-window U-factor of 0.13. The low-U-factor glazing comes with a down­side, however: a very low SHGC (0.20) and a very low visible transmittance (0.30). In other words, the windows don’t let in much light or heat. European window manufactur­ers (and most Passive House builders in the United States) have been reluctant to use Heat Mirror windows due to lingering skep­ticism about the long-term durability of the plastic films and an unwillingness to accept lower SHGC and VT ratings.

VINYL FRAMES WITH TRIPLE GLAZING

Builders experiencing triple-glazing sticker shock may want to consider a lower-cost option: vinyl windows. Paradigm Windows of Portland, Maine, offers casement win­dows with foam-injected frames. Paradigm’s best performing krypton-filled triple-glazed casement windows have a whole-window U-factor as low as 0.17. Unfortunately, these

almost all U. S. window manufacturers, Para­digm Windows doesn’t yet offer high-solar – gain triple-glazed products.

High-Performance Windows Don’t Make Sense in All Homes

The high cost of triple-glazed windows is hard to justify unless you’re building a su­perinsulated house in a cold climate. But once your wall specs reach the R-40 level, triple-glazed windows start to make sense.

A triple-glazed Optiwin tilt-turn window will cost at least $880, while a window from Bieber® will cost almost twice as much. Fortunately, Canadian windows with com­parable performance specs cost roughly half the price of an Optiwin window.

Because of their positive latching hardware, casement, awning, and tilt-turn windows always outperform single – or double-hung windows.

Подпись: Fibertec: www.fibertec.com Inline: www.inlinefiberglass.com Подпись: Paradigm: www. pa rad igmwi ndows .com Serious Windows: www.seriouswindows.com Thermotech: www.thermotechfiberglass .com EUROPEAN Bieber: www.bieberusa.com Heinzmann: www.europeanwindows .com Internorm: www.internorm.com Optiwin: www.optiwin-usa.com Pazen ENERsign: www.quantumbuilder.com/ pazen Silber: www.silberfenster.com Подпись: Unilux Ultratherm: www.unilux.de Martin Holladay is a contributing editor to Fine Homebuilding.

It’s Difficult to Compare U-Factors

Подпись: (О

Clay-Based Plasters

From a Building Biology standpoint, clay – based plasters provide a superior wall finish because of the remarkable hygroscopic prop­erties of clay. For more information about mixing your own plasters, we recommend The Natural Plaster Book (listed at the end of this chapter). Resources for commercially pre­pared clay-based plaster are:

• American Clay Enterprises: A variety of clay-based plasters for interior finish­ing, including three texture styles and 42 colors.

• Japanese Wall: Several lines of interior and exterior natural plasters imported from Japan. All-natural, nontoxic plasters contain sand, diatomite earth, clay, natural stone chips, and straw.

Plaster Finish

Because of the porous nature of plaster, it will stain and show fingerprints if left unfinished. Plaster walls, which were the norm before the advent of gypsum board or Sheetrock, were commonly painted or covered with wallpaper. Today, homeowners enjoy the organic feel of the color variations in natural plaster and it is fashionable to leave it unpainted. Most people prefer to apply a clear finish over it to protect and enhance its natural beauty, or to leave the plaster unsealed.

Natural beeswax finishes will protect the wall while maintaining its permeability. Tra­ditionally, beeswax was applied with a hot knife and troweled on the wall. There are very few craftsmen who know this art form today. However, we have found that a natural bees­wax furniture polish can be applied with a cloth and buffed. As with all plant chemis­try products, chemically sensitive individuals may find the scent objectionable and should test a small sample first.

Some synthetic finishes will create a more impervious seal and are less expensive, easier to apply, and more enduring. Synthetic finishes should be carefully evaluated for chemical content and outgassing. Some maybe toxic or increase problems with static electricity. Since most make the surface nonporous, they may encourage mold growth on the paper back­ing of the gypsum lathing behind the plaster if moisture becomes trapped. So, as with gyp­sum board, if a water accident occurs it should be quickly dried. We have successfully used the following finishes:

• American Clay Black Soap Finish: A

gelatinous castile soap infused with potash

to enrich color and create a soft patina

Clay-Based Plasters

This Santa Fe Style interior combines hard trowelled plaster wall finishes with brick flooring and stone de­tailing to create a healthy interior. Architect: Baker-Laporte and Associates; Builder: Prull and Associates. Photo: List Dennis.

Clay-Based Plasters

Flagstone floors, granite countertops, solid wood upper shelving, formaldehyde free cabinetry and plaster walls grace this sculptured home. Architects: Baker-Laporte & Assoc. Builders: Prull & Assoc. Photo: Rob Reck.


• American Clay Gloss Sealer: Low-VOC product used for high-traffic areas, pro­viding water resistance to walls; easy to clean

• American Clay Penetrating Sealer: A

low-VOC soy resin/acrylic spray-on sealer that increases durability and water resis­tance

• Livos Glievo Liquid Wax: Apply a thin coat and hand buff

• Окоп Seal and Finish: For satin gloss

Double top plate

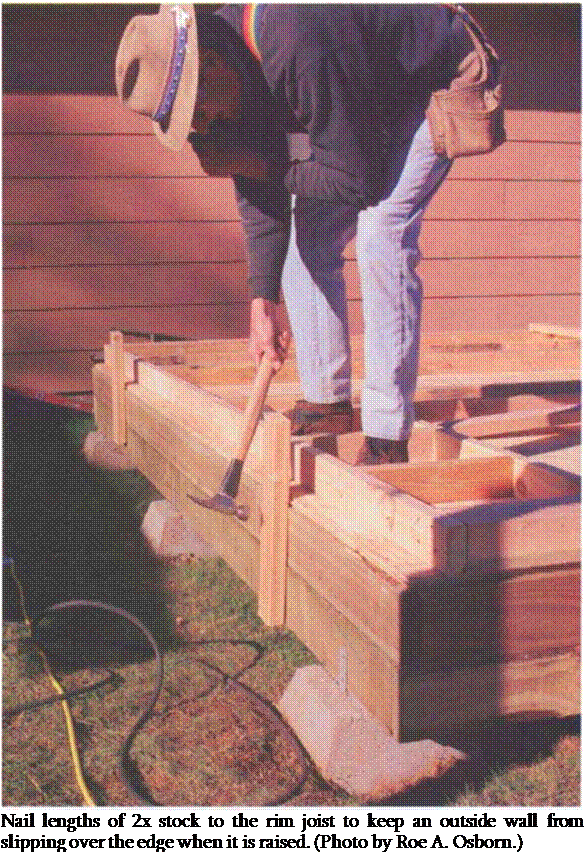
see carpenters raising the wall and then standing on ladders to nail on the dou­ble top plate, the job is much quicker and easier to do while the wall is still on the deck.

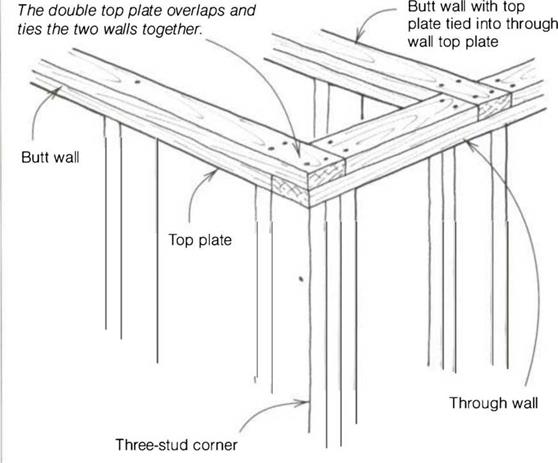
On butt walls, the double top plate laps over the top plate ЗУ2 in. (for a 2×4 wall) so that it can tie into a through wall.

On through walls, the double top plate cuts back from the end of the top plate ЗУ2 in. to leave room for the double top plate on the butt wall to lap over and tie the two walls together (see the drawing above). There is а ЗУ2-ІП. mark on the through walls left from when you located the corners with the corner­marking tool. Lay the double top plate on the wall with one end ЗУ2 in. from the end of the top plate. Go to the other end and cut the plate at the other ЗУ2-ІП. mark. At the channel marks, leave а ЗУ2-ІП. cutout so that an interior butt wall can lap over and tie in at this
point. Cut the double top plates a little short to leave а З3/д-іп. gap (more or less) rather than ЗУ2 in. This makes it easier for the double top plate of the butt wall to slip into the gap in the through wall. This is another one of those times when it’s okay not to be totally accurate.

To start nailing on the double top plates, drive two 16d nails into the end of each plate and then one more over every stud. Avoid driving nails between studs, because electricians and plumbers run their wires and pipes through holes drilled in these locations. Hitting a nail while drilling will not only dull the bit, but it can also give your arm a nasty twist and injure your wrist. Again, skilled carpenters understand what it takes to help other tradespeople do their work well and are mindful of other workers.

Bracing walls

Before being raised, walls need to be squared and braced, either by installing structural sheathing like plywood or OSB or by using wall braces. Due to changes in the building codes, buildings are built stronger than they used to be to resist lateral forces produced by earthquakes and high winds.

As a new carpenter, I used to cut 2x braces into walls. Each piece of 2x was cut on a 45° miter to fit between the studs. Check it out on your next old – house remodel job. One brace would often take me an hour or two to finish, especially when cutting with a handsaw. Once carpenters began framing walls flat on the floor, we learned to lay a 1×6 brace diagonally across the face of the studs. Then we learned to cut slots in the studs with a circular saw to let in the brace and allow it to nail in flush.

Finally, about 25 years ago, an easy-to – install, L-shaped metal angle brace was introduced. Lay it across the framed wall diagonally from the bottom plate to the double top plate and trace a pencil mark along one side. With a circular saw, cut a slot 1 in. deep along this line into the plates and studs. Slip one flange of the brace into the slot and nail it to the bot­tom plate with three 8d nails. Drive one more 8d nail through the brace and into the first stud. At the double top plate, start an 8d nail alongside the brace and bend it over to hold it in place as the wall is raised. You’ll nail the brace per­manently to the other studs and plates after the walls are plumbed.

Nowadays, the house frame is often held plumb by nailing on structural exte­rior sheathing, which eliminates the need for diagonal wall braces. Some builders like to square and sheathe walls while they are flat on the floor. I prefer sheathing walls after they are raised, especially if the house is one story. (A couple of sawhorses are all you need as scaffolding for a single-story house.) Sheathed walls are heavy and hard to raise by hand unless you use a wall jack, a device that hooks under a wall and slowly raises it upright (Qual-Craft Industries; see Sources on p. 198). Further, when building on a concrete slab, you often have pipes in exterior walls that make it impossible to sheathe some sections of a wall.

If you sheathe the walls before raising them, make sure the wall is flat on the floor and that the bottom plate is directly on the wall chalkline. Toenail this plate to the wood deck about every 48 in. or so with 16d nails to hold the plate in place as it is raised. Check the wall for square by measuring diagonally from corner to corner (see p. 87), remembering that the wall is square when the diagonals are equal.

The sheathing panels have to lap down at least 1 in. over a concrete slab. On a wooden floor, the panels have to lap down over the rim joist and 1 in. onto the foundation. So first determine how

Подпись:far the panels must extend below the bottom plate, and then hold your tape the proper distance below the bottom plate and measure up 8 ft. (the panel length) on the wall studs. After marking this height at both ends of the wall, snap a chalkline on the studs. Nail in a row of blocks between studs at this line to give backing for nailing panel ends (9-ft. and 10-ft. panels are available, which allow you to sheathe the entire wall without having a joint).
Immune Dysfunction Related to Formaldehyde Exposure in the Home

P. F. is a 54-year-old woman who was in good health until 1981 when she moved into a new mobile home. Shortly thereafter she developed a digestive disorder with gas and bloating, severe insomnia, and a chronic cough with frequent epi­sodes of bronchitis. By the following year she was suffering from persistent fatigue and frequent respiratory infections, including her first case of pneumonia. She became sensitive to most prod­ucts containing formaldehyde, especially press – board. She noted that she experienced "brain fog" while shopping at the local mall. Her symptoms continued to worsen, and now included allergies, hypoglycemia, and lethargy.

P. F. consulted with several healthcare practi­tioners, including a pulmonary specialist, psychia­trist, hypnotist, nutritionist, and acupuncturist. None of them ever questioned her about the air quality in her home. Eventually she received the diagnosis of multiple chemical sensitivity from a physician with similar symptoms, and was fi­nally educated about the underlying cause of her health problems. In 1992, P. F. moved into a house that contained low formaldehyde levels, alleviat­ing some of her symptoms. Her house contained several healthful features such as radiant heat in concrete floors and the absence of pressboard and particleboard in its construction.

However, further modifications were neces­sary before her health could be stabilized and im­proved. All gas appliances were removed; filtration was installed for both air and water; and the me­chanical room was vented to the outside. By 1996, P. F. had regained her health. However, as is typi­cal in such cases, she still becomes symptomatic on reexposure to toxic fumes and must diligently maintain a"safe"environment for herself.

Discussion

Indoor formaldehyde is gaining recognition as a severe health hazard for occupants of homes and office buildings where chronic exposure occurs. Several organizations, such as the American Lung Association, have recommended that formalde­hyde levels not exceed 0.1 part per million. People who have already become sensitized to formal-

minor cracks. To maintain a good barrier, these gaps should be filled with an acceptable sealant. Since most of the initial cracking will take place during the first 18 months while the house is settling, it makes sense to wait and do all of these minor repairs at once. In pumice – crete, clay/straw, and adobe construction, the plaster may be applied directly to the wall ma­terial (see Division 4).

Although most plasters are inert, some contain polyvinyl additives that are subject to outgassing and should be avoided. Verify the presence of additives with the manufacturer prior to purchase.

One potential health hazard associated with plaster lies in the method by which it is dried. Because new plaster releases a signifi­cant amount of moisture, it is necessary to dry it out quickly so that other building ma­terials are not adversely affected. This is espe­cially problematic in the winter months, when cold temperatures and lack of ventilation slow down the rate of evaporation. The standard solution is to use gasoline or kerosene heaters, dehyde will have reactions at levels as low as 0.02 part per million. Approximately 50 percent of the population is exposed on a daily basis in the work­place to levels that exceed the 0.1 part per million limit. Mobile homes are notorious for causing health problems because of the extremely high levels of formaldehyde emitted from the plywood and particleboard used in their construction.3

Individuals who develop permanent health problems associated with formaldehyde exposure often relate the onset of their symptoms to a flu­like illness, which is diagnosed as a viral infection. However, the affected individual usually does not totally recover from this so-called flu and is left with general malaise, fatigue, and depression. Other symptoms can include rashes, eye irritation, frequent sore throats, hoarse voice, repeated sinus infections, nasal congestion, chronic cough, chest pains, palpitations, muscle spasms, joint pains, numbness and tingling of the extremities, colitis and other digestive disorders, severe headaches, dizziness, loss of memory, inability to recall words and names, and disorientation. Formaldehyde is an immune system sensitizer, which means that chronic exposure can lead to multiple allergies and sensitivities to substances that are entirely unrelated to formaldehyde. This is known as the "spreading phenomenon."

P. F. was typical of people whose multiple chemical sensitivities stem from formaldehyde ex­posure in that she consulted numerous physicians and specialists in an attempt to obtain a diagnosis. Physical examinations and standard testing usu­ally fail to identify the cause of such health prob­lems. Sometimes it is suggested that the patient is a hypochondriac or in need of psychiatric evalu­ation. When asked if there might be a connection between the symptoms and formaldehyde, most physicians either do not know or believe that formaldehyde merely causes irritation. As a result, the patient’s health continues to deteriorate from continued exposure.

a. Jack Thrasher and Alan Broughton. The Poison­ing of Our Homes and Workplaces: The Indoor Form­aldehyde Crisis. Seadora. 1989, pp. 50-72.

but we do not recommend this practice. The byproducts of combustion generated by this machinery are readily absorbed into the plas­ter and other building materials. The heaters also create an unhealthy environment for the workers exposed to their fumes. Electric heat­ers tend to be more expensive to run, with far less BTU output. We recommend a combi­nation of dehumidifiers when necessary and careful scheduling so that the plasterwork is done during a warm, dry period. Although heat may be required for the comfort of the construction team, it is far less significant than dehumidification to the proper drying of wet building materials. In summary, we suggest that the following instructions be included in your specifications:

• Plaster shall be free of additives.

• The use of gas – or kerosene-generated heaters within the building envelope is prohibited.

• Turbo high-velocity heaters, other elec­tric heaters, and blow-in heaters with combustion sources outside the building envelope are acceptable for adding heat to a building during cold-weather con­struction.

• If plaster is applied when weather condi­tions do not permit the building to re­main open and well-ventilated, electric dehumidification should be used. At tem­peratures under 70 degrees Fahrenheit, moisture levels should be maintained at approximately 45 percent relative air hu­midity using electric dehumidification until the building is dry enough to consis­tently maintain this range without the use of this equipment. Interior surface tem­peratures shall remain above 50 degrees. Refrigerant dehumidifiers may not work well when temperatures drop below 65 de­grees Fahrenheit.

Building outside corners and channels

Building outside corners and channels

Building outside corners and channels

Three-stud channel


Building outside corners and channelsBuilding outside corners and channels

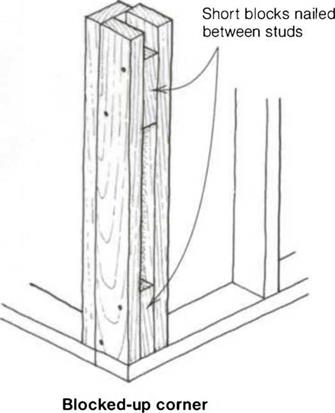
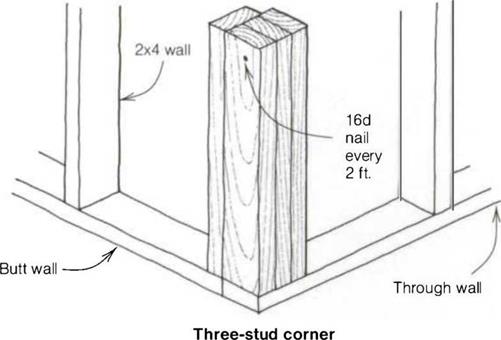
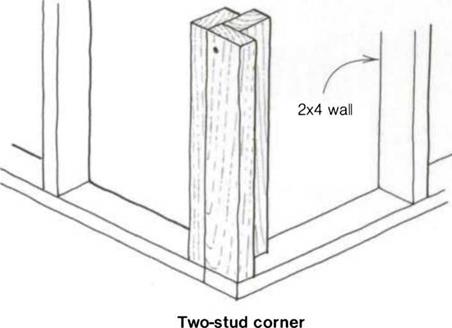
stud is nailed in flush with the end of the plate. The second stud is nailed in flat alongside the first so that when the intersecting wall is raised, it can be nailed into the flat stud.

A blocked-up corner can be built by nail­ing three equally spaced blocks in place of the full-length center stud used in
the three-stud corner. Whichever type you choose, the corner should provide adequate nailing not only for the inter­secting wall but also for interior and exterior wall finishes and trim. I person­ally prefer the solid, three-stud corner or channel. I try to use two straight studs for the side pieces and a bowed or knotted stud for the center piece.

Building outside corners and channelsUse 1 6d nails to fasten the studs at the corner to the plate. Hold the nails apart, one high and one low, just as you nailed the rough sills to the bottom cripples, and take care that the sides of the stud are flush with the sides of the plate. After the wall has been raised, you’ll nail the intersecting wall to these studs.

At channels, a stud is nailed in flat between two regular studs (see the top right drawing on the facing page). Tie channel studs together by driving three 16d nails into each side, one 2 ft. up from the bottom, one in the center, and one 2 ft. down from the top. This solidly built channel will provide adequate backing for an interior partition wall.

Once the outside corners and channels are nailed together and to the top plate, continue to nail the studs into the top plate, on the layout marks, with two 16d nails each. This is repetitive work, but you still need to pay attention.

Watch the layout marks so that every­thing gets nailed in properly, and when you come to a door or window opening, be especially careful that you nail the king stud on the X beside the mark showing the header location. It’s easy to nail the king stud on the wrong side of the layout mark, so be watchful.

When all the wall, king, and top cripple studs are nailed to the top plate, pull up the bottom plate and begin nailing it in place. Afterward, drive three 16d nails into both sides of the corner studs, 24 in. o. c., just like you did on the channel.

Nailing off the double top plate

While the wall is still flat on the floor, cut and fasten the double top plate. Structurally, the top plate is an impor­tant piece of wood because it ties the entire frame together. Without it, a building under earthquake or high wind stress can easily come apart at the joints in the single top plate. Although I still

Procession

While the principle of procession is still primarily about space, it also pertains to time. The best houses speak to us in a visual language with which we are all familiar. A gate in a picket fence that opens onto a narrow path that leads through a yard to an open porch that covers a door is a set of symbols we rec­ognize as signposts guiding us through increasingly private territory towards the threshold of someone’s clandestine world. Such "layering” (as it is often called) demarcates public space from semiprivate and private spaces. This serves to put us at ease, as it ensures that we will never be left to wonder if we have overstepped our boundaries as guests. Familiar symbols of domes­ticity, like the gable, can further comfort us by presenting the subconscious with the familiar language of home. A covered doorway that is clearly visible from the street not only lets us know where to enter a house, but indicates that we are welcome there. Generally, more private areas, like bedrooms and bathrooms, will be positioned towards the rear of a house and encountered only after more public realms, like the living room, have been passed.

Once inside a good dwelling, visual cues should leave us with no doubt that this is a home in the truest sense of the word. Some of the greatest residen­tial designs employ the same formal geometry as that of sacred architecture. When we approach and enter a well-designed church or mosque, we imme­diately find ourselves straddling its vertical symmetry. As we follow the axis between our eye and the cross or qibla at the far end of the room, we remain at the building’s center. This procession alludes to the structure’s significance as a symbol of the cosmos of which we are the center. A well-designed little house will remind us just as effectively as any cathedral that we are not merely witnessing divine beauty, but that we are that beauty.

A strong procession is created in the home by using some variation of the same three elements that are universally used to create it in sacred architec­ture: a gate, a path and a focal point. Moreover, all seven of the principles that have been presented here for residential design are none other than the same used to design a good cathedral. Attention to simplicity, honesty, proportion, scale, alignment, hierarchy and procession can help to produce a composition in which we participate as an indispensable component. So long as the prescriptions for good design are followed, even the tiniest hut will never seem twee or out of place. A well-composed, little house reflects the entire universe as no ordinary mansion can.

Third Street Cottages in Langley, WA

ЖД HARTLEY

Windows, Doors, Siding, and Exterior Trim

EACH PHASE OF A HOMEBUILDING PROJECT OFFERS A NEW SET OF CHALLENGES

and rewards, but the work that we do in this chapter is especially exciting. The big, stick-framed box we’ve built is about to receive a beautiful skin, with windows and doors added to make it weatherproof. By the time we’ve finished the tasks in this chapter, the house will show oil" its finished exterior appearance. And with the inside protected from the elements, we arc free to take on all the interior work ahead.

As I mentioned in chapter 4, its common practice in some parts of the country to sheathe wood-framed walls before they are raised rather than after. In other areas, sheathing is eliminated and diagonal steel or wood braces arc installed to nelp walls resist shear forces. Certain types of exterior siding (such as fiber cement) can be nailed directly to the studs and do not require sheathing underneath (see the sidebar on pp. 160-161).

We are sheathing this house with two materials that share the same —in. thick – ness. Structural wood panels (oriented strand board, or OSB) are used in the cor­ners, where they provide necessary shear strength. To cover the framing between the OSB panels, rigid foam insulation board is fastened against the studs and plates.

Подпись: STEP BY STEP

1 Install the Remaining Sheathing and the Rough Exterior Trim

2 Install the Housewrap and Flash Openings

3 Set the Windows and Doors

4 Complete Ventilation and Electrical Work

5 Install the Starter Strips and the Trim for Vinyl Siding

6 Install the Siding Panels

7 Finish the Soffits

8 Cover Exterior Trim with Aluminum Cladding

Windows, Doors, Siding, and Exterior Trim

Windows, Doors, Siding, and Exterior Trim

THE HOUSE IS READY FOR SIDING. This phase of construc­tion begins with felt on the roof and sheathing on the walls.


Lighter and less expensive than wood pan­els, rigid foam sheets are easy to handle, cut, and install. Their insulating value improves the home’s energy performance, augmenting the R-value of the fiberglass baits installed between the studs.

We won’t make much sawdust in this chap­ter. Instead, we’ll learn which tools and tech­niques are needed to install vinyl siding and prefinished aluminum coil stock. This plastic and sheet metal exterior is quite different from the redwood siding and trim I used ear­lier in my construction career. Depending on your budget, your personal preferences, and the local availability, there are many siding and trim possibilities. Out West, where I’ve done the most building, fiber-cement siding is often used; it has been installed on quite a few Habitat houses in western states. For a c. oser look at this type of siding, see the sidebar on
pp. 160-161. There are other affordable, low – maintenance siding options to consider, too.

A few of them are described briefly on the

і

facing page.

Vinyl Siding

It’s not difficult to understand the popularity of vinyl siding. It’s affordable, widely available, easy to install, and maintenance-free. Vinyl windows, vents, soffit material, and other components are designed to be compatible with vinyl siding, and there are plenty of colors, surface textures, and styles from which to choose. You’ll find vinyl siding on compact, affordable houses like the one fea­tured in this book, as well as on expensive custom-built homes.

Horizontal siding is the most popular type of vinyl siding, and most styles are designed to look like wood clapboards. Clapboard widths

Install ridge shingles and the ridge vent

At the ridge, many builders install ridge shingles on the roof ends with a ridge vent between them. An alternative is to install the ridge vent across the entire roof, even though the ends of the vent (located over the gable – end overhangs) are not functional. Some ridge vents do not require a cap of roof shingles, but others do. No matter which type of ridge vent von use, follow the manufacturer’s instructions regarding its installation (see the photo at left).

Ridge shingles arc easy to make—simply cut regular three-tab shingles into three pieces, as shown in the top left photo on the facing page. Lay the shingle upside-down on a piece of plywood and cut it with a utility knife. Start at the top of a slot and angle inward slightly in both directions toward the top of the shingle, cutting out a small triangle of waste. These shingles cover the ridge at both ends of the

MAKING RIDGE SHINGLES. Cutting a regular shingle into three pieces with a utility knife is an easy way to make these smaller shingles, which will cap the ridge.


READY FOR RAIN. Finishing the roof is a big step forward. High-quality roof singles should last 25 years or more and require little or no maintenance.


Install ridge shingles and the ridge vent

roof and arc overlapped to show a 5-in. reveal, just like regular shingles. The angled portion of each ridge shingle is covered by the exposed part of the next shingle.

To ensure that both the ridge shingles and the ridge vent are installed straight, I like to snap a blue chalkline about 5 n. to 6 in. down one side of the ridge. N’o one but the eagles I may see this, but it only takes a couple of minutes to do it right, and it’s important to
develop good habits. Fasten the ridge shingles securely with l/:-in. roofing nails. Some ridge vents must also be installed with long nails. Cover exposed nail heads with a good-size dab of roofing tar.

Nice work! This peak experience gives the house its most important protection from the elements. When a roof is installed prop­erly, you don’t have to worry about it for a long time.

Install ridge shingles and the ridge vent

With some people using nailers and other volunteers hammering, the panels go down quickly. . .

After lunch, we shift from sheathing to shingling. . .

The scent of cut wood is replaced by the smell of asphalt; pretty soon, we’re hoisting shingles onto the roof.

Install ridge shingles and the ridge vent

CLUBS AND LOUNGES

When you are dealing with clubs and lounges, you must pay attention to Board of Health requirements. Remember that if a restaurant will be serving alcoholic beverages, the building will be treated as a club or lounge for fixture require­ments. I should also point out that the tables we are using are from the Standard Plumbing Code. Local codes vary, so don’t use these tables for your actual work. I’m providing the tables for the sake of examples, not as the final word.

I’m not going to continue doing routine examples of table use. You should understand the basic concepts now. However, I will touch on the remaining categories and provide you with sample tables for determining minimum plumbing fixtures. Figure 9.9 is a table set up for clubs and lounges. There is nothing unusual about the table, so apply the same principles that we have been working with.

LAUNDRIES

Do-it-yourself laundries are required to have at least one drinking fountain and one service sink. Figure 9.10 will give you the basics for sizing fixture re­quirements of do-it-yourself laundries. Notice that this type of laundry might be allowed to operate with a single bathroom.

Eco-toxicity Tests

Despite most regulatory constraints being based on physico-chemical analysis, the hazard toward the natural environment represented by a contaminated solution or matrix cannot simply be assessed on the basis of the single analytical approach. The latter supposes that the contaminants can all be identified and are not too numerous (which is not always the case), but moreover, the chemical concentration does not provide any information about phenomena of synergy or antagonism between pollu­tants, and does not provide information about the toxicity towards living organisms (criterion H14 of the European Directive 91/689). Biological methods can do so (ADEME, 1999). The purpose of these methods is to assess the eco-toxicological danger of solutions and matrix. They are carried out in vitro on biological species chosen for their sensitivity to pollution (Ramade, 2000).

Eco-toxicity tests can also be carried out from solids thanks to extraction tech­niques (see Section 7.6.1 on leaching and percolation, above).

Biological test analyses range between classical tests on organisms measuring survival to tests on cells and enzymatic activity.

Water from different parts of the road pavements and embankments and their surrounding environment may be analysed for toxicity to plants, animals, fish and humans. The methods used for collection of the water for this purpose will be as for collection for analyses for chemical compounds. It is, however, especially important that the water quality does not change during the toxicity test. Therefore, it must be kept cool and in dark, and quickly transported to the laboratory (see Section 7.4.6).

The classical tests for deciding toxicity, biological degradation and bioaccumu­lation are tests according to international standards (OECD Guidelines, ISO). The tests use living micro and macro-organisms (plants, animals) or cell cultures to characterise the toxicity of tested single chemical compounds or mixtures of com­pounds. In vitro methods use cells or enzymes and proteins for the testing of single compounds or complex mixtures.

When assessing the environmental effects, the test solution is often subjected to several test organisms such as algae, crustaceans and fish to search for differences in the sensitivity of organisms at different trophic levels of the ecosystem.

Table 7.4 Some examples on standard toxicity tests

Category

Description/species

Test code

Toxicity

Algae

Growth inhibition, Selenastrum capricornutum

OECD210, ISO8692

Crustaceans

Immobilisatione, Daphnia magna

OECD202, ISO6341

Fish

Death, Salmo trutta 96 h

OECD203

Degradation

Micro-organisms

Easy degradation

OECD301, A, D,F

Bioaccumulation

Fish

Bioaccumulation, fish

OECD305

Codes refer to OECD (Organisation for Economic Co-operation & Development) and ISO (Inter­national Standards Organisation) test procedures

Eco-toxicity tests (Table 7.4) may be classified as acute tests or chronic tests. Acute tests are tests with effects showing within a short time. A classical acute test is the measurement of the survival of organisms. The results are recorded as the concentration at which half the number of test organisms survive/die during the test period (LC50, Lethal Concentration). If the test period is 96 h the concentration referred to will be 96 h LC50. The chronic tests are conducted during a longer pe­riod at lower test compound concentrations. The end point is not death, but some secondary sub-lethal effect.

7.7 Concluding Remarks

This chapter presents a general overview of water and soil sampling and analy­sis in the road environment. The main principles of data collection and storage, and methodologies for sampling design are presented. Furthermore, water and soil sampling procedures as well as in-situ and laboratory measurements and analyses methods are described, with an elucidation about their usefulness, potentialities and fields of application.

It is intended that the information presented in this chapter, as well as the biblio­graphic material that is referenced at its end, can provide a sufficient and valuable base from which the reader can consider the best choices for contaminant sampling and analysis methodologies, accordingly to the purpose of his/her investigation, and considering the abilities of available methods and tools as presented above.