|
Posted by admin on 21/ 11/ 15
When you think about sealing a house, remember how much frigid air can go through a small opening in a sweater or a jacket. Even a tiny hole in a woolen mitten can make your finger numb with cold. The same thing can happen in a house. We had single – glazed, double-hung windows in that old prairie home where I grew up. In the spring, the windows were nice—we could open them wide to let in fresh breezes and the songs of meadowlarks announcing warmer weather. In the winter, though, that loose-fitting sash was a fright. My mother gave us thin strips of cloth to stuff between the window frame and the sash in hopes of slowing the icy winds that would soon roll down from the north.
Today, we have the materials and the knowhow to seal a house effectively. The materials and techniques vary, depending on the type of sealing work that needs to be done.
Sealing work begins early
Sealing a house to limit air infiltration and energy loss begins early in the construction process and continues until the last bit of insulation work is done. As explained in chapter 3, the mudsill should be sealed to the foundation with a resilient gasket material, known as sill seal, or with two thick beads of silicone caulk. Before the exterior walls are raised, it’s also a good idea to apply two beads of silicone sealant beneath their bottom plates. If this was
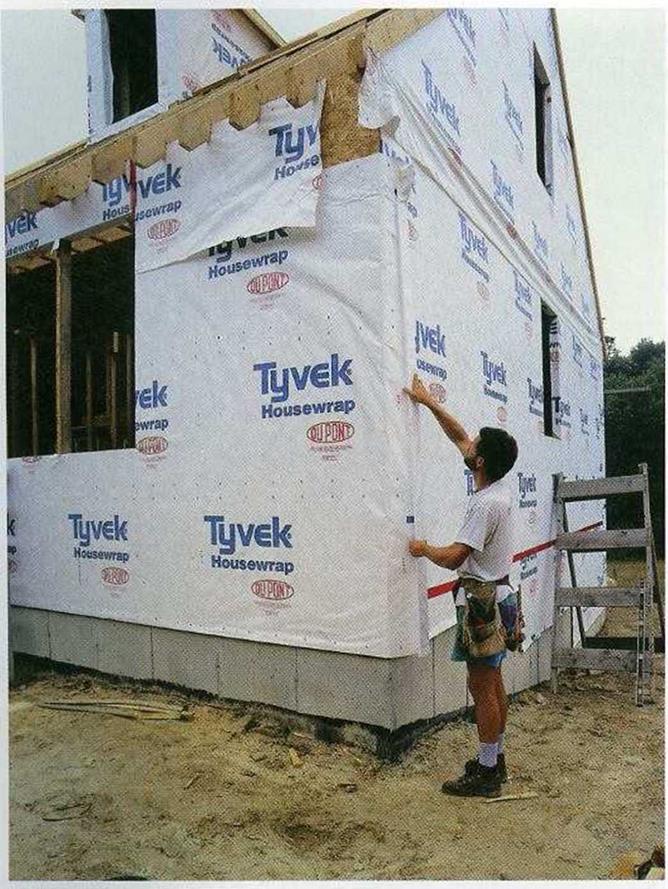 ![STEP 1 Seal Penetrations in the Walls, Ceilings, and Floors Подпись: HOUSEWRAP ACTS AS A WATERPROOF WINDBREAKER. Tyvek and other modern housewraps are installed beneath the exterior siding. They block wind and water while still allowing vapor to pass through. [Photo ® Mike Guertin.]](/img/1312/image734_0.gif) not done for some reason, you can run a heavy bead of sealant where the inside edge of the bottom plate meets the subfloor. not done for some reason, you can run a heavy bead of sealant where the inside edge of the bottom plate meets the subfloor.
Once the walls are framed, its important to install insulation in the sections that will be inaccessible after the wall sheathing is applied. As discussed in chapter 4, these areas include the voids or spaces in the framing for corners, channels, and headers. Likewise, pay attention to areas where tubs and shower units will be installed in exterior walls. You don’t want the stud cavities in these areas to be blocked off before you have a chance to insulate them.

Part of a sealing strategy may include housewrap. Modern housewraps, such as Tyvek and Typar, are wrapped around the framed exterior walls and stapled over the exterior sheathing or (if exterior sheathing is not used) directly over studs and plates (see the photo at left). Housewrap is effective at stopping cold air infiltration during winter months. And at all times of the year, it serves as a drainage plane behind the exterior siding, directing water that gets behind the siding downward, instead of into the wall cavity. (For details on installing housewrap, see pp. 153-155).
When installing windows and doors, apply a generous bead of sealant on the flange or the back of the exterior trim. Do this just prior to installation, as explained in chapter 6. Make sure that kitchen soffits and dropped ceilings (especially those with heating or cooling ducts inside) are completely sealed off from wall and attic spaces. Use drywall or OSB, and do it now, if you haven’t already. These steps help prevent moisture-laden indoor air from moving into wall or attic areas, where it can condense and create major moisture problems.
Spray-foam insulation can handle a multitude of sealing tasks
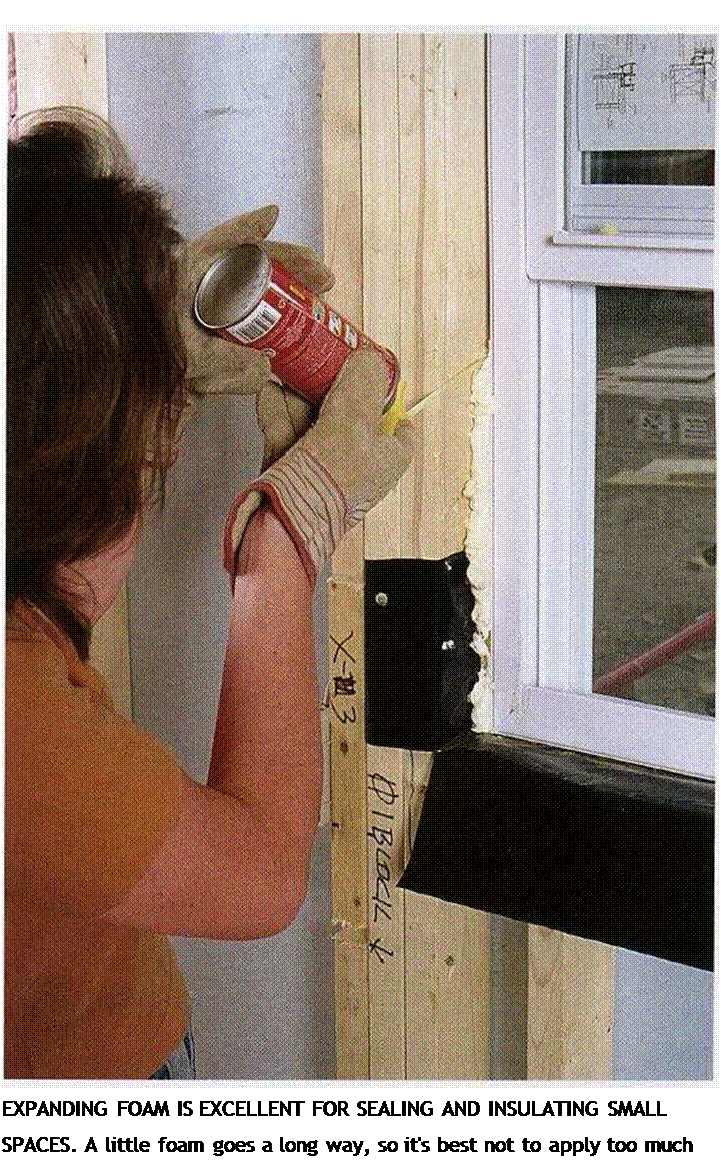
Packaged in a pressurized can, foam insulation is extremely useful when it comes to filling gaps; sealing openings; and insulating narrow, confined spaces where fiberglass insulation doesn’t easily fit (see the photo at right).
Although it’s not cheap, spray-foam insulation is so helpful that I don’t build a house without it. It’s available in expanding and nonexpanding versions. I prefer the expanding type, because it does a better job of spreading out to fill voids. If you apply too much and the foam starts to expand beyond the intended area, don’t worry. Come back later, after the foam has hardened, and trim off the excess with a utility knife. Don’t try to wipe off excess foam when the material is still sticky; you’ll just create a mess. Here are some of the areas in the house where spray foam can be used:
IN HOLES IN BOTTOM PLATES. Use foam to fill the spaces around plumbing pipes, electrical or cable wires, and ducts that pass through the bottom plates of walls. It’s especially important to seal off these routes, which can bring cold air into your living space, when building on a crawl-space foundation.
IN HOLES IN TOP PLATES. It’s very important to seal holes in the top plates of walls. This helps prevent moist indoor air from entering a cold attic, where it can condense and cause moisture problems.
AROUND WINDOWS AND DOORS. I’ve often seen folks use a screwdriver or another narrow tool to stuff fiberglass insulation between trimmers and king studs (see the photo on p. 198). Although this helps to some degree, fiberglass insulation loses insulating value
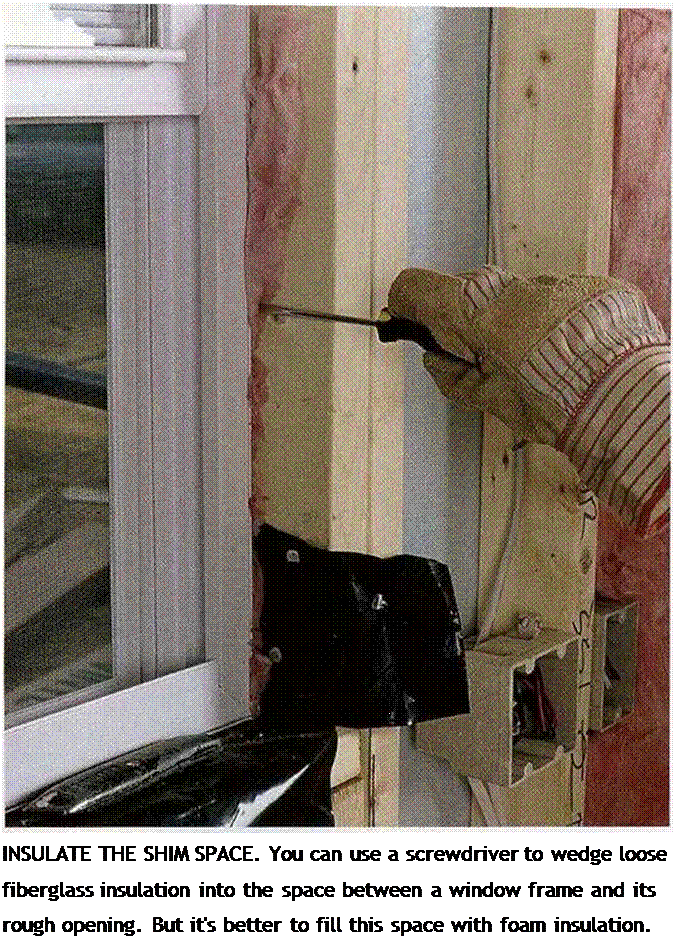 when it is compressed. Its better to insulate narrow spaces with foam insulation. The spaces between the window or door jamb and the rough opening can also be “foamed,” but be careful not to apply too much expanding foam in those areas. Since jambs are usually only}/ in. thick, the foam’s expansive action can cause them to bow inward. when it is compressed. Its better to insulate narrow spaces with foam insulation. The spaces between the window or door jamb and the rough opening can also be “foamed,” but be careful not to apply too much expanding foam in those areas. Since jambs are usually only}/ in. thick, the foam’s expansive action can cause them to bow inward.
AROUND PLUMBING AND ELECTRICAL LINES THAT PASS THROUGH EXTERIOR WALLS. If
your house has exterior faucets, seal the hole around each one with foam insulation. Holes for outdoor electrical lines and outlet boxes in exterior walls should also be sealed.
Caulks and sealants can be useful on small openings
For Filling small gaps (up to Z in. or so), caulks and sealants sometimes work as well as, or better than, foam. A good sealant has
Posted by admin on 21/ 11/ 15
THE OLD HOUSE I WAS BORN IN STILL STANDS out there on the prairie. When I was a child, the house was simply unbeatable in the wintertime. We definitely spent more dollars trying to heat the house than we did on the mortgage. Nowadays, the house has new doors and windows, insulation in the ceiling, and a real heating system— not just an old iron stove in the kitchen. But there are still plenty of cracks and gaps in the walls for those ever-present western winds to howl through.
Thankfully, we don’t build houses like we used to. Today, there are materials and methods available that allow us to design and build energy-efficient houses that hold heat during the winter and keep it out during the summer. But attaining high levels of comfort and energy efficiency is not always a simple feat. In fact, it can be the most technically complex aspect of building a house.
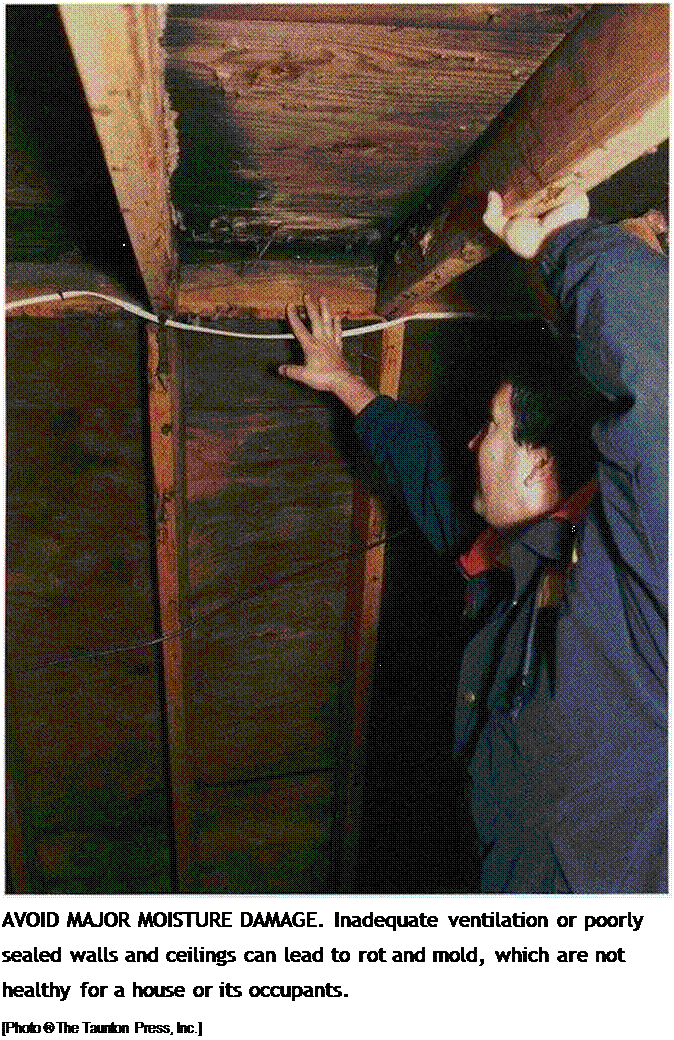
The products that we use to seal, insulate, and ventilate houses may do more harm than good if they’re not installed correctly. Common problems include poor indoor-air quality, peeling paint on interior and exterior surfaces, moldy bathrooms, and rotten wood in walls and ceilings (see the photo on p. 194). Sometimes we solve one problem (such as cold air infiltration during winter months) and cause another
1  Seal Penetrations in the Walls, Ceilings, and Floors Seal Penetrations in the Walls, Ceilings, and Floors
2 Insulate the Walls, Ceilings, and Floors
3 Install Vapor Barriers (if Necessary)
4 Provide Adequate Ventilation
1Q? I
(high concentrations of stale, humid indoor air, for example). And thanks to the significant climate differences in this vast country of ours, what works in Maine may be ineffective in Texas.
Although there is no standard approach to building a tight, comfortable, and energy – efficient house with good indoor-air quality, its not difficult to achieve those goals if you understand how a house works in terms of insulation, airtightness, and ventilation. This is especially true with the basic, affordable
houses that Habitat builds. This chapter explains the concepts, materials, and techniques to make your house comfortable, healthy, and energy efficient no matter what the temperature is outside. To expand your knowledge, see Resources on p. 278.
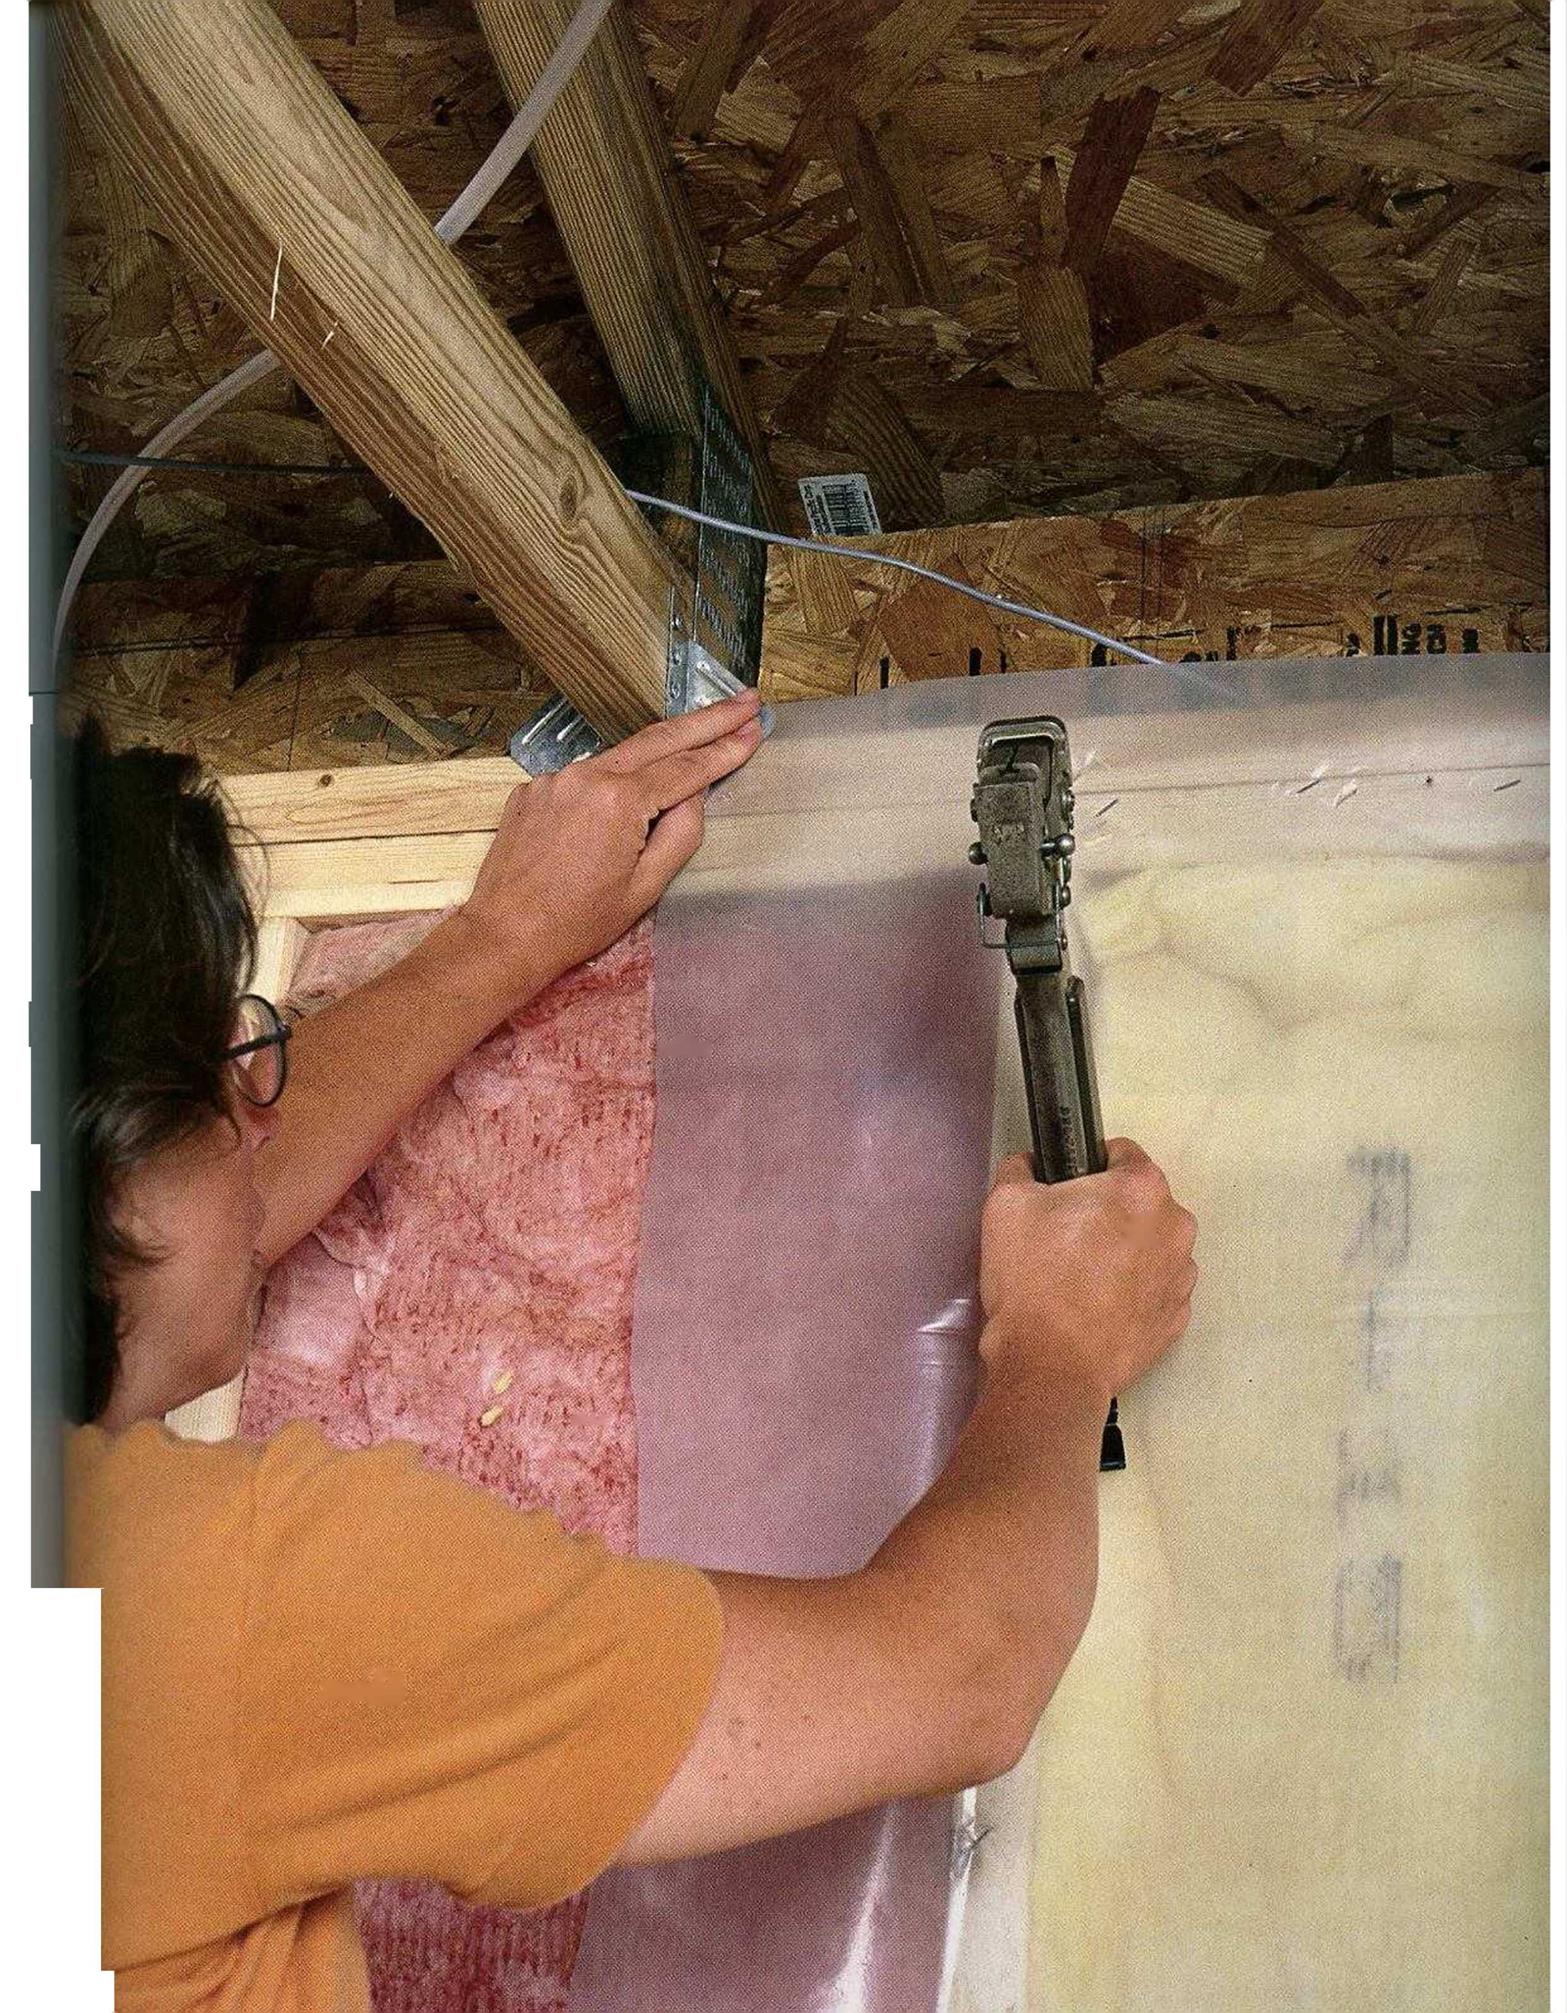
Before we dig into the technical details, here’s a final thought to keep in mind as you tackle the sealing, insulation, and ventilation work in your building project: Try to keep everyone aware of these important issues. When houses were built with simple materials, they were both leaky and energy /«efficient. People working in the trades didn’t really need to understand the work of those preceding or following them. To build a safe, energy – efficient, nontoxic house, everyone involved in its construction must have more knowledge and work together. Otherwise, a house that was perfectly sealed and insulated can be left riddled with holes by a plumber, electrician, or heating contractor who was “just doing his job.”
Sweaters, Windbreakers, and Rain Gear
Don’t worry; we haven’t suspended our home – building work to look through the L. L. Bean catalog. But what you already know about sweaters, windbreakers, and raincoats will help you understand the way sealing, insulating, and moisture-protection treatments work together in a house.
Start with a sweater and a windbreaker— just what you need to wear on a cold, windy day. A house exposed to frigid temperatures and icy winds also needs a sweater and a windbreaker. Insulation, exterior siding, and housewrap provide this protection. In fact, housewraps like Tyvek and Typar® act like a Gore-tex® raincoat, blocking wind and water while still allowing vapor to pass through.
Materials CODE REQUIREMENTS FOR INSULATION
MOST LOCALES have an energy code that defines how well insulated your house must be. Check with the building inspector in your community for this information. Rather than requiring so many inches of fiberglass or rigid foam, these codes define insulation requirements in terms of R-value, or resistance to heat flow. The higher the R-value, the greater the insulating value. For example, code may require that exterior walls be R-ll or R-19. As it turns out, a 2×4 wall with fiberglass insulation designed for a 3V?-in. wall has an R-value of 11. A 2×6 wall with 5Уг-іп.-thick fiberglass has an R-value of 19. Don’t try to stuff R-19 fiberglass batts into a 2×4 wall, though. Carpenters say that’s like trying to stuff a 1000-lb. gorilla into a 500-lb. bag. It just doesn’t work.
Remember—code requirements set minimum standards. As far as building materials go, insulation is relatively inexpensive, so it’s often cost effective to install more insulation than what is required by code. A house with lots of insulation (in the attic, for example) will not only reduce your heating bill for years to come but may also save you money up front by reducing the size of the heating or cooling system you need to install!
This helps prevent moisture buildup, both in our clothing and inside the walls of a house.
As we work through the steps ahead, you’ll see that there are different sealing, insulating, and ventilation tasks that need to be done at different stages of the construction process.
Pay attention to the tasks associated with each phase of construction and your house will repay you with maximum levels of comfort, longevity, and energy efficiency.
Posted by admin on 21/ 11/ 15
The most difficult part about building any railing is making sure the posts are well secured to the deck or stairs. Remember:
People will be leaning against the railings, so make them strong. A post that extends up to the roof framing will be solid and secure.
Short posts that support only the railing are more of a concern. Railing posts should be evenly spaced across a deck or porch and no more than 6 ft. apart. A good height for a railing is 36 in. to 42 in.
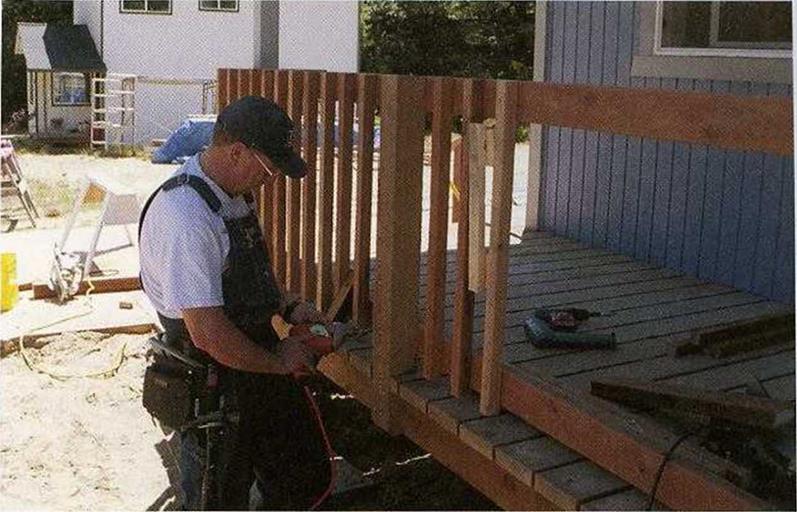
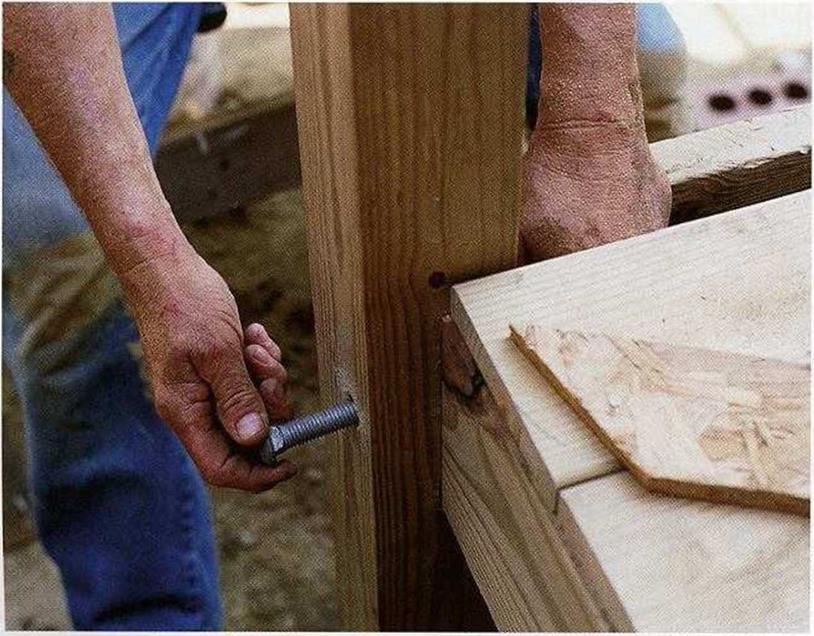
I like to notch railing posts to fit against the rim joist and on top of the decking (see the photo below). A notched post, installed with a couple of %-in. or l^-in.-dia. carriage bolts, makes for a strong and attractive installation. For a 4×4 post, make notches I/ in. deep and long enough so the notched post can cover the full width of the rim joist. If the top
of the railing posts won’t be covered by a 2×4 or a 2×6 cap, consider letting those posts run a few inches higher than the top rail and chamfering the top of each post. This technique, explained in the sidebar on the facing page, can enhance the appearance of any railing.
Posts for stair railings can be fastened to an
outer stair stringer. Use carriage bolts rather than screws for stronger connections. At the base of a long stairway, where extra strength is
required, the post can be anchored in concrete or to a steel post base embedded in concrete.
RAILS AND BALUSTERS. Once the posts are installed, cut and install the rails. I use PTor cedar 2×4 rails for most of my deck railings. They can be fastened to the outside or the inside of posts, depending on the overall design of the railing. Some builders even notch their posts to accept the rails. No matter which method you choose, secure each rail-to-post connection with two 3-in. deck screws. If your railing design calls for top and bottom rails, install the bottom rail ЗА in. from the deck.
If you like the look of the railing we installed on the Charlotte house, set up a chopsaw to cut balusters 31A in. long, with a 45-degree angle on the top to let water run off. Install the tops of the balusters 1 in. below the top of the top rail, and use 2H-in.-long deck screws to attach each baluster at both the top and the bottom. Using a gauge between balusters is helpful and speeds the process (see the bottom photo on the facing page). Just make sure you keep the balusters plumb as you attach them. Check every now and then with a 2-ft. level, and correct gradually, if necessary.
The handrail on a staircase should be about l A in. wide so that it can be grasped
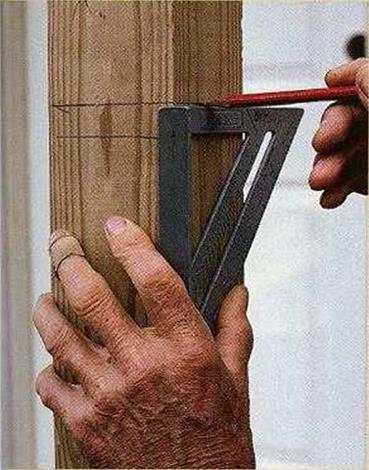   
CHAMFERING THE TOPS of railing posts or the ends of beams is a nice finishing touch you can add when building a deck or a porch. A plain, square – topped post looks clunky. But in a few minutes’ time, you can give the post a more distinguished appearance. All you need is a Speedsquare™ and a circular saw. For best results, use a sharp, finetoothed blade on your saw. If you haven’t tried this technique before, practice on a spare length of 4×4. Also, you may find it easier to make chamfer cuts "on the flat," with the 4×4 set on some sawhorses.
It takes a little more experience with a circular saw to chamfer a post that’s already installed vertically. Here’s how to chamfer a post in four simple steps: Lay out the chamfer lines. As shown in the photo at left, a pair of lines, spaced about 1 in. apart, should extend around all four sides of the post. The upper line represents the length of the finished post.
Cut the post to length. Make a square – end cut to sever the post along the upper layout line. Two cuts from opposite sides of the post should do it
Make the chamfer cuts. Loosen the angle adjustment knob or lever ц on your circular saw, and adjust the cutting angle to 45 degrees. An exact 45-degree angle isn’t necessary, but be sure to tighten the adjustment securely. Now make an angled cut along each side of the post, following the layout line. If you have trouble maintaining a straight cut, clamp a Speedsquare to the post to guide the base of your saw. Another trick for ensur ing a smooth cut is to retract the blade guard with your forward hand before you start to cut.
Sand the post smooth. Use some 120-grit sandpaper to smooth out any rough areas. You can also slightly soften sharp corners.
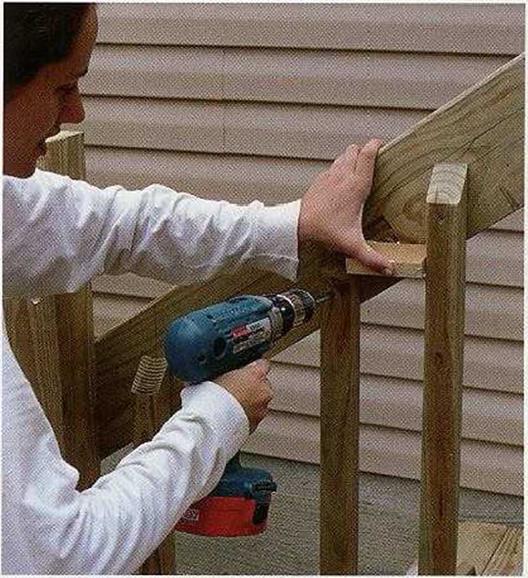 
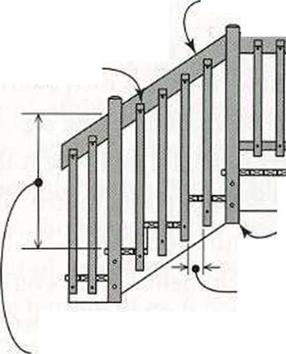
easily as people go up and down. A 2×6 on edge can be used for a top rail. Position it so the top edge is 32 in. to 36 in. Plumb from the front edge (nose) of the stair treads.
Balusters for the stairs must be individually measured for length on this stair handrail.
Keep the tops of the balusters 2 in. below the top of the handrail, as shown in the photo at right. Screw the bottom of each baluster to the stringer. The area under the stairs (and under the porch) can later be hidden with 4×8 vinyl or wooden lattice panels.
Posted by admin on 21/ 11/ 15
Most codes require railings only when a deck is more than 30 in. off the ground. But you may want to build a rail on a lower deck anyway, for appearance if not for safety. The basic structure of a typical deck or porch railing consists of posts, rails, and balusters, which are also called uprights or pickets.
Even with basic PT lumber, many designs are possible. For example, you can eliminate the bottom rail, extend the balusters down, and fasten them to the rim joist. You can
|
include a 2×6 “cap” installed over the tops of the posts and over the top rail. And you can use a chopsaw to bevel one or both ends of each baluster to give your work a sleeker appearance. There are even decorative FT balusters, along with shaped top and bottom rails that are grooved to hold baluster ends. Also available are quality vinyl railings that are attractive and maintenance-free. As I mentioned at the beginning of this chapter, it’s worthwhile to investigate the design possibilities, so take a drive around your neighborhood and visit a lumberyard or home center that carries these building supplies. No matter what the design, make sure the railing meets code requirements (see the sidebar below).
|
|
|
POSTS, RAILS, AND BALUSTERS MUST BE PRECISE. The clean lines on a finished porch or deck depend on accurate railing installation. Here, the posts are notched to fit against the rim joist. The ends of the decking boards overhang beyond the rim joist, even with posts.
[Photo © Larry Haun.]
|
|
|
TO MAKE PORCH RAILINGS and stair handrails both safe and legal, you need to know the basic rules and regulations that dictate how they’re built. The specs below cover most areas of the country, but codes do vary from region to region, so always check with your local building department.
|
|
|
In most regions, any deck higher than 30 in. off the ground needs a railing.
Stairs with more than three risers (three steps) need a handrail.
Stairs that are 44 in. wide or more need a handrail on both sides.
The height of a handrail, measured from the nose front edge of the stair tread, should be between 32 in. and 36 in. The handrail should extend the length of the stairs.
The width of a handrail must be between 1 in. and 2 in. so that it’s easy to grab.
The railing height on a deck guardrail should be between 36 in. and 42 in.
The balusters used on porches and stairs should run vertically, so children can’t climb on them. The spacing between them must be 4 in. or less, so children can’t squeeze through.
The bottom rail must not be more than 4 in. above the deck.
|
|
 |
|
Hold balusters down 2 in. so handrail is easy to grasp.
|
|
|
4×4 4 in. from
post deck maximum
4-in. maximum space between balusters
|
|
|
Height of rail must be between 32 in. and 36 in.
|
|
|
Building codes regulate heights of rails and spacing of balusters. Check with your local building department for your area’s requirements.
|
|

Posted by admin on 21/ 11/ 15
With the floor and stair framing complete, you can start installing the decking boards and stair treads. I mostly use 2×6 PT decking, because the ready supply of redwood decking disappeared along with the big trees.
Cedar decking is available in some areas, but at a premium price. More and more people are using plastic decking material or deck boards that are a combination of wood chips or sawdust and recycled plastic. Although the up-front cost of this high-tech decking is greater than that of PT wood, the new materials don’t warp, crack, or require regular finishing treatments to maintain an attractive appearance. They are worth considering.
If you’re installing wood decking, keep in mind that many boards have a tendency to cup because of their circular grain structure. If you see a curve in the end grain of a board, lay it so the curve forms a hill rather than a valley. Should cupping occur sometime in the future, water will run off rather than pool. Exposed PT or cedar decking needs to be treated with a good deck finish every other year or so.
  On narrow decks, the boards are often installed at a right angle to the house. I usually attach the first board on the end of the deck where the stairs are (or will be). Let the deck board overhang the end framing by about 1 in. I cut the boards slightly longer than the On narrow decks, the boards are often installed at a right angle to the house. I usually attach the first board on the end of the deck where the stairs are (or will be). Let the deck board overhang the end framing by about 1 in. I cut the boards slightly longer than the
 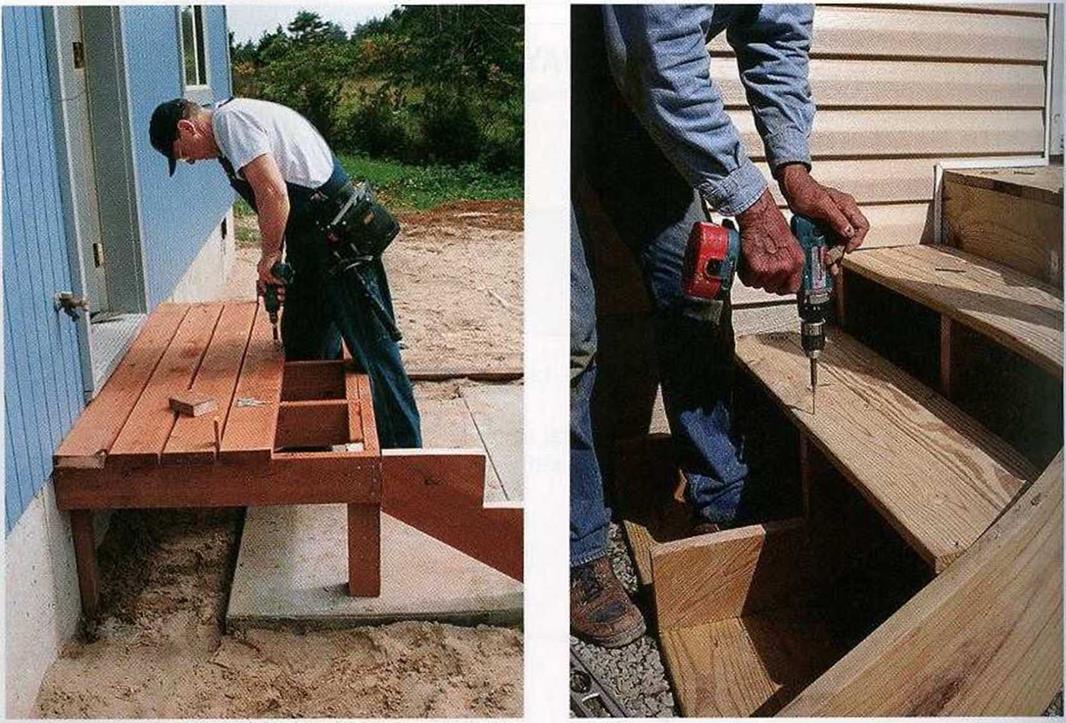 ATTACH THE STAIR TREADS. It takes two boards to form one step. With open risers, an outdoor stairway is easier to keep clean. ATTACH THE STAIR TREADS. It takes two boards to form one step. With open risers, an outdoor stairway is easier to keep clean.
deck. With the boards a bit long, you can snap a chalkline and cut them off evenly so everything looks neat and proper.
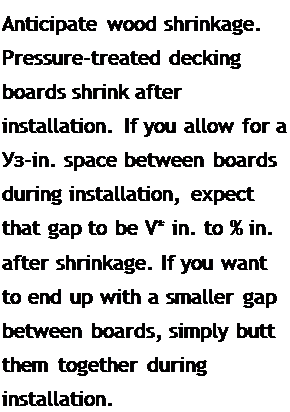
I use 16d nails as spacers between wood decking boards. Placing one nail near the house and another near the edge of the porch maintains consistent spacing. Where a board crosses a joist or beam, drive two decking screws. Those steel screws have a galvanized or polymer coating that protects against rust, and their coarse threads drive quickly and hold much better than nails do. To install VA-in.- thick decking, use З-in. screws. To install 5/4 boards, 2A-in. screws will do. Although it takes a bit more time, I predrill the screw holes in the decking with a %6-in.-dia. bit.
This makes it easier to pull the boards tightly against the framing and just about eliminates the possibility of splitting a board.
When you reach about 6 ft. from the end beam, calculate how many more boards will be required to cover the distance, and check whether the distance is equal along the ledger and along the rim joist. You may need to fine-
tune the spacing between boards to restore parallel orientation and to make sure the final board is of a reasonable width.
Once all the deck boards are in place, snap a chalkline across the front edge about 1 in. from the rim joist, then cut them straight with a circular saw. Tack a lx to the deck to guide the saw and ensure a good-looking, straight cut. Take your time and do a good job. This is finish work, and it must look right.
Posted by admin on 21/ 11/ 15
If you’ve done the stair layout and cutting correctly, the stringers should fit against the rim joist (or beam), with the level cut or cleat for the top tread located ТА in. down from the top of the deck framing. Snap or mark a line at I that level on the rim joist so you can make I sure the stringers are aligned. I
There are several ways to secure the I
stringers to a deck beam or rim joist. Some – I times the stringer butts against a post, so it I can simply be nailed to the post and to the I beam or rim joist. In other situations, a metal I strap can be nailed to the top of the stringer, I then to the beam or rim joist (see the bottom I photo at left). Still another option is to fasten I a PT plywood hanger board to the top plumb – I cut edge of each stringer, then nail the board I to the beam or rim joist (see the illustration I on the facing page). I
For a set of 36-in.-wide closed stringer I stairs, cut a hanger board 14 in. high and I
39 in. wide, then nail it flush with the top of I
the deck s 2×6 rim joist. Then measure down | 7Vi in. from the top of the rim joist, mark the 1 board on each end, and strike a line across it I at that height. Drive 8d galvanized nails I through the back of the hanger board and I into the stringers below the 2×6 rim, making sure the top of the upper cleats on both out – I board stringers and the top notch on the inte* I rior stringers land on the line you snapped on the hanger board. To stiffen the top of the I stairs, cut and install PT 2×4 blocking between the stringers.
Next, cut a 36-in.-long PT 2×4 kicker board I and nail it into the notch of the middle stringer and to the outside stringers. The kicker board
can be fastened to the concrete landing or base with hardened nails, steel pins, or concrete anchors.
Now that you know how to build a simple set of stairs—a good skill to learn for its own sake—let me tell you about an alternative to wooden stringers. You can buy manufactured metal stringers with a 7-in. rise (see Resources on p. 278). This means that you will have to control the overall distance (from the concrete landing to the finished surface of the deck) so that its a multiple of 7—either 14 in., 21 in.,
28 in., or 35 in. I like metal stringers because they are galvanized and stand up well outdoors. Holes in the metal stringers allow you to attach treads with screws or small bolts.
|
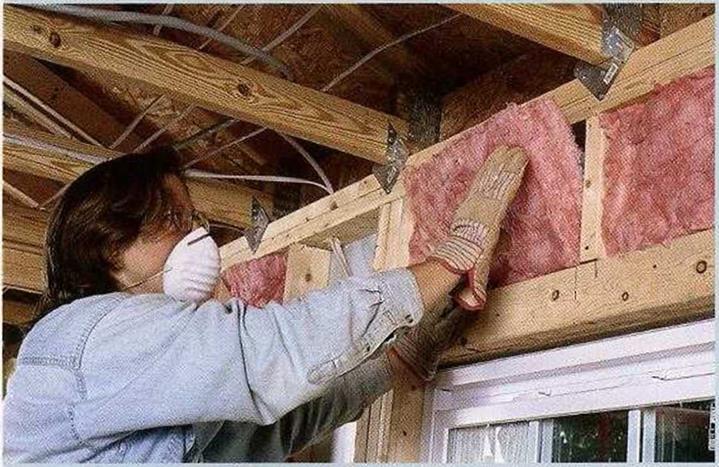
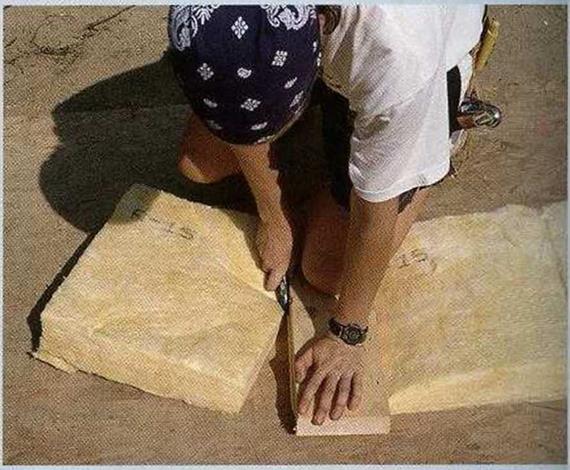
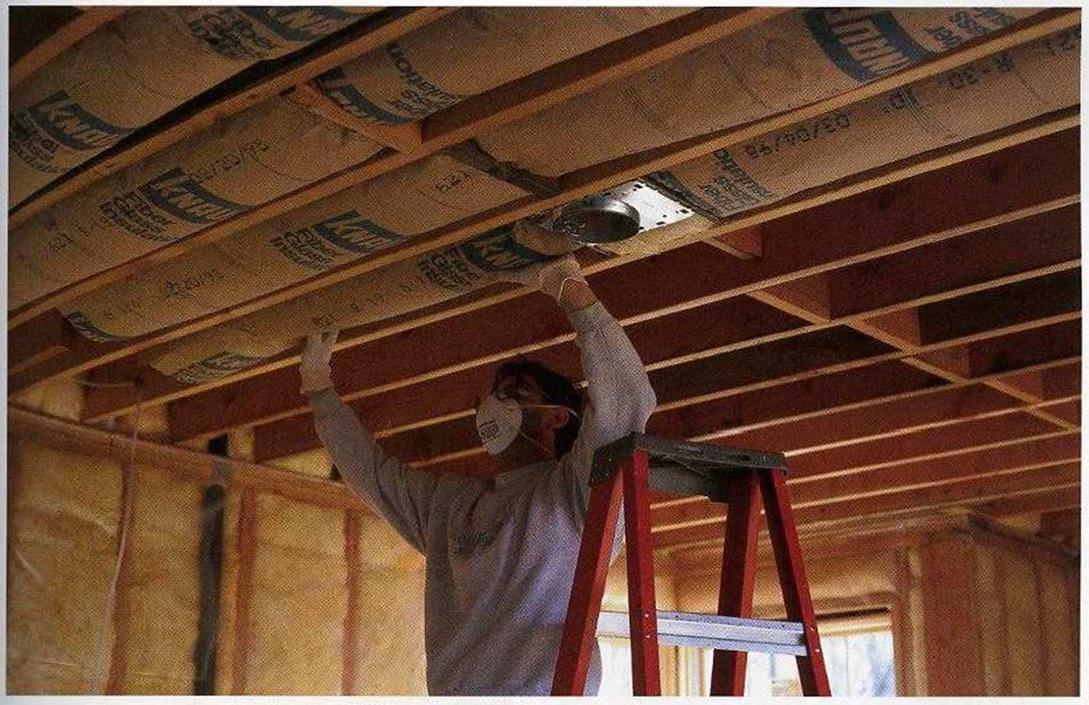 INSULATE THE CEILING. Be sure not to leave any gaps between batts that butt together. Heated air that enters the attic can cause severe moisture problems, especially in cold climates.








![STEP 1 Seal Penetrations in the Walls, Ceilings, and Floors Подпись: HOUSEWRAP ACTS AS A WATERPROOF WINDBREAKER. Tyvek and other modern housewraps are installed beneath the exterior siding. They block wind and water while still allowing vapor to pass through. [Photo ® Mike Guertin.]](/img/1312/image734_0.gif) not done for some reason, you can run a heavy bead of sealant where the inside edge of the bottom plate meets the subfloor.
not done for some reason, you can run a heavy bead of sealant where the inside edge of the bottom plate meets the subfloor.


 when it is compressed. Its better to insulate narrow spaces with foam insulation. The spaces between the window or door jamb and the rough opening can also be “foamed,” but be careful not to apply too much expanding foam in those areas. Since jambs are usually only}/ in. thick, the foam’s expansive action can cause them to bow inward.


 On narrow decks, the boards are often installed at a right angle to the house. I usually attach the first board on the end of the deck where the stairs are (or will be). Let the deck board overhang the end framing by about 1 in. I cut the boards slightly longer than the
 ATTACH THE STAIR TREADS. It takes two boards to form one step. With open risers, an outdoor stairway is easier to keep clean.