Wood siding, such as shingles or clapboard, is often better off when finished with stain rather than with paint. Solid-color exterior stain gives wood a paintlike appearance, hut it does not crack or peel the way paint can. To let more of the wood grain show through, use semitransparent stain, which is available in many wood tones and colors.
Whether you choose paint or stain, make sure you buy a good-quality finish that is rec-
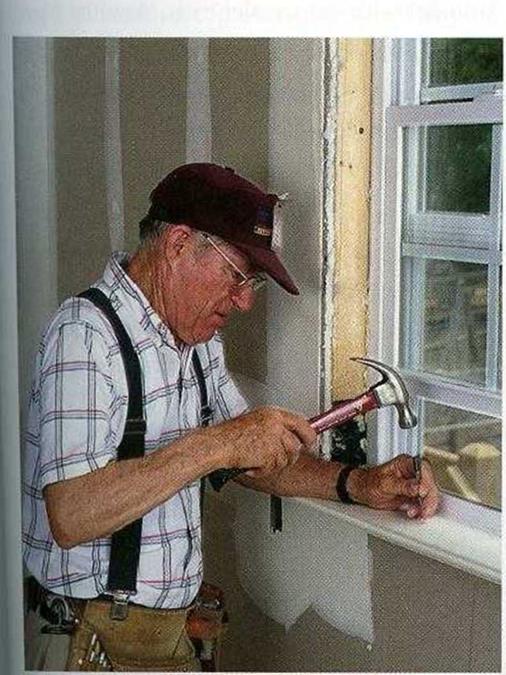
SET THE NAILS. Before painting any trim, use a hammer and nail set to drive all nails about Vs in. below the surface of the wood. Fill the holes with wood putty and sand them smooth.


ommended for the use you have in mind. For example, you don’t want to paint a deck with porch enamel or use interior trim paint on exterior wood. The pressure-treated lumber used on many decks needs a penetrating sealer or stain rather than paint. Upright pressure – treated porch posts can be painted or stained with a solid color once the wood is clean and dry. Find out which brands and formulations knowledgeable painters and paint suppliers in your area recommend.
Do the prep work for exterior finishes
Exterior siding and trim must be painted on all sides, not just on the surfaces that will be
exposed to the weather. Back-prime the trim before installation. On doors and windows with wood casings, make sure you back-prime all casings before installing the unit.
Take the time to fill all nail holes with exterior-grade wood putty. Don’t caulk under the lap between siding boards or where siding meets trim because you don’t want to trap water behind the siding. There is no need to caulk or seal under the lap between siding boards because any moisture that gets behind the siding can drain out between the laps. Always use a good-quality, long-lasting, paint- able, exterior-grade caulk. Mask and cover any decks or railings to protect them from drips and spills. Cover the foundation or walkways to keep paint from staining the concrete. Take the time to do it right. There is no excuse for being sloppy with paint. Drops of paint on a wood deck or concrete foundation will look bad for years to come.
Apply exterior paint
Much can be done with exterior paint to give a house a classy style. There is an old house in our neighborhood that has just been repainted lavender with light-violet trim. Now, this may not be your choice of colors, but it brightens up our neighborhood in a nice way. 1 like it better than the Coos Bay gray that makes so many buildings look like army barracks. A good

You can’t have too many volunteers when it’s time to paint. . .
We use brushes and rollers of all different sizes. . .
Painting a new house is great because you don’t n to worry about getting paint on carpets and furniture People with rollers paint the walls and ceilings qu but it’s just as satisfying to work on trim with a brus


PAINTING DOORS


choice of colors can make a home warm and inviting. Some paint dealers have a computer program that shows you what different color combinations will look like on your house.
Give your house a virtual paint job to test out various color schemes.
Once you have selected the color, try rolling paint on lap siding with a roller that matches the width of the laps. Once the paint has been rolled on, it must be brushed in to make sure every crack and crevice is covered properly. Take special care when painting the bottom edges of siding. These edges must be well coated because it is where moisture and ice gather.
Latex paint dries rapidly in hot weather, so don’t roll on too much paint before you go back over it with a brush. Remember, too, that most paints require a wall temperature of at least 50°F or so for good adhesion, so don’t paint if the weather is cooler than that.
Completely paint or stain the siding before you tackle the exterior trim, just as you did on the interior. Use a good brush and a steady hand to leave a neat-looking job. Doors get a lot of use, so it’s best to give them at least a couple of coats on top of the primer. The metal-clad exterior doors that are often used unaffordable houses come with a prime coat. You may want to use a higher gloss paint on doors because it is easy to clean.
Instead of trying to paint doors in place, take them down and remove all the hardware. Put the hardware for each door in a small plastic bag, label the bag, and store it in a kitchen drawer. Label the door, too. The top edge is a good place to write the door’s location. Drive nails or screws into the top and bottom edges, then set the door across a pair oi sawhorses (see the illustration above). After painting one side, flip over the door and paint the other side. Set the door aside, resting it on the nails, while you paint another door. Wait
■
until the first coat is dry, then apply a second coat, brushing out any streaks or drips. When you’re done, remember to put a bit of caulk in the top nail holes so water can’t enter.
Door jambs are also easier to paint when there’s no door in the way. On some exterior entries, weatherstripping is installed on the door; on others, it’s installed on the jamb. Either way, it’s usually best to remove weatherstripping before painting instead of trying to paint around it. Getting paint on weatherstripping can prevent it from sealing properly. If the weatherstripping is damaged or difficult to reinstall, just buy new material. It is generally inexpensive and is important for sealing the interior of the house from the elements.
Once you are finished painting, use a small piece of cardboard to scrape all unused paint into one can. Save some paint for later touch-up work. A contractor I know takes leftover cans of latex paint, stirs them together, and uses the mixture as back-primer for the next job. Some cities have a site where you can drop off paint for recycling. Otherwise, take unused paints, stains, and solvents to a hazardous-waste facility. Give the earth a break. Don’t dump toxic materials on the ground or down the sink.
|
|
|
|
|
|
і
|
Posted by admin on 23/ 11/ 15
Once the trim has been installed, the next step is to set all the nails, then fill and sand the nail holes. Any nails that are above the surface of the wood must be driven below the surface with a nail set (see the photo at left on the facing page). If you plan to stain or polyurethane the trim, fill the holes with matching wood putty. For paint prep, you can use painter’s putty or ordinary Spackle™ applied with a small putty knife or your finger.
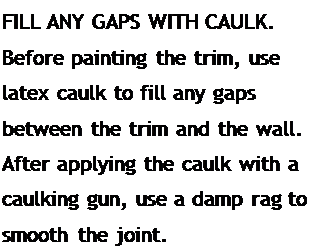
Sometimes the miter joints (where the door and window trim meet) are not tight so you need to fill the gaps. There also may be slight gaps between the wall and sections of door and window casing or baseboard trim.
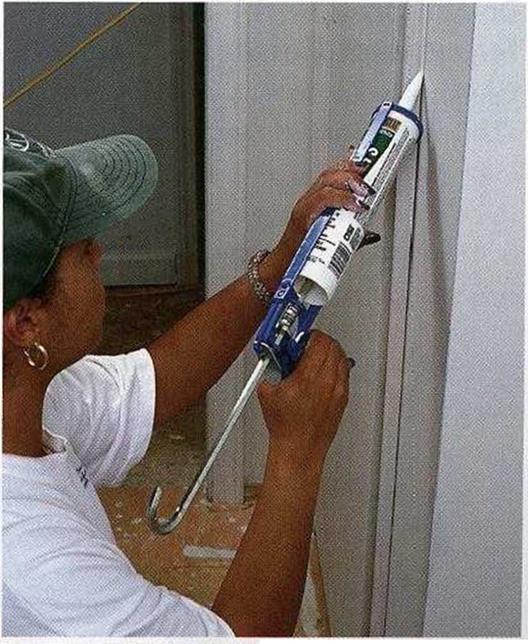
In addition, check for gaps between shelving and walls and around cabinets and other built-ins. All these gaps can be filled with latex caulk, which is paintable and has enough elasticity to move as wood trim expands and contracts with changes in temperature (see the photo at right on the facing page). Wipe off any excess caulk with a damp cloth.
Before painting any trim that has been nailed in place, take the time to remove all the doors and cover the cabinets with paper and painter’s masking tape. I like to use what is called painter’s tape, because it pulls off easily and doesn’t leave a glue residue. Cover finished floors with a paint-absorbing drop cloth. Unscrew the hinges from the door jambs and store them in a box or plastic bag.
Some people paint the trim with the same paint they use on the walls. In that case,
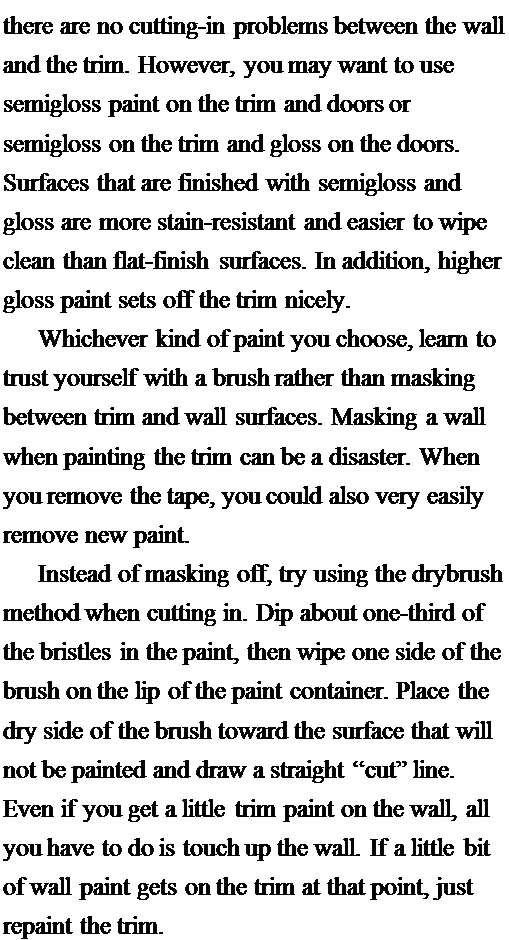    STEP 8 Paint the Exterior Siding and Trim STEP 8 Paint the Exterior Siding and Trim
On our Charlotte house, we didn’t have a lot of exterior painting to do. We installed vinyl siding, soffits, and windows and covered fascia and rake boards with aluminum cladding. But we still needed to do a bit of exterior painting (door casings and doors, for example). On houses with more exposed wood, you should know how to paint the exterior correctly. Here are some guidelines you can use to make sure your exterior finishing work will look good and hold up well.
Posted by admin on 23/ 11/ 15
The two basic techniques for painting both ceilings and walls are cutting in and rolling. uCutting in” means brushing paint onto areas that can’t be reached with a roller. Painters usually begin working from a ladder, cutting in the corners where the ceilings meet the walls. Use a З-in. or 4-in. brush to make a cut-in band all around the ceilings and walls, as shown in the top photo on p. 234. This band will be overlapped when the large open spaces are painted with a roller. Professional painters prefer to use a brush for cutting in, but it can also be done with a paint pad, which is basically just an absorbent sponge on a handle.
Take your time. Good brushes are easy to load with paint. Rather than painting with a
  full can of paint, painters like to use a bucket that’s about half full. This allows them to dip the bristles about halfway into the paint, then fill the inner part of the brush with a few gentle slaps of the brush against the inside of the can (see the photo at bottom left). Apply paint in relaxed, even, gentle strokes. full can of paint, painters like to use a bucket that’s about half full. This allows them to dip the bristles about halfway into the paint, then fill the inner part of the brush with a few gentle slaps of the brush against the inside of the can (see the photo at bottom left). Apply paint in relaxed, even, gentle strokes.
Use a roller to fill the field
Once you’ve finished cutting in, switch to a roller to paint the rest of the ceilings and walls. Ask at the paint store which roller to use for your type of paint and wall surface. Many painters use a good-quality 9-in. roller frame fitted with a Yz-in. synthetic-nap roller. An extension pole that attaches to the frame makes it easy to reach the ceiling. Paint can be loaded on a roller from either a paint pan or from a 5-gal. bucket with a roller screen hooked to the inside. Don’t overload either the pan or the bucket with paint. Dip the roller into the paint several times to saturate the nap. Then unload the excess paint on the pan or roller screen (see the photo on p. 236).
Rolling paint on ceilings and walls must be done slowly and methodically, using long strokes. It must be done slowly because pushing a roller rapidly scatters paint far and wide. It must be methodical so that every square foot of drywall receives full and equal coverage. Try painting in З-ft. squares, running the roller back and forth in a tight “M” or “W” formation, with each stroke overlapping the previous one by a few inches. Blend the main ceiling paint into the corners by overlapping the cut-in sections by an inch or so, but be careful not to touch the other side. In hot, dry climates, try to keep the working edge wet with paint. If you overlap a dried edge, you’ll often see a lap mark after the paint has dried.
When rolling paint on walls, you can reduce the splatter by painting on the
upstroke. Watch out for paint ridges left at the ends of a roller. Try tipping the roller to the side to squeeze out the excess paint as you roll. Then go back over the ridge and even out the coat. Apply a uniform, thick coat, but not so thick that the paint begins to run. When painting near the floor, turn the bend in the roller frame toward the floor to keep the roller from picking up dust and dirt. With care, you should be able to cover the walls and ceilings with one coat on top of the primer, especially I if you’re using good-quality paint. But don’t I despair if one coat looks a little thin. Paint is 1 not all that expensive, so just roll on another I coat, if necessary.
STEP 7 Prepare and Paint the Interior Trim
One nice aspect of new construction is that you can paint all the walls and ceilings before installing the cabinets, shelving, doors, and interior trim. Even though you’ll have more wall surface to cover, the work can go quickly because you don’t need to worry about getting paint on all the other finished surfaces. In the next chapter, we’ll see how trim and cabinets are installed. Just ahead, we’ll cover what you need to know about applying finish paint or stain on interior trim.
   
There are several finishing options for interior trim. Instead of paint, the wood can either be stained or finished with clear
    polyurethane. Both options allow the grain of the wood to show. If you like the look of natural wood against painted walls and ceilings, plan to install solid stain-grade trim rather than less expensive finger-jointed, paint-grade stock. Wood doors can also be stained or coated with polyurethane or another clear finish. An application of wood stain is usually followed by a coat or two of clear finish to give the wood added protection and make it easy to clean. Tinted polyurethane finish provides the benefits of both stain and clear finish in a single application. For recommendations on stain and clear finish treatments for interior trim, consult a knowledgeable paint supplier. polyurethane. Both options allow the grain of the wood to show. If you like the look of natural wood against painted walls and ceilings, plan to install solid stain-grade trim rather than less expensive finger-jointed, paint-grade stock. Wood doors can also be stained or coated with polyurethane or another clear finish. An application of wood stain is usually followed by a coat or two of clear finish to give the wood added protection and make it easy to clean. Tinted polyurethane finish provides the benefits of both stain and clear finish in a single application. For recommendations on stain and clear finish treatments for interior trim, consult a knowledgeable paint supplier.
With painted trim, it s a good idea to prime-coat the pieces before installing them. You can apply paint quickly when the trim
pieces are set up on sawhorses. Brush primer on the back of the trim (known as back – priming) as well as on the front. It doesn’t take a lot of extra time, and this technique makes the trim more resistant to warping, swelling, and shrinking in response to moisture fluctuations.
Posted by admin on 23/ 11/ 15
Professional painters know from experience that the biggest part of a paint job is the preparation. You don’t just grab a bucket of paint and a roller and have at it. Take time to remove doors from their jambs before you start painting the walls and ceilings. Number or label the doors so you’ll know later where each one belongs.
Some drywall jobs create lots of dust that must be removed before you can paint. I use a vacuum cleaner to remove dust from the walls and ceilings, but a broom or a pole sander wrapped with a cotton cloth also works well. Take it easy, because topping compound is relatively soft and easily scratched. Pay special attention to dust in the corners. Remove any drywall mud or dust left in electrical outlets, and scrape up any globs of drywall compound that have dried on the floor. Drywall mud left on the floor can work its way up through a carpet. Then vacuum up all the dust. Cover the tub or shower with a protective sheet of inexpensive 1-mil plastic, often called painters poly, affixed with masking tape.
Apply the prime and finish coats
My advice for buying paint and brushes is the same as for buying any other tools and materials: Talk to contractors and knowledgeable folks working behind the counter where you buy your supplies. Then buy the best you can

afford. A knowledgeable paint supplier will help you choose primer and finish paints that are compatible; you’ll also get advice on the I best brushes and rollers to use with your paint. For some basic background informa – I tion, see the sidebar above. A well-built house deserves a quality paint job. Spending more money on high-quality paint can actually save you money down the road, because 1 good paint covers better and holds up well over time.
When using several gallons of a single I color, mix them together in a 5-gal. bucket to j I ensure uniformity. Keep the pigment mixed by stirring well before painting and through – ■ out the day.
Posted by admin on 23/ 11/ 15
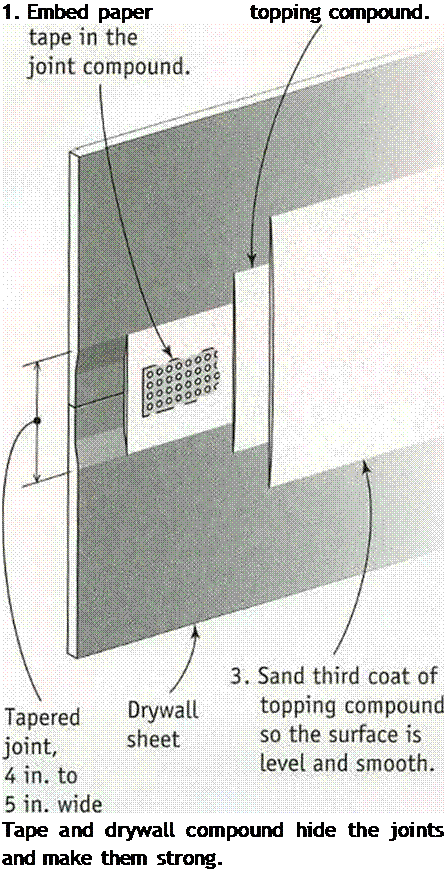
Drvwall compound must be applied in several thin coats because thick applications tend to shrink and crack. Also, thin coats can be feathered or tapered very gradually so that they’re invisible (or nearly so) after the dry – wall surface is painted. Before applying the second coat, remove any lumps, high spots, or ridges of hardened compound left from the first coat. This can be done with a drywall knife or a pole sander. Be careful not to oversand, or you could damage the paper face of the drywalk
Apply topping compound over the dimples around the fasteners, just as you did with the first coat. Be even more careful as you level the compound, and use a 10-in. or 12-in. knife. Along seams, apply topping compound with a 5-in. knife, then use a 12-in. knife to remove the excess (see the photo at right). Again, take your time. The second coat should conceal the tape. Using a wider knife, feather the mud away from the center of the joints to make them harder to detect. This is especially important at butt joints. It takes some practice to get this coat right. Go over the joints more than once, if necessary, pulling the knife with a steady, even pressure to leave a smooth surface.
The same can be done along inside corners, using a 5-in. knife to mud and smooth one side of the corner at a time. This takes some skill, because it’s difficult to keep the knife from marking the finished side as you mud the opposite side. For this reason, some tapers like to use a different procedure. They apply mud on one edge at a time, smooth it, and then let it dry. Once one side of the corner is dry, they return and do the other side.
Before applying the third coat of compound, lightly sand the second coat. Hit the corners, dimples, and seams with a 120-grit
screen on a sanding pole to remove any bumps, trowel marks, or ridges. The third coat should be little more than a light application of topping compound to hide any imperfections and feather the seams a bit wider. To make the topping compound easier to manipulate, thin it with a little water.
Sand drywall compound
Some tapers are so good that almost no sanding is required to make their drywall applications look nearly perfect. When I drywall, I can expect to spend some time with the sanding pole (see the photo on p. 232). Before you get started, make sure you have a good dust mask that seals well, because sanding drywall produces a lot of fine dust that can irritate your eyes and lungs. Goggles will help keep the dust out of your eyes. Use a 120-grit screen on the block at the end of the pole sander, and push the sander gently along the
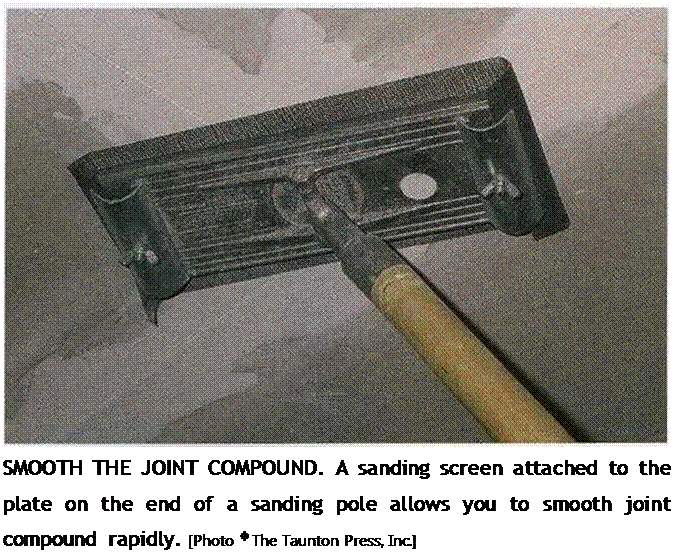    seams and corners with steady, even pressure. The key word for beginners is “gently.” Its easy to get carried away, sanding through the mud and exposing the tape or damaging the dry – walPs paper face. If you do, apply another coat of compound to those areas and sand again after the compound has dried. seams and corners with steady, even pressure. The key word for beginners is “gently.” Its easy to get carried away, sanding through the mud and exposing the tape or damaging the dry – walPs paper face. If you do, apply another coat of compound to those areas and sand again after the compound has dried.
A final, light sanding can be done with a 150-grit screen, some hand-held sandpaper, or even a damp sponge. Sandpaper folded into a “V” allows you to smooth out imperfections in inside corners by putting pressure on one side or the other or right in the center, as necessary. At this point, some folks like to apply another coat to give a texture to the walls before painting.
STEP 6 Paint the Ceilings and Walls
Our prairie home seldom, if ever, had any paint on the exterior. The siding became as grained and leathery as the faces of the inhabitants. Indoors, we sometimes used a dry powder, called Kalsomine, that we mixed with water and used to paint the ceilings and walls. Kalsomine came in different colors, which added a bit to our rooms and to our lives.
After I left home, it seemed that the only interior paint color in existence was Navajo White. For years, the interior of every house we built was painted this off-white color.
It was a breath of fresh air to see all the bright colors that exploded in the late ’60s and early 70s. From bland to bright to subtle pastels and now back to Navajo White— so much for progress.
Posted by admin on 23/ 11/ 15
|
 Helping Hand
Dispose of waste drywall. Before you send waste dry – wall to a landfill, contact the Gypsum Assoriation (see Resources on p. 278) to see whether there’s a recycling facility in your area. Local builders may also know of recycling possibilities that can help reduce the amount of construction material sent to landfills.
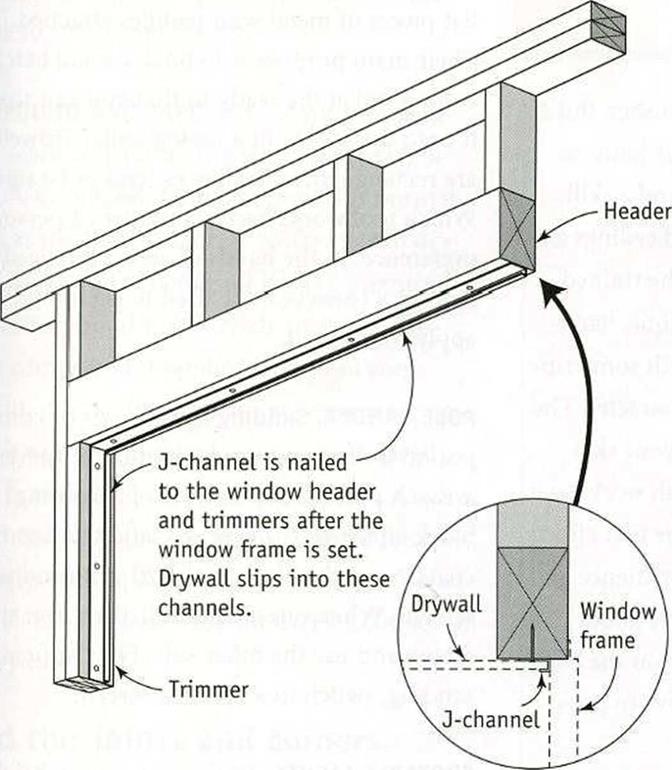
Using J-channet around a window makes a dean joint between the drywall and the window frame.
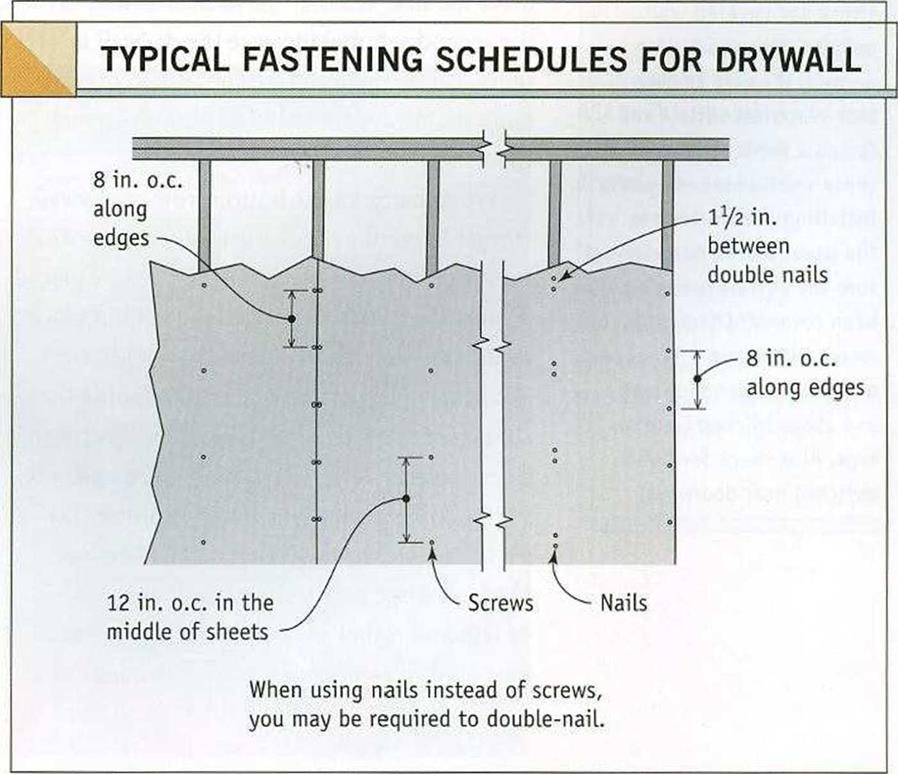
corner beads are designed to be nailed or stapled in place. Use tinsnips to cut floor-to – ceiling beads. Cut them at least Zi in. short, but hold them tightly against the ceiling. Starting at the top and working down, fasten the bead to the corner stud (below the top plates) with pairs of nails or screws opposite each other every 8 in. to 10 in. A pneumatic stapler also works well. Make sure all the beads are straight and lie flat against the wall.
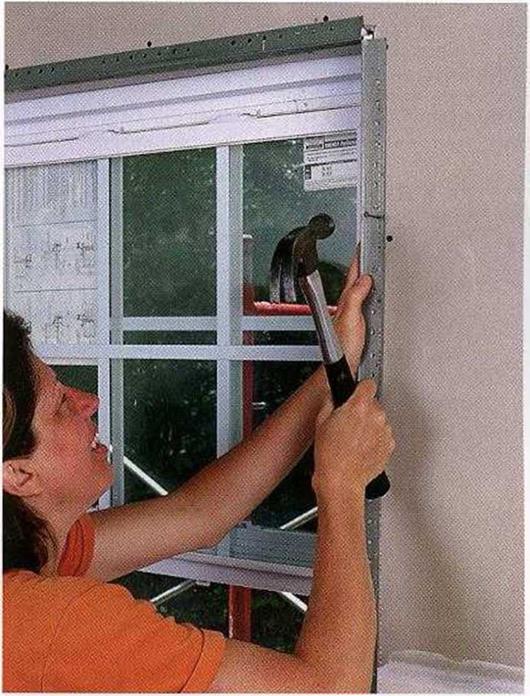
Beads around windows and doors are attached just like those on corners. The header beads are cut square on both ends and then nailed in place. The side trimmer pieces are also cut square and butt into the top piece (see the photo at right).

 STEPS Mud, Tape, and Finish the Drywali
I am not a professional drywali finisher. But I have taped enough wall and corner joints to know that this job is both an art and a skill. Some finishers can leave walls and ceilings as straight and smooth as glass. To the trained eye, my work looks more like antique, handmade glass—generally flat, but with some rippling and variations that give it character. The thing to remember, regardless of your skill level, is that taping drywali is finish work, so it needs to look good. Although your first efforts aren’t likely to be masterful, with patience and know-how you can learn to achieve good, solid work. This section will give you the basic know-how. The patience you111 have to provide yourself.
Tool up for finishing drywali
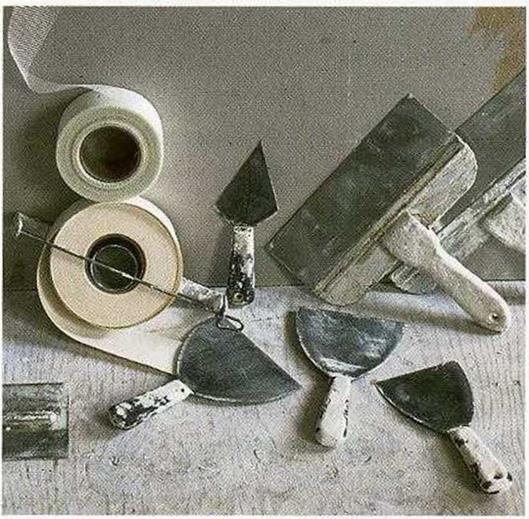
Although professional drywali finishers rely on an assortment of equipment, including stilts to speed ceiling work, you can achieve very good results with just a few tools. You’ll find them at well-stocked hardware stores, home centers, and drywali-supply outlets.
TAPING KNIVES. Mud applicators are called knives, even though they look more like overgrown spatulas. A 5-in.-wide knife is good for applying joint compound (referred to as mud). Wider knives are used to smooth and feather the edges of mud, tapering it so thin that it will be as undetectable as possible once the paint is applied. If you’re new to drywali work, start with 5-in., 8-in., and 12-in. knives for best results.
TROWELS AND HAWKS. These tools are simply flat pieces of metal with handles attached. Their main purpose is to hold a small batch of compound at the ready so that you can scoop it onto the wall with a taping knife. Trowels are rectangular, while hawks tend to be square. Which tool works best is a matter of personal preference. In the hands of an experienced worker, a trowel can be used to both hold and apply compound.
POLE SANDER. Sanding finish coats of compound is often necessary to smooth uneven areas. A pole sander consists of a sanding block attached to a pole. To sand the first two coats, cover the block with 120-grit sanding screens. When one side is dull, turn over the screen and use the other side. For the final sanding, switch to a 150-grit screen.
PORTABLE LIGHTS. With one or more bright, halogen-type work lights, you’ll have a much easier time finding flaws in the top coat.
DUST MASK AND GOGGLES. Don’t begin to sand drywali compound without donning safety gear.
Do the prep work
Before you start taping and mudding, make sure that all fasteners are below the surface of the drywali. You can do this by running your hand or a wide drywali knife over the fasteners in the walls and ceiling. If any fasteners are proud of the surface, they will show when you apply the first coat of mud.
You may need to do a bit of repair work around electrical-outlet boxes. If the fit around these boxes is sloppy, use a fast-setting (as opposed to a slow-drying) joint compound that’s available at supply stores. Mix a batch and fill the gaps with a small putty
knife. If the gaps are quite narrow, use latex caulk to seal around them.
COMPOUND AND TAPE. Part of your preparation work is making sure you have the right supplies on hand. Joint compound is normally used as the bed for tape. If you’re new to dry – wall work, you’re better off buying premixed joint compound that is ready to apply. Topping compound is applied over joint compound; it has a finer, creamier consistency so that it can be smoothed out nicely. It’s available in premixed and powdered forms. You’ll also need enough tape to cover all the joints between panels, including the inside corners. Buy about 400 ft. of tape for every 1,000 sq. ft. of drywall.
Mud the joints and corners
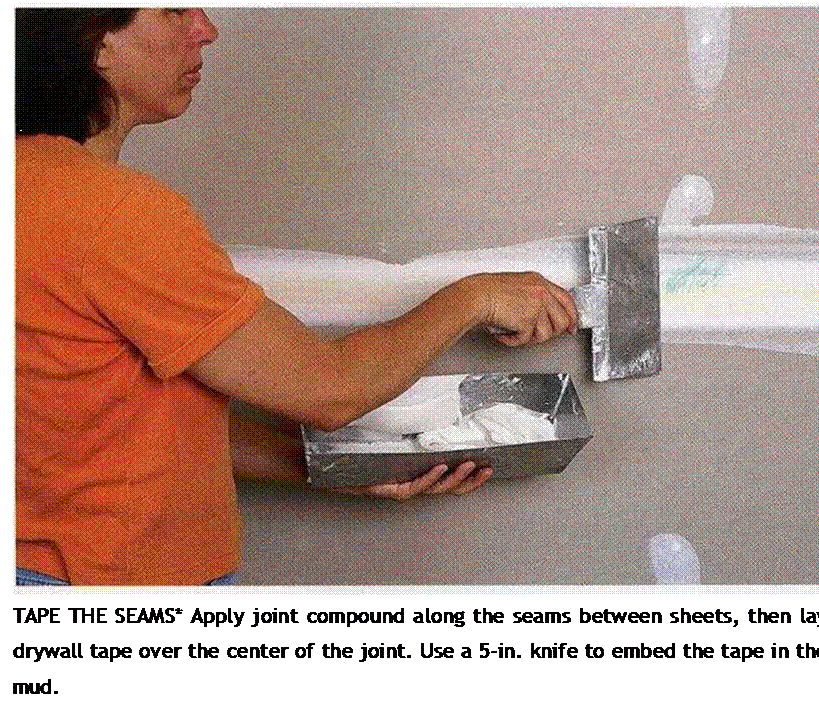
The long edges of drywall panels are tapered, allowing the seams between adjacent panels to be filled with joint compound and taped to create a level surface. Begin by using a 5-in. knife to apply mud about % in. thick along the entire seam. Roll out the tape from corner to corner, center it on the joint, press it lightly in place, and then pull it tight and straight.
Once the tape is in place, drag the knife over the top, applying enough pressure to embed the tape as you go (see the photo at left on p. 230). Make sure the tape is flat, wrinkle- free, and embedded in about % in. of mud. Be careful not to create mud buildup in the corners. Clean any excess compound from along the edges of the tape with your knife.

 Inside corners and wall-ceiling joints are taped a bit differently than flat joints in a ceiling or wall. Use a 4-in. or 5-in. knife to apply an S^-in.-thick layer of joint compound on each edge of the corner. Next, fold the tape at the crease and press it into the corner, flatten-
ing it as you go. Working on one edge at a time, press the tape against the drywall and into the mud with the taping knife.
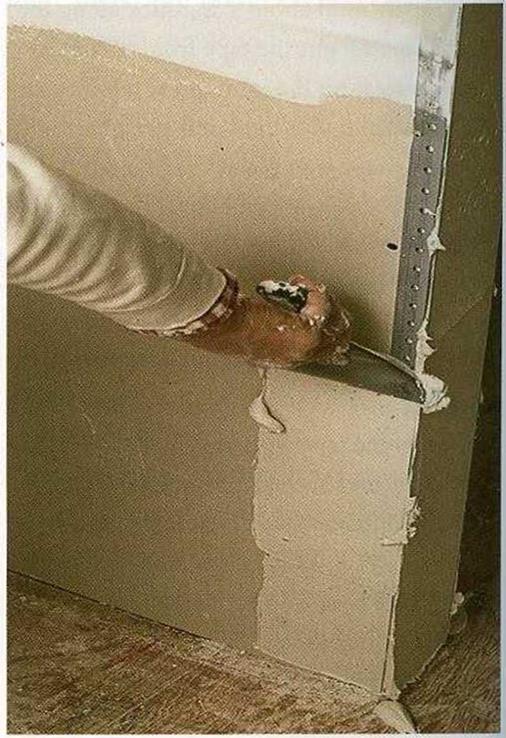
Outside corners covered with corner bead are easier to do (see the photo at right below). Using the same 4-in. or 5-in. knife, press mud along the length of the corner. The outside edge of the comer bead acts as a guide for your knife as you pull off excess mud.
The ends of a drywall sheet are not tapered like the edges are. For this reason, you should use less mud to cover the tape at the butt joints, where the ends of adjoining sheets meet. Otherwise, you can create an obvious bump in the wall. Cover the tape lightly with mud, and feather the edges away from the
MUD THE CORNER BEADS. Apply joint compound generously along each side of a corner bead. To level off the compound, run the taping knife over the rounded outside edge of the bead. [Photo by Charles Miller, courtesy Fine Homebuilding magazine, ® The Taunton Press, Inc.]
center of the joint so any bumps that result will be slight.
In hot, dry climates, joint-compound applications dry rapidly. Mud that dries too fast may not bond well and can crack. Try mudding a couple of joints in a room and then applying tape right away, rather than mudding every joint first. You may need to close up the house to retain moisture and create a slower drying time. You can also use an easy-to-sand setting compound that hardens with little shrinkage and is basically unaffected by hot, dry conditions.
Its a different story in cold and humid areas. Builders in those regions often have to close up the house, turn up the heat, and open the windows a bit to let out moisture. Portable propane heaters work well to help things dry, but they exhaust additional moisture into the air. If you’re using them, leave a window open so moist air can escape. Kerosene heaters also work well, but it may take a while for the smell to leave the house.
![]()
![]()


![]()


 full can of paint, painters like to use a bucket that’s about half full. This allows them to dip the bristles about halfway into the paint, then fill the inner part of the brush with a few gentle slaps of the brush against the inside of the can (see the photo at bottom left). Apply paint in relaxed, even, gentle strokes.


 polyurethane. Both options allow the grain of the wood to show. If you like the look of natural wood against painted walls and ceilings, plan to install solid stain-grade trim rather than less expensive finger-jointed, paint-grade stock. Wood doors can also be stained or coated with polyurethane or another clear finish. An application of wood stain is usually followed by a coat or two of clear finish to give the wood added protection and make it easy to clean. Tinted polyurethane finish provides the benefits of both stain and clear finish in a single application. For recommendations on stain and clear finish treatments for interior trim, consult a knowledgeable paint supplier.


 seams and corners with steady, even pressure. The key word for beginners is “gently.” Its easy to get carried away, sanding through the mud and exposing the tape or damaging the dry – walPs paper face. If you do, apply another coat of compound to those areas and sand again after the compound has dried.


 Inside corners and wall-ceiling joints are taped a bit differently than flat joints in a ceiling or wall. Use a 4-in. or 5-in. knife to apply an S^-in.-thick layer of joint compound on each edge of the corner. Next, fold the tape at the crease and press it into the corner, flatten-
