Category Habitat for Humanity International

STEP6 Install the Siding Panels

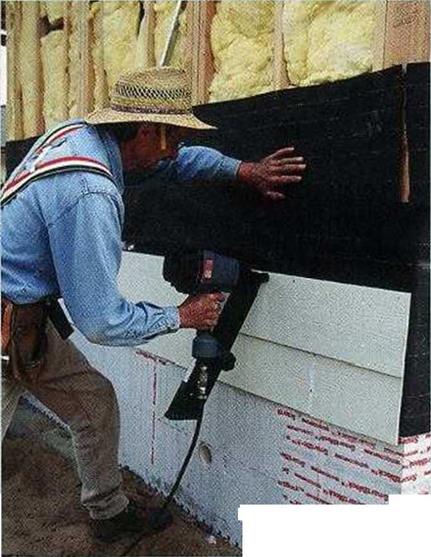
Thanks to the work you did in the previous step, panel installation can go quickly, espe­cially when you have a good-size crew, as we did on this job. The first panel course is always the bottom-most course. Start against the cor­ner on one side of the house (preferably the back corner). Pull up the first panel, snap it into the starter strip, and slide the end of the panel under the corner trims top edge. Keep the panel seated in the starter strip as you drive nails into each stud. The nail heads should be ‘/в in. proud of the flange. Don’t drive nails at the edge of a slot or through the vinyl itself. If the prepunched slot is not cen­tered over a stud, lengthen the slot with a util­ity knife or a slot-punch tool.

Once the panel is nailed in position, check whether you can slide it back and forth manu­ally. If the panel won’t slide, find out where it’s getting hung up and fix the problem. After you’ve checked that the panel is free to move, you can, if you like, nail it fast near the mid­dle. Some builders prefer this technique, which encourages the panel to expand and contract equally in both directions.

The clearance between the end of a panel and the inside edges of the trim pieces depends on the temperature. If it’s over 90°F when you install the siding, leave the panel end about і in. away from the trim piece’s inside edge. If it’s less than 30°F, leave a good ^ in. of clear­ance at each end so there’s room for heat – induced expansion. For temperatures between these two extremes, gauge accordingly.

Cutting and lapping panels

When you come to an opening or reach the end of a wall, cut a panel to fit. Remember always to leave room for expansion. Cut pan­els to length with a table saw, as described ear­lier, using a circular saw with the blade in
backward. You can also crosscut with a radial – arm saw, a sliding compound-miter saw, a utility knife, a hacksaw, or even tinsnips. Plan each siding cut so that the cut ends are hidden in the corner posts, in the J-channel trim, or by the factory edge of an overlapping panel. Panels that join within a course should over­lap by at least 1 in.

You’ll notice that the nailing flange on a siding panel is cut back about 1 in. from the end of the panel. When two panels join each other in the same course, their nailing flanges should never butt together on the wall. When necessary, cut back the nailing flanges so that those in the same course are separated by at least 1 in. (see the illustration on p. 159).

It’s best to lap the panels between—not on—the studs. Try not to install pieces shorter than 3 ft. long, especially in high-wind areas. And don’t let the overlaps where siding panels meet stack over one another in subsequent courses. Rather, randomly separate these over­laps by two or three studs, so that you don’t create a staircase pattern. The pattern created

Подпись: гПодпись: Helping HandПодпись: Turn the blade backward! For smoother, shatter-free cuts in vinyl siding, use a fine-tooth paneling blade in a circular saw and turn the blade so that the teeth face backward. The same backward rule applies if you're using a chopsaw or radial- arm saw to cut vinyl siding.by the installed vinyl panels should be pleas­ing to the eye.

Pull each panel up snugly against the lock­ing hem of the previous panel, but don’t stretch it. Panels that were stretched tightly when they were installed (especially in warm weather) can tear when cold weather causes them to contract. Before moving on to the next row, make sure each panel is free to move back and forth horizontally.

As you proceed upward, measure down from the underside of the trusses to each row to ensure that the siding is remaining level around the building. Vinyl siding can stretch upward and easily become out of level. Some builders snap level chalklines every 2 ft. or so around the building to serve as reference points while they install rows of siding.

Installing panels around win­dows, doors, outlets, and vents

Strips of undersill trim must be installed beneath windowsills. This special trim covers the horizontal edge of a siding panel and locks
the panel in place. Cut each trim piece to fit between the two side J-channels, then nail it flush against the underside of the window. If the panel beneath a window needs to be notched more than I in. to fit, you must fur out or shim the undersill trim. The deeper the notch in the siding, the thicker the shim you’ll need. By furring out the undersill trim, you can prevent the surface of the siding from bowing in beneath the window. Try not to have any joints between panels located beneath or above windows.

To determine a notch’s location in the panel beneath a window, measure from the last piece of siding to the opening and mark it on the panel (don’t forget to add 1 in. for the overlap). For an accurate height measure­ment, lock a scrap of siding into the nail flange of the piece below, then slide the scrap against the window edge. Mark where the scrap hits the bottom of the window and transfer the mark to the panel you’re cutting. Finally, measure the length of the opening and transfer it to the siding, leaving / in. on each

STEP6 Install the Siding Panels

STEP6 Install the Siding PanelsCUTOUTS ARE CHAL­LENGING. This siding panel was notched to fit over a door and a window. It’s important to mea­sure carefully so that the cutout edges fit properly in the 3-channel around the doors and windows.

. Corner trim, J-channel, and undersill trim

The corner trim pieces, which receive the ends of the vinyl siding panels, must be installed straight and plumb or they won’t look attrac­tive. Hold a short, cutoff piece of vinyl corner post against the sheathed corner of the house
and mark the edge of the flange on both sides of the corner at the top and bottom of the wall. Snap a chalkline between the marks. Set a corner post Z in. to И in. down from the sof­fit, and drive a l^-in.-long nail at the top of a slot on both sides of the corner. The corner post hangs from these nails, allowing the vinyl to move. Hold the posts directly on the chalk­lines and drive nails about every 12 in. in both flanges, down to the bottom of the wall. Keep each nail in the center of its slot. The corner posts should extend Zi in. to 1 in. below the starter strip.

Most doors and windows have factory – made siding channels. If yours do not, install J-channel along the top and sides of the window to hide the ends of the siding. You can use a miter or a square cut at the top corners. Either way, at the ends of the top piece, leave 1-in.-long drain tabs that can be folded down over the window sides. This helps channel water down around the window (see the photo at left).

TRIM AROUND A DOOR. J-channel trim is nailed around the window and door frames, with a tab in the top piece bent to fit around the corner.

Подпись: SNAPSHOTS. Corner trim, J-channel, and undersill trim

Some volunteers prefer contrast between the white cor­ner trim and the brown siding, while others aren’t sure whether it looks attractive. . .

We install siding panels from the bottom up. . .

Each new course of panels snaps onto the one below You can’t drive the nails hard against the vinyl bea it needs to move. . .

Подпись: THE WORK GOES QUICKLY. With scaffolding set up on two sides of the house and a Habitat-size crew, this siding job moves along at a good pace. Short offcuts from one side of the house can often be used elsewhere to minimize waste.. Corner trim, J-channel, and undersill trim

Tool Talk TOOLS FOR VINYL SIDING

Tool Talk TOOLS FOR VINYL SIDINGA LONG, FLAT work surface is essential for vinyl siding and sheet-metal work. A couple of 2×12 boards on sawhorses work fine. For precise 90-degree-angle cuts and angled rake cuts, I suggest making a cutting jig for a circular saw (see the photo at bottom left). The jig, which sits on a long worktable, is essentially a wooden cradle that guides the base of the circular saw. The cradle can be positioned at a right angle, or at

Tool Talk TOOLS FOR VINYL SIDINGother angles, to the siding.

Use both right – and left-handed aviation snips to make straight and curved cutouts (see the photo at top right); tinsnips are also helpful. Other specialty tools you’ll need include a slot-punch, to make nailing slots in siding (see the photo at center right); a snap-lock punch, to create crimps or tabs that lock into the finish trim (see the photo at bottom right); and a zip tool, in case you need to remove a damaged panel from a wall.

the siding. Its also smart to check with builders in your area for any local wisdom. This is the best way to avoid the bulges, buck­les, and tears that can result from incorrect installation. Most vinyl siding should not be nailed firmly against sheathing. The installa­tion slots in the siding, starter strips, and other vinyl components are there for a reason. Keep the nail heads proud of the vinyl so that the vinyl can move.

The tools you need to install vinyl siding are mostly tools you probably already own, but there are a few others you’ll need to either buy or make (see the sidebar above). These tools are also handy for the sheet-metal work we’ll tackle later in the chapter.

Starter strips

The installation of vinyl siding begins with different trim elements: starter strips, inside corners, outside corners, J-channel, and so on. The various trim details are designed to hide or interlock with siding ends and edges (see the illustration on p. 159). As with other homebuilding phases, if you get started right, the next steps follow more smoothly. The crit­ical first step is to put on a straight and level starter strip right above the top of the con­crete foundation wall or slab (see the top photo on the facing page). This strip can usu­ally be installed by nailing through the sheath­ing and into the bottom of the mudsill or sole plate. The strip’s bottom edge can then extend about 1 in. over the concrete.

Tool Talk TOOLS FOR VINYL SIDINGINSTALL VINYL TRIM. Attached along edges and corners, vinyl molding helps secure siding panels and contributes to a nice, finished appearance. Starter strips are installed along the bottom edge of the wall (left). To allow for heat-induced expan­sion, the end of a starter strip should be at least 1 in. away from the out­side corner trim (below).

Tool Talk TOOLS FOR VINYL SIDING

If the house is covered with housewrap, it is not always easy to see where to nail the starter strip. One way to establish the exact height of the strip is to measure down from the underside of the joist chords on the roof trusses and mark the proper height at various points around the house. This will ensure that the starter strip is level and equidistant from the top plates. Connect these points with a chalkline all around the house. On long walls, keep the line from sagging in the middle by having someone hold the line to a height mark near the middle of the wall, then snap the chalkline from the center to both corners.

To secure the starter strip, drive nails in the center of the installation slots, spacing them every 12 in. to 14 in. Leave at least / in. to ‘/ in. of expansion room between sections of starter strip as you install it around the building, and drive your first nail in each piece no less than 4 in. from an end. Remember: The strip must be able to move beneath the nail heads. At a walls outside corner, the starter strip must be 1 in. or more from the vinyl corner trim, as shown in the photo at right. Keep the strip

I. in. to 2 in. from the inside corners.

Fiber-Cement Siding

FIBER-CEMENT SIDING has been around a long time. The first house I worked on in the late 40s was cov­ered with fiber-cement siding. It was a bit brittle and not too attractive but just about indestructible. It fell out of favor because it was hard to work with and full of asbestos, while high – quality wood siding was inexpensive and becoming widely available.

Times have changed. Today, wood siding is expensive and often lacking in quality. Modern fiber-cement sid­ing, on the other hand, contains no asbestos and offers all of its old advantages and a few new ones, too. Like vinyl, it’s fairly easy to work with, thanks to the new cutting and nailing equipment available today. Unlike wood, it doesn’t cup, curl, rot, or attract termites. Unlike vinyl, it doesn’t burn, melt, expand, or contract.

Once you learn a few basic tech­niques, such as how to cut and nail it, fiber-cement siding is easy to install and goes on one plank at a time. The siding can be nailed directly to studs that have been covered with house – wrap. It can also be fastened to ver­tical furring strips or to exterior sheathing covered with housewrap. The manufacturers’ product and installation information is compre­hensive and extremely useful (see Resources on p. 278).

Fiber-cement clapboard siding comes in various widths that are usually 12 ft. long and Xr, in. thick. Both smooth and wood-grain tex­tures are available. For best results, order the siding pre-primed on both sides. After it has been delivered to the job site, keep it covered with a tarp whenever you’re not using it to minimize moisture absorption. Store the siding flat and level, too, so it doesn’t break or warp.

Cutting Tips

Fiber-cement siding can be cut with a regular circular saw and a convert-

Fiber-Cement Siding

INSTALLING THE SIDING. Fiber-cement panels can be installed over exterior sheathing or nailed against house – wrap or felt fastened to the framing.

tional carbide blade, but a diamond- tipped masonry blade with four to six teeth works much better and is prob­ably cheaper in the long run. The biggest problem with cutting fiber – cement with a power saw is that it creates a lot of dust. Be sure to wear a good dust mask and follow the manu­facturer’s recommendations to avoid unnecessary exposure to silica, which can damage your lungs.

I prefer to use a set of electric fiber-cement siding shears, a power tool designed specifically for this job (see Resources on p. 278). The shears cut cleanly, don’t create any dust, and can be used for both straight and curved cuts. For small holes, such as those for exterior electrical outlets, use a jigsaw with a carbide-tipped blade. Cut round holes for pipes with a carbide-tipped hole saw mounted in a heavy-duty, two-handled drill.

Corrosion-Resistant Fasteners

Most companies guarantee their fiber-cement siding for 50 years. Therefore, it will last a long time – provided it’s properly attached with high-quality, corrosion-resistant nails. I generally use regular 2-in.-long, hot-dipped galvanized nails. If I’m working near the ocean or in another area with high humidity, I often use stainless-steel nails.

Подпись:Подпись:Подпись:Подпись:Fiber-Cement Siding

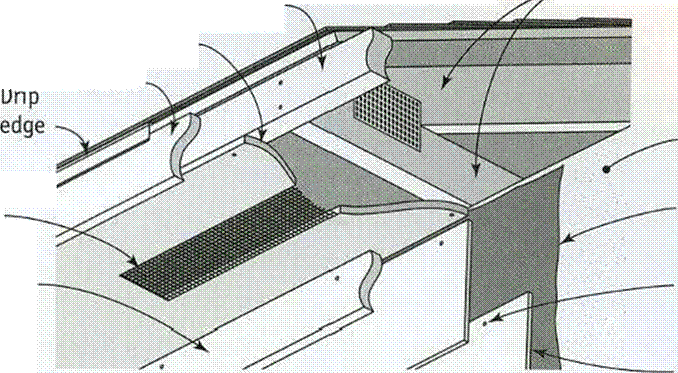
Подпись: SOFFIT, SIDING, AND FRIEZE-BOARD DETAILS n u u r • ^ Roof truss Rough or sub-fascia Soffit

Подпись: FasciaПодпись:Подпись:Подпись:Fiber-Cement SidingПодпись:Подпись: Fiber-cement sidingПодпись:Подпись: 1У4-ІП.- or la/2-in.-thick stock is used for the outside corner.Fiber-Cement SidingПодпись: 1У2-ІП. square inside-corner trim pieceПодпись:For the most part, builders use pneumatic nailers to attach fiber- cement siding to walls. I’ve found that a regular pneumatic nailer works better than a roofing nailer (see Resources on p. 278). Make sure that the pressure is set correctly once you get started. Fiber-cement panels can be nailed by hand, but you may need to predrill the nail holes, especially near the ends of planks.

Trim Details

As with wood siding, trim for fiber- cement siding is usually installed first, and then the siding panels are butted against it. Fiber-cement trim is avail­able for inside and outside corners, doors, and windows, as well as for covering fascia boards and soffits.

The illustrations at right show a few of the trim details available. These same details also work for wood clap­boards and wood shingle siding. The trim should be fairly thick—either 5/4 (ЇЙ in. thick) or 2x—in order to stand proud and cover the ends of the siding.

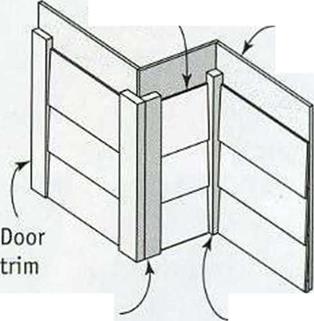
At the outside corners, the siding can butt against the corner boards or be covered with aluminum corner pieces (called siding corners). These pieces have been used for many years as trim for wood siding and work just as well with fiber-cement siding. The siding is installed first and stopped exactly at the comer. After all the sid­ing is in place, the siding corners can be slipped under each course. A flange at the bottom of the corner hooks a row of siding and a 6d or 8d

Screened
vent

Frieze board

STARTER COURSE, CORNER,
AND NAILING DETAILS

Apply caulk where the siding butts against the trim.

galvanized nail is driven through a hole in the top to hold it in place.

Installing Siding Panels

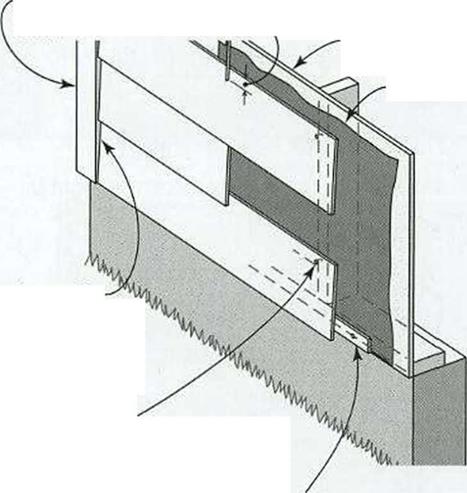
The installation details for fiber-cement siding are similar to those for wood clapboards. The bottom-most course of siding rests on а 5/б-іп.-thick, 1%-in.- wide starter strip cut from the siding or from pressure-treated wood. The bot­tom edge of the first course should lap about 1 in. below the top of the foun­dation. To install subsequent courses, follow the manufacturer’s recommen­dations for overlapping and nailing.

After you know the amount of reveal the siding will have, you can establish the height of each course. For example, a typical lap on 8!4-in.-wide siding is 1 / in., which leaves a 7-in. reveal. As you work your way up the wall, this reveal can be adjusted slightly (up to lA in.) to maintain a uniform distance between the top of the wall and the uppermost siding course. To make sure the last course of siding will be uniform in width, measure down from the top of the wall frequently (every other course or so) and fine – tune the reveal, if necessary.

STEP4 Complete Ventilation and Electrical Work

Before you install the siding, soffits, and exte­rior trim, its important to resolve some venti­lation and electrical details. For example, this house has a rectangular attic vent centered beneath the ridge in each gable-end wall. If you chose to sheathe the gable-end truss on the ground, this is the logical place to cut the hole for the vent. If the hole hasn’t been cut yet, do so now, then install the vent (see the photo on the facing page).

Referring to your house plans, an electri­cian will be able to locate any outlet boxes that need to be installed in the exterior walls. Outdoor receptacles are placed at convenient locations; the same is true for outdoor lights.

This is also the time to cut the hole for the dryer vent. A standard dryer vent requires a 4-in. hole; it’s usually placed in the laundry room, at the back of the dryer near the floor. There are several ways to cut a vent hole. The easiest way is to use a 4-in.-dia. hole saw (bor­row one from the plumber, if possible). Otherwise, mark the vent location with a 4-in.-dia. circle, drill a %-in. hole along one edge, then cut out the circle with a keyhole saw, a jigsaw, or a reciprocating saw. Just make

158! closing IN


STEP4 Complete Ventilation and Electrical Work

INSTALL ТНЕ АПК VENT. Vinyl siding panels can’t be installed until the vents, outlet boxes, and other wall elements are in place. This vent has flanges for easy installation.

sure you are above the bottom plate and base­board and away from the end stud. There shouldn’t be any electrical wires down this low, but check to make sure. Insert the vent pipe through the wall, then attach the vinyl trim cover.

Be sure to seal around the vent on both the inside and the outside to keep cold air and moisture from entering the house. Vent pipes can become plugged with lint after years of use. I unplug ours by cleaning out the pipe with a broom handle and then using the vacuum cleaner.

STEP5 Install the Starter I Strips and the Trim for I Vinyl Siding

The most important thing to keep in mind as you’re installing vinyl siding is that it expands and contracts significantly with temperature changes. All siding components and installa­tion details are designed to cope with this temperature-induced movement. Review the installation information shown in the illustra­tion at right and discussed throughout this chapter. Make sure you comply with the

І

STEP4 Complete Ventilation and Electrical Work

Подпись: UndersiLL trim Подпись: Outside corner Подпись: CUTTING BACK NAILING FLANGES ON VINYL SIDINGSTEP4 Complete Ventilation and Electrical WorkПодпись:Подпись:Подпись: At least 1 in.Подпись: Overlap at least 1 in.Подпись: SidingSTEP4 Complete Ventilation and Electrical WorkПодпись:Подпись: INSTALLING J-CHANNEL AROUND DOORS AND WINDOWSSTEP4 Complete Ventilation and Electrical WorkПодпись:Подпись:STEP4 Complete Ventilation and Electrical WorkПодпись: J-channel is nailed around the top and sides of doors and windows to receive siding panels. The top J-channel can be cut square or mitered to fit into the side channels. Use undersill trim at the bottom of windows. manufacturer s instructions that come with

STEP4 Complete Ventilation and Electrical Work

STEP3 Set the Windows and Doors

The setting process anchors the windows and doors in their final positions. Complete installation happens later, when we move inside the house and work on the interior trim. The windows and doors used in afford­able housing are mainly vinyl and vinyl clad, though aluminum-clad frames are still installed in some areas. Some codes require that window frames be clad with white vinyl; check with your local building department. Dark-colored vinyl absorbs more solar heat and, as a result, tends to deteriorate faster. On the other hand, dark-colored aluminum cladding holds up well in sunny areas.

Both vinyl and aluminum-clad windows come with a nailing flange on the outside of the window frame; the flange greatly simplifies the installation process. The most popular styles are single hung (the bottom sash moves up and down), double hung (both sashes move up and down), and sliding (one sash slides to the side). Windows with a built-in 1-channel, or channel surround, make it easy to hide the ends of vinyl and other siding without the use of extra trim.

Windows in affordable houses should definitely be double-glazed. The heat loss and gain through single-glazed windows is considerable. In very cold or very hot cli­mates, windows with low-E coatings offer even more energy savings. For more infor­mation on energy-efficient glazing, see Resources on p. 278.

Setting a window

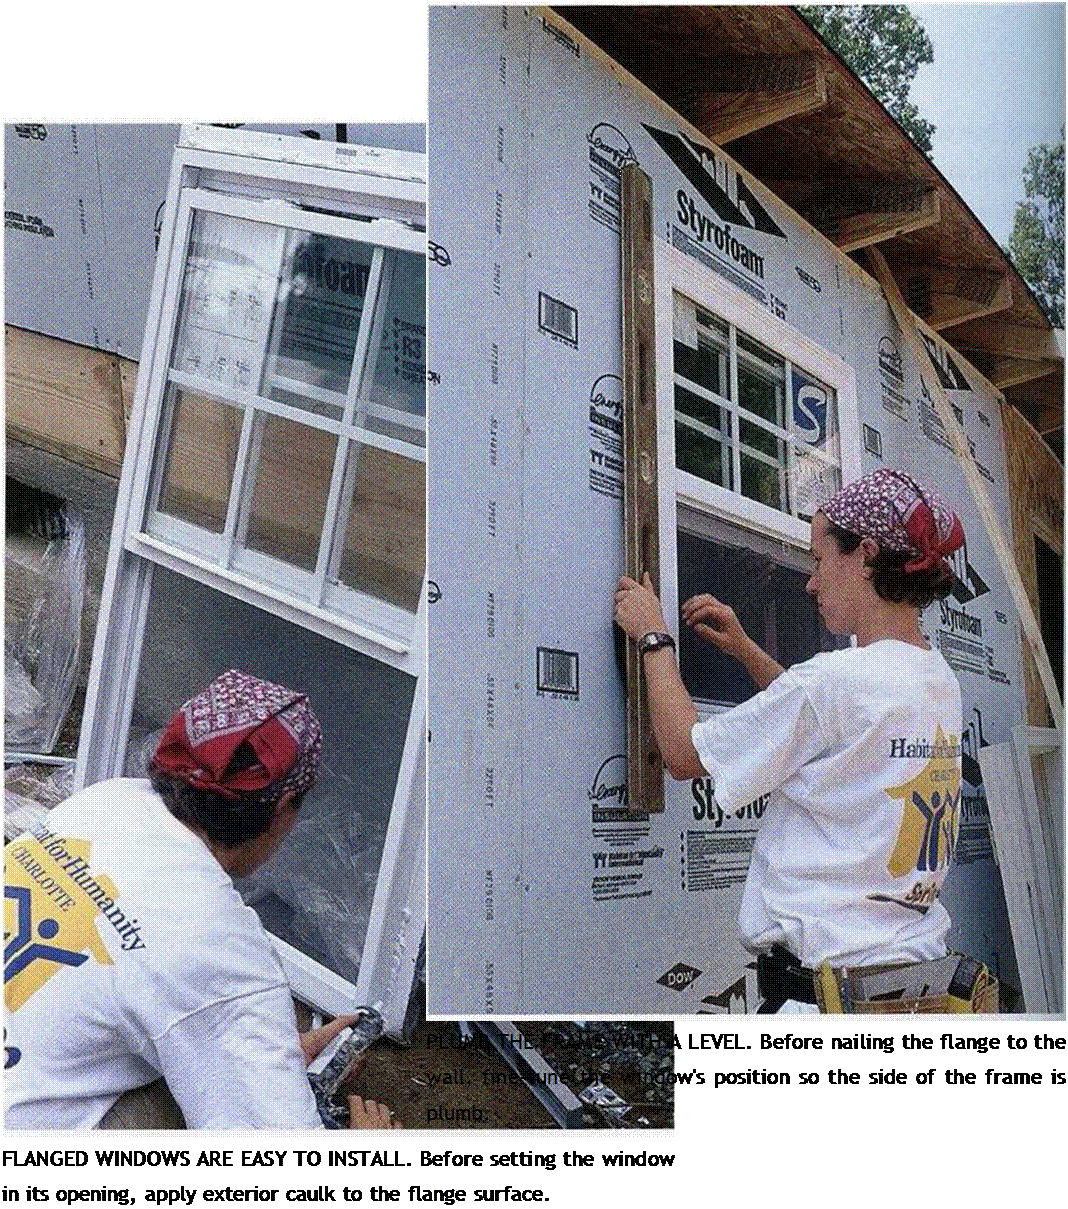
Flanged windows are the easiest windows to install, but windows that come with exterior trim instead of flanges are fairly easy as well. The main difference is that you nail through the exterior trim instead of through the flanges. No matter which type of window you use, its good to have two people for this job—one inside the house and one outside. There are three basic steps involved in setting a window:

Подпись:Подпись: Lighten the load. Before installing windows, you can substantially lighten their load by removing one or more sash members. It's also wise to store all screens in a safe place until the house is finished. 1. Caulk the flange. Squeeze a generous bead of exterior caulk or sealant on the back of each window flange (see the left photo on p. 156).
STEP3 Set the Windows and Doors
3 • Nail the flange to the wall. Secure the window by driving іИ-in.-long galvanized roofing nails at each corner of the window flange and every 8 in. elsewhere. Be careful not to damage the vinyl frame by hitting it with your hammer. When I’m building in rainy climates, I make one more seal all around the windows by running a strip of waterproof tape over the flange and onto the housewrap. It may be overkill, but who wants to tear off siding to repair a leaky window in the middle of a rainstorm?

Setting a prehung exterior door

Exterior doors are often prehung units that include jambs, a threshold, and wood exterior trim. I buy doors predrilled for both the house lockset and the deadbolt. Given the option, I also choose a door with a double-glazed glass window to bring more light into the house.

Take note of which way the plans say the door should open, and make sure the door you ordered swings the right way (see the illustra­tion at bottom right). Most exterior doors open inward. Also, make sure the door jamb is the proper width for the wall. A 2×6 wall takes a wider jamb than a 2×4 wall does. There are four basic steps involved in setting a pre­hung door:

1. Flash the doorsill. The sides and top of the rough opening can be flashed in the same way as a window. With an exterior door, sill flash­ing is essential if you want to prevent rot beneath the threshold. I prefer to use 12-in.- wide aluminum flashing for this application.

Cut the flashing about 6 in. longer than the width of the rough opening so it can cover the threshold area completely and extend several inches up each trimmer stud. Cut the flashing as necessary to create ears that fold onto the subfloor and over the exterior wall sheathing. You can keep the flashing in place with a few galvanized roofing nails.

2. Test-fit the door. When working with a prehung door, your primary concern is to set itsothat it opens and closes with ease. Fortu­nately, this is pretty easy to do. Once you’ve removed any materials used to protect the door during shipping and any device used to hold the door secure in its jamb, check the fit of the door in its opening. It should fit easily see the photo on p. 158).

Подпись:

3. Set the door in place. Run a bead of sealant on the back of the door trim and a couple of heavy beads across the bottom of the rough opening on the flashing where the threshold will sit. Then set the frame in its opening. From the inside, adjust the frame so that there’s a gap of about A in. all the way around the door. This will allow the weatherstripping on the door frame to seal properly. Secure the door in the opening by driving a 16d finish nail through each corner of the exterior trim and into the sheathing and studs. (Alterna­tively, you can drive З-in.-long trim-head screws.)

4# Finish fastening the door. Check the door again to see that it opens and closes with ease. If it does, then drive more 16d finish nails (or screws) 2 ft. o. c. all the way around the trim. Set all nails or screws about A in. below the
surface of the wood so they can be hidden by putty and covered with paint. Drive 8d finish nails or 2-in.-long screws through the hinge side of the jamb and into the trimmer near each hinge. If the jamb is not tight against the trimmer, slip in a shim to prevent the jamb from bowing. Shim and nail through the jamb on the lock side next, but be sure to keep nails away from the lock and deadbolt area. Finally, drive the long screws that are included with the door frame through the hinges and the jamb and into the trimmer. These help hold the entire assembly in place.

Simple flashing details

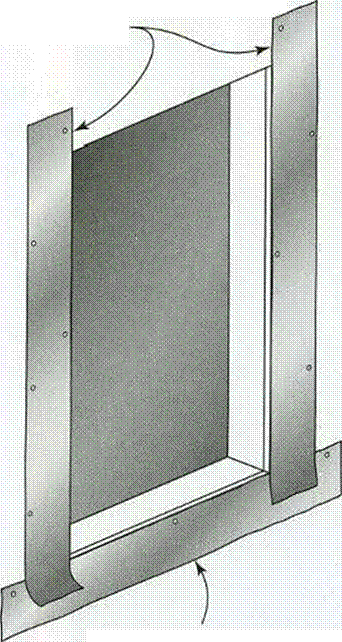
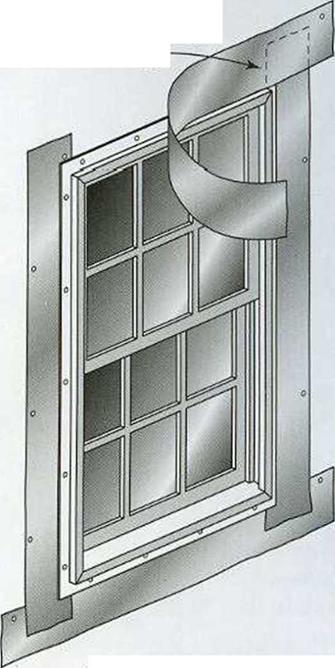
Whether or not you wrap the house, it’s important to flash around the window and door openings. Especially with windows, proper flashing can prevent the water that runs down both sides of the window from entering the wall cavity through the sill area. To flash window and door openings, I gener­ally use б-in.- to 8-in.-wide strips of felt paper, installing the strips as shown in the illustration on the facing page. Don’t forget to install the top piece of flashing after the win­dow has been set in its opening. If housewrap

Подпись: FLASHING A WINDOWПодпись: 2. Attach the side pieces to overlap the bottom piece.Подпись: 1. Fasten the bottom flashing along the rough sill.Simple flashing detailsПодпись: 4. Install the top flashing over the window flange and side flashing.Подпись: 3. Install the window.Simple flashing detailsПодпись: Cut flashing strips 6 in. to 8 in. wide from good-quality builder's felt. Secure flashing with staples or Уг-іп. roofing nails.is used, you can still install a top piece of flashing. Cut a horizontal slit in the house – wrap above the window, then slip the top edge of the top flashing piece into the slit.

STEP2 Install the Housewrap and Flash Openings

We didn’t use housewrap on this project, but this thin protective layer is worth considering on any house where finish siding is applied over wood framing. Modern housewraps, such asTyvek® and Barricade®, are lightweight, fabric-like materials that come in huge rolls and are literally wrapped around the walls of a house. The main purpose of this treatment is to form a drainage plane behind the siding to stop wind-driven water from penetrating into the wall cavity. No siding is completely water­tight, so in areas where hard, wind-driven rain is common, housewrap can help protect the walls from moisture damage. However, house – wrap is not a replacement for good flashing around doors, windows, and decks. Rather, it adds to those flashing systems, with upper layers always overlapping lower layers like shingles on a house. In addition to helping keep water out, housewrap reduces air leakage

but is porous enough to allow water vapor to escape from inside the house.

Climate plays a huge role in determining how housewraps are used. We live in a coun­try with an astonishing diversity of climates, and these varied conditions require different solutions for protecting a house and its inhab­itants from the elements. Even the type of wall covering you use can affect your wrapping strategy. Talk to builders in your area (and to the building inspector) to find out what’s used locally and why.

STEP2 Install the Housewrap and Flash Openings

Подпись: HOUSEWRAP KEEPS OUT WIND AND WATER. Modern house- wraps can be applied over sheathing or directly over framing, as was done here. After wrapping the walls completely, make "X" cuts at the window and door openings, then fold and staple the flaps inside. [Photo * Memo Jasso.] Подпись: r іПодпись: Helping HandПодпись: Old-fashioned housewrap is easy to install. Asphalt- impregnated paper, known as builder's felt or felt paper, has been around for generations. If you use felt paper instead of plastic, buy a heavy, quality product and apply it starting at the bottom of the house and working upward. Make sure each successive course laps over the previous one by 4 in. horizontally and 6 in. or more vertically (where the ends meet).Installing housewrap

Housewrap may be attached directly to studs, on top of wall sheathing, or over rigid foam. Modern plastic housewrap is usually white or gray and comes on huge 12-ft. rolls. Don’t plan to install housewrap on your own; this is definitely a two – or three-person job. The only installation tools required are a staple gun and a sharp utility knife. Here are the basic steps: [3] [4]
with a circular saw. Staple the free end of the roll near a corner of the house and unroll it over the entire side of the house, with one or two helpers stapling as you go. Cover the win­dow and door openings. When you’ve finished one side, simply keep rolling onto the next one until you’ve made your way all around the house.

3. Seal joints and repair tears, if necessary. Hopefully, you can skip this step. But if you can’t create a continuous wrap around the house, make sure you overlap the wrap by at least 16 in. or one stud space. Seal the seam with the sticky, self-adhering tape made for this purpose. Be sure to get some when you pick up (or take delivery of) your housewrap. Repair a tear in the housewrap by applying a patch from the top of the wall down over the tear, so that water will drain properly. Seal the tear with tape.

4. Cut and wrap the window and door open­ings. To finish the installation, cut an“X”-slice in the housewrap, cover each window and door opening, then pull the cut ends inside the house and staple them around the trim­mers, header, and rough sill. Staple the flaps right away so they don’t get caught by the wind and torn.

Habitat Helps New Homeowners Continue Learning

PROVIDING A FAMILY with four walls and a roof is just the first step in helping them get established. Here at the Twin Cities’ affiliate, we also aim to equip families with knowl­edge, so that they become successful homeowners. Because Habitat fami­lies are first-time home buyers, most are unfamiliar with the basic mainte­nance, repair, and budgeting respon­sibilities that come with homeowner – ship. To bridge this information gap, we provide more than a dozen differ­ent classes.

Many classes emphasize that “an ounce of prevention” helps protect a family’s investment and reduces

long-term costs. Basic maintenance classes describe how a house works from top to bottom and explain how (and why) to turn off outdoor faucets, clean out window wells, drain sedi­ment from the water heater, test fire alarms, and check for excessive mois­ture in the attic.

Habitat home-buyer classes cover more than just caring for the physical house, however. Three money-management classes cover everything from basic budgeting to the pitfalls of credit cards to teaching children how to use money wisely. Other classes cover topics such as poi­sonous household products, city ordi­
nances that affect property, block clubs, safety, and crime prevention.

Because Habitat has a commitment to environmental stewardship, our classes also cover recycling; ecologi­cally friendly (and economical) prac­tices, such as making cleaning prod­ucts from natural ingredients; and energy and resource conservation. These practices often seem like com­mon sense to homebuyers who have come from countries without the wealth of natural resources we enjoy here. And while they learn new ways of doing things in class, Habitat fami­lies often share old traditions as well.

-Cheryl Winget

Подпись: SNAPSHOTS

The walls look strange covered with foam boards and wood panels. . .

Vinyl siding will be a big improvement…

All the windows must be installed before the siding goes on.. .

It takes teamwork to get the window frame into its opening and centered properly. . .

Vinyl starter strips and different kinds of trim must be nailed in place before we install the siding panels. ..

Habitat Helps New Homeowners Continue Learning

Подпись: INSTALL FASCIA BOARDS. This rough exterior trim will soon be covered with aluminum cladding. Nail the 2x4 trim boards to the rafter and truss ends. Подпись: і • — 1Подпись: Helping HandПодпись:

Exterior trim

Aluminum-clad exterior trim goes well with vinyl siding because, like vinyl, it’s also a no-maintenance finish treatment. Aluminum sheets have a factory-applied finish and come on large rolls in various widths. Often referred to as coil aluminum, this sheet material is bent at the job site to fit around exterior trim boards.

To prep for this treatment, rough fascia boards (also called gutter boards) are nailed to the ends of the roof trusses and to the rafter tails on the roof extension above the side door (seethe photo at right). Some of these trim details are covered in chapter 5 and should be completed before the roof is sheathed and shingled. Other trim details, such as the boxed gable-end return shown on p. 171, can be done as the aluminum cladding goes on.

Materials HOW TO ORDER VINYL SIDING

HORIZONTAL SIDING PANELS are usually 12 ft.

6 in. long, though some companies make longer panels. Siding is sold by the square, or the number of panels needed to cover 100 sq. ft. To estimate how many squares of siding you’ll need, calculate how many square feet of wall surface you need to cover, add 10% for waste, then divide by 100.

Order enough starter strips to go around the entire building; these typically come in 10-ft. lengths. You’ll also need trim for each inside and outside corner. You can order trim pieces that are the same color as the siding or use a contrasting color, as we did on this house.

If the windows didn’t come with an integral J-channel, or channel surround, then order enough

J-channel to cover the top and the sides of all the windows and doors. J-channel is also used along the rake and soffit, as shown on p. 169. You also need to order enough undersill trim to go be. ow each window and to cap the top edge of the last piece of wall siding on the eave walls, which is how they are often finished.

Large-head, ГЛ-іп. to 2-in. galvanized nails are used to attach both the siding and the trim.

A 50-lb. box should be adequate for a small house. Tinally, don’t forget about the vinyl soffit panels for closing in the area under the eaves. As shown in the following pages, soffit panels may require J – or F-channel trim.

Подпись: DO FINAL SHEATHING WORK. To save time, apply foamsheathing panels over window and door openings, then make cutouts with a handsaw.Materials HOW TO ORDER VINYL SIDING

STEP 1 Install the Remaining Sheathing and the Rough Exterior Trim

Straight courses of finish siding and sharp­looking exterior trim depend on good prep work on the sheathing and exterior trim sur­faces that will be covered with aluminum cladding. A good deal of wall sheathing will already be done at this stage. Now that finish siding is about to be installed, it’s important to make sure the wall surfaces are flat and free of gaps that will cause dips or irregularities when the vinyl is installed. When installing foam sheathing, you can sheathe right over window and door openings, then use a hand­saw to cut out the foam from the opening (see the photo at left).

If necessary, install wood sheathing or foam board over any unsheathed areas on

Подпись: BAFFLES KEEP INSULATION OUT OF THE EAVES. Nail these panels to the top of the wall between the roof trusses. which siding will be installed. These areas include the rim joist and headers above win­dows and doors. Along eave walls, its also essential to extend the sheathing between the roof trusses above the top plate of the exterior wall, as shown in the photo at right. This additional sheathing acts as a baffle, pre­venting attic insulation from spilling out into the eaves. Cut each OSB panel so that there are a couple of inches of open space between the top edge of the panel and the top edge of the roof trusses. This clearance is essential for good ventilation; it allows air to be drawn through the soffit vents and into the attic space.

Safety on the lob SAFE SCAFFOLDING KEEPS YOU OUT OF HARM’S WAY

ON SINGLE-STORY CONSTRUCTION, most scaffold work can be done with good sawhorses and good planks. Make sure the planks you choose have a solid, even grain and small, tight knots.

If a plank breaks, a fall of only a couple of feet can put you out of commission for a while. And just because you buy good scaffold planks today doesn’t mean that they will be safe to use a year from now, especially if they’re left out in the elements. I prefer to use manufactured decking planks made of steel and aluminum. They are more expensive, but they make a more secure working platform.

When you have to work higher up, you’re better off buying or renting solid-pipe scaffolding. These 6-ft.-high units are easy to set up, and they create a 5-ft. by 8-ft. working platform. Make sure the legs are set on a firm foundation and not just on bare earth. Pipe-scaffolding units can be stacked on top of each other for working on a two-story building. If you will be working more than 10 ft.

high, ask for guardrails, which are easy to install and help protect you from an accidental fall.

Some builders like to use pump jacks and ladder jacks as an alternative to pipe scaffolding. Available at most supply houses, these jacks are useful when installing sheathing, housewrap, or siding. Used in pairs, pump jacks attach to double 2×4 or single 4×4 (372-in.) posts that are held upright with braces temporarily nailed to the roof or to the wall fram­ing. Each pump jack can move up and down on its post to adjust the elevation of the work platform.

If you’re using pump jacks, make sure the units come with a built-in guardrail that protects you from falling backward. Make sure the uprights rest on a solid base and not on bare earth.

Ladder jacks are steel brackets that hook on the rungs of ladders. Once the brackets are secured to a pair of ladders, you can set planks on the brackets. If you want to move up and work at a higher level, you must remove the planks and reposition the brackets.