Category Habitat for Humanity International

Use a drywall router to save time

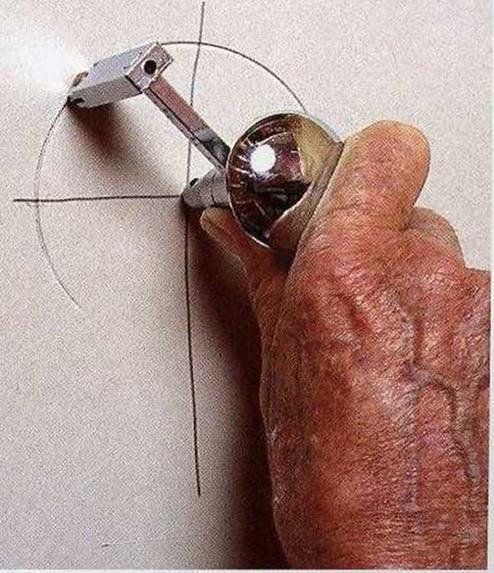
Most of the time you can drywall right over door and window openings, attic access holes, and heating vents, then cut around the outlet boxes with an electric drywall router, as shown in the top photo at right. (Get a feel for this tool by making some practice cuts on scrap drywall.)

Make sure the electrical wires are shoved to the back of all the boxes, and double-check to be sure there isn’t power at any of the boxes for which you’re routing holes. Tack the sheet on the ceiling or wall, then mark on the sheet the location of each outlet with a line noting the edge of the box and an “X” showing the side the outlet is on. Don’t nail too near the outlet or you could break the drywall, but be sure to drive enough nails or screws into ceil­ing panels so they won’t fall down.

Set the router bit to extend aboutъ/ in. past the base plate. With the router running, insert the bit into the center of the box and gently move it until it hits the side of the box. Pull the bit out and reinsert it just to the outside of the box. Cut in a counterclockwise direction, maintaining slight pressure against the box.

The router generates some dust, so wear a good mask. A router or a large drywall saw can be used to cut larger openings as well.

Dimples are essential

Before you install the first panel on the ceiling, it’s important to understand how to fasten drywall to the joists, studs, and other framing members. Whether you’re using nails, screws, or both, yon must leave a dimple in the panel with every fastener you drive. This small recess will later be filled with drywall com­pound as the wall surface is filled and finished. Screw guns can be set to pull the drywall panel tightly against the framing members and drive the screw just below the surface

without breaking the face paper. If you’re driv­ing nails instead of screws, your last hammer blow should push the drywall tightly against the wood and set the head of the nail in a shallow dimple without breaking the paper surface (see the bottom photo below).

Подпись: Helping HandПодпись: Rent your equipment. You can buy or rent a com-mercial lifter that holds drywall against the ceiling as you fasten it in place, or you can make your own inexpensive supports from some scrap lx stock. The braces, sometimes referred to as dead men or preachers, are extremely useful; I don't hang drywall without a pair of them.

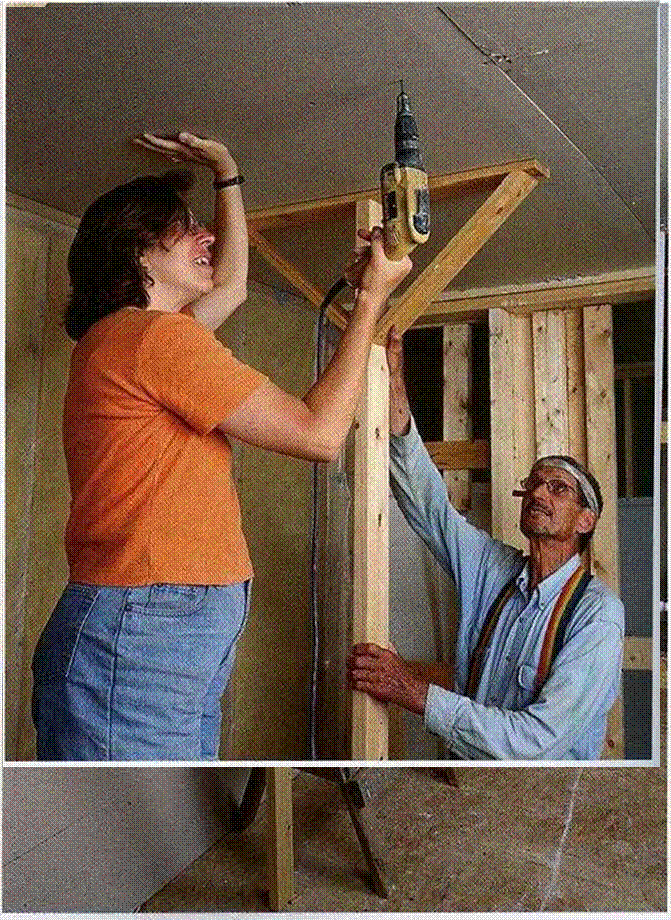
Подпись: T-SUPPORTS ARE HELPFUL HOLDERS. Easily made on the job site, T-supports hold ceiling panels in place, allowing you to concentrate on driving nails or screws.
Use a drywall router to save time

Dead men are useful

Whether you have one helper or several, you 11 find it useful to have a couple of drywall T-supports (also called preachers or dead men) to brace each panel against the framing while you drive enough screws to secure it. If possible, always start by installing a full-size sheet against one corner of the ceiling. Lift one end of the sheet into position, then raise the other end against the joists while holding the edge against the wall. Wedge the T-supports underneath the panel, then nudge the panel into its final position. Set up short ladders or sawhorses to stand on as you drive the fasteners (see the photos above).

Fasten according to code

Hold screws or nails back about % in. from the edges of the panel, and drive them in straight so you don’t break the paper. Follow the fas­tening schedule for drywall that applies in your area. When ceiling joists are 24 in. o. c., nails or screws are usually driven every 8 in. along the edge of the panel and every 12 in. in the middle.

Some builders use drywall panel adhesive when attaching sheets of drywall. The adhe­sive is applied with a caulking gun, just like caulk or sealant. With panel adhesive, the need for screws or nails is greatly reduced. Don’t use adhesive over a poly vapor barrier or kraft

г


Learning from Your Fellow Volunteers

WHEN VOLUNTEERS SHOW UP to

build a Habitat house, they often find themselves being assigned to jobs they’ve never done before. Still, with the proper training and supervi­sion, they’re almost always capable of rising to the challenge and making a significant and meaningful contribu­tion to providing another family a decent home. And sometimes in the process stereotypes are broken and we learn from one another.

On the second day of a six-day blitz in 1993, during which we built 20 houses, I was roofing with Bunny Church and her friend, Stuart Phillips, it was a hot, steamy day,

and we had just half a day to start and finish shingling a roof, so we set to the task energetically and with great focus. After a couple of hours of hard labor up on that roof, the temperature rising all the while we were working, we were tired, dirty, and thirsty. Sud­denly, Stuart stopped our roofing production line, sighing, Tm sorry, but I just have to put on some lipstick. Lipstick always makes me feel better.” She excused herself, climbed down the ladder to the ground, pulled her lipstick out of her pocket, then went to the Porta Potti. A moment later, Stuart emerged, still dirty and dusty, but also smiling and radiant, her lips
perfectly covered with pink lipstick.

It did help!

Despite being something of a tomboy, I appreciated the lesson Stuart had unintentionally taught me—that it’s okay to assert your femi­nity on the job. And that’s one of the wonderful things about Habitat— everyone is welcome. How many roofers wear lipstick? If your heart is open, the diversity you encounter while working on a Habitat house just might enrich your life. And remem­ber: Lipstick can make you feel better!

-By Anna G. Carter

[Photo e’Anna G. Carter.]

Learning from Your Fellow Volunteers


Подпись: іПодпись: MAKE CUTOUTS WITH A ROUTER. Equipped with a narrow straight bit, this power tool cuts holes around electrical outlet boxes after a drywall panel has been tacked in place.Learning from Your Fellow VolunteersПодпись: MAKE A DIMPLE. Use a dry- wall hammer when nailing panels in place. The curved hitting surface is designed to dimple the drywall surface, setting the nail and creating a depression that can be filled with drywall compound.Learning from Your Fellow VolunteersПодпись: Helping HandПодпись: Snap lines to locate studs. If you miss framing members when driving fasteners near the center of a panel, you can snap lines to locate studs and joists. Use white chalk, which will not bleed through finish coats of paint. Or you can draw a pencil line along a straightedge.

STEP 2 Install the Ceiling Panels

It’s best to drywall the ceiling before you do the walls. This way, the top edges of the wall panels can butt up against the ceiling panels, supporting them along the edges. The long

edges of ceiling panels run perpendicular to the joists or joist chords. In bedrooms and other small rooms, you’ll probably be able to cover the full length of the ceiling with 12-ft. panels. If the ceiling is more that 12 ft. long, stagger the end joints where the panels butt together, just as you do on floor and roof sheathing panels. Try not to have a drywall joint land on an electrical or heat outlet, because this makes it harder to tape and hide the seam.

Measuring and cutting drywall panels

If you watch professional drywall installers measure and cut panels, you’U be impressed with the speed and accuracy of their work. Although you may not achieve speed right away, accuracy is possible from the start if you use some of the tips explained below. And with accurate cuts, you’ll have a much easier time mudding and taping the panels.

MAKE STRAIGHT CUTS. Instead of cutting a panel to the exact dimensions you measure on a wall or ceiling, cut it % in. short. This leaves a %-in. gap on both sides of the panel, allow­ing you to fit the piece without binding on neighboring walls or panels. Make a straight cut by scoring along the cut line; snap the cut open so the panel folds back on itself and slice through the resulting crease on the back.

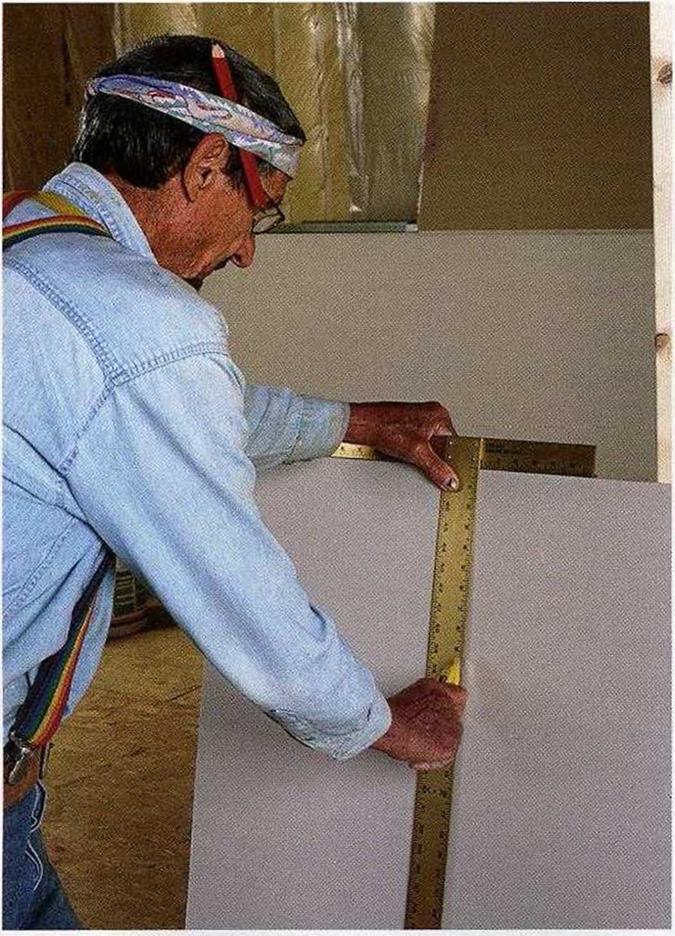
Mark and cut on the “good” side of the panel. Use a sharp utility knife to score the sheet along the cut line. If you have a drywall T-square and need to make a square cut, guide the knife against the edge of the square (see the photo at left on p. 218). Take care not to let the knife slip and cut the hand that’s hold­ing the T-square. Just cut through the paper

STEP 2 Install the Ceiling Panels

CUT THE DRYWALL PANEL TO LENGTH. First score the sheet with a sharp utility knife. A large T-square, held to the measurement mark, guides the cut (see the photo at left).


STEP 2 Install the Ceiling Panels

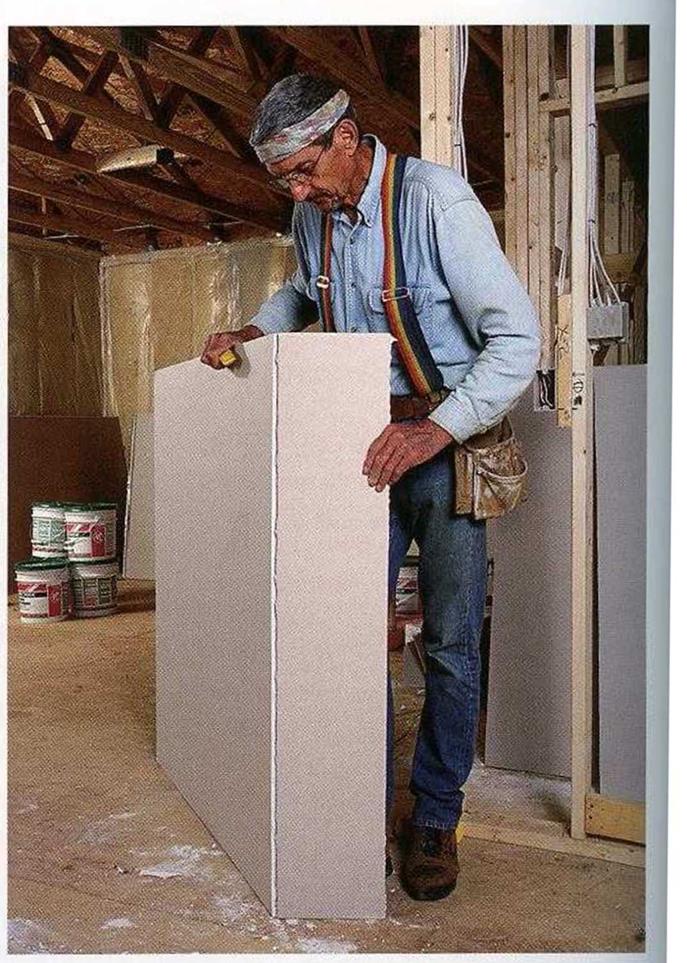
Once scored, the drywall breaks right along the cut line (see the photo at right). Cut the piece free by slicing along the crease on the back.

Подпись: Helping HandПодпись: Remove fasteners that miss the framing. It's easy to tell when a drywall screw or nail misses a stud, joist, or other framing member. When that happens, remove the fastener and make a dimple (a concave mark with a drywall hammer) at the spot so the hole can be filled and hidden with joint compound.

and slightly into the gypsum core—about % in. or so. There’s no need to force the blade deep into the panel.

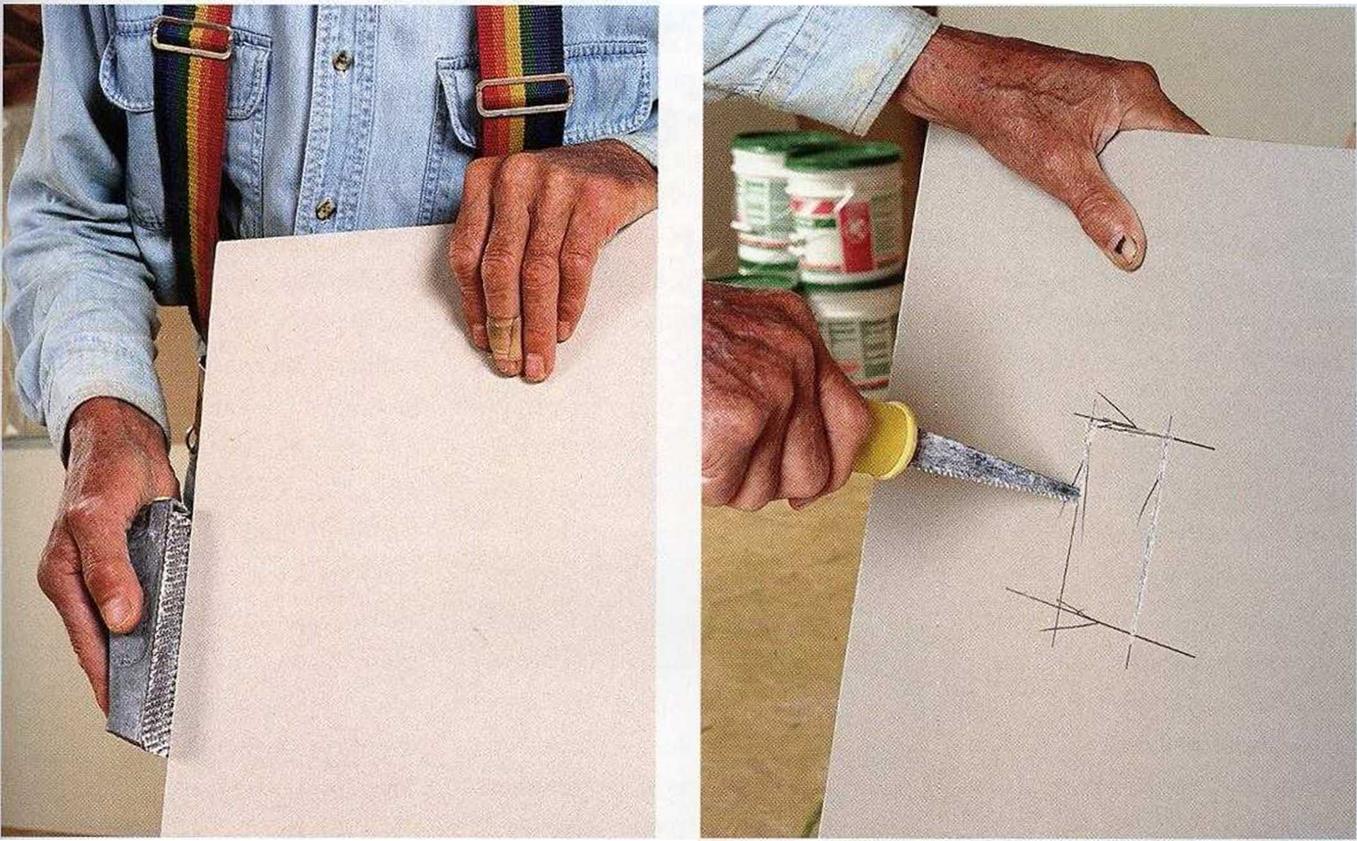
Once the panel has been scored, snap it away from the cut, as shown in the photo above right. Running a utility knife along the crease on the back of the panel usually sepa­rates the pieces. If they’re not quite free, bend the cut piece forward and separate the two pieces. If the cut edges are rough or uneven, smooth them with a Surform rasp (see the top left photo on the facing page).

CUT ACCURATE HOLES IN PANELS. Holes for electrical outlet boxes, heating vents, and pipes must be laid out and cut accurately. Take your measurements from a wall, ceiling, floor, or sheet of drywall already in place. I like to transfer these measurements to the drywall panel with a T-square. For electrical outlets and heating vents, use a T-square to outline the hole, then make the cut with a small dry – wall saw. Plunge the point of the saw into the panel from the “good” side and saw along the cut line (see the top right photo on the facing page). The finished cut should be within % in. of the outlet.

SMOOTH ROUGH EDGES. A Surform rasp works well when A DRYWALL SAW IS MADE FOR THE JOB. This small saw has

you need to smooth or trim the edge of a drywall panel. a pointed end for making plunge cuts in dry wall. It also

works well for making small rectangular cutouts to fit electrical outlet boxes.


STEP 2 Install the Ceiling Panels

For a dryer vent or a round electrical out­let, measure and mark the center of the cut. Then use a compass or another round electri­cal box as a template to outline the hole. To make the cut, use a small drywall saw, a utility knife, or a circle-cutting tool made specifically for this job (see the bottom photo at right).

Подпись: USE A CIRCLE CUTTER. This tool is ideal for cutting round holes in drywall for pipes or round electrical boxes.STEP 2 Install the Ceiling PanelsAnother method for marking the location of an electrical box, regardless of its shape, is to rub the face of the box with chalk or keel, place the sheet in position on the wall, and press the sheet against the outlet. The chalk will show you where to cut. Cut gently so you can avoid tearing the paper facing on the “good” side.

Ordering Drywall and Associated Supplies

Ordering Drywall and Associated Supplies

LIKE SHINGLES, SIDING, and insula­tion, drywall amounts are calculated by the square footage of the area to be covered (in this case, the walls and ceilings). Rather than measuring the ceiling and walls in every room, experienced drywallers use a shortcut calculation. They simply multiply the total square footage of a house by 3!! (3.5). For instance, a 24-ft. by 36-ft. house has 864 sq. ft. of floor space, and 864 times 3.5 equals 3,024 sq. ft. of drywall coverage.

DRYWALL IS HEAVY! Carrying a long sheet, like this 12 footer, is definitely a two-person job.

[Photo ® The Taunton Press, Inc.]

Your drywall order

For the modest-size houses that Habitat builds, it s best to make up most of your drywall order with 12-ft. drywall panels. A 4×12 sheet of dry – wall is more difficult to carry than a 4×8 sheet, but it covers more area and often eliminates the need for butt joints on a wall or ceiling. To fine – tune your drywall order, subtract any greenboard you will be using in the bathroom. Also, if you decide to go with %-in. drywall on the ceiling, sub­tract the floor area (864 sq. ft. in our example) from the square-foot total, then order that amount of %-in. dry – wall for the ceiling.

Have the drywall delivered several days before you plan to hang it. If you’re using any %-in. drywall, stack those sheets on top of the %-in. sheets. Storing all the drywall in one room creates a lot of weight on a few floor joists. Therefore, make a neat pile in each room, with the drywall flat on the floor, finish side facing up.

Screws and nails

Professional drywall hangers rarely use drywall nails. Screws hold better than nails, and a screw gun automati­cally drives the screws just the right distance, dimpling the drywall surface without breaking the paper.

If you’re not a seasoned drywall hanger, you’ll probably find it useful to drive a few nails to hold a panel in place against the studs or ceiling joists. Then you can finish installing the panel with screws. A 5-lb. box of dry – wall nails and a 50-lb. box of l!4-in. drywall screws should give you all the fasteners you need for a l,200-sq.-ft. house. If you’re hanging %-in.-thick panels, order 1 %-in.-long fasteners.

Joint tape, corner beads, and drywall compound

You can order these finishing supplies when you order your drywall. Joint tape comes in rolls; order 400 ft. for every 1,000 sq. ft. of drywall.

Every outside corner covered with drywall requires a corner bead. These steel or plastic trim pieces are typi­cally sold in 8-ft. or 10-ft. lengths. When estimating the amount of bead to order, make sure you account for corners where drywall wraps around window and door openings.

As far as drywall compound goes, the typical Habitat house requires about nine 5-gal. buckets. For the Charlotte house, we used an all-purpose compound called Durabond®, which comes in powdered form and is mixed with water at the job site. Other folks prefer to buy premixed compound, which comes in buckets or boxes.

Ordering Drywall and Associated Supplies

UTILITY KNIVES AND SPARE BLADES. Most straight cuts in drywall are made with a utility knife. Have a good supply of new blades handy. A sharp blade cuts cleanly through a panel’s paper facing, while a dull blade can tear the paper.

DRYWALL SQUARE. This large, aluminum, T-shaped square enables you to quickly and easily make straight, square cuts in drywall.

SCREW GUN. A screw gun takes the guesswork out of fastening drywall because it sinks dry- wall screws just the right distance into the panel. This tool resembles an electric drill and holds a replaceable Phillips-head bit.

DRYWALL HAMMER. This hammer looks like a small hatchet with a convex hitting surface.

The curved face allows you to set the nail below the surface of the drywall without breaking the paper. The hatchet end is not sharp and can be used for levering or wedging drywall into place.

SURFORM® TOOL. Designed to function like a handplane, this shaping tool is very useful for trimming small amounts off the edge of a panel to improve its fit on the wall or ceiling. Avoid large Surform tools; the smaller ver­sions are more maneuverable and fit in a pouch on your tool belt.

Materials SIZES AND TYPES OF DRYWALL

DRYWALL IS MADE by sandwiching a gypsum core between two sheets of paper. The "good" side of the panel is faced with smooth, white paper that takes paint easily. The "bad" side is darker in color, with a rough, porous paper surface. Panels (also called sheets) of drywall are packaged in pairs; to open the package, simply pull off the strips of paper that extend along each end.

The standard width for drywall panels is 48 in. Different lengths are available but, for affordable housing, the most commonly used lengths are 8 ft. and 12 ft. The most common thickness for drywall is Уг in. However, Ye-in.-thick panels are often used on ceilings where the joists are spaced 2 ft. o. c. because they are less prone to sagging. Most codes require Ys-in. panels between the garage and the house for fire resistance. If you
use Vs-in. drywall on the walls, be sure to order wider doorjambs.

Water-resistant drywall is often used in high – moisture areas, such as bathrooms. Called "green – board" because of its green-paper facing, it is treated to resist moisture damage but is not waterproof. It’s most often used to cover wall areas above tub and shower enclosures. Greenboard can be taped and painted just like regular drywall. It should not be installed on the ceiling, unless the joists are spaced 12 in. o. c. to keep the board from sagging.

The short (48-in.) ends of a drywall panel are cut square, leaving the gypsum core exposed. The long edges of the panel are faced with paper and tapered so that the seams between panels can be leveled with the surrounding drywall during the fin­ishing process.

PREPARING FOR DRYWALL INSTALLATION

Подпись: Electrical switch = $ location centerline holder 24 in. to centerline Подпись: Before installing drywall, mark on the floor with keel the location of wall studs, electrical boxes, and backing.Materials SIZES AND TYPES OF DRYWALL

warm weather. Otherwise, make sure the wood dries out. You can even run a dehumidi­fier inside, if necessary.

Clean and mark the floor

Take time to clean up any scraps of wood or trash on the floor. Once the floor is clean, use a piece of keel (I use red because it shows up well) to mark the stud, trimmer, and cripple locations on the floor and the joist locations on the top plate. Knowing the location of studs and joists makes it easier to nail off dry – wall and, later, baseboard trim.

It’s also a good idea to mark the locations of electrical outlets on the floor (see the top illustration at right). This helps avoid installing drywall panels over outlets, which can easily happen if you’re not paying atten­tion. If it does happen anyway, at least there will be a mark on the floor telling you where the outlet is located. You can also mark the location of the backing placed in the walls to support towel racks, grab bars, toilet-paper holders, and so on.

Check and correct bad studs

Even if all the studs were crowned in one direction during wall framing, it doesn’t ensure a perfectly straight wall. Sight down the length of the walls or lay a straightedge across them to locate bad studs. Replace any badly bowed studs, or fix a bowed stud by making a cut into the bowed area, forcing the stud straight, and bracing it with a lx cleat (see the bottom illustration at right).

Tool up to hang drywall

The tools you need to install drywall are pretty basic. In addition to the chalkline and tape measure you’ve used for the work cov­ered in earlier chapters, you’ll need the follow­ing tools:

Dry wall and Painting

I’M NOT SURE WHEN DRYWALL—also known as gypsum board, wallboard, and Sheetrock®— was first used in construction. I have seen drywall on pre-WWII houses, but we defi­nitely didn’t have drywall in my old prairie home. It wasn’t until the late ’50s in California, where I was working, that drywall became the preferred wall covering in residential housing. “Knock on the Wall! Demand Genuine Lath and Plaster!” was the rallying cry of the once-mighty plaster industry, as they struggled against the newcomer—drywall.

Big plaster fought a losing battle. It took two or three weeks to cover walls with layers of plaster, and the process left the house frame waterlogged. In the winter, it could take a month or more for a house to dry out well. Cabinets installed after plas­tering often had sticky drawers. In addition, passage doors were hard to open, and hardwood floors expanded and buckled. It’s no wonder the construction industry switched to drywall. It allowed builders to complete houses in record time.

Drywall installation can begin once you’ve passed all your inspections—electrical, plumbing, heating, framing, insulation, and vapor barrier. Drywall is not difficult to secure to ceilings and walls, but it takes more skill to leave the finished walls straight

Q.

1

Get Ready to Install Drywall

5

Mud, Tape, and Finish the Drywall

0

2

Install the Ceiling Panels

6

Paint the Ceilings and Walls

ca

3

Install the Wall Panels

7

Prepare and Paint the Interior Trim

С/Э

4

Install the Corner Bead

8 Paint the Exterior Siding and Trim

Dry wall and Painting

щят


Dry wall and PaintingDry wall and Painting

Подпись: Helping HandПодпись: Drywall has delicate corners and edges. When you store and handle sheets of drywall, make sure you protect the panels' edges and corners from getting damaged.

and smooth. This chapter will tell you how to order and store drywall, which tools and methods you need to cut and “hang” it, how to tape and finish the joints, and how to paint the walls and trim. By the time you’re done with these jobs, your house will look a lot more like a home.

STEP 1 Get Ready to Install Drywall

There’s some important prep work to be done before you take delivery of your drywall order and before any installation work can begin. In addition to following the advice explained below, see the sidebars below and on p. 216 for information on sizes and types of drywall and how to order and store the material.

Make sure the studs and joists are dry

Framing lumber used today often arrives at the job site with a high moisture content. Over time, it will shrink—sometimes quite a lot. When the studs and joists shrink after the drywall has been installed, the fasteners can work loose. A loose nail or screw can create a noticeable and unsightly bump, or nail pop, in the drywall surface.

To reduce the chances that nail pops will mar your drywall work, you may need to close in the house and turn on the heat for a couple of weeks. Leave a couple of windows cracked open to allow moist air to escape as the wood dries. You can ignore this advice if you’re working with dry wood or if you’ve had the good fortune to frame your house in clear,

Energy-Saving Tips

WHILE YOU’RE THINKING about insu­lation and ventilation, you should also pay attention to a few other details that relate to energy conservation. Taken together, these small improve­ments can make a big difference in how well your house works.

a Locate the water heater near the kitchen and bathroom. This avoids long runs of pipe that increase plumbing costs and dissipate heat between the water heater and the faucets or showerheads.

a In cold climates, keep water-supply lines out of exterior walls.

a. Use an insulated wrap for the water heater. Some water heaters come with built-in insulation. If yours doesn’t, buy a water heater insula­tion kit to reduce heat loss and con­serve energy.

a Insulate all hot-water lines, and insulate cold-water lines in a crawl space. Both foam and fiberglass wrap pipe-insulation kits are avail­able at building-supply outlets and home centers.

a. Install low-flow showerheads. A showerhead with a built-in shutoff valve provides even more savings, allowing you to shut off the water while soaping up.

a Consider using a small solar panel to preheat your water. The sun’s energy is free. With a solar panel, you can reduce the energy used by your hot-water heater.

Habitat for Humanity has devel­oped many guides to help home­builders and homeowners save energy and money. They are available online and from HFH International (see Resources on p. 278). Take advantage of these resources and increase your understanding of how to build durable, energy-efficient houses with good indoor-air quality.

time that people are generally home (it doesn’t make much sense to exchange air when no one’s home). The fan we have in our home is centrally located in a hallway, but check with your HVAC contractor to locate yours. Beware of bargain-priced fans. Those models are almost always noisier than other vent fans. An experienced HVAC contractor can advise you on which models run quietly and reliably.

Whenever fans are blowing indoor air out­side the house, fresh air must come in to replace it. This ensures a healthy supply of fresh air and prevents negative air pressure from drawing exhaust gasses from the fire­place or furnace flues, which is a serious safety hazard. The simplest way to provide replace­ment air when exhaust fans are running is to open a window or two. It’s not necessary for
the window to be fully open; just a crack will usually do. If it’s cold outside, open a window in a utility room, unused bedroom, or some­where away from the main living area.

If you’re building a house where the win­ters are long and very cold (in Maine or Minnesota, for example), it may be necessary to have an HVAC contractor install a heat recovery ventilator (HRV) to bring replace­ment air into the house at a more comfortable temperature. Those devices typically work by blowing warm indoor air outdoors while pulling an equal volume of outside air indoors. Since only a thin membrane sepa­rates the passing airstreams, some of the inte­rior’s warmth is transferred to the fresh incoming air.

Meeting My Role Model on a Habitat Build

Подпись: THE FIRST TIME I remember working with Helen Sanders was when we were patching a rotten roof on a Habitat rehab in Charlotte, North Carolina, in 1992.1 was up on theПодпись: PHILIPPINES

roof, cutting out rotten sheathing with a circular saw, reaching as far as I could, with my foot supported by Helen, whom I’d just met. Just as I was stretched to my limit, depending totally on her for support, Helen said, “You know, my friends say a 72-year-old woman doesn’t have any business being up on a roof.” I fin­ished cutting out the rotten section of roof, but she had shaken my world: T thought she was 50.

Since then, Helen and I have become best friends. It has been nine years since we were up on that roof. We have traveled with Habitat to Africa, participated in several of Jimmy Carter’s Habitat projects, and worked hundreds of days together for our local affiliate. Helen continues to
work every Thursday in the field, moving at a steady, even pace. Her specialty is vinyl siding, though she can do it all.

Helen, who was a Navy Lieutenant in 1945 and was widowed nearly 25 years ago, is unflappable, taking everything in stride. Now 81 years young, her experience and attitude provide me with a wonderful perspec­tive on life. Over the years, she’s become almost family, helping me build my two-story garage and spend­ing time with my family (my children adore her), all the while quietly exud­ing a serenity I hope someday to attain myself. Role models are where you find them, but I found mine on a roof, working for Habitat.

-Anna G. Carter

[Photo ® Anna G. Carter.]

Подпись: NSIDEПодпись: 208 I COMFORT

for installing a poly vapor barrier are provided in the next section.

Vapor barriers are often eliminated in warm climates, especially in areas of low humidity, such as the Southwest. But you may want to consider installing a vapor barrier beneath the exterior siding if the house will be exposed to warm, moist air outdoors and fre­quent air-conditioning indoors.

In mixed-climate zones—the region that extends from the mid-Atlantic states through the Carolinas and west by southwest to north­
ern Texas—the need for a vapor barrier is minimal. In those regions, where mild winters are the rule, any moisture that does enter the wall cavities can dry from the outside in during the summer and from the inside out during the winter.

Installing a polyethylene vapor barrier

To work effectively, a vapor barrier must be installed with care. Even the smallest holes in a poly or kraft-paper vapor barrier must be

sealed with houscwrap tape or its equivalent. Use a durable, high-quality tape; neither duct tape nor packing tape will hold over the long run.

A friend of mine is a carpenter in Fair­banks, Alaska. They’re serious about vapor barriers up there. They cut sheets of poly from rolls that are 10 ft. to 20 ft. wide and 100 ft. long, covering the entire ceiling and all the exterior walls (on the inside). They even make sure to put poly behind a bathtub installed against an exterior wall.

In any given room, there are two steps to installing a poly vapor barrier. This isn’t a job you want to do solo; have helpers so that some can spread the sheet out over framing mem­bers while others staple it fast. You can begin as soon as all the insulation is in place.

1. Install the ceiling poly. Cut a piece of poly to fit the ceiling. If you have to use several pieces, make sure they overlap by at least one joist (or rafter, if you’re working on a cathe­dral ceiling). Seal overlaps with a layer of mas­tic, acoustical sealant, or housewrap tape. At the edges of the ceiling, the poly should lap at least 3 in. down onto the walls. Begin stapling the poly to the joists or joist chords in the center of the room and work out toward the walls. My friend staples about 12 in. o. c. through small, precut squares of heavy paper. This keeps the poly from tearing. Fit the poly tightly into all corners so the drywall will go on easily. The drywall holds the poly tight against the studs and insulation.

2, Install poly on the walls. Make this sheet continuous so that it laps over the ceiling poly along the wall’s top plate and extends past the bottom plate to lap about 3 in. onto the sub­floor surface. First staple the sheet along the top plate, working from the upper center of the wall and down and out to the edges of the
wall. If you need to join one sheet of poly to another, overlap them by at least one stud and seal the lap as described previously.

You can sheet right over door and window openings, then cut openings in the poly after it’s completely stapled in place. If the windows and doors have already been installed, cut the poly along the inner edge of the jambs. If the windows and doors haven’t been installed yet, wrap the poly around the trimmers, headers, and sills. Avoid loose flaps that can catch the wind and cause tearing.

Подпись:To prevent leakage at electrical outlets, use airtight boxes. Available at most electrical – supply stores, airtight boxes have a broad, flex­ible gasket around the front edge, where a poly barrier can be sealed easily. Alternatively, you can simply cut a box-size opening in the poly and seal the poly to the electrical box with a bead of caulk (see the photo below).

Meeting My Role Model on a Habitat Build

Подпись: Helping HandПодпись: Avoid single-speed fans. You'll appreciate having a vent fan that can operate at more than one speed. Multiple-speed and variable- speed models cost a little more, but they enable you to use a lower, quieter speed during extended operation.STEP 4 Provide Adequate Ventilation

Now that we have a tight, well-insulated house, what do we do when we want a breath of fresh air? And how can we rid the house of kitchen odors and steam from cooking, show­ers, and the like? Indoor-air-quality problems are magnified in a new house because of fumes from new carpets, vinyl flooring adhe­sive, and paint. Obviously, you can open a couple of windows to get some fresh air, as long as the weather is cooperative. But what if you’re not comfortable opening windows in your neighborhood? That’s a problem. And what if it’s -15°F outside? What if its 105°F and humid? Opening windows when the weather is extreme or unpleasant undermines the effort you put into creating an energy – efficient house. There is a better solution, and it’s called mechanical ventilation.

All houses need at least a few small fans in critical locations where large volumes of vapor are created. A mechanical ventilation system can help maintain good indoor-air quality without making a lot of noise or cost­ing a fortune. Unfortunately, my experience is that many local building codes (and build­ing inspectors) have some catch-up work to do when it comes to understanding house ventilation. You’re better off finding a knowl­edgeable and reliable HVAC (heating, ventila­tion, and air-conditioning) contractor with up-to-date knowledge of home ventilation requirements. That said, proper ventilation for small, affordable houses isn’t all that difficult to obtain.

Source ventilation is the key to reducing moisture and odors

You can start by installing adequate spot, or source, ventilation wherever moisture or odors are created. Venting moist air directly
to the outside prevents it from escaping through the walls or ceilings, where it can cause damage. At a minimum, showers and stoves should have exhaust fans that are con­trolled by simple on-off switches or wired to come on automatically when a bathroom light is turned on or the stove is being used. For a stove installation, mechanical ventilation is usually provided by a vent hood equipped with a fan. In a bathroom, a variety of ceiling – mounted fans are available, including models with built-in lights.

Exhaust fans in moisture-producing areas should always be vented directly outdoors. That means out through a wall or up through the roof and not into an eave soffit or a crawl space. When we moved into our home in Oregon, I discovered that the clothes dryer was vented into the crawl space. Some pretty creepy looking stuff was growing down there in the dark. Even worse is venting moist kitchen or bathroom air into the attic.

Try to keep vent runs short—less than 10 ft., if possible. Avoid running vents through the attic, if possible; install them in interior soffits and dropped ceilings instead. If you can’t avoid running a vent through the attic,

then make sure it is well insulated. This is cru-

%

cial in cold climates, where heat inside the attic can cause ice damming along the eaves. This is serious business, so pay attention to the details.

Good indoor-air quality requires air exchange

We all need fresh air to stay healthy, and in a tightly built house, some form of mechanical air exchange is essential. You can provide air exchange fairly inexpensively by using a bath­room exhaust fan controlled by an automatic timer. Look for a fan that moves air at 80 CFM (cubic feet per minute) to 120 CFM. Set the timer to run the fan about two-thirds of the

Meeting My Role Model on a Habitat Build

210


COMFORT INSIDE


KEEPING COLD AIR FROM ENTERING. AT THE RIM JOISTS

Подпись: To keep cold air from entering on top of the floor insulation, ensure that insulation is right up against the subfloor (above, left) or roll the insulation up the inside of the rim joist to the subfloor (above, right). Either of these techniques will help prevent a cold floor. Helping Hand

Store fiberglass scraps in a garbage bag. Spare and scrap pieces of fiberglass can easily blow all over a job site. To keep this fluffy material under control, put it in a large plastic garbage bag. Partial rolls can also be stored in a plastic bag until needed.

Подпись: SUPPORTING INSULATION BETWEEN FLOOR JOISTSПодпись:Подпись: InsulationПодпись: Wood lath nailed to the bottom of the floor joists 12 in. to 16 in. o.c.Подпись: Metal rods between joists about every 12 in. o.c.Подпись: Plastic mesh or landscape cloth stapled to the underside of the joistsKEEPING COLD AIR FROM ENTERING. AT THE RIM JOISTS

STEP 3 Install Vapor Barriers (if Necessary)

Unlike housewrap, a properly installed vapor barrier is supposed to be impermeable. Vapor should not pass through it. Different materials are used as vapor barriers. The kraft-paper facing on fiberglass batt insulation is designed to function as a vapor barrier. To form a con­tinuous barrier, the paper flanges must over­lap on the sStud face, where they are stapled in place. Polyethylene sheeting is also commonly used as a vapor barrier. Thin (6 mil), clear “poly” sheet material is stapled to the face of studs, attic joists, and (on cathedral ceilings) rafters. The barrier is kept continuous by overlapping adjoining sheets and sealing the overlap with silicone or another sealant.

Its much easier to describe what a vapor barrier does than to explain why it is essential in some situations but not in others. I once

Techniques THE AC ALTERNATIVE: A WHOLE-HOUSE EXHAUST FAN

KEEPING COLD AIR FROM ENTERING. AT THE RIM JOISTSПодпись: COOLING WITH A WHOLE-HOUSE FANПодпись: Ridge ventПодпись: WindowsПодпись: A fan pulls in cool night air through the windows and pushes hot air that has built up during the day through the gable-end or ridge vents.Подпись: WindowsKEEPING COLD AIR FROM ENTERING. AT THE RIM JOISTSПодпись:Подпись: Insulated fan cover for winter monthsПодпись: Placed in a central location, a whole- house fan can cool a small house quickly.KEEPING COLD AIR FROM ENTERING. AT THE RIM JOISTS

ALTHOUGH IT IS NOT IDEAL in all cli­mates or seasons, a whole-house fan can be a very attractive alternative to air – conditioning. A simple fan is more reliable and less expensive than a single window – mounted AC unit, and it can effectively cool an entire house. As shown in the illus­tration at right, the principle is simple: A single, centrally located fan pulls in fresh air through open windows and blows hot indoor air outside. By turning the fan on in the evening and opening all major win­dows, it’s possible to quickly cool a house that has become hot during the day.

These fans work best in dry climates, or at least when the air is cool and dry out­doors. In the winter, when the fan is not being used, it must be protected with an insulated cover to prevent heated air from entering the attic space. I make a simple cover from plywood and then glue several layers of rigid foam to the top and sides.

had to tear out an entire wall that had rotted because the house had no vapor barrier. There was so much water trapped in the walls that you could literally wring it out of the insula­tion. A vapor barrier would have prevented such damage.

To understand why and where a vapor barrier is important, imagine what happens when someone takes a long, hot shower in your home when its freezing cold outside.

The bathroom is foggy with water vapor, and some of that warm, humid air makes its way into the attic and the exterior walls. The air can easily pass through openings around electrical outlets and light fixtures and even
through the gypsum board itself, which absorbs moisture readily. At some point, the temperature in the attic and the exterior walls drops enough to cause condensation. This dew point can occur in the middle of the attic or wall insulation or against roof and wall sheathing. Over the course of a cold winter, a steady supply of moist interior air can easily accumulate, causing soggy insulation, mold, and rotten wood.

A vapor barrier prevents the movement of vapor from a warm area to a cold surface. In cold climates, it should definitely be installed right underneath the drywall, paneling, or other interior wall finish material. Instructions

KEEPING COLD AIR FROM ENTERING. AT THE RIM JOISTS

Insulating between floor joists in crawl spaces

Floor insulation is important in a house with a crawl-space foundation. Often, it is not enough just to put insulation under the floor, because cold can pass through the rim joist. Unless batts fill the entire joist space, cold air can seep in through the rim joist and over the top of the batts, making the floor uncomfort­ably chilly.

To prevent this from happening, you can either hold the insulation high or roll it up to cover the rim joist (see the top illustration on p. 206). Better yet, use a thicker batt with a higher R-value to fill the entire joist space and butt up against the rim joist.

When insulating between I-joists, make sure the insulation is wide enough to extend all the way from web to web. If you live in a cold part of the country and yoifre using kraft paper-faced insulation, the paper should face toward the floor. This may seem back-

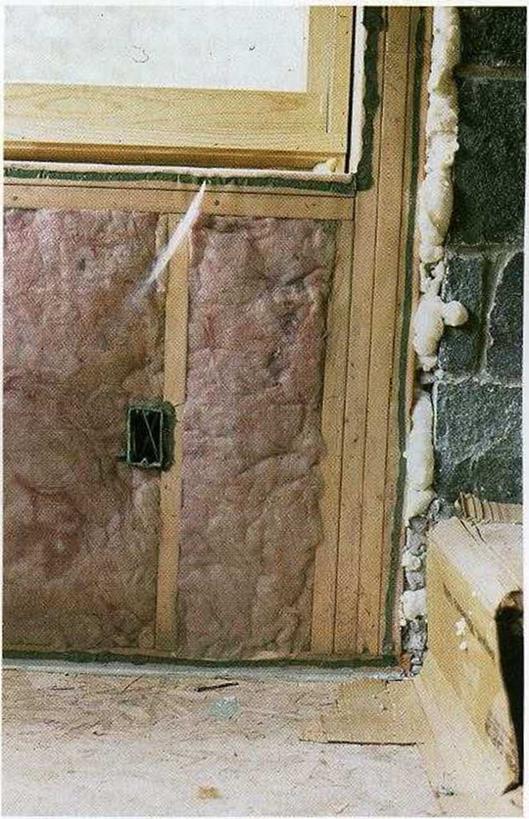
Insulating between floor joists in crawl spacesINSULATE AROUND ELECTRI­CAL BOXES. First, divide the batt into two layers instead of compressing it. Slide the back layer behind the out­let box (see the photo far left), then cut out the front layer to fit around the box (see the photo near left). This technique also works for installing fiberglass batts around electrical wires and plumbing pipes.

[Photo by Steve Culpepper, courtesy Fine Homebuilding magazine, – The Taunton Press, Inc.]

Подпись: Helping HandПодпись: Eliminate gaps when installing fiberglass insu-lation. Gaps around outlet boxes and along a wall's bottom or top plate can let in a lot of unwanted air. A gap of just Ye in. along both sides of a fiberglass batt can cut the insulation's effectiveness by 50% or more!

ward, but the paper acts as a vapor barrier (more on that later) and must face the heat, so to speak. If you live in an area where cooling (air-conditioning) is an issue for a majority of the year, staple the kraft paper to the under­side of the joists.

It can be a pain to install batts of insulation under a floor, because there is often not much space between the ground and the joists. Its not a lot of fun to lie on your back and install fiberglass batts! Sometimes, especially in dry dimates, it’s possible to insulate the floor before you sheathe. The drawback with this technique is that subcontractors (plumbing and heating, especially) may not treat your work with TLC. In rainy Oregon, we wait to insulate until after the shingles are on and the house is closed in. Either way, take your time, and make sure that underfloor insulation batts are installed properly and securely around all pipes and conduits.

There are a number of ways to hold under­floor batts in place (see the bottom illustration on p. 206). In Oregon, its common to nail strips of lath every 12 in. to 16 in. o. c. across the bottom of the joists once the insulation is installed. Its a lot of work, but it holds the batts securely without compressing them. Another way is to staple polypropylene (not cotton) twine or mesh to the bottom edges of the joists. I’ve also seen people staple chicken wire or hardware cloth across the joists. Still another option is to use wire supports designed specifically for the job. Called light­ning rods or tiger teeth, these wire supports clip between joists and bow up against the batts, holding them in place. Installed about every 12 in. or so, they do a good job of keep­ing the batts in place for years to come. Just take care not to compress the batts when installing the rods.