Category RENOVATION 3

TILE AND SLATE ROOFS

Tile and slate are relatively brittle, expensive, and easily damaged if you don’t know what you’re doing. And they’re slippery when wet. In most cases, hire a pro to make repairs.

Tile and slate are so durable that they often outlast the underlayment and fasteners. So when repairing or replacing these roofs, prolong the life of the installation by using heavy under – layment (30-lb. building paper or a self-adhering bituminous membrane), copper attachers, and copper flashing. Although these materials are expensive, if the roof lasts upward of 60 years without leaking, it’s money well spent.

Roof tiles weigh about three times as much as asphalt shingles. So if you’re thinking of installing a new type of tile or tiling a roof for the first time, have a structural engineer evaluate your situation. Your roof framing may need bol­stering to support the additional load.

Подпись: If properly installed over a durable membrane-such as the fiberglass-reinforced underlayment shown below— a tile roof can last 80 years. Подпись:Подпись:Tiles are available as two-piece, mission-barrel tiles; as one-piece, low-profile concrete tiles; and as flat-shake tiles, which mimic wood shakes. Tiles overlap to direct rain into tile channels. Traditionally, tiles were set without nails on wood battens or skip-sheathing. But today they are commonly nailed to plywood sheathing, especially if the roof pitch is 5-in-12 or steeper. Two-piece mission tiles are nailed in two manners: Trough tiles are nailed directly to sheathing. Cap tiles, which sit atop trough tiles, are attached to inter­vening copper wires nailed to the roof.

Slate roofs are most often damaged by tree limbs. You can usually make repairs safely if the damage is along an edge and hence reachable without requiring that you walk on the roof. If you note a number of missing slates and concomitant rust stains on the roof, the nails may be rusting through, creating an extremely dangerous situation. Call a slate specialist at once.

To repair incidental damage, buy a slate hook. Work the head of the tool up under the dam­aged piece until the tool’s hooked head catches a nail shank. Then strike the handle of the tool with a hammer to cut through the nail shank. When both shanks are severed, slide out the damaged slate, being careful not to disturb adjacent pieces.

Once the damaged slate’s on the ground, transfer its dimen­sions onto a replacement slate. Then rent a tile-cutting saw to cut the new piece, wearing gog­gles. Or ask a tile dealer to cut the piece for you. Ideally, the new piece should be the same size as the one it’s replacing, but old nail shanks may prevent sliding a full-size replacement piece into place. In this case, trim the replacement piece further.

That done, align the bottom edge of the replacement slate to others in the course. Predrill two nail holes, each one 1 in. from the edge and about 1 in. below the course above; you’ll proba­bly be drilling through two layers of slate, so take it slow. (A cordless drill is ideal for this task.) Size the drill bit just slightly larger than the thickness of the nail shank. Because this pair of nails won’t be covered by the slate above, caulk all holes with urethane before inserting nails. Drive the nails down just snug and no more, so you don’t split the slate.

METAL ROOFS

Although metal roofs tend to be quite durable, nail maintenance is key to their longevity. Most leaks occur when wind and ice lift the sheeting and pop nails up.

At least once a year and after major storms, study the roof with binoculars, and nail down any pop-ups. For extra security, put a dab of urethane caulk beneath nail heads. (Although roofing cement works too, it would be unsightly.) If popped nails seem loose, upsize the nail or use a screw.

To avoid galvanic-action corrosion, use nails or screws that are compatible with the roof metal. By the way, nail or screw metal roofing only at the raised crests, not in troughs where the water runs.

image183If the roofing is rusted but serviceable, use a wire brush on the surface to remove the rust and paint on an elastomeric roof coating, such as Gacoflex® acrylic latex. An elastomeric coating is necessary because metal expands and contracts. Incidentally, such coatings can also extend the life of metal gutters.

SHINGLE REPAIRS

To remove wood shingles, use scrap blocks to ele­vate the butt ends of the course above. Work the blade of a chisel into the butt end of the defective shingle, and with twists of your wrist, split the shingle into slivers. Before fitting in a new shin­gle, remove the nails that held the old one. Slide a hacksaw blade or, better, a shingle ripper (also known as a slate hook) up under the course above and cut through the nail shanks as far down as possible. If you use a hacksaw blade, wear a heavy glove to protect your hand.

Wood shingles should have a!4-in. gap on both sides, so size the replacement shingle lA in. narrower than the width of the opening. Tap in the replacement with a wood block. If the replacement shingle won’t slide in all the way, pull it out and whittle down its tapered end, using a utility knife. It’s best to have nail heads covered by the course above, but if that’s not pos­sible, place a dab of urethane caulk beneath each nail head before hammering it down. Use two 4d galvanized shingle nails per shingle, each set in 14 in. from the edge.

image176

GOT

Moss-covered shingles and shakes are common in moist, shaded areas. Hand scrape or use a wire brush to take the moss off. Keep it off by stapling 10-gauge or 12-gauge copper wire to a course of shingle butts all the way across the roof. Run one wire along the ridge and another halfway down. During rains, a dilute copper solution will wash down the shingles, discourag­ing moss. A nice alternative to toxic chemical treatments.

A Medley of Roofing Types

Although this section contains a few modest repairs a novice can make, most of the roof types discussed here should be installed by a roofing specialist. You’ll also find suggestions for deter­mining the quality of an installation as well as a few inspired tips.

FLAT ROOFS

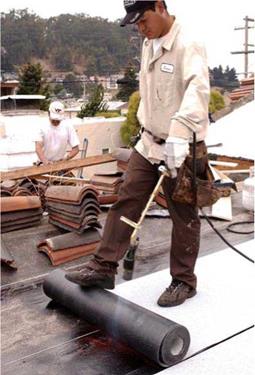
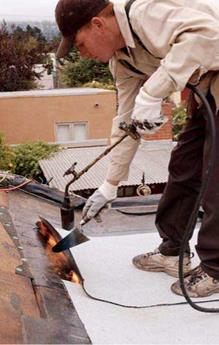
Actually, no roof should be completely flat, or it won’t shed water. But flat roof is a convenient term for a class of multimembrane systems. At one time, builtup roofs (BURs) once represented half of all flat roof coverings. BURs consisted of alternative layers of heavy building paper and hot tar. Today, modified bitumin (MB) is king, with cap membranes torched-on to fuse them to fiber­glass-reinforced interplies or base coats. MB sys­tems are durable and adhere well to dissimilar materials and difficult joints, but an inexpert torch user can damage the membranes and set a house on fire. For that reason, future roofs are likely to employ hot-air welding, cold-press adhesives, and roll membranes with self-sticking edges.

Causes of flat-roof failure. Whatever the mate­rials used, flat roofs are vulnerable because water pools on them, people walk on them, and the sun degrades them unless they’re properly maintained. Here are the primary causes of membrane damage:

► Water trapped between layers, because of improper installation. This is caused by installing roofing too soon after rain or when the deck was moist with dew. The trapped water expands, resulting in a blister in the membrane. In time, the blister is likely to split.

► Inadequate flashing around pipes, skylights, and adjoining walls.

► Drying out and cracking from UV rays— usually after the reflective gravel covering has been disturbed.

► People walking on the roof, or roof decks placed directly on a flat roof membrane. Roof decks should be supported by "floating posts" bolted through the sheathing to rafters and correctly flashed.

Repairing roof blisters. If there are no leaks below and the blister is intact, stay away from it! Don’t step on it, cut it, or nail through it. How­ever, if it has split, press it to see what comes out. If the roof is dry, only air will escape; if the roof is wet, water will emerge. In the latter case, let the inside of the blister dry by holding the side open with wood shims; if you’re in a hurry, use a hair dryer. Once the blister has dried inside, patch it.

LAYING A FLAT ROOF

image177

In the final phase of a MB roof, an installer torch-welds a granular surface membrane to an interply sheet or directly to a base sheet. The granular surface is somewhat more expensive at installation, but it is cost-effective in the long run because it doesn’t need periodic recoating.


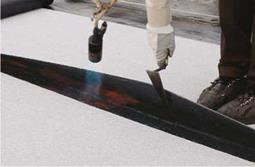
image178

Once the granular membrane is down, its overlapping edges are often lifted and torched again to ensure sound adhesion and a waterproof seam.


image180

The intersection of flat and sloping roof sections is worth extra attention. Run MB membranes at least 10 in. (vertical height) up the sloping section. Then overlap those membranes with the underlayment materials and asphalt shingles.


image179

Roofers refer to the molten material being forced out by the pressure of the trowel as wet seams—the mark of a successful installation.


Подпись: Ilie-ROOT UNDERLAYMENT A rubberized asphalt underlayment reinforced with fiberglass, layfastSBS®, is getting a lot of buzz among professionals. Specified for tile roofs, it's installed in two layers (double-papered) with 36.-in.-wide sheets overlapped by 19 in. Tiles often gouge building paper underlayment during installation, but not this stuff, which is also specified for shake, shingle, and metal roofs.

Professionals repair split blisters with a three – course patch, which requires no nails.

1. Trowel on a J4-in.-thick layer of an elas­tomeric mastic, such as Henry 208 Wet Patch®, carefully working it into both sides of the split. Extend the mastic at least 2 in. beyond the split in all directions.

2. Cut a piece of "yellow jacket” (yellow fiberglass roofer’s webbing) slightly longer than the split and press it into the mastic; this reinforces the patch.

3. Apply another!4-in. layer of mastic over the webbing, feathering its edges so it can shed water.

A three-course patch is also effective on failed flashing, where dissimilar materials meet, and for other leak-prone areas.

ASPHALT SHINGLE REPAIR

Most roofs are repaired in response to leaks caused by a missing shingle or, more often, worn – out or missing flashing. Or, in some cases, it’s necessary to disturb shingles to install a roof vent or a plumbing vent.

When removing a shingle, or a course of shin­gles, disturb surrounding shingles as little as pos­sible. First break the adhesive seal between courses, by sliding a mason’s trowel or a shingle ripper (see the left photo on p. 121) under the shingles and gently slicing through the adhesive strips. It’s best to do this when shingles are cool and the adhesive is somewhat brittle and easier to break. If you attempt this when the roof is hot, you’re more likely to tear the shingles. However, actually working with the shingles—lifting them to remove nails or slide in new shingles—is best done when the shingle is warm and flexible.

To remove a damaged shingle, raise the shin­gles above and tear the old one out. If it doesn’t tear easily, use a utility knife to cut it out.

Remove the nails that held the damaged shingle by inserting a shingle ripper against the nail shafts and prying up. Keep in mind that those nails are actually going through two shingle courses—the one you’re trying to remove and the top of the course below. If you extricate the shin­gle and the nails don’t come up with a reasonable amount of trying, just knock them down with your hammer and a flat bar.

Fill old nail holes with roofing cement, and slide the new shingle into place. Gently lift the course above and position nails so they’ll be over­lapped by that course. Once you’ve inserted a new shingle, use the flat bar to help drive them down, placing the flat bar atop the nail head and striking the bar with a hammer.

Wood Shingles

There’s romance in wood shingles. Despite wood’s tendency to mold, grow moss, and catch fire and despite the diversity and durability of laminated asphalt shingles, wood remains popular.

Подпись:
Подпись: New Roofing over Old Although "roofovers," placing new roofing over old, may be allowed by some codes, roofovers tend to be inferior. As noted earlier, you must strip a roof if there are two or more layers or if existing shingles are curling. That said, laminated shingles are usually better than three-tab shingles for roofovers because their random appearance hides minor irregularities in the old roof. Before beginning, replace or flash over old flashing as follows: ► Use aviation snips to cut away flashing around plumbing vents. ► Use a cold chisel to remove chimney counterflashing. ► Along the eaves, install a new drip-edge over the butt ends of existing shingles. ► Along the rakes, install a new J-channel drip-edge, which wraps around the old rake flashing and starter courses. ► Leave the old valley flashing in place, and install new over it. To level out an existing asphalt roof, rip down (reduce the height of) two courses of shingles, as shown in the drawing. Because asphalt shingles are routinely exposed 5 in., rip down the first strip (the starter course) so that it is 5 in. high. Then lay it over the original (old) first course so that the strip is flush against the butts of the original second course above. Next rip down a second strip (second course) 10 in. high and put it flush against the butts of the original third course. You now have a flat surface along the eaves. The third course of new shingles—and all subsequent shingles—need not be cut down, just butted to an original course above and nailed down. Use lVi-in. roofing nails for roofovers. PREPARING THE ROOF

Be sure to read the earlier sections on sheathing, underlayment, and flashing. And review the methods of asphalt-shingle installation, for they have much in common with wood shingling.

If the old roof was once covered with wood shingles, they were likely nailed to skip-sheathing, which consists of widely spaced 1-in. boards that allow air to circulate under the shingles and dry them. These days, most roofers cover skip­sheathing with plywood because it stiffens the roof and is safer to walk on. But nailing shingles directly to plywood or building paper impedes air circulation and may lead to cupping (shingles’ undersides will dry much more slowly than the tops), rotting, and shortened shingle life.

The answer to this dilemma is a layer of %-in.-thick synthetic mesh between the building paper and the shingles. CedarBreather is one brand, which comes in 39-in.-wide rolls. Roll the mesh out over 30-lb. building paper, tack or sta­ple it down, and you’re ready to shingle. The mesh retains enough loft to allow air to circulate freely around the shingles, so they can dry. To attach shingles over the mesh, you’ll need longer nails: 6d shingle nails should do, but check the product’s literature to be sure.

Flash a wood shingle roof as you would an asphalt roof, including WSU along the eaves, rakes, and valleys and metal drip-edge along the eaves and rakes.

ESTIMATING MATERIALS

Use only No. 1 (blue-label) shingles on roofs because they’re free of sapwood and knots.

Lesser grades are fine for siding but may leak on
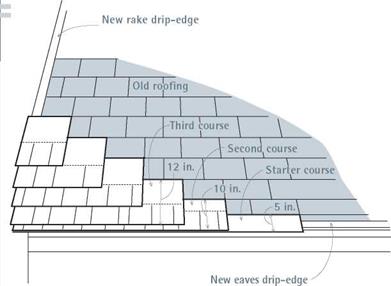
image172Подпись: When installing a new roof over an old one, avoid a wavy-looking job by reducing the height of the first two courses to establish a flat surface.New Shingles over Old

Подпись: After installing drip-edge flashing, double the first course of wood shingles along the eaves. Along eaves and rakes, the drip-edge overhangs sheathing or trim boards by ’/> in. to 3A in., and shingles extend at least 1 in. beyond the drip-edge. Подпись: Wood Shingle DetailsПодпись:Подпись: Two nails per shingle, in 3/4 in. from edgesПодпись:Подпись: Old skip-sheathingПодпись: Felt paperПодпись: Mesh allows shingles to breatheПодпись: 1/4-in. gap Подпись: Shingles overhang 1 in. at eaves and rake.Подпись:Подпись: Double first course of shingles along eaves.Подпись:image174"Подпись: BASICSa roof. Shingles come 16 in., 18 in., and 24 in. long, with recommended exposures of 5 in.,

5h in., and 7h in., respectively, on roofs with a

4- in-12 slope or steeper. Ultimately, slope deter­mines exposure and thus the number of bundles per square (100 sq. ft.).

In general, four bundles will cover a square.

To calculate the number of squares you’ll need, calculate the square footage of the roof and divide by 100. Because shingles are doubled along eaves and rakes, add an extra bundle for each 60 lin. ft. of eaves or rake. For valleys, add an extra bundle for each 25 lin. ft. For ridges and roof hips, buy preassembled ridge caps, sold in bundles that cover 16 lin. ft. One Canadian sup­plier, WoodRoof™ (www. woodroof. com) offers information about hip and ridge caps, precut "fancy butt” shingles, specialty tools, and more.

You’ll need 2 lb. of 4d or 5d galvanized shingle nails per square of shingles. For shingle caps along ridges and hips, use 6d shingle nails to accommodate the greater thickness of materials. Have your supplier deliver the materials in a lift – bed truck, so that you can unload the shingles right onto the roof.

INSTALLING WOOD SHINGLES

Double the first courses of shingles along the eaves, extending them beyond the drip-edge by 1 in.; and double shingles along rakes, overhang­ing rake trim by 1 in. In addition, install metal drip-edge along eaves and rakes. When nailing the bottom course of doubled shingles along the eaves, nail them about 1 in. up from the butt edges; if possible, sink the nails into the edge of the fascia board. Those two nails will be covered by the top course of doubled shingles. Nail that course with two nails placed 1 h in. above the exposure line.

wood Shingle i

No matter how wide the shingle, use only two nails—placed 3/ in. in from the edge, and 11/ in. above the exposure line. To allow for expansion, leave a 1/4-in. gap between shingles, unless they are wet, in which case you can place them snug against each other because they’ll shrink. Offset joints between successive courses at least 11/! in. Shingle joints that line up must be separated by two courses—in other words, shingle joints can line up every fourth course, but not sooner. Finally, nail heads should touch but not crush shingle surfaces; deeper, they may split the wood.

You could snap chalklines to indicate expo­sures for successive courses, but chalk can be unsightly and slow to fade. Instead, get a straight board as wide as the shingle exposure (5 in., for example), place its bottom edge flush to the bot­tom of the last shingle course, and position the next course of shingles by simply placing them atop the board. Move loose shingles around till all their joints are correctly offset to the courses below. Then nail them down.

When you start stretching to install courses above, install roof jacks as described on p. 81. Because wood shingles do not have fixed lengths as asphalt shingles do—just the same bottom line—several workers can work on a course at the same time. As you get within 6 ft. of the top, measure up to the ridge. If the ridge is not paral­lel to the eaves, there may be a discrepancy of several inches between measurements at one end of the roof and the other. If so, start adjusting exposures so that the final course of shingles will be more or less parallel to the ridge. If there’s a discrepancy of 2 in., for example, you should reduce exposures on the narrow end of the roof by ‘/a in. per course.

Open valleys. Refer to previous sections in this chapter on underlayment and valley flashing before you start. For most renovations, an open valley is the way to go: The exposed metal flash­ing of an open valley clears water well and is not likely to clog with debris and to dam up water. In addition, shingles running alongside an open val­ley require less fitting and cutting than those in closed valleys.

You can shingle out from a valley or into a val­ley from roof planes on either side. In either case, start by snapping parallel chalklines along both sides of the metal valley flashing, each line should be at least 3 in. from the center fold of the flash­ing. As each course approaches the valley, don’t nail the last four or five shingles immediately; just arrange them so that wide shingles end in the valley. Where shingles cross a chalkline, use a utility knife to notch the shingle at those points.

Keep nails as far as possible from the valley center: 5 in. away is minimum. A bead of ure­thane caulk under the leading shingles should keep the edges from lifting.

Closed valleys. Run shingles into the valley until they meet oncoming shingles from the other side. At that juncture, rough cut each shingle about 14 in. wide to establish the correct angle. Then use a block plane to back-bevel its leading edge. By cutting and planing, you create a compound angle so that the shingles fit tightly; this can be done only on the roof, shingle by shingle—a slow job. For best weathering, alternate miters right
and left, from course to course. Build up several courses in the valley and shingle out to the rest of the field.

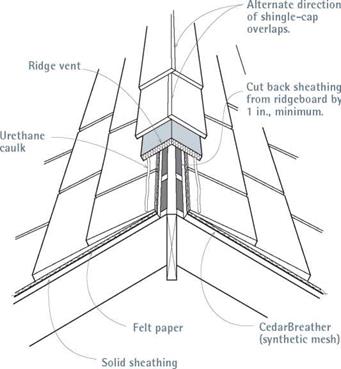
Ridge treatments. Be sure to read the com­ments on venting a ridge on p. 76. In brief, cut back sheathing at least 1 in. on either side of the ridgeboard. Then run underlayment and shingles to the edge of the sheathing before nailing a ridge vent over the opening.

► Shingle caps. Use a pneumatic nailer to attach preassembled shingle caps over the vent. Because the mesh underlayment and the ridge vent are compressible, they would move if you tried to hand nail them. Shoot 2-in. to 2/4- in. galvanized shingle nails through the shingle caps; nails should penetrate the roof sheathing at least /2 in.

► Ridgeboards. These butt to each other; for a weather-tight fit, they should be mitered. To establish the miter angle, lap two pieces of scrap at the peak and, using an adjustable bevel, transfer this angle to your table saw.

Подпись:Подпись: I Ventilating a Wood Shingle Ridgeimage175"Use a pneumatic nailer to attach preassembled ridge caps over the ridge vents because hand nailing the caps could split them.

Test-cut several pieces of scrap till the fit is tight; then rip down the ridgeboards on the table saw. Because ridgeboards should be as long as possible, get help nailing them down.

If it takes several boards to achieve the length of the ridge, bevel joints 60° and caulk each with urethane caulk.

Using 8d galvanized ring-shank roofing nails, nail the ridgeboards to the rafters; use two nails per rafter. Then go back and draw the beveled joint together by nailing it with 6d galvanized box nails spaced every 12 in. As you work, push down on the ridgeboards to force them together. To avoid splitting boards, predrill them or use a pneumatic nailer to shoot nails through the roofing layers into the rafters.

Using Pneumatic Nailers

Because pneumatic nailers can easily blow nails through shingles, some codes specify hand nailing. And it’s safer to hand nail the first five or six courses along the eaves, where stepping on a pneumatic hose could roll you right off the roof. Wear goggles when using nailers. Those concerns aside, pneumatic nailers are great tools if used correctly. Here’s how:

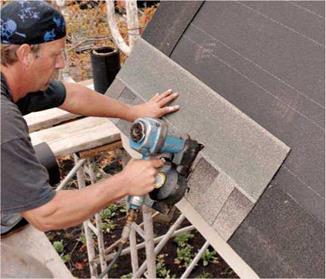
► Don’t bounce-fire a nailer till you’re skilled with it. (To bounce- fire, you hold the trigger down and press the nailer’s nose to the roof to fire the nail.) Shingles must be nailed within a small zone—below the sealer strip but above the cutouts, if any—and it’s hard to hit that zone if the nailer is bouncing around. Instead, position the nailer nose where you want it, and then pull the trigger.

► Trigger-fire the first nail of every shingle. Do this to keep shin­gles from slipping, even if you’re skilled with pneumatic nailers. Once the first nail is in, you can bounce-fire the remaining ones.

► Hold the nailer perpendicular to the roof so nails go in straight, and keep an eye on nail depth as the day wears on. Nail heads should be flush to the shingle; if they’re underdriven or overdriven, adjust the nailer pressure.

image167

► Nailing schedule: four nails per shingle is standard; six nails for high-wind areas. Trimmed-down shingles must have at least two nails. Place the first and last nails in from the edges at least 1 in. All nails must be covered by the shingle above.

INSTALLING SHINGLES IN A PYRAMID PATTERN

Carefully align the first shingle (which is uncut) to the edges of both eaves and rake starter strips.


PROnP

If you mistakenly shoot a nail through a shingle, cover the nail head with roofing cement and drive a new nail within 1 in. If a nail is crooked, hammer its head flush. Then apply roofing cement and a new nail within 1 in. If a nail is too low to be covered by the shingle above, dab cement on its head and sprinkle loose shingle granules on the cement so the head won’t be noticeable.

1111


Shorten the second shingle in the pyramid by the offset dimension (5 in.). Use the gauge-stop on the bottom of the pneumatic nailer to establish the correct exposure between courses.


At this point, you could run courses all the way across the roof, but most roofers prefer to workup and out, maintaining the diagonal. Although this veteran roofer didn’t need to snap horizontal chalklines across the roof to keep courses straight, novices should.


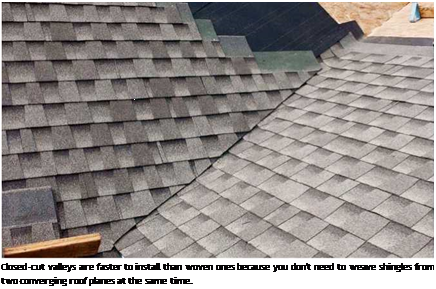
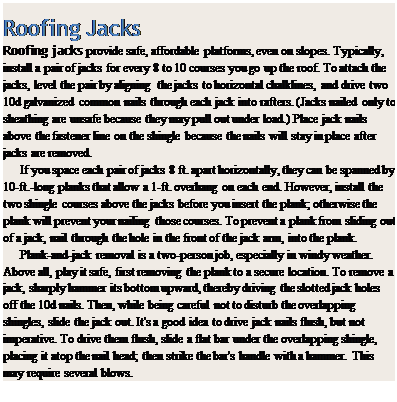
Подпись: Closed-cut valleys are faster to install than woven ones because you don't need to weave shingles from two converging roof planes at the same time. Подпись: Roofing Jacks Roofing jacks provide safe, affordable platforms, even on slopes. Typically, install a pair of jacks for every 8 to 10 courses you go up the roof. To attach the jacks, level the pair by aligning the jacks to horizontal chalklines, and drive two 10d galvanized common nails through each jack into rafters. (Jacks nailed only to sheathing are unsafe because they may pull out under load.) Place jack nails above the fastener line on the shingle because the nails will stay in place after jacks are removed. If you space each pair of jacks 8 ft. apart horizontally, they can be spanned by 10-ft.-long planks that allow a 1-ft. overhang on each end. However, install the two shingle courses above the jacks before you insert the plank; otherwise the plank will prevent your nailing those courses. To prevent a plank from sliding out of a jack, nail through the hole in the front of the jack arm, into the plank. Plank-and-jack removal is a two-person job, especially in windy weather. Above all, play it safe, first removing the plank to a secure location. To remove a jack, sharply hammer its bottom upward, thereby driving the slotted jack holes off the 10d nails. Then, while being careful not to disturb the overlapping shingles, slide the jack out. It's a good idea to drive jack nails flush, but not imperative. To drive them flush, slide a flat bar under the overlapping shingle, placing it atop the nail head; then strike the bar's handle with a hammer. This may require several blows. image169

There are many ways to lay out and install shingles. If you’re installing laminated shingles, a pyramid pattern is best. With this method, you precut a series of progressively shorter shingles, based on some multiple of the offset dimension. Because each successive course is, say, 5 in. or 6 in. shorter, the stepped pattern looks like a pyramid. Typically, pyramids start along a roof edge, with the first shingle in each course flush to the rake starter strip.

Once the pyramid is in place, the job goes fast. Just place a full shingle against each step in the pyramid and keep going. Because the offset is established by those first shingles, you can install full shingles till you reach the other end of the roof. But most roofers prefer to work up and out, maintaining the diagonal. If there are color varia­tions among bundles, they’ll be less noticeable if the shingles are dispersed diagonally.

The frequency of a pyramid pattern’s repeat­ing itself depends on how random you want shin­gles to look. Traditionally, patterns repeat every fourth course, that is, every forth course begins with a full shingle. Whatever pattern you choose, trimmed pyramid shingles should be at least 8 in. wide; otherwise they’ll look flimsy.

Keeping things lined up. As you work up the roof, align the top of each shingle to a horizontal exposure line. Chalklines wear off quickly, so don’t snap them too far in advance; snapping chalklines each time you roll out a new course of building paper is about right. However, to get the measuring done all at once, you can measure up from that original 12-in. line and use a crayon to mark off exposure intervals along the rake edges on both ends of the roof, and then snap chalk­lines through those marks later.

Alternatively, if you snap chalklines only every second, third, or fourth course, use the gauge on the underside of your pneumatic nailer or on your shingle hatchet to set exposures for interven­ing courses. If your shingling field is interrupted by dormers or such, always measure down to that original 12-in. line to reestablish exposure lines above the obstruction. Finally, if the ridge is out of parallel with the eaves by more than % in., stop shingling 3 ft. shy of the ridge and start adjusting exposures so that the final shingle course will be virtually parallel with the ridge.

For example, if there’s a discrepancy of 112 in., then at 3 ft. below the ridge, you’ll need to reduce exposures on the narrow end of the roof by % in. in each of six courses.

Valleys. Both open valleys (in which metal valley flashing is exposed) and closed valleys should be lined, as described in “Underlayment,” on p. 69. Closed valleys are more weathertight but slower

Подпись: PROnP As shingles run diagonally into an open valley, their leading edges often end in sharp points, under which water can run. To prevent that, use a utility knife with a hooked blade to clip points at a 45° angle. 1111 Подпись: Ridge vents allow hot air—and excess moisture—to exit the building. Here, a perforated plastic ridge vent gets capped with shingles. to install, so they’ve become less popular. Open valleys are faster to install and better suited to laminated shingles, which are too bulky and stiff to interweave in a closed valley.
Once you’ve installed valley flashing, snap chalklines along both sides to show where to trim overlying shingles. Locate chalklines at least 3 in. back from the center of the valley; oncoming shingles cover valley flashing at least 6 in. When nailing shingles, keep the nails back at least 6 in. from the valley centerline—in other words, 3 in. back from the shingle trim line—so nails can be covered by shingles above. To seal shingle ends to the metal flashing, run a bead of roofing cement under the leading edge of each shingle, and put dabs of cement between shingles. Ideally, you should not nail through the metal at all, but that could leave an inordinately wide area of shingles unnailed. Besides, self-adhering waterproofing membranes beneath the metal flashing will self­seal around the nail shanks.

As a shingle from each course crosses a chalk­line, use a utility knife to notch the shingle top and bottom. Then flip the shingle over and, using a straightedge, score the back of the shingle from notch to notch. Or, to speed installation, run shingles into the valley, and then, when the roof section is complete, snap a chalkline along their ends to indicate a cut line. To avoid cut­ting the metal flashing under­neath, put a piece of scrap metal beneath shingle ends as you cut, use a hooked blade in the utility knife, or use snips.

Finally, codes in wet or snowy regions may require that valleys grow wider at the bot­tom. In that case, move the bot­tom of each chalkline away from the valley center, at a rate of Z in. per ft.

RIDGE VENTS

To install a ridge vent, cut sheathing back at least 1 in. on either side of the ridgeboard. Run underlayment and shingles to the edge of the sheathing. Then nail the ridge vent over the opening, straddling the shingles on both sides. In most cases, the ridge vent is covered by cap shingles. Because shingles folded in this manner tend to split over time, it’s wise to double them.

Chapter 14 offers more information on venti­lation. But, in brief, you need a minimum of 1 sq. ft. of ventilation per 300 sq. ft. of roof sur­face. Install half the vent area as soffit vents on the underside of the eaves, and half as ridge vents. For example, if the roof surfaces total 2,500 sq. ft., vent surfaces should be 2,500^300, or 8.33 sq. ft. Ridge vents would therefore be half that, or 4.16 sq. ft. Your building supplier can explain the calculations, but 4.16 sq. ft. corre­sponds roughly to 33 lin. ft. of ridge vents, based on net free vent area (NFVA) charts.

INSTALLING SHINGLES

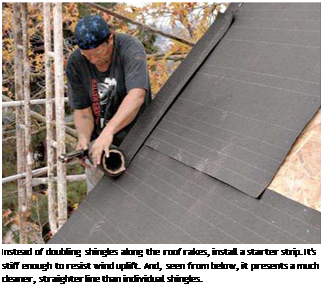
After attaching drip-edge flashing to the eaves and rolling out underlayment over the drip-edge, install the starter course along the eaves. You’ll cover the starter course with the first course of shingles. Running starter courses along the rakes isn’t imperative, but it’s smart because starters stiffen the overhanging shingle edges and create a cleaner line.

The starter course. First determine how much the starter course will overhang the drip-edge:

I in. to Va in. overhang is typical, but some roofers allow as much as 1 in. if eaves or rake boards are badly bowed. The starter course will be 7 in. high. Extend your tape measure past the drip – edge the amount of the overhang, and make crayon marks on the underlayment at 7 in. and at 12 in. Do this at both ends of the roof and snap chalklines through both sets of marks. The 7-in. line indicates the top of the starter course; the 12-in. line indicates the top of the first course of shingles.

Подпись: After installing drip-edge along the eaves, double the first course of shingles or, as shown, install a starter strip. The lower edge of the starter strip overhangs the drip-edge by ’A in. to % in., or even 1 in. if bowing eaves or rake boards require it. Подпись: Instead of doubling shingles along the roof rakes, install a starter strip. It's stiff enough to resist wind uplift. And, seen from below, it presents a much cleaner, straighter line than individual shingles. Starter courses can be three-tab shingles with the bottom 5 in. cut off or a starter strip that comes on rolls in various widths. Starter strips have the advantage of stiffening shingles above and, viewed from below, providing a clean, unbroken line. Still, trimming three-tab shingles is cheaper, so here’s a quick look at that method.
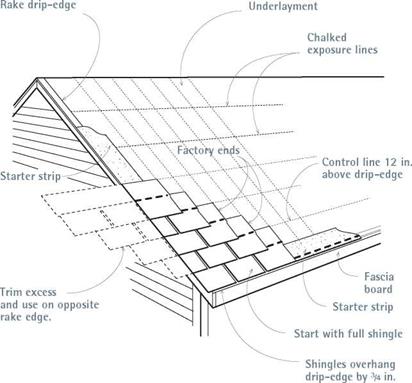
First, use three-tab shingles as a starter course, rather than laminated shingles, which cost more and don’t lie flat. Traditionally, the starter course was just a full shingle turned upside down so its tabs faced up, but that placed the shingle’s self-seal strip too high to do much good. Far better to measure down 7 in. from the top of the shingle, trim off the bottom 5 in., and snap off the shingle tabs.

Secure the starter course by aligning the shingles’ top edges to the 7-in. control line and nailing them down, four nails per shingle. If you’re installing a starter strip, align its top edge to the 7-in. control line. Next, install starter courses over rake drip-edges, using the same overhang you used for eaves. Rake starter strips overlap eave starter courses when they meet at lower corners. Along both ends of the roof, measure up from the 12-in. control line and snap exposure chalklines for the shingle courses to come. That done, you’re ready to install the first course of shingles.

Shingling the field. Install the first course of shingles over the starter course. If you’re right­handed, start at the left side of the roof and work right; otherwise, you’ll be reaching across your­self continually. Left-handers, of course, should start right and work left.

image165
Подпись: A pyramid pattern is best for installing laminated shingles that don't have distinct cutouts. As you build the pyramid along the rake edge, trim excess from the rake end so a factory end always leads off each course. Align shingles to horizontal chalklines you snap, not to lines printed on building paper. This method is also shown in the photo sequence on p. 80.

Using a Pyramid Pattern Layout

Asphalt Shingles

On residences, two primary types of asphalt shin­gles are used. Until recently, most were three-tab shingles with two slots dividing the exposed part of the shingle into thirds. But today, laminated shingles (also called architectural and dimension­al shingles) are gaining in popularity. Consisting of two bonded layers, laminated shingles are thicker, more wind resistant, and somewhat easi­er to install because they have a random pattern,
with no shingle cutouts to line up. When installed, they look distantly like wood shakes.

MATERIALS: ROUGH NUMBERS

Shingle dimensions vary by maker. Three-tab shingles are typically 12 in. by 36 in. Laminated shingle dimensions are often metric, roughly 13 in. by 40 in. Most shingles are installed with a 5-in. exposure, though shingles with metric dimensions may specify a 5%-in. exposure.

Calculating shingles needed for a complex roof is.. .complex. Begin by measuring the roof accu­rately, making a to-scale sketch on graph paper as you measure. Note valleys, ridges, chimneys, skylights, plumbing vents, and other elements that require flashing, waterproof membranes, or special attention. With that sketch, a building sup­plier can develop a final materials list for shingles, nails, underlayment, flashing, vents, and so on.

Asphalt shingles come three to five bundles to the square (100 sq. ft.), depending on shingle dimensions. Thus you need to calculate the square footage of roof surfaces and divide that number by 100 to get the number of squares needed to shingle the field. In addition, you’ll need materials to reinforce shingles along eaves and rake edges—either by installing a double layer of shingles along the roof perimeter or by applying a heavy starter strip before shingling.

If you’re installing laminated shingles, use three-tab shingles as an underlayer along the eaves and rakes. For this purpose, three-tab shin­gles are far cheaper than laminated shingles and will lie flatter. If you’re installing woven valleys, you’ll interweave roughly one bundle of shingles per 16 linear (lin.) ft. of valley. Finally, add two extra bundles for waste, ridge and hip caps, and future repairs.

Shingle colors often vary from one production lot to another. So, to avoid having a new roof with a patched-together look, specify that all bundles come from the same lot when you order. Then when your order arrives, check the lot num­bers on the bundles and open a few bundles from different lots. If lot numbers don’t match and the color variation is noticeable, call the supplier and ask it to rectify the situation. If the color varies only slightly, you might mix lots every other shin­gle during installation. Finally, have shingles delivered directly to the roof. Many suppliers will place bundles on the roof by means of truck booms or conveyor belts.

Roofing nail quantities vary according to method: hand nailing, power nailing, or some combination of both. Typically, use 4 nails per shingle, or about 2 lb. of nails per square if you’re hand nailing. However, high-wind areas require

image159
6 nails per shingle or 3 lb. per square. Roofing nails come in 5-lb. and 50-lb. quantities. Boxes of pneumatic nails typically contain 120 nails per coil and 60 coils per box. At 4 nails per shingle, you’ll need about 313 coils (400 nails) to attach a square of shingles.

Use corrosion-resistant roofing nails at least 1 !4-in. long for new roofs; 113-in. nails if you’re roofing over a previous layer. Ideally, nails should sink three-quarters into sheathing or stop just short of penetrating all the way through for h-in.- to 53-in.-thick sheathing. Hence, if the roof has an exposed roof overhang (you can see the under­side of the sheathing), use M-in. ring-shank nails

Подпись:image161

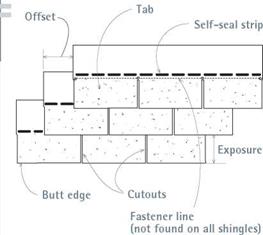
Подпись: Shingling Terms These definitions will help you make sense of roofing terms. ► Course: a horizontal row of shingles. ► Butt edge: the bottom edge of a shingle. ► Exposure: typically, the bottom 5 in. of the shingle, left exposed to weather. Shingles with metric dimensions are usually exposed 55/ in. ► Cutouts: slots cut into the exposed part of a three-tab shingle, to add visual interest and allow heat expansion. ► Offset: the distance that shingle slots or ends are staggered from course to course. ► Self-seal strip: the adhesive on the shingle face which, when heated by the sun, fuses to shingles above and prevents uplift. ► Fastener line: on shingles with a 5-in. exposure, a line roughly 55/ in. up from the butt edge. Nails along this line will be covered by the shingles above. (If shingles don't have such lines marked, nail just below the self-seal strip.) ► Control lines: chalklines snapped onto underlayment to help align courses and cutout lines.

Many local codes don’t allow pneumatic staples to attach roofing, and for good reason. Slight variations in compressor-line pressure or setting depth will blow staples right through shingles, and even if staple depth is correct, shingles can easily work loose from the skinny crown holding them down. Roofing nails are vastly superior.

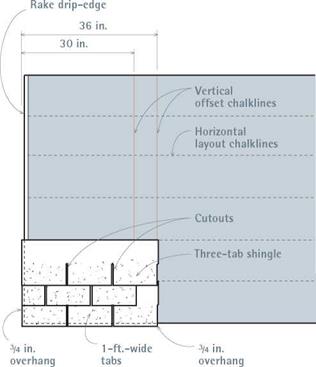
Подпись: PROTIP Score shingles on the backside, using a utility knife. If you try to cut through the granules on the front, the blade will go awry and soon dull. When you score along a straightedge and snap along the cut, you'll get a straight, clean edge. 1111 Подпись: I Laying Out Three-Tab Shinglesimage162"Подпись: Aligning three-tab shingle cutouts can be as easy as snapping two vertical chalklines 6 in. apart. Because individual shingle tabs are 1 ft. wide, a 6 in. offset will line up shingle cutouts every other course.(along the overhang) for a new roof; 1-in. ring- shank nails for roofovers.

When ordering, don’t forget tabbed roofing nails for underlayment and metal-compatible nails for attaching flashing or valley clips.

SHINGLE LAYOUT

We’ll assume that the roof has been stripped of old shingles, that failed sheathing has been replaced, and that the roof is safe to walk on.

Reconnoiter the roof. Use a tape measure to see whether the roof is square, the ridge is parallel to eaves, the rake edges are parallel, and whether— overall—the width of the roof requires shifting shingle courses left or right. To determine square, measure diagonally from both ends of the ridge down to the opposite eaves corner; if the readings are roughly equal, chances are the roof is square. If the ridge is parallel to eaves within h in., run shingle courses right up to the ridge. But if ridge – to-eaves readings differ by % in. or more, you’ll need to compensate by adjusting shingle – exposures as you approach the ridge.

The last two measurements, for parallel rakes and roof width, are of most concern if you’re
installing three-tab shingles. Because three-tab shingle patterns align vertically, avoid cutting shingle tabs less than 2 in. wide along either rake edge—such short tabs look terrible. It’s far better to shift the shingle layout (and thus the vertical control lines) slightly right or left, so the shingle piece is larger. For additional strategies for installing three-tab shingles, see Mike Guertin’s fine book, Roofing with Asphalt Shingles.

Establishing control lines. After installing drip – edges along the eaves, many pros measure only once, to establish a horizontal control line paral­lel to the eaves, to which they nail the shingle starter course. After the starter course is down, they put away their tape measure and use only the exposure gauge of their pneumatic nailer or shingle hatchet to position successive courses.

But, to keep courses evenly spaced and straight, you should mark horizontal lines at reg­ular intervals on the underlayment. If your shingle exposure is 5 in., snap chalklines for every course or every third course—whatever works for you. Snapping lines doesn’t take much time and will help ensure professional-looking results.

If you’re installing three-tab shingles, it’s also wise to snap a pair of parallel, vertical control lines 6 in. apart, to line up the slots of alternating shingle courses, as shown in "Laying Out Three – Tab Shingles,” at left. With a 6-in. offset, the slots of every other course line up, creating a strong visual pattern. If slots don’t align, the installation will look sloppy. On the other hand, laminated shingles have no slots to align and so don’t need vertical control lines.

SKYLIGHT AND RIDGE FLASHING

Skylight flashing is discussed in Chapter 6, where you’ll see an installation from framing to flashing. As a general rule, follow the instructions in the flashing kit provided by the skylight manufacturer.

Traditionally, ridges were flashed with a con­tinuous strip of 12-in.-wide, 30-lb. building paper folded lengthwise, which straddled the ridge and overlapped the top courses of shingles. The build-

Подпись: PRO"ГIP Before inserting counter-flashing, blow or brush out debris from the mortar joints. If your air-compressor hose can reach the roof, use it. Otherwise, insert a piece of plastic tube in the joint and just blow. Wear goggles—and when the tube is in place, don't inhale. 1111 Подпись: 2. This grinder is poised to grind out an old chimney mortar joint. Once the abrasive wheel hits mortar, you'll see nothing but grit. So wear goggles.

Подпись: 4. Finally, run a bead of urethane caulk such as Vulkem® 116 to fill the joint and seal out water. Once the caulk has set a bit, you can tool it with your thumb.

CHIMNEY FLASHING

image156

1. As you roof along a chimney, alternate shingles and L-shaped pieces of step-flashing. Counterflashing will cover the tops of the step-flashing. For extra protection, run a bead of urethane between the step­flashing and the chimney. Press the flashing into the urethane to achieve a positive seal.

image157

3. Counterflashing is held in place by a folded – back lip jammed into the mortar joint. For good measure, the mason hammered masonry nails into the mortar, and then used a cold chisel to set them deeper.

Подпись: VENTS Ridge and soffit vents allow hot air under the roof to rise and exit, thus moderating under-roof temperatures, extending the life of roofing materials, reducing ambient moisture in the attic—a big source of mold—and preventing ice dams from forming along the eaves. Подпись: Roof VentingПодпись: Baffled ridge vent off excess moisture. ing paper was then covered with a shingle saddle or overlapped ridgeboards. Metal flashing was sometimes used instead of building paper.

These days, ridges aren’t sealed by flashing. Instead they are often covered with ridge vents that allow hot air to escape, as shown on p.82.

CHIMNEY FLASHING

Chimneys must be counterflashed(see p. 74). The upper pieces of counterflashing are usually tucked into chimney mortar joints and made to overhang various pieces of base flashing, which are nailed to the roof deck. Counterflashing and base pieces overlap but aren’t physically joined, so they can move independently yet still repel water. (This independence is necessary because houses and chimneys settle at different rates, causing single-piece flashing to tear and leak.)

Closed Valleys

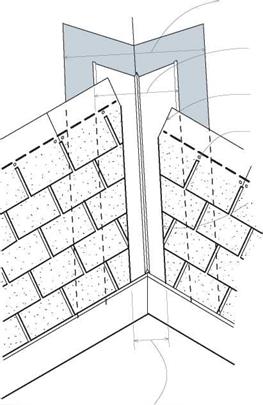
Подпись: CLOSED-CUT VALLEY image147Подпись:Подпись: Cut shingles stop 1 in. to 2 in. short of valley center.Подпись: WOVEN VALLEY image148

Urethane caulk under closed-cut shingle edges

There are two kinds of closed valleys: woven and closed-cut. Woven valleys offer better protection from weath er but take longer to install. Cld-cU-cut valleys are faster but are pnly one-nhingle-layer thick in the valley center. When shingling closed valleys, it’s sometimes necessary to add a shorteked shingle yo tne course before yo c reach the val ley, so that yeu nac run a fullshinglh aceoss the valley.

36-in.-wide felt paper or peel-and-stick WSU membrane

Overlapping shingles extend 12 in. past valley center.

No nails within 6 in. of valley center

Replace counterflashing and base flashing when reroofing. To avoid damaging the chim­ney, use the gentlest possible method to remove counterflashing. If mortar is weak and crum­bling, you may be able to pull the flashing out by hand; in that case, repoint the mortar before replacing counterflashing. If the mortar is sound and the counterflashing firmly lodged, try using either a cold chisel or a carbide-tipped bit in a pneumatic air chisel to cut out the flashing and as little of the mortar as possible.

You need to remove base flashing because you’ll be stripping the roofing and building paper at the same time. Base flashing has several com­ponents: a continuous sheet-metal apron across the chimney’s downslope face, L-shaped step­flashing running up both sides, and (when the chimney sits below the roof ridge) a cricket (or saddle) running across the upslope face. A cricket is sloped like a tent roof to deflect water around

the chimney. Use a claw hammer, a flat bar, or a cat’s paw to pry up old base flashing. Then ham­mer down any nails you can’t pull.

Reattach base flashings first. As shingles butt against the chimney’s downslope face, place the apron over them. The apron’s bottom flange should overlap shingles at least 4 in.; its upper flange should run at least 12 in. up the face of the chimney. Prefabricated aprons usually have “ears” that wrap around chimney corners and are nailed to the deck sheathing. As shingles progress up both sides of the chimney, they overlap the bottoms of L-shaped pieces of step-flashing.

Keep nails as far back from the flashing crease as possible. Use a single nail to nail down each piece of step-flashing and the shingle covering it. When shingle courses along both sides of the chimney reach the back (upslope) face of the chimney, the lower flanges of the cricket overlap them.

image149Подпись: AN Alien ONПодпись: by 4 in., minimum. Подпись:ON THE ROOF

You often see TV antennas strapped to chimneys. Terrible idea! Whipped by winds, an antenna stresses the mortar joints and causes leaks.

A chimney is designed to be a freestanding unit that safely carries hot gases out of the house. Don’t ask more of it.

If a self-supporting cricket is fabricated from heavy 20-gauge galvanized steel, predrill the nail holes in the cricket’s lower flange. Nail it down with ring-shank roofing nails spaced every 6 in., down 2 in. from the top edge. Then cover the top edges of the cricket flange with a strip of peel – and-stick bituminous membrane, and overlap that with shingles. Finally, caulk the top edges of apron, step-, and cricket flashings with urethane caulk to seal them to the chimney.

There are several ways to install counter­flashing. Counterflashing should overlap the base flashing by 4 in. Traditionally, a mason used a tuck-pointing chisel to remove chimney mortar to a depth of 112 in. and then inserted a folded lip of counterflashing into the mortar joint. The joint was then packed with strips of lead to hold the flashing in place, followed by fresh mortar applied with a striking tool (also known as a slick). This method can work well, but you need to be careful not to damage the surrounding bricks. Caulk with urethane caulk once the mortar has set.

Подпись:
Alternatively, you can use an abrasive wheel in a handheld grinder to cut narrower slots in the mortar joints; then insert counterflashing with its lip folded back so sharply that it resembles the barb of a fishing hook. This barbed lip friction – fits tightly into the slot, so mortar is unnecessary.

image152

The transition step-flashing that turns the corner on a dormer sidewall is complex and inclined to leak, so have it prefabricated by a sheet-metal shop. Seal the top of the step-flashing with 9-in.- wide peel-and-stick membrane, and then overlap that with housewrap before covering it with siding.

Instead, fill the slot with urethane caulk, which adheres well and seals out water.

FLASHING ADJOINING STRUCTURES

Where roof sections abut other roofs or walls, there are various ways to flash but only one underlying principle: Allow water to run down­hill freely.

Where a shed roof abuts a wall, you’ll need to open up the wall or remove siding nails so you can slide the upper leg of the flashing up at least 4 in., under both underlayment and siding—8 in. in snow country. The lower leg of the flashing goes over the uppermost course of shingles on the shed roof. Secure flashing with gasketed roof­ing nails 2 in. from its lower edge. Stop the siding at least 1 in. above the shingles of the shed roof.

Where a gable-end addition abuts a vertical sidewall, install step-flashing on both sides of the gable. Fashion L-shaped step-flashing by folding in half 5-in. by 10-in. pieces of sheet metal; alter­nate pieces of flashing and shingles, as you would chimney step-flashing. Again, you’ll need to pull siding nails or cut back the siding to fit the upper legs of the flashing up under wall underlayment and siding. Place nails as far as

Flashing a Shed Roof That Abuts a House Wall

image153

possible from the flashing folds. Use two nails to attach each piece of step-flashing: one nail (into the sidewall) 1 in. from the top edge of the upper leg and the other nail through the bottom leg and the shingle overlapping it. Apply urethane caulk under any flashing legs or shingle edges that don’t lie flat.

VALLEY FLASHING

There are basically two types of valleys: open, where the valley’s flashing is exposed, and closed, where flashing is covered by shingles. Each has advantages. Open valleys clear water well, are easy to install, and work especially well beneath wood shingles, shakes, and laminated asphalt shingles, which are thicker and harder to bend than standard three-tab shingles. In woven val­leys, shingles from both roof planes meet in the valley in alternating overlaps and are slower to install, but offer double-shingle protection and are favored for low-slope roofs. And there are variations, such as the closed-cut valley of the two valleys shown in "Closed Valleys,” on p. 73.

Prepare all valley types by sweeping away debris, hammering all sheathing nails flush, and

Lower Roof Corners

then lining the valley with underlayment. Tradi­tionally, this lining was 30-lb. building paper.

But, as mentioned earlier, peel-and-stick WSU, though more expensive, is simpler to install and far more durable. Because it’s self- sticking, WSU doesn’t need to be nailed; more­over, it self-seals around shingle nails, preventing leaks. Though it comes in varying widths, install 36-in.-wide WSU for valleys, centering a single piece down the length of the valley and overlap­ping the drip-edge flashing at the bottom.

If you instead line the valley with 30-lb. build­ing paper, run a continuous piece of 36-in.-wide paper down the valley or overlap pieces below by at least 6 in. Using tabbed roofing nails, nail down the paper, keeping nails 6 in. away from the center of the valley. The 15-lb. building paper underlayment used elsewhere on the roof will overlap the outer edges of this heavier "valley paper.”

Install metal valley flashing that’s 18 in. to 24 in. wide on most slopes, so that each side of the valley is 9 in. to 12 in. wide. If the roof pitch is steep or if you live in an area that gets much

An Open Valley


Подпись:Подпись:Подпись:Подпись:image144

image145

Open valleys are well suited to thicker roofing materials, such as laminated asphalt shingles, wood shingles, and shakes. Because roofing cement may not be compatible with peel-and-stick WSU, use urethane caulk under shingle edges. The crimp in the valley flashing prevents cross­valley runoff from running under shingles.

Подпись: Vent-pipe flashing overlaps shingles below and is overlapped by shingles above. To keep water from entering the snipped metal collar, seal it with urethane caulk.

rain, have a metal shop fabricate valley flashing with an inverted V-crimp down the middle. This crimp helps prevent heavy runoff from one side running across the valley and up under shingles on the other side. Overlap lower sections of flash­ing 8 in. to 9 in. The heavier the metal, the more durable the valley: 26-gauge is standard for pre­fabricated pieces, but the heavier 24-gauge is better.

Avoid driving nails through metal valley flashing. Rather, place nail shanks snugly against the edge of the flashing and drive nails till their heads touch, but don’t dent, the metal. Space nails every 12 in. to 16 in. along both edges or use clips that inter­lock seams along the edge. Not nailing through the metal allows it to expand and contract freely and leaves no nail holes for water to penetrate. To pre­vent corrosive galvanic action, use nails or clips of the same metal as the flashing.

VENT-PIPE FLASHING

Vent-pipe flashing (also called jack flashing) is usually an integral unit with a neoprene collar atop a metal base flange. Some pros prefer all­metal units because UV rays won’t degrade them

and their taller collars are less likely to leak on low-slope roofs.

Neoprene combos are easier to install. In both cases, shingle up to the base of the vent pipe and slide the unit down the pipe. Nail the top edge of the base, and then overlap it with shingles above. Neoprene collars slide easily over the pipes, but metal collars must be snipped and spread to receive the pipe, before being caulked with ure­thane to prevent leaks. For either base, don’t nail the lower (exposed) edge; instead, apply a bead of urethane caulk beneath the flange, to seal it to the shingles beneath.

Roof Flashing

Because underlayment directs water away from sheathing, it’s technically flashing, too. More often, however, roof flashing refers to sheet metal that protects building seams or edges from water penetration or diverts water around pipes, chim­neys, dormers, and so on. Metal flashing is widely used because it’s durable and relatively easy to cut and shape. Always replace old flashing when installing a new roof.

MATERIALS

Various sheet materials are suitable for flashing. Unformed, they come in sheets 10 ft. long or in rolls of varying lengths, widths, and gauges. Copper is the longest lasting and most expensive. Lead is the most malleable but is also the most vulnerable to tears and punctures. Galvanized steel ranks second in longevity, but it’s so rigid that you should buy it preshaped or rent a metal­bending brake to use on site. Lightweight alu­minum is commonly shaped on site and is a good trade-off in expense and durability. There’s also painted steel flashing, in case you don’t like the glare of bare metal.

When installing flashing, use the fewest nails possible and avoid nailing in the center of a flash­ing channel, where water runs. If possible, always position nails so they can be overlapped by roofing above. Where you must leave nail heads exposed—say, when installing skylight flashing or wall cap-flashing—put urethane caulk under the nail heads before driving them down or use gasketed roofing nails.

DRIP-EDGE FLASHING

You want water to drip free from roof edges, rather than being drawn by capillary action back up under shingles or sheathing. Drip-edge also covers and protects sheathing edges from gutter splashback and ice dams along the eaves and gives rake edges a clean, finished look. The

ACTION

A number of metals, if paired, will corrode one another in a process called galvanic action. To be safe, use nails or clips that are the same metal as the flashing you install. Because water is an electrolyte, any moisture present will increase corrosion. The following metals make up a group known as the electrolytic sequence.

image141

When you pair up materials, the metal with the lower number will corrode faster. If you must pair two different metals, you can retard galvan­ic action by insulating between the metals with a layer of heavy (30-lb.) building paper.

Подпись:image143Подпись: Underlayment runs over the eaves drip-edge, and rake drip-edge runs over the underlayment. Thus, at lower corners the rake drip- edge will overlay the eaves drip-edge.crimped edge of drip-edge flashing also resists bending and thus supports overhanging shingles.

Drip-edge is sold in varying widths and comes in an L-shape or a lopsided T-shape. Install drip – edge along the eaves first, nailing it directly to sheathing, using 4d big-head roofing nails. Space nails every 18 in. or so. Underlayment along the eaves thus overlaps the drip-edges. Along the rake edges of a roof, install underlayment before applying rake drip-edge. In the corners, where rake edges meet eaves, run the rake drip-edge over the eaves drip-edge. Slitting the vertical leg of the rake drip-edge makes it easier for you to bend it over the leg of the eaves drip-edge.

In general, drip-edge flashing 6 in. wide or wider is better than narrower flashing because it enables you to nail well back from the edge of the flashing—always desirable.