Category RENOVATION 3

Skylight above a Flat Ceiling

Positioning a skylight above a flat ceiling is an inexact science. Situating the skylight between rafters is easy enough, but because lightwells flare out, sizing and positioning the ceiling opening can be tricky if you’ve never done it before. Here are a few tips to demystify and simplify the process.

► Use a pencil or painter’s tape to roughly outline the lightwell opening on the ceiling. Push nails up through the corners of the opening so you can spot them from above.

► Go into the attic or crawl space above to find the four corner nails and determine if there are wires, pipes, and ducts that would be a problem to relocate. Avoid positioning skylights where roof planes converge, by all means. It’s far easier to reposition the skylight.

► If the space over the ceiling is inaccessible, turn off the electricity and use

a cordless recip saw (or a hammer) to punch a hole big enough for your head, so you can take a better look before enlarging the hole.

► If you can position skylight openings to avoid cutting rafters or ceiling joists, do so. If you must cut more than one rafter, have an engineer review your plans. Otherwise, double up headers and trimmers around the rough opening(s) to redistrib­ute the loads, and use steel connectors to ensure solid connections.

► Flare the top and bottom of the lightwell but, if possible, leave the sides vertical. To simplify layout further, make the upper (end) wall of the lightwell perpendicular to the rafters and the lower (end) wall, plumb, as shown in "Skylight Positioning," at left. It’s possible to flare all four surfaces, but compound-angle cuts on all studs are a monster to do correctly.

► When you have a better sense of the lightwell’s location, enlarge the hole

in the ceiling but don’t cut it to its final size yet. To mark the corners of the opening in the roof, drive 16d nails up through the sheathing. Note: Thus far you’ve cut into finish surfaces only, not into framing.

After snapping chalklines to outline the rough opening, use a utility knife with a hooked blade to cut the shingles. Then use a shingle ripper (left) or a flat bar (right) to pry up the shingle nails and remove the shingles within the cutout area. Kneepads are a must for most roof work.


Unless you are highly skilled with a reciprocating saw, like this pro, use a circular saw to cut through the roof sheathing. To avoiding gumming up a blade, remove the building paper before cutting. Be sure to wear eye protection.


Standing outside the cutout area, pry up the sheathing and pass it through the hole to your helper inside. By the way, many old-timers don’t like sneakers because nails can pierce the thin soles; on the other hand, sneakers can improve your footing. Your call.


image258

After removing the sheathing, the installer used a hooked blade to cut back the shingles more precisely so the Velux skylight’s mounting brackets could sit on the flat plane of the roof sheathing, rather than on an uneven shingle surface.


Here, all four lightwell walls will flare out toward the bottom (none plumb). Using his level as a straightedge, the installer marks the rafter cuts; the level runs from the edge of the roof opening to the doubled headers in the ceiling opening. After cutting the rafters, he’ll attach a doubled header behind the cut-line.


image259

Подпись: PROnP Cut the Length of the light- well a little long. It's difficult to know exactly where the grooved lower edge of the skylight curb will meet the finish surface on the plumbed lower wall, so you're better off cutting the opening long and shimming it up as needed, using thin pieces of plywood. Ultimately, '/2-in. dry- wall edges should fit perfectly into curb grooves. llll

shingles within the RO without disturbing those around the perimeter.

Once you’ve removed the shingles within the RO, use a circular saw with demolition blade set to the depth of the roof sheathing. If you’re skilled, you can use a reciprocating saw with a bimetal blade to cut through the sheathing, as the pro is doing in the photo on p. 121, but don’t cut through a rafter while you’re standing on it! Whatever tool you use, wear eye protection because you’re likely to hit nails. After you’ve cut around the perimeter of the RO, use a claw ham­mer or a flat bar to pry out the sheathing.

Next slide a shingle ripper under the shingles around the RO, gently breaking the self-sealing shingle spots and pulling out any nails within 1 ft. of the opening. This nail-free perimeter will enable you to properly flash the skylight curb with building paper or self-adhering bituminous flashing. Finally, if you’re installing a skylight with L-shape mounting brackets, cut back the shingles an additional 1 h in. to 2 in. around the RO so the brackets can sit on a uniformly flat surface and be screwed easily into sheathing.

Framing. Frame the roof opening and the light – well. Before cutting through the rafters, install temporary braces to the ceiling joists below; those rafter braces stay in place till the rafters are head – ered off. If the upper wall of the lightwell will be perpendicular to the rafters, use a framing square to mark a square cut back 3 in. from the edge of the opening (a doubled header is 3 in. wide).

The lower end of the lightwell is a bit trickier to frame because it intersects the roof plane at an obtuse angle (greater than 90°). Hold a 4-ft. level plumb against the lower edge of the roof RO, and then mark that angle onto the face of the trimmer rafters on each side of the opening. Bevel-cut the top edges of the doubled headers at that same angle. Once you’ve headered off the top and bot­tom of the RO, double up the trimmer rafters along the sides of the opening, using as long a board as possible. (Space is tight in an attic.)

Finally, install studs running from the RO in the roof to the RO in the ceiling below. If you install the four corner studs first, you can run taut strings between them to align the interven­ing studs. If the lightwell sidewalls are plumb, rather than flared out, you will have saved your­self a lot of work.

Replacement Windows

If existing sashes have deteriorated and you’d like to avoid the major headache of ripping out existing frames, casing, finish surfaces, and siding, then replacement windows can be a cost-effective solution. These units come encased in frames, which you insert into existing wood frames, after removing the old sashes and pulling the parting beads so that old jambs are reasonably flat. Just cut the sash cords and leave old sash weights in the wall.

Start by measuring the existing window frames carefully, because replacement units fit snugly inside them. Old frames are frequently out of square, even if their jambs are parallel. Thus, in addition to measuring height and width, note which way a frame leans, so you can order the biggest rectangle that will fit into that opening. To install most replacement units, apply a 3/s-in. bead of siliconized acrylic caulk along the inside faces of the interior or exterior window stops and across the sill in line with those stops. Set the new window in bottom first, tilt it up into place, and then press its vinyl frame into the caulking so there’s a good seal. There’s little shimming; many models have adjustable screw jacks that hold side jambs tight to the opening. Use a mild expanding polyurethane foam to seal the gaps around the unit.

Admittedly, these units are something of a compromise. If existing frames and casings are parallel but not plumb, replacement windows are commonly installed slightly off-plumb. Replacement sashes tend to be narrower than old-fashioned wood ones, so there’s also an aesthetic compromise. That noted, vinyl – or Fiberglas®-clad replacement units are typically one-half the cost of custom-milled wood sashes, require little maintenance, and cut drafts and energy costs dramatically. Their color range is limited—white—but you can paint Fiberglas. Aluminum-clad units come in dozens of colors but are the most expensive option, and salty coastal air will eventually corrode the metal.

Подпись: The area under the roof is a messy place to work, especially if the ceiling's insulated. Use sheet plastic to isolate the area below the lightwell and a dustpan and trash bags to store the insulation for reuse. Wear gloves, a dust mask, and goggles. To protect your head from roofing nails sticking through the sheathing, wear a hard hat. (You should already have gotten a tetanus shot.)Подпись: 1111

SIZING SKYLIGHTS

Folks often order skylights larger than they need to be. Keep in mind that even the smallest unit brightens a room greatly. Moreover, much of the light gain comes from reflections off the sides of the lightwell (or lightshaft), which is why wells are usually painted white. You can increase the amount of light markedly by flaring out the sides of the well. If you need more light than one nar­row skylight will yield, consider “ganging” sever­al, side by side, in adjacent rafter bays. Smaller skylights are easier to frame out, and the fewer rafters you disturb, the better.

Most skylights are sized incrementally to fit between rafters spaced 16 in. or 24 in. on center. Thus skylights routinely come in 24-in., 32-in., and 48-in. widths. Skylights 32 in. wide are the most popular size because you need to cut only one rafter to accommodate the unit. Velux®, for example, has several models whose inside curb dimensions are 30’/г in. wide—the same distance between rafters spaced 16-in. on center, if one rafter in between is removed. Aligning the inner faces of skylight curbs and rafters also makes installing drywall much easier. Attached to the
roof sheathing with L-shaped mounting brackets, the sides of Velux units sit right over rafters.

FRAMING A SKYLIGHT OPENING

This section provides general guidance related to the framing procedures shown in the photos. Usually, it doesn’t matter whether you cut ceiling joists or rafters first, as long as they’re adequately supported. Some pros prefer to frame out the lightwell completely before opening the roof; whereas others place the skylight first and meas­ure down from that.

Insulation. Remove the ceiling insulation. Then disconnect and cap any wires and pipes that will need to be rerouted around the opening. (Use a voltage tester to be sure the power’s off.) Where possible, work from a stepladder rather than sit­ting on ceiling joists; that way, you’ll be less likely to crack the finish ceiling. The job will go faster if one worker on a ladder measures carefully and calls out measurements for headers, trimmers, lightwell studs, and the like to a second worker on the floor, who does the cutting.

Before cutting ceiling joists, support them
with a strongback, which is a piece of dimension

Skylight Positioning

Temporary braces support cut-through rafter.

image257

Installing a Skylight

By letting in light, skylights can transform a room, making a bathroom seem larger, a kitchen warm and cheery, or a bedroom a place to watch the stars. And because of marked improvements in flashing and quality control, skylights can now
be installed without fear of leaks from outside or excessive heat loss from within.

Where you put the skylight is partly aesthetic and partly structural. If it’s a kitchen unit, catch the morning sun by facing it east. If placed in a hallway, even a small unit provides enough light to let you do without electric light during the day. In a bathroom, privacy is the main issue. Avoid skylights in south-facing roofs unless you’re designing for passive solar gain; such skylights can roast you in the summer. Similarly, skylights in west-facing roofs may create too much heat in the South and Southwest United States. Avoid skylights that straddle a ridge because they are difficult to flash and likely to leak.

SELECTING A SKYLIGHT

Consider a number of things when buying a sky­light, not least of which is the manufacturer. Although sizes have become pretty much stan­dard, quality varies greatly—so ask local contrac­tors or lumber suppliers which brands they pre­fer. Here are a few aspects to investigate:

► Do you want ventilating (openable) or fixed (closed) skylights? Skylights that open can vent excess heat. And turn-tilt models pivot so they’re easy to clean.

► Is it energy efficient? Most units come with doubled thermal-pane glass, but units should also have a thermal break to minimize loss by conduction. A metal frame that’s continuous (inside to out) will wick off a lot of indoor heat. A better bet is sealed wood.

► Does it have step-flashing along its sides (desirable for shingle roofing) or strip flash­ing, which must be caulked to keep water out? If the unit is wide (more than 32 in.), does the maker supply a cricket to deflect water around the skylight head?

Does the unit have tempered glass?

That’s an important consideration if a tree limb overhangs your roof. Your building code may require such glass.

If the unit will be installed beyond reach, how easy is it to open and close? Remote – controlled units with motors can be pro­grammed to open at a given temperature, and shut when an electronic sensor detects rain, but such units are more expensive and more temperamental than manually operated ones.

Can you get units with screens, blinds, shades or polarizing tints? Low-Ecoatings selectively admit light while reflecting heat. Note: There are different coating types for cold and hot climates, so ask your supplier which is appropriate for your area.

image256

Skylights dramatically change rooms. Because drywall joints and nail holes will be illuminated, too, apply joint compound generously and sand carefully. Heat buildup in the lightwell can cause compound to shrink, so you may need to apply an extra coat.

REPLACING GLASS

Wear goggles and gloves when replacing dam­aged glass and dried-out putty (glazing com­pound). Although a glazier’s chisel will easily remove most putty, use paint stripper or an elec­tric putty softener to dislodge the tough stuff. (But do not use chemical stripper and heat at the same time.) Because direct heat can crack glass, cover nearby panes with a piece of hardboard wrapped in protective foil. After removing the old putty, glazier’s points, and damaged glass, sand the frame lightly, using 180-grit sandpaper.

Prepping the frame. Before applying new glaz­ing compound to weathered sashes, brush the exposed wood with a sealant or a half-and-half mixture of alcohol (or turpentine) and linseed oil. This will prevent the dry wood from sucking the oil out of the fresh putty. Let the sash dry for an hour or two. Then spread a thin bed of putty along the lip that receives the glass. This bed of putty will prevent rattling and seal air leaks. The replacement pane should be in. smaller than the width and length of the frame.

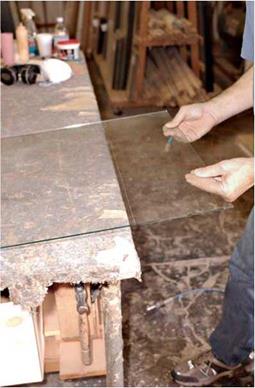
Cutting the glass. After scribing the glass with a glass cutter, gently rap the ball end of the cutter along the underside of the cut—up and down its length—until a clear line develops. Then, with the cut directly over a table edge, quickly snap the waste portion free. If the waste piece is too small to grip, use glass pliers. Note: Old glass is imper­fect and often hard to cut because it’s irregular and often doesn’t break cleanly.

As you place the glass in the frame, press around the edges so that the putty will seat evenly beneath the pane. With a putty knife held almost flat against the glass, push in new glazier’s points until they are half-buried. (Never hammer the points in; you may break the glass.) Sink a point every 6 in., or at least one for each side of the glass. Be particularly careful when pushing points into muntins (the wooden strips between panes); if you push a point in too far, you could crack the adjacent pane. Glass in metal-frame windows is usually held in place by metal spring clips, which can be reused.

Once the replacement pane is held fast by glazier’s points, apply putty generously. Scoop
out a palmful of putty and knead it in one hand until it is soft and pliable. Use your thumb to press the putty into the frame, applying moderate pressure. You’ll recover any excess when you trim, so use a lot of putty now to ensure getting a good seal.

To trim off the excess, hold the knife blade at an angle of about 45° to the glass, with a corner of the blade touching the glass and the middle of the blade resting on the frame. Pull the knife evenly toward you, plowing a steady furrow through the putty. Go back and touch up the corners after removing most of the excess. You

Подпись: Don't use putty with insulated glass. Otherwise, oils in the putty will attack and degrade the seal on the glass. Instead, use a closed-cell foam, peel-and-stick glazing tape. The tape is sticky on both sides: One side sticks to the frame, the other to the glass. 1111 image254Подпись: Double-sided, self-adhering foam tape has largely replaced putty in production glazing. Tape, unlike putty, is uniformly thick, quick to install, and won't degrade the seals of insulated glass.image255Подпись: However, once the glass is placed in glazing tape, it's difficult to reseat. So seat the panes carefully if you use tape.

shouldn’t be able to see putty from the inside of the window once it has been trimmed.

If the putty doesn’t stick, either you’re holding the knife handle too high or there is dust on the frame or the glass. If the problem is just the drag of the knife blade across the putty, a bit of saliva on the blade will lubricate it. When the putty has cured for a week, overpaint it slightly onto the glass to seal the putty from weather.

Shimming Windows

ALL window frames must be shimmed securely. Pairs of tapered shims allow you to plumb and level window frames in out-of-square openings; supporting frame jambs and preventing deflection even as you drive screws or nails through them.

Ideally, you should shim each side jamb within 4 in. of its top and bottom corners, and every 16 in. in between—a minimum of three shim points along each jamb.

If the rough sill is level and uniformly supports the windowsill, don’t shim underneath it. Window makers disagree about shimming the head jamb. Some recommend that you shim head jambs at the same intervals as side jambs; others suggest not shimming at all because if the header sags, shims beneath it could deflect the head jamb. To be safe, follow the installation instructions that come with your window.

As explained on p. 94, you can nail through or below shims as long they’re snug.

At each shimming point, use a pair of 10d galvanized finish nails or 3-in. galvanized or stainless-steel trim-head screws to keep the jambs from twisting. Screws are more expensive but allow you to make adjustments easily. If the shims are green or "yard wet," there’s no need to predrill them to avoid splits; otherwise, predrill. You can easily fill and paint dimpled nail heads and countersunk screw heads in the jambs. Or you can remove the inside window stops, nail through the jambs, and replace the stops to hide the nails.

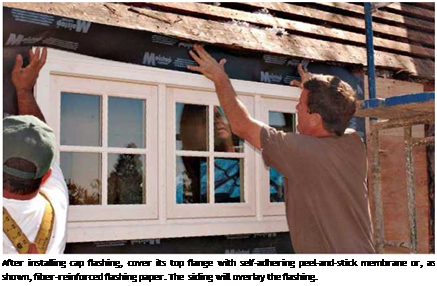
Подпись: After installing cap flashing, cover its top flange with self-adhering peel-and-stick membrane or, as shown, fiber-reinforced flashing paper. The siding will overlay the flashing.

Window Repairs

Old houses often have ailing windows, unopen – able because they’re swollen shut or entombed in paint. Try to repair windows during a sunny stretch, but have a roll of sheet plastic on hand to
tack over the openings in case a storm catches you by surprise. Above all, be patient, use force very sparingly on balky windows, and wear gog­gles and gloves.

FREEING SASHES

The window may just be painted shut. Rap around the perimeter of the sashes with a ham­mer, using a wooden block to prevent marring. Then run a scraper or a putty knife along the sash edges.

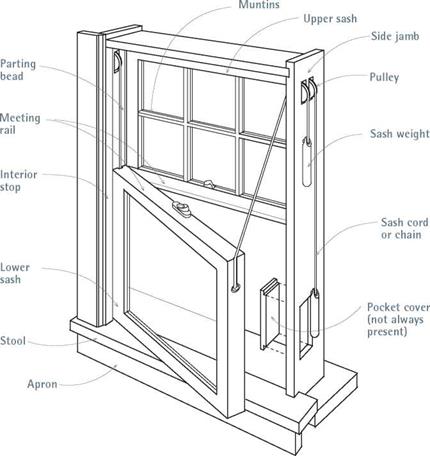
If the lower sash still won’t move, remove the inside stop, which is usually screwed on, if you can find the screws under all that paint. If you can’t pry up the stop, use a chisel to cut it out; stops are easy to replace. But try not to damage the jamb. Once the inside stop is out, pull out the lower sash and disconnect the sash cord if it hasn’t already rotted away. Use a narrow scraper to remove paint or debris from the sash channel. With a putty knife, clean up the sash channels, and then lightly sand them. Try the sash to see if it now slides more smoothly. If so, wax the chan-

Double-Hung Window Elements

PROnP

Retrofitting cap flashing takes dexterity. Cut back the siding nails 2 in. to 4 in. above the opening, and pry up the siding so you can slide the top flange of the Z-bar cap flashing under the building paper and siding, while simultaneously holding up the window unit. You can nail the top flange of the Z-bar through the siding, but that’s not impera­tive. Wedged into place, the cap flashing won’t go anywhere.

image2511111

Подпись: Using a straightedge to guide your cut, pull the glass cutter, with an even pressure, toward you. One pass of the cutter should do it. Then use the ball end of the cutter to rap lightly along the line. Подпись: Wearing gloves and safety glasses, place the scribed line over a table edge and snap the glass sharply; it will break along the line.image253

nels (a piece of candle works fine) and the sides of the sash, replace the sash, and reattach the inside stop.

If a sash weight has come loose from its cord or chain, reattach it while the sash is out. Access to these weights varies, but there is often a removable panel toward the bottom of each jamb. If there is no such panel, pry the jamb trim off.

INSTALLING THE WINDOW UNIT

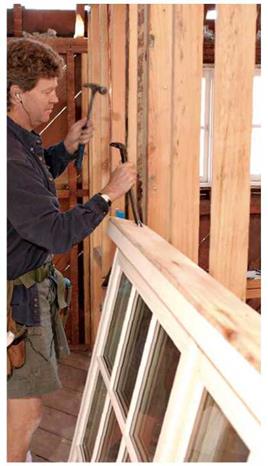
Before installing window units, remove the packaging, shipping blocks, screens, storm windows, and so on. If the unit is uncased, screw temporary cleats to the outside edges of the frame so that when it is placed in the opening, its jamb edges will be flush to the sheathing. Window installation is a two-person job—one inside, one outside.

1. Dry – fit the window first.

Set the bottom of unit onto the RO sill and tilt the window up into place. There should be roughly h in. of space on both sides of the unit and h in. to 1 in. above. Using a spirit level, the person outside quickly checks for level and plumb. If there are no glar­ing problems, set the unit aside and caulk around the opening.

2. Caulking details will vary. For most pre­cased or flanged units, apply a continuous 18-in. bead of siliconized acrylic caulk along the sides and top of the RO, back h in. from the edge, and press the casing or flange of the new unit into the caulking for a good seal. If the unit is uncased, caulk only along the bottom of the opening, at this stage.

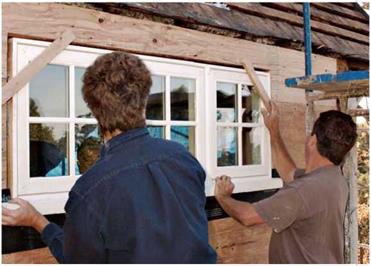
3. Now install the window. As the outside person supports the unit, the inside person uses a small flat bar inserted between the RO and the frame to center the unit in the opening. That done, the person outside uses a spirit level to check the window’s sill and head for level, while the person inside uses the flat bar and adds shims as needed. Once the unit is level and plumb, the outside person uses a tape measure to check the frame’s “diagonals” (opposite corners of the frame). If diagonal measurements are equal, the frame is square.

4. When the unit is level and plumb, nail the upper corners of precased units and units with nailing fins. Tack uncased units with a nail or screw centered in each side jamb, down about 4 in. from the top of the frame. Open and close the window to see if it binds. Where the frame binds, use screws to draw it out or shims to push it into the opening. If you are installing a double – hung window, make sure the meeting rails meet evenly.

image247

After dry-fitting the window, flash the sill of the RO and run a bead of siliconized acrylic latex caulk near the corner so the window seats in it. Once the window is in place, apply an additional bead of caulk to the underside of the windowsill to cut air infiltration.

Подпись: Once the unit is shimmed and screwed into final position and the window opens and closes freely, cut the shims flush with the inside face of the framing. Do the same outside. Подпись: After applying a bead of caulking along the outside edge of the jambs, seat fiber-reinforced flashing paper in the caulking, as shown. Apply a second bead of caulking over the paper. Then install the casing and head flashing as shown on p. 89. FINISHING TOUCHES

Use a Japanese saw or a utility knife to cut the shims flush to the interior finish surfaces and exterior sheathing. Set the nails or sink the screws holding the frame to the opening, and then fill the holes. Use a mild-expanding polyurethane spray-foam sealant to stop air infil­tration around the unit. This type of foam is less likely to bow window frames than a foam that expands aggressively (see Chapter 14).

Now weather-seal the outside of the opening.

If you installed a precased unit, it’s already set in caulking, so you’re ready to install the cap flash­ing. If the unit has continuous nailing flanges, seal the sides and sill with strips of self-adhering membrane. But install cap flashing before apply­ing a self-adhering membrane strip across the top of the unit.

If the unit is uncased, like the unit shown in the photos, caulk the side jamb edges with siliconized acrylic caulk (run the beads back h in. from jamb edges), press fiberglass-reinforced strip flashing into the caulk, and nail the side casing to the jambs, using 8d galvanized finish nails. Then apply a bead of caulking to the edge of the head jamb and nail up the head casing to the side cas­ings. To keep the joints from pulling apart, send one nail diagonally through each joint, too. Then apply the cap flashing (usually metal or vinyl), nailing through its top leg. Flashing strips, self­adhering membrane strips, or housewrap over­laps that top leg. Finally, apply a bead of surface caulk to the frame/sheathing joints all around.

Installing a Basic Window

Some of the terminology for doors and door frames is common to windows and window frames. For example, frames are made of jambs, a head, and a sill, with stops to guide or seat win­dow sashes. Window sashes, like door frames, have horizontal rails and vertical stiles.

WINDOW CHOICES

Windows arrive installed in a preassembled frame, complete with the hardware necessary to operate them. Unlike door installation, there is no need to trim window jambs, so the sill is always preattached. You can order windows pre­cased (casing preattached), but such units can be tricky to shim properly. Uncased units are better suited to renovation: Local mills will offer a wider range of casings than window manufac­turers, and you’ll have more latitude in adjusting casings to irregular walls or out-of-square frames.

Wood windows are the sentimental favorite. They’re also pleasant to work with and good looking, but they take a lot of maintenance. On the other hand, vinyl-clad and aluminum-clad wood units are virtually maintenance-free, though they cost more. Of late, all-vinyl units have become popular, and are an especially good choice in rainy regions. Metal windows, on the other hand, seldom look good as retrofits in older houses; and because they encourage condensation and heat loss, they’re a poor choice in cold climates.

Clad window units come in a variety of durable prefinished colors, eliminating costly exterior painting. Many manufacturers will cus­tomize a range of factory-built window units to your specifications. Options include a choice of fixed, double-hung, single-hung, sliders, bow, bay, casement, awning, and hopper styles; single – or double-glazing; many configurations of lights and muntins; custom glass for sound or UV light attenuation; safety glass; custom jamb widths; extended sill horns to accommodate various exte­rior casing details; and mulled units (windows

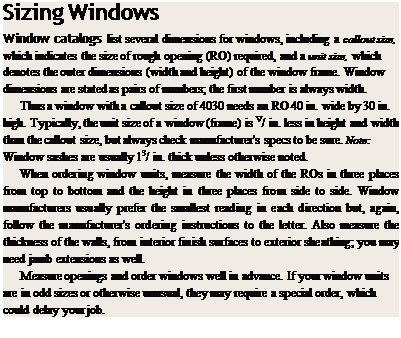
Подпись: Sizing Windows Window catalogs list several dimensions for windows, including a callout size, which indicates the size of rough opening (RO) required, and a unit size, which denotes the outer dimensions (width and height) of the window frame. Window dimensions are stated as pairs of numbers; the first number is always width. Thus a window with a callout size of 4030 needs an RO 40 in. wide by 30 in. high. Typically, the unit size of a window (frame) is V/ in. less in height and width than the callout size, but always check manufacturer's specs to be sure. Note: Window sashes are usually 13/ in. thick unless otherwise noted. When ordering window units, measure the width of the ROs in three places from top to bottom and the height in three places from side to side. Window manufacturers usually prefer the smallest reading in each direction but, again, follow the manufacturer's ordering instructions to the letter. Also measure the thickness of the walls, from interior finish surfaces to exterior sheathing; you may need jamb extensions as well. Measure openings and order windows well in advance. If your window units are in odd sizes or otherwise unusual, they may require a special order, which could delay your job.

ganged together to create larger units). These factory-built wood windows are generally made to tighter tolerances than shopbuilt windows, ensuring good weather tightness and insulation values.

PREPPING THE OPENING

Before ordering windows and again just before installing them, check the ROs for level and plumb. Most window units will need some shim­ming, but if the sill is level, the rest of the instal­lation will be relatively easy. Typically, an RO is 1 in. taller and wider than the window frame.

WEATHERPROOFING OVERVIEW

Water is persistent, so always wrap exterior wall openings with moisture barriers before installing windows, and use cap flashing on the frame heads to direct water around the opening. The order in which you install weatherproofing mate­rials depends on several variables: Is exterior sheathing exposed or covered by building paper

image244

Before installing windows, carefully remove the packaging and shipping blocks.

and siding? And are window units uncased, pre­cased, or surrounded by a continuous nailing flange?

If the sheathing is exposed, run housewrap or building paper at least 4 in. into the RO, and staple it to the framing. However, leave the housewrap over the top of RO unstapled because it will overlap the window’s cap flashing later.

Alternatively, you can first flash the perimeter of the RO with strips of fiberglass-reinforced flashing or with self-adhering membrane. Self­adhering membrane is more expensive, so it’s often reserved for flashing sills and head casing, which are more likely to leak. Flash the sill first, folding the strip ends so they extend at least 6 in. up onto the jack studs. Then flash the jack studs, overlapping the upturned ends of sill flashing. (But don’t flash the head of the opening yet; that needs to wait till the window is installed.) Then run housewrap or building paper up to the edges of the opening, overlapping the strip flashing just installed.

If the exterior is already covered with building paper and siding, you’ll need to fit flashing strips and cap flashing under it. If there’s lap siding such as clapboards, or wood shingles, this is rela­tively easy: Drive a shingle ripper up under siding courses to cut the nails holding them, slide flash­ing strips under the existing building paper and siding, and then caulk and install the unit, as described in the next section. Cut siding nails back at least 4 in. around the opening, although you may want to cut back shingles 12 in., allow­ing you to offset the shingle joints correctly.

Подпись:Подпись: PROnP Windows are usually installed by setting the bottom onto the sill of the opening and tipping the unit up into place. But if you're installing a flanged unit, which has integral cap flashing, slip the cap flange up under the housewrap and siding first; then swing the bottom of the unit onto the sill. Obviously, you'll need to slit the housewrap or pry out the siding nails above the opening to insert the flange. 1111 Подпись: Dry-fit the window first to make sure it fits and that there's enough space in the opening to level and shim the unit. That done, set the window aside, and caulk around the opening. The temporary diagonal cleats at the upper corners keep the jambs flush to the sheathing.image246Replace and renail the siding, as necessary; then caulk and install the window as described in the next section.
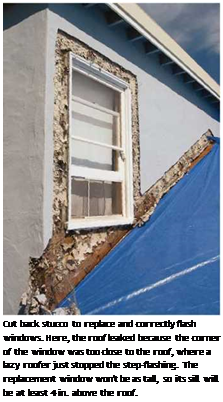
If there’s stucco, the only way to retrofit flash­ing successfully is to cut back the stucco and wire lath 6 in. to 8 in. around the opening, using an electric chipping hammer (see the top photo on p. 145). After installing the new unit, insert flash­ing beneath the existing building paper (especially the cap flashing), tie new wire to the old, and patch the stucco.

Hanging a Door to an Existing Frame

Hanging a new or recycled door to an existing frame is a common renovation task, but not always feasible. At the very least, the hinge jamb must be straight. If it’s badly bowed and you can’t draw the bow back with screws, you may need to remove the old frame (and its casing) and replace it with a prehung unit.

Creating a Template

The most reliable way to fit a door to an out-of­square frame is to create a template. (Read "The Beauty of Templates," on p. 317, for some tips.) Use 4-in.-wide, Vs-in.-thick strips of doorskin plywood; tack-staple the plywood strips to the edges of the doorstops the door will seat against. Where they cross, join the strips with fast-setting hot-melt glue. In addition, run a horizontal strip across the bottom of the door opening from jamb to jamb, and diago­nally cross-brace the strips so they will retain the outline of the frame opening after you pull the staples.

I Hinge Setbacks

image238

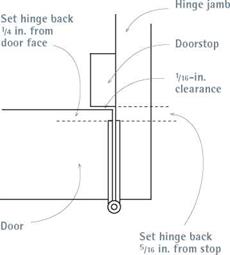
Leave a slight gap between the door and the doorstop, so the door won’t bind.

As you transfer the outline of this template to the face of the door, subtract V8 in. from the top and sides of the template to create an V8-in. clearance between the door and the jambs; subtract 74 in. from the bottom edge of the template for clearance above the finish floor or threshold. If the floor isn’t level, you may need more clearance. Place a 4-ft. spirit level across the opening to see how much out of level the floor is.

Trimming the Door

Trim the door rails of the door, then the stiles.

To prevent splintering, first score along cut-lines with a utility knife (see the photo on p. 96). Then use a 7‘A-in circular saw with a sharp, 40-tooth carbide blade to make the cut. For best results, cut V/i6 in. beyond the cut-line. Then use a belt sander with 80-grit sandpaper to trim the edge exactly to the cut-line. Some carpenters instead trim door edges with a handplane or power plane. If you use a power plane, go slowly to remove the wood gradually, making several shallow passes.

Cutting the Hinge Gains

Cutting hinge gains (recesses) is best done with a router and a template (see the photo on p. 103), but a hammer and chisel are easy enough if you’re hang­ing just one door. If the door frame already has hinge gains, transfer their locations to the door; otherwise, mortise the hinge gains into the door before trans­ferring hinge marks to the frame. To transfer hinge locations, use shims to position the door snug against the hinge jamb—with an %-in. gap. Then use a utility knife to mark the top and bottom of the hinge leaves in both the frame and the door.

Typically, the top of the top hinge is 7 in. from the top of the door; the bottom of the bottom hinge,

9 in. to 11 in. from the bottom of the door (see "Positioning Door Hardware," on p. 93). If there’s a third hinge, it’s equidistant from the other two.

Pull the hinge pins so you can work with one hinge leaf at a time. Set the hinge leaf slightly back from the edge of the door, as shown in "Hinge Setbacks." The setback from the hinge to the doorstop should be slightly greater than that from the hinge to the edge of the door, so there is room for several coats of paint. Use a combination

Подпись: Water-Return Threshold
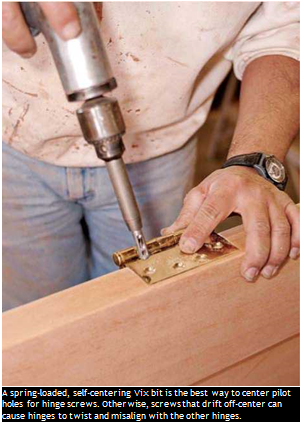
Подпись: A spring-loaded, self-centering Vix bit is the best way to center pilot holes for hinge screws. Otherwise, screws that drift off-center can cause hinges to twist and misalign with the other hinges.

image240

square to mark setback lines on doors and jambs. Finally, when mortising hinges, it’s best to set the router slightly shallow and then use a chisel to pare away the last little bit of wood so the hinge leaf is just flush. Setting hinges too deep can cause the door to bind.

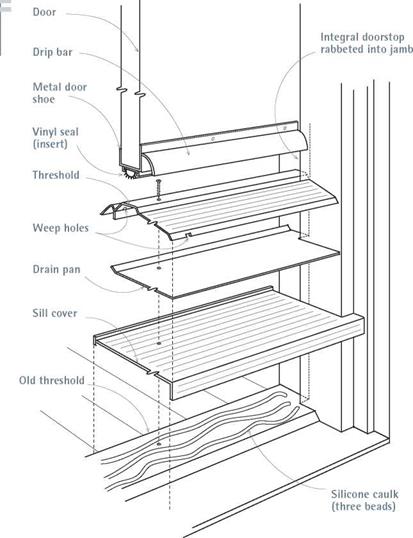
Подпись: This three-piece threshold fits over an existing threshold and can withstand just about anything short of Noah's Flood. For success, carefully fit and caulk the unit's pieces.Hanging the Door

Screw down all the hinge leaves using a self­centering Vix-bit®, which centers screws perfectly in the hinge holes. Then lift the door into the frame and mate the door’s hinge leaves with those on the frame, starting with the top hinge. Insert the hinge pins loosely, then eyeball the hinges as you open and shut the door. If the clearance between the door and the hinge jamb is excessive, remove the door and set the hinges a little deeper.

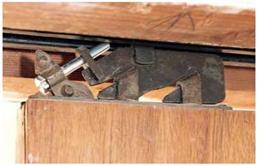
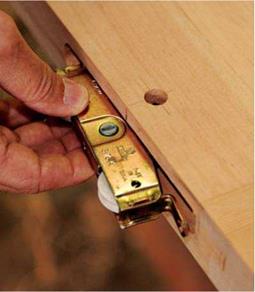
image241Подпись: Top-mounted pocket door mechanisms need oiling and a little ingenuity to keep them rolling. Here, an installer retrofitted a new machine bolt, sawing a slot into its head so the bolt can be easily turned to raise or lower the door.image242Подпись:image243

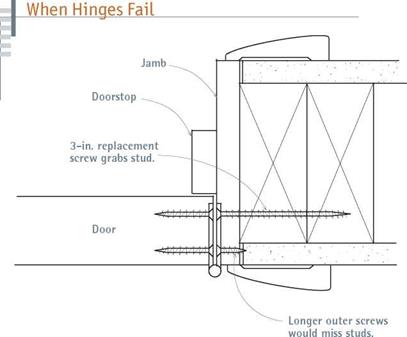
Replacing a short hinge-screw with one long enough to grab the framing should be your first “cure" when hinge leaves pull free from door jambs.

threshold and the drain pan, shut the door and spread a scriber to the distance from the top of the sill cover to the mark(s) on the jambs. Then scribe the bottom of the door to indicate the amount that you’ll need to trim off. Cut down the door, vacuum the existing threshold well, apply three beads of silicone caulking across the open­ing, and press the sill cover into it. Then do the same with the sill drain pan. Also caulk the jamb – and-pan joints. Finally, screw down the threshold and install the shoe on the bottom of the door, as described in the preceding section.

SEALING DOOR BOTTOMS

Weatherstripping beneath exterior doors must be weather tight and durable, this because of the heavy traffic it must bear in normal use.

Elements that attach to door bottoms are called shoes or sweeps; those that attach to the floor,

I Weatherstripping Thresholds

image233image234image235

image237

By turning the screws of this adjustable threshold, you can raise and lower the oak strip to get a good seal to the door bottom, thus stopping drafts and water.


image236

Door shoes are usually sized for the ГА-in. thickness of the exterior door. The shoe is cut back about ’/> in. from both sides of the door so the shoe’s drip cap will clear the thicker part of the jamb as the door closes.


Подпись: PROnP Hinges are manufactured so there will be a Ms-in. gap along the hinge jamb when the hinge leaves are mortised flush to the jamb and the door. In other words, when the door is shut, hinge leaves do not quite touch. 1111

thresholds. If the doorway is protected by an overhang, installing a shoe/threshold combination will significantly cut drafts under the door. How­ever, if the doorway is exposed or there are signs of water damage around an existing threshold, cover it with the water-return threshold shown on p. 111. Also see "Floor Pan for Exterior Door,” on p. 97.

Attaching sweeps and shoes is straightforward. The simplest are flap sweeps that are nailed or screwed to the bottom of a door while it’s shut. On an outswinging door, cut the sweep to length and hold it against the bottom edge of the door so the sweep touches the threshold. Flap sweeps are not terribly durable, but they’re cheap and easy to install.

Installing shoes is somewhat more complicated because most types cover the bottom edge of the door and have a vinyl seal. Moreover, you need enough space between the door and the thresh­old to accommodate the thickness of the shoe and its seal (usually Z in., but check manufactur­er’s specs). If not, plane or cut down the door.

If there is enough space under the door, pull its hinge pins, and lift the door out. Then, using a hacksaw, cut the shoe to length (12 in. shorter at each end than the width of the door). Shoes have screw slots that let you adjust their height; attach the shoe with one screw at each end. Rehang the door, lower the shoe till its seal makes solid con­tact with the existing threshold, tighten the screws at that height, and then open and shut the door. The door should drag slightly as you oper­ate it, and you shouldn’t see daylight under the shut door. When you’re satisfied with the shoe positioning, insert and tighten the rest of the screws in their slots.

Retrofitting a water-return threshold is a bit

more work. A three-piece threshold can be installed over an existing threshold. Consisting of a sill cover, a drain pan, and a threshold with weep holes, the assembly is sloped to send water back outside; hence the name water return.

The retrofit requires accurate measurements and careful cutting so all three pieces fit snugly to the existing door frame. To start, measure the widest point of the doorway opening and rough cut the sill cover to that length; then hold one end of the sill cover square to the base of a jamb and scribe the jamb’s profile onto the metal sill. Use a small circular saw with a metal-cutting blade to cut the first end before scribing and cutting the other end. The sill cover must slope about 18 in. toward the outside so it will shed water. Hold a torpedo level on the sill cover while you tem­porarily shim its back edge up.

Measure and cut the threshold (not the drain pan) next. Usually, the threshold lines up to the outside edge of the doorstop, so when the door shuts, it fits snug to the threshold, as well. As you did with the sill cover, scribe the profile of the jambs onto both ends and cut them out. With the threshold resting on the sill cover, lightly scribe the outside edge of the threshold onto the sill cover, using an awl or a pocketknife. The outer edge of the drain pan should sit just shy of this scribed line. Remove the threshold and scribe the profiles of the jambs onto the drain pan; use avia­tion snips to cut the pan—it’s very thin.

With all three threshold pieces in place (and sloping toward the outside), measure up 12 in. onto each jamb and make pencil marks. The Z in. indicates the thickness of the door shoe you’ll attach to the bottom of the door. Remove the

(continued on p. 112)

Quick Door Fixes[1]

SYMPTOM


CAUSE OR SIGNIFICANCE


WHAT TO DO


Подпись: Loose hinges allowing door to sag into opening Larger-diameter screws won't fit holes in hinges Hinge may be bent Hinges not mortised deep enough into door or frame Hinge leaves set too deep Foundation has settled or framing has shrunk Strike plate is misaligned Подпись: Built-up dirt or floor wax on floor Top track sagging or mechanism needs adjustment Door has fallen off track Подпись: Wheels not turning freely or are rusty; track bent or broken Door off track or stud has bowed into pocket Подпись: Door not fitting tightly to frame Water collecting around doorsill area, soaking wood Absent or poorly installed cap flashing on exterior Metal frames conduct cold; moisture condenses on them Possible foundation settlement

Hinged doors, general

Door binds against top of latch jamb or scrapes floor

Hinge-screw holes in jambs are stripped

Door binds along latch jamb, but hinges are tight

Door binds on latch jamb; hinges are tight; big gap seen along hinge jamb

Door binds along hinge jamb

Door binds because door frame is racked (out of square)

Door shuts but won’t latch

Pocket doors

Door slides roughly

Door slides roughly; floor abraded under door

Door does not slide at all; hard to operate

Door drags, balking at certain points; wheels squeal

Door face abraded; door difficult to operate

Exterior doors

Drafts around door

Water damage to wood doorsill, finish floors, and subfloor

Water stains on interior walls, especially around top of door

Heavy condensation on metal sliding door; floor is water damaged

Door frame not square; casing tilts; large diagonal cracks at corners of doors or windows

Rescrew hinge to jamb, replacing inner screws with ones long enough to reach studs, if needed

Use longer screws or fill holes with white glue, insert toothpicks, allow to dry, and rescrew

Use adjustable wrench to bend hinge-leaf knuckles on door

Remove hinges, chisel hinge gains (recesses) deeper, and reattach hinges

Remove hinges, place cardboard shims under hinges, and reattach

Scribe and trim door to fit skewed opening or replace old frame with squared, prehung door unit

Raise or lower strike plate

Vacuum track thoroughly

Remove trim to expose top-hung mechanism; adjust to raise door

If bottom track, lift door back onto it; if top track, remove trim and set tracking wheels up onto track

Remove trim, swing door out, and oil or replace wheels; use flashlight to examine track inside pocket

Lift door onto track; if problem persists, remove finish wall on one side-may need to replace stud

Install weatherstripping or new threshold

Replaced damaged materials; install water-return threshold to keep water from getting in

Remove siding above top of door frame and retrofit cap flashing

Upgrade to vinyl-clad door with better insulating properties

Have structural engineer check foundation

PRO"ГIP

Metal thresholds are thin enough to cut with hacksaws or jigsaws. But a small (33/s-in.) cordless circular-saw blade is wide enough to track properly and cut square, yet agile enough to notch door-frame profiles. Play it safe: Don’t hand-hold stock while cutting it. Clamp it down so your hands are free. And by all means, wear eye protection and work gloves when cutting metal.

1111

PRO TIP

If hinges are loose because the screw holes are stripped, fill the holes with epoxy putty. Allow that to harden before predrilling and replacing the screws. Don’t bother filling holes with standard wood putty, since it won’t hold.

1111

WEATHERSTRIPPING JAMBS

Today, there are three main types of weather­stripping: tubular, metal-leaf, and kerf-in. Most are easy to install and require few special tools. Prehung doors usually come with weather­stripping attached, which can be a nuisance when installing the unit and trying to establish a uniform gap between the door and its jamb all around. Thus many installers remove kerf-in weatherstripping before beginning the installa­tion; it’s easy enough to slide the strips back into the kerfs when the job is done. Door shoe gaskets (which seal the bottom of a door) are removed for the same reason.

Tubular is the easiest to install on old doors and the least expensive type of permanent weather­stripping. The reinforced part of the strips is usually metal, with slots for attaching screws; slots allow you to adjust the stripping so it fits tight to windows or doors. To install tubular weatherstripping, shut the door and press the strip’s flexible seal against the door, then screw the reinforced part to the jamb; if it’s metal, use a hacksaw or aviation snips to cut it. Don’t buy tubular stripping that nails up or has round holes (not slots), because it can’t be adjusted.

Metal-leaf, commonly called a V-bronze or metal-tension strip, is a thin metal strip folded lengthwise and nailed with brads to door jambs. When the door shuts, it compresses the metal, stopping drafts. Metal tension strips are durable

image231

Kerf-in weatherstripping is essentially the same for doors and casement windows. Both compress the flexible stripping as they shut, sealing out drafts and moisture.

I Door Weatherstripping

image232

Kerf-in


TIP


Подпись: Because manufacturers often create a general hardware template for several different door styles, the template provided may be inaccurate. You may not need all the holes indicated, or you may need to reposition the template to accommodate a door edge bevel. So examine the door hardware and think things through before you mark or drill the door. If spindle holes don't line up perfectly after drilling, gradually enlarge them with a rat-tail file till they do. 1111

and, because they fit between the door or win­dow and its frame, are hidden when the door is shut. When installing it, place the leaves flush to the doorstop, spacing brads every 3 in. Install the head piece first, then the sides. To keep the leaves from snagging where they meet in the corners, snip them back at a slight angle (5°). In time, the leaves flatten, but they can be raised by running a flathead screwdriver down the center of the fold.

Kerf-in features flexible stripping (silicone, vinyl, foam) that slides into a kerf (slot) between the jamb and the doorstop. Kerf-in is the preferred weatherstripping for new prehung doors because it seals tightly and can be easily replaced if the

stripping gets worn out. To cut kerfs into existing frames, use a kerfing tool, which looks like a lami­nate trimmer on an angled base. Silicone stripping is a good choice for retrofits because it compresses so small that old doors shut easily without door­stop adjustments. At head-jamb corners, cut stripping at 45° angles so it lies flat.