Category RENOVATION 3

CYLINDER LOCKSETS

Cylinder locksets (also called tubular or key-in­knob locks) are popular because they’re cheap and easy to install. Better models have a spring – loaded dead latch that prevents the bolt from

DEAD B

Подпись: I Cylinder Locksetimage226Подпись: Cylinder locks are relatively inexpensive and easy to install. Many interior doors come with the large face bore predrilled.Exterior doors should have a dead bolt with a minimum 1-in. throw (extension) and a reinforced strike plate that screws into the framing behind the door frame. Single-cylinder deadbolts have a thumb-turn on the interior that is easy to open in the event of a fire. Unfortunately, such thumb-turns can easily be turned by a burglar breaking a glass side light. Double-cylinder models, which require a key on both sides, are more secure but are frequently banned by fire codes.

Подпись:image228"Подпись: .. .then insert the lock body into the spindle hole of the latch assembly, and screw the two handles together. Follow the instructions supplied with your lockset.image229image230

being retracted by slipping a plastic credit card between the door edge and the frame. But no cylinder lock is secure, because all can be snapped off with a pry bar or a swift kick. To be safe, install a dead bolt, too.

1. Using the template supplied by the manu­facturer, mark the centers of holes to be drilled into the face of the door (face bore) and the edge (edge bore). Use a 2f8-in. hole saw to drill the face bore. But after the tip of the hole saw bit emerges on the other side, prevent splitting by backing the bit out and finishing the hole by drilling from the other face.

2. Use a 18-in. spade bit to drill the edge bore, keeping the bit perpendicular to the edge. (Buy or rent a boring jig if you have a lot of locks to install.) Insert the latch/bolt assembly into the hole and use a utility knife to trace around the latch plate. Rout the inscribed area so that the plate is flush to the edge of the door.

3. Screw down the latch plate and insert the lock mecha­nism through the latch assem­bly. Try the handle; it should turn freely. Next, position the

strike plate on the jamb. To locate the strike plate exactly, rub a pencil on the end of the latch bolt, shut the door, and release the bolt against the jamb.

4. Using a 18-in. spade bit, drill a latch hole Я in. deep into the jamb. Center the strike plate over the hole and trace around it with a utility knife. Use a router to mortise the strike plate. Note: When the door is shut, the latch bolt should descend into the strike plate hole; the small spring-loaded plunger next to the latch bolt should not. Rather, the plunger should be stopped short by a lip on the strike plate.

5. For greater security, install a unit with a strike-plate reinforcer and З-in. mounting screws. To install the reinforcer, you’ll need to drill through the frame jamb into the framing behind; likewise, the extra-long screws will grab the framing.

Weatherstripping Door Frames

Air infiltration (drafts) can account for 20 per­cent to 30 percent of the total heat loss of an insulated house. If your budget is tight, caulking gaps and installing weatherstripping should be your first priority, even before insulating. The single most crucial piece of weatherstripping is a tight-fitting door threshold.

Installing Hardware

Specifics vary, but most locksets come with paper templates that locate the center of the holes drilled in the face of the door (face bores) for handle spindles or cylinders and holes drilled into the edge of the door (edge bores) for latch assemblies. A second paper template locates holes drilled in the latch jamb of the door frame. Although the directions given in this section are typical, follow the directions supplied by your lock maker. Note: Measure the door thickness before buying locksets or key cylinders; some mechanisms are adjustable; others fit only specific door thicknesses.

Mortise Lockset

Mortise locksets combine security and convenience, because you can use a single key to operate both a latch bolt and a dead bolt.

Подпись:Подпись:MORTISE LOCKSETS

Mortise locksets house latch bolts and dead bolts in a single casing and can be operated with a sin­gle key turn. Mortising a lock case into the edge of the door takes some work, but the unit is very secure. The door stile must be solid wood for this type of lock.

1. Using the template, mark the edge of the door to indicate the outline of the lock case. Then mark a line running exactly in the center of the edge. Along this centered line, use a 18-in. spade bit to drill holes to the depth of the lock case. Overlap holes slightly to minimize the need for chiseling.

2. Use a chisel to square up the edges of the lock-case mortise. As you chisel, test-fit the lock case periodically to avoid chiseling away any more than necessary. When the lock case fits all the way into the hole, trace the outline of the main latch plate onto the edge of the door. Use a router to mortise the latch plate. Note: If the door edge is beveled, adjust the tilt of the latch plate to match the bevel beforehand.

3. Remove the lock case. Again, using the template, mark knob/spindle and key/cylinder holes on the face of the door stile. Use a hole saw to cut the cylinder hole and a Forstner bit or spade bit to cut the smaller spindle hole, holding drill bits perpendicular to the stile. Drill the holes

image221

Use a chisel to square up the rounded corners of the latch-plate mortise.

image222

Drill the face bores, which were positioned by using a paper template. Use a hole saw for the larger, key/cylinder hole and a Forstner bit for the spindle or thumb-lever hole. The small round level taped to top of drill helps the installer drill perpendicular to the door face.

image223

Properly installed, the holes in the lock case will align with the holes drilled into the door face. If they don’t line up, use a rat-tail file to gradually enlarge the face bores.

until the point of the bit just starts through the other side. To prevent splintering of the stile face, back the drill out and finish drilling from the other side.

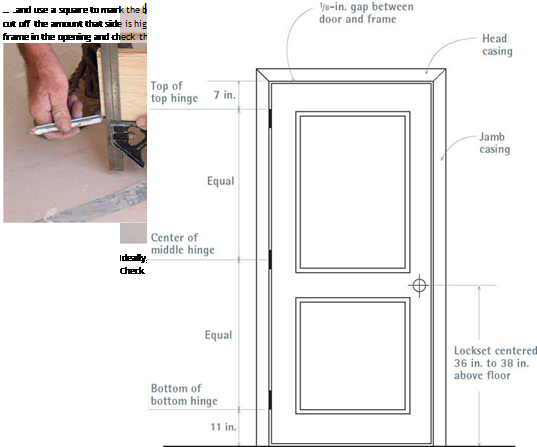
4. Reinsert the lock case and screw it to the edge of the door. Then insert the spindles, slide the escutcheons over the spindles, attach the handles or knobs to the spindles, and see if they turn freely. Once they do, screw on all the trim hardware. Typically, door handles or thumb levers are 34 in. to 38 in. high.

Подпись: Strike plates are closely matched to the locksets they're supplied with. Typically, the larger opening receives the dead bolt. For added strength and security, use 3-in. screws that will reach framing. I Reinforced Strike-Plate Assembly

image225

Because 3-in. screws anchor this assembly to framing behind the door frame, this strike plate can’t be dislodged by a kick.

5. Подпись: oltsYou will also find a strike-plate template. The plate is often mortised into the latch jamb about 1 in. below the top of the latch plate; use a router to mortise the strike plate into the jamb. To more accurately position the leading edge of the strike plate, rub pencil lead on the latch edge; when the latch is released against the jamb, it will leave a pencil mark. For greater security, buy a unit with a strike-plate reinforcer and 3-in. mounting screws.

FINE-TUNING FRENCH DOORS

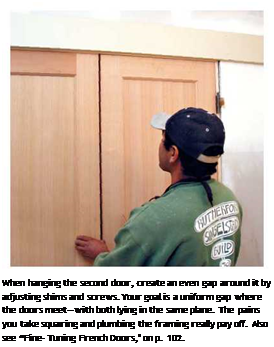
Now it’s time for fine-tuning the installation or, as the pros call it, working the frame. Here are a few things you might see and what to do about each:

► Doors hitting in the center. Ease off the shims behind the jambs. If the problem is a bowed jamb, use additional nails to pull it back toward the RO or, better yet, use 2h-in. screws.

► Doors too far apart in the center. Shim out from the RO more. If that doesn’t work or if you must shim so much that the center of the jamb bows, the head jamb was probably milled too long and should be cut down. The gap between the double doors should be 54e in. or whatever the manufacturer suggests.

► Wider gap between doors near the top. Shim out behind a top hinge on one side.

► Uneven door heights, binding in a corner. One corner is lower than the other; drive a shim in under the jamb on the low side. Less likely, one jamb is too long. If you use a Japa­nese saw, you can cut the jamb in place; pull the nails tacking the jamb to the RO and then pry down from the top corner of the cut jamb.

► Doors aren’t in plane. The frame or RO is twisted. Use a level to see which element is out

image216Подпись:Подпись: Thumb-turn image218Подпись: PRO"ГIP Before drilling, chiseling, or routing a prehung door, insert wedges beneath it so it can't move. Alternatively, you can pull the hinges, remove the door from the frame, and support it in a pair of homemade door bucks, also called door-holding jigs. 1111

After the doors are set and the casing is installed, apply foil-faced, peel-and-strip flashing over the top flange of the head casing if the doors aren’t protected by an overhang. Note that this flashing overlaps the fiber-reinforced flashing on each side. To facilitate painting, the manufacturer premasked the lights with plastic film.

of plumb. If it’s the frame, pull the nails hold­ing it in place and push the high edges in and the low ones out. If the RO is racked (out of plane), use a sledgehammer as described earlier in this chapter to move the bottoms of the walls until you plumb them. Finally, if the walls and frame jambs are plumb, the door may be warped.

► The door won’t stay shut, or one hinge binds while the others work fine. See if the jamb is twisted. You may need to reset the shims until the jamb is square to the door. Otherwise, the hinge may be irregular. To correct it, use an adjustable wrench or locking pliers to bend the knuckles on one of the hinge leaves. Bend the leaf on the door, though, because you’ll probably split the jamb if you try to bend a leaf attached to it.

Installing French Doors

Installing double doors requires more plumb and level readings, shim adjustments, and—above all—more patience than hanging a single door, but the procedure is much the same. So we’ll zip through the steps covered earlier to get to the heart of the matter. figuring out why the doors don’t meet perfectly in the middle and what to do about it.

INSTALLATION: A QUICK RECAP

► Measure the RO to make sure it’s big enough to install the door frame.

► Using a 6-ft. spirit level, see if the floor is level and the sides of the RO are plumb. Also check the walls on both sides of the RO for plumb. If the bottom of the opening is more than !/i in. out of level, correct the situation. French doors are wide and heavy and need to rest solidly on a level opening. Otherwise, they can rack and bind.

image210

Install cap flashing atop the head casing, nailing its upper flange as high as possible. Here, this flashing will be overlapped by flashing paper and stucco. Cap flashing should overhang the casing slightly along the front and at the ends of the casing, so water drips free.

► The sides of the RO can be shimmed, but if the wall framing isn’t plumb, place a 2×4 block against the base of the wall and strike the block with a sledgehammer. Go easy: Numerous gentle hits will cause less damage than one mighty blow.

► Remove the doors from the frame, center the frame in the RO, and tack it up with one 10d finish nail at the top of the frame on each side.

► Plumb and shim one side of the frame first. Shim behind the top hinge first, then the bottom, then the middle hinge—rechecking that the jamb is plumb, square, and flush to the wall as you go. Nail (or screw) the frame at each shim point. Shim and tack the other side jamb; shim and tack the head jamb, placing shims at thirds of the RO width.

► Next, rehang the doors. If everything is perfect, the doors will be in the same plane. There will also be a uniform Иб-in. to ki-in. clearance around the doors and an even ih-in. gap where they meet at the center. More likely, you’ll need to re-adjust shims. When the fit is perfect, use a utility knife to score the shims before snapping them flush to the finish walls.

image211Подпись: When installing casing, set it back 1/4 in. from the jamb edges. This setback, called a reveal, tricks the eye: Even if jambs or casings are not straight, their joints look straight. Door-Casing Reveal

Installing French Doors

FRENCH DOOR

image212

Подпись: Tilt French doors into place. Tack the cleats to the upper corners of the frame to keep the unit from falling through the opening and to ensure that the jambs will be flush with the sheathing.

Because French doors are wide and heavy, it’s crucial that the subfloor of the opening be level. Insufficiently supported, French-door thresholds can flex, misalign, and admit water.

Barely above grade, this opening needed thorough waterproofing. Self-adhering bituminous water­proofing membrane seals the sheathing/foundation joint (just visible, lower left); this membrane is further covered by galvanized sheet metal. The rough­opening bottom is being wrapped with foil-faced peel-and-stick flashing, which extends up 4 in. onto the studs at each end.

TIP

Prime and paint all six sides of exterior doors—especially the top and bottom edges—before putting on the hardware and weatherstripping. Protect unfinished wood with at least one coat of primer and two coats of good-quality oil-based paint. Also carefully prime lock holes, leaf gains, and all edges. Finally, caulk panels after priming and before painting so there’s no place for water to penetrate.

image213image214llll

When jambs are bowed, a plumb bob gives more accurate readings than a spirit level. Hang the bob from a nail near the top of the frame. When the jamb is plumb, readings to the string will be equal along its length.

When there’s too much of a gap where French doors meet in the middle, use a flat bar to ease the jambs toward the middle so you can slip shims behind them. Tweak and reshim the doors till they seat correctly and close evenly in the center.

Подпись: Door leafimage215

I Bending a Hinge Knuckle

Leveling a Doorsill

There are several ways to level an exterior doorsill. After you’ve installed a floor pan, place a spirit level across the bottom of the rough opening (RO) and insert pressure – treated wood shims under the tool till it reads level. Tack shims to plywood subfloor­ing to keep them from drifting, and then install the prehung door unit. If the subfloor is concrete, use construction adhesive to spot-tack the shims. Or you can place the door frame into an unlevel opening, use a flat bar to raise the low end of the frame sill, and insert shims under the sill till it’s level. To prevent flexing between shims, space shims every 12 in. beneath aluminum/combination or oak sills, or every 6 in. beneath sliding-door sills.

The problem with any of these solutions is that many sills—especially hollow alu­minum ones—are so thin that they may flex between shim points. If there’s 1/4 in. to V2 in. of space under the sill, use a Vf-in. tuck-pointing trowel (see the photo on p. 198) to push dry-pack mortar into the spaces between the shims, compacting the mortar as best you can. Or fill under the shimmed-up sill with nonshrinking mortar, such as an epoxy mortar/grout.

The only way to correct an out-of-level opening without shims is to rebuild it, which is rarely simple. For example, you can remove the subfloor and power-plane down the tops of joists till they are level and then install pressure-treated plywood atop them, but if nearby floors are out of level, you may need to level them next. Jacking is another option.

Подпись:Подпись:image203Подпись: PROTIP Caulk around the rough opening, rather than the door frame or casing; if you instead caulk the frame, you're likely to get sticky fingers lifting it into place. If it's necessary to remove a frame after pressing it into caulking, reapply a continuous bead of caulking around the opening. llll

EYEBALLING THE FRAME

Once you’ve prepped the opening, place the door unit in it to see what needs tweaking. This is a dry run, so frame jambs needn’t be perfectly plumb or level—just close.

1. Test-fit the door frame in the opening. Center it right to left in the RO; then margin the frame. There should be!4 in. to h in. of clearance around the frame so it can be shimmed to the RO. Jamb edges should Vu in. proud of the interior wall surfaces to accommodate framing quirks.

2. Is the door frame square? If the frame is square, there should be an even space between the door and the frame jambs; if not, the frame is skewed. To resquare it, remove the frame from the opening, and— with the door still hung—tilt the frame to one side until acute corners (less than 90°) become square and the door fits evenly.

3. Remove the unit, make necessary final adjustments to the RO, and then caulk the bot­tom of the opening. If the door unit is precased, apply a bead of caulking to the exterior wall around the RO, inward about h in. from the edges of the opening. If the prehung door unit is uncased, don’t caulk around the opening yet, just caulk the bottom of the RO.

INSTALLING AN EXTERIOR FRAME

As with interior doors, there is no one right way to install a prehung exterior door. Some carpen­ters prefer to install door frames with doors hung. Others prefer to remove the door, plumb and attach the hinge jamb, rehang the door, then attach the other jambs. Though the accompany­
ing photos show the second method, both meth­ods are described here.

Method 1: The door stays hung. Pry off the

shipping blocks, remove the plastic plugs from the lock bore, and place the unit into the RO. (At this point, assume the doorsill is level.) Center the unit left to right in the opening; press the cas­ing into the caulking; and then, while a helper keeps the unit from tipping, drive a 10d galva­nized finish nail (or 3-in. screw) into each side jamb about 6 in. above the sill, or into nailing fins (flanges). Leave the nail heads sticking up so you can pull them if needed.

Hold a 6-ft. level against the inside of the hinge jamb to see if it’s plumb. If not, insert a flat bar between the frame and the RO near the top of the frame, and pry the frame out on one side till the jamb is plumb. Then drive a nail into the top of each jamb, about 6 in. below the top of the frame. Finally, eyeball the inside of the door frame to make sure there’s a uniform clearance (usually Иб in. to /8 in.) between the door and the frame. Use nails to draw the frame to the RO or adjust the shims until the clearance is uniform.

Speaking of shimming, precased units can be shimmed only from the inside. Unbacked by shims, frames can twist as the door swings. To shim from the inside, insert a shim, fat end first, till it butts

image204

Shim and secure the hinge jamb first, checking for plumb often. Here, installers place shims slightly above and below the hinges so the hinge screws sticking through the jamb won’t snag on the shims. Screwing the jambs to the framing facilitates adjustments.

against the back of the casing; then slide addi­tional shims, thin edge first, till shims are tight. Nail or screw below each stack of shims; then close the door and see if it seats evenly against the frame. Once you’ve corrected that, secure the frame to the rough opening, and finish the exterior.

Method 2: Remove the door. After leveling and prepping the opening, pull the hinges and remove the door from the frame. Screw temporary cleats to the outside of the frame—or to the exterior sheathing itself—so that when the frame is placed into the RO, the outer edges of its jambs will be flush to the sheathing.

Center the frame left to right in the opening, and check the jambs for plumb and the sill for level. If it’s necessary to shim the doorsill to level, place the first shim under the jamb on the low side. Plumb and attach the hinge jamb first, inserting the first set of shims behind the top hinge. Remove the middle hinge screw(s) so you can slide the shims freely as you adjust them. Then drive a 10d galvanized finish nail or a 212-in. screw just below the shims, in the center of the hinge jamb; this holds the shims snugly, but you can still adjust them. Shim behind the bottom hinge, check for plumb, and then shim behind the middle hinge. Adjust the shims as needed to attain plumb; then shim behind the corners of the hinge jamb, top and bottom.

With the hinge jamb securely attached, rehang the door. (Get help; exterior doors are heavy.) Close the door and note how it fits the frame. Without weatherstripping, there should be an even gap, /и in. to ‘/ in. wide, around the door, and the corners of the frame should be square. If the door hits the edge of the latch jamb, that jamb may be bowing into the RO or the shims behind the hinge jamb may be too high.

Adjusting an uncased exterior door frame is very similar to “working” an interior door frame.

Подпись: After plumbing and securing the hinge jamb, rehang the door so you can use it as a gauge to align the latch jamb correctly. This method is particularly helpful if the door is slightly twisted or warped, because you can align the latch jamb to the door.Подпись: As you adjust latch and head jambs, make sure there's an even gap (typically ’/ in.) between the door and the jambs all around.image205Подпись: Shimming Exterior Doors Shim exterior door units at five points down each side jamb. Along the hinge jamb, shim behind each hinge and at top and bottom corners. Space shims along the latch jamb at roughly the same intervals, but don't shim directly behind strike plates or deadbolts. Shim the head jamb midway and at both corners. Exterior door frames are often installed with a pair or 10d or 16d galvanized nails spaced every 16 in.; using two nails at each interval keeps the frame from twisting. Other builders favor 3-in. stainless-steel trim-head or plated flathead screws, because they grip better and can be removed if needed; countersink flathead screws. In addition, many builders remove the middle hinge screws, shim behind the hinge, and replace the original screws with 3%-in. screws that sink deep into the roughopening framing. Here are some fine points to consider: ► It doesn't matter whether you screw or nail below shims or through them, as long as the shims are snug and won't move; if you screw through shims, predrill them to reduce splits. ► Even if jack studs are plumb, shim between the door frame and the rough opening; a shimmed frame is easier to modify or replace later. ► Always shim the head jamb so it won't bow into the opening or jump when you nail casing to it. To cut shims flush to finish surfaces, score the shims with a utility knife. Then, with a flick of the wrist, snap off the waste. Or use a Japanese saw. Shim the latch jamb and then the head jamb. When all is okay, secure the frame with two
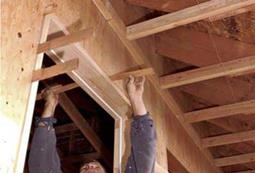
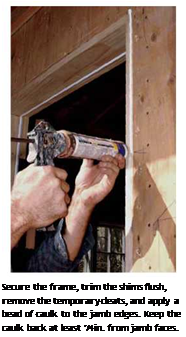
image206

Shim the head jamb after plumbing the latch jamb. If the frame is uncased, you can insert shims from both sides and easily slide them in and out. The white line inside the jambs is kerf-in weatherstripping.

Подпись:Подпись: Apply fiber-reinforced flashing paper to the edge of each side jamb so that it beds in the caulking. However, before applying exterior casing, apply a second bead of caulking over the flashing paper. Double-caulking virtually eliminates air and water infiltration. 16d galvanized finish nails spaced every 16 in. and in 1 in. from the edge. Then seal the frame to keep out weather, apply casing, and flash it, as described in the next section.
FINISHING THE EXTERIOR

If you installed an uncased unit, now seal the outer jamb edges and install the casing.

1. If the unit’s sill has horns that extend beyond the side jambs, cut down each horn so that it is as long as exterior casing is wide plus /a in. for a reveal (the amount that the casing is set back from the inner edge of the frame jamb). Casing legs sit on horns, so cut casing bottoms at the same angle as the sill. (Use an adjustable bevel gauge to record the angle.)

2. Before attaching casing, however, run a single bead of siliconized acrylic caulking along the side and head jamb edges. Keep the caulking back at least J4 in. from the inner edge of the jambs so it’s not visible in the %-in. reveal.

3. Next, cut two fiberglass-reinforced flash­ing strips a in. to 6 in. longer than the length of the side jambs. Press a strip against the caulked jamb edge, again holding back the strip at least

h in. from the inner edge of the jambs. Staple the portion of the flashing strip that overlaps the sheathing so the strip doesn’t blow off.

4. Attach casing to both sides of the jam. Create a reveal by setting back the inner edges of casing І4 in. from the jamb edges. Then nail up the head casing. If the corners are mitered, nail through the joint to draw the jambs together, as shown in the left photo below. Note. There’s no flashing strip under the head casing; it’s applied over the cap flashing to direct water away from the sheathing.

image209

As you install casing, drive a finish nail through corner miter joints to keep them from separating. You can also glue the joint, but here, stucco will help keep the joint from moving. Note the ’/4-in. reveal between the casing and the edge of the jamb.

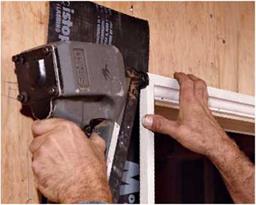
5. Once the head casing is up, attach the cap flashing (head flashing), which is often prefabbed from vinyl or metal. It’s easy enough to make your own from 26-gauge aluminum or galvanized steel; use aviation snips to cut and fold it and a rubber mallet to shape it. Caulk the head casing/ sheathing joint, and then press the cap flashing down onto the casing. Use big-head roofing nails to nail the top flange of the flashing. Then staple strip flashing over the top flange of the flashing, and run housewrap and/or siding over that.

At this point, you’re ready to install hardware, insulate between the jambs and the RO (use a mild-expanding spray foam), and attach the inte­rior casing.

Replacing an Exterior Door

To replace an exterior door, first remove the interior and exterior casing to expose the door frame and the rough opening. Proceed carefully, minimizing damage to the siding and finish surfaces whenever possible. Exposing the rough opening enables you to measure it exactly and inspect for water damage or rot, which must be repaired before installing a new unit.

To remove casing without breaking it, use a flat bar to raise it slightly; then use a reciprocating saw with a metal-cutting blade to cut through the casing nails.

(Wear safety glasses.) Cutting nails is far easier on surrounding surfaces than prying alone. However, some casing can’t be removed without destroying it—stucco molding, for example.

In many older houses, the sill will be a 2-in.-thick board notched into the framing so that it sits flush with the subfloor. If it is in decent shape, leave it. If it has rot, cut out the sill and install a floor pan over the framing before installing a replacement sill that’s flush to the subfloor. If there’s a sloping threshold atop the sill, remove it.

It will probably be weathered, and anyway, the new preframed door must sit on a level surface. (New exterior doors typically have a combo sill-threshold preattached to the side jambs.)

To install the new door unit, remove the existing door frame, preferably by cutting through the nails holding it to the rough opening so that you can pull out the frame in one piece. That way, should the new frame not fit, you can easily replace the old frame and rehang the door so you won’t be without a door while you correct the problem.

SHIMMING THE FRAME

Plumb the hinge jamb first, using a 6-ft. level for accuracy. Or you can hang a plumb bob from a nail in the top of the jamb, as shown in the left photo on p. 102, and measure from the plumb line. When the jamb is plumb, all measurements from the jamb to the line will be equal.

1. If jack studs (trimmer studs) on either side are square to the face of the opening, pair shims so that their tapers alternate, creating a flat sur­face behind the jamb. However, if jack studs are twisted, you may need to insert an odd number of shims to build up the low edge of the twisted stud. Adjust shims in and out, constantly check­ing for plumb and square till both the face and the edges of the hinge jamb are plumb. This takes patience. Most installers start shimming behind the top hinge.

Interior doors are commonly shimmed with three pairs of shims along each jamb: behind the two hinges and halfway between them. However, to prevent jambs from twisting should the door fly open suddenly, many carpenters also shim behind the top and bottom corners of each side jamb.

2. After checking that the frame head is level, secure the latch jamb. Margin that jamb, and tack it in place. At this stage, most carpenters rehang the door to the hinge jamb so they

can eyeball jamb clearances to the door. Mill specs vary, but there’s usually an ‘/-in. gap along the hinge jamb and Иб in. to ‘A in. of clearance along head and latch jambs.

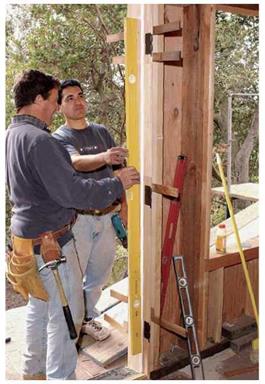
Shim at least three points along the latch jamb; one shim point should be directly behind the strike-plate location. If the latch jamb bows into the opening, add nails or screws to draw it back toward the jack stud. Check for margin,

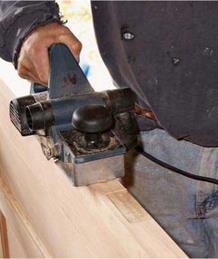
Подпись:Подпись: If you must reduce the width of a door, use a power plane on the hinge stile of the door. Planing down the lock stile is not advisable because locks have specific setbacks from door edges and you'd need to move face bores, too. So, it's far easier to plane hinge stiles.image197Подпись:square, and plumb as you go. Shim up from the bottom of the jamb as needed to create a uniform clearance along the length of the door and at the upper corner.
3. Shim the frame head, inserting a pair of shims at either corner. Caution: If you drive shims too aggressively, you’ll cause the top of the door to bind.

4. This is the last chance to check margins and adjust shims, if necessary. Make sure all clearances around the door are uniform. When the door is closed, it should be parallel with the latch jamb. Once you’ve checked for margin, plumb, level, and clearances all around, secure the frame. Use five pairs of 10d finish nails or trim-head screws: one pair near each hinge, one pair in the middle of the frame, and one pair at each corner. Using a pair of nails or screws at each shimming point will keep the frame from turning.

image199

After planing down the hinge stile, use a small router (laminate trimmer) to mortise the hinge gains deeper. Clamp scrap to the door edge to provide a wider base for the router. You could use a chisel, but a router will get the depth exactly right.

IF THE DOOr HITS THE LATCH JAMB

If the door hits the latch jamb, the frame head may have been cut a little short.

If it’s a very slight amount, you may be able to back out latch-jamb shims and hammer the latch jamb outward, using scrap wood to avoid marring it. But if the door still hits, you may need to rip down the hinge stile slightly to reduce the door’s width. Because holes for locksets are backset exactly from the edge of the door, don’t rip down the lock stile. It’s far easier to remove the hinge butts, use a power plane to trim the hinge stile, and then recut the hinge mortises an equal amount.

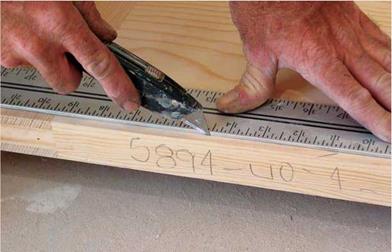
Подпись: FINAL TOUCHES Now you're in the home stretch. 1. Install the lockset in the door, mortise the strike plate into the latch jamb, and shut the door. With the door shut, make light pencil marks on the latch jamb to indicate the door edge when closed. Then place the doorstop back Иб in. (about the thickness of a dime) from those marks. The door and its stops should not quite make contact if they're yet to be painted. Evenly space five 4d finish nails to attach the stop to the latch jamb. 2. Set all nails with a nail set (or turn screws slightly below the surface) and fill holes. If you'll be painting, fill the holes with spackling compound; if using a clear finish, fill with wood dough or a stick-type filler. 3. Using a sharp mat knife or a Japanese saw, score the shims along the wall, tight to the frame. Trimming Doors When your door swings open, it should not "pattern" your carpet or abrade the finish floor. If it does, trim the bottom rail of the door. To register the height of the carpet on the base of the door, slide a flat builder's pencil across the carpet. The pencil, being flat, won't sink into the carpet as much as a round pencil will. Add Vs in. of clearance to that rough line and score the final cutoff line onto the door, using a utility knife drawn along a straightedge. Scoring the door is important, for it prevents vertical grain from splitting and veneer from lifting and splintering. Run the circular saw a whisker below that scored line and you'll get a nice, clean cut. For best results, use a circular saw with a sharp Mastercut® blade, which has a close configuration of at least four fine teeth and a raker to clear chips. Use a straightedge clamped to the door to guide the blade. Clean the saw sole (base plate) well: de-gum it with turpentine (or paint thinner) and steel wool; then rub it with metal-polishing cloth or paraffin to help it glide across the wood. Smooth the cut, and ease the edge with 220-grit sandpaper, sanding with the grain. image200

Score as deeply as you can (shingle butts may take several passes); then snap off the waste.

Don’t try to snap shingles that are too thick, or you may torque the jamb out from the opening. Then install the interior trim (see Chapter 17).

Installing a Basic Exterior Door

Installing a prehung exterior door builds on the information just presented, so if any step is insuf­ficiently explained here, consult the preceding section.

ASSESSING AND PREPPING THE OPENING

Cover finish floors with heavy cardboard or particleboard when installing an exterior door, and cover the work area with tarps to contain the mess.

1. Before ordering the new door unit, meas­ure the height and width of the RO and the thick­ness of the wall; check the jack studs for plumb, the header for level, and corners for square. You can install a squared door frame into an out-of­square opening. But to allow proper shimming, the RO must be at least 1 in. taller and wider than the frame.

2. Next determine the height of the finish floor. In most cases, prehung doors come with a combination sill-threshold already attached, which sits directly on the plywood subfloor. How­ever, some custom exterior doors come with sep­arate sills set flush to the subfloor, which require installing the sills before the subfloor or notching the subfloor and the framing below the subfloor to accommodate the thickness of the sill.

If you need to build up the bottom of the opening to make the new sill the same height as the finish floor, do so now.

3. The bottom of the RO should be level and weather tight. If there’s an overhang to protect the door, just line the bottom of the RO with building paper. If there’s no overhang, install a floor pan across the bottom of the RO. The pan can be as simple as a peel-and-stick flexible membrane applied to the subfloor or, if your region gets driving rains, a prefabricated metal pan (usually aluminum).

Whatever the pan material, fold its ends and back edge up so it will confine any water that gets under the sill rather than soaking the fram­ing, subfloor, or finish floor. Overlap the pan cor­ners and caulk them for good measure. (Make sure the caulk is compatible with the flexible membrane.) Solder or caulk the metal pan seams. Finally, the outer lip of a floor pan should

Installing an Interior Door

There are many ways to hang a door. Thus, the installation sequences that follow occasionally offer alternative methods.

ASSESSING AND PREPPING THE OPENING

Prehung doors usually come preassembled with the door hung on hinges in the jamb and held tight by a screw through the latch jamb into the door. Or the door may be secured with a remov­able plastic plug through the predrilled hole where the lock will go.

1. Start by measuring the height and width of the opening. Rough openings (ROs) are typi­cally 52 in. to 1 in. wider and taller than the out­side dimensions of the door frame, or about 252 in. taller and wider than an unframed door.

2. Measure the thickness of the wall, from finish surface to finish surface. Standard 2×4 walls covered with drywall are 452 in. thick, so standard frame stock is 452б in. wide, providing an extra Иб in. to accommodate wall irregularities— I in. extra would be better. So if you’re using 58-in. drywall, order 458-in. jamb stock.

3. If the finish floor is not yet installed, deter­mine its thickness so that you’ll know how much to cut off the bottoms of the door frame’s side jambs. Ideally, side jambs will stand directly on the subflooring or flooring. Jambs are nailed to the RO, but they must be solidly footed so they can’t drift down later. If a jamb leg is too short to
reach the subfloor, shim it solidly and trim the shim flush; finish flooring will cover the shim.

Allow ‘/ in. clearance above the finish floor, so the door can swing freely. For example, if you’re installing a 6-ft. 8-in. door and 5/i6-in. oak flooring, make jambs 80 in. + 5І6 in. + І4 in., or 80^6 in. long. If you’ll be laying heavy carpet and a thick pad, allow Ш in. + ‘/ in. clearance.

4. Use a level to see if the floor in the door­way slopes; if it does, add the amount below level to the jamb on that side. By doing this, you ensure that the frame head will be more or less level when jambs rest on the floor or subfloor. Check studs and walls for plumb.

FITTING THE

FRAME TO THE OPENING

If the door is shipped attached to the hinge jamb, pull the hinges and remove the door before fit­ting the frame to the opening. (Another opinion: Leave the door in its frame, especially if the door is a lightweight hollow core. To mark the bottom
of the side jambs for cutting, lean the frame against the RO. With the door in the opening, you can easily see the exact amount of clearance between the door and the subfloor.

1. Using a circular saw, cut the jambs to length; a small cordless circular saw is perfect for the task. Cut from the back side so you get a nice clean line on the front, and cut through stop pieces, if any.

2. If your door frames are knocked down, fasten the jambs to the head with carpenter’s glue and three or four 6d finish nails or 2-in. screws per side.

3. Подпись: TIPПодпись: For aesthetic reasons, head casing for a new door should be the same height as that of nearby doors and windows. Try to match that height exactly because the eye notices even slight discrepancies. 1111

image192

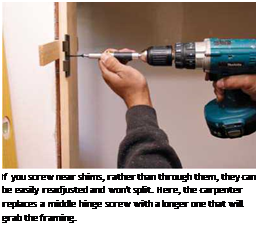
Position the frame in the RO. If stray dry- wall or sole plates sticking into the RO interfere with the frame, cut them off. If screws from hinge plates protrude through the jamb stock— as they frequently do—remove them so you can slide shims easily. Many carpenters remove the middle screw, insert shims behind it and, later, after the jambs have been shimmed, replace that middle screw with an extra-long one.

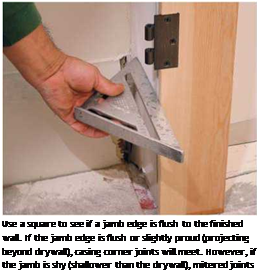
4. Подпись: Use a square to see if a jamb edge is flush to the finished wall. If the jamb edge is flush or slightly proud (projecting beyond drywall), casing corner joints will meet. However, if the jamb is shy (shallower than the drywall), mitered joints will gap. Подпись: Using a 6-ft. level to check that the jamb is plumb, start shimming frames near the top hinge and work down the jamb, checking for plumb constantly. Подпись: If you screw near shims, rather than through them, they can be easily readjusted and won't split. Here, the carpenter replaces a middle hinge screw with a longer one that will grab the framing. Use a Speed Square to determine if the studs on either side of the opening are twisted; if so, you can shim the jambs to make them square. That noted, margin the frame in the opening— that is, center the frame in relation to the wall’s thickness. Ideally, a jamb will be slightly wider, so that it is!4 in. proud (extending beyond) on each side.

5. With the frame margined in the opening, use 2h-in. finish nails or trim-head screws to tack it in place. Place shims behind the top hinge, and nail or screw just below the shims. By not nailing through the shims, you can still adjust them, and if you center tack nails in the middle of the frame, they’ll be covered later by the stop pieces.

Installation, in a Nutshell

Today, most doors, windows, and skylights are preassembled in factories and delivered preframed, which makes installation much easier. Basically, you screw or nail the unit’s squared frame to a rough opening (RO). If the opening is in an exterior wall, weatherproof it first-wrap, flash, and caulk. Rough openings are typically Уг in. to 1 in. wider and taller than the outside dimension of the door or window frame being installed.

However, rough openings are rarely square or perfectly sized, so you need to insert shims (thin, tapered pieces of wood) between the square frame and the out-of-square open­ing. Shimming takes patience. But if you install shims well, doors, windows, and skylights will operate freely, without bind­ing. Once a preframed window or door is installed in its RO, insulate or spray foam between the frame and the RO to further block moisture and drafts. Then cover those gaps with casing (or trim) inside and out.

In general, avoid precased units, which have casing pre­attached to frames. It’s difficult to shim between the frame and the rough opening if casing’s in the way.

As you level and plumb windows and doors, use pairs of taperec shims to hold units in the rough openings. Use trim-head screw when tacking frames. They are easier to remove when adjusting shims and less likely to bend than finish nails. And their small heads are easy to sink, fill, or cover with a stop.

Подпись: This is a pair of prehung single-panel fir interior doors.

Подпись: Jambs. Wall thickness will determine the widths of door jambs if you order prehung units. Interior door jambs are commonly 4?іб in. wide, which can span a 2x4 stud wall (actual width, 318 in.) with 12-in. drywall on both sides—leaving Иб in. to spare. Typically, interior door jambs are built from M-in.-thick stock (nominal 1 in.). For 2x6 walls (actual width, 512 in.), specify 6%6-in.-wide jambs, which can accommodate two wall-sandwiching layers of 12-in. drywall or—on an exterior wall—12-in. drywall and 18-in. plywood sheathing. Jambs for prehung exterior doors are usually fashioned from 1 U-in.-thick stock, rabbeted with an integral doorstop to receive the door when closed. Standard-width jambs won't work if your old house has full-dimension lumber and plaster walls or if you're covering walls with 18-in. dry- wall. Your choices then become (1) jamb extensions to increase the width of standard jambs; (2) custom-milled jambs, including 18 in. extra to accommodate wavy walls or twisted lumber; and (3) splitjambs, interlocking half-jambs that can be adjusted to the widths of walls. (An integral doorstop covers the gap between sections.)
image189
Подпись: A standard frame jamb, which is 49/ie in. wide, can span a stud wall sandwiched between '/2 in. drywall panels

Height. Standard door height is 6 ft. 8 in., for both interior and exterior doors on newer houses. Older houses (1940s and earlier) sometimes had doors 7 ft. high, so that size is still widely avail­able. Of late, 8-ft.-high French doors are in vogue. Of course, you can special-order a door of virtually any size if you’re willing to pay enough. Salvage yards are excellent sources of odd-size doors.

Swing. Door swing indicates which side you want the hinges on. Imagine facing the door as it swings open toward you: If the door knob will hit your right hand first, it’s a right­handed door; if your left hand grabs the knob, then it’s a left­handed door.

Type and style. Hinged single doors are by far the most com­mon type, but they need room to operate. If space is tight, con­sider sliding doors, pocket doors, or bifolds. For wide openings, note that hinged double-doors individually weigh less and take less room to swing open than one massive door.

Try to match existing doors or those on houses of similar architectural periods. In general, frame-and – panel doors tend to go well with older houses; whereas flush doors have a more contemporary look. For that reason, sliding doors on older homes are usually placed on the back side of the house so they don’t look inconsistent with the front and side facades.

Interior Wall Cross Section

Подпись: TIPПодпись:Подпись: OPENED HINGE SIZE(in.) DOOR THICKNESS(in.) DOOR WIDTH (in.) 3'4 И-И Up to 32 4 И-И 32-37 T/S-T/S Up to 32 5 T/8-T/8 32-37 5,extra-heavy T/8 and up 37-43 6,extra-heavy T/8 and up 43 and up Construction and materials. For exterior doors, wood is the traditional favorite, but it requires a lot of maintenance. Consequently, wood doors come clad in vinyl or aluminum, and good-quality, insulated steel doors are virtually indistinguishable from wood once they’re paint­ed. Fire codes require steel doors between living spaces and attached garages or workshops. Exte­rior doors should have integral weatherstripping.

Given the rise of engineered lumber, it’s not surprising that many doors—both interior and exterior—are now made from plywood, hard – board, and so on. They can be stamped to mimic traditional panel doors and insulated to deaden sound and retain heat. They paint up nicely, can be cost-effective, and are generally more stable than solid wood.

Weatherstripping and glazing. Weatherstripping on exterior doors is often rabbeted into jambs, so it’s tighter and more energy efficient than any­thing you could install later. There is also a variety of thresholds and door bottoms available to keep snow or rain out, or to clear water so it doesn’t soak and destroy the bottom of the door.

If your exterior door has glass panels, they should be double glazed at the least; triple glazing is more energy efficient but costs more. Double glazing and a storm door may be a better choice. Finally, prefinish exterior doors with a UV – and water-resistant finish; at the very least, prime or seal all six sides.

Hardware. Hardware for prehung doors is pre­installed at the factory; then locksets and door handles are removed to prevent damage during shipping.

As indicated in "Sizing Hinges,” below, hollow – core or solid-wood interior doors up to 158 in. thick can be supported by two 352-in. by 352-in. (opened size) hinges; whereas 1 52-in.-thick exterior doors

Sizing Hinges

usually require three 4-in. by 4-in. hinges. Extra­heavy exterior doors may need even bigger hinges or hinges with ball bearings or grease fittings.

As shown in "Mortise Lockset,” on p. 103, and "Cylinder Lockset,” on p. 105, exterior locksets are most often cylinder locks, which require a 258-in. hole drilled into the face of the door, or mortise locks, which are housed in a rectangular mortise cut into the latch edge of the door. Mortise locks are more expensive and difficult to install, so they are most often used only on entry doors, with a thumb-lever handle. For added security, supplement exterior door locksets with a dead bolt and a reinforced strike plate.

Double exterior doors may have interconnected locksets, and flush bolts or surface bolts. Interior locksets are almost always some kind of cylinder lock: passage locks or latch sets on doors that don’t need to be locked and privacy locks or locksets on doors that do need locking, such as bedroom doors. Bathroom locks are specialized locksets with a chrome bathroom-facing knob to match plumbing fixtures.

Doors, Windows, and Skylights

Doors, windows,

to do a lot. They must be solidly attached yet mov­able, let light in while keeping rain out, admit guests but deny drafts. Because these units are so complex, it’s impossible to shoehorn everything one might say about them into one chapter. You’ll find more about flashing in Chapters 5 and 7; more on adding openings to exterior walls, replac­ing rot, and structural carpentry in Chapter 8; and more on installing interior casing in Chapter 17.

This chapter begins with installing interior doors—among the last things you’d do in a renova­tion—but a task so similar to hanging exterior doors that these two procedures belong side-by-side.

Ordering Doors: An Overview

Door frames consist of several pieces: two side pieces, or sidejambs, and a head jamb (or frame head) running across the top; exterior doors also have a sill spanning the bottom. (The sill may also
have a threshold, but more about that later.) Jambs are further distinguished by the hardware they bear: The jamb on which the door is hung is the hinge jamb; the jamb that receives the latch is the latch jamb (also called strike jamb or lock jamb).

From door to door, parts names are similar. On a common frame-and-panel door, the thicker vertical elements are called stiles; hence, hinge stile and latch (or strike) stile. Horizontal ele­ments are called rails. Glass panes in French doors are called lights, and the wood strips between lights are called muntins. Consider the following factors when ordering doors.

Interior vs. exterior. Exterior doors are generally thicker (154 in. vs. 158 in.), more expensive, more weather resistant, and more secure than interior doors. Because they must withstand weather, exterior doors may have water – or UV-resistant finishes and are often insulated and weather – stripped. Don’t use doors designed for interiors outside—they won’t last.

If water is a house’s greatest enemy, cap (head) flashing may be one of its greatest allies, for it diverts water around doors, windows, and skylights, thus preventing leaks at the top of the unit. Building paper and stucco will overlay the top flange of this cap flashing.


image185

Подпись: I Door, Door Frame, and Rough OpeningПодпись: ROUGH OPENING image187Prehung. Prehung (preframed) doors come fit­ted to a frame, with hinges mortised into a jamb. Ordering prehung doors can save huge amounts of time. However, if doorways are already framed, specify unframed doors (see "Hanging a Door to an Existing Frame,” on p. 110).

Knock-down prehung doors arrive with the frame head cut to the correct width and all other parts milled with correct clearances around the door, but the parts are not assembled. This allows you to trim the jambs down to the right length for your flooring and threshold heights. Suppliers will cut exterior sills to fit if you ask them to, but many contractors prefer to buy sills separately and fit them on site.

Width. Door widths increase in 2-in. increments. When door dimensions are stated as a pair of numbers, width always comes first—for example, 2 ft. 8 in. by 6 ft. 8 in. (this is sometimes abbrevi­ated as 2868).

Standard interior doors are 2 ft. 6 in. and 2 ft.

8 in. wide. For doors leading to busy hallways, architects often specify 2 ft. 10 in. or 3 ft. 0 in. If you need access for wheelchairs, order special doors 3 ft. 6 in. wide. Narrow doors (2 ft. 0 in. to 2 ft. 4 in.) are available for half baths and closets; and narrower ones (1 ft. 4 in. to 1 ft. 10 in.), for linen closets and such.

Standard exterior doors are 3 ft. 0 in. wide, though side doors are sometimes 2 ft. 8 in. or 2 ft. 10 in. wide. Again, wheelchair-access exterior doors need to be 3 ft. 6 in. or 4 ft. 0 in. wide.