Category RENOVATION 3

CONTAINING THE MESS

Managing mess is crucial to a successful renova­tion. Torn-out plaster and drywall are nasty stuff to handle and worse to breathe. The dust gets everywhere, and the volume of debris is prodi­gious. If you’re sloppy as you renovate, you’ll pay later: Finish floors are particularly vulnerable to grit that isn’t swept up and to nails that go astray. Lath with nails sticking out creates a hazardous workplace. Heed these tips and your life will be a lot easier:

► Cover floors with heavy plastic, thick floor-covering cardboard (it comes in rolls), or hardboard panels duct-taped together.

► Isolate the demolition area by duct-taping clear plastic over door and window openings to contain the dust. Clear plastic lets in light.

► Clean up as you tear out.

► When demolishing outside, drape heavy tarps to protect your plants and to avoid a lot of raking later on. After discarding large pieces of debris, two people can lift the tarp and shake the remnants directly into the trash.

Organize your debris. Maximize Dumpster loads by first putting in dense materials such as plaster, concrete, and soil. Place lighter, bulkier items on top. If your community has a recycling center, set aside recyclable materials such as unpainted wood, brick, glass, or metal. That may be cheaper than sending them to a landfill.

TEAROUT

Before you construct anything in renovation, it’s usually necessary to tear out part of what’s there and beef up what remains. No sooner have you torn out plaster than you’re nailing up blocking for partitions to come. This natural flow from demolition to construction is a little frustrating for how-to writers who like to pigeon­hole everything, but it’s a fact of life if you’re renovating. Frequently, you’re doing both at the same time.

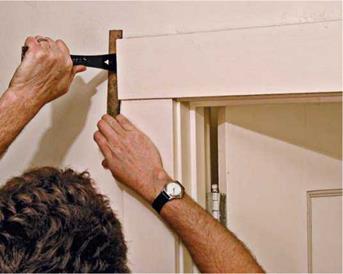
Подпись: PROTIP Before storing salvaged trim, remove finish nails by pulling them through the back of the wood to avoid splintering the face. Likewise, if it's difficult to pry off trim without breaking it (rusty nails are often the culprit) use a fine nail set to drive the finish nails all way through the wood. Holes created by a nail set are small and easy to fill. 1111 Подпись: Old trim is likely to be dry and brittle, so be patient when removing it. Use a flat bar to pry it out from the framing it's nailed to, gradually raising its entire length.image343Conserve when you can. If most of a plaster surface is sound, avoid damaging adjacent areas when removing loose plaster, exposing framing, or adding openings. For example, if you’re adding a medicine cabinet, set your circular-saw blade to the depth of the old plaster and lath, and cut back those materials to the nearest stud cen­ters on both sides so the plaster edges can be renailed before you patch the opening.

On the other hand, if at least half of a room is to be affected by demo or if the existing plaster walls are cracked and damaged, it is often better to gut the room. When wires, pipes, framing, and rotted areas are exposed, new framing and dry – wall go in faster and finish better. It’s tough and time-consuming to patch extensively.

GETTING READY FOR DEMOLITION

Living in a house that’s being torn apart and ren­ovated isn’t fun, and it can be murder on mar­riages. But you can minimize the stress caused by disruption, noise, confusion, and dirt. If you don’t need to be around the house during the demolition, don’t be; that’s a good time to take a vacation. If you just bought the house and can afford the expense of keeping your old place until the demo is done, do so. But if you’re there for the duration, create a clean room—usually a bedroom—in which you do no work at all.

Isolate the zone by covering the doorway with sheet plastic held up by duct tape or by installing temporary plastic walls with zippered doorways such as the Zipwall System®. Situate your Shangri-La upstairs if you can, because dust set­tles downward. If you are beneath a room being renovated, particularly one in bad repair, tape plastic to the ceiling. In the clean zone, store clothes, stereo equipment, art—anything that

Подпись: When nailing a kneewall top plate to the underside of a rafter, align the leading edge of the top plate with the inner edge of studs. Drywall will cover the small triangular voids where the plate meets the rafter.I Kneewalls

image341could get ruined by the omnipresent dirt of tearout. At the end of the day, go there and relax.

LAST-MINUTE PRELIMINARIES

Take care of these items before you start:

► Notify gas, water, and electric companies if you haven’t done so already. Utility repre­sentatives can tell you what temporary hook­ups are safe and who must do them.

► If you’ve newly purchased the building and if inspection reports indicated signs of insect infestation, have a pest-control profes­sional treat the condition before you move in.

► Make sure your general contractor is properly covered by insurance. Or, if you’re acting as your own GC, check with your insur­ance company to make sure you and any helpers are covered.

► If you don’t have a cell phone, have a telephone installed so you can call for help in an emergency. Have a first-aid kit and fire extinguisher handy. Ensure that everyone on site has had a tetanus shot.

USEFUL TEAR-OUT TOOLS AND EQUIPMENT

Many of the tools mentioned here are shown and discussed at greater length in Chapter 3.

Safety. Be sure you have a voltage tester, hard hat, goggles or safety glasses, a respirator mask with changeable filters, sturdy work gloves, a droplight, and shoes with thick soles.

Dismantling. Your kit should include wrecking bars of various sizes (see the photo on p. 44), a flat utility bar, cat’s paw, hand sledge, full-size sledgehammer, and heavy scrapers. If you’re tear­ing out masonry, rent an impact hammer with carbide-tipped bits.

Work aids. Rent scaffolding if you’re doing a lot of tearout over your head. Have a good supply of rolls of sheet plastic, duct tape, and heavy tarps; heavy cardboard, Masonite or!8-in. doorskin ply­wood can be used to protect finish floors. Gather heavy rubber trash cans (they work better than metal ones), wheelbarrows, push brooms, dust­pans, square-nose shovels for scooping debris, stepladders, and planks. Rent a Dumpster for big jobs.

Подпись: You CM.Подпись: Demolition is incredibly dusty and disruptive, so seal off one room where you can store your stuff.Подпись: cutting (gradually lowering a blade into a surface) and bimetal construction that can cut through nails without shattering. ELECTRICAL SAFETY О Before you cut into finish surfaces, always shut off electrical, water, and gas service to that area. After disconnecting electrical power and using a voltage tester to make sure the power's off, start slowly and proceed carefully. If any procedures described in the following sections are unclear, please read Chapter 11 and especially "Using a Voltage Tester,” on p. 235, before continuing. Circuits. Identify circuit breakers or fuses controlling electricity to the construction areas. This will require one person at the panel to flip breaker switches or unscrew fuses while another person watches a light fixture or a voltage tester inserted in a receptacle to see if the light goes out. If you use cell phones to communicate, you won't need to scream instructions between floors. Receptacles and switches. o Plug-in voltage testers allow you to quickly see if a receptacle is energized. Always test a tester first on an outlet Cutting. Wear goggles when cutting out materi­als, for you’re likely to hit nails. Most blade mak­ers sell demo blades, which are often carbide tipped and frequently thicker than standard blades. Reciprocating saws with demolition blades are the workhorses of renovation. Such blades typically have pointed ends that enable plunge-

you know is hot, to be sure the tester is working correctly. To double-check a receptacle or to check a switch, however, you’ll need to remove the cover plate. To do so safely, follow the proce­dures described in Chapter 11.

Junction boxes. о As you break open drywall or plaster or pull up flooring, you may find junc­tion boxes. To get at the wires, remove the junc­tion box cover. The wires inside will either be spliced together with wire nuts or be tape wrapped. Using pliers with insulated handles, carefully pull wire groups out of the box and remove wire nuts or tape to expose wire ends. (If you are at all uneasy about handling wires, turn off all the elec­tricity in the house and remove the wire nuts before proceeding.) Touch your voltage tester to the black and white wires simultaneously, then to each wire group and the metal box.

There are also pen-like voltage detectors that can detect electrical current through a wire’s insulation. You simply place the tester sensor near the wire.

Hidden wires. (^) If you unexpectedly discover cables hidden in a wall you are demolishing, stop and turn off all power in the house. Then snip the cable in two with a pair of insulated wire cutters, but never do this when the power is on. After test­ing both ends of the snipped cable with a voltage

image342

A roof-stripping shovel’s serrated edges punch through and pry off drywall plaster lath easily. Wear goggles for this job, and disconnect the electricity before you begin.

tester to make sure that there is no live current, separate the black and white wires, and wrap the individual wires with electrical tape or cap them with wire nuts. While the power is off, also pull any staples holding the cable to the studs so that you can remove the studs later without damaging the cable.

With the cable thus severed and protected, you may proceed with the demolition. If the cable is to be discarded, disconnect it from the entrance panel. If the cable is to be reconnected, reroute it after the structural work is complete— and house all new connections in a junction box. Again, consult Chapter 11 for further details.

ALTERNATIVE FRAMING METHODS

In renovation, it’s not always possible to assem­ble a wall on the deck and tilt it up. There may not be enough room, shoring may be in the way, or sloping floors may frustrate attempts to cut studs accurately in advance. In those cases, it may be easier to build the wall in place, piece by piece.

Building a partition in place. Start by position­ing the plates and tack nailing them to joists (or blocking) above or below. Although it’s most common to snap a chalkline on the floor and plumb up to the top plate, it doesn’t really matter which plate you attach first, unless there’s a com­pelling structural or design reason. If you’re erecting a bearing wall, for example, center its sole plate over the appropriate girders or bearing walls below. But if you’re trying to align a non­bearing partition with a rafter above, set the top
plate first and plumb down to establish the sole plate. If possible, face-nail the plates with two 16d nails at each joist crossing.

Mark the stud intervals onto the plates, and then—especially if floors or ceilings slope— measure the stud lengths individually. Cut the studs slightly long (Й6. in) so that they fit snugly. Toenail each end of the studs with three 10d nails or four 8d nails, angling them roughly 60° from horizontal. Use a spirit level to level the headers. Use three 16d nails to end-nail a header through the king studs on either side. Then face-nail trim­mer studs to the kings, staggering 10d or 12d nails every 16 in.

Framing beneath slopes. Framing beneath stair stringers and rafters isn’t difficult if you measure carefully and use an adjustable bevel. Mark off 16-in. intervals along a 2×4 sole plate, nail it to the floor, and then plumb up to the underside of the rafter or stringer to mark the top plate.

Cut the top plate to length, and nail it to the underside of the sloping rafter or stair stringer before using a plumbed board to mark off stud intervals along the top plate.

To establish the angle at which you’ll cut the top of the studs, plumb a piece of 2x stock in

image339I Sizing Gable-End Studs

image340

After marking off 16-in. stud centers onto the sole plate, plumb up and transfer the stud marks to the rafter or top plate. Once you’ve cut two consecutive studs, you’ll know the difference in length between adjacent studs, indicated by “X."

front of the top plate and use an adjustable bevel to duplicate the acute angle at which they inter­sect. (Set your circular saw to the angle of that bevel.) Holding a straight board against 16-in. on-center marks on the sole plate, plumb and mark the tops of two adjacent studs. The differ­ence in their lengths—represented by the Xin "Sizing Gable-End Studs,” above—will be con­stant for all successive pairs. Toenail the studs with four 8d nails on each end.

Establishing kneewalls. Kneewalls are short partitions, about knee high, which isolate the largely unusable space where the rafters approach the top plates of the exterior walls. Kneewalls usually run parallel to the roof ridge and consist of a single top plate and sole plate, with studs spaced 16 in. on center. Position the sole plate and plumb up to the underside of the rafters to mark the top plate. Using an adjustable bevel, copy the angle at which the rafters inter­sect, using a plumbed spirit level or board.

Nail the top plate with two 16d nails per rafter and the sole plate with two 16d nails per joist.

Cut across the faces of the studs in the angle established by the bevel gauge. (Note: This is not a bevel cut, but a square cut at an angle.) To attach the studs to the plates, toenail each end with 8d nails.

Demolition

Before demolishing an old wall or framing up a new one, determine whether it’s a bearing wall. If so, erect shoring if needed, and have a plan for rerouting electrical cables, pipes, or heating ducts in existing walls. О the electrical power before cutting into finish surfaces—and use a voltage tester to be sure the power’s off.

. PLUMBING AND SECURING THE WALL

Once the wall is up, nail the bottom of the brace so the wall will stay upright as you fine-tune its position. Use a sledgehammer to tap the sole plate till it aligns with your chalkline on the floor. As you adjust, continuously check for plumb, using a 6-ft. level. If you unnail the brace to plumb the wall, have workers support the wall until you’ve renailed it.

Once the bottom plate lines up with the chalk­line, drive two or three 20d nails through the plate, into the joists or blocking below, so the wall can’t drift. Methods for securing the top of the wall vary. If you’re framing an addition and have wide-open space, typically two walls inter­secting at right angles are raised, plumbed, and braced, and then tied together by overlapping top plates.

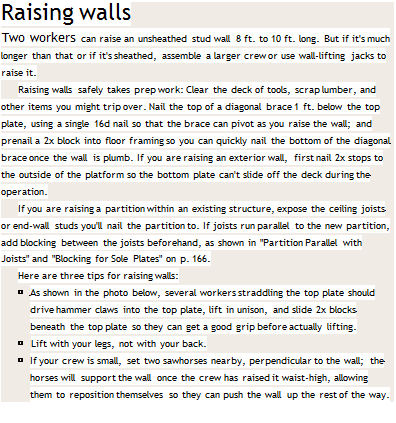
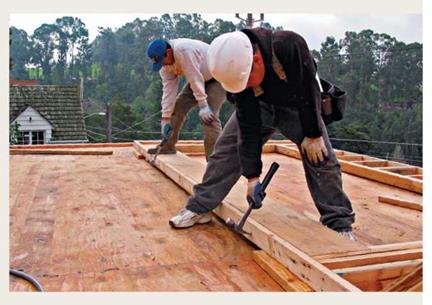
Подпись: Raising walls Two workers can raise an unsheathed stud wall 8 ft. to 10 ft. long. But if it's much longer than that or if it's sheathed, assemble a larger crew or use wall-lifting jacks to raise it. Raising walls safely takes prep work: Clear the deck of tools, scrap lumber, and other items you might trip over. Nail the top of a diagonal brace 1 ft. below the top plate, using a single 16d nail so that the brace can pivot as you raise the wall; and prenail a 2x block into floor framing so you can quickly nail the bottom of the diagonal brace once the wall is plumb. If you are raising an exterior wall, first nail 2x stops to the outside of the platform so the bottom plate can't slide off the deck during the operation. If you are raising a partition within an existing structure, expose the ceiling joists or end-wall studs you'll nail the partition to. If joists run parallel to the new partition, add blocking between the joists beforehand, as shown in "Partition Parallel with Joists" and "Blocking for Sole Plates" on p. 166. Here are three tips for raising walls: ► As shown in the photo below, several workers straddling the top plate should drive hammer claws into the top plate, lift in unison, and slide 2x blocks beneath the top plate so they can get a good grip before actually lifting. ► Lift with your legs, not with your back. ► If your crew is small, set two sawhorses nearby, perpendicular to the wall; the horses will support the wall once the crew has raised it waist-high, allowing them to reposition themselves so they can push the wall up the rest of the way. image336But if you’re raising a partition in an existing room, you’ll usually nail the top plate to ceiling joists. Invariably, space is tight indoors, and you’ll often need to gently sledgehammer the par­tition into place, alternating blows between top and sole plates till the wall is plumb. Alterna­tively, you can gain room to maneuver by first nailing the upper 2×4 of a doubled top plate to the exposed ceiling joists—use two 16d nails per joist—before raising the wall. Tilt up the wall, slide it beneath the upper top plate, plumb the wall, and then face-nail the top plates together using two 16d nails per stud bay. Finally, finish

image338
nailing the sole plates, driving two 16d nails into the joists or blocking below. In the corners, use 10d or 12d nails to toenail the corner studs to blocking or existing studs; use 16d nails if you can face-nail them. Adding blocking to existing framing is discussed on p. 165.

HEADERS

Every opening in a wall must have a header over it. Headers must be able to carry a cumulative load and transfer it downward without warping, flexing, or pulling away from the sides of the opening. Thus headers must be sized according to the loads they carry and the distances they span. Your local building code will have the final say in sizing them.

That noted, many builders in North America use this rule of thumb when sizing headers for single-story buildings with 2×4 walls and a 30-lb. live load on the roof: The nominal depth a 4 x header in inches equals the span in feet of the opening. For example, if a builder uses No. 1 grade Douglas fir on edge, its spans look like this:

Douglas Fir Header Spans

HEADER SIZE (in.)

SPAN (ft.)

4×4

4

4×6

6

4×8

8

4×10

10

4×12

12

Oversizing headers. Span tables establish mini­mum requirements. In the field, however, experi­enced builders routinely oversize headers—using 4x12s to span all openings, interior and exterior. This is a considerable overkill, say, for a 4-ft.-wide window. But it has important advantages:

► Same-size headers ensure that the tops of most exterior openings will be at the same height, which is aesthetically pleasant.

► The additional cost of using an oversize beam is more than offset by the peace of mind it brings. That is, there won’t be any cracks in finish surfaces caused by undersize beams.

► The reasons for using a 4×10 or 4×12 for a partition are equally compelling. Should a nonbearing partition become point-loaded
because of structural shifts, its header should bear the additional load easily.

► Even in nonbearing walls, the header is the weakest point, structurally. Each time you shut a door, you compress the air in the room causing the wall to flex. The more solid wood you’ve got to nail to, the stronger the con­nection. (Code requires at least five 16d nails through-nailed into each end of a header.)

► But the most compelling reason is time. Cutting an oversize header from solid stock is far quicker than cutting and laminating two pieces of 2x lumber to a i^-in.-thick plywood core. (The 12-in. core makes the whole package exactly 312 in. thick, the width of a nominal 2×4.) You also save time because you don’t need to cut dragon’s teeth, the term pros use for cripple studs between a header and the top plate.

ASSEMBLING THE WALL

After marking the top and bottom plates, and cutting full-length studs, start assembling the wall. Place the plates on edge, roughly a wall height apart. Then insert the studs on edge between them. Again, use straight studs at wall ends and cabinet locations; elsewhere, place slightly bowed studs crown (bow) up so that stud ends will rest on the deck when it’s time to nail them to the wall plates.

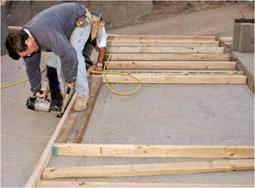
Nailing studs. Position studs to the squared marks along the plates. Then end-nail studs through the sole plate, using two 16d common nails at each end. Space nails h in. to 1 in. from the edge of the plate. If you stand on the stud as you nail it, it will stay put. As you nail, be sure that stud and plate edges are flush, or the result­ant wall plane won’t be flat. When you’ve nailed all studs to the sole plate, nail the top plate. Important: If the sole plate will sit on concrete, it should be pressure-treated lumber or a naturally rot-resistant wood such as redwood. Moreover, all nails set into redwood or pressure-treated

Подпись: When nailing the top plate to studs, lift the studs as needed so their edges align with the top plate's. Flush studs and plates allow drywall finishing to go smoothly. This exterior wall will have a doubled top plate; the second plate is nailed on once the wall is up, tying this wall to another.image331Подпись: Because a 3x4 mudsill is too thick to end-nail through, toenail studs instead. Here, pneumatic nailers really shine: They nail so quickly that studs won't drift off stud marks, as they frequently do when you're hand-nailing them.image332image333Подпись: A stud wall a with continuous sole plate is less likely to flop around as you raise it, but it's difficult to cut through a plate once it's resting on a subfloor. The solution? Cut halfway through the sole plate before you nail it to studs, and finish the cuts after the wall is up.

Подпись: After using five 16d nails to end-nail the header through the king stud, face-nail the trimmer stud to the king.
image334

plates must be galvanized so they won’t be cor­roded by chemicals in the wood.

Framing the rough opening. After cutting the header, end-nail the king studs (through the plates), on both sides of the RO. If you’re installing a full-height header such as a 4×12, insert the header between the king studs and nail down through the top plate into the header, to draw it tight to the plate. Then nail through the king studs into the ends of the header, using at least five nails per end. Next, to determine the length of the jack studs, measure from the under­side of the header to the top of the sole plate. Cut the jack studs slightly long; tap them into place; and face-nail them to the king studs, making sure their edges are flush.

If the header requires cripple studs between it and the top plate, install king studs, then jack studs, then the header. Holding the header tight to the top of the jack studs, nail through the king studs into header ends. If the header is laminated from pieces of 2x lumber, each piece should get two or three nails per end. Then cut and toenail the cripple studs that run between the top of the header and the top plate. If you’re framing a rough opening for a door, you’re done.

However, if you’re framing a rough opening for a window, your final steps will be leveling and toenailing the sills (also called saddles) to jack studs and then nailing cripple studs between the sills and the sole plate. Again, space cripples according to the 16-in. on-center markings along the plates.

Leaving the sole uncut. You’re now ready to tilt up the assembled wall. Note, however, that sole plates haven’t yet been cut and removed within door ROs, and for good reason: It’s far easier to raise a wall if its sole plate is continuous. Thus cut only halfway through the sole plate while it’s flat on the deck, as shown in "Half-Cutting the Sole Plate.” Finish the cut once the wall is up and nailed down.

Exploring Your Options

To assess the framing hidden behind finish surfaces, go where it’s exposed: the basement and the attic. Joists often run in the same direction from floor to floor.

Generally, a girder (also called a carrying timber or beam) runs the length of the house, with joists perpendicular to it. Some houses will have framed cripple walls (short walls from the top of a foundation to the bottom of the first-floor joists) instead of a girder. Main bearing walls often run directly above the girder, but any wall that runs parallel to and within 5 ft. of a girder or cripple wall is probably bearing weight and should be treated accordingly.

Bearing walls down the middle of the house are also likely to be supporting pairs of joists for the floors above. That is, most joists are not continuous from exterior wall to exterior wall—they end over bearing walls and are nailed to companion joists coming from the opposite direction. This allows the builder to use smaller lumber—

2x6s rather than 2x8s, for example—to run a shorter span. If you cut into such a bearing wall without adding a header, the joists above will sag.

Large openings in obvious bearing walls are often spanned by a large beam or a header that supports the joists above. These beams, in turn, are supported at each end by posts within the wall that carry the load on down to the foundation. These point loads must be supported at all times. Similarly, large openings in floors (stair­wells, for example) should be framed by doubled headers and trimmers that can bear concentrated loads.

Подпись: are always surprises once you start. If you plan to remove walls, be sure to hire a structural engineer to review your plans. Framing Walls The framing of walls is arguably the most common carpentry task in renovation, and it employs many of the layout and assembly techniques you'd use elsewhere to construct walls, floors, and roofs. For a deeper look at carpentry, consult Rob Thallon's Graphic Guide to Frame Construction or Mike Guertin and Rick Arnold's Precision Framing, both published by The Taunton Press. Basically, wood-frame walls are an array of vertical studs nailed to horizontal top plates and sole (bottom) plates. Depending on whether walls are bearing or nonbearing, plates may be doubled. Although 2x4 walls are more common and less expensive, 2x6 walls allow you to install thicker insulation and route pipes more easily. To simplify matters, the examples in this section assume 2x4 framing. HANDLING LUMBER Here are a few lumber-handling tips that'll save energy and make the job go quicker. Minimize moves. Lumber is heavy. Tell your lumberyard to load the delivery truck so that the lumber you'll use first—say, floor joists—will be on the top of the load. Clear a level place close to the work site where the truck can unload. Many suppliers have boom trucks that can unload lumber stacks directly onto a work deck. Sort your lumber. Lumber today is often bowed, so eyeball each piece for straightness—and sort it into like piles. Save the straight stock for kitchen and bathroom walls—especially those that will get cabinets or be tiled—and for corners, top wall plates, and jack studs along rough openings (ROs). Pieces with slight bows (J4 in. in 8 ft.) can be used as studs and joists, but draw an arrow on the face of the lumber to indicate which way the lumber bows so you remember to place slightly bowed joists crown (bow) up, so they'll be less likely to sag when loaded. Set aside stock that bows more than '/ in. in 8 ft., which you'll cut shorter and use as headers, cripple studs, and blocking. Return corkscrew (twisted) studs to the lumberyard for credit. Be methodical. Snap chalklines onto floors to mark wall plates. Cut top and bottom plates. Then mark stud locations and ROs onto the plates. Make a cutting list: By cutting same- length lumber all at once you'll save a ton of time. If possible, cut lumber or plywood right atop the stack that the lumberyard truck delivered. Finally, it may be wise to leave a wall where it is if pipes, electrical cables, and heating ducts run through it. Look for them as they emerge in unfinished basements or attics. (^) Electrical wiring is easy enough to remove and reroute—but disconnect the power first! However, finding a new home for a 3-in. or 4-in. soil stack or a 4-in. by 12-in. heating duct may be more trouble than it’s worth.

Подпись: t AIПодпись: Precut studs save labor and time; they're available in several lengths. Buy 92У,-ІП. studs if finished ceiling heights are 8 ft. (92У4 in. + 3 in. for two wall plates = 95V4 in.), 88-in. studs if the ceilings are 7 ft. 6 in., and 104-in. studs if the ceilings are to be 9 ft.Подпись: 1111

NAILING IT

On larger renovations these days, pneumatic nailers do most of the work, but it’s worth know­ing how to use a hammer correctly. Then you’ll create fewer bent nails, splits, and dings (dented wood when the hammer misses the nail), and perhaps avoid a smashed thumb, tendonitis, and joint pain.

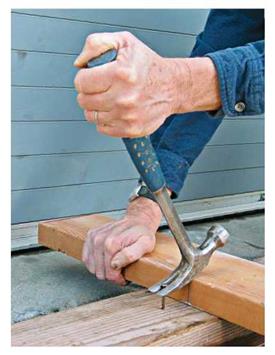
The perfect swing. If you’re driving large nails such as 16d commons, start the nail with a tap. Then, with a relaxed but firm grip on the end of the hammer handle, raise the hammer head high and swing smoothly from your shoulder. If you’re assembling stud-wall elements, spread them out on a deck, put one foot on the lumber to keep it in place, bend forward slightly, and let the falling hammer head’s weight do some of the work. Just before striking the nail, snap your wrist slightly to accelerate the swing.

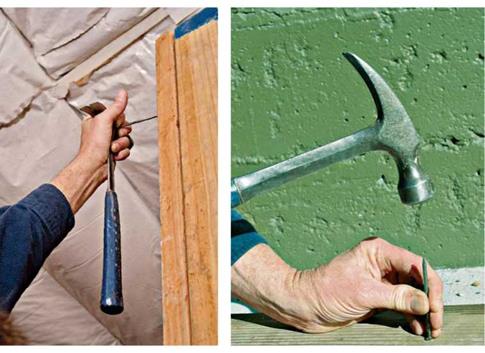
However, if you’re driving smaller nails (6d or 8d), you won’t need as much force to sink them. So choke up on the handle and swing from the elbow. Choking up is particularly appropriate if you’re driving finish nails because you’ll need less force and be less likely to miss the nail and mar the casing. It’s also necessary to choke up when there’s not enough room to swing a hammer freely or where you must drive a nail one-handed in a spot that you need to stretch to reach.

Work SAFELY

Put first-aid kits and fire extinguishers in a central location where you can find them quickly. Likewise, gather hard hats, safety glasses, hearing protection, and respirator masks at the end of each workday so they’ll be on hand at the start of the next.

image318

I Loads and Structure

image319

Подпись:Подпись:image320Plywooc

To nail plywood panels 1k in. thick or less, most codes specify 6d common nails spaced every 6 in. along the panel edges and every 12 in. in the field. Panels thicker than % in. require 8d common nails spaced in the same pattern. (Structural shear walls are typically nailed with 10d nails 4 in. to 6 in. on center along the edges and 12 in. on center in the field, but an engineer should do an exact calculation.)

Don’t overdrive nails. Ideally, nail heads should depress but not crush the face ply of the plywood. Panel strength isn’t affected if nail heads are overdriven by %6 in. or less, but if more than 20 percent of the nail heads are % in. or deeper, the American Plywood Association recommends adding one extra nail for each two overdriven ones.

Dnanm<>fif<.iiailav nmr. i______________________________________________________________________________ i

sure that’s too high is the most common cause of overdriven nails. It’s far better to set the nailer pres­sure so the heads are flush, and then use a single hammer blow to sink each nail just a little deeper.

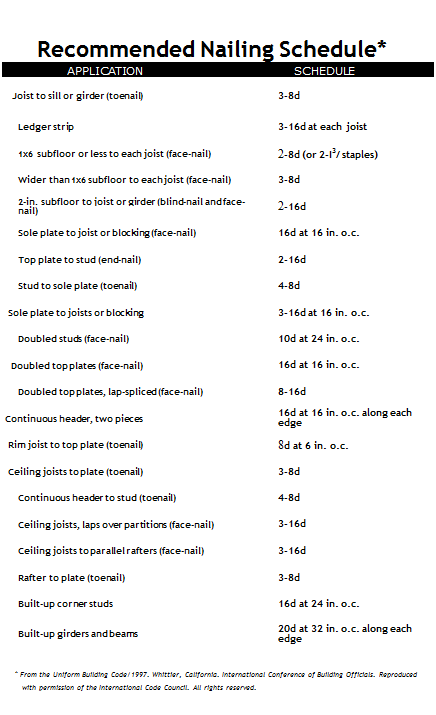
Подпись: The right nail. The nailing schedule given in "Recommended Nailing Schedule,” on the facing page, suggests the size and number of nails you need for various framing tasks, but local building codes will have the final say. When joining two pieces of framing lumber, nails should be long enough to penetrate the second piece of wood, without sticking out its other side. Properly sized nails are also less likely to split board ends. As the table indicates, use two 16d nails to end-nail a stud through a plate, and four 8d nails, which are shorter and skinnier than 16d nails, to toenail stud ends to sole plates. Speaking of splits, you can reduce them by first hammering nail points to blunt them. Removing nails. Everybody inadvertently bends nails now and then, especially when nailing at an odd angle or in a tight space or nailing into a hard wood like southern pine. To remove a bent nail, slip a block under a claw hammer head to increase the leverage as you pull out the nail; if the nail head is buried too deep to grasp with a claw hammer, use a cat's paw, which has pointed claws, to dig it out. LAYING OUT WALLS Wall layout varies, depending on whether you're erecting walls in open space (say, framing an addition) or within existing space (adding a parti- NAILING TIPS

image322

A wood block under your hammer head makes nail-pulling easier.


To nail where it’s hard to reach, start the nail by holding it against the side of the hammer and smacking it into the wood. Once the nail is started, you can finish hammering with one hand.


A blunted nail point is less likely to split wood because it will crush the wood fiber in its path rather than wedging it apart, as a sharp nail point does.


image321

Подпись: Assembling a wall on the ground is no guarantee that lumber edges will line up. Here, a builder uses his hammer to raise the top plate flush to the header, before nailing. Wear safety glasses when using a pneumatic nailer.image323Подпись: Recommended Nailing Schedule* APPLICATION SCHEDULE Joist to sill or girder (toenail) 3-8d Ledger strip 3-16d at each joist 1x6 subfloor or less to each joist (face-nail) 2-8d (or 2-І3/ staples) Wider than 1x6 subfloor to each joist (face-nail) 3-8d 2-in. subfloor to joist or girder (blind-nail and face-nail) 2-16d Sole plate to joist or blocking (face-nail) 16d at 16 in. o.c. Top plate to stud (end-nail) 2-16d Stud to sole plate (toenail) 4-8d Sole plate to joists or blocking 3-16d at 16 in. o.c. Doubled studs (face-nail) 10d at 24 in. o.c. Doubled top plates (face-nail) 16d at 16 in. o.c. Doubled top plates, lap-spliced (face-nail) 8-16d Continuous header, two pieces 16d at 16 in. o.c. along each edge Rim joist to top plate (toenail) 8d at 6 in. o.c. Ceiling joists to plate (toenail) 3-8d Continuous header to stud (toenail) 4-8d Ceiling joists, laps over partitions (face-nail) 3-16d Ceiling joists to parallel rafters (face-nail) 3-16d Rafter to plate (toenail) 3-8d Built-up corner studs 16d at 24 in. o.c. Built-up girders and beams 20d at 32 in. o.c. along each edge * From the Uniform Building Code/1997. Whittier, California. International Conference of Building Officials. Reproduced with permission of the International Code Council. All rights reserved.

tion). In both cases, use house plans to position walls. Snap chalklines onto subfloors (or floors) to indicate wall sole plates. If you’re building a wall within a room, next measure from existing framing to determine the height and length of the new wall, as described in "Reinforcing and Repairing the Structure,” on p. 165. Finally, mark the locations of ROs, wall backers (blocking you nail drywall corners to), and studs into plates.

The easiest way to frame a wall is to construct it on a flat surface and tilt it up into place. Once the wall is lifted, just align its sole plate to a chalkline on the floor sheathing. This construc­tion method is also stronger, because you can end-nail the studs to the plates rather than toe – nailing them. Sometimes, there’s not enough room to tilt up walls, a situation which is addressed later in this chapter.

I Stud-Wall Elements

image324

If you use doubled 2x6s for your header in a rough opening in standard 8-ft. wall framing, you need cripple studs to support the doubled top plate. If you use a 4×12 instead, it will support the top plates. Although code may allow a single top plate for nonbearing walls, a single plate offers little to nail drywall to, if the ceiling is finished before the wall.

Подпись: A Speed Square is used to mark stud locations on a pressure-treated mudsill (sole plate) and a top plate. An Xusually indicates regular studs 16 in. on center; a _/,jack studs; a K king studs; and a C, cripple studs. The sole plate has been predrilled so it will fit over the anchor bolts when the wall is assembled and lifted into place. I Stud Layouts________

STUD-AND-PLATE LAYOUT

Подпись: Marked stud edges

Mark stud edges on plates so that stud centers will be spaced 16 in. on center (O. C.).

Distances (O. C.)

48 in.

16 in.

16 in.

16 in.

X

X

<

X

X

<

151/4 in.

in.

31 1/4

47’/4 in.

Подпись: PROnP When partitions run perpendicular to the joists, center the studs over the joists whenever possible. Aligning studs and joists creates straight, open channels from floor to floor, so plumbers and electricians can easily drill through plates and run wires and pipes. Partitions that ran parallel to and directly over the joists would be a big problem if you needed to run wires or pipes. Instead, consider moving the partition 1 in. to 2 in. to avoid the joist. 1111 image326

Mark rough openings. Place the sole plate, face up, next to a chalkline; then place a top plate next to it, so that edges butt together and the ends align. Use a square to mark the top plate and the sole plate at the same time. (If the top plate is doubled, there’s no need to mark the upper top plate.) Using a tape measure, mark the ROs for doors and windows. Rough openings are so named because they are about 1 in. wider and 1 in. higher than preframed doors or windows (so units can be shimmed snug) and 2h in. wider and higher than unframed units.

As you mark the width of the RO on the plates, keep in mind that there will be a king stud (full length) and a shortened jack stud (also called a trimmer stud) to support the header on each side of the opening. After marking the ROs, mark the corner backers (also called wall backers)— extra blocking for drywall where partitions inter­sect with the wall you’re framing. "Corner-Stud Layouts” shows several backer configurations.

Mark studs on the plates. After marking the first stud, which is flush to the end of the plates, mark the subsequent studs 3з4 in. back from the red 16-in.-interval highlights on your measuring tape. (In other words, mark stud edges at 1514 in., 3114 in., 4714 in., and so on.) By marking stud edges 3з4 in. back, you ensure that stud centers will coincide with the edges of drywall or sheathing panels, which are usually some multiple of 16 in., for example, 48 in. by 96 in.

Mark studs every 16 in. on center on plates— through the ROs as well—so that drywall or sheathing panels running above or below open-

CORNER-STUD LAYOUTS Corners require at least three studs to provide adequate backing for finish materials. In the first example, the middle stud need not be continuous, so you can use pieces.

image327

image328

image329

For standard 8-ft. wall framing, cut studs 92‘/4-in. long. One bottom plate and two top plates will be roughly 41yfe in. thick, creating a wall height of 963/ in. This height accommodates one drywall panel (*/! in. to 5/i in. thick) on the ceiling and two 4-ft.-wide drywall panels run horizontally on the wall. If you install a 4×12 header directly under the top plates of a standard wall, the rough opening height will be 821/ in. This is just right for a 6 ft. 8 in. door, and door head heights will match that of the windows.

Подпись: STANDARD ings can be nailed to cripple studs at regular intervals. At window openings, you’ll mark crip­ple studs on both the top and the bottom plates. But on door openings, you’ll mark cripple studs on the top plates only. Note: For door openings, where 16-in. on-center studs occur within 2 in. of a king stud, omitting the 16-in. on-center stud will not weaken the structure.

Carpentry

This chapter od, the king

of building materials. Built amid virgin forests, the first wood houses were fashioned from mas­sive ax-hewn timbers that took half a neighbor­hood to raise. Because iron was scarce, those great post-and-beam frames were joined without nails. Instead, they were fitted tightly and then fastened with whittled wooden pegs. The technol­ogy was crude, but the houses survived, in large part because of the mass and strength of wood.

Early in the nineteenth century came plentiful iron nails and circular-sawn lumber of uniform, if smaller, dimensions. Although such lighter components needed to be spaced closer than rough-hewn timbers, their reduced weight made it possible for three or four people to raise a wall. Balloon framing was the earliest of milled lum­
ber houses, with long studs running from one story to the next, and is rarely used today. Since the beginning of the twentieth century, platform framing (also called western framing) has been the most widely used method. Here, each story is capped with a floor platform. Because the studs of a platform-framed house run only one story, they are shorter and easier to handle.

Understanding Structure

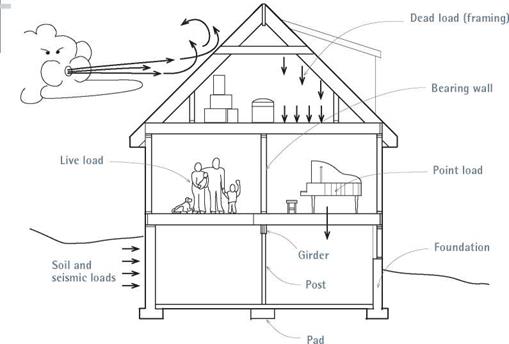
A house must withstand a variety of loads (forces): the dead load of the building materials; the live loads of the people in the house and their possessions; and the shear loads from earthquakes, soil movement, wind, and the like, which exert racking (twisting) forces on a building. There are

image317If there’s room, assembling a wall on a flat surface and walking it up­right is the way to go. This crew nailed restraining blocks to the outside of this second-story platform before­hand, so the sole plate couldn’t slide off the deck.

Подпись: Local building authorities have the final say about altering the structure of your house. In earthquake country, for example, removing sections of a wall could reduce its shear strength— its resistance to seismic and wind forces. In short, always have a structural engineer review your working drawings. Some building departments require that plans be reviewed and stamped by a licensed engineer before any significant structural work is done. llll other, finer distinctions, including point loads, where concentrated weights dictate that the structure be beefed up, and spread loads, in which a roof’s weight, say, pushes outward with enough force to spread walls unless counteracted.
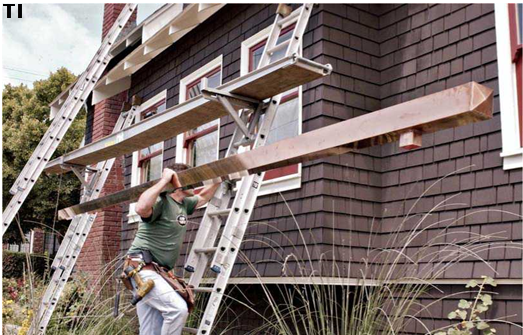
Loads are transferred downward by framing members, primarily by exterior walls sitting atop a perimeter foundation and by interior bearing walls, often supported by a secondary foundation consisting of a girder, posts, and pads. Generally, a girder runs the length of the house, and sup­ports floor joists running perpendicular to it. Nonbearing walls, as their name denotes, are not intended to bear anything but their own weight. Headers (or lintels) are bearing beams that carry loads across openings in walls. A partition is any interior dividing wall, bearing or not.

Before you decide to demolish old walls or frame up new ones, determine what is a bearing wall and what’s not. This will influence how you frame up, for example, the size of headers, whether you need shoring, whether you need additional support below the walls being removed, and whether you should disturb the structure at all. Get as much information as you can before you commit to a plan because there

SLOPING AND PLACING GUTTERS

Ideally, gutters should slope down toward down­spouts 1 in. per 16 ft., but this is not always pos­sible. For starters, this may not look good: Next to a level fascia board, the steeper the slope of the gutter, the more it looks out of whack. As long as there is a slight pitch—say, І2 in. in 20 ft.—with no low spots en route to the downspout, a gutter will drain. If a house settles so that its roof edge or trim slopes away from downspouts, either install new gutters with downspouts properly located or raise or lower the gutters so they slope toward existing downspouts.

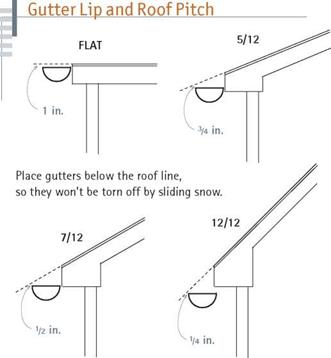
Place the front lip of the gutters below the roof plane, low enough so the sliding snow won’t tear them off yet high enough so the rain runoff won’t overshoot them. The distance below the projected roof plane varies with pitch: For a gently sloped 5/12 pitch, place the front lip of the gutter % in. below the projected roof plane; for a steeper 7/12 pitch, h in. below the plane; for a 12/12 pitch, /a in. The front lip of a gutter should always be about 1 in. lower than the back. That way, if the gutter overflows, water will spill over the front lip rather than soaking the fascia and siding behind.

INSTALLING GUTTERS

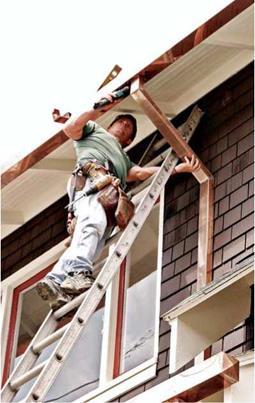
Reconnoiter the roof. Measure the length of the roof the gutter will service, and check the fascia (if any) and roof edge for level. Try to place the downspouts in an inconspicuous place, away from foot traffic. In positioning downspouts, the biggest challenge is usually on the uphill side of the house, where downspouts often require
underground drains to carry water beyond the outside house corners.

Next determine where you want seams, which should also be placed inconspicuously. Because gutter stock comes in 10-ft. or 20-ft. lengths, it might look better to join a 15-ft. length and a 10-ft. length to achieve a gutter 25-ft. long, rather than tacking a 5-ft. length onto the end of a 20-ft. length, if that joint would be near the front door.

image312

image313

Although gutter sections are light enough for one person to carry, the job is safer and more

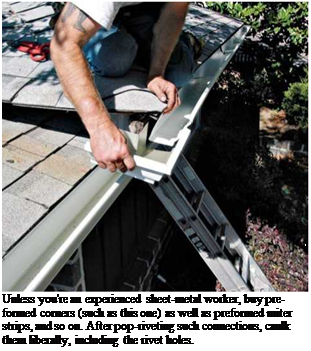
Подпись: Gutters are relatively fragile. Where you must replace a hanger or remove a gutter spike, use locking pliers to pull the fastener out; don't risk collapsing the gutter by attempting to pull spikes with a claw hammer. And where you must lean a ladder against gutters, place it near an internal support such as a spike- and-ferrule or a hidden hanger. 1111 Подпись:image314Подпись: Unless you're an experienced sheet-metal worker, buy preformed corners (such as this one) as well as preformed miter strips, and so on. After pop-riveting such connections, caulk them liberally, including the rivet holes.

predictable with two workers, especially if it’s windy. Snap a chalkline along the fascia to indicate the level of the hanger brackets and install a bracket at either end of the roof. Other­wise, snap a chalkline to indi­cate the back lip of the gutter.

If your gutter hangers fit into the gutters, position them before you carry gutter sections aloft; also, preassemble the end caps, downspout takeoffs, and so on.

Once you’ve secured either end of the gutter and checked its position, add hangers every 32 in. (every other rafter); in snow country, install a hanger every 16 in. The hangers you choose will deter­mine exactly how you secure gutters. Most mod­ular gutter systems can be cut to length with a hacksaw and joined with poprivets or self­tapping sheet-metal screws. A disadvantage of screws: Their points protrude, snagging leaves and causing blockages. An advantage: Screws can be removed to disconnect the sections.

Consequently, use rivets to join the gutter sec­tions, downspout outlets, and miter strips. And use the shortest screws feasible to join the down­spouts to the gutter outlets. To avoid galvanic corrosion, use screws that are the same material as the gutter; otherwise, use stainless-steel screws. Because elbows slow water and tend to clog, use as few as possible. Place the vertical sec­tions above the elbows so falling water can pick up speed to flush debris out of elbows. Apply gut­ter caulk freely to seal the joints, rivet holes, and the like. And where you see holes left by earlier gutter hangers, fill them with exterior wood filler or color-matched acrylic latex caulk.

GUTTER REPAIRS

If gutters are rusty but otherwise intact, use a wire brush to remove rust. Then rinse well and allow the gutters to dry. Paint gutters with an elastomeric roof coating such as Gacoflex acrylic latex, which can handle the expansion and con­traction of metal gutters.

You may be able to get a few more years from metal gutters beginning to rust through by patch­ing them with a compatible-metal patch. First, vigorously wire-brush the rusted area till you uncover solid metal, wipe the area clean with a rag damped with paint thinner, and prime with metal primer. After the primer dries, spread epoxy around the hole, and press the patch into it. Or simply wire brush the rusted area clean and apply a foil-faced, self-adhering bituminous membrane; such waterproofing membranes are often used to flash skylights, plumbing pipes, and other roofing elements. They’re easily shaped to the contour of a gutter.

Wooden gutters should be inspected every year for deterioration and repainted every 2 years or 3 years. They must be thoroughly dry before painting; otherwise, paint will seal in moisture and promote rot. So it’s best to paint gutters after a dry spell, after allowing the morning dew to evaporate.

Begin work by sanding the wood well and wiping away grit with a rag dampened with paint thinner. Next, apply a water-repellant preserva­tive, prime, and apply two finish coats of paint.

If you find rot, your problem is compounded if the gutter also doubles as exterior trim and abuts sheathing or framing. Short of replacing such integral gutters, you may be able to prolong their life by lining them with peel-and-stick waterproofing membrane.

Gutter Hangers

Gutter sections need to be supported by hang ers at least every 32 in.; closer if there’s a heavy snow or ice load. The many variations can be grouped into two general types: roof mounted, which employ a strap nailed to roof sheathing, and fascia mounted, which screw or nail directly to fascia boards or rafter tails. Whatever type hanger you use, gutters are less likely to pull free if you nail or screw the attachers to framing behind the fascia or roof sheathing. Here are profiles of four common hanger types:

► Spike-and-ferrule hangers nail directly into rafter ends or through fascia boards. Although this is a simple system, its detractors point out that 7-in. spikes leave large holes, encourage rot, and—in the end—don’t hold well.

► Roof-mounted strap nailers support gutters well and are an alternative to end-nailing rafters—in fact, they’re the only option when there’s no fascia. If you’re reroofing, nail them to the roof sheathing and apply shingles over them.

Or, if the rafter tails are exposed, nail the straps atop the rafters, and install flashing over the straps to forestall rot.

► Hidden hangers are favored for hanging K-style aluminum gutters. They can be inserted into the gutters on the ground and, thanks to integral screws, attached to the fascia one-handed. But because they clip inside the gutter channels— rather than supporting them underneath—these

image310

Hidden hangers are commonly used with К-type gutters. They can be prepositioned in the gstter and quickly screwed or nailed to the faseia. Because hangers are not visible, gutter lines are clean.

hangers are best used with heavier, 0.032-in. gutter stock, which is stiffer and less likely to flex or sag than the lighter stock.

Подпись: Prefab Gutter Pieces Подпись: Spike-and-ferrule Подпись: Prefabricated gutter pieces facilitate assembly. Use the hanger type most appropriate to your eaves detailing. ► Bracket hangers are usually lag screwed to fascia boards. They range from plain 4-in. brackets that snap over the back gutter lips to cast bronze brackets ornamented with mythical sea creatures. Brackets simplify installation because you can mount them beforehand—snap a chalkline to align them—and then set gutters into them.

Rain Gutters

Gutters direct water away from the house, pre­venting water from collecting next to the founda­tion and thereby possibly undermining it. The two most common gutter profiles are half-round and K-style, in which the gutter has a squared-off back and an ogee front. For appearance’s sake, try to match the profile of new gutters to old.

To clear water adequately, gutters must be sized properly and cleared of leaves and debris twice a year—in spring and in fall. Your lumber­yard probably has elaborate gutter-sizing charts based on regional rainfall, roof square footage, and pitch. But you might remedy chronically overflowing downspouts simply by upsizing the gutters from a standard 5-in. width to a 6-in. model and installing larger downspouts. To keep

image305

Begin any gutter installation by checking the slope of roof edges and trim and then measuring the areas to receive gutters. Typically, gutters extend beyond the roof section ‘h in. on each end. As you reconnoiter, consider where downspouts will be least obtrusive.

Подпись: Use a hole saw in a cordless drill to create openings for downspout outlets. In a pinch, you can also start holes by hammering an old chisel into the metal, then use aviation snips to complete the cutout.
Подпись: Most metal gutter stock is relatively lightweight, so it can be cut, drilled, and attached easily with a modest assortment of tools. When using a hacksaw on gutters, cut from the back and bottom sides forward, so you'll be cutting the shaped (thicker) edges last. Aluminum and copper are soft and easy to work; galvanized steel is more challenging.

roof runoff from running behind gutters and rot­ting fascia, extend the roof drip-edge flashing so it overhangs the gutter.

If gutters are spaced too far from the roof edge or slope away from the drip-edge, you can place an L-shaped piece of metal flashing over the back of the gutter and tuck its upper edge up under the drip-edge. (Notch that flashing so it fits around the roof hangers.) Some К-style gutters also come with an integral flange that runs under the roofing and serves the same function as a drip-edge.

MATERIALS

Metal gutters can be fabricated on site by a gutter specialist with a mobile machine. Or you can assemble them from 10-ft. or 20-ft. prefab lengths, using pop rivets and exterior caulking. Plastic gutter sections need cementing. Gutter runs that are longer than 40 ft. need an expan­sion joint to keep them from buckling. Here are the materials most commonly used.

Aluminum. By far the most popular, aluminum resists corrosion, is easily worked, is reasonably priced, and is durable—though it will dent. It comes prepainted in a range of colors. Standard thickness is 0.028 in., but spending a little more for 0.032 in. is prudent, especially if heavy snows and ice dams are common in your area.

Galvanized steel. Stronger and harder to dent than aluminum, galvanized steel rusts if you don’t keep it painted. There are prepainted vari­eties, generally in the same colors as painted metal roofs. The minimum thickness is 26 gauge.

image308

For gutters, a pop riveter is indispensable for joining because, unlike screws, pop rivets don’t intrude into the gutter or downspouts and so won’t snag leaves and cause clogs. Predrill pop-rivet holes.

Copper. Handsome when new, copper acquires a beautiful green patina as it weathers. It’s mal­leable, durable, and about five times as expensive as aluminum. This gutter is usually formed from 16-oz. sheet copper. Copper resists salt air but may be corroded by cedar-shingle runoff.

Plastic. Plastic comes in 8-ft. and 10-ft. lengths, with matched fittings. You can join sections either with liquid cement or with neoprene gas­kets. It’s virtually maintenance free and durable, if the plastic contains a UV inhibitor. Its expan­sion joints can accommodate a wide range of movement.