Category RENOVATION 3

FRAMING A DOOR OR WINDOW OPENING

After cutting back interior surfaces to expose the framing in the exterior wall, outline the RO by snapping chalklines across the edges of studs. If you can incorporate existing studs into the new opening—an old stud might become the king stud of the new opening, as shown in the photo on p. 165—you can save time and materials.

To remove old studs within the new opening, use a sledge to rap the bearing wall’s top plate upward, thus creating a small gap above the studs (and old header, if any). That should create enough space to slip in a metal-cutting reciprocating-saw blade and cut through nails holding studs to the top plate. Though sheathing or siding may be nailed to the studs, they should still pull out easily.

Start framing the new opening by toenailing the king stud on both sides, using three 10d nails or four 8d nails top and bottom. Laminate the header package or cut it from 4x stock. (The pro­cedures described here employ terms illustrated in "Stud-Wall Elements,” on p. 155.) Precut the jack studs, and face-nail one to a king stud; lean the second near the other side of the opening. Place one end of the header atop the jack stud in place. Then slide the second jack under the free end of the header. Raise the header by tapping the second jack into place. Or, as an alternative, you can use a screw jack to hold the header flush to the underside of the top plate. Check for level; then measure and cut both jack studs to length.

If there are cripple studs over the header, nail up one jack stud, use a level to establish the height of the jack stud on the second side, and nail it up. Install the header; then cut the cripple studs to length and install them. If you’re framing a window opening, there will also be cripple studs under the sill. So level and install the sill next, using four 8d nails on both sides for toenailing the sill ends to the jack studs. End-nail through the sill into the top of the cripple studs; toenail the bottoms of the cripple studs to the sole plate.

To mark the rough opening outside, cut

through the sheathing and the siding, using a reciprocating saw. Or, if you want to strip most of the siding in the affected area first, drill a hole

is it a Bearing wall?

As noted in "Exploring Your Options," on p. 152, bearing walls and girders usually run parallel to the roof ridge and perpendicular to the joists and rafters they support. And in most two-story houses, joists usually run in the same direction from floor to floor.

Things get tricky, however, when rooms have been added piecemeal and when previous remodelers used nonstandard framing methods. For that, you’ll need to explore. Use an elec­tronic stud-finder or note which way the heating ducts run (usually between joists) to figure out joist direction. If all else fails, go into a closet, pantry, or other inconspicuous location and cut a small hole in the ceiling so you can see which way the joists run.

Finally, nonbearing walls sometimes become bearing walls when homeowners place heavy furniture, book shelves, appliances, or tubs above them. If floors deflect—slope downward—noticeably toward the base of such walls, they’re probably bearing.

through each corner of the RO. Outside, snap chalklines through the four holes. Remove siding within that opening—plus the width of the new exterior casing around all four sides. Nail the sheathing to the edges of the new frame. Finally, run a reciprocating saw along the chalklines to cut sheathing flush to the edges of the RO. Now you’re ready to flash the opening and install the door or window. Chapter 6 will guide you from there.

REPLACING A BEARING WALL

Bearing-wall replacements should be designed by a structural engineer and executed by a con­tractor adept at erecting shoring and handling heavy loads in tight spaces. In the two methods presented in the following text, beam-and-post systems replace bearing stud walls. In the first method, the bearing beam is exposed because it supports joists from below. In the second method, the beam is hidden in the ceiling, and joist hangers attach joists to the beam.

О Once you’ve cut electrical power to the affected area, installed shoring on both sides of the existing bearing wall, and inserted blocking under support post locations, you’re ready to remove the bearing wall and replace it with a new beam. However, if you’re installing a hidden beam, your job will be easier if you leave the old

wall in place a bit longer to steady the joist ends as you cut through them.

Installing an exposed beam is the easier of the two methods. Because ceiling joists sit atop an exposed beam, it’s not necessary to cut the joists—as it is when installing a hidden beam. After removing the bearing wall, snap chalklines on the ceiling to indicate the width of the new beam—say, 4h in. wide for a beam laminated from three 2x10s or 2x12s. Cut out the finish sur­faces within this 4h-in.-wide slot so the joists can sit directly on the beam. Chances are, the slot won’t need to be much wider than the width of the top plate of the wall just removed.

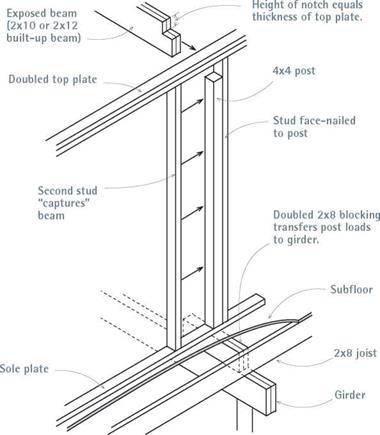
Because the beam extends into end walls, notch the beam ends so they will fit under the end-wall top plates, which may also support joists. Notching ensures that the top of the beam, the top plates, and the bottom of the ceiling joists will be the same height. If end walls have dou­bled top plates, the notch will be 3 in. to 4 in. deep. Before notching the beam, eyeball it for crown and place it crown up. Before raising the beam, be sure to have blocking under each post to ensure a continuous load path down to the foundation.

A laminated 2×12 beam can weigh 250 lb., so have enough helpers to raise it safely. Once the top of the beam is in place, flush to the underside of the joists above, temporarily support it with plumbed screw jacks or 2x4s cut % in. long and wedged beneath the beam—have workers tack- nail and monitor the 2x4s so they can’t kick out! (Put 2x plates beneath the jacks or the wedged 2x4s to avoid damaging finish flooring.)

Measure from the underside of the new exposed beam to the floor or subfloor. Then cut 4×4 posts Яв in. longer than the height of the opening, and use a sledgehammer to tap them into place. (Ideally, cut posts the exact length; but a little long is preferable to a little short.) Plumb the posts, and install metal connectors such as Simpson Strong-Tie A-23 anchors to secure the post ends to the top and sole plates. Add studs to both sides of each post, as shown in "Supporting an Exposed Beam,” to "capture” it and keep it from moving; nail these studs to the plates and to the 4x4s as well.

Подпись: I Supporting an Exposed Beamimage368Подпись: After notching and then raising an exposed beam with jacks, cut 4x4 posts to support it at both ends. There must also be blocking under each post, to transfer post loads to the girder and other foundation elements.Подпись: ineCKing THE LOAD PATH Because loads will be concentrated on support posts beneath each end of the new beam, those posts must be supported continuously all the way down to girders and to concrete pads, footings, or foundation walls. To make sure there is adequate support below proposed post locations, strip the bearing wall to its studs and insert shoring along both sides before removing corner studs at both ends of the bearing wall. Leave the rest of the wall alone for now. Using a long auger bit (18 in. by % in.), drill down through a sole plate at each end, where a post will stand. (In fact, the posts may be hidden in end walls at either end of the bearing wall.) If the bit hits a girder, posts should have adequate support. But if the bit hits air or only a single joist, add solid blocking. That blocking may be a 6x6 atop a girder or a new post and concrete footing—but let a structural engineer decide. Fit the blocking tight to the underside of the subflooring beneath the posts so there can be no deflection when loads are transferred to them. Installing a hidden beam takes more work than installing an exposed beam but yields a smooth ceiling. To summarize, after erecting stud-wall shoring on both sides of the bearing wall to be replaced, cut all the ceiling joists to create a slot for the hidden beam, assemble the beam on the ground, and then lift it into place. Here, joists will hang from the sides of the beam rather than
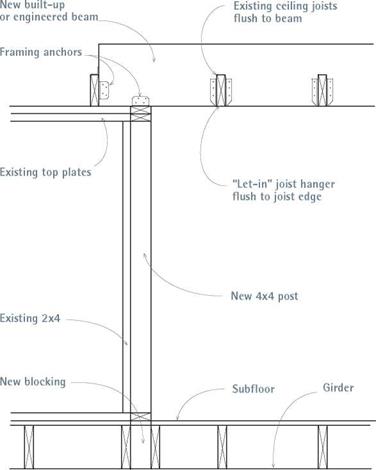
image369Подпись: A hidden beam allows you to remove a bearing wall and still have a smooth expanse of ceiling. A continuous load path—from the beam, through the posts, to the foundation—is crucial to a successful installation.Подпись: I Hidden Beam

sitting atop it, so the hidden beam will rest on top of end-wall top plates.

Thus install 4×4 posts between the top and the sole plates—and blocking under the posts— before raising the beam. Snap chalklines on the ceiling to indicate the width of the beam plus 4 in. extra on each side so you can slide joist hangers in later. Cut out drywall or plaster within that slot to open up the ceiling and expose joists. After installing shoring, as explained in earlier sections, go up into the attic.

1. Make the attic workspace safe and com­fortable. Place 2-in.-thick planks or 58-in. plywood walkways on both sides of the area where you’ll insert the beam. Tack-nail the walkways so they can’t drift. Clamp work lights to the underside of rafters and add ventilation. For necessary ventila­tion, you may first need to install gable end lou­vers and buy a fan—especially if it’s summer. If roofing nails protrude from the underside of roof sheathing, wear a hard hat.

If there’s enough room in the attic, assemble the beam in place and lower it down into the slot you’ll create by cutting back joist ends. However, if you must assemble the beam on the floor below—or if you’re raising an engineered beam— use a nylon web sling and a chain fall (see the photo on p. 53) bolted through the rafters to raise the beam up through the cutout in the ceiling. Angle-brace rafters to keep them from deflecting under the load, and don’t attach a chain fall to rafters that are cracked or already sagging.

2. Snap a chalkline to mark the beam loca­tion onto the top edges of joists. Snap a first line to mark the centerline of the beam. Then meas­ure out half the beam width plus 58 in. on both sides, and snap chalklines to indicate cut-lines on the joists. Using a square, extend these lines down the face of each joist. Use vivid chalk so the marks will be visible.

Because thin reciprocating-saw blades wan­der, use a circular saw to ensure square cuts across joists. It’s hard to see the cut-line of a saw you’re lowering between two joists, so clamp a framing square to each joist to act as a guide for the saw shoe. Some renovators prefer a small chainsaw for this operation, but hitting a single hidden nail in a joist can snap a chainsaw blade and send it flying at you. Whatever you use to cut the joists, wear hearing and eye protection and, ideally, have a similarly protected helper nearby shining a light into the cut area.

3. Get help to raise the beam one end at a time. If your cuts are accurate, you should be able to raise the beam between the severed joists and onto the top plate of one end wall and then the other. But, invariably, the beam gets hung up on something. Here, a chain fall is invaluable because it allows you to raise and lower one end of the beam numerous times without killing your back or exhausting your crew.

When the first end of the beam is up, nail cleats to both sides of the beam so it can’t slip back through the opening as you raise the other end. Raise and position the other end of the beam atop the other end wall and directly over
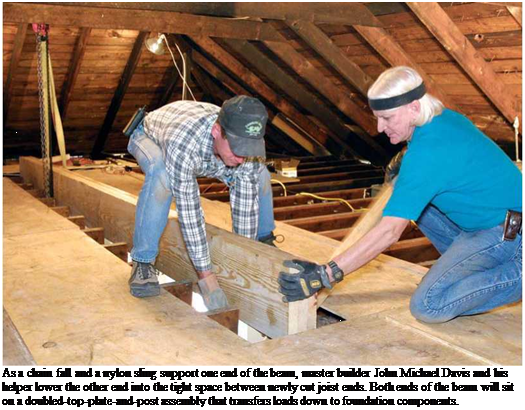
Подпись:Подпись: the 4x4 support post. Then use a metal connector such as a Simpson BC4 or an A-34 anchor (see the top photo on p. 60) to secure the beam to the top plates. 4. Fine-tune the height of individual joists till their lower edges are flush to the bottom of the beam. This operation is easiest with one worker downstairs using a 2x4 to raise or lower the joist ends as a worker in the attic directs. As each joist is correctly positioned, attach it to the beam using joist hangers and the case-hardened nails supplied with the hangers. Before attaching joist hangers, however, use a power planer to cut a shallow slot into the underside of each joist, to let in the hangers so they're flush to the underside of the joists. If there's not much room to swing a hammer between joists, use a pneumatic palm nailer to drive the nails most of the way. Finally, along the edges of the beam slot, center and end-nail 2x4 backing between the joists for the finish-surface patches to come. For more details on this complex operation, see John Michael Davis's article "Removing a Bearing Wall,” in FineHomebuilding, No. 152. image371image372Before attaching joist hang­ers, make a single pass of a power plane across the underside of each joist end, where it abuts the new beam. The planed area, roughly the width and thickness of a joist hanger "stirrup," ensures that the joist hangers will be flush to the bottom of the joists and the beam and that the patched ceiling will be evenly flat.

1111

Heavy Metal

Steel connectors are an impor­tant part of renovation carpentry, often joining new and old framing members.

Straps such as Simpson Strong – Tie LSTA strap ties are frequently used where wall plates are cut, at wall intersections, and as ridge ties.

Pros often use them to splice new rafter tails to existing rafters, to replace sections that rotted at the wall plate. After cutting rafter tails at the correct angle, toenail them to the top plate and use 12-in. or 18-in. strap ties to tie new tails to the old rafters. After the sheathing is nailed on, such reinforced rafter tails will stay in line indefinitely.

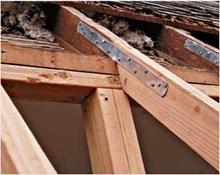
The 4×14 Parallam beam sitting atop a 2×4 top plate at right is much like the hidden beam dis­cussed in "Installing a Hidden Beam" in the text. In the old days, beams of this size would have been merely toenailed to top plates.

So the Simpson BC4 post cap now specified by engineers is quite an improvement. It’s simple to install and strong enough to resist uplift and lateral movement. Note, too, the 4×4 post directly under the beam—it’s part of the load path that goes all the way down to the foundation.

Shoring

Shoring temporarily supports loads carried by bearing walls while you modify them—say, to add a window or a door opening. Typically, shoring is installed after removing finish surfaces and rerouting pipes and wires but before cutting into a bearing wall. If you’re not sure if the wall is bearing or whether it can be safely modified, have a structural engineer inspect the house and review your remodel­ing plans. This is hard-hat work.

For first – and second-floor walls, two types of shoring are common: screw jacks used with top and bottom plates, and temporary stud walls built from 2x4s. In either case, position shoring back 2 ft. to 3 ft. from the wall you’re working on so you’ll have room to move tools and materials.

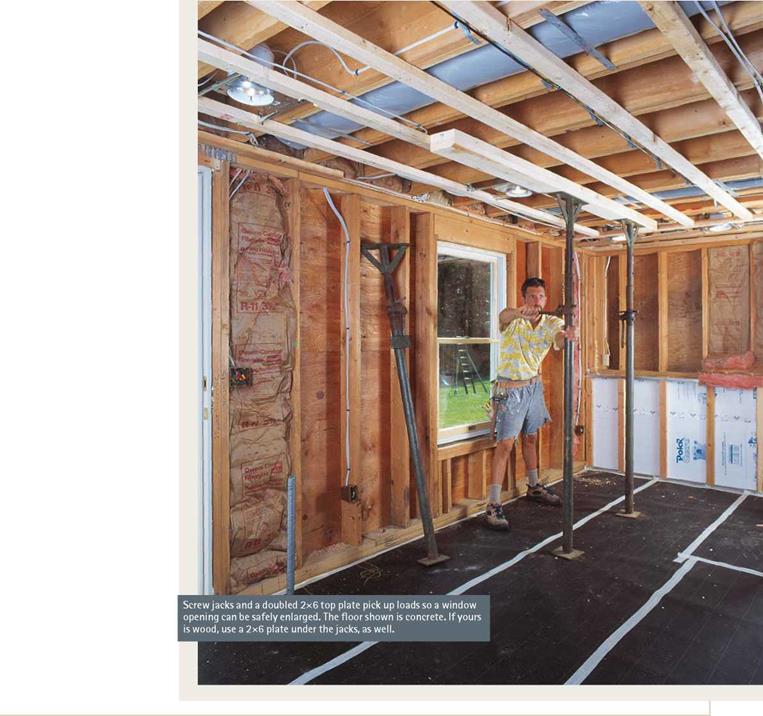
► If you’re using screw jacks, doubled 2×6 top plates will distribute loads better. Here’s how to laminate the top plates in place: Use two or three

image366

g


image367

16d common nails to nail the upper 2×6 directly to the ceiling joists; then face-nail the second 2×6 to it. Ideally, the top plates should extend one joist beyond the new opening on both sides. Don’t over­nail, you’re just holding up the plates till you get jacks underneath. Plumb down to mark the location of the single 2×6 sole plate. Place jacks every 4 ft., and plumb them. Tack-nail the top of each jack so it can’t fall over. Then raise one jack in tiny increments before moving to the next. Raise ceiling joists no more than Vs in.—just enough to take pressure off the bearing wall.

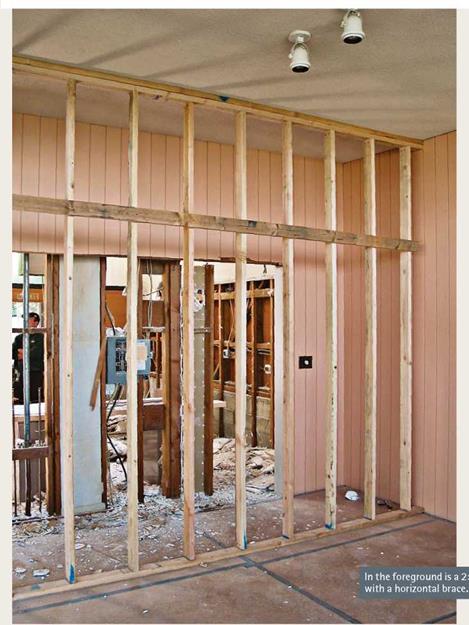
► Building a temporarily stud wall is simi­lar: Tack-nail the top plates; then plumb down to
mark the bottom plate. (To keep the bottom plate in place, tack-nail it to the joists underneath.) Cut studs in. longer than the distance between the plates because, here, the studs do the lifting. Toenail the studs to the top plate on 16-in. or 24-in. centers. Then use a sledge to rap the bottom of each stud till the stud is plumb. Recheck each stud for plumb as you progress, and monitor them periodically.

Once shoring supports the loads above, remove the studs from the bearing wall as needed to enlarge openings, add headers, and the like. If the bearing wall transfers loads from upper stories down into girders or foundation walls, study the lengthy sec­tion on jacking and shoring in Chapter 10.

Подпись: TIPПодпись: Today, rough openings are usually 82VHn. high, which accommodates a standard 6 ft. 8 in. preframed door. But if your house is nonstandard, instead try to line up new or enlarged openings in exterior walls to the tops of existing doors and windows. The underside of a new header will usually be 2 in. to 2V2 in. above the window or door frame, but check your unit's installation instructions. Подпись: llll

Structural Remodeling

Once shoring is in place, you should be safe in removing bearing walls. Check with a structural engineer if you have any doubts. Again, wear safety gear (hard hat, eye protection, work boots with thick soles, and so on) and test the electrical outlets to be sure the power is off. If you need to do any jacking, read Chapter 10.

REALIGNING AND REINFORCING CARRIAGES

If the outside stair carriage has bowed outward, use a 2×4 jammed against a near wall to push the carriage back into place. You can instead use an adjustable screw column horizontally to push the carriage back, but nail the column’s top plates so it can’t fall.

Where a carriage has separated from its stringer, clamp the pieces together; then add two J4-in. lag bolts, staggering the pairs of bolts every 18 in. along the length of the boards. If a carriage has pulled free from a stud wall, reattach it with washered lag bolts. Where a carriage is attached to a masonry wall, drill through the carriage into the masonry, using a carbide-tipped masonry bit. Slip a lead sleeve into the hole and expand the sleeve by tightening a washered 3/8-in. lag bolt into it. To forestall rot, slip a piece of 30-lb. building paper behind the carriage before bolting it down.

Occasionally, stringers or carriages come loose at the top and bottom. In a well-built stair­case, the upper ends of carriages are nailed to the inside of the header above; the lower ends of those carriages sit on, and are nailed to, the dou­bled joists of the rough opening below.

However, sometimes the lower ends of center carriages are mistakenly nailed to the inside of a RO header; in time the nails pull free and the car­riages slip down. Jack up the fallen carriages, using a plumbed, adjustable column securely footed on the floor or atop a 4×8 beam on edge. To create a flat jacking surface for the top of the column, screw a triangular piece (with the same slope as the stairs) to the underside of the car­riage. Should old nails resist your effort, cut through them with a metal-cutting blade in a reciprocating saw. Goggles, please.

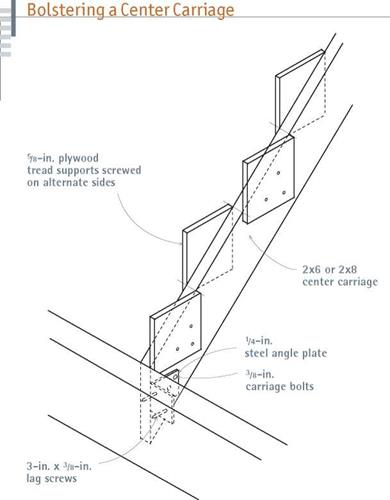
Jack up the center carriage and join its lower end to the header with steel connectors or f4-in. right-angle mending plates. Secure the plates to the header with 18-in. lag bolts and through the bottom of the carriage with й-in.-diameter car­riage bolts. It’s not usually necessary to use mending plates on the upper end of the carriage because the lower end is bearing most of the weight.

Inadequate support for the middle of a stair­case can lead to split treads or major failures. Where a center carriage is not sawtoothed to receive treads, add plywood supports beneath each step. Cut support blocks from scrap ply­wood h in. thick. Then glue and screw them to alternate sides of the carriage—one per tread. If the stair sags in the middle and has no center carriage, add one.

You can replace finish surfaces after the car­riages are bolstered and reattached and the stairs and balusters are reinstalled. Be sure that the nailing plane on the underside of the carriages is flat, shimming as needed. To reattach plaster lath or drywall, use type W drywall screws (hammering drywall nails can crack surrounding materials).

SAGGING STAIRS

If the staircase has several of the ailments described in preceding sections, it may also have major troubles underneath. Investigate further. If the stairs tilt to one side, the carriage on the low side is having difficulty: That is, nails or screws holding it to the wall may be pulling out, the wood may be rotting or splitting, or the carriage may be pulling free from the stringer. Sagging on the open side of a stairway is common, for there’s no wall to bolt its carriage to. If there are large cracks or gaps at the top and bottom of the stairs, you’re seeing symptoms of a falling carriage.

To learn more, remove the finish surfaces from the underside of the staircase. But before cutting into anything, rent a Dumpster for the rubble and confine the mess by sealing off the stairwell with sheet plastic. When you cut, set your circular saw just to the depth of the finish materials so that you don’t cut into carriages. Wear goggles and use a Carborundum™ blade to cut out the surface in 2-ft. squares.

You can probably save any decorative plaster molding along the staircase by cutting parallel to it—about 1 in. from its edge, thus isolating the section of lath nailed to the underside of the outer carriage. Leaving a 1-in. strip will also make it easier to disguise the seam when you reattach the ornamental border after repairing the stairs.

With the underside of the stairs exposed, you can see exactly what the problem is. If the car­riages have pulled loose from adjacent walls, you’ll see a definite gap. Replace wood that is rot­ted or badly cracked, especially wood cracked across the grain. If the wood sags or is otherwise distorted, bolster it with additional lumber; it may also need to be reattached. All of these repairs are big ones. To do them right, you’ll need complete access to the substructure, from one end of the carriages to the other.

Starting at the top, remove all nosing, balus­ters, treads, and risers. You could theoretically bolster undersize carriages without removing all the treads, risers, and balusters, but it’s better to

image365Подпись: If the center carriage isn't notched, it may not support treads well. In this case, screw plywood tread supports to alternate sides. Also, if the center carriage was only nailed to the face of a header originally, it may have slipped down. If so, jack it up and reattach with a 1/4-in. steel angle plate.remove them. Otherwise, misaligned or distorted carriages will be held askew by all the pieces nailed to them. So remove the treads and risers, and jack up the distorted carriages to realign them. (You may want to stretch taut strings as an alignment aid.)
Number all parts as you remove them, group­ing pieces according to the step number.

TIGHTENING NEWEL POSTS

If many of the balusters are loose, check the rail­ing and the newel post: They may not be firmly attached. Or if the upper end of the railing dead ends into a wall on the floor above, the railing may be anchored with a bracket beneath. Make sure this bracket is tight.

If the newel post is shaky, try shimming underneath its base or screwing the post down

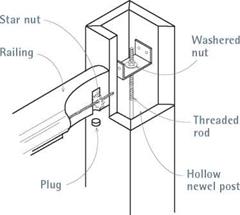
Anatomy of a Hollow Newel Post

image360

image361

Unlike modern newel posts, older ones are often hollow and attach to railings in various ways. One common way is a star nut centered in the end of a railing, which is accessed by removing a plug on the underside. The bottom of the post may be screwed to a stringer or held fast by an adjustable rod-and-plate assembly running down the middle of the post.

image362

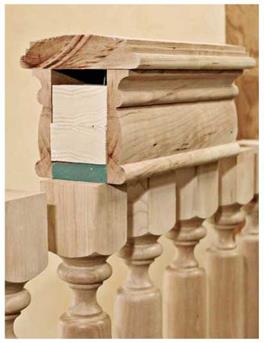
This three-piece railing assembly mockup has two skirt (side) pieces that cover the tops of the balusters and a cap. This unusual assembly will create a massive, magisterial look.


image363

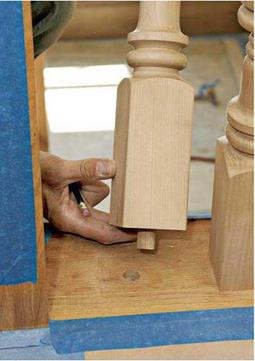
The doweled end of this square-cut baluster fits precisely into a hole predrilled into a stair tread.


image364

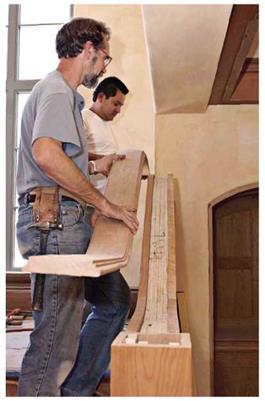
With skirt pieces glued and clamped to both sides of the rough cap, the finish railing cap is test-fitted.

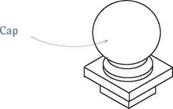
with predrilled 3-in. Torx screws. If this easy repair doesn’t suffice, see if the internal hardware needs tightening. Quite often newel posts are hol­low, with a long, threaded rod inside, as shown in "Anatomy of a Hollow Newel Post,” on p. 173.

You may be able to tighten the upper end of this rod, concealed by the post cap, by turning a nut against a restraining plate. Because you may have difficulty finding the cap joint under many years of polish and grime, loosen the cap by rapping the side of it with a rubber mallet. The bottom end of the threaded rod often emerges on the underside of the subflooring—if it’s exposed, have a look.

On occasion, newel posts also connect to another plate-and-rod assembly on the inside of the nearest stair carriage. About the only way to get at that assembly (if it exists at all) is to pull up the first tread. Where the railing meets the newel, the railing is held tight by wood joinery or by a double-ended hanger bolt accessible through a plug on the underside of the railing.

REPLACING STAIR TREADS

Treads crack because they aren’t supported cor­rectly or they weren’t made from good stock. To replace them, you’ll need to pry or cut them out. Prying is preferable but rarely possible, especially if the treads are rabbeted to risers or housed in stringers.

To cut a tread out, first remove the balusters from the step’s open end, saving that end as a template for the new tread. Drill into the middle of the tread and, driving a chisel with the wood grain, split out the old tread. Clean up any old glue or wood fragments. After fabricating the new tread and testing its fit, apply glue to its edges and to the tops of the carriages on which it will sit. To each carriage, screw down the tread with two or three trim-head screws, predrilled to prevent splitting. Reinsert and glue balusters and nosing.

Water, Insects, Rot, and Mold

Whether structural damage is caused by insects or rot fungi, excess water is usually the heart of the problem. Thus, before treating the specific agent causing the deterioration, reduce excess water by maintaining gutters, improving drainage, grading the soil away from the building, eliminating wood-soil contact, improving ventilation, and so on.

The fungi that rot wood reproduce by airborne spores, so they’re virtually every­where. But they can’t establish colonies on wood with a moisture content (MC) less than 28 percent; and they go dormant if the MC drops below 20 percent or the air temperature drops below 40°F. Household molds, also caused by fungi, thrive in a similar moisture and temperature range. So if moisture-meter readings in your basement or crawl space are too high, reducing excess moisture may solve both wood rot and mold problems.

How you reduce moisture, however, is something experts can’t agree on (see Chapter 14 for more on mitigating moisture and mold). Many building codes recom­mend covering dirt floors in crawl spaces or basements with sheet plastic and installing screened vents to circulate air and disperse moisture: 1 sq. ft. of vent per 100 sq. ft. of floor space is the standard formula. Whereas another group of builders argues that it makes more sense—especially in the humid South—to close vents, insulate crawl space or basement walls, seal air leaks, and install a dehumidifier. That, they argue, will stop mold from colonizing and migrating to living spaces. Best bet: See which approach builders in your region favor.

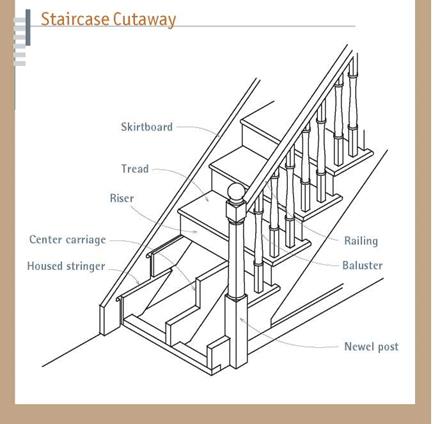
Подпись: StairПодпись:image357Подпись: As shown below, stringers and carriages support steps. Stringers serve as the diagonal support frames on each side. And carriages carry by means of a sawtooth pattern cut into them. Stringers and carriages are often fastened together. Another option is a housed stringer, in which a stringer has routed grooves that receive and support tread and riser ends.image358

Stair Repairs

Stairs are complicated to build, and problems can be tricky to diagnose. For example, it may be possible to repair squeaky stairs with glue and a few screws. But if squeaking is widespread, stairs tilt to one side, and there’s a gap along a stairwell wall, the diagonal supports beneath the staircase may be failing. In that case, you’ll probably need to expose those supports to find out.

SQUEAKY STEPS

If the underside of your staircase is covered and you have only a few squeaks, try fixing them without tearing out finish materials. Many peo­ple mistakenly attempt to fix squeaks by nailing down offending treads with finish nails, but nails alone won’t work. The nails may split the nosing, and they’ll almost certainly pull loose. It’s far bet­ter to predrill and countersink Torx screws

through the tread into a riser or center carriage beneath.

If stairs can be painted or carpeted over, caulk the squeaky joint with subflooring adhesive. This doesn’t bind the pieces together as well as screws do, but the adhesive cushions them, in effect. Keep people off the stairs until the compound has cured. If that doesn’t eliminate squeaking, expose the underside of the staircase to examine its underpinnings.

What you do next depends on the construc­tion of the stairs. If there are blocks glued along the riser-tread joint, it’s likely the glue has failed. First, eliminate tread movement by nailing through the back side of risers into treads: predrill, and use two or three 6d finish nails per tread. Then reglue errant blocks with white glue or, better yet, with construction adhesive.

REPLACING BALUSTERS

Broken balusters can usually be doweled, glued, and filled. But if you’re disappointed with the repair, see if your lumberyard can order a replacement in the same pattern. Stair parts have been mass-produced for a century or more, so there are catalogs full of stock balusters. Custom mills can create new balusters to match old ones, but the process is labor intensive and costly.

Thus, if you have many damaged or missing balusters and can’t find stock replacements, con­sider replacing all with another pattern.

image359

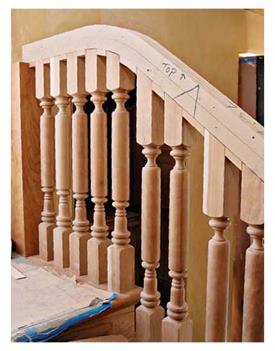
The rough cap atop this baluster section of a custom – built staircase will be covered by a three-piece railing assembly. The short fillet strips between the baluster tops can be removed, should balusters need replacing later.

If balusters are intact but shaky, remove and reglue them; simply nailing them won’t do much good. To get at balusters, pry free the return molding at the end of the tread by inserting a putty knife or small chisel into the nosing seam. Once you start prying, you’ll see small finish nails holding the nosing in place; remove these nails. Then gently tap out the bottom of the baluster, which is usually joined to the tread by a dovetail joint or a dowel. The top of the baluster is held in place by fillet strips that fit tightly between balus­ter tops and are toenailed with tiny finish nails to the plow (routed channel) in the underside of the railing. Pry out the fillets first, shown in the photo on the facing page.

To fit the baluster back in place tightly, lightly coat both ends with white glue and replace the tenoned or doweled end first. Replace fillets to evenly space the tops of the balusters. Replace the return molding and wipe off the excess glue. To prevent marring during this operation, cush­ion blows with a rubber mallet or scrap wood.

Finishing Basement Walls

Basement walls are usually masonry, rarely plumb, and often damp. If you want fin­ished basement walls, here’s a skeletal outline of the principal steps (see Chapter 14 for insulation tips).

1. Eliminate external sources of water such as clogged gutters, inadequate drainage, and improper grading. Repair foundation cracks that could admit water.

2. Trowel or roll a cementitious coating onto foundation walls to damp-proof them. Using construction adhesive, install rigid foam insulation panels to isolate cool foundation walls and prevent condensation. Cover the panels with a plastic water­proofing membrane.

3. Erect wood-frame or light-steel stud walls within—but not touching—

the foundation walls. Use pressure-treated sole plates on wood walls. Or, if space is tight, consider installing 15/s-in.-wide steel studs. (Covered with drywall, they’re sturdy and stable.)

4. image353Powder-actuated tools quickly attach sole plates to concrete floors, but such tools are dangerous because most powder loads are the equivalent of a.22 cartridge. Plus you’re shooting steel fasteners into concrete. Get instruction in using these tools safely, read the accompanying safety manuals, and wear appro­priate safety equipment— including eye and hearing protection.

As furring for basement walls, light-steel studs have advantages: They won’t rot, and 15/o-in.-wide studs don’t waste much space. Here, a powder-actuated tool attaches a metal sole plate to a concrete floor. Because of risks in mis­using such tools, follow the manufacturer’s operating instructions exactly.

When a partition runs parallel to the joists, try to position it over a joist so you’ll have something to nail the sole plate to. If you can’t reposition the wall, add blocking between the joists.

or unnecessarily. Moreover, local codes may require a professional.

Подпись: I Sistering JoistsПодпись:Подпись: To sister a new joist when one end will rest on a mudsill and the other will hang from a girder, angle cut the mudsill end and slide it into place. Then raise the other end till it's flush with the girder before attaching with a hanger.Подпись: SISTER JOIST SITS ATOP SILL AND GIRDER Подпись: To “sister" a new joist to one that sits atop a mudsill on one end and a girder on the other, bevel the leading top edge so it will “sledgehammer “ into place.It’s often difficult to tell whether an infestation is active or not. For example, if a subterranean termite infestation is inactive, a prophylactic treatment may suffice. But if the infestation is active, the remedy may require eliminating the conditions that lead to the infestation (such as excessive moisture and earth-wood contact) and an aggressive chemical treatment. Treatment usually consists of applying a chemical barrier on the ground that repels the termites or a "treated zone” whose chemical doesn’t repel them initially but later kills or severely disrupts them.

Termites, the most famous of insect pests, include drywood, subterranean, and Formosan types. Because subterranean termites need access to the moisture of the soil, they build distinctive dirt tubes up along the surface of foundations. When they eat into the wood, they usually pro­ceed with the grain. Termites swarm in spring or fall. Discourage the return of subterranean ter­mites by lowering soil levels around foundations, footings, and the like.

Drywood termites hollow out chambers sepa­rated by thin tunnels and often travel cross-grain; they eject fecal pellets through kick-out holes, forming a pyramid-shaped pile under the holes. Fumigation is effective for drywood termites, but it’s ineffective for treating subterranean termites because their colonies are located in the ground and fumigation gas does not penetrate the soil.

Formosan termites, whose colonies may exceed 1 million individuals, are wreaking havoc along the Gulf Coast of the United States; they live in the ground or in buildings and build huge, hard nests.

Carpenter ants are red or black, ‘/ in. to h in. long. Sometimes confused with termites, these ants have narrow waists and, when winged, wings of different sizes. While they do tunnel in wet or rotting wood, they do not eat it as food and are therefore less destructive than termites. To locate their nests, look for borings rather like coarse sawdust. Professionals will often drill into nests and spray them with an insecticide safe enough for inside use; dusting with boric acid is another common treatment.

Powder-post beetle holes look like tiny BB-gun holes; their borings resemble coarse flour. Because these insects favor the sapwood, evidence of borings may be only superficial until you prod with a pocketknife. Still, holes are not a sure sign of an active infestation. One approach is to remove the damaged wood, sweep up borings, paint the area, and monitor it for a year. If holes reappear, it’s an active

image356

This wall sheathing shows evidence of fungi and insect damage. After failed window flashing allowed water behind a stucco exterior, wood-destroying fungi grew quickly. Then subterranean termites tunneled, consuming the moist, fungus-damaged wood. Cross-grain checking just above center is a typical sign of fungus damage. A beetle larva showed up too.


BOLSTERING JOISTS

Widespread sagging or excessive springiness in a floor is probably caused by joists that are too small for the span or by post, pad, and founda­tion failure, as covered in Chapter 10. Isolated joist failure is usually caused by insect or water damage; an earlier renovator cutting into the joist; or point loading, in which a heavy piece of furniture or a tub causes joists to sag. If there’s infestation or rot, correct that condition first.

Sistered joists. The most common way to rein­force a weakened joist is to nail a new one to it— a “sister” of the same dimension and length. The new sister needn’t be the exact length of the origi­nal but should be long enough to be supported on both ends by the perimeter foundation or a girder. For this reason, short sections “scabbed on” don’t work and are usually prohibited by local building codes.

To insert the new joist, remove blocking or bridging between the affected joists, and bend over or snip off flooring nails protruding from the underside of the floor. Then eyeball the new sister joist and note its crown: If its arc is exces­sive, power plane it down so that you don’t bow up the floor as you drive the joist into place. Beveling the leading top edge of the joist will also make sledging into place easier. Once the new joist is in position, use bar clamps to draw it tight to the old joist; then face-nail them, staggering 16d nails every 12 in. If there’s no room to swing a hammer, use a pneumatic palm nailer to the drive nails most of the way.

Angled-end joist. Where joists will rest on a foundation mudsill at one end and hang from a girder at the other (rather than sitting atop it), angle-cut the end destined to rest on the mudsill so it will fit between the mudsill and subfloor.

Подпись: Here, new joists are sistered to both sides of existing joists, with a 3-ft. overlap. The red chalkline down the center of the joists indicates the center of a new girder to come.

Подпись: I Leveling a Ceiling with Steel Studs
image350
Подпись: Steel studs let you establish a level plane of nailers for eventual drywall. As detailed in the text, measure up from a level laser line, drive a nail at each room corner, and stretch a string perpendicular to the joists at each end of the room.

Cut the other end square to butt to the girder. Place the angle-cut end of the joist on edge over the mudsill; then lift the squared end and slide it toward the girder till it butts against it. Thus angle cut joists must be a few inches shorter than the original joist you’re sistering to.

You may need a plumbed adjustable column or a screw jack to raise the joist till it’s flush to the underside of the subflooring. Once it is flush, use a double-joist hanger to join the new joist (and its sister) to the girder. Face-nail the two joists, staggering 16d nails every 12 in. Remove jacks and replace blocking between joists. Should one flange of the double-joist hanger overlap a hanger already there, predrill the metal so that you can nail through both hangers with case – hardened hanger nails. To learn more about jack­ing safely, see Chapter 10.

Flitch plates. Steel flitch plates are sometimes used to reinforce undersize beams or joists. Because they are typically 18-in. to 12-in. thick and must be predrilled, they’re not well suited to casual installation by nonspecialists. There’s more on flitch plates on p. 53.

TREATING INSECT INFESTATIONS

If you see signs of an infestation, hire a pest- control professional to assess and remedy it. Pesticides are often toxic, and anyone unfamiliar with insect habits may not destroy all their nest­ing sites or may apply pesticides inappropriately

BOLSTERING JOISTS

LEVELING CEILINGS

The older the house, the more likely its ceiling joists are sagging. If you’re gutting the old finish ceiling, the easiest way to create a flat, level plane for the drywall that will follow is to fasten light­weight steel studs to the old joists at a uniform height below the lowest joist (see p. 168).

With the aid of a helper, stretch a taut, level stringline perpendicular to existing joists at each end of the room and position each string lower than the bottom of the lowest joist so the studs won’t deflect it as you work. Here’s how:

1. Use a self-leveling laser level to establish a level line around the room that is % in. below the lowest point of your ceiling joists.

Подпись: bracing FOR A LOAD In addition to providing something solid to nail stud wall plates to, blocking also braces a floor, distributing loads between joists so that individual joists can carry roughly 10 percent to 15 percent more than unbraced joists. If you don't need solid blocking to nail wall plates to but still want to brace joists, consider installing bridging, which is metal or 1x4 wood pieces installed diagonally between joists. Bridging is generally easier and quicker to retrofit than solid blocking and interferes less with pipes and wires running in the joist bays. Where Walls Meet

image347

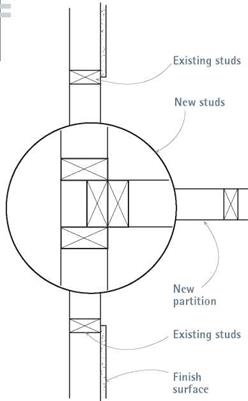
Where a new partition abuts an existing wall, cut back finish surfaces to the centers of the nearest stud on either side, and add studs to nail the partition to.

2. At this height, drive nails into the comers of the room. Stretch a taut string perpendicular to the ceiling joists at both ends of the room.

3. Line up the bottom edges of the steel studs Яв in. above these taut strings, as you and your helper screw studs to the faces of the ceiling joists. (The Иб-in. gap is necessary to avoid mov­ing the string and misaligning studs.)

4. Unless the ceiling is badly out of level (more than 1h in.), use 4-in.-wide steel studs. Lift the studs over the leveled strings, and lower each stud till its bottom edge is Ув in. above the strings.

5. Once the stud is correctly positioned, use 1-in. screws to attach it to the joist; stagger screws every 16 in. along the length of the stud. Place the screws back at least h in. from the lower edge of the joist. Use aviation snips to cut light (20-gauge to 25-gauge) steel framing.

Note: If the ceiling joists are undersize, rotted, or very springy, fix those conditions first. Screw­ing light steel to the joists won’t strengthen them appreciably.

STRAIGHTENING STUDS

Before installing drywall on recently gutted or newly erected stud walls, scrutinize them to make sure they’re flat. Stud variations of ‘/ in. (from flat) are generally acceptable, unless they’re in bathroom or kitchen walls—where studs should be within Me in. of flat. There, plumbed cabinets will make high and low spots glaringly obvious. Granted, you can scribe cabi­net backs to fit wavy walls, but it’s easier to straighten studs while they’re still exposed.

Eyeball walls for obvious discrepancies. Then stretch taut strings across the stud edges at several heights. If the studs aren’t flush to the top or sole plates, hammer them flush and screw on steel reinforcing-angles (see the photo on p. 61) to attach studs to the new position; more toenailing might split them. Next stretch a taut string, chest high, across the wall plane to find really high (protruding) and low (receding) spots. Mark them with a pencil. Finally, use a 6-ft. or 8-ft. level or straightedge to assess individual studs for bowing. Scribble symbols directly on stud edges, indicating high spots to be planed down, where studs bow toward you, and low spots to be built up, where studs bow away from you. Use special cardboard furring strips to build up the low spots.

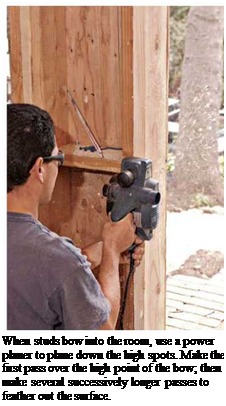
Подпись: When studs bow into the room, use a power planer to plane down the high spots. Make the first pass over the high point of the bow; then make several successively longer passes to feather out the surface. Plane down high spots. Before power planing the high spots, use a magnet to scan the old studs for nails. Nails will destroy planer blades, so if the nails are too rusty or deep to pull, use a metal-cutting blade in a reciprocating saw to shave down the stud edges—a tedious process. If studs are nail free, plane down the high spots in several passes, starting at the middle of the high spot and gradually tapering out. Because knots are hard, they’ll take more passes. Use your straightedge to check your progress, and use taut strings to check the whole wall again after build­ing up or planing down the studs. Caution: Wear eye protection when using a power planer.

Common sense and “feel” are a big part of the straightening process: If all the studs in the wall have a slight bow inward or outward, the wall won’t be flat, but drywall covering it may look flat. In that case, leave the studs as they are.

REMOVING DOORS AND TRIM

Doors, hardware, and trim (casing) make a house distinctive. Remove and store them till you are done with tearout and rough framing. Remove doors and hardware worth saving and clearly mark them “Salvage” so they don’t get tossed. Most of the time, it’s easy to pop hinge pins and lift doors out of the frame. But if that’s not possi­ble and hinge leaves are encrusted with paint, use an old screwdriver or a chisel good for little else to chip away paint from the screw heads. Or apply paint stripper.

To gently remove trim, first run a stiff putty knife between the frame and the trim to break the paint seal. Don’t use anything with a sharp blade, because a sharp blade will slice into the trim. Then gently tap a flat 8-in. prybar behind the trim, as shown in the photo below, preferably near the nails holding it down. Pry up along the entire length of the trim, raising it little by little. Be patient. As you remove trim pieces, use a per­manent marker to number the back of each so you can reinstall trim assemblies correctly.

REMOVING PLASTER AND DRYWALL

Whether you’re cutting a large hole for a skylight or gutting the whole ceiling, try to minimize the mess. Using a reciprocating saw with a demo blade to cut out 2-ft. by 2-ft. sections of drywall or plaster, you’ll create a lot less dust and have a compact load to carry to the trash. But that’s not always possible.

If the old plaster falls off the lath as you try to cut out sections, go ahead and break it out. Pull the lath and plaster down together, using a pick or crowbar, or use a hand sledge or a 2×4 to pound it down from the attic space above (place planks across the attic joists) or from the back side of the wall, if it’s exposed. After separating and bundling the lath, shovel the plaster into buckets.

Dress for the job: hard hat, goggles, dust mask, heavy gloves, long-sleeved shirt. Wear thick-soled work boots when gutting plaster:

Lath nails are ubiquitous and razor sharp, and they’ll puncture tennis shoes in a flash.

Ceilings. О If ceiling joists are exposed in the attic, first take out the insulation from the area to be removed. If it’s loose insulation, use a dustpan to shovel it into a garbage bag.

If you work on the ceiling from below, use movable scaffolding for ceilings 10 ft. or higher. Otherwise stand on 2-in.-thick planks straddling sawhorses or stepladders. If the plaster is solidly adhered to the lath, use a reciprocating saw to “outline” sections. Then rock them from side to side till the nails holding them to joists work free. Hand the removed section to a helper on the floor. Then proceed to the next plaster section.

If plaster is sound but sagging in a few spots, you may be able to reattach it with washered screws or cover it with 14-in. drywall, as described in “Attaching Top Plates,” on p. 166.

Walls. О Walls are easier to gut than ceilings because debris won’t rain on you. Start at the top of each wall and work down, periodically carting out debris before it restricts your movements. Again, use a recip­rocating saw to cut out 2-ft.-sq. sections if possible; otherwise break them out. Tile walls, you’ll need to break out. If you’ll be putting up new drywall or plaster, this is the time to pull old nails. Likewise, remove any old wires and pipes.

Подпись: A skillful integration of old and new framing: After stripping interior surfaces and removing a wall to enlarge the room, carpenters installed a new 4x4 window king post and a third top plate to raise the old wall's framing. WoterOld and new window headers line up.
image344

Before removing bearing walls, first shore up the joists or other loads they support. But if you’re removing a nonbearing partition, you can do so after stripping plaster or drywall. Cut through the middle of each stud, using a recipro­cating saw; its thin blade is less likely to bind than a circular saw’s. With studs cut, pull them away from their plates. To remove plates, pry them up with a wrecking bar (goggles and a hard hat are musts). Use a metal-cutting blade in a reciprocating saw to cut through any remaining nail shanks.

REMOVING WOOD FLOORING

If they’re solidly attached, old wood floors are generally left in place, to be refinished later or floored over. However, it’s sometimes necessary to pull up a few boards so you can install joists or blocking, run wires, or patch-repair floor sections elsewhere. Partitions installed over finish floor­ing make it difficult to pry out floorboards.

If you’ll be reinstalling the floorboards, try to pry them up in an inconspicuous spot, such as along the base of an existing wall. Remove the baseboard trim and try to insert a flat bar under the leading edge of a floorboard. You may need to destroy the first row of boards to get them out if they’re face-nailed or, at the very least, break off the tongue on tongue-and-groove flooring. Successive courses will likely be toenailed through the tongue.

If you’re gutting wall surfaces, the space between studs is a good place to fit the curved head of a wrecking bar, to pry up a first row of floorboards.

Reinforcing and Repairing the Structure

This section focuses on upgrading nonbearing structural elements: adding blocking, leveling ceil­ings, straightening stud walls, bolstering joists, and treating rotten or insect-damaged wood.

ADDING BLOCKING

In renovation, it’s common to add blocking (short pieces of wood) to bolster existing joists or studs, to give new framing something to nail to, and to provide backing for the drywall or plaster lath to come.

Attaching top plates. To attach the top plate of a new partition, first cut back finish surfaces to expose ceiling joists. Snap two parallel chalklines to indicate the width of the top plate. If joists run perpendicular to the partition, cut out a 4-in.- wide slot to receive the top plate. Remove plaster or drywall sections, relocate insulation (if any), and pull nails sticking out of the joists. Use a util­ity knife to clean up ragged edges before nailing up the top plate, using two 16d nails at each point the plate crosses a joist.

If joists run parallel to the partition, cut back finish surfaces to joist centers on either side of the proposed plate so you can add blocking.

Snap chalklines to indicate joist centers, and cut along those lines. (Set a plaster-cutting circular – saw blade to the thickness of the ceiling drywall or plaster. Wear eye protection.) Install blocking that’s the same depth as the joists, spaced 24 in. on center. Cut blocking square for a tight fit, and make sure that its lower edges are flush to the

underside of the joists. If there’s access, end-nail each block with three 12d nails, through adja­cent joists. If you toenail them, use four 8d nails on each end. A pneumatic palm nailer is ideal for driving nails in such tight spaces.

Finally, add backing for the ceiling patch to come and reattach plaster or drywall edges along joist centers, as needed. Metal drywall clips (see the photo on p. 360) are a good alter­native to blocking. Nail them to the top edge of the top plate.

Blocking for walls. (^) To effectively nail off a new wall where it abuts an existing one, first cut into the existing wall to expose the framing. Start with a small exploratory hole to determine exact­ly where the studs are. Then cut back finish sur­faces to the nearest stud center on either side.

Even if your new wall runs directly to a stud in place, add blocking for metal drywall clips to reattach drywall patches.

If, as is more likely the case, there are no studs in the spot where you need a nail off, add them, as shown in the drawing "Where Walls Meet,” at right. These nailers will be stronger if you preassemble them and then sledge them into place. Face-nail them together with 16d nails staggered every 16 in. Full-length nailers should be toenailed with three 10d or four 8d common nails top and bottom. Or prenail metal L-angles to tie nailers to plates.

Blocking for sole plates. Nail partition sole plates to the framing below, not merely to floor­ing or subflooring. If the partition runs perpendi­cular to the joists, use two 16d nails at each point the sole plate crosses a joist. (See p. 169.)

However, if the wall is parallel to the joist grid, try to locate it over an existing joist. If that’s not possible, add blocking between the joists so there’s something solid to nail the sole plate to.

If the partition is nonbearing, use blocking the same depth as the joists, spaced on edge every 24 in. on center. Cut the blocking square so that it fits snug, flush to the underside of the subfloor­ing. Use two or three 16d common nails to end – nail blocking through the joists. Blunt the nail points to prevent splits.

Note: Bearing walls should be supported by two full-length joists, on edge, running directly under the sole plate. Add blocking to adjacent joists to keep the new joists from rotating, and attach both ends with a double-joist hanger. Because doubled joists are, in effect, a girder, they may also need post support beneath; see "Beam Span Comparison,” on p. 213, which offers sizes and spans. But because local codes have the final say, consult a structural engineer in your area.