Category RENOVATION 3

RELINING A CHIMNEY

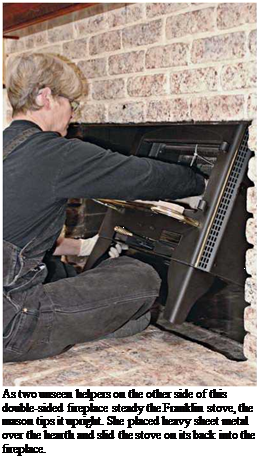
Подпись: As two unseen helpers on the other side of this double-sided fireplace steady the Franklin stove, the mason tips it upright. She placed heavy sheet metal over the hearth and slid the stove on its back into the fireplace.

image398
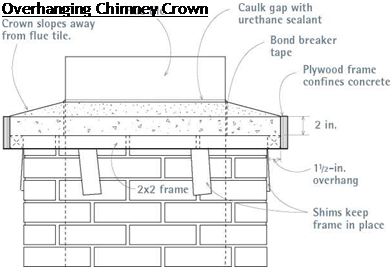
Подпись: A simple 2x2 and plywood frame creates a 11/2-in. overhang and a 2-in.-thick edge for this site-built concrete crown. To make frame disassembly easy, use drywall screws to fasten it.

While inspecting a chimney, you may find that it has no flue-tile lining or that existing tiles are cracked or broken and too inaccessible to replace. Because superheated gases can escape

through gaps, such a chimney is unsafe to use. In this case, your options are:

► Seal up the chimney so it can’t be used and add a new, properly lined chimney else­where. Or tear that chimney out and replace it.

► Install a poured masonry liner. In this procedure, a heavy-gauge tubular rubber balloon is inflated inside the chimney, and the void is then filled with a cementitious slurry. After the mixture hardens, the tube is deflated and removed. Poured masonry creates a smooth, easily cleaned lining and can stiffen an old chimney whose strength is suspect. Poured masonry systems are usually proprie­tary, however, and must be installed by some­one trained in that system. Finally, this method is expensive.

► Which brings us to stainless-steel pipe, a sensible choice if you want a solution that’s readily available, quickly installed, effective, and about one-third the price of a poured masonry liner. Interchangeable rigid and flexible pipe systems enable installations even in chimneys that aren’t straight.

Installing a stainless-steel liner. Steel flue lin­ers and woodstoves are often installed in tandem, correcting flue problems and smoky fireplaces at the same time.

Start by surveying the chimney’s condition, including its dimensions. After steel flue pipe is installed, there should be at minimum 1 in. clear­ance around it. Thus a 6-in. pipe needs a flue at least 7 in. by 7 in. Note jogs in the chimney that might require elbows or flexible sections. Also note obstructions, such as damper bars, that must be removed before you insert the pipe.

If you’re installing a woodstove, too, measure the firebox carefully to be sure the stove will fit and that there’s room for the clearances required by local code and mentioned in the stove manu­facturer’s instructions. You’ll also need room to insert the stove, with or without legs attached, and raise it up into its final position. Stoves are heavy—300 lb., on average—so give yourself room to work. Fireboxes often need to be modi­fied to make room for a fireplace insert or stove. Install the stove or fireplace insert before installing the flue liner.

Assemble the flue pipe on the ground, joining pipe sections with four stainless-steel sheet-metal screws per joint, so the sections stay together as you lower them down the chimney. Although pop rivets could theoretically join such pipe, they’d likely fail under the stress and the corrosive chemicals present in wood smoke.

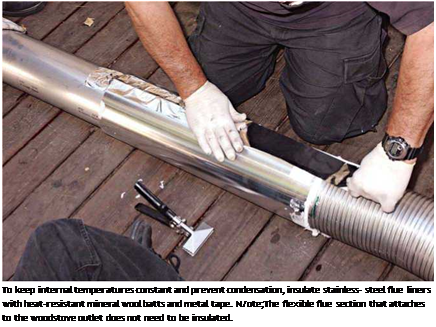
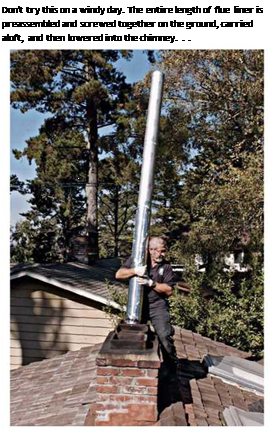
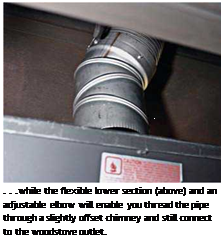
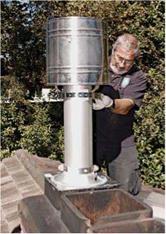
Подпись: INSTALLING AN INSULATED FLUE PIPEПодпись: To keep internal temperatures constant and prevent condensation, insulate stainless- steel flue liners with heat-resistant mineral wool batts and metal tape. N/ote;The flexible flue section that attaches to the woodstove outlet does not need to be insulated. Подпись: Don't try this on a windy day. The entire length of flue liner is preassembled and screwed together on the ground, carried aloft, and then lowered into the chimney. . . Подпись: . . .while the flexible lower section (above) and an adjustable elbow will enable you thread the pipe through a slightly offset chimney and still connect to the woodstove outlet. Подпись: To increase directional draw and prevent rain blow-in, the big monsoon cap (right) is clamped to the top of the metal flue liner. A steel top plate sealed to the top of the terra-cotta tile centers the steel flue liner in the opening and stabilizes it.image402Next insulate the flue pipe, as necessary, with heat-resistant mineral batts and metal joint tape.

Heat ratings vary. Temperatures inside flue pipes intermittently reach 2,000°F. Thus flue pipes are insulated to keep temperatures constant inside and prevent condensation, which also prevents accretion of creosote and creosote’s corrosive effects. Generally, the first pipe section coming off the woodstove is not insulated because tem­peratures are so high that there’s little danger of condensation. Toward the top of the pipe, stop the insulation just before the pipe clears the chimney—you don’t want to expose the insula­tion to the elements.

Carry the flue-pipe assembly onto the roof and lower it down the chimney. This is a two – person job, especially if it’s windy. Once the lower end of the flue pipe nears the woodstove, one team member can go below to fit the lower end over the woodstove’s outlet.

NINE Fixes FOR SMOKING FIREPLACES

► Open a window. New houses are often so tightly insulated that there’s not enough fresh air entering to replace the smoke going up the chimney. So smoke exits only sluggishly if at all. Alternatively, you can install an air-intake vent near the hearth.

► Use dry wood. Burning wet or green wood creates a steamy, smoky fire whose low heat output doesn’t create enough of an updraft and promotes creosote buildup.

► Clean chimneys at least once a year, so their flue diameters aren’t choked down with creosote. Cleaning also removes obstructions, such as nests.

► Have a properly sized flue. Flues that are too large won’t send volatiles upward

at a fast enough rate and often allow smoke to drift into living spaces. Although flue pipes are sized to match woodstove flue outlets (6 in. or 8 in.), sizing fireplace flues is trickier. In general, a fireplace flue’s cross section should be one-eighth to one-tenth the area of a fireplace opening.

► Reduce air turbulence inside the smoke chamber, above the metal damper by giving the corbeled bricks on the front face a smooth parge coat. To do this, brush, vacuum, and wet the corbeled bricks before applying a smoothening heat-resistant mortar such as Ahrens® Chamber-Tech 2000. (You’ll need to remove the damper for access.)

► Replace the chimney rain cap. Clogged or poorly designed metal or masonry caps can create air turbulence and prevent a good updraft.

► Increase the height of the chimney. A chimney should be a minimum of 3 ft. above the part of the roof it passes through and a minimum of 2 ft. above any other part

of the roof within 10 ft.

► Rebuild the firebox with Rumford proportions. Count Rumford was a contemporary of Ben Franklin and almost as clever; however, he bet on the British and left the colonies in a hurry. But not before he invented a tall, shallow firebox that doesn’t smoke and radiates considerably more heat into the living space than low, deep fireboxes. Search the Internet for companies that sell prefab Rumford-style fireplace components—or build your own.

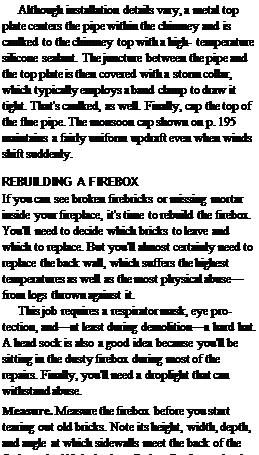
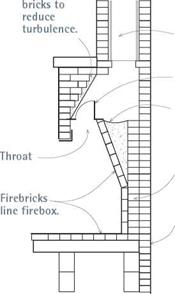
Подпись: Although installation details vary, a metal top plate centers the pipe within the chimney and is caulked to the chimney top with a high- temperature silicone sealant. The juncture between the pipe and the top plate is then covered with a storm collar, which typically employs a band clamp to draw it tight. That's caulked, as well. Finally, cap the top of the flue pipe. The monsoon cap shown on p. 195 maintains a fairly uniform updraft even when winds shift suddenly. REBUILDING A FIREBOX If you can see broken firebricks or missing mortar inside your fireplace, it's time to rebuild the firebox. You'll need to decide which bricks to leave and which to replace. But you'll almost certainly need to replace the back wall, which suffers the highest temperatures as well as the most physical abuse—from logs thrown against it. This job requires a respirator mask, eye protection, and—at least during demolition—a hard hat. A head sock is also a good idea because you'll be sitting in the dusty firebox during most of the repairs. Finally, you'll need a droplight that can withstand abuse. Measure. Measure the firebox before you start tearing out old bricks. Note its height, width, depth, and angle at which sidewalls meet the back of the firebox. And if the back wall also tilts forward, take several readings with a spirit level Подпись: Traditional Fireplace Cross Section Подпись: Parge corbeled Подпись: FlueПодпись: Hinged damper Smoke shelf (mortar) Подпись: Rubble brick and fillПодпись: Back wall of chimneyimage403Install a Franklin woodstove. Charming as they are, fireplaces are an inefficient way to heat a house. Install an efficient, glass-doored stove and you can watch the flames without getting burned by wasted energy costs.
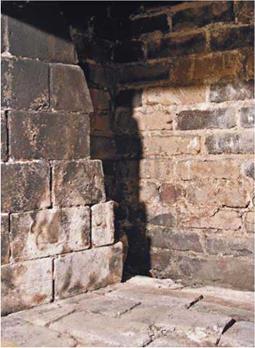
Подпись: This is a partially dismantled fireplace firebox. To the left, the firebrick sidewall is solid enough to be left in place, though its mortar joints need repointing. The back-wall firebricks have already been removed, revealing the back of the chimney. (An intervening wall of rubble bricks was also removed.)image404

RELINING A CHIMNEY

to determine how much off-plumb it is. Finally, note the height and dimensions of the chimney throat, the narrowed opening at the top of the firebox, usually covered by a metal damper. Knowing the location and dimensions of the throat is particularly helpful—it tells you the final height of the back wall of the firebox.

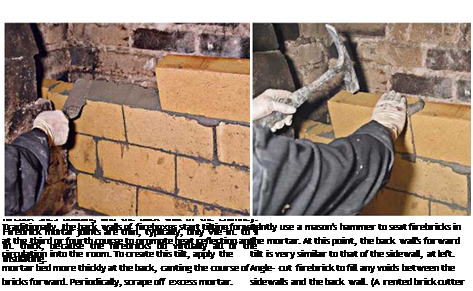
Tear out. Starting with the back wall of the firebox, use a flat bar to gently dislodge loose firebricks—most will fall out—and place them in an empty joint-compound bucket for removal. Rebuild with only new firebricks. Remove the damper, and if it’s warped, replace it. As you remove firebricks from the back wall, you may find an intermediate wall of rubble brick between the firebox and the outer wall of the chimney. And, as likely, the rubble bricks will also be loose, their mortar turned to sand. You can save, clean, and reuse these bricks when you rebuild the rubble wall.

Next remove loose or damaged firebricks from the sidewalls and floor of the firebox. But, again, if the bricks are intact, it’s a judgment call. If repointing the joints is all that’s needed, leave the bricks in place. Firebricks on the floor, which have been protected by insulating layers of ash, often need only repointing. Once you’ve removed loose bricks, sweep and vacuum the area well. (Rent a shop vacuum.) Using a spray bottle, spritz all surfaces with clean water till they’re damp.

Bricks and mortar. Firebricks (refractory bricks) are made of fire clay and can withstand tempera­tures up to 2,000°F. They’re bigger and softer than conventional facing bricks and less likely to expand and contract and hence are less likely to crack from heat. Yet, because they are soft, they can be damaged by logs thrown against

them. Firebrick walls need tight joints of he in. to ‘/ in. thick and thus require exact fits. To achieve this, rent a lever-operated brick cutter.

For firebricks, two kinds of mortar are used. Until recently, most masons just threw a few handfuls of fire clay into a conventional portland cement-based mortar, such as Quikrete® Mason Mix. (Fire clay helps resist burnout and smoothes easier.) However, adding too much fire clay makes a mix so sticky it’s difficult to scrape off your trowel. The second mortar, refractory mortar, comes premixed in cans or pails and is roughly the consistency of joint compound. With names such as Heat Stop® and Alsey Air-Set Refractory

Fireplace Mortar, these mortars can withstand high temperatures without degrading. Heat toler­ance aside, the biggest difference between the two mortar types is drying time: Refractory mortars set very quickly—in 15 seconds or 20 seconds—so there’s little time to re-adjust bricks once in place. If you’re new to bricklaying, a conventional mix will be more forgiving.

About Chimney Fires

Chimney fires occur when imperfectly burned materials in wood smoke condense and stick to the inside of a chimney. The chief culprit in chimney fires is creosote, a sticky brown or black substance that may harden to resemble fragile glass. Incomplete combustion also produces tar, ammonia, methane, carbon monoxide, toluene, phenol, benzene, and eventually, turpentine, acetone, and methyl alcohol.

Подпись: This flue tile and mortar cap were cracked by a chimney fire in a flue overdue for cleaning.Подпись: and attack mortar joints. Above all, never use chimneys whose tiles or mortar joints are cracked or chimneys that have no flue lining. If you're considering buying a house, have its chimney professionally inspected if you see signs of a chimney fire such as creosote flakes on the roof or the ground, scorched or cracked flue liners or chimney crowns, warped dampers or charred studs or joists near a chimney. Many local codes require inspections before homeowners fire up new woodburners. If the chimney isn’t cleaned for a while, creosote accumulates until it’s heated enough to combust in a flash fire, often in excess of 2,000°F. For homeowners, a chimney fire is a terrifying experience, for it may literally roar for extended periods inside the entire flue, flames shooting skyward from the chimney top as though from an inverted rocket. If there are cracks in mortar or flue tiles—or no flue tiles at all—those superheated gases can "breach the chimney" and set fire to wood framing. At that point, the whole house can go up in smoke.
Fortunately, you can prevent chimney fires, simply by inspecting and cleaning the chimney regularly. In general, don’t burn green (unseasoned) or wet wood. Give a fire enough air to burn completely. Each time you start a fire, open the dampers and air controls until the fire is burning well. Don’t burn Christmas trees (whose unburned resins collect as sticky masses inside flues), wrapping paper, or glossy-coated papers because their emissions can corrode stovepipes

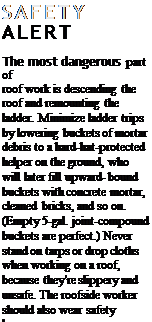
Подпись: SAFETY ALERT The most dangerous part of roof work is descending the roof and remounting the ladder. Minimize ladder trips by lowering buckets of mortar debris to a hard-hat-protected helper on the ground, who will later fill upward- bound buckets with concrete mortar, cleaned bricks, and so on. (Empty 5-gal. joint-compound buckets are perfect.) Never stand on tarps or drop cloths when working on a roof, because they're slippery and unsafe. The roofside worker should also wear safety harnesses. Подпись: Illlll

After you’ve brushed the flues well, allow the dust and debris to settle before removing the plas­tic covering the fireplace and other openings. Shovel up the soot and debris at the bottom of each flue and from the fireplace; then vacuum all areas thoroughly. Don’t forget the soot that may be resting in thimbles or on the fireplace smoke shelf.

REPLACING A CHIMNEY CROWN

A masonry crown is a beveled flue collar at the top of the chimney, sloping gently to direct water away from flue tiles. When crowns weather and crack, water can drain between flue tiles and brick, seep into mortar joints, and freeze, thereby cracking flue tiles, bricks, and mortar joints. In warmer seasons, this water can leak into living spaces, stain walls, and linger as acrid combus­tion smells. Replacing the crown is easy enough if the chimney is not too tall—and the roof not too high or too steeply sloped. Otherwise, you’ll need rooftop scaffolding—which a pro should install—before tearing down the chimney to sound masonry and rebuilding from there.

Note: In warmer regions, uncovered flues and crowns are common. However, for winters in cold climates, flues should be capped to prevent the entry of rain and sleet that can damage flues during freeze-thaw cycles.

In most cases, a few hammer blows will dis­lodge old mortar crowns. Put the debris into a bucket. Then sweep the top of the chimney clean. If some mortar joints need repointing, attend to that. If many mortar joints are soft and badly eroded, tear down the chimney to the roofline, clean the bricks, install new flashing, and rebuild it. If bricks are cracked or broken, replace them with new SW grade bricks. It’s okay to reuse old bricks if they’re solid, but if you must replace more than a handful, rebuild the chimney with new bricks. They’ll look more uniform and last longer.

Installing a new crown. Spread sheet plastic around the base of the chimney to catch falling mortar. There are essentially two types of crowns. If your region gets a lot of precipitation, pour an in-place concrete crown, which overhangs the chimney 1 in. to 112 in. and acts as a drip cap, keeping rain and sleet off bricks near the top. Otherwise, use a trowel to build a sloping mortar crown that runs flush to the chimney faces. A flush crown isn’t as durable as an overhanging crown but is much quicker to build.

To construct an overhanging crown, as shown on p. 194, measure the outside dimension of the chimney top and build a frame from 2x2s that slides snugly over the chimney top. Shim from

below to wedge the frame in place so its upper face is flush to the top of the chimney. This 2×2 frame (actual dimension, 12 in. x 1 f2 in.) creates a 1h-in. overhang. Next, cut strips of plywood 3h in. wide and as long as the sides of the frame; using a cordless screwdriver, screw these strips to the frame so that they stick up 2 in. above the top of the frame. The resultant plywood frame keeps the concrete in place and creates a 2-in.-thick edge.

Wet the bricks with a brush or a spray bottle, and you’re ready for the concrete. Use a cement – rich, fairly stiff concrete mix: 1 part portland cement, 2 parts sand, and 2 parts %-in. gravel is about right. To prevent cracks, mix in a handful (!4 cup) of fiberglass fibers, which concrete sup­pliers carry. As you place the concrete into the plywood frame, use a trowel to force it into the corners and to drive out air pockets.

Important: Whether you build a mortar crown or pour a concrete one, wrap the flue liners with polyethylene bond-breaker tape or closed-cell foam strips. This prevents the mortar and con­crete from bonding to the tile liners and thereby provides an expansion joint. Without this gap, heat-expanded flue tiles can crack a new crown in a single heating season.

If you’re building up a mortar crown, use a premixed mortar mix. For a slightly more flexi­ble, crack-resistant crown, substitute a liquid latex fortifier for part of the water.

Both types of crowns should be sloped away from the flue liners and troweled to a smooth fin­ish; and both will cure slower and stronger if you cover them with a damp burlap sack or plastic to protect them from rain and sun. Caulk the gap between the flue liners and the crown with a good urethane sealant.

Chimney caps should match the style of the house: chimneys on colonials and capes are often covered with slabs of bluestone bedded into corner tiers of mortared brick. Whereas, for newer homes or those with stainless-steel liners a stainless-steel or copper cap may be more appropriate. If there are multiple flue liners, you may need multiple caps or an over­all custom cap.

Chimneys

Masonry chimneys are freestanding units that carry exhaust gases out of the house. To prevent superheated gases from escaping, chimneys should be tile lined and free from cracks or gaps, or they should have insulated stainless-steel flues. Annual inspections and maintenance are crucial to chimney health: If you discover mortar or flue tiles that are cracked or missing, the chimney is unsafe. Chimney flashing and roof safety are fur­ther discussed in Chapter 5.

These days, new and retrofit chimneys are often nonmasonry. There are several reasons for this transition: building code and insurance require­ments; a shrinking pool of qualified masons; the inherent inflexibility and tendency of masonry to crack and compromise safety when structurally stressed; and, perhaps most important, a host of safe, cost-effective, and easily installed insulated metal chimneys now available. That noted, the review here is limited to masonry chimneys.

CLEANING A CHIMNEY

Chimneys and their flues should be inspected at least once a year and cleaned as needed—ideally, before the heating season. Better chimney-cleaning services will get up on the roof, inspect the chimney top, and in some cases lower a videocamera into the flue linings. That video is very helpful if the chimney needs relining because homeowners can see the damage for themselves and make an informed decision.

Because chimney cleaning takes serious elbow grease, working atop the roof is often the most effective way to brush clean a chimney. But working on a roof is inherently dangerous to you and your roof shingles, which can be easily abraded, torn, and dislodged, leading to leaks. Moreover, because many people put off cleaning a chimney till it’s almost heating season, they fre­quently go aloft when the weather is inclement or the roofs are slick after a rain. For all these rea­sons, you’re probably better off hiring an insured professional, certified for cleaning and inspecting.

However, if you are determined to clean the flues yourself, first turn off the furnace and other appliances (such as water heaters) that vent to the flues and disconnect their vent pipes. Using duct tape, tape plastic over the thimbles that open into living spaces, to prevent dislodged soot from entering. If you have a fireplace, open its damper to allow dislodged soot to fall into the fire pit. Then firmly tape sheet plastic around the fireplace opening. But before you start, suit up. Dislodged creosote and soot are highly carcino­genic, so wear a respirator mask with replaceable cartridges, tight-fitting goggles, gloves, and dis­posable coveralls.

To clean a chimney thoroughly, you’ll need special brushes, which scrub flue surfaces without damaging them. Today, many professional sweeps favor polypropylene brushes to clean sooty flues and stiff steel-wire brushes for flues with heavy use and creosote buildup. These brushes come in various sizes to match the most common flue cross sections. You can screw them onto a series of 3-ft. to 4-ft. rod sections or to a continuous flexible rod (on a reel) up to 50 ft. long.

CLEANING AND SEALING EXTERIORS

Use the gentlest, least damaging cleaning agents, chemicals, steam cleaner, or water pressure that works. Determine this by testing on an inconspic­uous area. If the gentlest method doesn’t work, move to the next stronger. If mortar joints are eroded, a pressure washer may make them leak. After cleaning, allow the brickwork to dry for two days or three days; then caulk gaps around doors and windows and replace worn flashing. Safety note: Whatever cleaning method you choose, wear a face shield, rubber gloves, protective clothing, and a respirator mask before you begin.

Cleaning brick surfaces. Get bids on hiring an authorized cleaning service. Because cleaning solvents can be hazardous and must be disposed of according to EPA and local environmental standards, hiring professionals will spare you those headaches. Moreover, the service will be responsible for achieving the desired results, however long it takes. If you’ve got a tight budget or an adventurous spirit, consider the DIY options described next; they’re listed more or less in order of gentleness. Wear safety glasses and rubber gloves for all procedures, and read operat­ing manuals carefully before using pressure washers, steam cleaners, and the like.

Use a garden hose to soak the surface, and then scrub with a nylon scrub brush. The warmer the water and the longer the soak, the more dirt you’ll remove.

If the hose wash isn’t sufficient, try a pressure washer on a low setting. Increase the pressure slightly—say, to 300 psi to 400 psi—and you’ll remove yet more. Note: If you see sand in the runoff water, lower the machine’s pressure set­tings immediately. Otherwise, you may be strip­ping the mortar joints. Likewise, monitor the inside of the building, especially around win­dows, for leaks; it’s easier to lower the pressure than to replace drywall.

Strippin

Steam cleaning is especially effective if sur­faces are mossy, or have ivy “trails” or built-up grime. Although somewhat slower than pressure washing, steam doesn’t generate the volume of runoff and won’t penetrate as deeply into brick surfaces or cracks.

If you’re in an urban area where soot and auto exhaust have soiled the building, try a nonionic detergent with a medium pressure (1,000 psi) next. Nonionic detergents such as GAF’s Igepal®, Union Carbide’s Tergitol®, and Rohm & Haas’ Triton® won’t leave visible residues, as household detergents and TSP (trisodium phosphate) will. Again, scrub with a synthetic-bristle brush, and rinse well.

If these methods don’t produce the results you want, proprietary chemical cleaners are the next step. They usually involve a three-step process— wetting surfaces, applying the cleaner and scrub­bing it in, and then rinsing—repeated as many times as needed. If you apply the cleaner, follow manufacturer’s instructions to the letter. Instructions will be quite specific about safety garb, dilution rates, dwell times (how long the chemical remains on), washer settings, tempera­ture ranges (most don’t work well below 50°F.), and so on. Before committing to a cleaning sys­tem, visit the manufacturer’s Web site and call its tech-support number.

Sealing exteriors. Are water-repellent or water­proof coatings necessary on exterior masonry walls above grade? Mostly, no. There may be a few 200-year-old buildings in every city whose porous brick would benefit from being coated, but most masonry exteriors won’t admit water if rain is directed away from the structure by gut­ters, downspouts, and other standard drainage details and if the masonry is properly flashed, caulked, and detailed.

Подпись: О PAINTED BRICKПодпись: If you intend to repoint a painted brick wall, strip the paint first—no small job. For this, rent a pressure washer: Have the rental company recommend a tip size and pressure—1,800 psi to 2,500 psi is common for stripping—and show you how to use the machine safely. Buy heavy-duty tarps, too. Caveat: Removing paint by any method makes a prodigious mess. At the job site, test the washer on an out-of-the-way area first. If the stripped brick doesn't look so great, rethink stripping it. The brick may have been painted in an attempt to protect crumbling mortar joints and eroding brick from further weathering. Finally, never sandblast old brick: Sandblasting equipment will destroy brick in a flash, and it's dangerous to use. Подпись: PRO"ГIP In spite of recommendations you may get from store clerks or old-time masons, don't use muriatic acid to clean masonry surfaces. Its fumes are noxious. It can burn your skin or, if you get it in your eyes, blind you. It also etches the surface of stone, brick, and mortar joints and so weakens their ability to shed water. And it stains. Подпись: 1111First of all, so-called exterior sealants, loosely divided into water-repellent and waterproofing

Подпись: TIPПодпись:Подпись: A professional chimney sweep needs a variety of brushes. The reel at the right contains a 50-ft. flexible rod that can push and pull brushes. coatings, don’t fully seal masonry surfaces, nor would you want them to. A perfect seal could trap water inside the walls. Moreover, masonry walls with water trapped inside and walls that are wicking moisture from the ground will, in time, exude soluble salts in the masonry as pow­dery white substances called efflorescence.

Water-repellent coatings, which are usually clear, penetrate masonry pores and so keep rain from penetrating to a large degree, while allowing water vapor from living areas to escape through the wall. Most water-repellent compounds are water-based, formulated from silanes, siloxanes, and silane/siloxane blends. Both premixed and concentrated coatings are available—typically applied in several coats. Some water-repellent coatings double as graffiti barriers, though they tend to be shiny.

Waterproof coatings come closer to being true sealers because they’re usually pigmented or opaque and form a thin elastomeric (flexible) film. Chemically, they run the gamut from water based to bituminous. Bituminous varieties are widely applied below grade on building founda­tions and, to a lesser extent, to interior basement walls where mild leaks have occurred.

REPOINTING MORTAR JOINTS

Even materials as durable as brick and mortar break down in time, most commonly near the top of a wall or chimney, where masonry is most exposed to the elements. Often, the struc­ture wasn’t capped or flashed properly. If the bricks are loose, remove them till you reach bricks that are solidly attached. If joints are weathered but bricks remain firmly attached, repoint (or tuck-point) the joints by partially cutting back the mortar, adding new mortar, and shaping the joints. If the brick is painted, see "Stripping Painted Brick,” on p. 191.

Finally, if vertical or diagonal cracks run through several courses, there may be under­lying structural problems, which must be corrected before repointing. In this case, consult a structural engineer.

Raking old mortar. For best results, rake out (scrape out) mortar joints in an inconspicuous area as a test, starting with the least destructive tool. If the mortar is soft enough, an old screw­driver may be all you need. But if the mortar is as hard as the brick, you’ll need to be patient. Cut

FOR RAKING MORTAR

Before you can repoint joints, you must rake (cut back) old mortar, preferably without damaging surrounding brick. You’ve got several options:

► TUCK-POINTING (PLUGGING) CHISELS are usually thinner than mortar joints. Used with a 2-lb. hand sledge, they’re slow but exact.

► ANGLE GRINDERS with an abrasive wheel cut quickly into old mortar, but they can easily damage soft brick and leave a ragged line.

► PNEUMATIC AIR CHISELS represent a good balance of speed and control, but you’ll need to special-order mortar-removal bits. Trow & Holden (Barre, VT) offers a set that includes Vin. and V4-in. cape chisels, a V4-in. swept cape chisel, and a 4-tooth ripper. Wear safety glasses and a respirator mask when cutting mortar.

Подпись: Use a tuck-pointing (or plugging) chisel to cut back eroded mortar before repointing joints. The tool's narrow blade fits easily into joints and so is unlikely to damage brick faces. Подпись: PROnP Though it may seem counterintuitive, start washing brick walls at the bottom and work up, keeping the whole wall wet as you progress. If the entire wall is wet, dirty water and diluted cleaners running down won't streak the cleaned sections, but dirty water and chemicals running over unwetted dirty sections will leave marks. Подпись: lllljoints 1 in. deep, and try to cut a square trough (not a V-groove) in the old mortar.

Once you’ve raked the joints to the correct depth, brush them out well, using a whisk broom or a wallpaperer’s brush, which you can also use to wet down the joints before adding fresh mortar. Remove debris with an air hose or a heavy-duty vacuum. Of course, wear safety glasses and a respirator mask for this work.

The mortar mix. Try to match the old mortar mix when repointing an older brick building. Before portland cement was widely used, mortar joints were usually a resilient mix of hydrated lime and sand, which compressed slightly as the bricks expanded during summer and expanded slightly as the bricks contracted during cool weather. Soft, lime-rich mortars also show auto­genous healing, an ability to self-repair hairline cracks caused by seasonal temperature shifts. Mortar joints with portland cement, on the other hand, are relatively hard and inflexible: As old bricks heat up, they have no room to expand, so they crack and spall (flake).

Although mortar analysis is the best way to match old mixes—historic preservation agencies can suggest mortar analysts—type О mortar (described earlier in this chapter) should be a close match for most old mortars. For this, mix 1 part portland cement, 2 parts hydrated lime, and 8 parts fine sand. The mix should be fairly stiff as mortar mixes go, keeping its shape when squeezed into a ball. If the mix becomes too stiff to work, periodically sprinkle on and stir in small amounts of water.

If you’re repointing only a section of a struc­ture, however, and don’t want it to stick out like a sore thumb, experiment with combinations of mortar dye, cement, sand, and lime, carefully labeling the proportions of each batch and allow­ing it dry for a month before committing to a recipe. Masonry supply houses stock such mate­rials; they also carry new bricks manufactured to look old, should you need to replace bricks as well.

Repointing technique. Using a spray bottle or a brush, dampen the newly cleaned-out joints before applying fresh mortar. There are two ways to fill joints with new mortar. If you’re repointing a relatively small area, use a brick­layer’s trowel as a palette for the mortar and a tuck-pointing trowel to push the mortar into the joint. (See the photo on p. 198.) Press the mor­tar firmly, so that it will stick.

Подпись: WORKING MORTAR INTO JOINTSПодпись: Option 1: Let your bricklayer's trowel serve as a palette as you scoop mortar from it with your smaller pointing trowel and press mortar into joints. Two trowels are useful when repointing old joints. Подпись: Option 2: Or you can use a grout bag if you've got a lot of joints to fill. But this is hard work: The bag is heavy, and you need to twist hard to force the mortar out a small opening—a bit like wringing water from a stone. Подпись: Here a bullhorn jointer compresses mortar joints. If you’re repointing a large area, use a grout bag to squeeze the mortar into the joint. A grout bag looks like the pastry bag used to dispense fancy icing onto cakes. You force the mortar out by twisting the canvas bag. But you’ll need strong

hands and forearms to twist the filled 5-lb. to 10-lb. bag. And you may need to thin the mix slightly so it will flow easily through the bag.

After using a grout bag, you’ll still need to tuck- point the mortar joints.

When the mortar has dried enough to retain the imprint of your thumb, tool the joints. In most cases, use a jointer that creates mortar joints the same shape as the old ones. Point the head joints first, then the bed joints. As you work, use a trowel to clean the mortar from the brick faces, but don’t disturb the mortar joints. Then wait 2 hours or 3 hours before using a stiff plastic-bristle brush to remove the mortar still stuck to the brick faces.

Mortar Types (ASTM C 270-68)*,t

Подпись: TYPE PORTLAND CEMENT MASONRY CEMENT HYDRATED LIME or LIME PUTTY AGGREGATE* M 1 1 — Not Less than 21/ 1 — fir and not more than three times the sum S 1/2 1 — of the combined 1 — >/4-2 volumes of Lime and cement used N — 1 — 1 — >1/2-11/4 O — 1 — 1 — >11/4-21/2 K 1 — >21/2-4 Подпись: Adapted from the publications of the American Society for Testing and Materials, as are the compression figures given in the text. t Parts by volume. t Measured in a damp, loose condition. TWO WAYS TO CUT BRICK

image381

Using a mason’s hammer, score all the way around the brick, then strike the scored lines sharply.

Such cuts will be more accurate if you place the bricks on a bed of sand.

Подпись: Using a brick-cutting tool, slice small amounts of a brick to ensure a close fit. This tool is safer and quieter than using a diamond blade in a power saw.

Mortar will remain usable for about 2 hours, so mix only about two buckets at a time. If the batch seems to be drying out, “temper” it by sprinkling a little water on the batch and turning it over a few times with a trowel. As you seat each course of bricks in mortar, use the trowel to gen­tly scrape excess mortar from joints and throw it back into the pan or onto the mortarboard. Periodically turn that mortar back into the batch so it doesn’t dry out. Don’t reuse mortar that drops on the ground.

Trowel techniques. Hold a trowel with your thumb on top of the handle—not on the shank or the blade. This position keeps your thumb out of the mortar, while giving you control. Wrap your other fingers around the handle in a relaxed manner.

There are two basic ways to load a trowel with mortar. The first is to make two passes: Imagine that your mortar pan is the face of a clock. With the right-hand edge of the trowel raised slightly, take a pass through the mortar from 6:30 to 12:00. Make the second pass with the left-hand side of the blade tipped up slightly, traveling from 5:30 to 12:00. According to master mason and author Dick Kreh, a trowelful of mortar should

I Throwing Mortar

image383

As you turn the trowel to unload the mortar, pull it toward you quickly, thus stringing the mortar in a line.

resemble "a long church steeple, not a wide wedge of pie.”

The second method is to hold the trowel blade at an angle of about 80° to the mortarboard. Separate a portion of mortar from the main pile and, with the underside of the trowel blade, com­press the portion slightly, making a long, tapered shape. To lift the mortar from the board, put the trowel (blade face up) next to the mortar, with the blade edge farthest away slightly off the board. With a quick twist of the wrist, scoop up the mortar. This motion is a bit tricky: If the mor­tar is too wet, it will slide off.

To unload the mortar, twist your wrist 90° as you pull the trowel toward you. This motion spreads, or strings, the mortar in a straight line.

It is a quick motion, at once dumping and string­ing out the mortar, and it takes practice to mas­ter. If you are laying brick, practice throwing mortar along the face of a 2×4, which is about the same width as a wythe of brick. Each brick course gets a bed of mortar as wide as the wythe.

After you’ve strung out the mortar, furrow it lightly with the point of the trowel to spread the mortar evenly. Trim off the excess mortar that hangs outside the wythe, and begin laying brick.

Laying brick. If the first course is at floor level (rather than midway up a wall), snap a chalkline to establish a baseline. Otherwise, align new bricks to existing courses.

Throw and furrow a bed of mortar long enough to seat two or three bricks. If you’re fill­ing in an opening, "butter” the end of the first brick, to create a head joint, as shown in the bot­tom left photo at right. Press the brick into posi­tion and trim away excess mortar that squeezes out. Both bed and head joints are ’/2 in. to 58 in. thick until the brick is pressed into place, with a goal of compressing the joint to about 58 in. thick.

Use both hands as you work: One hand maneuvers the bricks, while the other works the trowel, scooping and applying mortar and tap­ping bricks in place with the trowel handle. If you use a stringline to align bricks, get your thumb out of the way of the string just as you put the brick into the mortar bed. As you place a brick next to one already in place, let your hand rest on both bricks; this gives you a quick indica­tion of level.

When you have laid about six bricks in a course, check for level. Leaving the level atop the course, use the edge of the trowel blade to tap high bricks down—tap the bricks, not the level. Tap as near the center of the bricks as the level will allow. If a brick is too low because you have scrimped on mortar, it’s best to remove it and reapply the mortar.

Next plumb the bricks, holding the level lightly against the bricks’ edges. Using the handle of the trowel, tap bricks till their edges are plumb. (Hold the level lightly against the brick, but avoid push­ing the level against the face of the brick.) Finally, use the trowel handle to tap bricks forward or back so that they align with a mason’s line or a level held lightly across the face of the structure

The last brick in a course is called the closure brick. Butter both ends of that brick liberally and slide it in place. The bed of mortar should also be generous. As you tap the brick into place with the trowel handle, scrape excess mortar off, ensuring a tight fit. If you scrimp on the mortar, you may need to pull the brick out and remortar it, per­haps disturbing bricks nearby.

Striking joints. Striking the mortar joints, also called tooling the joints, compresses and shapes the mortar. Typically, a mason will strike joints every two or three courses, before the mortar dries too much. To test the mortar’s readiness for striking, press your finger into it. If the indenta­tion stays, it’s ready to strike. If the mortar’s not reading for striking, wet mortar will cling to your finger and won’t stay indented.

Use a jointer to strike joints. First strike the head joints and then the bed joints. The shape of the joint determines how well it sheds water. As suggested in "Mortar Joints,” joints that shed water best include concave (the most common), V-shaped, and weathered joints. Flush joints are only fair at shedding water. Struck, raked, and extruded joints shed poorly because they have shelves on which water collects.

image386

Experienced masons lay up bricks from the corners in, moving string guides up as they complete each course.


image387

Before the mortar is compressed, it is ’/> in. to 5/8 in. thick, as shown. Press the brick into the mortar to create a good bond, compressing the mortar to 3/8 in. thick.


image384

Flush


ill

"V"


image385

Raked and tooled


C

Extruded


7

Struck


image388

Weathered


After using a bricklayer’s trowel to throw and furrow a mortar bed, butter one end of the brick to create a head joint.


After using the end of the trowel handle to tap the brick down, trim off the excess mortar.


Concave


image389

Mortar Types (ASTM C 270-68)*,t

Подпись: After the mortar joints have set enough to retain a thumbprint, strike (tool) them to compress the mortar and improve weatherability. Strike the head joints, as shown, before striking the bed joints. (This tool is a convex jointer.)

Mortar Types

Mortar is usually classified according to its strength and weatherability: The table at right describes the correct proportions of ingredients for each.

► Type M has the highest compressive strength, at least 2,500 pounds per square inch (psi). This durable mix is recommended for load-bearing walls, masonry below grade, and masonry that is not reinforced with steel.

► Type S has a relatively high compressive strength (1,800 psi) and the best tensile strength of any mortar listed here; so it best resists wind and soil movement.

► Type N offers medium compressive strength (800 psi) and is suitable for all above-grade uses, including those subject to heavy weathering, such as chimney mortar.

► Type O has a low compressive strength (325 psi) and is limited to non-load-bearing, interior uses. However, it is sometimes specified for repointing chimneys with soft, old brick that would be destroyed by stronger mortar (see "The mortar mix," on p. 190, for more information).

► Type K is an extremely low strength (100 psi) mortar and is not recommended.

Of the mortar types listed here, type N is the most versatile. A simplified version of its pro­portions is 1 part portland cement, 1 part lime, and 6 parts sand (or 1 part masonry cement and 3 parts sand). Before portland cement became widely used in the nineteenth century, mortar was usually a mixture of lime and sand (animal hair was often added to reduce cracking). If brickwork 100 years old or older needs repoint­ing, use type O so it won’t destroy the brick (roughly, 1 part portland cement, 2 parts lime, and 4 parts fine sand).

Dry mixing. When mixing mortar, mix the ingre­dients dry first to ensure a uniform mixture. That done, create a pocket in the middle, and add water gradually. As you add water, be fastidious about turning out the material in the corner of the mixing pan, so that there will be no dry spots. Mortar should be moist, yet stiff. A batch that’s too wet will produce a weak bond. Once the mix is nearly right, its texture will change radically if you add even a small amount of water.

Working with Brick

Common brick-related repairs include repoint­ing mortar joints, repairing chimney tops, rebuilding chimneys and fireboxes, and cleaning bricks. You may also have to repair or add flash­ing where the chimney meets the roof, as shown in Chapter 5. Less common repairs include filling openings after the removal of doors or windows. If you want to create an opening to a brick wall, leave that to a structural engineer and a licensed and insured mason.

To conserve resources and get the best­looking results, respect existing masonry. Match existing bricks and mortar as closely as possible, including the thickness of mortar joints.

When repointing brick, choose a mortar of appropriate strength.

TYPES AND TERMS

Of the many types of brick available, renovation calls mainly for building brick, also called com­mon brick. Building brick is classified according to its weathering grade: SW (severe weathering), MW (moderate weathering), and NW (nonweath­ering). SW grade should be used where brick­work will be below grade—that is, in contact with the soil and hence subject to freezing in cold climates. Use SW on all floors, whether indoor or outdoor. MW grade is used indoors or on exteriors above grade. NW is used only indoors, though not as flooring.

Standard-size brick is nominally 8 in. by 4 in. by 233 in.; but it is actually 7% in. by 358 in. by 2!4 in., to accommodate mortar joints 3з8 in. thick. Thus three courses of brick (and mortar) will be 8 in. high.

Brick is also named according to its position­ing, whether it is laid on its face, end, or side. Stretcher and header are the most common place­ments, with rowlock patterns often being used to finish courses beneath windowsills or to cap the tops of walls where coping isn’t used.

In masonry work, the word bond has several different meanings. Mortar bond denotes the adhesion of brick (or block) to mortar. Structural bond refers to the joining or interlocking of indi­vidual units to form a structural whole. If there are two wythes (pronounced w-EYE-ths) of brick
(a double wall), the wythes may be bonded struc­turally by steel ties, or by header bricks mortared into both wythes, or by grout poured into the cavity between the two wythes. Finally, pattern bond indicates brick placement, as shown in "Bond Patterns,” on p. 186.

If you’re laying up a typical brick pattern— say, running bond—you will need about 63з4 bricks per square foot of wall; figure 7 bricks per square

I Bricklaying Terms_______

Подпись: TIPПодпись: To determine how clean aggregate is, put about 2 in. in a quart jar and nearly fill the jar with clean water. Shake the jar. If there's a layer of silt V8 in. or more floating on the water, wash the entire load of aggre-gate carefully or get a new load. Because seashore sand is coated with salt and its particles have been ground smooth by water action, never use it as an aggregate. 1111 Подпись: I Brick Names Based on Positioningimage377"Two wythes

image378

image379

Подпись:Подпись: RunningПодпись: Roman thirdПодпись:Подпись: Flemish Подпись: Running, common, Roman third, Flemish, and Dutch cross-bond are stronger because their head joints are staggered.foot in order to have enough extra for waste. As you handle bricks, inspect each for soundness. All should be free of crumbling and structurally significant cracks. When struck with a trowel, bricks should ring sharp and true.
BASIC BRICKWORKING TECHNIQUES

You should wet bricks before using them so they won’t absorb moisture from the mortar mix. Hose down the brick pile once a day (more often in hot, dry weather), but don’t overdo it. If the bricks become too wet, they will slide around on the mortar bed.

Cutting bricks. Wear goggles when cutting bricks. If you’re cutting across brick faces, rent a brick cutter, a levered tool that cuts easily. Otherwise, cut bricks by hand.

An experienced mason can score and cut bricks with only a trowel, but you’ll probably find that a brick set works better. Placing the

1 г

^l

II 1

□□□□□□□□

1 г

ІГ

II 1

II

II

II II

1 II

II

II 1

_ll___

Jl___

Jl____ II

Common

1 ІГ

ІГ

II 1

1 II

II

II 1

1 II

II

II 1

1 II

II

II 1

1 II

II

II 1

1____ IL

___ IL

___ II___ 1

Stretcher

1 ІГ

^L

II 1

1 ІГ

^L

II 1

□□□□□□□

1 ІГ

^L

II 1

Dutch cross-bond

□□□□□□□□ □□□□□□□□ □□□□□□□□ □□□□□□□□ □□□□□□□□ □□□□□□□□ Stacked header

brick on a bed of sand makes the brick less likely to jump when you strike the brick set. After marking the cut-line on the face of the brick, hold the brick set perpendicular to the brick and strike it with a 4-lb. hand sledge. Because the edge of the brick set is beveled on one side, keep the bevel on the waste side of the line. You can also use a mason’s hammer as shown in the top photo at right, controlling the cut by using the hammer point to score entire­ly around the brick. Then rap the scored line sharply to break the brick.

BASIC MASONRY TOOLS

Most of the tools listed in this section are hand tools. Chapter 3 describes impact drills, rotary hammers, and other useful power tools. Important: Wear goggles and a respirator mask when striking, grinding, or cutting masonry. Errant chunks of masonry can blind you, and masonry dust is not stuff you want to breathe.

Trowels are indispensable masonry tools. If you have no other tool, a trowel can cut brick, scoop and throw mortar, tap masonry units into place,

THE Point OF IT ALL

When you see the term pointing in masonry texts, someone is doing something to mortar joints—usually shaping or compressing them so they weather better. Repointing or tuck-pointing refers to adding (and shaping) new mortar after old, weak mortar has been partially removed from a joint, usually with a tuck-pointing chisel or a tuck-pointer’s grinder

Подпись:Подпись: 1111Подпись:Mason’s hammers score and cut brick with the sharp end and strike hand chisels with the other. The blunt end is also used to tap brick down into mortar.

Brick sets have a cutting edge beveled on one side, so you can cut bricks precisely or dislodge deteri­orated brick without damaging surrounding ones.

Brick cutters are rentable levered tools that pre­cisely cut or “shave” brick, as you often must do when fitting firebricks to fill gaps in a firebox.

Line blocks (or pins) secure a long, taut line to align masonry courses. They’re less important in renovation masonry, where you’re often filling in between existing courses or laying short runs, such as the sides of a chimney.

Mason’s levels are indispensable for leveling courses and assessing plumb. Generally 4 ft. to 6 ft. long, better quality levels have an all-metal casing and replaceable vials. During work, be sure to wipe wet concrete or mortar off a level before it hardens and affects the readings.

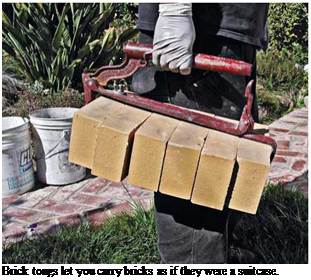
Brick tongs enable you to carry up to 10 bricks comfortably, as if they were in a suitcase.

Concrete tools include floats (used to level concrete), finish­ing trowels (for smoothing sur­faces), and edgers (short tools that contour edges). You’ll also need a strike-off board (usually a straight 2×4) for leveling freshly poured pads. Action photos of these tools appear in Chapter 10.

Miscellaneous tools include goggles, knee pads, rubber gloves, rubber boots (concrete work), a flat bar, and a home­made mortarboard (a platform that holds mortar near the work) made from scrap ply­wood. You’ll also need sheet plastic to cover sand or cement, a concrete mixer or a mortar pan, a wheelbarrow, square-nose shovels, buckets, a garden hose, stiff-bristle brushes, and so on.

PREP TIPS

The following tips will help your job go smoothly.

Code. Check local building codes and get neces­sary permits.

Water. Protect materials from rain as soon as possible. Because water causes cement to set, sacks of portland or mortar cement left on the ground—or on a seemingly dry concrete floor— will harden and become useless. If outdoors, ele­
vate sacks on a pallet or scrap lumber and cover the pile with sheet plastic, weighting down the edges with rocks.

Although bricks should be wetted before being laid, don’t leave them uncovered in a down­pour. They will absorb too much water, which can dilute the concrete and weaken the bond. (Concrete blocks, on the other hand, should be laid dry. Don’t wet them beforehand.)

Sand and gravel are little affected by water, but if they absorb a lot of water, you’ll need to reduce the amount of water you must add to a mortar or concrete mix. Damp sand won’t ball up when you squeeze a fistful; it contains about 1 qt. of water per cubic foot. Wet sand will ball up and will contain about 2 qt. of water per cubic foot. Dripping wet sand oozes water when you squeeze it and will contain about 3 qt. of water per cubic foot. Of greater concern is the purity of these aggregates: Unload them onto an old sheet of ply­wood or a heavy (6-mil) plastic tarp to keep them from being contaminated with soil or other organic matter.

Weight. Masonry materials are heavy. To save labor, have materials delivered close to the work site. Likewise, have a mortarboard within 3 ft. of your work area and about waist high so you don’t need to bend over to scoop mortar. For this rea­son, scaffolding is a sensible investment if you will be working higher than shoulder height. If you’re not strong or in good shape, divide materials into loads you can handle without straining, and use ramps and wheelbarrows when possible. As you lift, get close to the object and lift with your knees, not your back.

Game plan. Before mixing mortar, complete preparatory work, such as chiseling out old joints, removing old brick, and brushing dust off receiving surfaces.

Curing. Give masonry time to cure. Because freezing compromises strength, plan your work so the mortar joints or new concrete will set before temperatures drop that low. Admixtures can extend the temperature range in which you can work, but exterior masonry work is easiest when the 24-hour temperature range is 40°F to 80°F. On hot summer days, start early—prefer – ably on a shady side of the house—and follow the shade around as the day progresses. Cover fresh work with burlap sacks, dampened periodically, or with sheet plastic. The longer masonry stays moist, the stronger it cures.

Protecting surfaces. Spread tarps to catch mor­tar droppings. And if you’re working on a chim­ney, tack plywood over the windows to protect glass from falling bricks, tools, and such.

Cleanup. At the end of the day, clean tools well. Wet them down and use a wire brush as needed to remove hardened materials. Before lunch breaks or at the end of the day, run a few shovel­fuls of gravel and a few buckets of water in the concrete mixer to loosen caked materials. Then dump it out, ensuring that the barrel wall and mixer blades are clean.

Masonry

Подпись: Masonry needn't always be straight lines. Here, clinker bricks, fieldstones, and tile playfully conceal a drab concrete retaining wall. (For more on this technique, see “Dressing Up a Concrete Wall," on p. 199.)
image374

Modern masonry

materials, including stone, brick, tile, concrete, and other minerals that become strong and durable when used in combination. The craft of masonry is ancient. The oldest surviving build­ings are stone, but stone is heavy and difficult to work with. Brick, on the other hand, is less durable than stone but lighter and easier to lay up. And clay, the basic component of brick, is found almost everywhere.

Technologically, the switch from stone to brick was a great leap in several respects. First, masons began with a plastic medium (mud and straw) that they shaped into hard and durable building units of uniform size. Second, brick­making is one of the earliest examples of mass production. Third, basic bricklaying tools, such as trowels, were so perfectly designed that they’ve changed little in 4,000 or 5,000 years.

Terms, Tools, and Tips

Unless otherwise specified, mixes and methods in this chapter are appropriate for brickwork as well as concrete-block work. But most of this chapter is about brick and poured concrete because concrete – block work is uncommon in renovation.

TERMS

Here’s a handful of mason’s lingo that’s frequently confused:

Portland cement. The basic component of all modern masonry mixtures. When water is added to cement, it reacts chemically with it, giving off heat and causing the mix to harden, thus bond­ing together materials in contact with the mix. By varying the proportions of the basic ingredients of a concrete mix, the renovator can alter the concrete’s setting time, strength, resistance to

image375certain chemicals, and so on. Portland cement is available in 94-lb. bags.

Masonry cement. Also called mortar cement, a mix of portland cement and lime, although exact proportions vary. The lime plasticizes the mix and makes it workable for a longer period. Once dry, the mix is also durable.

Aggregate. Material added to a concrete mix. Fine aggregate is sand. Coarse aggregate is gravel. Concrete aggregate is typically 14-in. gravel, unless specifications call for pea gravel (58-in. stone).

Mortar. Used to lay brick, concrete block, stone, and similar materials. As indicated in "Mortar Types,” on p. 187, mortar is a mixture of masonry cement and sand or of portland cement, lime, and sand. It’s usually available in 60-lb. bags.

Grout. A mix of portland cement and sand or of masonry cement and sand. Mixed with enough water so it flows easily, grout is used to fill cracks and similar defects. In tiling, grout is the cemen­titious mixture used to seal joints.

Concrete. A mixture of water, portland cement, sand, and gravel. Supported by forms until it hardens, concrete is afterward a durable, mono­lithic mass.

Reinforcement. The steel mesh or rods embed­ded in masonry materials (or masonry joints) to increase resistance to tensile, shear, and other loads. In concrete, the term usually refers to steel rebar (reinforcement bar), which strengthens foundations against excessive lateral pressures exerted by soil or water.

Admixtures. Mixtures added to vary the charac­ter of masonry. They can add color, increase plas­ticity, resist chemical action, extend curing time, and allow work in adverse situations. Admixtures are particularly important when ordering con­crete, because mixes may contain water reducers, curing retardants, accelerants, air entrainers, and a host of other materials that affect strength, cur­ing times, and workability.

and shape mortar joints. A good-quality trowel has a blade welded to the shank. Cheap trowels are merely spot welded. Bricklayer’s trowels tend to have blades that are 10 in. to 11 in. long. Pointing trowels, which look the same, have blades roughly 5 in. long; they’re used to shape masonry joints. Margin trowels are square- bladed utility trowels used for various tasks.

Jointers (striking irons) compress and shape mortar joints, some of which are shown in "Mortar Joints,” on p. 189. The most common are bullhorn jointers, shown in the photo on p. 190, and convex jointers, shown in the photo above. The half-round, concave mortar joint they create sheds water well.

Tuck-pointing trowels are narrow-bladed trow­els (usually the width of a mortar joint, 58 in.) used to repoint joints after old mortar has been cut back. Because it packs and shapes mortar, this tool is both trowel and jointer and has more aliases than an FBI fugitive: tuck-pointing trowel, jointing tool, repointing trowel, striking slick, slicker jointer, slicker, and slick.

Подпись: A bricklayer's tool kit (clockwise, from upper left): 4-ft. brass-bound level, tool bag, 6-ft. folding rule, statistical booklet, 11-in. steel trowel, 5’/2-in. pointing trowel, brick hammer, two convex jointers, 4-in. brick set, box of line clips, yellow stringline.Tuck-pointing chisels partially remove old mor­tar so joints can be repointed (compacted and shaped) to improve weatherability. Angle grinders and pneumatic chisels also remove mortar.