Stratified sampling technique

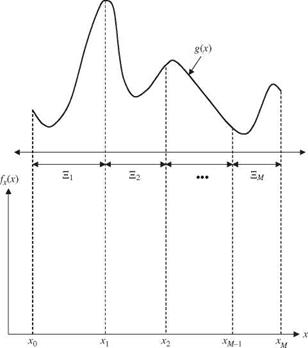
The stratified sampling technique is a well-established area in statistical sam­pling (Cochran, 1966). Variance reduction by the stratified sampling technique is achieved by taking more samples in important subregions. Consider a prob­lem in which the expectation of a function g (X) is sought, where X is a random variable with a PDF fx(x), x є E. Referring to Fig. 6.13, the domain E for the random variable X is divided into M disjoint subregions Em, m = 1, 2,…, M. That is,

m

S = U Sm 0 = Sm Fl Sm! m = m

m=1

Stratified sampling technique

Let pm be the probability that random variable X will fall within the sub­region Em, that is, f fx(x)dx = pm. Therefore, it is true that Lmpm = 1.

The expectation of g (X) can be computed as

m.. M

G = g(x) fx(x) dx =^2 / g(x) fx(x) dx =^2 Gm (6.86)

m=1J Em m=1

where Gm = fw g (x) fx(x) dx.

Note that the integral for Gm can be written as

Stratified sampling technique

(6.87)


(6.88)


Stratified sampling technique

Подпись: M G =Y, G m m=l Stratified sampling technique Подпись: nm Eg( Xmi) _i = 1 Подпись: (6.89)

where nm is the number of sample points in the mth subregion, and Lmnm = n, the total number of random variates to be generated. Therefore, the estimator for G in Eq. (6.86) can be obtained as

After the number of subregions M and the total number of samples n are determined, an interesting issue for the stratified sampling is how to allo­cate the total n sample points among the M subregions such that the variance associated with G by Eq. (6.89) is minimized. A theorem shows that the optimal n*m that minimizes Var(G) in Eq. (6.89) is (Rubinstein, 1981)

Подпись: (6.90)Подпись: nm=npm&m

v^M p _

Xm’ = 1 P m’ °m!

where am is the standard deviation associated with the estimator Gm in Eq. (6.88).

In general, information about am is not available in advance. It is suggested that a pilot simulation study be made to obtain a rough estimation about the value of am, which serves as the basis in the follow-up simulation investigation to achieve the variance-reduction objective.

A simple plan for sample allocation is nm = npm after the subregions are specified. It can be shown that with this sampling plan, the variance associated with G by Eq. (6.89) is less than that from the simple random-sample technique. One efficient stratified sampling technique is systematic sampling (McGrath, 1970), in which pm = 1/M and nm = n/M. The algorithm of the systematic sampling can be described as follows:

1. Divide interval [0, 1] into M equal subintervals.

2. Within each subinterval, generate n/M uniform random numbers umi ~ U[(m — 1)/n, m/n], m = 1, 2,…, M; i = 1, 2,…, n/m.

3. Compute Xmi = F—l(Umi).

4. Calculate G according to Eq. (6.89).

Example 6.13 Referring to Example 6.7, apply the systematic sampling technique to evaluate the pump failure probability in the time interval [0, 200 h].

Solution Again, let us adopt the uniform distribution U(0, 200) and carry out the computation by the sample-mean Monte Carlo method. In the systematic sampling, the interval [0, 200] is divided into 10 equal-probability subintervals, each having a probability content of 0.1. Since h(t) = 1/200, 0 < t < 200, the end points of each subinterval can be obtained easily as

tQ = 0, t1 = 20, t2 = 40,…, t9 = 180, t10 = 200

Furthermore, let us generate nm = 200 random variates from each subinterval so that £mnm = 2000. This can be achieved by letting

20(m — 1) 20m 10 , "00”


U


for i = 1, 2,…, 200; m = 1, 2,… ,10


U„


The algorithm for estimating the pump failure probability is the following:

1. Initialize subinterval index m = 0.

2. Let m = m + 1. Generate nm = 200 standard uniform random variates {um1, um2,…, um,200}, and transform them into the random variates from the corre­sponding subinterval by tmi = 20(m — 1) + 20umi, for i = 1, 2,…, 200.

3. Compute pf, m as

Подпись: 200

pf, m = 200 5-/ ft(tmi)

mi = 1

and the associated variance as

Подпись: Var( p f ,m) =p2 s2 0 12s2

m m. m

nm 200

in which sm is the standard deviation of 200 ft(tmi) for the mth subinterval.

4. If m < 10, go to step 2; otherwise, compute the pump failure probability as

1 10

P f = 10 E p f m

m=1

and the associated standard error as

“I 1/2


10


1


m=1

The results from the numerical simulation are shown below:

m

p f, m

sm

m

p f, m

sm

1

0.15873

0.00071102

6

0.14659

0.00066053

2

0.15626

0.00069358

7

0.14423

0.00064361

3

0.15374

0.00069298

8

0.14194

0.00064993

4

0.15121

0.00072408

9

0.13968

0.00066746

5

0.14887

0.00065434

10

0.13742

0.00067482

All 0.14787

0.15154 x 10—5

The value of pf is extremely close to the exact solution of 0.147856.

BATHING UNITS

Bathing units for handicap use are required to be equipped with grab bars.

Bathtubs and showers for handicap use are often different in size and equip­ment from what you would find in a standard fixture (Fig. 10.10, Fig. 10.11).

The minimum clear space in front of a bathing unit is 30 inches from the edge of the enclosure away from the unit and 48 inches wide. If a situation exists where a bathing unit is not accessible from the side, the clear space in front of the unit must be increased to a minimum of 48 inches. Faucets for showers and bathtubs must be equipped with a hand-held shower. The hose for these showers must be a minimum of 60 inches in length. The faucets must be able to be opened and closed with a maximum force of five pounds.

Grab bars are required in handicap bathing units. Diameters and widths of grab bars must be a minimum of 1.25 inches and a maximum of 1.5 inches. The bars must be spaced 1.5 inches from the wall. It is not al­lowable for the bars to rotate. All bars used must be approved for the in­tended use.

BATHING UNITS

FIGURE 10.10 ■ Handicap bathtub. (Courtesy of McGraw-Hill)

BATHING UNITS

FIGURE 10.11 ■ Handicap shower.

(Courtesy of McGraw-Hill)

Boundary Conditions

In the preceding section, differential equations were given for three types of prob­lems. In order to solve these equations, we need to define boundary and initial con­ditions. Classical boundary conditions may be considered: imposed displacements or forces for solid mechanics problems and imposed fluid pressures, temperatures, concentrations or fluxes for diffusion and advection-diffusion problems.

However, it may be useful to consider much more complex boundary conditions. For example, in solid mechanics, unilateral contact with friction or interface be­haviour is often to be considered.

When coupling phenomena, the question of boundary conditions increases in complexity and has to be discussed.

INSTALLING FIBERGLASS BATTS

All batts are installed in basically the same way, so the following tips for installing fiberglass batts also hold true for cotton and mineral-wool batts, unless otherwise noted.

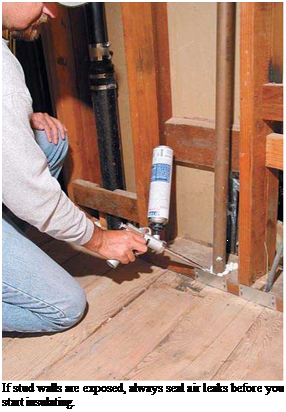
Getting started. Carefully seal air leaks before insulating; air currents can dramatically reduce
an installation’s R-value. Then suit up with the appropriate safety gear to keep fiberglass off your skin and out of your lungs. Wear a respirator mask, eye protection, long-sleeved shirt, long pants tucked into your socks, and work gloves.

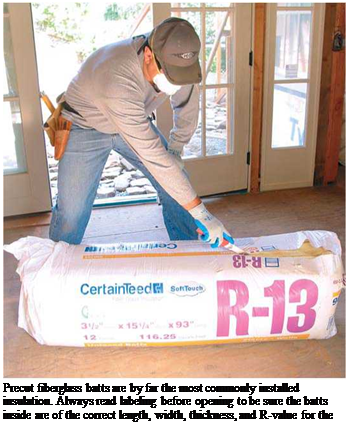
To determine how much insulation to buy, measure the square footage of walls, ceilings, and floors and then divide by the number of square feet in an insulation package. Also printed on the packaging is the insulation’s R-value and the width of the batts. Because most joists, studs, and rafters are spaced 16 in. on center, 15-in.-wide batts are the most common size. The fewer cuts you make, the faster the job will go; thus many contractors buy precut 93-in. batts to insulate standard 8-ft. walls. (Although 8 ft. equals 96 in, the 3-in. shortfall in batt length anticipates the space occupied by the top and bottom plates.) Batts that long can be a bit unwieldy, though, so you might want to use precut 4-ft. batts in those stud bays where you must fit insulation around pipes and wiring.

When no vapor barrier is required or a sepa­rate vapor barrier will be installed later, most contractors prefer to install unfaced batts.

They’re quicker to install because there’s no facing to cut through, and you can friction fit the batts. By contrast, kraft paper-faced or foil-faced batts,

Recommended Levels of Insulation*

.INSULATE TO THESE LEVELS

IF YOU LIVE IN A CLIMATE THAT IS…

AND YOUR HEATING SYSTEM ISL..

CEILING

WOOD- FRAME WALL

FLOOR

BASEMENT/CRAWI SPACE WALLS*

Warm: cooling and minimal heating needs (FL, HI, coastal CA, U. S. southeast)

Gas/oil or heat pump Electric resistance

R-22 to R-38 R-38 to R-49

R-11 to R-13 R-13 to R-25

R-11 to R-13 R-13 to R-19

R-11 to R-19 R-11 to R-19

Mixed: moderate heating and cooling needs (U. S.

Gas/oil or heat pump

R-38

R-11 to R-22§ R-11 to R-26§

R-13 to R-25

R-11 to R-19

southwest, southern midwest, northwest, mid-Atlantic)

Electric resistance

R-49

R-25

R-11 to R-19

Cold: heating and moderate

Gas/oil or heat pump

R-38 to R-49

R-11 to R-22§

R-25

R-11 to R-19

cooling needs (all of Canada except Pacific coast; mountain-

Electric resistance

R-49

R-11 to R-28§

R-25

R-13 to R-19

ous regions, U. S. northern midwest, New England)

Table adapted from U. S. Department of Energy (DOE) Energy Star Program table "Cost-Effective Insulation R-Values for Existing Homes" (www. energystar. gov) and 1997 "Insulation Fact Sheet." t Insulation is also effective at reducing cooling bills; levels assume you have electric air-conditioning.

Ї Do not insulate crawl space walls if the crawl space is wet or ventilated with outdoor air.

§ R-values are for insulation only, not the whole wall; R-values may be achieved with a combination of cavity insulation and rigid-board insulation.

Подпись: If stud walls are exposed, always seal air leaks before you start insulating.

Stapling Faced Insulation to Studs or Rafters

image705

image706

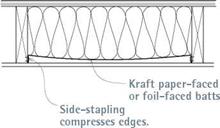
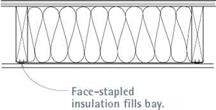
Always staple the insulation’s kraft-paper or foil facing to the edges of the framing. Stapling facing to the sides of the studs or rafters compresses the insulation’s edges and creates voids that air can flow through.

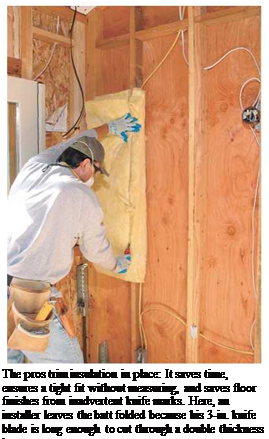
Подпись: The pros trim insulation in place: It saves time, ensures a tight fit without measuring, and saves floor finishes from inadvertent knife marks. Here, an installer leaves the batt folded because his 3-in. knife blade is long enough to cut through a double thickness in one pass.

whose facing serves as a vapor barrier, must be cut carefully to avoid tears and face-stapled to the framing edges as shown in the drawing above. In general, place insulation facing toward the side of the building that’s usually warmer—in cold climates, place the facing toward the inside of the building.

Cutting and placing insulation. Fiberglass insulation cuts easily with a utility knife, although its short blade requires several passes and should be changed as it gums up or gets dulled. Consequently, professional insulators use a long-bladed insulation knife or hone one edge of a putty knife till it’s razor sharp. A common way to cut an insulation batt is to place it on the subfloor, measure off a cut-line, and press a 2×4 into the batt to compress the insulation and guide the knife. If you’re cutting several pieces to the same length, you can save measuring time by marking the batt length on the subfloor with masking tape. To cut faced batts cleanly, place the facing side down on the subfloor.

However, most insulation contractors prefer to insert batts into stud bays and trim them in place. To trim a batt’s width, for example, place one side of the batt into the bay and use the stud on the other side as a cutting guide. To get a tight fit, cut the batt about!4 in. wider than the stud bay.

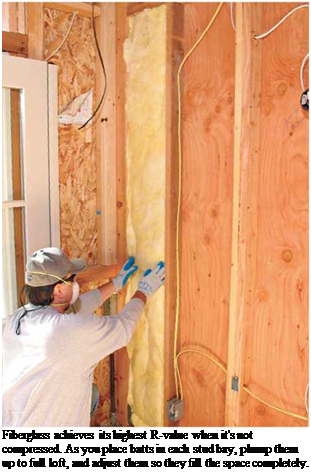
Подпись: Fiberglass achieves its highest R-value when it's not compressed. As you place batts in each stud bay, plump them up to full loft, and adjust them so they fill the space completely. Подпись: Before insulating attic floors, locate electrical boxes and IC-rated recessed lights. Using coat hangers and bright scrap plastic—newspaper delivery sleeves are perfect—make little flags about 1 ft. high and staple them to the joists near each box or fixture. When the floor is covered with insulation, those little flags will show you where the electrical elements are, should you need to repair or replace them. llll Подпись: PПодпись:image709

As you place batts, make sure they fill the bays fully. Fiberglass insulates best at “full loft,” so before placing a batt between studs or joists, shake it gently to plump it up to its full thickness. Thus, if you use sev­eral batts to fill a bay, butt their ends together rather than over­lapping and compressing them. To avoid compressing the edges of faced batts, always staple facing flanges to the edges— not the sides—of studs or rafters. Use a hammer tacker with M-in staples.

Insulating the attic. Start insulating the attic by sealing air leaks (described earlier in this chapter). If attic floor joists are exposed, place planks across them so you can move safely. (Stepping from joist to joist is a good way to misstep and fall through the ceiling.)

If there is a rough floor and you’re not ready to finish the attic, it’s easiest to remove floorboards every 6 ft. to 8 ft. and blow in loose-fill insulation. But batts are easy enough to install if you can pry up floorboards and insulate the floor in sections. Starting at one side of the attic, pry up and stack the floorboards, place batts, and renail the floor­boards before moving to the next section.

To allow moisture to migrate, use unfaced batts when first insulating a floor in warm or mixed-climate zones. Use unfaced batts when adding insulation in any climate. When insulat­ing an attic floor for the first time in very cold climates, use kraft paper-faced insulation because it’s permeable; install with the facing down, toward the living spaces. Never use imper­meable foil-faced batts or plastic vapor barriers when insulating an attic floor or ceiling because they’d trap moisture.

Fitting batts is straightforward: Cut them to length and place them so they fill the joist bays completely. If there’s diagonal bridging, slit the insulation down the middle, 4 in. to 6 in. from the end, and fit the slit ends around the bridging. As with walls, split batts (see accompanying photos) to feed them over and under wires and pipes. Note: Keep insulation and other com­bustible materials back at least 3 in. from masonry or metal chimneys, and non-IC-rated recessed light fixtures, as noted in the Safety Alert on p. 330. When adding insulation, place new batts

reventin

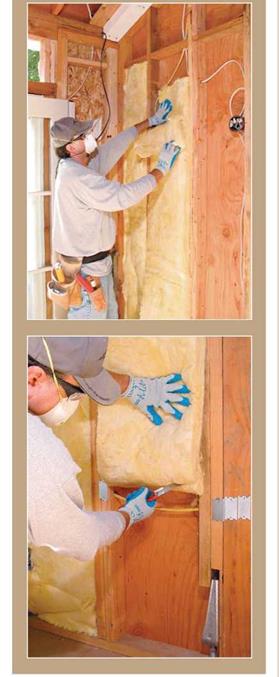
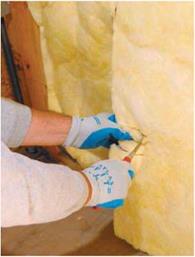
To prevent cold spots behind pipes and wiring, split batts in two-sort of like pulling apart a sandwich—so that each piece is roughly half the batt thickness. Slide one half of the batt behind the wiring or pipes, and place the other half in front. Where it would be tedious to split and slide batt ends behind the obstruction in the middle of the stud bay, instead slice halfway through the batt as shown below; split the fiberglass at the cut-line, and fit the insulation behind the obstruction.

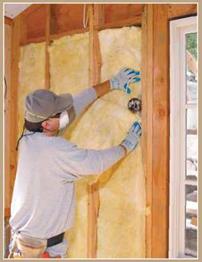
Подпись: INSULATING AROUND ELECTRICAL UUtletS Electrical outlet boxes in exterior walls can be big energy losers because builders often forget to insulate behind boxes. To stop air leaks, split insulation batts and slide portions behind the boxes. In very cold climates, you might also want to install airtight outlet boxes. Be careful not to knick cables around boxes. ^ Before insulating around any outlet, disconnect the electrical power to the area and use a voltage tester to be sure the power is off. image710image711

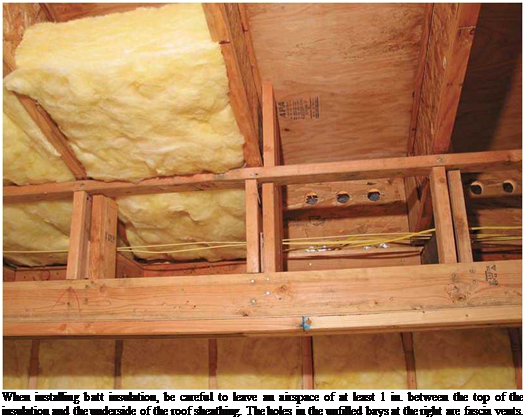
Подпись: When installing batt insulation, be careful to leave an airspace of at least 1 in. between the top of the insulation and the underside of the roof sheathing. The holes in the unfilled bays at the right are fascia vents.

perpendicular atop old ones. Finally, install air chutes (baffles) between rafters, or block off insulation where rafters meet walls, so that air can flow freely from soffit vents to ridge or gable – end vents.

If you want to finish the attic with drywall, you can forego insulating the floor and instead insulate the kneewalls and rafters. But because an insulated floor deadens sound, you may want to insulate it anyhow. Before inserting batts into the rafter bays, staple lightweight rigid-foam air chutes to the underside of the roof sheathing.

The chutes create a 1-in space between the sheathing and the insulation on the attic floor, so that air can keep flowing under the roof. If the rafters are spaced regularly on 16-in. centers, unfaced friction-fit batts will stay in place till the drywall goes up. But if the rafter spacing is wide (24-in. on center or greater) or irregular, friction- fit batts may sag or fall out. Instead, you might use any of these options: (1) staple paper-faced batts to the rafter edges, (2) have foam insulation sprayed to the underside of the roof sheathing after installing air chutes, or (3) trim rigid-foam panels to fit between the rafters and glue them to the underside of the roof sheathing. If there are gaps between the panels and rafters, shoot a compatible foam into the gaps.

image713Подпись:InsuLatin

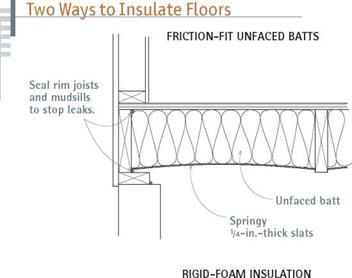
When insulating a floor over an unconditioned crawl space or basement, you’re fighting gravity and moisture.

First, let’s deal with gravity. The easiest way to install fiberglass batts without needing three hands is to precut a number of thin wood slats— ‘/4-in. fence lath is light and springy—Yi-in. longer than the distance between the joists.

As you hold the unfaced batts in the joist bays with one hand, use the other to wedge the slats into place, under the insulation. Being slightly long and springy, the slats will bow up and support the insulation; insert them every 16 in. to 24 in.

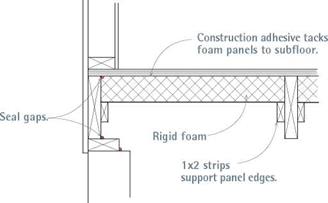
image714image715If the subfloor area is damp or if there’s heavy condensation during warm months, rigid-foam panels are a better choice than fiberglass batts. (Mice are also less likely to tunnel through or nest in rigid foam.) Use a compatible con­struction adhesive to glue the foam panels to the underside of the subfloor. If floor joists are straight and regularly spaced, trim panels so they are in. wider than the distance between the joists. But if the joists are irregular, trim the foam panels a bit smaller and use expanding foam to fill any gaps.

INSTALLING FIBERGLASS BATTS

Подпись: SAFETY ALERT Rotating paddles of an insulation blower that are strong enough to break up compressed insulation can also mangle hands and arms, so keep them out of the hopper when the paddles are turning. Instead, shut off the machine or use a stick to dislodge balky clumps of insulation. Illlll

Material Selection

Material selection is a concern for green framing. The following are six ways in which material selection is considered green.

1. Use of Forest Stewardship Council (FSC) and Sustainable Forest Initiative (SFI) certified lumber. This is lumber that is harvested following environmentally

Forest Stewardship Council Label

friendly guidelines for sustainable practices. This lumber is tracked through the chain of custody from the forest to the end user. It is labeled for identification.

2. Use of salvaged or reused material. reusing lumber minimizes the need for new lumber.

3. Use of regional material. This is material that is harvested typically within 500 miles of the end use. The value gained is from the transportation energy savings.

4. Use of rapidly renewable material. This is usually considered material that has a 10 year or less growth cycle.

5. Use of composite panels that contain no added urea formaldehyde resins. Plywood and Oriented-Strand Board (OSB) commonly use adhesives containing urea formaldehyde which is a known carcinogen. No-Added – Urea Formaldehyde composite panels are available.

6. Minimized use of volatile organic compounds (VOCs). VOCs release toxins. Products such as subfloor adhesives will list the amount of VOCs that they contain.

A tube of subfloor adhesive labeled “VOC Compliant" (see “VOC Compliant Subfloor Adhesive" photo) has VOC less water, less

Sustainable Forestry Initiative Label

exempt solvent: <196g/l and <10.6% wt/wt. This makes it compliant with California ARB, which are among the strictest standards.

Structural Insulated Panels (SIPs)

SIPs are a structural sandwich panel made of a foam plastic insulation core bonded between two structural facings usually made of oriented-strand board (OSB). SIPs are most commonly used for walls and roofs, but can also be used for floors and foundation systems. SIPs are considered green because of their expected energy savings. It is also expected there will be conservation of material because SIPs are made in shops.

SIPs Organized, Transit for Leveling, Sill Plate and Bottom Plate Attached

2. Check the foundation or platform for level, square and dimensions. When starting out it is important the walls have a level surface to sit on and the building is square. Where necessary, shim your bottom plates or use a power plane to make sure they are level, and when you are chalking lines for setting your bottom plates, adjust the lines so they are square and dimensioned per plan.

3. Install sill plate. If you are using sill insulation you will need to apply it before installing the sill plate. It is usually a piece of foam about 1/8" thick and the width of your sill plate. To install it just hold it in position over the anchor bolts and press down to punch a hole in the insulation (see “Sill Insulation" photo).

The sill plate will probably need to be ripped to the dimension of the full width of the panel. For installation follow the same process used in standard wall framing. Mark and drill for your anchor bolts using your chalk lines for location and then align with the anchor bolts and drop into place.

4. Install bottom plate. The bottom plate needs to be the same width as the foam area of the panel, commonly 5-1/2". It will be bolted to 6. the center of the sill plate so that the faces

the one it will be connecting to. If the panel ends with an opening or a corner, check the location and trim if necessary. Circular saws and chain saws are commonly used for trimming panels and foam scoops can be used on the foam.

Where factory-supplied electrical chases are in the SIPs you will need to make sure that any splines you install have corresponding holes to allow for running electric wire. Mark and drill the splines if necessary before you install them.

7. Seal panel to be installed. Because SIPs are meant to be energy efficient it is particularly important to continuously seal all adjoining surfaces (see “Sealing" photo). The spline details in the SIP Details illustration later in this chapter show the locations of the seal.

8. Set panel in place. Tip the panel into place hinging on the far corner of the bottom of the wall (see “Installing SIP Panel" photo).

9. Plumb and brace panel. After the panel is standing check for proper placement, plumb both directions, and then nail in place and brace if needed. Sledge hammers, crow bars, long bar clamps, and come-alongs can be used to pull the panels together when needed. Allow a 1/8” space between panel faces.

Attaching Spline

10. Nail and screw panel. Panel screws come with the panels and you need to follow the manufacturer’s suggested location for their installation. Also follow the manufacturer’s instructions for size and

spacing of the nailing. You will be using your standard framing nails. See the SIP Details illustration later in this chapter.

11. Install top and double plates. Top plates and double plates are installed to provide overlapping at intersections, corners, and splines. The top plate needs to be made of 2x wood, recessed into the panel, and nailed between the faces. The double plate needs to overlap the top plate a minimum of 2 feet and be the width of the SIP including the faces.

12. Apply SIP tape. As a last step, apply the SIP tape to the inside seams of all SIPs (see “Applying SIP Tape" photo).

The following SIP Assembly SIP Details illustrations are from a SIP manufacturer and give you an idea of what you can expect for instructions from SIP manufacturers.

See “SIP Tools" photos for examples of tools that are commonly used for SIP installation, but not often used in standard framing. Standard framing tools are also used in installing SIPs.

Most important to SIP installations is organization. If you want to have a successful and productive job, do your homework and make sure you have all the tools you will need, your foundation is level and square, and you have a good understanding of where each and every piece of the puzzle will fit.

Dry wall and Painting

I’M NOT SURE WHEN DRYWALL—also known as gypsum board, wallboard, and Sheetrock®— was first used in construction. I have seen drywall on pre-WWII houses, but we defi­nitely didn’t have drywall in my old prairie home. It wasn’t until the late ’50s in California, where I was working, that drywall became the preferred wall covering in residential housing. “Knock on the Wall! Demand Genuine Lath and Plaster!” was the rallying cry of the once-mighty plaster industry, as they struggled against the newcomer—drywall.

Big plaster fought a losing battle. It took two or three weeks to cover walls with layers of plaster, and the process left the house frame waterlogged. In the winter, it could take a month or more for a house to dry out well. Cabinets installed after plas­tering often had sticky drawers. In addition, passage doors were hard to open, and hardwood floors expanded and buckled. It’s no wonder the construction industry switched to drywall. It allowed builders to complete houses in record time.

Drywall installation can begin once you’ve passed all your inspections—electrical, plumbing, heating, framing, insulation, and vapor barrier. Drywall is not difficult to secure to ceilings and walls, but it takes more skill to leave the finished walls straight

Q.

1

Get Ready to Install Drywall

5

Mud, Tape, and Finish the Drywall

0

2

Install the Ceiling Panels

6

Paint the Ceilings and Walls

ca

3

Install the Wall Panels

7

Prepare and Paint the Interior Trim

С/Э

4

Install the Corner Bead

8 Paint the Exterior Siding and Trim

Dry wall and Painting

щят


Dry wall and PaintingDry wall and Painting

Подпись: Helping HandПодпись: Drywall has delicate corners and edges. When you store and handle sheets of drywall, make sure you protect the panels' edges and corners from getting damaged.

and smooth. This chapter will tell you how to order and store drywall, which tools and methods you need to cut and “hang” it, how to tape and finish the joints, and how to paint the walls and trim. By the time you’re done with these jobs, your house will look a lot more like a home.

STEP 1 Get Ready to Install Drywall

There’s some important prep work to be done before you take delivery of your drywall order and before any installation work can begin. In addition to following the advice explained below, see the sidebars below and on p. 216 for information on sizes and types of drywall and how to order and store the material.

Make sure the studs and joists are dry

Framing lumber used today often arrives at the job site with a high moisture content. Over time, it will shrink—sometimes quite a lot. When the studs and joists shrink after the drywall has been installed, the fasteners can work loose. A loose nail or screw can create a noticeable and unsightly bump, or nail pop, in the drywall surface.

To reduce the chances that nail pops will mar your drywall work, you may need to close in the house and turn on the heat for a couple of weeks. Leave a couple of windows cracked open to allow moist air to escape as the wood dries. You can ignore this advice if you’re working with dry wood or if you’ve had the good fortune to frame your house in clear,

CLEANING UP MOLD

Mold can’t grow without moisture, so first identi­fy and correct the source(s) of the excess mois­ture before you start cleaning up. Otherwise, the mold can return.

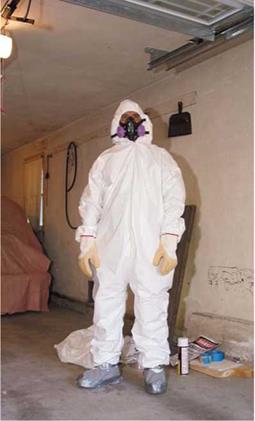
Necessary precautions. Limit your exposure to mold spores by wearing a respirator mask with N95 (or higher) filters, rubber gloves, eye protec-

I A Bathroom Fan

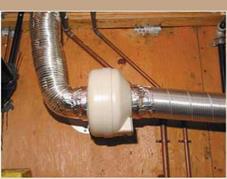
Подпись: Moisture can condense in bathroom-fan ducts that run through unheated areas. To reduce in-duct condensation, insulate the ducts; keep the duct runs short; and if you're venting the duct through a wall, slope the duct downward toward the wall cap so the moisture will run out if it does condense.Подпись: 1111Подпись:Подпись:image699

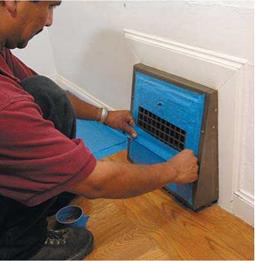
tion, and disposable coveralls, which you should discard at the end of each day. After assessing the mold’s extent, determine the shortest way out of the house for contaminated materials—maybe out a window—to minimize spreading mold spores to clean areas. Use sheet plastic to seal doorways and heating registers in affected areas, and turn off central HVAC systems till the reme­dial work is complete. Seal damaged materials in plastic before transporting them from the site. Never sand moldy materials because that will spread spores. Finally, rent a commercial-grade vacuum with HEPA filters; if possible, vent it to the outside.

Assessing the extent. If mold is limited to small areas at the top of a bathroom or exterior wall, it may be surface mold caused by condensation or inadequate ventilation. However, if mold is wide­spread around windows or doors, bathroom drywall is crumbling, or tiles mounted on dry – wall are loose, there’s probably mold growing in the walls. Start looking at the base of the walls. О Turn off the electrical power to the area, remove the baseboard, and use a utility knife or a hole saw to cut small holes in the drywall. If there’s no mold, you can easily patch the holes and cover them with the baseboard. More likely, you’ll find stained or rotted wall plates and exten­sive mold colonies.

Throw out moldy drywall or hardboard. On the other hand, moldy lumber and engineered wood products such as plywood, particleboard, and OSB (oriented strand board) may just have surface mold, so probe them with an ice pick or

image700

pocketknife to see how sound they are. If they are spongy, replace them. Engineered wood products are particularly susceptible to rot because they contain adhesive binders that fungi feed on.

Remediation. Wash surface mold with soap and water and let it dry well. There’s no need for caus­tic bleaches to kill mold spores (and irritate your lungs) because washing should remove mold. After the surface has dried, paint it with a stain killer such as B-I-N.® If mold has caused the drywall’s paper facing to roughen or delaminate, cut back the drywall at least 1 ft. beyond the damaged area and replace it.

If your inspection revealed mold growing inside wall cavities, use sheet plastic to seal off the affected area, including the heating registers; then cut back damaged drywall to the nearest stud center on both sides, and cut out damaged framing, if any. If you must replace more than one stud, erect temporary shoring to support the loads above (see Chapter 10). To contain spore­laden dust, have a helper hold the hose of the commercial-grade vacuum near the materials being cut. Using soapy water, scrub the surface mold from the framing, and allow all materials to dry before installing new drywall—framing mois­ture content should be 15 percent to 20 percent

Подпись:Подпись:Подпись:Подпись:image701

or less. (Borrow or buy a moisture meter to check.) Wrap moldy debris in 6-mil plastic and have it carted away.

Insulation

Seal air leaks before installing insulation because insulation won’t be an effective thermal barrier if air can move freely around and through it.

As you’ll see, stopping air is also a major consid­eration in choosing insulation that’s right for the renovation.

CHOOSING INSULATION

There are dozens of insulating materials, which can be classified into four groups: batt (in precut lengths or continuous rolls), blown in, rigid foam, and sprayed on.

Batts are made of recyled cotton, mineral wool, and fiberglass; but fiberglass batts are the giant

Insulation Values

TYPE OF

R-VALUE

INSULATION

PER INCH

Batts and blankets

Fiberglass

3.2

High-density fiberglass

3.8

Cotton

3.2

Mineral wool

3.2

Loose fill (blown in)

Cellulose

3.2

Fiberglass

3.2

Mineral wool

3.1

Cotton

3.2

Rigid board

Expanded polystyrene (EPS)

4.0

Extruded polystyrene (XPS)

5.0

Polyisocyanurate

6.5

Spray on (contractor applied)

Polyurethane

6.0

Open-cell polyurethane

3.6

Wet-spray cellulose

3.5

Magnesium silicate

3.9

to Fight moi

R-Values of Common Building Materials

MATERIAL

R-VALUE

8-in. concrete (solid)

0.90

4-in. common brick

0.80

31/2-in. wood stud (on edge)

4.5

‘/2-in. plywood sheathing

0.63

3/,-in. plaster or ‘/2-in. drywall

0.40

Glass

Single pane

0.89

Double pane

1.91

Triple pane

2.80

Подпись:of the group, accounting for three-quarters of all residential insulation. As a group, batts are easy to install; cost effective; and available in a variety of widths, thicknesses, and densities. Batts faced with kraft paper, foil, or plastic are installed by stapling facing flanges to framing edges; unfaced batts are friction fitted between studs, joists, or rafters. In attics, unfaced batts are instead laid perpendicularly atop existing batts to improve heat retention.

Batt insulation is an effective thermal barrier if it’s installed correctly and fills cavities com­pletely. Unfortunately, framing is often irregular in older houses, and batts with precut widths may not totally fill the cavities. Consequently, if installers don’t fill gaps, cut batts a bit short, allow facing flanges to pucker, or don’t take time to fit insulation behind pipes and electrical cables, air movement can dramatically reduce the insulation’s R-value.

That caveat noted, batts are safer to work with and more insulative, thanks to numerous innova­tions. In response to eye, skin, and lung irritation caused by loose glass fibers, insulation makers now offer fiberglass batts encapsulated in perfo­rated or woven plastic wrapping—particularly
helpful when you’re insulating ceilings and don’t want fiberglass fibers raining down on you. In some products, such as Miraflex®, the fiberglass has been reformulated so that it’s soft, itchless, and formaldehyde free. And there is a slew of high-density fiberglass batts: 3h-in.-thick batts that are rated at R-ll, R-13, and R-15 and 51/2-in.- thick batts rated at R-21. Note: If you compress batts into the cavities, you’ll decrease the insula­tion’s loft and thus reduce its R-value slightly.

Cotton batts (usually unfaced) are formalde­hyde-free, absorb sound well, block air infiltra­tion, insulate well, and won’t make you itch. Cotton batts are treated with a natural biostat (borate) to inhibit mold and make them fire resistant. Wear a disposable paper mask when installing cotton: Although its lint is more benign than airborne glass fibers, avoid breathing it any­way. Mineral wool (also called rock wool) is spun from natural stone such as basalt or from blast­furnace slag and is the most fire resistant of any insulation. Mineral wool batts are installed mainly in commercial buildings because they are costly, heavy, and raise health-related concerns similar to those of fiberglass.

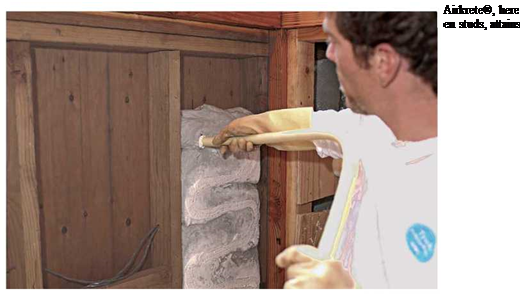
Blown-in insulation is the best insulation for wall cavities when you don’t want to rip out fin­ish surfaces. It’s also good for insulating attic floors for the first time and adding to insulation that’s already there. Loose-fill fiberglass is occa­sionally blown in, but cellulose is by far the material most often blown in. At low densities (1.5 lb./cu. ft.) cellulose traps air and is an effec­tive insulator (R-3.5). And when it’s dense packed (3 lb. to 4 lb./cu. ft.), that increased density effec­tively seals air leaks. In fact, some New England contractors report that old houses retrofitted with dense-packed cellulose are as airtight as new houses with polyethylene vapor barriers under the drywall.

Blowing-in insulation is dusty work, so most contractors prefer to gain access to wall cavities by prying off small sections of exterior siding and drilling through exterior sheathing. You can work from the inside, drilling discrete holes in the plas­ter or drywall, but empty the room first. In either case, a successful insulation depends on filling all cavities completely—not so easy if walls contain nonstandard framing, diagonal bracing "let into” studs, or fire-stop blocking.

Most blown-in cellulose is environmentally friendly and reasonably pleasant to work with if you wear a dust mask. Made from recycled paper, cellulose doesn’t itch, and is often treated with borates to make it more resistant to mold, insects, and fire. Treated cellulose will not rot if it becomes wet, but it will absorb water. If leaks or condensation are minor, moisture will migrate
out of the walls in time. But cellulose doesn’t dry quickly, so if it gets soaked, remove it; otherwise, drywall installed over it could get moldy and deteriorate. For this reason, although cellulose can be wet-sprayed into open cavities, only an experienced installer should do so.

Rigid-foam panels are the best choice for insu­lating below-grade areas such as basement and crawl space walls, where there’s sometimes seep­age or condensation, and for retrofitting insula­tion to exterior sheathing or foundations. In other words, use panels wherever batt, blown-in, or sprayed-on insulation can’t do the job. Conversely, don’t use rigid foam where odd spaces and air infiltration require insulation that can be shaped. Rigid-foam panels boast some of the highest R-values per inch, but the poorest UV and fire resistance, so consult local codes to determine how to fireproof rigid panels.

Expanded polystyrene (EPS), extruded poly­styrene (XPS), and polyisocyanurate (polyiso) are the panels most commonly installed in homes. Panels come in widths of 12 in., 16 in., 24 in., and 48 in.; lengths in multiples of 2 ft., up to 12 ft.; and thicknesses from h in. to 4 in. EPS is the least expensive and has the lowest R-value (R-4 per inch); it is usually unfaced. XPS is inter­mediate in price and R-value (R-5 per inch); often faced with foil or polyethylene film, it is the most water resistant of the panels discussed here and hence the best for insulating foundations. Polyiso is the most costly, has the highest R-value (R-6.5 per inch), and has the lowest compressive strength of the three materials—though its foil
facing improves its durability. Since the insula­tion industry switched from ozone-depleting blowing agents to pentane in manufacturing it, polyiso has been considered an environmentally friendly material.

Sprayed-on foams should be applied only by contractors with specialized training and equip­ment. Most foams are two-part compounds that mix at the applicator nozzle. If the components don’t mix properly or the nozzle partially clogs, you can end up with a substance that won’t cure completely or insulate well. But correctly applied, sprayed-on foams fill even the oddest – shaped cavities, achieve high R-values, and block air movement effectively.

Permeability—the ability of water to permeate and migrate through the foam—is another criti­cal factor. Basically, permeability depends on the

Подпись: InsulationПодпись: DO YOU NEED?Подпись: How much insulation you need depends on climate, the house's heating system, and which part of the house you're insulating, as shown in "Recommended Levels of Insulation," on p. 340. Or you can use the U.S. Department of Energy's interactive ZIP Code Insulation Program™ (which is free online). To get a detailed insulation plan, type in your ZIP code, and then check the boxes that best describe the house and its heating system. Major insulation manufacturers offer similar calculators. You should also consult your local building authority, which has the final say and, in many cases, can tell you about tax incentives or rebates that encourage homeowners to insulate and save energy.

image703

HOW MUCH

Подпись: Standard fiberglass can itch like crazy. So even if you wear a long-sleeved shirt and a pair of gloves, wash well at the end of each day with cold water. Exactly why cold water reduces itching is unclear (shrinks pores perhaps), but it works.Подпись: llll

amount the foam expands. Open-cell foams, which use water as a blowing agent, expand as much as 100 times and so are quite permeable (high-perm ratings). Use open-cell foams where you want moisture to migrate through wall or ceiling cavities or on the inside of foundation walls that haven’t been damp proofed adequately on the exterior. Closed-cell foams, manufactured with pentane as a blowing agent, expand roughly 30 times, and thus are less permeable (low-perm ratings).

It’s not always obvious what type of foam to install where. In warm regions, for example, high-perm, open-cell foam is typically sprayed under roof sheathing, to allow moisture to migrate freely. But in very cold regions, low-perm, closed-cell foam is sprayed to the underside of roof sheathing. So ask reputable local insulation contractors for their recommendations.

In the heart of the Arab world: the splendor of the Umeyyades and the Abbassids

Byzantium, the Sassanides and the new Arab empire

Water supply systems of the Byzantine cities do not measure up to those of the Romans, either in quality or in quantity. In many Byzantine cities, such as Apamea-on-Orontes or even Constantinople itself, aqueducts are abandoned in favor of cisterns, sometimes very large and fed by runoff from rainstorms. Small rural communities located along wadis or on small rivers implement numerous hydraulic developments at their scale[317]
such as modest derivation canals that support gravity irrigation of valley fields, with many small mills.

The Byzantines indulge in large-scale hydraulic activity in Anatolia, where they build several dams. One among them is the Dara dam, constructed under Justinian (527­565) on a tributary of the Khabur. It probably has an arch in its central portion – at least this is what Procopius of Caesarea, in the 6th century, attributes to the dam’s architect, Chryses of Alexandria:

Подпись: Figure 7.5 A cistern serving a house of the Byzantine age at Sergilla, in northern Syria (photo by the author).
In the heart of the Arab world: the splendor of the Umeyyades and the Abbassids

“He did not build the dam in a straight line, but in the form of a crescent, such that this arch, turned against the stream of the water, could better resist its violence.”[318]

At about this time, and at the other end of the Syro-Mesopotamian universe, a great misfortune occurred in what had been the land of Sumer: the submergence of the irrigat­ed lands of lower Mesopotamia, with new marshes that rendered the land useless during all of the Middle Ages. The bed of the Persian Gulf had been filling with sediment since the Bronze Age (Figure 2.1). The fields created by alluvial deposits of the great rivers are relatively low in elevation, and only drained thanks to the inhabitants’ continuous
efforts.[319] [320] [321] Repeated ruptures of the dikes along the Tigris occur during the time of the Sassanide sovereign Kawadh (488 – 531). His successor Khusraw I (531-579) manages to repair the dikes. But on the eve of the Arab conquest, one hundred fifty years later in 627 or 628, there is a catastrophic flood of the great rivers. Khusraw II is powerless to manage these floods, despite an interesting means of managing human resources. This is told to us by al-Baladhori, one of the most ancient Arab historians (he dies in 892): “Then when arrived the year when the Prophet (God bless him and give him peace!) sent as ambassador to Chrosroes-Parviz (Khusraw II, 590-628) Abdullah son of Hodhafa as-Sahmi, that is to say in the year 7 or 6 of Hegire the Euphrates and the Tigris had a considerable flood, such as had never been seen before or after: large breaches opened that Parviz tried to close, but the water was stronger and reached the low country, submerging villages and crops and several land districts in this place. Chrosroes came to the site in person to block the breach­es: he laid a pile of silver on a leather tablecloth and put to death those workers who did not work hard enough (it is said that on a single dike he put under the cross, in one day, forty of those who worked there), but he could not stop the water. At the same time, the Arabs invad­ed Iraq and the Persians became henceforth preoccupied by war, to the point that the breach­es grew larger without anyone worrying about it: the landowners in the villages were power-

22

less to block them, so large were they, so the marshes grew in extent.”^

The Umeyyades installed the capital of their empire at Damascus not long after the Arab conquest of Syria, (661 to 750 AD). This empire soon extended from the Atlantic ocean to the Indus. Damascus, a city that had prospered since the Bronze Age thanks to the water taken from Barada where it comes out of the Anti-Lebanon mountains (Figure 7.6), quickly becomes the very image of paradise, with its gardens and orchards. Yazid, the second Umeyyade caliph, builds a new canal coming from the Barada (after which the canal is named) and establishes a pattern for the cultivated zone, the Ghouta, that will last for all of the Middle Ages. The Andalusian pilgrim Ibn Jubayr, in the 12th century, tells us of the charms of this region:

“The gardens surround Damascus as a halo surrounds the moon (….). To the east, the green Ghouta extends as far as the eye can see and no matter which direction one looks, its sparkling splendor transfixes the gaze. How true is what one says of Damascus: If paradise is on the earth, Damascus is it, and if paradise is in heaven, Damascus is its rival and just as wonderful!”^

The Umeyyades use Egypt as a granary, much as did the Romans and then the Byzantines, and send wheat to Arabia using the ancient canal of Necho between the Nile and the Red Sea (Figure 3.8). They renovate the canal about 641 and rename it canal of the Caliphs.

To foster the economic development of Syria and Iraq, the Umeyyades continue the

In the heart of the Arab world: the splendor of the Umeyyades and the Abbassids

Figure 7.6 The arms of the Barada artificially branched off to irrigate the Ghouta of Damascas (after Kamel, 1990). In 1185, ibn Jubayr observes these seven arms from the top of a hill he climbed as a pilgrim: “This blessed hill (according to the Koran, Jesus and his mother took refuge on it) marks the beginning of the city gardens and the line of separation of the watercourses that divide into seven branches each going in a different direction. The most important of these is the Taura that passes below the hill and that is dug into the rock as an underground canal, as large as a grotto. Now and then an audacious swimmer, a young boy or a man, dives from the heights of the hill into the river and swims underwater to cross the canal below the hill and comes out downstream. But this is a very risky undertaking! From the hill, one can look over all the gardens to the west of the city. No vista rivals this one in beauty, splendor and perspective.”24

ancient Roman method of conceding undeveloped land to colonists – friends of the pow­erful, retired soldiers, even entire tribes. Then, when the lands begin to produce a har­vest, the colonists pay a tax to the central treasury. Under the first caliph Mu’awiya (661 – 680), and under his successors al-Walid (705 – 715) and Hisham (724 – 743), the marshland reclamation works in lower Mesopotamia are financed by the close col­leagues of the caliph, who later take possession of those lands:

“The breaches having opened during the time of al-Hajjaj (the governor of Iraq), he wrote to al-Walid (the caliph) to inform him that the cost of closing them would not be less than three million dirhems. Al-Walid judged this to be excessive, but his brother Maslama offered to [322] undertake it himself, under the condition that he would be given rights to all the lands that would remain submerged, once the three million dirhems had been spent. [….] Al-Walid accepted: Maslama thus obtained several adjoining land districts. Then he had two canals dug from as-Sib, brought in peasants and farmers, and brought these lands under cultivation: these people prospered and formed numerous villages, to take advantage of the protection they would offer.”[323]

In 750, the Abassids come to power and massacre all the Umeyyade family save one, who flees to found the caliphate of Cordoue. The definitive closure of the canal of Necho, associated with the troubles in Hedjaz, occurred at the beginning of this new dynasty in 767. The closure is ordered by the caliph al-Mansour, to prevent the shipping of wheat toward the revolting cities of Mecca and Medina and to prevent an invasion that might make use of the canal. The Abbasids relocate the capital to the city of Baghdad, founded in 762 on the Tigris. From 836 to 892 the capital will be moved once again a bit further upstream, to Samarra. From the 11th century this will be the era of the Seljuk Turks, with a general distribution of power. Before long it becomes a defacto split. One side of the split is the Syrian-Egyptian world of the Fatimides, the Ayyubids (the Saladin Dynasty, enemy of the crusaders) and the Mamlukes. The other side is the Persian and Iraqi worlds that are more oriented to Central Asia under the influence of Persian and Mongol leaders.

Air – Conditioning: Bigger Isn’t Better

Подпись: HEATING AND COOLING■ BY CHRIS GREEN

S

itting in a green-and-white woven lawn chair, fanning away the sweat, my grandmother said, "It’s not the heat, it’s the humidity." With seven Virginia summers behind me, I suspected that the heat did have something to do with it, but I kept this thought to myself.

It turns out that each of us had it partly right. It was the combination of high heat and humidity that raised us to our exalted level of discomfort on that oppressive summer day.

Seven years later, my parents finally built a house that included central air­conditioning. Although it was better than being without, the air-conditioning system wasn’t ideal. The house had cold and hot spots, and my basement bedroom always felt cold and damp.

Unfortunately, these problems weren’t limited to my parents’ house nor to the 1970s. Problematic air-conditioning systems
abound nationwide. According to a recent study, 95% of new air-conditioning instal­lations fail in regard to operating efficiency, with more than 70% of systems improperly sized or installed.

The top three reasons for poor air – conditioner performance are improper sizing (1.5 to 2 times too large is common); improper installation (incorrect refrigerant levels and airflow); and poorly designed and installed duct systems. Because air­conditioning systems integrate refrigeration, air distribution, and electronics, there are lots of opportunities for mistakes.

Air Conditioners Move Heat Outside

Heat naturally moves from a higher energy level (warm) to a lower energy level (cool). You could say that heat, like water, flows

Air - Conditioning: Bigger Isn&#39;t BetterWhether it’s new

or a replacements properly sized and installed system affords

downhill. Without help, heat that accu­mulates within a home will not leave on its own unless the heat sources (the sun, people, appliances, etc.) are removed. Help comes in the form of air-conditioning, which uses refrigeration combined with ven­tilation essentially to push heat uphill, or move it outside, where it’s even warmer.

Residential air-conditioning systems are made up of an indoor and an outdoor unit connected by a pair of pipes that circu­
late refrigerant in a loop. By manipulating pressure and temperature, the indoor unit absorbs heat by blowing warm indoor air over a cold coil. The heat is released to the outdoor unit, which houses a compressor (which compresses refrigerant and itself generates heat) and a condenser coil and fan (which dissipates the heat to the outside).

In addition to cooling, air conditioners serve another important function: They dehumidify the air. In the same way that

I How It Works

Residential air conditioners are split systems—an indoor and an outdoor unit—that remove heat from the house and release it outdoors. A pair of pipes, which circulate refrigerant, form a loop and connect the units. Cold air is produced when compressed refrigerant is forced through a tiny valve or metering device (1) and expands into the evaporator coil (2), similar to the cold spray an aerosol can produces as the compressed liquid passes through the valve. This causes the refrigerant’s pressure and temperature to drop quickly, cooling the coil.

Air - Conditioning: Bigger Isn&#39;t Better

As warm air passes over the evaporator, it is cooled and dehumidified. Moisture condenses on the evaporator’s fins and drains away. After absorbing heat from the home’s interior, the refrigerant is pumped to the outdoor unit, where it passes through the compressor (3)

moisture condenses on the side of a cold soda can sitting outside on a hot day, air conditioners wring moisture from warm, humid air as it is forced across the indoor unit’s cold evaporator coil. Once past the evaporator, cool dehumidified air is deliv­ered to the rest of the house—unless there’s a problem.

Choose Energy-Efficient Mechanical Help

While I’m a firm advocate for passive cooling, I also believe there is a place for mechanical systems. Used in conjunction with passive-cooling techniques, the effec­tiveness of both can be enhanced, leading to lower energy use without any compromise in comfort.

Choose Energy-Efficient Mechanical HelpПодпись: Start small. Strategically placed mechanical devices, such as the fan at the top of the hallway, can enhance passive design.That said, if you are going to use both passive and mechanical systems, it’s im­portant they work together. When hiring a heating and cooling contractor, choose someone who can size a mechanical system with your passive-cooling elements in mind and who will recommend energy-efficient equipment.

1

Sources

Seeking Solar Professionals

When considering passive design, you should seek the services of a qualified pro familiar with the right strategies for your home and climate. professionals accredited by the U. S. Green Building council’s LEED (Leadership in Energy and Environmental Design) program are a good place to start. Make sure anyone you hire to size or install mechanical sys­tems understands the effect your home’s passive elements will have on the sys­tem. The following resources can help in your search:

•U. S. Green Building Council: www. usgbc. org

•American Solar Energy Society: www. ases. org

•North Carolina Solar Center: www. ncsc. ncsu. edu

•Energy Star program: www. energystar. gov

•Southface Energy institute: www. southface. org

Choose Energy-Efficient Mechanical Help

Mechanical assist. This fan, at the top of the sloped ceiling, can also enhance passive design.

If your climate demands it, one mechani­cal component you might consider is a de­humidifier. When you rely on natural ven­tilation to cool your house, you need to be aware that letting in the breeze also means letting in moisture. When the air leaves, the moisture may remain. In these cases, mechanical systems can help to dehumidify the air, preventing mold and damage to your home.

The best way to introduce mechanical cooling to a passive house is to start small. Ceiling fans are a simple way to enhance natural ventilation. If you’ve installed radiant-floor heating tubes in the floor slab, you can boost its cooling effect by pumping cool water through the pipes in summer­time. Although this strategy must be care­fully monitored to avoid condensation, it can have the added benefit of preheating your domestic hot water.