Techniques CROSS-SIGHTING A JAMB

  Techniques CROSS-SIGHTING A JAMB

Techniques CROSS-SIGHTING A JAMBTechniques CROSS-SIGHTING A JAMB

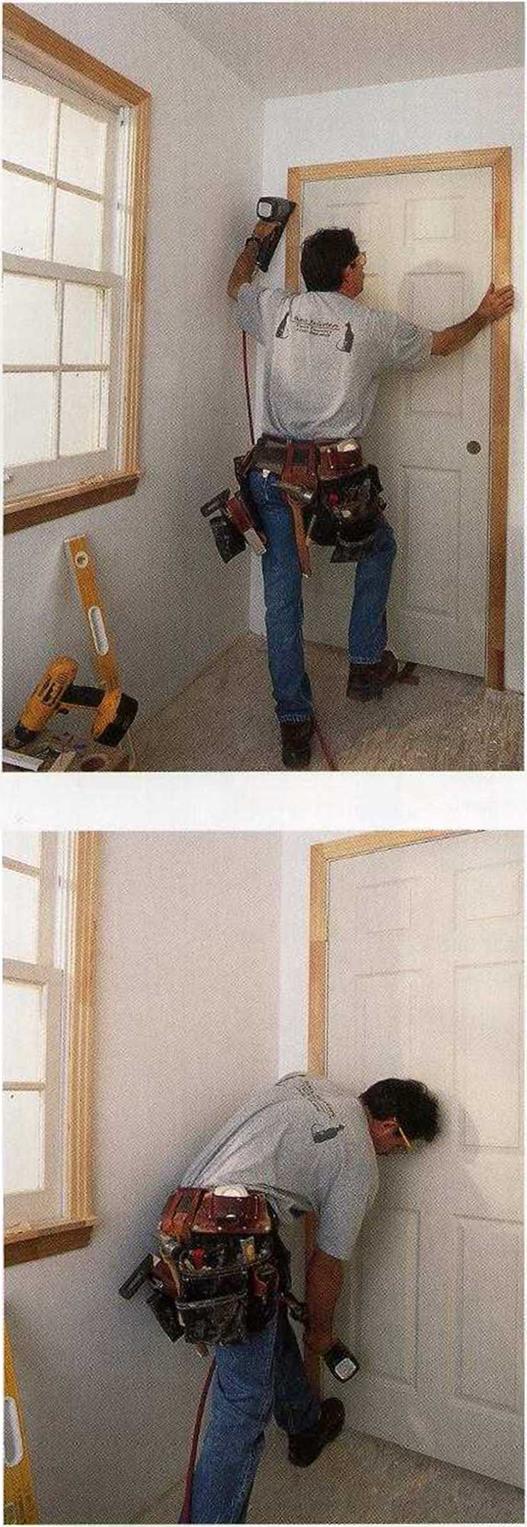
Подпись: LEAVE ENOUGH OPER-ATING CLEARANCE. Leave a Ye-in. margin between the door and the jamb so the door can open and Close freely. [Photo by Andy Engel, courtesy Fine Homebuilding magazine, ® The Taunton Press, Inc.] Подпись: KEEP THE JAMBS STRAIGHT. A heavy door can bow a jamb inward at the top hinge. Straighten the jamb by lifting up the door on the lock side and then nailing the jamb securely in place. [Photo by Andy Engel, courtesy Fine Homebuilding magazine, ® The Taunton Press, Inc.]

Techniques CROSS-SIGHTING A JAMB

thickness of a nickel, all the way across the top (see the top photo above). If the margin at the top is too tight (less than % in.) or too wide (more than % in.), it can be corrected by rais­ing a jamb side. The hinge side can be raised, even with a nail at the top, with a flat bar

under the jamb. Once the margin is correct, nail again near the bottom hinge. Remember to shim under every jamb that doesn’t rest directly on the subfloor.

When setting heavy doors, the weight on the top hinge can bow the jamb outward. If that happens, place a bar under the door and raise the strike (lock) side of the closed door until the hinge jamb is straight or even bowed back slightly. Then drive a nail through the jamb on the hinge side, both above and below the top hinge.

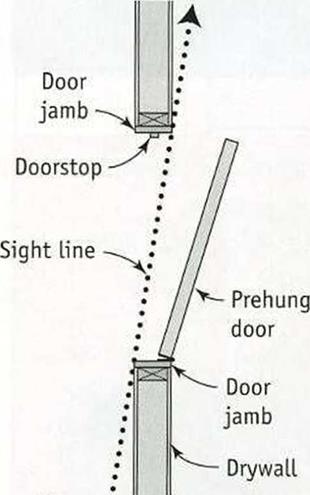
You don’t need to plumb the strike side of a prehung door. Just bring the jamb near the door so that the margin between the jamb and the door is consistent—and at least % in.—all the way around the door. Once the margin is correct, the strike-side jamb can be shimmed and nailed like the hinge side (see the illustra­tion on the facing page). Keep all nails well above and below the lock area.

When jambs come with the casing trim installed, drive 6d finish nails through the cas­ing and into the trimmer all the way around the door. Try not to drive nails into any grooves in the casing. This makes it hard to fill and sand nail holes.

Any space between the jamb and the trim­mer can be filled with a shim before vou nail

/

the jamb to the rough framing. I am not a fan of tapered shims because, unless you use a pair of them, a jamb may not be installed flat and straight. 1 prefer using small pieces of ply­wood (% in., Уїв in, Z in., or thicker) for shims.

I slide a З-in.-square shim between the jamb and the trimmer to provide solid backing before nailing the jamb sides in place. If there is a wide gap between the jamb and the trim­mer, don’t fill the space with a stack of tapered shims. Instead, use a single thick shim.

To strengthen the door assembly, remove a short screw from each hinge and drive an identical-looking but longer screw through

Durability Considerations for MSE Walls with Polymeric Reinforcement

The durability of polymeric reinforcements is influenced by time, temperature, mechanical damage, stress levels, microbiological attack, and changes in the molecular structure due to radiation or chemical exposure. The effects of aging and of chemical and biological exposure are highly dependent on material composition, including resin type, grade, and additives; manufacturing process; and final product physical structure.

Polymeric reinforcement, although not susceptible to corrosion, may degrade as a result of physicochemical activity in the soil, such as hydrolysis, oxidation, and environ­mental stress cracking. In addition, it is susceptible to construction damage, and some forms may be adversely affected by prolonged exposure to ultraviolet light. The durability of geosynthetics is a complex subject, and research is ongoing to develop reliable procedures for quantification of degradation effects. Moderate-strength geosynthetics have tensile strengths of about 100 lb/in (17.5 N/mm); some are now available that have strengths well over an order of magnitude higher. Current procedure to account for strength loss due to construction damage, and as a result of aging and chemical and biological attack, is to decrease the initial strength of the intact, unaged material for design.

West Bridge on the Great Belt Link, Denmark

image156

Another example of an SMA bridge application in Europe is found on one of the longest bridges in Europe—the Great Belt Link connecting Denmark with Sweden.

FIGuRE 13.1 Grading of the SMA aggregate mix, Roosteren design. (Data from von Brochove, G. G., Voskuilen, J., and Visser, A. F.H. M., Proceedings of the 4th Eurasphalt & Eurobitume Conference, Copenhagen, paper 402-102, 2008.)

It is a 6600-m long, prestressed concrete structure with an asphalt pavement consist­ing of the following courses (Wegan, 2000):

• 15 mm open graded asphalt concrete (drainage layer)

• 40 mm thick asphalt concrete (protective course)

• 40 mm thick SMA (wearing course)

The expected lifespan of the SMA layer on this bridge is 25 years.

Examples of SMA Pavements on Bridges

What follows are descriptions of a few applications of SMA-type asphalt mixes for pavements on steel bridge decks. It has been noted before that this type of bridge construction poses the greatest challenge for the asphalt pavement.

13.2.1.1 Bridge in Roosteren, the Netherlands

In 2005, in Roosteren, the Netherlands, an experimental SMA pavement was made with mastic containing a binder that was highly modified with elastomer (Pen@25°C = 50/70, SP > 90°C) instead of typical mastic asphalt (von Brochove et al., 2008). Demanding requirements, as follows, were required of the SMA mix to compare it with mastic asphalt:

• Resistance to permanent deformation measured by the triaxial compression method after EN 12697-25

• Cracking resistance by the method based on the semicircular bending test at 0°C and 5°C after EN 12697-44

• Fatigue limit, four-point bending test, prismatic sample (4PB-PR) at 5°C after EN 12697-24

• Stiffness, four-point bending test, prismatic sample (4PB-PR) at 5°C after EN 12697-26

The test results proved that the designed mix had a very high fatigue limit. It was laid down in one layer with gritting performed. The grading of the SMA aggregate mix is shown in Figure 13.1.

Tools and Equipment

Ladders and scaffolding are essential for many painting jobs. For more on them, see Chapter 3.

MASKS AND CARTRIDGES

Disposable paper masks will keep out sanding dust, but you need a filtered mask when spraying paints or applying chemical strippers. For any task involving leaded paint, wear a full-face respi­rator mask with replaceable HEPA (purple) car­tridges. For most paint applications, a half-face mask with replaceable organic vapor cartridges will be adequate. Masks vary, so pick one that fits your face snugly. To test the fit, when you cover cartridge openings and inhale, no air should enter the mask.

Cartridge life varies according to the chemical you’re using, the type of filter specified for that chemical, ventilation in your workspace, and the care you take to keep cartridges “alive” in stor­age. Change the cartridges whenever you smell fumes or whenever it becomes difficult to breath through the mask. Manufacturers suggest their own change schedules. For example, when filter­ing epoxy-based paints (very toxic) or urethanes, filters can become loaded in 8 hours. Whereas, filters for latex-based paints typically have a much longer change schedule—for example, 30 days or 40 working hours, whichever comes first.

BRUSHES

The bristles of high-quality brushes are flagged, meaning the bristle ends are split and of varying lengths, enabling them to hold more paint.

As you shop for brushes, pull lightly on bristles. Are they well attached to the metal ferrule on the handle? Then, when you gently press the bristles as though painting, they should spread evenly and have a springy, resilient feel. Avoid brushes with stiff bristles.

Bristle types. Bristles are either natural (hog bristles, for example) or synthetic (usually nylon). Use natural bristles for oil-based paints, varnishes, shellacs, and solvent-thinned polyurethanes. Use synthetic bristles for latexes. Nylon bristles may dissolve in oil-based paints; whereas natural bristles tend to swell and clog when used with the water-base of latex. Although some synthetic bristles work with either painting

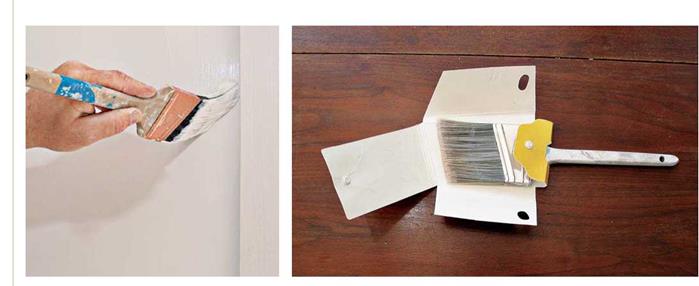
Quality bristles fan out as you apply paint. Here, the tapered bristles of а 2’Л-іп. angled sash brush “cut" a straight edge where walls meet trim.


Heavy paper or cardboard covers help bristles keep their shape.


image897

Подпись: PROTIP Before storing brushes, wrap them in stiff paper to protect the original shape of the bristles. Never wrap damp brushes in foil or plastic bags: Damp natural bristles can rot, and paint thinner remaining in the bristles can dissolve plastic bags. llll

medium, once you’ve used a brush for a particu­lar type of paint, continue using it for that type.

The width of the brush should depend on the amount of paint to be applied. Because rollers and spray guns are best for large surfaces, spend your brush money on smaller, better brushes. Many pros praise the 21/2-in. angled sash brush as the most versatile brush in their arsenal; it’s wide enough to smooth out paint on baseboard trim, yet slim enough to "cut an edge” at corners and along window casings. If you own only one brush, this should be it. But if you’ll be painting many narrow window muntins, also buy a 1 ’/2-in. sash brush.

Brush care. Brush care begins with proper use. Don’t stab bristles into tight spots. Instead, stroke the paint on. When you take a coffee break, leave a moderate amount of paint on the bristles so your bristles don’t dry out.

Clean brushes immediately after you finish painting for the day. Remove excess paint from the bristles by drawing them over a straightedge, not over the edge of the paint can. Brush the remaining paint onto old newspapers. Clean the brush in an appropriate solution: paint thinner for oil-based paints, soap and water for latexes.

Wear disposable gloves during brush cleaning, and use your fingers to work the solution into bristles and all the way to the ferrule. After giving each brush a thorough initial wash, rinse it in a fresh batch of solution. When the brushes are clean, shake and brush out the excess solution. Rinse with warm water, shake out the excess, and comb the bristles. (Solvent-cleaned brushes require an intermediate cleaning with soap and warm water.) Don’t use hot water when cleaning brushes because it splits the bristles.

ROLLERS, PANS, POLES, AND PADS

Rollers enable you to paint large areas quickly and evenly. In addition to the familiar 9-in. cylin­der type, there are also 6-in. "hot-dog” rollers for tight spaces, such as inside cabinets, and beveled corner rollers that resemble a pointed wheel. There are also textured rollers, including stip­pled, faux finish, and distressed.

Choosing a roller cover. The surface and paint should determine the type of roller cover, also called a sleeve. For example, if you’re painting smooth walls, use a short-nap cover (/4 in. to И in.). Whereas, concrete block and stucco need a long nap (1 in. to 1й in.). Most covers are synthetic and work either with oil-based or latex paints. However, for fine finishes with glossy oil-based paints, use a fine-nap natural-fiber cover. For an ultra-smooth finish when rolling enamels, varnish, or polyurethane, use a fine-nap mohair cover.

Don’t buy cheap cardboard-backed roller cov­ers unless you intend to paint a single room with latex and throw the cover away. (Never use cheap roller covers with oil-based paint. The oil will pluck the fibers from the cylinders and leave them sticking to your wall.) Quality roller covers have plastic sleeves that survive repeated clean­ings. As you do with brushes, use a roller cover for only one type of paint, whether oil-based or latex.

Roller pans. Ramped metal or plastic roller pans are routinely sold in packages that include a roller frame and a cover or two, but pros rarely use roller pans. Occasionally, pros may use a pan to hold a small amount of paint for decorative painting. But when pros roll multiple rooms, they prefer a ramp of expanded-metal inside a 5-gal.

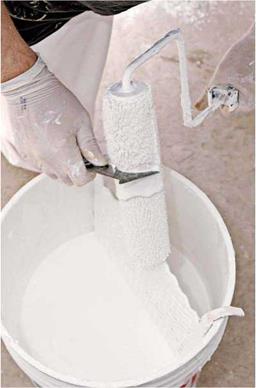
Подпись: Expanded metal ramps allow you to quickly load and roll excess paint into the bucket. Note the building paper protecting the flooring from paint spatters. paint bucket about half full. This ramp gives you room to load the roller and remove excess paint quickly—so you can keep painting, rather than repeatedly filling a roller pan.

Paint pads. Pads for paint are about the size of a small kitchen sponge and have a short nap. Generally, they are used to paint hard-to-reach spots such as insides of cabinets. They’re also

image899

Before washing roller covers, use this painter’s 5-in-1 tool to remove the excess paint.

used for applying clear finishes such as polyurethanes to flat surfaces.

Extension poles. Whether sectioned or telescop­ing, extension poles are indispensable for reaching ceilings and upper parts of walls with rollers or pads. Because the poles tax mainly your shoulder and back, rather than your wrist and arm, they enable you to work longer with less fatigue. Another advantage: By painting with an exten­sion pole, you don’t need to stand immediately under the drizzle, known as "paint rain.”

Roller-cover care. If you buy quality roller covers, clean them as soon as you finish a job.

For this, wear disposable gloves. Before washing a cover, use a 5-in-1 painter’s tool shown below to remove excess paint. Then slide the cover off the metal roller frame and wash the cover in the paint-appropriate cleaner, working out the paint with your gloved fingers. Repeat the procedure with fresh cleaner. Then wash with soap and water. Blot the excess moisture with a paper towel or a clean rag. Air-dry the cover by sliding it onto a hanger somewhere; don’t let it lie on its nap while drying. Store the dried cover or pad in a paper bag or foil. If a cover or pad wasn’t cleaned properly and has become crusty, throw it away.
Window Testing

Water infiltration caused by faulty windows or installation procedure is a common source of building failure leading to mold infestation and water damage. Because water infiltrating through window assemblies will often leak directly into the wall cavity, a problem can go undetected for a long time and once it is dis­covered the damage is often extensive.

Such problems can be avoided if the proper testing protocol is carried out at the time of in­stallation. Some windows are designed with drainage channels and weep holes that allow water to drain to the outside of the building and not into the wall. One way to test the ef­fectiveness of a windows drainage capacity is to temporarily block the weep holes with putty and then fill the drainage channel with water. If the window is properly manufactured and installed, the water should not drain out of the drainage channel when the weep holes are plugged. This test should be performed on each window for a minimum of 15 minutes. Be sure to remove the putty from the weep holes when the test is complete.

Durability Considerations for MSE Walls with Metal Reinforcement

Where metallic reinforcement is used, the life of the structure will depend on the corro­sion resistance of the reinforcement. Practically all the metallic reinforcements used in construction of embankments and walls, whether they are strips, bar mats, or wire mesh, are made of galvanized steel. Epoxy coating can be used for additional corrosion protection, but it is susceptible to construction damage, which can significantly reduce its effectiveness. PVC coatings on wire mesh also provide corrosion protection, provided again that the coating is not significantly damaged during construction. When PVC or epoxy coatings are used, the maximum particle size of the backfill should be restricted to /4 in (19 mm) or less to reduce the potential for construction damage.

For the purpose of determining the sacrificial metal required (corrosion allowance), the following design life is provided, pursuant to recommendations of Task Force 27 of AASHTO-AGC-ARTBA:

Structure classification Design life, yr

Permanent structure 75

Abutments 100

Rail supporting structures 100

Marine structures 75

The required cross-sectional area of steel reinforcement is calculated using the rela­tionships given in Fig. 8.38 for the selected type of reinforcement (strips or grids). The corrosion loss assumed is based on the following.

In 1985, an FHWA study was initiated to develop practical design and construction guidelines from a technical review of extensive laboratory and field tests on buried

FIGURE 8.38 Metallic reinforcement for MSE walls showing correction for corrosion loss.

(From the Reinforced Earth Co., with permission)

metals. The results of this research were published in December 1990 in the Federal Highway Administration report FHWA-RD-89-186, “Durability/Corrosion of Soil Reinforced Structures”:

For structures constructed with carefully selected and tested backfills to ensure full compli­ance with the electrochemical requirements, the maximum mass presumed to be lost per side due to corrosion at the end of the required service life may be computed by assuming a uniform loss model which considers the following loss rates:

1. Zinc corrosion rate for first 2 years: 15 ^m/yr

2. Zinc corrosion to depletion: 4 |xm/yr

3. Carbon steel rate: 12 ^m/yr

The resulting sacrificial thickness for a 75-year life based on initial galvanization of 2 oz/ft2 (86 |xm) is approximately 1.5 mm of total sacrificial thicknesses. Since this is a maximum loss rate, it is presently assumed that the reduced minimum thickness remains proportional to tensile strength and therefore no further reduction is necessary. (See Fig. 8.39.)

The select backfill materials shall meet the following requirements:

Internal friction angle. The material shall exhibit an internal friction angle of not less than 34 degrees as determined by the standard direct shear test, AASHTO T-236, utilizing a sample of the material compacted to 95 percent of AASHTO T-99, Methods C or D (with oversize correction), at optimum moisture content. Internal friction angle testing is not required for

TABLE 8.5 Backfill Requirements Related to Durability of Steel Reinforcement

Property

Requirement

Test method

Resistivity

Minimum 3000 D • cm, at 100% saturation

California DOT 643

pH

Acceptable range 5-10

California DOT 643

Chlorides

Maximum 100 ppm

California DOT 422

Sulfates

Maximum 200 ppm

California DOT 417

Source: From the Reinforced Earth Co., with permission.

backfill materials that have at least 80 percent of the material greater than or equal to the /4-in (19-mm) size.

Soundness. The material shall be substantially free of shale or other soft, poor durability particles. The material shall have a magnesium sulfate soundness loss of less than /0 percent after four (4) cycles, as determined by AASHTO T-104.

Electrochemical requirements. The material shall conform to the electrochemical requirements as described in Table 8.5.

The Contractor shall furnish to the Engineer a Certificate of Compliance certifying that the select granular backfill material complies with this section of the specification. A copy of all test results performed by the Contractor, which are necessary to assure compliance with the specifications shall also be furnished to the Engineer.

Backfill not conforming to this specification shall not be used without the written consent of the Engineer.

The frequency of sampling of select granular backfill material, necessary to assure gradation control throughout construction, shall be as directed by the Engineer.

The Han Empire: continuing hydraulic development. Awakening of the Yellow River

The First Emperor left the legacy of an energetic, but bloody, monarchy to Chinese his­torians. And this is no doubt why the Qin Dynasty could not survive it. It is replaced by the long Han Dynasty, dominating China for more than four centuries from 206 BC to 220 AD. The Empire continues to encompass the basins of the two great rivers, and even extends to the south as far as Canton and to the west into the corridor of the Silk Road, nearly to Bactria. But the demographic and economic center of gravity remains in the north. The census of the year 2 AD showed 85% of China’s 57 million people to be in the north. The most populated zones[408] are the Wei valley, ancient nursery of the Qin, and the vast alluvial plain of the lower course of the Yellow River down to the sea, between the Jiang River to the north and the Huai to the south. The capital of the early Han, Chang’an, is on the present-day site of Xi’an. Following a temporary usurpation of power by a dignitary named Wang Mang (9 to 23 AD), the capital is relocated to

Luoyang, near the ancient capital of the Zhou (the latter Han), where the Yellow River flows out onto the plain.

Moisture Meters

There are two general types of moisture me­ters. The first uses sharp pin probes that are pushed into the material to be tested. The pin probe meter detects moisture by electri­cal conductivity, since wet materials conduct greater amounts of electricity than dry materi­als. This meter leaves pinholes in the materials being tested. The second type of meter sends an electronic signal into the material. The de­gree of moisture determines how the meter will register the returning signal.

Both types of moisture meters are bat­tery operated and can be used repeatedly. The meters range in cost from about $200 to over $1,000 and can require some technical expe­rience. For example, damp wood is measured with a different setting and scale than damp concrete or brick. Companies that specialize in fire and flood damage restoration are likely to have this equipment and be experienced in its use. If you decide to purchase or borrow a moisture meter, plan on spending some time becoming familiar with it and thoroughly reading the owner s manual and instructions. Keep in mind that hidden metals or salt de­posits may falsely indicate that materials are wet when in fact they are dry.

Testing for Weathertightness

All homes are supposed to be weathertight but many are not. One simple method for testing is to literally water the house. You can specify that the exterior of the house shall be weathertight before any interior construction begins. Once the exterior is complete and the doors and windows are installed and caulked, spray the house with a hose so that every part of the house gets soaked for at least 15 min­utes. Then inspect all areas inside the house for leaks. A moisture meter will be useful for this task.

This test should be performed only prior to the installation of interior sheathing or insula­tion so that leaks can be easily detected, dried out, and remedied. The test will be much more effective if a negative pressure can be created in the house while the test is being performed, as this will more accurately simulate pressure conditions that exist during a storm. A blower door is an excellent way to create a known negative pressure for this test. (See the section on blower doors below.)

Porous Asphalt

Although they may not be considered as part of the drainage system, a pervious type of asphalt treated surface layer, known as porous asphalt, has become common in Europe in recent years. The main advantages attributed to porous asphalt layers are noise reduction, improvement of skid resistance in wet weather, and enhancement of runoff water quality. Asphalt treated drainage layers of this type are discussed further in Chapter 5, Section 5.7.

13.3.4.2 When Drainage is Unnecessary

Some authors suggest that subsurface drainage may not be necessary if:

• annual rainfall is not significant;

• the subgrade has a relatively high permeability value;

• the pavement is structurally adequate without drainage;

• lateral and vertical drainage in the pavement section exceeds infiltration; or

• heavy traffic level is negligible.

For example, Christopher (1998) found that drainage provides no additional benefit if average annual rainfall is less than 400 mm and permeability of the sub­grade exceeds 3.5 x 10⁻⁵ m/s, however Dempsey (1988) and Forsyth et al. (1987) suggested different values, 3 x 10⁻⁶ m/s and 1.7 x 10⁻⁴ m/s, for this parameter.