Reclaimed Asphalt

According to the standard, the use of RAP for SMA is permissible. The types, quan­tities, and requirements for RAP to be used in SMA mixes should be specified in an NAD appropriate to the intended use.

RAP should be classified according to EN 13108-8 and should conform to the relevant requirements for a particular application.

The maximum size of a particle in RAP cannot be larger than size D of the SMA mix. The quality of aggregate in RAP cannot deviate from the requirements for a new aggregate to be used in a given SMA.

When the used RAP contains road binder (unmodified) and when the binder added to the mixture is road binder then additionally one of two values should be determined: either the penetration at 25°C or the softening point (R&B) of a mixture created by combining the recovered binder from the RAP with the new binder added during SMA production. The test result (Pen25 or SP) of this binder mixture should meet the requirements for the target (design) road binder selected for a given SMA. Formulae for calculating properties of binder mixes can be found in the standard EN 13108-5, Annex A. The method of recovering binder from recy­cled asphalt paving mixture should be in accordance with EN 12697-3 (binder recovery—rotary evaporator) or EN 12697-4 (binder recovery—fractionating column). The penetration should be determined according to EN 1426 and the softening point according to EN 1427. Such an additional requirement is used in following cases:

• In a wearing course when more than 10% (m/m) RAP is used

• In a regulating (leveling) and intermediate course when more than 20% (m/m) RAP is used

When used RAP or the new SMA contains a modified binder or a modifier addi­tive, according to Item 5.1 of the standard the amount of RAP cannot exceed the following:

• 10% by mass of the total mixture if the SMA is intended for a wearing course

• 20% by mass of the total mixture if SMA is meant for a regulating* or intermediate course or a base course

Both the client and the producer of the SMA mix may arrange otherwise, pro­vided that other local (national) regulations are not infringed upon.

14.4.4 Additives

Additives should conform to the requirements for constituent materials; namely, they should have the determined suitability—marked by complying with an appropriate EN standard, ETA, or a demonstrable history of satisfactory use.

Complex and Special-Care Areas

Installing wallcovering would be a snap if there were no corners, doors, windows, and electrical outlets, where you need to use extra care.

TILTING TRIM

AND COCKEYED CORNERS

In renovation, trim and corners are rarely per­fectly plumb, but strips of wallcovering must be, regardless of tilting trim and corner walls out of plumb. If your first strip begins next to an out-of-plumb jamb casing, overlap it by the amount the casing is off plumb. After brushing

Подпись:

Подпись: Fixing Three Small Flaws ► A paste lump under the covering. First try to flatten it with a plastic wall smoother. This may take several gentle passes. (Don't use a metal blade because it would snag on the lump and tear the wallpaper.) If there are many lumps, the paste is unevenly mixed. In this case, pull the strip off the wall, and sponge the wall clean. Then adjust or replace your paste mix, and start with a new strip. ► Air bubbles that you can't brush out. This is a common problem with vinyl wallcoverings. Use the point of a razor knife to cut a small slit. As you gently force out the air with a smoothing brush, the slit will flatten out and then become unnoticeable. ► Edge not adhering. Pull it away from the wall slightly and dab on paste with a small brush. Avoid stretching the covering, especially if it's vinyl.

out the wallpaper, trim the overlapping edge.

Thus the leading edge of that strip will be plumb, as will the next strip’s. But always double-check for plumb before hanging subsequent strips.

Inside corners. If an inside corner is cock­eyed, a strip of wallcovering wrapping the corner will be out of plumb when it emerges on the sec­ond wall. First use your spirit level to determine which way the walls are leaning. Then trim down the width of the strip so it is just wide enough to reach the second wall—plus a J/s-in. to!4-in. over­lap. (Save the portion you trim off: If it’s wide enough, you may be able to paste it onto the sec­ond wall, thus attaining a closer pattern match in the corner.)

Now hang a strip of wallcovering on the sec­ond wall, plumbing its leading edge to a plumbed line you’ve marked on the wall first. Tuck the trailing edge of the strip into the corner so that it overlaps the first strip. There will be a slight mis­match of patterns, but in the corner, it won’t be noticeable. If you don’t like the small welt that results from the overlap, use a razor knife to double-cut the seam. However, if your walls are old and undulating, they’ll make it tough to cut a straight line. Ignoring a slight welt may spare you
a lot of frustration. In any event, don’t butt-join strips at corners because such seams almost always separate.

Подпись: As you wrap an outside corner with wallpaper, relief-cut the top of the strip at the corner, as shown. Otherwise, the paper won't lie flat on both walls. Outside comers. Outside comers project into a room and so are very visible. So when laying out the job, never align the edge of a strip to the edge of an outside comer. Such edges look terrible ini­tially and then usually fray. If the edge of a strip would occur precisely at a corner, cut it back h in. and wrap the corner with the edge of a full strip from the adjacent wall. Relief cut the top of the wallcovering where it turns the corner, as shown in the photo below, so the top of strip can lie flat. Remember to plumb the leading edge of the new strip.

FITTING OVER OUTLETS AND FIXTURES

О Before hanging paper over an electrical outlet, switch, or fixture, turn off power to that outlet and check that it’s off by using a voltage tester.

image977

Cutting option 1: Loosely hang the paper, locate the outlet, and cut a small X over the center of the outlet, extending the X until the paper lies flat.

Cutting option 2: Loosely hang the paper and cut around the outside of the outlet box. When the cutout is complete, brush the paper flat.


Подпись: PROnP To reach your ceiling, you'll probably need an elevated plat-form. The safest option is rental scaffolding. In a pinch, sturdy planks running between two stepladders will do. llll

Z-Glass House

This contemporary design does not have a pronounced gabled roof or loft. It looks a lot like the New Popomo, but is about three times bigger. Like its smaller cousin, the Z-Glass House has a glass wall that is intended to face south during the winter for solar gain. This design includes a stain­less steel counter, sink, range and refrigerator, a full bath and a fire­place. While it is not built on inte­gral wheels, it is small enough to be moved on a trailer. It is shown at right with hot rolled steel siding. [5]

Square feet: 461

With add-on: 557 House width: 16’

House length: 30’

Porch: 6’ x 6’

Great Room: 10’ x 15%’ Kitchen: 7%’ x 7’

Bathroom: 7%’x4[6]/2’

Addition: 7’x10’

Ceiling height: 7’ 6” – sizes are approximate

. Three Types of Seams

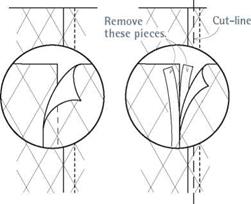
You can join strip edges in three ways: butt seam, overlap seam, or double-cut seams.

► The butt seam is the most common, its edges are simply butted together and rolled with a seam roller.

► An overlap seam is better where corners are out of sguare or when a butt seam might occur in a corner and not cover well. Keep the overlap as narrow as possible, thereby avoiding a noticeable welt and patterns that are grossly mismatched.

► Double-cut seams (also called through-cut seams) are the most complex of the three. They are used primarily where patterns are tough to match or surfaces are irregular; for example, where the walls of an alcove aren’t sguare.

How to Cut Seams________________________

OVERLAP SEAM DOUBLE-CUT SEAM

image966

Подпись:covering are called straight match. Patterns that run diagonally are called drop match and waste somewhat more material during alignment.

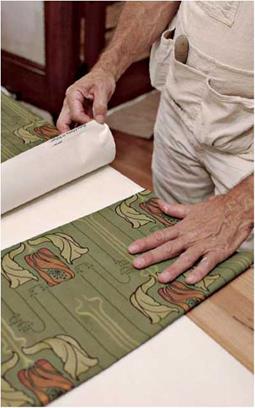
Unless you are working with a delicate cover­ing, cut several strips at a time. But be careful not to crease them. Flop the entire pile of strips face down on the table so the piece cut first will be the first pasted and hung. The table must be perfectly clean; otherwise, the face of the bottom strip could become soiled.

PASTING

Unless you’re experienced, buy a premixed adhe­sive. But if mix you must, try to achieve a mix­ture that’s slightly tacky to the touch. Add paste powder or water slowly: Even small increments can change the consistency radically. Finally, mix thoroughly to remove lumps.

As you work, keep the pasting table clean, quickly sponging up stray paste so it won’t get on strip faces. Some coverings, such as vinyl, are not marred by stray paste on their face, but many others could be. Although the batch of paste you mix should last a working day, keep an eye on its consistency. Paste should glide on, never drag. Rinse the paste brush or roller when you break for lunch and when you quit for the day.

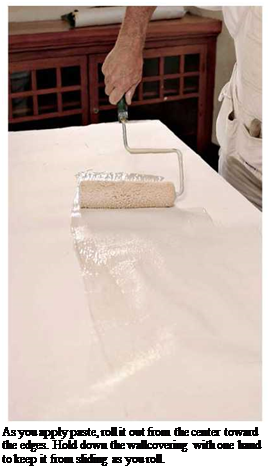
Until you become familiar with papering, apply paste to only one strip at a time. Using a roller, apply paste in the middle of the strip, toward the top. Spread the paste to the far edge and then to the near edge. For good measure, run the roller over strip edges twice because it’s often hard to see if the paste along the edges is evenly spread.

Prepasted Papers and Water Trays

Most wallcoverings come prepasted. Typically, manufacturers specify that indi­vidual strips be soaked for 30 seconds in a water tray filled with lukewarm water. But follow the directions printed on the back or supplied by the retailer. After soaking, pull each strip out of the tray and onto the work table, book (fold) it, and allow it to expand before hanging it on the wall. Precut the pieces before placing them in the water tray. Otherwise, if you try to trim soaked strips, they’ll snag or tear.

Many professional paperhangers will hang prepasted wallcoverings but hate water trays because (1) water and diluted paste drips everywhere; (2) the water in the tray must be changed often; (3) a thin film of paste also ends up on the front of the wallcovering; and (4) if the strips are soaked too long, they may not adhere well.

Instead, these pros roll prepaste activator onto the backing of strips, just as you’d apply standard paste. Rolling on an activator reduces mess and ensures good adher­ence to the wall.

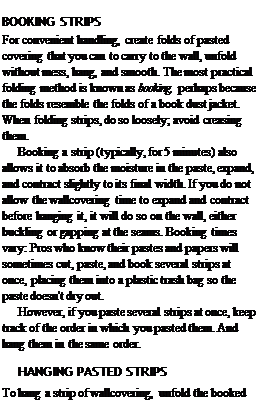
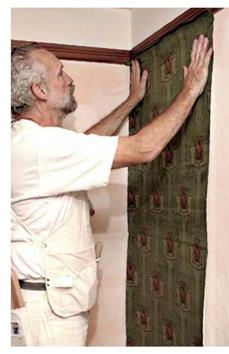
Подпись:Подпись: BOOKING STRIPS For convenient handling, create folds of pasted covering that you can to carry to the wall, unfold without mess, hang, and smooth. The most practical folding method is known as booking, perhaps because the folds resemble the folds of a book dust jacket. When folding strips, do so loosely; avoid creasing them. Booking a strip (typically, for 5 minutes) also allows it to absorb the moisture in the paste, expand, and contract slightly to its final width. If you do not allow the wallcovering time to expand and contract before hanging it, it will do so on the wall, either buckling or gapping at the seams. Booking times vary: Pros who know their pastes and papers will sometimes cut, paste, and book several strips at once, placing them into a plastic trash bag so the paste doesn't dry out. However, if you paste several strips at once, keep track of the order in which you pasted them. And hang them in the same order. HANGING PASTED STRIPS To hang a strip of wallcovering, unfold the booked upper fold (leaving the lower one folded) and align the edge of the strip to your plumb line. Last, pros sometimes roll thinned-down paste instead of activator. That may be okay, but first ask the wallcovering supplier if the two pastes will be compatible.


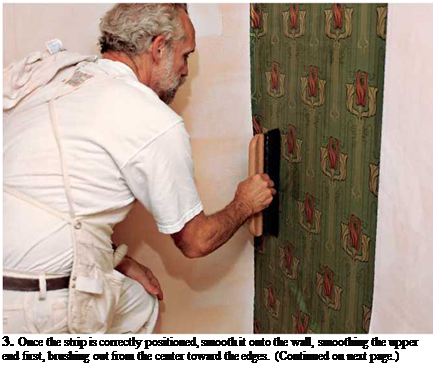
Подпись:Подпись: 2. To hang the first strip, unfold the top half and carefully align it to the plumbed line you marked earlier, leaving an inch or so extra at the top. Gently slide the strip into place. Align each subsequent strip to the leading edge of the preceding one. image968Подпись:image970Подпись: 3. Once the strip is correctly positioned, smooth it onto the wall, smoothing the upper end first, brushing out from the center toward the edges. (Continued on next page.)

Position the upper end of the strip an inch or so above the ceiling line. Smooth the upper end of the strip first, by running a smoothing brush down the middle of the strip and out toward the edges. Working from the center outward, brush air bubbles, wrinkles, and excess paste from the middle to the edges. Align subsequent pieces to the leading edge of each preceding strip, checking periodically to make sure the strips are plumb.

If the upper half of the strip is adhering well, simply unfold the lower fold and smooth the paper down, again brushing down the center and out toward the edges with small strokes.

If a butt seam doesn’t meet exactly, you have three choices:

Move a strip slightly by raising one of its edges, and—palm on paper—using your other hand to slide the strip toward or away from the seam. Raising one edge of the strip reduces the grip between paper and wall.

Pull the strip off the wall, realign its patterns along the seam, and brush it down.

But you’ve got to move quickly: Don’t wait much more than a minute to pull the strip off.

Pull off the strip, quickly sponge clean the wall, and hang a new strip.

Don’t try pulling just one edge of the strip, however. At best, it will stretch, draw back when it dries, and open the seam. At worst, you’ll pucker or rip the strip.

SPONGING

It’s impossible to overstate the importance of gently wiping paste off the wallcovering and adja­cent surfaces. Left on the wallcovering, paste can shrink and pull the ink off. If paste dries on a painted ceiling, it will pull the paint off. (If you see a brown crust along a ceiling-wall intersec-

Dry-HANGING

If handled too much, many fabrics, foils,

Mylars, and grasses will separate from their backing once they absorb the paste. For that reason, pros often dry-hang them. Here’s how: They roll paste onto the wall and smooth the dry covering onto it. However, leave this job to a pro because the paste must be applied impec­cably even, and the strips placed exactly— there’s little chance to adjust them. Likewise, these materials can’t tolerate sponging, rub­bing, or seam rolling. Pros sweep them on with a soft-bristle smoothing brush and let them be.

tion, that’s dried paste.) Paste will even pull the finish off wood trim. Vinyl-on-vinyl and clay adhesives are especially tenacious, so sponge off the excess immediately.

Equally important: Change your sponge water often so diluted paste doesn’t accumulate. Warm water is best. And wring the sponge almost dry before wiping. When you’ve wiped the surfaces
clean, come back with a soft, dry rag. But apply only light pressure so you don’t move the wall­covering, disturbing its seams.

Note: Don’t rub delicate wallpapers. Instead, blot them clean with a just-damp sponge. Before you commit to any wallcovering, ask your sup­plier if it can be wiped (or blotted clean) with a sponge. If not, consider other materials.

TRIMMING AND ROLLING

Where a strip of wallcovering meets borders such as woodwork, a ceiling line, or a baseboard, use a 6-in. taping knife to press the edges of the cover­ing snug. Cut off the excess by running a razor knife along the blade of the taping knife. Because strips may cover door or window casing, you may want to rough-cut the ends of strips first so you don’t cut them too short. Then, using your taping knife to tuck the wallcovering snugly against the casing, trim it more precisely. For clean cuts, razor blades must be sharp.

Conventional wisdom suggests rolling wall­covering seams 10 minutes or 15 minutes after the strips are in place—that is, after the paste has set somewhat. But the master craftsman shown hanging wallpaper in photos here prefers to the roll seams before he brushes out the paper. If you position the strips correctly, roll the seams, and then smooth the covering, he asserts, you’re less likely to stretch the wallpaper. Also, if seams don’t align correctly, you want to know that sooner, rather than later, so you can adjust or remove the strip before the paste sets up.

In any case, rolling may cause paste to ooze from the seams. So, be sure to sponge wallcover­ing clean as you work, unless you’re installing delicate or embossed wallcovering, which shouldn’t be rolled or wiped at all. Finally, use a moderate pressure when rolling. After all, you’re trying to embed the wallcovering in the paste, not crush it.

Material Organization and Cutting

Material Organization, Mitre Saw

1. Set up your table in convenient locations for moving lumber in and out.

2. Place the incoming material as close as possible to the side of the saw where you will be positioning it to cut.

3. As it is cut, stack the lumber in a pile that is neat and easy to pick up and carry or lift with a forklift.

4. Put scrap wood that you will be cutting into stacks nearby, maybe under the saw table.

Cutting with a Mitre Saw

1. Set your length gage for multiple cuts.

2. Cut your first piece, then check the cut for square (both vertical and horizontal) and correct length.

3. Check the second and tenth piece for square and length.

4. Check every tenth piece after that for length.

5. Keep lumber tight against lumber guides, but don’t bang them so that they move.

6. Remove any sawdust near the guides.

7. Respect the saw! If you don’t, there is a good chance you will hurt yourself or your fellow framers.

Fractions

Many apprentice framers are not familiar with fractions, and some might be embarrassed to admit this. It doesn’t take long to teach fractions. Ask the framer to show you where 11/16" is on the tape. If he can’t do it easily, draw a duplicate of a tape showing the different length lines. Mark the fractions on each line, and tell him to take it home and memorize it. Review as frequently as required to develop proficiency.

Hydraulic energy – water mills and windmills

We have seen the first use of hydraulic energy in China under the Han Empire, at the beginning of the 1st century AD. The Chinese devices are quite complex from the very beginning, in contrast to the comparable but simpler devices developed at the same time in the Roman Empire. There, simple horizontal-axis mills are used to turn a grindstone. But in China there are complex devices powered by vertical-axis water wheels, according to all evidence. These wheels power batteries of pestles for agricul­tural or metallurgical use (21 AD). In the industrial center of Nanyang they power bat­teries of bellows to provide combustion air for the melting and casting of iron (31 AD).

It is probably in the 4th century that the direct use of rotating wheels to grind grain was developed, in response to depopulation resulting from the wars following the fall of the Han Empire. In the 7th century the technology of mills is exported from China toward Korea, Japan, and Tibet. In China of the 8th century one finds many large mills having up to five wheels, the property of rich merchants, Buddhist abbots, imperial concubines and palace eunuchs. Conflicts inevitably arise from competing uses of water: the industrial flour trade, navigation, and agriculture. The Confucian civil ser­vants give priority to traditional uses of water for the general public good, and accord­ingly they issue edicts to limit the proliferation of mills. In 778, eighty mills are destroyed by order of the administration.[453]

Hydraulic energy is thoroughly assimilated into Chinese culture at the beginning of the Christian era, when the use of the water wheel is increasingly widespread. Such uses include the powering of batteries of hammers, forge bellows, mills, and also square-pal­let chain pumps, and even merry-go-rounds of dolls (in 260), celestial spheres (slowly rotating astronomical models) in 590, and textile spinning machines (the first dating from 1313.[454] The noria should, however, be considered separately. As we have said earlier, it is probably a technique imported later from the Near East or India, independ­ently of other uses of hydraulic energy.

Windmills, known in the Islamic world since the 7th century, are apparently intro­duced into China from Turkestan toward the 12th or 13th centuries:

“The people of the west use wind mills as the people of the south use water mills.”[455]

These are vertical-axis mills, as was the case in Persia. In China, the sails of the mills are improved through adoption of the technology of sails for junks.

Natural Asphalts

Natural asphalt may be employed for SMA as an additive to the road binder or modi­fied binder under the following conditions:

• If it conforms to the requirements of EN 13108-4, Annex B, Tables B.1 and B.2, for natural asphalts with high or low-ash contents, respectively

• When natural asphalt is being incorporated in the road or modified binder by means of the following:

• Intermixing with heated binder in a liquid state in a tank

• Direct batching into a pugmill in the case of natural asphalt in the form of a powder or granulate with particles not exceeding 10 mm

14.4.2 Aggregates

All types of applied aggregate (coarse, fine, all-in,[74] added filler) should comply with the requirements of EN 13043 selected for a specific use. The appropriate NAD with requirements for SMA aggregates corresponding to the standard EN 13043 should be selected (examples of such requirements are detailed in Chapter 5).

The amount of added filler should be fixed. Hydrated lime and cement may also be used as fillers.

ACOUSTICAL STANDARDS AND DESIGN

Federal Highway Administration (FHWA) regulations for mitigation of highway traffic noise in the planning and design of federally aided highways are contained in Title 23 of the United States Code of Federal Regulations, Part 772. Requirements during the planning and design of a highway project include identification of traffic noise impacts, examination of potential mitigation measures, inclusion of reasonable and feasible noise mitigation measures, and coordination with local officials. The regulations contain noise abatement criteria for different types of land uses and human activities. Reasonable and feasible efforts must be made to provide noise mitigation when the criteria are exceeded. Compliance with the regulations is a prerequisite for securing federal-aid highway funds for construction or reconstruction of highways. Further details may be found in the FHWA Noise Standards.

Computer programs based on mathematical models have proven very useful for pre­dicting noise levels and designing noise barriers. The FHWA has released an entirely new, state-of-the-art computer program known as TNM® that provides a traffic noise model for predicting noise impacts in the vicinity of highways. Replacing older models (Stamina and Optima), the new program uses advances in personal computers and soft­ware to improve the accuracy and ease of modeling highway noise, and the design of effective, cost-efficient highway noise barriers. Included are the following components:

• Modeling of five standard vehicle types, including automobiles, medium trucks, heavy trucks, buses, and motorcycles, as well as user-defined vehicles

• Modeling of both constant-flow and interrupted-flow traffic using a 1994/1995 field-measured database

• Modeling of the effects of different pavement types, as well as the effects of graded roadways

• Sound level computations based on one-third octave-band database and algorithms

• Graphically interactive noise barrier design and optimization

• Attenuation over/through rows of buildings and dense vegetation

• Multiple diffraction analysis

• Parallel barrier analysis

• Contour analysis, including sound level contours, barrier insertion loss contours, and sound-level difference contours

Local criteria may be more restrictive than federal criteria. In Minnesota, for example, daytime criteria in residential areas are an hourly L10 of 65 dBA and an hourly L50 of 60 dBA. L10 refers to the sound level that is exceeded 10 percent of the time over the period under consideration (1 h, in this case); L50 refers to the level exceeded 50 percent of the time. Noise abatement projects strive for a minimum reduction of 10 dBA in L10 and 6 dBA in L50 from existing traffic noise levels.

Install the base cabinets in kitchens and baths

Cabinet installation details are the same, whether you’re working in the kitchen, the bathroom, or any room. Some people prefer to install wall cabinets first so they won’t have to reach over the base cabinets. Perhaps because I am tall, I gen­erally install base cabinets first. Either way, it’s best to begin in a corner. Corner cabinets tend to be large and are trickier to install because

Kitchen cabinets are seen and used every day. It’s important that they be installed with care, leaving them plumb, level, and straight. [Photo by Don Charles Blom]


Install the base cabinets in kitchens and baths

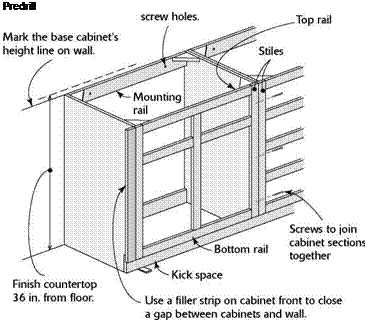
Подпись: їм їм їм їм їм и їм їм їм їм їм їм їм и їм їм їм їм їм їм їм и їм їм їм їм їм їм їм и їм їм їм їм їм їм и їм їм їм їм їм їм їм и їм їм їм їм їм їм їм и їм їм їм їм і INSTALLING A BASE CABINET Подпись: Predrill

they have to fit against two wall surfaces. But once you get a corner cabinet installed plumb and level, you’ll have an easier time with the rest of the job.

PLANNING AND PREPARATION ARE

IMPORTANT. Before you screw any cabinets to the wall, it’s a good idea to line them up and see whether they will fit into the allotted space. It’s not unheard of for one or more cabinets to be manufactured in the wrong size, so this test­fitting exercise is important. At this stage, and during the installation process, it’s important to allow adequate clearances between cabinets for the major appliances. For example, you should leave between 301/8 in. and ЗО1/ in. of space be­tween base cabinets to fit a standard 30-in.-wide range or stove. Your final prep step is to label all cabinet doors and drawers, then remove them until you’ve finished the installation process. START WITH A LEVEL LINE. Begin the in­stallation process by marking a level line on the wall, where the top edges of your base cabinets will fit. If you suspect that the floor surface isn’t exactly level where the cabinets will be installed,

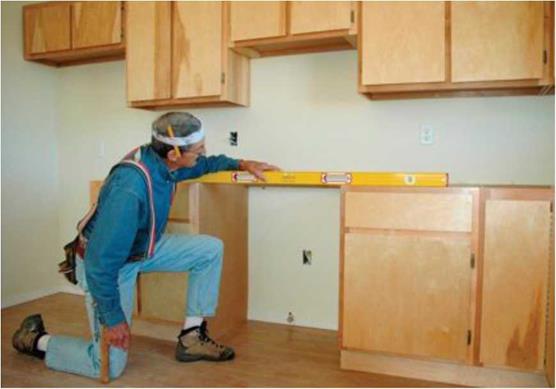
Make sure base cabinets are level and set to a height line marked on the wall.

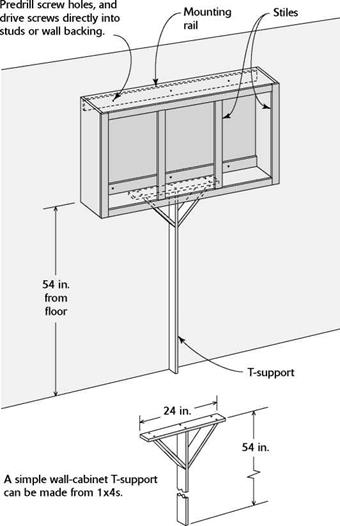
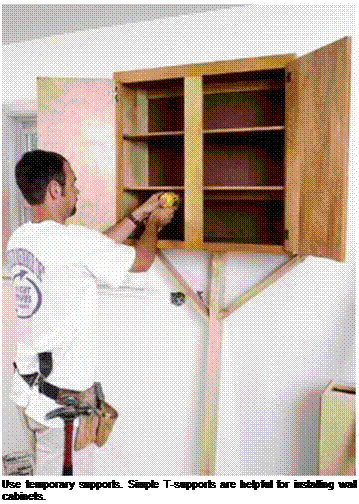
Подпись: Inexpensive sensors, both electronic and magnetic, are available to help locate studs behind drywall. As a sensor is moved along the drywall, it detects the location of the wall studs and indicates when it finds one.Подпись: INSTALLING WALL CABINETSInstall the base cabinets in kitchens and bathsПодпись:

use a level to find the highest spot on the floor, then measure up the wall near that spot. The standard height of base cabinets without a countertop is usually 341/2 in. or 3514 in., depend­ing on the manufacturer (see the illustration on

p. 255).

DRIVE INSTALLATION SCREWS INTO STUDS. Base cabinets are screwed into wall studs or the 2×4 backing described in Chapter 4. If stud locations were not marked on the floor, you can locate them by tapping lightly
on the drywall with a hammer and listening for a solid sound. To make sure you’ve found a stud, drive a nail through the drywall in a place where the cabinet will cover the holes. Once you locate one stud, other studs should be 16 in. or 24 in. o. c. Use 3-in. flat-head screws to install cabinets. Don’t use drywall screws, because they tend to be brittle and aren’t designed to support heavy loads.

GET CABINETS LEVEL. Make sure the top back edge of the cabinet sets directly to the wall line so it’s level. Predrill holes for the installa­tion screws through the mounting rail and into the studs. Then screw the cabinet to the wall. Now place a 2-ft. level across the top of the cabinet from the back edge to the front edge. As necessary, wedge shims under the cabinet to get the top of the cabinet level in all directions. You can glue the shims in place to make sure they don’t shift around. If any part of a shim proj­ects beyond the front or side of a cabinet, cut or chisel it flush. Use this leveling technique when installing all base cabinets.

JOIN CABINETS TOGETHER. Separate cabinets, both base and wall types, are joined together where their stiles meet. A stile is a ver­tical member in the rectangular face frame that forms the front of most cabinets. Horizontal frame members are called rails (see the illustra­tion on p. 255). With face-frame cabinets, the stiles of adjacent cabinets are clamped together, drilled, and screwed.

As you join and clamp one cabinet to another, make sure each cabinet is level and at the proper height. A pair of clamps should be sufficient to hold two stiles together until you screw them to each other. Drill countersunk pilot holes for two screws, one near the top hinge and one near the bottom hinge. A third screw can be driven near the center of the stile, if necessary. With a coun­tersunk pilot hole, the head of the screw should be just slightly below the wood surface.

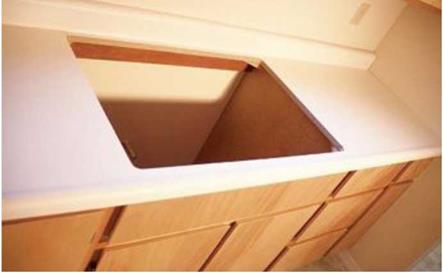
CUT HOLES IN SINK CABINETS. A base cabinet that will hold a sink needs to have holes drilled or cut at the back for water supply and waste lines. A kitchen sink base will also have

Подпись:Подпись:Install the base cabinets in kitchens and bathsan electrical line coming in, if a garbage disposal unit and/or a dishwasher will be installed (see the bottom photo on p. 254). Measure from the floor and the adjoining cabinet to locate the cen­ters of the access holes. You can use a jigsaw or a drill with a hole saw to cut the holes. Drill slowly and leave a neat-looking job. Seal any holes around pipes with expanding foam or caulk. FILL GAPS WITH STRIPS. At times you may need a vertical filler strip to close a gap between the edge of a cabinet and an adjoining wall. A filler strip is like a stile. It is cut to the width of the gap and then screwed to the cabi­net stile, as shown in the illustration p. 255. If the space allotted between walls is too small for the cabinets to fit in, the overhanging part of a stile can often be trimmed to make more room.

В-53

The В-53 is the biggest design I offer. It is essentially the Enesti with a bungalow exterior and a bump-out over the porch.

н-W: