ROLLING OFFSETS

Rolling offsets can be figured with a complex method or with a simplified method. since i assume that you are interested in the most accurate informa­tion that you can get in the shortest amount of time, i will give you the sim­plified version. The results will be the same as the more complicated method, but you will not pull out as much hair or lose as much time as you would with the other exercise, and you will arrive at the same solution.

ROLLING OFFSETS

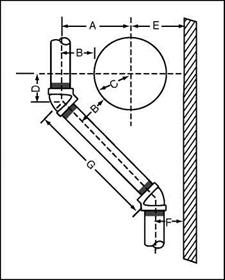
FIGURE 2.8 ■ Starting point of a 451 offset around a tank.

ROLLING OFFSETS

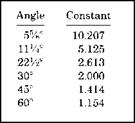
FIGURE 2.9 ■ Simplified method of figuring a rolling offset.

To figure rolling offsets simply, you will need a framing square, just a typ­ical, steel, framing square. The corner of any flat surface is also needed, so that you can form a right angle. You will also need a simple ruler. The last tool needed is the table that I am providing in Fig. 2.9. This is going to be really easy, so don’t run away. Let me explain how you will use these simple ele­ments to figure rolling offsets.

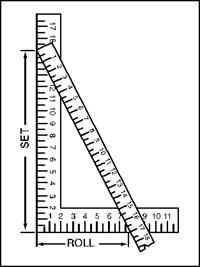
stand your framing square up on a flat surface. The long edge should be vertical and the short edge should be horizontal. The long, vertical sec­tion will be the Set, and the short, horizontal section will be the Roll. Your ruler will be used to tie the Set together with the Roll (Fig. 2.10 square and ruler). A constant will be needed to arrive at a solution, and you will find constants in the table I’ve provided in Fig. 2.9. Once again, the three main angles are addressed.

ROLLING OFFSETS

FIGURE 2.10 ■ Laying out a rolling offset with a steel square.

When you refer to Fig. 2.9, you will find that the constant for a 45° bend is 1.414. The number for a 60° bend is 1.154, and the constant for a 22V2- bend is 2.613. If you were working with a 45° angle that had a Set of 15 inches and a Roll of eight inches, you would use your ruler to measure the distances between the two marks on the framing square. In this case, the measurement from the ruler would be 17 inches. You would multiply the 17-inch number by the 45° constant of 1.414 (found in Fig. 2.10) and arrive at a figure of 24V32 of an inch. This would be the length of the pipe, from center to center, needed to make your rolling offset. Could it get any easier?

Too Good To Be Legal

image27"It is illegal to inhabit a tiny home in most popu­lated areas of the U. S. The housing industry and the banks sustaining it spent much of the 1970s and 1980s pushing for larger houses to produce more profit per structure, and housing authori­ties all cross the country adopted this bias in the form of minimum-size standards. The stated purpose of these codes is to preserve the high quality of living enjoyed in our urban and sub­urban areas by defining how small a house can be. They govern the size of every habitable room and details therein. By aim­ing to eliminate all but the most extravagant housing, size standards have effectively eliminated housing for everyone but the most affluent Americans.

No Problem Too Small

Again, the intention of these limits is to keep unsightly little houses from pop­ping up and lowering property values in America’s communities and, more­over, to ensure that the housing industry is adequately sustained. The actual results of the limits are a greater number of unsightly large houses, inordi­nate construction waste, higher emissions, sprawl and deforestation, and, for those who cannot afford these larger houses, homelessness.

One of the leading causes of homelessness in this country is, in fact, our shortage of low-income housing. After mental illness and substance abuse, minimum-size standards have probably kept more people on the street than any other contributing factor. Countless attempts to design and build efficient

Подпись: 38Another Sausalito Houseboat (above)

forms of shelter by and for the homeless have been thwarted by these codes. By demanding all or nothing from our homes, current restrictions ensure that the have-nots have nothing at all. The U. N. Declaration of Universal Human Rights (of which the United States is a signatory) holds shelter to be a fun­damental human right. Yet, in the U. S.. this right is guaranteed only to those with enough money to afford the opulence.

The stated premise of these well-intentioned codes is as profoundly flawed as their results. Little houses have not been shown to lower the values of neigh­boring large residences. In fact, the opposite holds true. When standard­sized housing of standard materials and design goes up next to smaller, less expensive dwellings, for which some of the budget saved on square footage has been invested in quality materials and design, the value of the smaller places invariably plummets while that of the derelict mansions is raised.

Protecting "the health, safety and welfare not only of those persons utilizing a house but the general public as well” is the stated purpose of minimum-size standards. But, by prohibiting the construction of small homes, these codes clearly circumvent their own alleged goal. It would seem far more effective to outlaw the kind of toxic real estate that such codes currently mandate. An even more reasonable and less draconian system would allow individuals to determine the size of their own homes – large or small.

Some of us prefer to devote our time to our children, artistic endeavors, spiri­tual pursuits or relaxing. Others would rather spend their time generating disposable income. Some enjoy living simply, while others like taking risks. Every American should be free to choose a simple or an extravagant lifestyle and a house, to accommodate it.

Time Domain Reflectometry Techniques

Time Domain Reflectometry (TDR) is a non-destructive electromagnetic technology that utilises the relationship between the relative permittivity (usually known as the dielectric constant, кг) of porous materials and their water content. Dry soils have values of dielectric constant of around 2-6 but water about 79-82 depending on wave frequency and water temperature. As the water content of the soil increases the dielectric constant also increases and is therefore an indirect indicator of the soil water content (Topp et al., 1980; Topp & Davis 1985; Svensson, 1997; Hillel, 1998; O’Connor & Dowding, 1999).

Time Domain Reflectometry Techniques Подпись: 2L t Подпись: (3.2)

Time Domain Reflectometry is nowadays the most common technique for mon­itoring water content in pavement structures and subgrades. Topp et al. (1980) used TDR to measure permittivity of a wide range of agricultural soils and developed an empirical relationship between the permittivity and the volumetric water content which made it possible to use TDR in monitoring the water content of a given soil. A schema of a TDR probe is shown in Fig. 3.2 (Ekblad, 2004). Usually the probes have 2 or 3 rods of length, L (normally approximately 300 mm in length). They act as a wave guide while a transmitter inside the probe generates a pulse of frequencies up to 1 GHz which propagates along the metal conductors of the sensors. An electro­magnetic field is therefore established around the probe. The pulse is reflected back to the source at the end of the conductors. The transit time of the pulse is therefore estimated according to

where ce is the velocity of the electromagnetic pulse, L is the probe length and t is the transit time.

The determination of the dielectric constant is thereafter achieved from the basic equation

Подпись: (3.3)c0

ce = Г ——–

Kr ■ —r

Подпись: Fig. 3.2 Schema of a TDR-probe. Dimensions are in mm (Ekblad, 2004). Reproduced by permission of Jonas Ekblad Time Domain Reflectometry Techniques

in which c0 is velocity of light, кг is the dielectric constant and – r is the relative magnetic permeability. Most soils are practically nonmagnetic, thus their relative magnetic permeability is close to unity. Roth et al. (1992) investigated ferric soils

Подпись: Kr Подпись: (cot)2 4 L 2 Подпись: (3.4)

and could not find any influence of magnetic properties on the volumetric water content. By inserting ce from Eq. 3.2 and rearranging, the dielectric constant can be estimated as

where the relative magnetic permeability has been set to unity.

TDR moisture probes express their readings as a volumetric water content в, defined as in Eq. 2.9 which can be related to gravimetric water content, w, as in Eq. 2.11. The volumetric water content is obtained via a relationship with the relative dielectric constant which is based on an empirical approach. A number of relationships exists which, frequently, have been derived using regressions analyses. Topp et al. (1980) gave the relationship as:

в = -5.3 x 10⁻² + 2.92 x 10⁻²Kr – 5.5 x 10-Vr2 + 4.3 x 10⁻⁴Kr3 (3.5)

Their analysis was based on a variety of soil types although many were low density agricultural soils. Jiang and Tayabji (1999) derived a similar third-order polynomial relationship for coarse grained soils as:

в = -5.7875 x 10⁻² + 3.41763 x 10⁻²Kr -1.3117 x 10⁻³к2 + 2.31 x 10⁻⁵к3 (3.6)

Thus, by combining either Eq. 3.5 or Eq. 3.6 with Eq. 3.4, it is possible to relate volumetric water content to transit time.

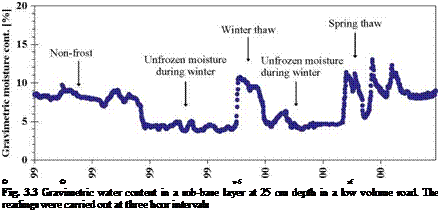
Подпись: © © т-5 rf Fig. 3.3 Gravimetric water content in a sub-base layer at 25 cm depth in a low volume road. The readings were carried out at three hour intervals

It is not uncommon that TDR sensors can measure transit time with a resolution of 10 picoseconds, which corresponds to a water content of approximately 0.1% by volume. Figure 3.3 shows readings from a TDR probe over a seven month period,

starting in the autumn of 1999, at a depth of z = 25 cm in a sub-base layer in SW Iceland (Erlingsson et al., 2000; 2002). Gravimetric water content is plotted after Eq. 2.11 has been applied to the TDR readings. In the period October to late November the actual water content decreased at a slow rate, with irregularities due to rainfalls. The freezing period started in late November which can be seen as a rapid drop in the water content. As the soil was frozen the TDR registration represents the unfrozen water content but not the actual water content in the layer. A two week long thawing period can be seen in January 2000. The spring thaw period started in early March and influenced the water content in the sub-base for more than a month.

Maintaining a Healthy Home

So the much anticipated day finally arrives. After all these years of dreaming and endless months of planning, your new, healthy home is ready to move into. Now, most people would think that’s the end of the story. Mission accomplished! Crack out the champagne! But it’s actually a very important new beginning and one that is sadly overlooked by many people. You see, your home is essentially a living organism, and in order for it to remain as healthy and vibrant as when you first move in, you will need a long-term commitmentto both occupy and maintain your home in a healthy manner.

Most people assume they already know how to do this. After all, they can arrange the furnish­ings; decorate or coordinate color schemes; clean their home and even make it smell nice; use the various appliances; and go to the nearest home improvement store if they need to fix something. Surely all this effort makes a home healthy? Unfor­tunately, most of the time it does not.

One of the most important factors that define
whethera home is healthy or not is indoorairqual – ity. If your new home has been built with health in mind, the indoor air quality will be free of the usual toxic chemical soup found in convention­ally built new homes. However, it is possible to ruin a healthy home’s indoor air quality (even within minutes of moving in) if you aren’t aware of a few key facts.

Usually the first thing people do when they move into a new home is bring everything with them from their previous home, whether they need it or not. Let’s take a look at how some of the most common items can ruin your healthy home’s indoorair quality:

1. Old sofas and chairs made of polyurethane foam: The foam breaks down over time, re­leasing fine particulate matter into the air. This "dust" can contain chemicals such as toxic fire retardants and antimicrobials.

2. Furniture and household items impregnated with toxic cleaning products and syntheticfra-

• Bio-Wash: Environmentally friendly

household cleaners

• Bon Ami Polishing Cleanser: Non­chlorine all-purpose scouring powder

• Enviro Care: Environmentally preferred green cleaning products, some Green Seal certified

• Green: Personal care cleaner; contains fra­grance

• KD Gold: All-purpose biodegradable nat­ural soap

• Mystical: Odorless cleaner and deodor­izer

• Naturally Yours: A complete line of “eco – nomological” household and personal cleaning products

• Spectracidal Disinfectant Agent: An EPA

approved nontoxic germicide

• Trewax Nature’s Orange: Scientific Cer­tification Systems certified biodegradable cleaner/degreaser; contains citrus oils

• Trewax Neutral Cleaner: Scientific Cer­tification Systems certified biodegrad­able all-purpose cleaner for no-wax floors, marble, terrazzo, pavers, etc. (not for un­finished wood floors)

• Wow!: Scientific Certification Systems cer­tified biodegradable stainless steel cleaner

grance:These items will outgas chemicals into the air around them, often indefinitely.

3. Fragranced laundry products: These prod­ucts may be loaded with petrochemicals and are frequently a major source of unhealthy indoor air quality. Not only do these prod­ucts outgas in your laundry but as soon as you start laundering your clothes, towels, and bedding your whole house may also become polluted. I know many people love the smell of their dryer sheets, but just remember those are synthetic chemicals you are smelling, not real fragrance. Many of these chemicals have never been tested for their effects on human health.

4. Cleaning products: Like laundry products, many of these contain synthetic fragrances as well as a host of othertoxic chemicals that will outgas intotheairand leavean invisible chem­ical coating on all the surfaces with which they come in contact.

5. Pillows, duvets, and blankets: These are often full of dust mites and their feces, another in­door polluter and common allergen.

6. Old paints, adhesives, stains and finishes, garden and home pesticide products, car maintenance products, and a whole array of miscellaneous products people tend to store in the dark recesses of their cupboards and their garage: These products will frequently outgas even with their lids or caps in place and may pose a serious poisoning risk around small children and pets.

Moving into a new home often requires buying a few newthingstoo. Everything from mattressesto curtains to furniture made of particleboard now contains staggering amounts of chemicals, many known to cause everything from cancer to repro­ductive harm. All these products will outgas vigor­ously when new and ruin your home’s indoor air quality.

and protectant with no petroleum dis­tillates

Common Household Products That Clean

The following common household products may also be used for cleaning:

• Baking soda cleans, deodorizes, scours, and softens water. It is noncorrosive and slightly abrasive and is effective for light cleaning.

• Borax cleans, deodorizes, disinfects, and softens water. It is also effective for light cleaning, for soiled laundry in the washing machine, and for preventing mold growth.

• Hydrogen peroxide (H202) is effective

in removing mold stains from nonporous surfaces. Purchase a 10 percent food-grade solution. (The solution most commonly sold off the shelf is only 3 percent.) Use protective gloves to apply. A 10 percent so­lution will bleach many types of surfaces. A 35 percent food-grade H202 is available through many health food stores. The con­tainer must be refrigerated and kept clean. The 35 percent solution will burn skin and must be carefully diluted before it can be safely used.

• Soap (as opposed to detergents) biode­grades safely and completely. It is an effec­tive and gentle cleaner with many uses. For hands, dishes, laundry, and light cleaning,

As you can see, this combination of old and new household items can quickly ruin all your ef­forts to create a healthy home. The good news is that much ofthis damage can be prevented. Here’s some advice:

1. Replace old, worn furniture with new items made of natural materials, such as natural la­tex foam instead of polyurethane foam, and fabrics without flame retardants and other chemical treatments. If this isn’t within your budget, at least give your furniture a good vac­uuming outdoors and if possible let it sit out­side in fresh air and sunshine for a few hours. Wipe furniture down with either a damp mi­crofiber cloth or a mild solution of acceptable soap and water to remove old cleaning prod­uct residues. Vinegar may also help remove certain alkaline residues such as soap films. It shouldn’t be mixed with the soap but should be used separately. Replace particleboard fur­niture with solid wood items free of toxic fin­ishes and adhesives and whenever possible choose certified wood.

2. Replace laundry products with healthier, non- fragranced ones. If you want your laundry to smell good, the best remedy is to hang it out­side in the sunshine for a while. Many laundry products simply are not needed.

3. Replace cleaning products with nontoxic ones or make your own from common kitchen in­gredients such as baking soda or vinegar. (Don’t mix these two together since they are a mild alkali and an acid that will neutralize each other’s cleaning effectiveness.)

4. Microfiber cloths often eliminate the need for any cleaning product at all.

5. If you need a vacuum cleaner, make sure it’s a HEPA model. Conventional vacuum cleaners miss and recirculate about 70 percent of fine dust particles.

use the pure bar or soap flakes without per­fume additives.

• TSP (trisodium phosphate) can be used according to the manufacturer’s instruc­tions for grease removal. TSP is available in hardware stores. Surfaces cleaned with TSP should be neutralized with baking soda prior to the application of finishes. Fluids containing TSP should not be dis­posed of in septic systems or sewer systems because of their high phosphate content.

• Vodka is effective for dissolving alcohol – soluble finishes. Use a high-proof (high al­cohol content) product.

• Washing soda (sodium carbonate) cuts grease, removes stains, disinfects, and soft­
ens water. It is effective for washing heavily soiled laundry and for general cleaning.

• White vinegar cuts grease and removes lime deposits. A safe and useful all-purpose cleaning solution can be made from dis­tilled white vinegar and plain water in a 50:50 ratio. For window cleaning, add five tablespoons of white vinegar to two cups of water. The solution should be placed in a glass spray bottle. Glass is preferred be­cause plastics are known to release hor­mone-disrupting chemicals into bottle contents. Vinegar has been used to clean and control mold growth, but the thin film of residue left on the surface may supply nutrients for new growth.

4


6. Avoid fragranced air fresheners of all kinds.

7. As your budget allows, replace bedding with naturally dust mite resistant organic wool pil­lows, duvets, and blankets. Mattresses made of true natural latex are also dust mite resis­tant. Organic cotton pillowcases, sheets, and duvet covers are well worth the investment when you can afford them.

8. Develop the habit of reading labels. Don’t bring any product into your home that con­tains the words "warning,""danger," or "poison." If in doubt, err on the side of caution and find a safer option.

Over time, situations may arise that need special attention. If you plan todecorate, remodel, or make repairs, you will need to plan ahead to be sure to make the healthiest choices. In case of any unex­pected problems, be sure to get them resolved im­mediately. For example, if you have a burst pipe,
dry the area out quickly, hiring qualified profes­sionals, so there is no time for mold to grow.

Understanding how to live in and maintain your home for optimum health is as important as building your home correctly in the first place. With these basic ideas, you can protect the health of your whole family, including pets, and avoid the ever-increasing list of problems associated with living and sleeping in an unhealthy home. May you never know what you have prevented!

Athena Thompson is a certified Building Biology Practitioner. A natural health specialist for over 20 years, she focuses on environmental health, spe­cializing in children’s health issues. She is the au­thor of the popular book Homes That Heal (and those that don’t): How Your Home May be Harming Your Family’s Health and cofounder of Humabuilt — Healthy Building Solutions.

Contract Close-Out

Once construction is complete and before a home is handed over from the contractor to the owner, various tests should be run on the building. This testing provides the opportu­nity for tuning and adjusting various systems and either assures that the building is operat­ing as intended or detects errors and omissions in the building system so that the contrac­tor or appropriate subcontractor can cor­rect them prior to occupation. This also pro­vides an opportunity for the contractor to do a walk-through with the owner to explain how the systems work and how the owner needs to maintain and monitor them.

Throughout this book we suggest various tests that the owner may wish to include as part of the contract, to be conducted either by the contractor and his subcontractors or by a third party. Some of these are:

• testing for air leakage in the HVAC system

• pressure balancing of HVAC or start-up and balancing of radiant floor heating

• cycling all appliances

• testing for magnetic fields

• testing air and water quality

• blower door tests to determine if there is sufficient air tightness in the finished building

We also suggest that the owner obtain various documents from the contractor including:

• photo documentation of the building pro­cess showing location of utility trenches, electrical wiring, plumbing piping, block­ing in the walls, and any other pertinent information that has been covered up in the finished home

• an owner’s manual containing equipment, material, and labor warranties, schedules for required maintenance, contact num­bers for major subcontractors, and certifi­cates of inspection and occupancy

• “as-built” drawings, which are marked-up copies of the original drawings, and speci­fications indicating any changes that have been made in the course of construction and locating any pertinent information that was not on the original documents (refer to the section on occupant educa­tion in the Overview chapter)

Further Reading

Ashford, Nicholas and Claudia Miller. Chemical Exposures: Low Levels and High Stakes. 2nd ed., John Wiley and Sons, 1998. A scientific discus­sion of the mechanisms underlying chemical sensitivities.

Bower, Lynn Marie. The Healthy Household. Healthy House Institute, 1995. Contains a useful section on household cleansers.

Dadd, Debra Lynn. Nontoxic, Natural and Earth – wise. J. P. Tarcher, 1990. Has a good selection of alternatives to toxic cleaning products.

Lab Safety Supply, Inc. Preparing, Understand­ing, and Using Material Safety Data Sheets. This booklet can be obtained from Lab Safety Supply, Inc. at 800-356-0783.

McDonough, William and Michael Braungart. Cradle to Cradle: Remaking the Way We Make Things. North Point Press, 2002. Described on their website as “a manifesto calling for the transformation of human industry through ecologically intelligent design.”

Wilson, Cynthia. Chemical Exposure and Human Health. McFarland, 1993. A reference to 314 chemicals, with a guide to symptoms. We use this handy guide to supplement information from the MSDS.

Maintaining a Healthy Home

Techniques TOENAILING BASICS

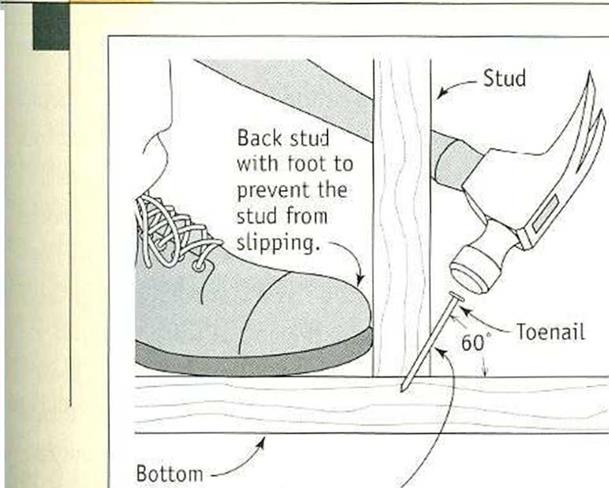
Подпись: plate start the nail at a 60' angle, about 1 in. from the end of the board.Techniques TOENAILING BASICSПодпись: When it’s not possible to drive a nail directly through one piece of wood and into another, join them with a toenail.DRIVING A COUPLE of nails through the side of one 2x into the edge or face of another creates a strong connection. This is a good way to join two 2xs at a right angle. But sometimes this isn’t pos­sible, either because the board is too thick or because its face is not exposed. That’s when you resort to driving a nail at an angle, or toenailing.
To toenail two boards together, hold the nail at a 60-degree angle and start it about 1 in. from the end of the board. If the nail angle is not cor­rect, the connection between the two pieces of wood will not be as strong. Back up the wood with your foot to hold the board in place as you toenail. With practice, you’ll soon gain skill, speed, and confidence.

MEASURING POST OR PONY-WALL STUD LENGTHS

Techniques TOENAILING BASICS

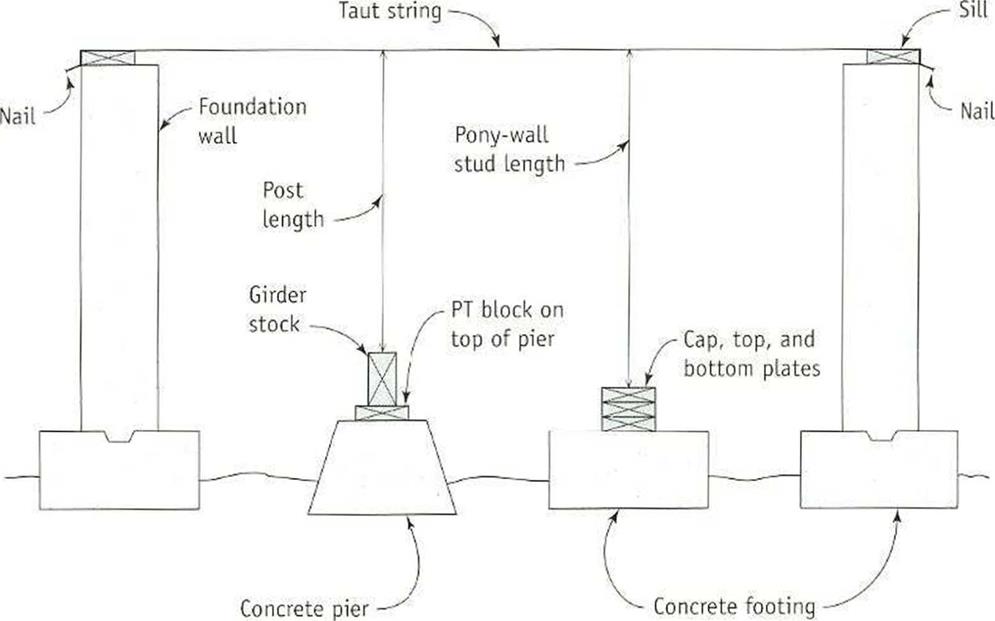
Stretch a string tightly from one sill to another. For the post length, measure from a oiece of girder stock to the taut string. To find the stud lengths for a pony wall, measure from the top of a stack of three wall plates to the string.


walls stticis, stretching a line above a piece of girder stock placed on the pier. Cut youi posts to length, then secure them directly to the piers or toenail them to the blocks attached to the piers. Make sure the posts arc plumb and parallel to one another.

Girders must butt together over a post. When the end of a girder fits into a pocket in the foundation, you’ll have to shim up the girder to get the top surface level with the top of the sill. The shims used beneath girders will hear the full weight of the floor, so they must he cut carefully from pressure-treated stock. Cut uniformly thick shims instead of tapered ones and make them large enough to fit in
the bottom of the foundation pocket. Because of concretes ability to absorb moisture, code requires that the end of the girder he held about V: in. away from the hack of the pocket when cutting the girder to 111. If you’re not using pressure-treated stock for the girder, you can wrap the end of the girder with builder’s felt or sheet metal to give it some protection against moisture damage. Toenail the girders to the posts with either four 8d or three 16d nails. Now brace the posts and splice the girders by nailing the plywood gussets on both sides of the joint (see the illustration on p. 44).

Portable table saw

When I first started framing back in the 1950s, the only power tool we had on the job was a table saw. It was a heavy monster with more iron in it than a John Deere tractor. It definitely was not portable. These days, table saws aren’t used much in framing, but they’re still very useful on the job site. Fortunately, these new machines are now so portable that they can be lifted with one hand. I find the table saw especially use­ful when it’s time for finish work. With it, I can easily and quickly cut siding and interior and exterior trim to size.

While these saws are convenient, they— like any tool—can be hazardous if used improperly. They’re light, so they should be secured to a work table at a comfort­able working height. Once secured, the saw won’t move around during a cut, which decreases the possibility of kick – back. For safety, always stand to one side of the workpiece so you’re out of the line of fire in case the material kicks back.

As with any power tool, familiarize your­self with the manual before using it, and make sure the blade guard is in place and functioning properly before plug­ging the saw in. Also, raise the blade so that it projects only about Vs in. above the material being cut. Hold the stock securely against the fence when ripping, but, of course, keep your fingers away from the blade area. If the stock is longer than the table, set up a makeshift out-feed table or have someone support the opposite end as it comes off the table. Use a push stick to keep your hands clear of the blade as you finish the cut.

Power miter saw

What the circular saw did for rough frame carpentry, the power miter saw did for finish trimwork. Just as the circu­lar saw replaced the handsaw, the power miter saw replaced the miter box. The miter saw (often called a chopsaw) can make fast, accurate cuts in framing lumber, door and window casings, base­board, and crown moldings.

The first miter saws I recall were used almost exclusively by plumbers to cut plastic pipe. Basically a circular saw mounted on a short table, a power miter saw is used to make square and angled cuts and has evolved into a tool that’s used daily by both frame and finish car­penters. Unlike a radial-arm saw, which slides along a track and is notoriously difficult to keep aligned, a power miter saw lowers into the cut with a chopping action from a fixed pivot point. The saw is rugged and easy to use and, when equipped with a high-quality blade, can make glass-smooth cuts. Blade diame­ters range from 8 in. to 16 in. Most carpenters prefer the 10-in. model,

A kickback occurs when the sawblade gets pinched in the kerf (the saw cut) and the power of the motor forces the saw backward. This can be a bit scary, and it is bound to happen to you if you use a circular saw all day.

There are two keys to preventing a kickback. First, always cut in a straight line. Don’t try to force or twist the saw as you cut, which will cause the blade
to bind in the kerf, kicking the saw out. Second, pro­vide solid support for the stock on both sides of the cut. Without proper support, the stock will sag and pinch the blade, as shown in the drawing below.

If a kickback occurs, release the trigger on the saw immediately and allow the saw to stop. As long as the blade guard is working properly, there is little danger of injury.

Not enough support


The stock sags in the middle, pinching the blade.


Portable table saw

Portable table sawThe stock sags on the end, pinching the blade.

Proper support


The stock is supported on both sides of the cut.


Portable table saw

Before using a circular saw, or any power tool, first study its manual, familiarize yourself with its parts, and follow the instructions on using and caring for the tool.

The blade guard of the saw should always move freely. If the guard is stiff, it could have a buildup of wood pitch on it. To remove the pitch, use bleach on the guard and brush off the pitch with a wire brush. Or better yet, try a common cleaner called Oxi-Solve on both (see Sources on p. 198). Before cleaning or testing the guard, be sure the tool is unplugged.

When you’re sure the guard is working properly, set the sawblade to the proper depth. In general, the blade should be set about Ve in. deeper than the thickness of the stock. Again, be sure to unplug the cord when setting the blade depth so that you don’t accidentally start the saw.

The three basic saw cuts used by carpenters are the crosscut, rip cut, and plunge cut. The key to making any of these cuts with a circular saw is being able to make straight cuts. With practice, this will become second nature, so grab some scrap wood—2×4 stock or plywood—and start cutting.

Discrete Univariate Probability Distributions

In the reliability analysis of hydrosystems engineering problems, several proba­bility distributions are used frequently. Based on the nature of the random vari­able, probability distributions are classified into discrete and continuous types. In this section, two discrete distributions, namely, the binomial distribution and the Poisson distribution, that are used commonly in hydrosystems reliability analysis, are described. Section 2.6 describes several frequently used univari­ate continuous distributions. For the distributions discussed in this chapter and others not included herein, their relationships are shown in Fig. 2.15.

Discrete Univariate Probability Distributions

Figure 2.15 Relationships among univariate distributions. (After Leemis, 1986.)

Computations of probability and quantiles for the great majority of the dis­tribution functions described in Secs. 2.5 and 2.6 are available in Microsoft Excel.

SAWS

Old-time carpenters needed many hand tools to cut and shape raw wood, such as the handsaw, keyhole saw, and miter box. Today’s carpenters use power tools, such as the circular saw, reciprocating saw, jigsaw, and miter saw.

Circular saw

The portable circular saw is as indispens­able to a carpenter as a word processor or computer is to a writer. It is the one tool that you will use over and over again every day.

Circular saws come in two basic styles (see the photo below). One is a worm – drive saw with the blade on the left side. Direct-drive saws (also called sidewinders) have the blade on either the right or left side. Like many framers I know, I prefer the worm drive because it’s heavier, more durable, and delivers more power to the blade than the sidewinder.

For most carpenters, the average job can be handled by a heavy-duty 7У4-ІП. circu­lar saw. For big work, such as timber framing, carpenters use a larger circular saw, called a beam saw. Beam saws are available with blade diameters of up to

SAWS

The circular saw is the workhorse of the building industry. Shown here are (from left) a 7У4-ІП. direct-drive sidewinder, a 53/e-in. cordless trim saw, a 7У4-ІП. direct drive, and a 7У4-ІП. worm drive. (Photo by Joe Haun.)


When using power tools at home or on the job, make sure you plug them into quality extension cords. A good cord ensures that adequate electricity will be delivered to the tool you are using. So when shopping for an extension cord, don’t just buy the cheapest one on the shelf. A cheap cord can be dangerous.

In 1948, the year I first helped build a house, I was helping to finish a concrete slab in a basement. It was getting dark, so I asked for a light, and some­one handed me a trouble light. It was trouble all right! I was standing with wet shoes on wet con­crete. The extension cord supplying electricity to the light was frayed and ungrounded. The shock that went through me knocked me over backwards, and as I fell, I pulled the plug out of the outlet. Some­times you get lucky!

BUYING GUIDELINES

When shopping for an extension cord, pay attention to the gauge (the diameter) of the wire. The smaller the gauge number, the larger the diameter of the wire. A 12-gauge wire is larger in diameter (or heav­ier) than a 14-gauge wire.

A corded power tool needs an extension cord with wires heavy enough to deliver adequate power to the tool. Imagine trying to water a lawn with a hose the diameter of a toothpick. Not much water will pass. When using a light-gauge extension cord, a power tool doesn’t get enough electricity. That means the motor will work harder, causing it to over­heat and possibly burn out.

In general, a long cord requires a heavy-gauge wire to deliver the electricity with a minimal drop in volt­age. As a rule of thumb, use 16-gauge wire for a 25-ft. cord. A 50-ft. cord needs at least 14-gauge wire, and a 100-ft. cord needs 12-gauge wire.

For protection against electrical shock while using a power tool, buy an extension cord equipped with a ground-fault circuit interrupter (GFCI). In the event of a short, or ground fault, the GFCI automati­cally shuts off power—and fast. (Many localities re­quire GFCI protection on all job sites, so check your local codes.)

CARE AND STORAGE

Proper care of an extension cord is critical to mak­ing it last. Like a water hose with a hole in it, an ex­tension cord (or a cord on a tool) with exposed wires can allow electricity to leak out, possibly into you. Take time to temporarily repair any cord that is frayed or cut by wrapping the area with electrical tape and by replacing the cord as soon as possible.

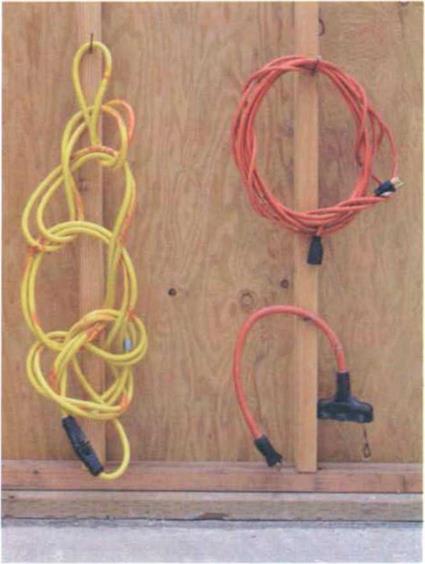
Another thing that will help an extension cord last— and remain tangle free—is proper storage. You can simply loop it into a circle and hang it on a hook. Or you can loop it into a daisy chain—which is a simple crochet stitch—and hang it on a hook.

SAWS

Hang extension cords from hooks when not in use. To help ensure tangle-free cords, loop them into a circle (right) or a daisy-chain (left).

1 б in. and are capable of cutting through б-in.-thick stock. Smaller circu­lar saws for trimwork are available with blade diameters as small as 4Vi in.

While most circular saws come equipped with a steel blade, I recommend replac­ing it as soon as possible with a carbide-tipped blade. These blades stay sharp longer than standard steel blades, which makes cutting faster and safer. Most carpenters use a thin combination blade, which allows you to crosscut and rip wood easily. While not indestructible, most carbide-tipped blades will cut through the occasional nail without too much damage. But be sure to sharpen or replace a dull blade. A dull blade requires more pressure to make a cut, making the saw harder to control and creating more opportunities for acci­dents. Special blades for cutting materials like plastic, masonry, ceramics, tile, and even metal are also available.

Round Obstacles

You’ve just seen how to get around what many would see as a typical prob­lem. Most offsets are used to get around square or rectangular objects. But, what happens when you have to bypass a round object, such as a pressure tank? Don’t worry, there is a simple way to get around most any problem, so let’s talk about going around circular objects.

Okay, we have a pipe that has to rise vertically, but there is a horizontal expansion tank hanging in the ceiling that is blocking the path of our pipe. We have a very limited amount of space on either side of the tank to work

within, so our measurements have to be precise. Assume that an eyeball meas­urement will not work in this case. So, let’s set up the symbols that we will use in this formula.

Let’s use the letter A to indicate the center of the offset rising pipe from the center of the expansion tank. The letter B will represent the center of the offset rising pipe from the edge of the tank. One-half of the diameter of the tank will be identified by the letter C. We will use the letter D to indicate the distance from the center line of the tank to the starting point of the offset. Ad­ditional information needed is that A = B + C and D = A X.4142. See Fig. 2.8 for a drawing to help you visualize the setup.

To put the letters into numbers, let’s plug in some hypothetical numbers. Assign a number of 18 inches to C and eight inches to B. What is D? Here’s how it works. A = B + C = 8 + 18 = 26 inches. D will equal A X.4142 = 26 X.4142 = 103/4 inches. This makes the center of the fitting 103/4 inches from the center of the tank.

Toxic Fumes from Cleaning Products

L. G. is a 53-year-old woman who was in reason­ably good health until two years after she began working for a hotel as a housekeeper. At that time she consulted Dr. Elliott complaining of rashes, headaches, joint pain, and fatigue. After extensive questioning, Dr. Elliott concluded that the source of her symptoms was probably at her place of employment. Through a process of elimination, it became apparent that she had become sensitized to the pine-scented product she used to disinfect bathrooms. Although this woman was unable to convince her employer to switch to less toxic

and health standards for industrial and insti­tutional cleaners. Based on information pro­vided by the manufacturers, Green Seal has recommended cleaners that meet the follow­ing criteria:8

• are not toxic to human or aquatic life

• are readily biodegradable

• contain VOC levels under 10 percent by weight when diluted for use

• are not made of petrochemical compounds or petroleum

• do not contain chlorine bleach

• are free of phosphates and derivatives

• do not contain phenolic compounds or glycol ethers

• are free of arsenic, cadmium, chromium, lead, mercury, nickel, and selenium

• have acceptable pH levels

• work optimally at room temperature

The following industrial/institutional strength cleaners are among those that are recommend – cleaning products, her symptoms improved when she was transferred to a different job within the same building.

Discussion

Certain strong-smelling cleaning products and disinfectants contain phenol, which is known to sensitize the immune system in some people, as happened to this unfortunate woman. When checking for phenol as an ingredient in a product, a generallysaferuleofthumbistolookforany ingre – dientincluding phenol in its nameorending in"ol."

ed by Green Seal9 and that we have found to be reasonably available for use by contractors:

• Earth Friendly Products: A complete line of floor care, all-purpose, and specialty cleaners

• ECO 2000: A multipurpose cleaner and degreaser derived from naturally occur­ring, renewable, rapidly biodegradable re­sources (can be used from a 1:5 dilution as a degreaser and stripper all the way down to a 1:64 dilution as a window cleaner)

• Enviro Care: Cleaning products for all washable surfaces

• Formula G-510: A multi purpose concen­trated colloidal cleaner/degreaser

• Green Unikleen: An industrial strength degreaser/cleaner

• The Natural: A complete line of naturally derived, fragrance-free cleaning products, with an all-purpose cleaner, a degreaser, and a bathtub and tile cleaner meeting Green Seal requirements

Household Cleaning Products

For normal household cleaning, several effec­tive alternatives to harsh chemical cleaning compounds are available. The following brand-name cleaning products do not contain harsh chemicals:

• AFM SafeChoice Glass Cleaner: Virtu­ally odorless glass, mirror, and hard sur­face cleaner

• AFM SafeChoice Safety Clean: Industrial strength cleaner/degreaser and disinfec­tant

• AFM SafeChoice Super Clean: All-pur­pose cleaner/degreaser

• AFM SafeChoice X158: Low-о dor, anti­fungal, antibacterial treatment

• Auro Awalan Line Cleaning and Care Products: Full line of natural plant-based cleaning and care products

• Auro Cleaning and Care Products: Full line of natural plant-based cleaning and care products

• Begley’s Best: Cradle to Cradle certified biodegradable all-purpose cleaner

• BioShield: A complete line of biodegrad­able, soap-based household cleaners con­taining natural and mostly organic ingre­dients