F. Diagonal Percent Method

The length of a rafter can be found by determining the horizontal length (run) that it covers, and the pitch of the roof. The constant relationship

between these factors is defined as the diagonal percent. This percent is constant for any common or jack rafter on any roof that has the same pitch. To find the length of a rafter, multiply the length of the run by the diagonal percent. For example, if you have a roof with a 6/12 pitch and a run of 6′-111/4", you multiply 6′-111/4" by 1.118 (diagonal percent for a 6/12 pitch) and find that your rafter length is

7′-91/16". With a construction calculator, enter 7′ x 1.118, and it will read 7′-91/16". The illustration below provides the diagonal percent for common pitch roofs. To figure the length of hip and valley rafters, use the hip-val diagonal percent shown on the chart.

When you use the diagonal percent, the most difficult part of figuring rafter length is finding the length of the run. The adjustments that need to be made at the top and bottom of the rafter should be added and subtracted from the run before the rafter length is calculated. In finding the run, it is best to start with the full run distance from the outside of the bearing wall to the framing point of any connecting framing member. Use the framing point for consistency, and then make adjustments from there.

The illustrations in this section show details on: Cut a pattern first and try it for fit before cutting

A Rafter cut length all the rafters. A framing square can also be used

B Bird’s-mouth to mark cut lines. (See illustration in “Framing

C Angle cuts Square Stepping Method" earlier in this chapter.)

A. Rafter Cut Length

Rafter length (See previous section.)

Length of overhang (Find in same manner as rafter.)

See cutting bird’s-mouth on next page.

Building line

Mark tail cut same as ridge cut.

Set speed square to H (which is given on plans).

H = the amount of rise per foot of run.

This speed square, as an example, is set to H = 4.

12

Shown on plans like this: 4 H Usually shown on elevation sheet above the roof.

Steps (illustrated below):

1. Mark rafter length.

2. Mark building line at rafter length for the correct pitch.

3. Mark parallel plumb line a distance equal to width of wall and toward interior of building.

4. Mark seat cut square (90°) from building line at rafter length and bottom of parallel line.

5. Cut bird’s-mouth.

A framing square can also be used to mark a bird’s-mouth. (See illustration in “Framing Square Stepping Method" earlier in this chapter.)

Ridge board ready for rafters

Height of Temporary Ridge Board Support

Ceiling joist

Temporary

sheathing

Height of temporary ridge support =

Rise + length of plumb from bird’s-mouth seat cut

– width of ceiling joist

– thickness of temporary sheathing

– ridge board width

Formula for figuring temporary ridge board support height

To start the ridge board layout, plumb a line up from a string held tight between roof layout marks on opposite walls. From that point, mark the ridge board layout to match the roof layout on the double plate.

Begin by setting the end rafters, as shown. Set the remaining rafters in the order that works best for you. As in lining a wall, attach a string in a similar manner along the edge of the ridge board. This will guide you in keeping a straight ridge board while you set the remaining rafters.

Here two pair of common rafters are fitted into place to secure the ridge board. Be sure to set end rafters first.

The length of the hip and valley rafters can be found by using any of the six common rafter methods previously described, and then making adjustments for the run and the top and bottom cuts.

Carpentry

This chapter od, the king

of building materials. Built amid virgin forests, the first wood houses were fashioned from mas­sive ax-hewn timbers that took half a neighbor­hood to raise. Because iron was scarce, those great post-and-beam frames were joined without nails. Instead, they were fitted tightly and then fastened with whittled wooden pegs. The technol­ogy was crude, but the houses survived, in large part because of the mass and strength of wood.

Early in the nineteenth century came plentiful iron nails and circular-sawn lumber of uniform, if smaller, dimensions. Although such lighter components needed to be spaced closer than rough-hewn timbers, their reduced weight made it possible for three or four people to raise a wall. Balloon framing was the earliest of milled lum­
ber houses, with long studs running from one story to the next, and is rarely used today. Since the beginning of the twentieth century, platform framing (also called western framing) has been the most widely used method. Here, each story is capped with a floor platform. Because the studs of a platform-framed house run only one story, they are shorter and easier to handle.

Understanding Structure

A house must withstand a variety of loads (forces): the dead load of the building materials; the live loads of the people in the house and their possessions; and the shear loads from earthquakes, soil movement, wind, and the like, which exert racking (twisting) forces on a building. There are

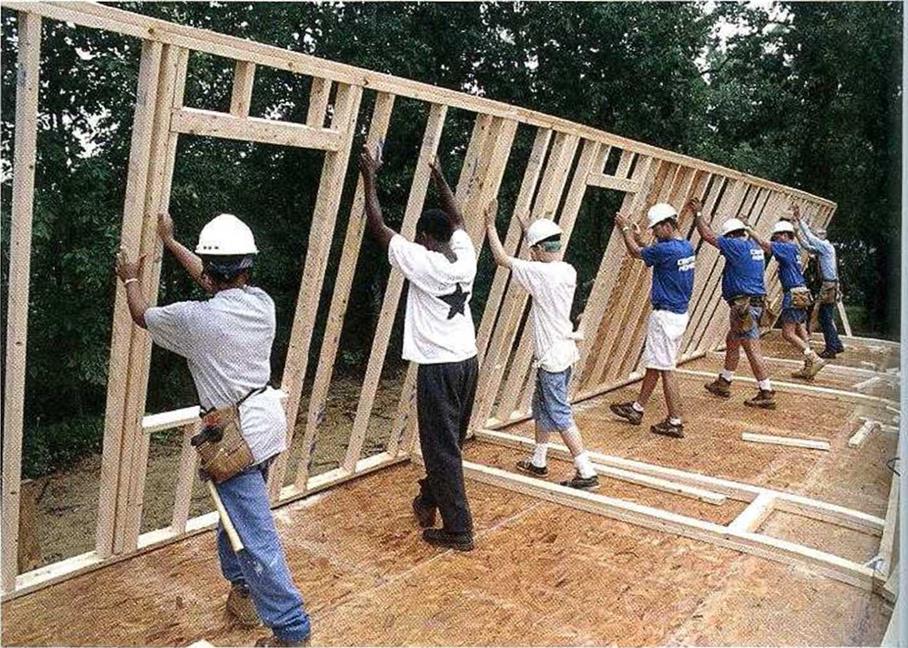
image317If there’s room, assembling a wall on a flat surface and walking it up­right is the way to go. This crew nailed restraining blocks to the outside of this second-story platform before­hand, so the sole plate couldn’t slide off the deck.

Подпись: Local building authorities have the final say about altering the structure of your house. In earthquake country, for example, removing sections of a wall could reduce its shear strength— its resistance to seismic and wind forces. In short, always have a structural engineer review your working drawings. Some building departments require that plans be reviewed and stamped by a licensed engineer before any significant structural work is done. llll other, finer distinctions, including point loads, where concentrated weights dictate that the structure be beefed up, and spread loads, in which a roof’s weight, say, pushes outward with enough force to spread walls unless counteracted.

Loads are transferred downward by framing members, primarily by exterior walls sitting atop a perimeter foundation and by interior bearing walls, often supported by a secondary foundation consisting of a girder, posts, and pads. Generally, a girder runs the length of the house, and sup­ports floor joists running perpendicular to it. Nonbearing walls, as their name denotes, are not intended to bear anything but their own weight. Headers (or lintels) are bearing beams that carry loads across openings in walls. A partition is any interior dividing wall, bearing or not.

Before you decide to demolish old walls or frame up new ones, determine what is a bearing wall and what’s not. This will influence how you frame up, for example, the size of headers, whether you need shoring, whether you need additional support below the walls being removed, and whether you should disturb the structure at all. Get as much information as you can before you commit to a plan because there

Urban hydraulics in the Mycenaen palaces

The centers of Mycenaen power are in strongly fortified palaces (Figure 4.6), with an architecture that has been described as cyclopean due to its use of huge stone blocks. At Mycenae in the palace of Agamemnon, at Pylos homeland of Nestor, and at Tiryns, one finds bathing rooms equipped with permanent bathtubs of terra cotta that sometimes

Urban hydraulics in the Mycenaen palaces

Figure 4.6 Sites of the great hydraulic developments in the Greek world before Alexander.

were equipped with a drain. Complex systems of drainage sewers in the floors of the palace drained both rainwater and wastewater, including water from the bathing rooms. At Pylos, stone drains collect wastewater and dump it into collectors large enough for a
man to stand in.[148]

Like the Cretans, the Mycenaens bring water to their palaces using aqueducts. At Pylos, it is thought that a two-kilometer aqueduct brings spring water to the palace; part of the aqueduct is made of terra cotta in the shape of a U; another part is made of wood; and

Urban hydraulics in the Mycenaen palacesyet another part is incised into the rock. At Mycenae, an underground cistern is accessed from the citadel by going down three flights of stairs that pass under the outer enclosure wall. This cistern is fed by a rock tunnel that brings distant spring water to it (Figure 4.7).[149]

Figure 4.7 The underground cistern of the palace of Mycenae (photo by the author).

Beef Up Your Old Insulation without Tearing into Walls

■ BY JUSTIN FINK

W

hen it comes to insulating floors, walls, and ceilings, nothing makes it easier than working with the blank canvas of a newly framed house. The walls are wide open, so contractors can add any type of insulation they want to achieve the best pos­sible thermal performance.

What about the rest of us, though? Those of us living in houses built with minimal
insulation, or none at all? The ones who don’t have the luxury of gutting their walls? The ones who work on or live in houses that hemorrhage heat in the winter and bake like an oven during the summer? What can we do to improve the thermal performance of these homes?

A lot. Techniques and materials for retro­fitting insulation in old walls have improved

Balsam wool Urea-formaldehyde foam


Vermiculite


Beef Up Your Old Insulation without Tearing into Walls

over the years. Many times, insulation can be added from the interior or exterior of the house without gutting the walls. Even so,

I’m not going to sugarcoat this: Adding new insulation to closed walls is a hassle.

Pick the Low-Hanging Fruit First

Before thinking about adding insulation to your walls, you should have already tackled your home’s other major weak spots. If you haven’t, you should, and your efforts should begin in the attic, where the most heat loss typically occurs (see "Upgrade Your Attic Insulation," pp. 46-55). If, however, after air-sealing and insulating the attic and plug­ging some other common energy trouble spots (see "Home Remedies for Energy Nosebleeds," pp. 12-19) your house still feels drafty and your energy bills are still too high, it’s time to consider the walls.

There’s a lot to consider when it comes to adding new insulation to old walls. The first step is to find out what type of insula­tion, if any, is already in the walls. Once that is determined, you can assess the thermal performance of the walls and then make a more informed decision about the potential benefits of an insulation upgrade. You might
find that the existing insulation is astonishingly inferior and that a small out­lay of cash would mean a significant decrease in your energy bills. Or you could be surprised to find that a high-cost retrofit will offer only a minuscule return on investment.

How to Build a House on Wheels

The Foundation and Framing

With little exception, my first portable house was built by using the most stan­dard methods of construction. Like any other mobile home, my structure sit on a steel chassis – in this case, a 7’ x 14’ flatbed, utility trailer. I took most of the wooden deck off to save weight and put aluminum flashing over the gaps to safeguard against mice. The floor framing was laid on top of that. I used two-by-fours spaced about 24 inches apart on center.

Once that framing was assembled, I filled the cavities between the boards with foam board insulation and spray foam and capped the whole thing off with some %-inch plywood subflooring.

The walls were framed right over the wheel wells using headers just as you would over any other opening. I used two-by-four studs and rafters spaced twenty-four inches on center rather than the more typical sixteen inches. This is a fairly standard practice used to save both money and natural resources. At this point, I was using it primarily to save weight. My flatbed was rated to hold 7,000 pounds.

Probability Estimates for Data Series: Plotting Positions (Rank-order Probability)

As stated previously, the objective of frequency analysis is to fit geophysical data to a probability distribution so that a relationship between the event magnitude and its exceedance probability can be established. The first step in the procedure is to determine the type of data series (i. e., event magnitude) to be used. In order to fit a probability distribution to the data series, estimates of probability (or equivalent return period) must be assigned to each magnitude in the data series.

Consider a data series consisting of the entire population of N values for a particular variable. If this series were ranked according to decreasing magni­tude, it could be stated that the probability of the largest variate being equaled or exceeded is 1/N, where N is the total number of variates. Similarly, the exceedance probability of the second largest variate is 2/N, and so forth. In general,

1 m

P(X > X(m)) = — = – (3.2)

in which m is the rank of the data in descending order, x—) is the mth largest variate in a data series of size N, and Tm is the return period associated with x—). In practice, the entire population is not used or available. However, the reasoning leading to Eq. (3.2) is still valid, except that the result is now only an estimate of the exceedance probability based on a sample. Equation (3.2), which shows the ranked-order probability, is called a plotting position formula because it provides an estimate of probability so that the data series can be plotted (magnitudes versus probability).

Equation (3.2) is appropriate for data series from the population. Some mod­ifications are made to avoid theoretical inconsistency when it is applied to sam­ple data series. For example, Eq. (3.2) yields an exceedance probability of 1.0 for the smallest variate, implying that all values must be equal or larger. Since only
a sample is used, there is a likelihood that at some future time an event with a lower value could occur. In application, if the lower values in the series are not of great interest, this weakness can be overlooked, and in fact, Eq. (3.2) is used in the analysis of the annual exceedance series. A number of plotting-position formulas have been introduced that can be expressed in a general form as

1 m — a

P(x > x(m)) = um = — = n + 1 _ b (3.[1]

in which a > 0 and b > 0 are constants, and n is the number of observations in the sample data series. Table 3.2 lists several plotting-position formulas that have been developed and used in frequency analysis. Perhaps the most popular plotting-position formula is the Weibull formula (with a = 0 and b = 0):

1 m

P{X > X(m)) = Um = ^ = ^^ (3.4)

Tm n + 1

As shown in Table 3.2, it is noted that although these formulas give different results for the highest values in the series, they yield very similar results for the middle to lowest values, as seen in the last two columns.

Plotting-position formulas in the form of Eq. (3.3) can be categorized into being probability-unbiased and quantile-unbiased. The probability-unbiased

Probability Estimates for Data Series: Plotting Positions (Rank-order Probability) Подпись: 1 P (X > x(m)) Подпись: for n = 20

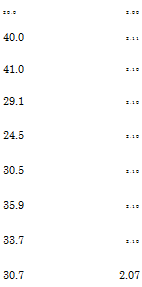
Подпись: m = 1Подпись: m = 10Подпись: 20.0 2.00 40.0 2.11 41.0 2.10 29.1 2.10 24.5 2.10 30.5 2.10 35.9 2.10 33.7 2.10 30.7 2.07

Подпись: Name California (1923) Hazen (1930) Weibull (1939) Leivikov (1955) Blom (1958) Tukey (1962) Gringorten (1963) Cunnane (1978) Hosking et al. (1985) Подпись: Formula P(X > X(m)) m n m _ 0.5 n m n + 1 m _ 0.3 n + 0.4 m _ 0.375 n + 0.25 m _ 0.333 n + 0.333 m _ 0.44 n + 0.12 m _ 0.4 n + 0.2 m _ 0.35 n

TABLE 3.2 Plotting-Position Formulas

plotting-position formula is concerned with finding a probability estimate u(m) for the exceedance probability of the mth largest observation such that E[G(X(m))] = u(m), in which G(X(m>) = P(X > X(m>). In other words, the probability-unbiased plotting position yields the average exceedance probabil­ity for the mth largest observation in a sample of size n. If the data are indepen­dent random samples regardless of the underlying distribution, the estimator U(m) = G(X (m)) will have a beta distribution with the mean E (U(m)) = m/(n+l). Hence the Weibull plotting-position formula is probability-unbiased. On the other hand, Cunnane (1978) proposed quantile-unbiased plotting positions such that average value of the mth largest observation should be equal to G-1(u(m>), that is, E(X(m)) = G-1(u(m)). The quantile-unbiased plotting-position formula, however, depends on the assumed distribution G( ). For example, referring to Table 3.2, the Blom plotting-position formula gives nearly unbiased quantiles for the normal distribution, and the Gringorton formula gives nearly unbiased quantiles for the Gumbel distribution. Cunnane’s formula, however, produces nearly quantile-unbiased plotting positions for a range of distributions.

Blowing Insulation Is a Team Effort

A

division of labor keeps insulation flowing. One person handles the hose, and the other feeds the blowing machine. The most critical job is at the machine (see the top left photo below and the bottom right photo), where the steady rate of insulation flow is controlled by the operator. At the other end of the hose, it’s best to start at the farthest point and work back to the attic access. A slight upward hose angle helps to spread the insulation more evenly.

Fiberglass made easier

Owens Corning® (www. owenscorning. com) has introduced AttiCat®, a rental system that processes and distributes bales of fiberglass. The packaging is stripped as the bale is pushed into the hopper. Then the machine agitates the fiberglass and blows it out through the hose. The blowing fiberglass (top right photo below) is not as dusty as cellulose.

Blowing Insulation Is a Team Effort

Подпись: 1 Cost and Labor for an Attic Upgrade he project was a 1950s ranch with 1,500 sq. ft. of attic space. Here's a breakdown of the costs. It's mostly labor, and relatively little money for materials. Air-Sealing One tube of fire-barrier caulk: $7 Two cans of polyurethane foam: $20 Scrap pieces of rigid foam and recycled metal drip edge: $30 Labor: About three hours Insulation Cellulose bales and blower rental: $500 Labor: About eight hours to tune up existing insulation. Also, two people for three hours to blow in cellulose and clean up. Optional: Seven hours to lay a new floor deck. Total Materials: $557; optional floor deck: $170 Labor: 17 hours

settle more than fiberglass. Of the two mate­rials, cellulose is generally more available to homeowners; both can be installed with the same basic techniques. A two-person crew is the absolute minimum. The machines used to blow in insulation vary in power and fea­tures, but rental machines are typically the most basic.

Pick a blower location as close to the attic access as possible. Cellulose and blowing fiberglass are messy to handle, so the load­ing area will be covered quickly. I prefer to set up outside, but a garage is an ideal place to stage the bales and blower when the weather doesn’t cooperate. I lay down a large, clean tarp and place the machine in the middle with the bales close by. Insula­tion that falls onto the tarp is easy to gather up and reload. Don’t let any debris get mixed into fallen insulation. Nails and sticks can jam the blower or plug the hose.

Route the delivery hose through the shortest, straightest distance to the attic.

Runs of 50 ft. or less are ideal. Runs longer than 100 ft. or runs with a lot of bends re­duce airflow and can lead to a plugged hose.

All blowing machines have an agita­tor that breaks up the insulation bales and a blower that drives air and insulation through a hose. The person feeding the machine breaks up the bales and drops them through a protective grate on top of a hop­per. It takes a little practice to know how fast and how full to feed the machine, especially when using a basic blower. Fill too fast, and you run the risk of slowing the flow through the delivery hose. After a little practice, the loader understands the sounds the blower makes and can adjust loading speed for opti­mal delivery.

The insulation dispenser handles the hose and works from the far ends of the attic toward the access hole. Good lighting is a must. If hard-wired attic lighting isn’t enough, run a string of work lights or wear a high-powered headlamp. Discharge the hose at a slight angle upward, and let the insula­tion fall into place. This helps it to spread more evenly. Shooting the hose directly at
the ceiling causes the insulation to mound up. If high spots occur, use a long stick or broom to even them off. Although high spots aren’t really a problem, low spots don’t perform as well.

Once insulation covers the ceiling joists, there’s little way to know the depth of the insulation. Insulation distributors sell paper gauges marked in inches that you staple to rafters or ceiling joists. I make gauges by cut­ting 11/2-in.-wide cardboard strips about 1 in. to 2 in. longer than the target depth; I draw a line across each strip at the final insulation grade. Expecting the insulation to settle 1 in. or 2 in. over time, I mark the strips at 14 in. and staple them to the sides of the ceiling joists every 6 ft.

Mike Guertin (www. mikeguertin. com) is a builder, remodeling contractor, and writer in East Greenwich, R. I.

Подпись: го

STEP 6 Raise the Walls

STEP 6 Raise the WallsПодпись:
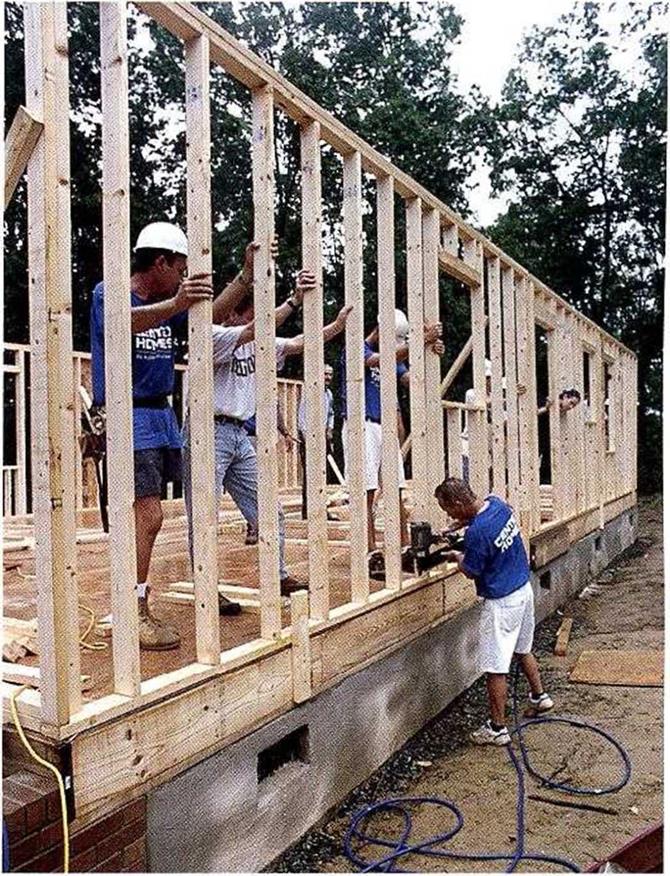
As with barn raisings of yore, it takes a few warm bodies to raise framed walls. Let one person be the team leader and encourage everyone to work together (see the photo below). Remind people to lift with their legs, not with their backs. In many areas, builders put a heavy bead of caulk or a roll of foam

(polystyrene) on the floor or slab under the bottom plate before raising a wall. This helps keep out cold air as well as any bugs that may want to migrate inside. To ensure that the wall wont slip over the outside edge of the build – ingas it’s being raised, nail pieces of 2x stock to the rim joist so they stick up a few inches above the floor to catch and hold the bottom plate (see the top photo at right ). On a slab, bolts hold the bottom plate in place.

Raise exterior through walls first

Start with one of the exterior through walls. Make sure there is no debris beneath the plates before nailing the walls to the floor. If the wall is flat on the deck, stick the claw of a hammer into the double top plate, lift the wall up a bit, and put a 2x block under the wall.

This way you can get your fingers under the wall to lift it. Keeping your back straight, use your legs to lift the wall to your waist, then take it overhead using your arms and upper body. Continue to raise the wall by pushing on the studs until it is fully upright. Once the wall is upright, hold it steady—especially if theres a good wind blowing—until the wall braces are nailed in place.

After the wall is in position, nail a stud to each end as a temporary brace, extending it diagonally from about 6 ft. up on the corner stud down to the rim joist. Drive a couple of 16d nails into each end of the brace. On long walls, nail other braces in the middle from a jtuddown to the subfloor. Make sure these temporary braces will hold the wall until the butt walls are built and raised against it.

STEP 6 Raise the WallsПодпись:STEP 6 Raise the WallsПодпись:Use a sledgehammer to move the wall until itisright on the chalkline and flush at the ends with the correct marks on the subfloor. After the wall is in position, nail through the bottom plate and into the subfloor, using one

STEP 6 Raise the Wallsembedded in framing lumber. Don l nail in donrwavs, Ьіч-aiise you’ll be cutting out the plate later when you set the door frame.

When working on a slab, lever the bottom plate into position over the bolts. S ip the end of a 2×4 under the bottom plate to use as a lever. While one person works the 2×4 lever, other crew members can move the bottom plate in or out to align the holes with the installation bolts. In some areas, bottom plates are attached to the slab with concrete nails. In other areas, steel hurricane straps are used to tie wall framing to the floor framing and foundation (see the photo at left). Now is the time to make sure that these framing connec­tors are nailed to the wall frame.

Teaching By Example

Embracing less in a culture founded on the precept of more is counter-cul­tural, but it need not be self-consciously so. To do what we know to be right takes effort enough. There is no need to waste our much-needed energy on actively trying to change this spendthrift society. The tangible happiness of a life well lived is worth a thousand vehement protests.

Magazines, television and billboards incessantly insist that the cure for what ails us will be revealed by earning and spending more and increasing square footage. But the security and connectedness we seek are unobtainable so long as we continue to surround ourselves with these symbols of security and connectedness. Our desire for that which pretends to be success and our fear of not having it bar us from feeling genuinely fulfilled. Happiness lies in understanding what is truly necessary to our happiness and getting the rest out of the way.

Simplicity is the means to understanding our world and ourselves more clear­ly. We are reminded of this every time we pass by a modest little home. Oc­casionally, between the billboards, a tiny structure reveals a life that is unfet­tered by all of the excesses. Such uncomplicated dwellings serve to remind us of what we can be when our striving and fear are abandoned. Each person who chooses to live so simply inadvertently teaches the virtue of simplicity.

In a society as deeply mired in over-consumption as our own, embracing sim­plicity is more than merely countercultural; it can, at times, be downright scary. We are in many ways a herd animal, and to take the path less traveled requires courage. We are living in a system that, if left to its own devices, would have us in debt up to our eyeballs and still clamoring to purchase more things than we could use in a thousand lifetimes. Simplification requires that we consciously resist this system and replace it with a more viable one of our own making. For some of us, it requires that we either break laws or expend the time and mon­ey required to change those laws that currently prohibit an uncomplicated life.

In any case, anyone who sets out to create such a life should know that he or she is not alone. Though our current system discourages (even prohib­its) such freedom, we are all, on some deeper level, familiar with our own need for simplicity. Order is a human concept that expresses an inherent human need. On at least the most intuitive level, we all see the beauty in a well-made, small dwelling because the necessity such a structure ex­presses resonates with the necessity within each of us. The fear that these little places sometimes inspire is not really so much one of lower proper­ty values; it is the fear that these simple dwellings may inadvertently tell us something important about ourselves that we are not ready to face.

image37

Trinity Park, MA

image38

Trinity Park, MA (top) & a San Francisco Bungalow Court (above)

Return Period

Return Period Подпись: 1 1 - P (X < xT) Подпись: (3.1)

Hydrosystems engineers have been using the concept of the return period (or sometimes called recurrence interval) as a substitute for probability because it gives some physical interpretation to the probability. The return period for a given event is defined as the period of time on the long-term average at which a given event is equaled or exceeded. Hence, on average, an event with a 2-year return period will be equaled or exceeded once in 2 years. The relation­ship between the probability and return period is given by

in which xT is the value of the variate corresponding to a T-year return period. For example, if the probability that a flood will be equaled or exceeded in a single year is 0.1, that is, P (X > xT) = 0.1, the corresponding return period is 1/P (X > xT) = 1/0.1 = 10 years. Note that P (X > xT) must be the probabil­ity that the event is equaled or exceeded in any one year and is the same for each year regardless of the magnitudes that occurred in prior years. This is so because the events are independent, and the long-term probabilities are used without regard to the order in which they may occur. A common error or mis­conception is to assume, for example, that if the 100-year event occurs this year, it will not occur again for the next 100 years. In fact, it could occur again next year and then not be repeated for several hundred years. This misconception resulted in considerable public complaints when the Phoenix area experienced two 50-year and one 100-year floods in a span of 18 months in 1978-1979 and the Milwaukee area experienced 100-year floods in June 1997 and June 1998.

Hence it is more appropriate and less confusing to use the odds ratio; e. g., the 100-year event can be described as the value having 1-in-100 chance being exceeded in any one year (Stedinger et al., 1993). In the United States in recent years it has become common practice to refer to the 100-year flood as the 1 per­cent chance exceedance flood, and similar percent chance exceedance descrip­tions are used for other flood magnitudes (U. S. Army Corps of Engineers, 1996).

The most common time unit for return period is the year, although semi­annual, monthly, or any other time period may be used. The time unit used to form the time series will be the unit assigned to the return period. Thus an annual series will have a return-period unit of years, and a monthly series will have return-period unit of months. However, one should be careful about compliance with the statistical independence assumption for the data series. Many geophysical data series exhibit serial correlation when the time interval is short, which can be dealt with properly only by time-series analysis procedures (Salas, 1993).