The dawn of the 14th century, from the era of abbeys to the era of cities, and the rebirth of central power

We have seen that the role of the abbeys, and in particular the Cistercians, was quite important in the conquest of new agricultural lands in the 12th and 13th centuries. However an assessment of the social success of these monk-hydraulicians is not as clear as it might be. Unless supported by a powerful lord or by royal authority, the villagers and peasants are not in a position of strength vis-a-vis the abbeys, especially since the

abbeys are themselves favored by the local lords. Often the villagers are chased off by monks who want to develop their land; yet these lands, once developed and intended to serve a single order, almost always engender numerous conflicts with other occupants, whether they be lay or monastic.

The turn of the 13th to the 14th century sees a strengthening role of central power. We have seen how the kings intervened in major projects such as the “King’s channel” in Poitou, and the “royal canal of Thuir” in Roussillon. We also saw this on the shores of the North Sea, and in the actions of the count of Flanders (and rich townspeople) in appropriating land on the seashore, developing ports, marking them and constructing beacons.

The middle of the 14th century was a period of catastrophes in the West – from a grave economic and monetary crisis, to the beginning of the Hundred Years’ War (1337­1453), to the great plague of 1348-1349. In this period there was also a recurrence of the great famines that had not been seen since the 10th century. There is a general decline in population, the abbeys are decimated by the plague, and the grand era of land conquest is more or less finished. A new power emerged: that of the cities, concentrat­ed and enclosed within walls and behind moats in response to the general insecurity, and through which water no longer flowed freely, but became stagnant and unhealthy.

Over time an awareness of the need for the flow of wastewater and for the manage­ment of water supply developed. Wells used by townspeople who were located some distance from the rivers were terribly contaminated by the infiltration of stagnant water polluted by all sorts of wastes. These cities begin to develop sewer networks and to organize freshwater delivery to public hydrants and fountains, although hesitantly at first. This movement had slowly begun in the 12th century in Italy but did not reach the cities of western and northern Europe until the 14th and 15th centuries.[488] Public water fountains, essentially unknown since the end of Roman civilization, timidly reappear. Some are found around 1100 in the port city of Genoa; three are built at Sienna between 1220 and 1227; and large ones appear in Viterbo and Perugia around 1251 and 1277, respectively. But Florence and Milan must wait until the 15th century before seeing seri­ous development of public fountains, and Bordeaux must wait until 1520.

Portions of Roman aqueducts are restored to service, and sometimes new delivery canals are built, as we have seen for Perpignan, under the influence of the king of Majorca. In the cities of northern Europe the movement toward public fountains begins, again very slowly, with the use of water supplies originally developed for religious establishments. Philippe Auguste is credited with establishment of the first public foun­tain in Paris in 1182 at the grand Halle, through derivation of some of the water of a monastic groundwater supply from Pre-Saint-Gervais. This first fountain is soon fol­lowed by others, so that there are ten in Paris by the end of the 14th century, and seven­teen a century later.[489] But it is still not until the 20th century that the quantity of water per inhabitant becomes comparable to the abundance seen during the Roman period.

STEP 2 SELECT AND INSTALL THE FINISH FLOORING

Things are looking good. The house is painted; the doors, cabinets, and countertops have been installed; and all your faucets and light switches are working. But one major transformation remains—the finish flooring.

Installing finish flooring is one of the last jobs to do or have done, and for good reason. Now that you’re down to the detail work, fewer workers will be coming through the house, so there is less chance that the flooring will be damaged. There are many options, even for affordable homes, so this is a great opportunity to make choices that express your personal style.

Know the pros and cons of carpeting

Carpeting is not my first choice for a floor covering. In general, inexpensive carpeting

Подпись: Engineered-wood flooring is easy to install. Plied construction, tongue- and-groove joints, and a factory-applied finish make engineered-wood flooring easy to install and very durable. Different plank widths and a wide range of wood species are available. [Photo by Scott Phillips, courtesy Fine Homebuilding magazine © The Taunton Press, Inc.]

doesn’t last long, so it tends to be a significant part of the waste stream clogging our landfills. Fortunately, efforts are now being made to re­cycle some of the millions of yards of carpeting that are replaced every year.

If you really like wall-to-wall carpeting,

I recommend using it selectively—in bed­rooms, for example. It’s not a good flooring choice in bathrooms, kitchens, and entryways. Don’t install wall-to-wall carpeting where it will get wet and be difficult to keep clean.

In those situations, carpeting can collect dust and harbor dust mites and mold, becoming a potential health hazard. It’s worth it to buy good-quality carpeting. Avoid light colors, if possible.

Carpeting is most often purchased from a supplier and then installed by a subcontrac­tor. Talk to your carpet subcontractor about the quality and durability of any carpet you’re considering. A tightly woven carpet with a low nap is the easiest type to clean. Find out whether your choice of carpeting and carpet padding are manufactured with low levels of volatile organic compounds (VOCs), which can adversely affect allergy-prone individuals. Low-VOC carpets, pads, and adhesives cost a bit more, but your health is on the line.

As with other types of finish flooring, carpeting should be installed only over a clean, dry substrate. When installing carpeting over a concrete slab, make sure the concrete has had a chance to cure and dry. Laying carpet on a damp slab is an invitation to mold and rot.

Vinyl floor coverings come in many designs

When I was growing up in my family’s prairie home, our kitchen floor was covered with a thick linoleum that was common years ago. It had a beautiful floral pattern in bright col – ors—except in the high-traffic areas, where it had worn bare within six months of installa­tion. Fortunately, today’s vinyl floor coverings are much tougher than old-fashioned linoleum, and they come in a dazzling array of colors, patterns, and designs. I usually shy away from light colors because they tend to show dirt and require more cleaning.

Vinyl works well in kitchens, bathrooms, mudrooms, dining areas, and entryways be­cause it’s durable, waterproof, and easy to clean. Whatever you install should be able to with­stand the wear and tear of a family for at least a few years. Better grades are usually worth the extra money because they last longer.

As with wall-to-wall carpeting, vinyl floor­ing is usually installed by a subcontractor. In most cases, an underlayment of /d-in.-thick plywood or OSB is installed over the subfloor to provide a flat, firm base for the vinyl. Make sure the adhesive the contractor uses to bond the vinyl to the underlayment has a low VOC content. Once the vinyl flooring is in place, take care when moving the refrigerator, stove, or other heavy object across the floor. The feet on those appliances can scrape or tear a vinyl floor.

MCS: What is It?

Multiple Chemical Sensitivity

Multiple chemical sensitivity (MCS), often re­ferred to as environmental illness, is an im­mune and nervous system disorder involving severe reactions to many everyday chemicals and products. For some people MCS occurs with dramatic onset, precipitated by a major chemical exposure or industrial accident. But for most people the condition develops gradu­ally as the result of the cumulative exposures of daily life.

The symptoms of MCS are diverse and unique to each person and can involve any or­gan of the body. Symptoms range from mild to disabling and can sometimes be life threat­ening. They include headaches, fatigue, sleep disturbances, depression, panic attacks, emo­tional outbursts, difficulty concentrating, short-term memory loss, dizziness, heart pal­pitations, diarrhea, constipation, shortness of breath, asthma, rashes, flu-like symptoms, and seizures. Symptoms maybe chronic or may oc­cur only when a person is exposed to certain substances. The particular organs affected de­pend on the individuals genetic background and prior history as well as the specific chemi­cals involved in the exposure.

Symptoms are often triggered by very low levels of exposure, including levels lower than permissible by government standards and typically below the levels tolerated by most people. Triggers include a wide range of sub­stances found in the workplace and at home. Solvents, paints, varnishes, adhesives, pes­ticides, and cleaning solutions are most fre­quently implicated. Other substances include new building materials and furnishings, form­aldehyde in new clothes, artificial fragrances in cleaning and personal care products, deter­gents, car exhaust, and copy mach ine and laser printer toner. Symptoms can occur after inhal­ing chemical vapors, after chemicals touch the skin, or after ingestion. Sensitivity to a par­ticular chemical can lead to sensitivity to an

ever-widening range of other, often dissimilar, chemicals. This characteristic is known as the spreading phenomenon.

It may be useful to think of environmen­tal illness as a spectrum that encompasses a wide range of chemical sensitivities. At one end are individuals who may suffer from mild symptoms, such as simple sinus congestion or headaches, which usually resolve when the triggering chemical is removed. At the other end of the spectrum are individuals with full­blown MCS, who suffer extremely debilitating symptoms that can last for months or years af­ter exposure.

Why do some people develop MCS while others with the same level of exposure do not? Because of biochemical individuality, all humans manifest disease according to their genetic makeup, past chemical exposure, and overall general state of health, which includes total load. Total load refers to all the stressors in a person s life, including chemical exposure, poor nutrition, emotional tension, allergies, infections, trauma, and physical stress.

Although the exact mechanism whereby chemicals create this heightened sensitivity has not yet been clearly elucidated, theories are emerging that will hopefully lead to greater understanding and better treatment of MCS. Recent studies have demonstrated how tox­ins, having gained access to the brain through the olfactory nerve, can cause release of excit­atory amino acids that result in swelling, dys – regulation, and destruction of brain cells. The olfactory nerve is also the pathway to the lim­bic system, which is an area of the brain where the nervous, immune, and endocrine systems interact. The limbic system regulates an ex­tremely wide variety of body functions. Many of the varied and seemingly bizarre symptoms reported by persons with MCS are consistent with symptoms known in the medical litera­ture to occur when various parts of the limbic system are damaged by chemicals or physical injury.

Toxic chemicals can also cause direct dam­age to specific tissues of the body such as en­zymes in the liver that are essential in the de­toxification pathway. Because of inadequate amounts of detoxifying enzymes, a person with MCS is less able to handle chemical loads. Also, recent data indicate that certain toxins in the environment, especially chlorinated com­pounds, mimic natural hormones, causing disruption of endocrine systems such as the thyroid, adrenal, and reproductive systems.

The first documented cases of environmen­tal illness resulted from widespread chemical poisoning during World War I. The exposure to mustard gas had long-term consequences for soldiers, many of whom developed chronic symptoms of chemical sensitivities. More re­cently, thousands of veterans who fought in the Gulf War returned with symptoms simi­lar to those found in patients diagnosed with MCS.

Since World War II, the production of syn­thetic chemicals has increased significantly. In 1945, the estimated worldwide production of these chemicals was less than 10 million tons. Today it is over 110 million tons. As more and more synthetic chemicals are introduced into the environment, larger numbers of healthy people are becoming affected. Most people with MCS have not been through a war. They have become ill from ordinary day-to-day, low-level exposures to poor indoor air qual­ity in their homes and workplaces. MCS suf­ferers often say that their role in society is like the canary in the coal mine. When the canary collapsed, the miners were warned that lethal gases were in the air.

Although MCS is a rapidly growing prob­lem, sometimes called a silent epidemic, health care workers know little about the sub­ject. Chemical sensitivity is a relatively new field of medicine, controversial in nature, and not recognized or understood by most physi­cians. The illness does not fit neatly into the current medical model and, unlike diabe­tes or hypertension, there is no simple med­ical test for making the diagnosis. There are remarkably few individuals in medicine who have toxicology training and who are sensitive to the possible neurological, behavioral, and psychiatric problems resulting from chemical exposures. In addition, the chemical and in­surance industries have played a major role in influencing the average persons perceptions about chemicals and their impact on living or­ganisms.

One of the most important steps in the treatment of the chemically sensitive person is to avoid or reduce toxic chemical exposures as much as possible in order to allow the body to heal. A healthy home is a prerequisite for those who wish to regain their health. The person with MCS needs a sanctuary of peace and well-being in a world saturated with toxic chemicals.

In spite of widespread ignorance and vested financial interests, MCS is gradually becoming known to the public as more and more people are becoming ill. For several years a small but growing number of physi­cians specializing in environmental medicine have been focusing on this serious problem. If you would like information about a physi­cian in your area with expertise in the diagno­sis and treatment of chemically related health problems, contact the American Academy of Environmental Medicine in Wichita, Kansas, at 316-684-5500 or aaemonline. org.

Shielding Electric Fields Emitted from Refrigerators

Because refrigerators generate large electric fields, they should be given a dedicated circuit and the wiring should be shielded with one of the recommended metal conduits in order to block the fields. In addition, the metal refrig­erator cabinet should be bonded to the elec­trical ground. Since the compressor motor and defroster will still produce high magnetic fields, the home should be designed with the refrigerator at least 12 feet away from living and sleeping areas.

Gasketed Electrical Boxes

As discussed in the section on air barriers in Division 7, electrical boxes must be sealed in order to make an exterior wall airtight. You may have experienced the flow of air coming through an outlet on a cold day if the boxes are not installed in an airtight manner. It is neces­sary to prevent air from flowing into the living space from a wall cavity not only for the sake of energy efficiency but also to maintain opti­mal indoor air quality. The following gasketed electrical boxes are designed to create an air­tight seal:

. AirFoil

• Lessco Air Vapor Barrier Boxes

• Allied Moulded Vapor Seal Boxes

Residential Lighting

Residential lighting can also be a source of electromagnetic fields. Here are some point­ers on residential lighting and EMFs:

• Transformers of low-voltage lighting pro­duce a magnetic field. If you use low volt­age lighting, choose remote transformers and locate them in closets at a distance from where you spend a lot of time.

• Fluorescent lighting with ballasts emits magnetic fields that may not be detect­able on an inexpensive gaussmeter. Avoid fluorescent lighting with ballasts in areas where you spend a lot of time, and never locate it on a ceiling below a bedroom. It should also be noted that fluorescent light tubes and compact fluorescent lights con­tain mercury and should be properly re­cycled. Breaking the tubes may release the mercury. (For more information about proper disposal, see earth911.org.)

• If you are using recessed can lighting, spec­ify insulation contact airtight (ICAT) cans. These cans save energy and prevent dust and attic gases from filtering into the cans.

• If wiring is run through a metal conduit, the metal housing of the fixture must be in electrical contact with the metal conduit in order to shield the occupied space from electric fields.

Smoke Detectors

The two basic types of smoke detectors are ionizing and photoelectric. The ionizing type contains a radioactive substance called ameri­cium-241. Although the radioactive substance

is shielded, we cannot recommend this type because there is no safe place for disposal once the smoke detector is discarded. Smoke detec­tors are available for use with 9-volt batteries or for hardwiring into the 110-volt household wiring, with or without battery backup. We recommend a hardwired photoelectric system with battery backup, which can be purchased through BRK/First Alert and MCS Referral & Resources. If you are wiring so that your bedroom circuitry can be shut off, it is impor­tant to put the smoke detector on a separate circuit so that it will always remain active. If this circuit is run through a metal conduit, the electric field will be minimal.

Carbon Monoxide Detectors

All gas-burning appliances to which occu­pants are exposed, such as gas ranges and dry­ers, should be tested for carbon monoxide emissions prior to building occupancy. Hie installation of a simple monitoring device en­sures that you will be alerted if a problem with carbon monoxide develops. The device should have battery backup and a digital readout. The following CO monitors meet these criteria:

• Aim S-450 is a portable pocket alarm CO detector unit with a digital readout.

• BRK/First Alert

• NightHawk Carbon Monoxide Detec­tor contains a sensor that samples the air every 2У2 minutes and updates the digital readout.

Further Reading

Becker, Robert O. Cross Currents. J. R Tarcher, 1990. A timely and eloquent warning on the hazards of electronic pollution

Von Pohl, Gustav Freiherr. Earth Currents: Caus­ative Factor of Cancer and Other Diseases. Freeh – Verlag, 1987.

Maintenance

It is of great importance that the draining system is working properly, hence regular checks (e. g. Fig 13.44) and maintenance are required. Every drainage system should be designed to ensure that inspection and maintenance operations are possible and accessible. Usually, the cleaning of the drainage system should be done at the end of the summer, but inspections could be intensified in periods of high precipitation. However, at least every 5 years it is fundamental that there is a proper inspection of every part of the drainage system.

The problems that practitioners encounter are manifold. In the WATMOVE ques­tionnaire survey (see www. watmove. org) the following issues were mentioned:

• The drainage system becomes clogged with fine materials,

• Crushed pipes,

• Poor outlet conditions, i. e. outlets have negative slopes,

• Root penetration,

• Generation of ferrous hydroxide and calcium carbonate,

• Insufficient capacity,

• Inadequate water velocity,

• The (plastic) cover of the inspection well at the slope may be damaged (some­times due to snow clearance of the road).

An earlier study by Dunnam & Daleiden (1999) revealed similar problems as well as blockages by vegetation and animal nests.

In order for maintenance works to take place and to ensure a long life for the road, it is essential to plan a maintenance programme, based on a series of procedures, measures, actions and practices. The establishment of maintenance actions, of a systematic nature, and emergency actions should be part of that intervention plan.

The systematic plans, i. e. those used in normal conditions, aim to guarantee that the drainage systems remain in a good working condition. These plans will com­prise, at least, inspection actions, vigilance and cleaning (which include the removal of sediments), clearance of channels and ditches and the removal of vegetation.

Inspections could be visual or by video surveillance of pipes, depending on pipe diameter. Close-circuit TV cameras are available, mounted on the end of umbilical cables and incorporating lighting, to achieve down-pipe inspections (Dunnam & Daleiden, 1999; Fleckenstein & Allen, 1996; FHWA website).

The intervention plans, for accident/emergency situations, requires fast inter­vention of maintenance teams, to mitigate the negative impacts on personal safety and environmental contamination. To do so, a sequence of procedures should be established and adapted for different scenarios. These will require prior surveys, covering:

• The boundaries of water areas and environmental compartments;

• aquifer vulnerability;

• sensitivity of each compartment;

• existing drainage systems;

• the assessment of potential hazard sources (including industrial areas); and

• transportation requirements for dangerous substances.

In order for these plans to fully work, one must ensure proper management of the road infrastructure with maintenance programs, specialist human resources and operational and logistical support.

Install the interior-door hardware

Подпись:

Подпись: Bath fixtures can be mounted on a 1x4 and then screwed securely into wall studs. [Photo by Don Charles Blom]
Install the interior-door hardware

Interior-door handles and locks are installed in essentially the same manner as those used on exterior doors. Most interior doors just require a handle and a latch, or what is commonly known as a passage-door lockset. However, for bedroom and bathroom doors you may want a privacy lock—an interior lockset that locks when you push or turn a button.

Подпись: Vinyl flooring offers beauty, durability, and easy main-tenance. Available in roll or tile form, vinyl flooring offers all three advantages, making it a wise choice for kitchens. [Photo by Reese Hamilton, courtesy Fine Home-building magazine © The Taunton Press, Inc.]Install the interior-door hardwareInstall the bathroom hardware and fixtures

One of your primary concerns when install­ing fixtures in a bathroom is to make sure they won’t come loose in a month or two. A toilet – paper holder, for example, should be screwed into solid wood and not into drywall alone. This is why we installed backing in the bathroom walls when we framed the walls (see Chapter 4). If, for whatever reason, there is no backing in the wall, try to mount items by screwing them into studs. If you simply can’t avoid fastening into dry – wall alone, use an expansion, or toggle, bolt that goes through the drywall and opens in the back. You could also mount the fixture on 1×4 trim and then screw the board into the wall studs.

A recessed medicine cabinet is installed in the hole left in the drywall, which is usually directly over the sink. If the cabinet is surface mounted,
position it so the bottom edge is 4 ft. from the floor, then screw it into studs or backing.

The toilet-paper holder should be screwed either into backing near the toilet, at 24 in. above the floor, or into a nearby vanity cabinet at the same height. Towel bars should be installed near the tub and vanity at 54 in. above the floor (see the photos on p. 271).

If you want to install a toothbrush and cup holder, they should be located 4 in. above the sink or 40 in. from the floor. It’s also a good idea to put a small clothes hook or two on the back of the bathroom door.

Various types of shower curtain rods can be installed in different ways. I like the ones that mount in sockets that are screwed into wall studs, much like the pole in a clothes closet. Or you can use the type of rod that is held by pres­sure between the two walls that surround the tub-shower. Cut the rod to length with a hack­saw, locate it just above the top of the shower walls, then expand it until it holds itself in place. Don’t forget to hang a beautiful shower curtain to add some color to your bathroom.

Ofnoco

The exterior of the Ofnoco resem­bles the Tarleton and the Lusby. The inside is a blank slate with space to create a tiny home of your own.

Square feet: 36

House width: 6’ House length: 6%’ Road Height: 6’-5”

Dry Weight: 950 lbs

Ceiling height: 4’-3” – sizes are approximate

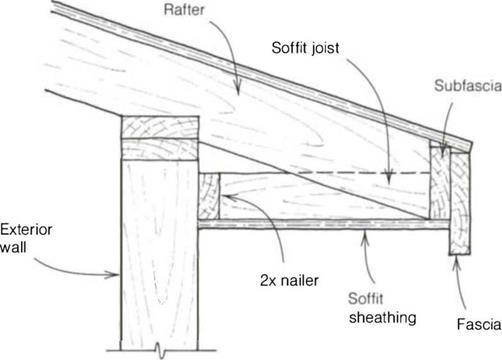
TWO WAYS TO FRAME A SOFFIT

TWO WAYS TO FRAME A SOFFITTWO WAYS TO FRAME A SOFFIT

plywood, or siding boards to the width of the overhang and nail it to the look­outs running up the gable end. Fit the stock tight to the barge rafter, but don’t worry if it fits loosely against the wall, because this joint can be covered by sid­ing and trim. Use 6d galvanized nails or screws, because they won’t go through the sleepers and into the roof covering.

Installing exterior trim

Trim makes a house look neat and invit­ing. It helps give a house its distinctive look. Use good, straight, kiln-dried stock and install it with care so that it will last a long time with little maintenance.

This book deals with just a few of the basic trim options. To begin, I often use 1x cedar or pine for corner boards,

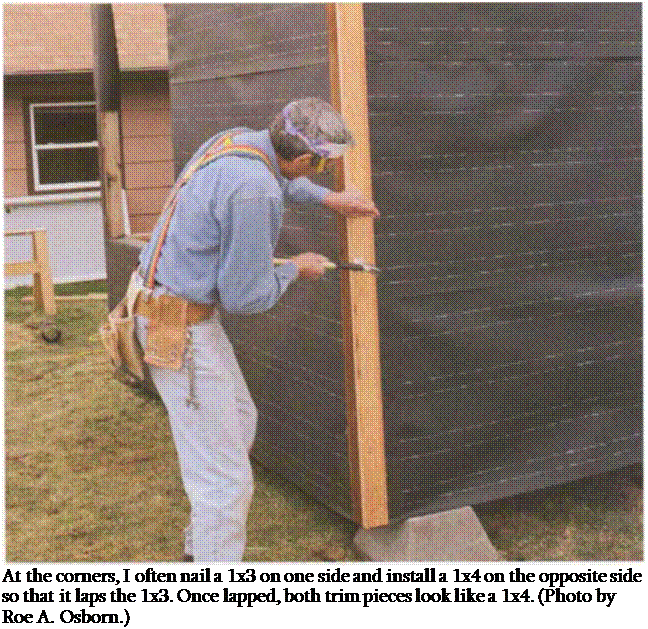
Подпись: At the corners, I often nail a 1x3 on one side and install a 1x4 on the opposite side so that it laps the 1x3. Once lapped, both trim pieces look like a 1x4. (Photo by Roe A. Osborn.)
around windows, and where the siding meets the frieze blocks. But thicker stock is available for trim. It’s common to see four-quarter (true 1 in.) material, five – quarter (1 Ул in.), or even 2x (1У2 in.) trim. Most types of siding—particularly lap siding (clapboards)—fit better against thicker trim stock. The thicker stock stands out farther from the build­ing and hides the ends of the siding.

Houses seem to look better with corner boards, which define the house’s out­lines and are easy to install. Starting at a gable-end corner, use a small rafter square to scribe the roof pitch (4-in-12, for example) on one end of a corner board and make the cut. Place this piece against the building, flush with the wall edge and butted up to the roof sheath­ing or soffit (see the photo above).

Corner boards extend down onto the foundation, V2 in. or so below the rim joist or sill plate. So mark at this point and cut the corner board to length.

Nail it flush with the corner of the building—or even У16 in. proud—with 8d hot-dipped galvanized nails. Other options for fastening exterior trim include noncorrosive aluminum nails, stainless-steel nails, or galvanized dry- wall screws. Try nailing a few scrap 1x cleats up the opposing wall to butt the corner board to, because the actual corner, once it is wrapped with building paper, is often hard to locate precisely.

Pull the cleats off and you’re ready to start on the other side of the corner. This piece runs from beneath the end rafter, soffit, or frieze block to the same dis­tance below the sill, and laps over the

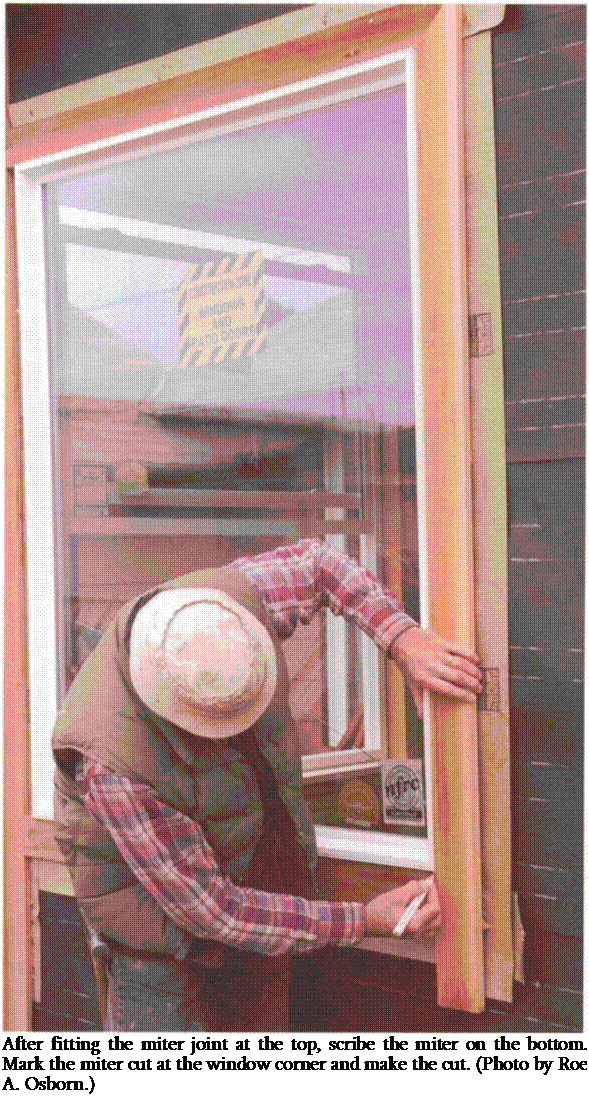
Подпись: After fitting the miter joint at the top, scribe the miter on the bottom. Mark the miter cut at the window corner and make the cut. (Photo by Roe A. Osborn.) first corner board. To make the corner symmetrical, be sure to rip the thickness of the trim stock off the first board before nailing it into place. If you’re using 31/2-in.-wide by %-in.-thick stock, for example, rip 3Л in. off the first piece of trim (or 11Л in. off 4-in. by 1 Win. stock). When the second piece of trim is nailed over it at the corner, both pieces will be the same width. After marking it and cutting it to length, nail it to the wall and to the other corner board.

Some carpenters connect this joint with waterproof glue. Take care driving nails into the edge of the first board so that it doesn’t split out; angling the nails in toward the corner can help. Trim out the remaining outside corners the same way.

Inside corners trim out a bit differently.

I often use a piece of 2×2 (1У2 in. by 1У2 in.) and nail it directly into the corner from the rafter down, overlapping the foundation by У2 in. The siding can butt directly to this board from either direc­tion, leaving a bit of corner trim showing.

If the windows and doors aren’t already cased, now is the time. Clad windows often are trimmed picture-frame style (with mitered corners) using a type of trim known as brickmold. The trim boards are nailed snugly against the win­dow frame to cover the flange. Framing a window is pretty straightforward: Cut one 45° miter on a piece of trim, place it in position, mark it for length, and then cut a 45° miter at the other end. I find it easier to hold a board up to the window and measure it in place rather than using a tape measure (see the photo at left). Repeat this process all the way around, nailing the trim in place with 8d galvanized finish nails staggered and spaced 16 in. o. c. Finish the process by nailing through the miters to close them up and hold them in place.

If the trim is to be painted, prime or paint the end grain of these miter joints to keep water from soaking into the trim. You can also put a bit of caulk or waterproof glue, such as Gorilla Glue (see Sources on p. 198) at this point before nailing the joint together.

Nailing trim over flanges can be a prob­lem. The thickness of the flange can cause the trim to tip and open up the miter joint. Try slipping thin strips of wood behind the trim to bring the nail­ing surface up level with the flange. All of these tasks take time, but this is trim that will be seen by everyone. Taking the time to do it right shows you care about your work.

It’s a good idea to install either wood drip edge or aluminum flashing at the top of horizontal trim (for example, at the top of a window). Both are quick and easy to install and help divert water away from the wood underneath. A kerf, or groove, cut in the underside of wood sills and drip edge helps prevent water from creeping back into the wall.

If using a wider casing, try butting the joints instead of mitering. Wood has a tendency to move as it dries out and the house settles, which makes miter joints open up. Let the top and bottom pieces run past the opening and the side pieces butt up to them. I sometimes run a 1 Уг-іп.-thick piece at the top and bottom and 5/4 (1 ’A in. thick) stock between. This creates a reveal, which, unlike a flush surface, can dry out and move and still look good.

Testing Plan

The tests to be performed on site, or in parts of the project, are defined in the testing plan. To verify the characteristics and behaviour of the materials to be used, samples must be taken and tests performed as specified in the contract specifications. These specifications typically define the type and frequency of the tests as illustrated in Table 13.4. The codes used are listed at the end of the Table.

Table 13.4

Tests on soils, rock and aggregates

Embankment materials – Soils

Test code

Number of tests

Periodicity and quantity

PSD, LL, PL, COM, Seq, Cr, PEAA

1 ofeach

For each excavation and/or at each 25 000 m3 excavated, or every time there is an alteration in soil nature.

w, Pd

3 of each

For profile in each layer

Embankment materials – Rock/Soil fill

Test code

Periodicity and quantity

LA, PSD, PEAA, e, FR, DR

They will be performed in the experimental section and when required by the Quality Controllers if material are heterogenic with a minimum of 1 test for each 50 000 m3 of constructed embankment.

Capping layer material – Soil

Test code

Number of tests Periodicity and quantity

PSD, LL, LP, MB, Seq

1 of each

For each 2 500 m3 or working day

Cr, CBR

1 of each

For each 10 000 m3

w, Pd

3 of each

For each 12.5 m

PLT

1

For each 2.0 km

Granular material

Test code

Number of tests

Periodicity and quantity

PSD, LL, LP, MB, Seq

1 ofeach

For each 2 500 m3 or working day

Cr

1

For each 10 000 m3

LA

2

For each homogenous formation or 1 per day

PEAA, %C

1 ofeach

For each 10 000 m3 or working day

w, Pd

1 ofeach

For each 12.5 m or 1 per day

w, PLT

1

In each 2.0 km

Lime/Cement treated soils

Test code

Number of tests Periodicity and quantity

PSD, LL, PL, Cr, CBR(7d), CBR-i

1 of each

For each working day

w, Pd

1 of each

In each 12.5 m

PLT

1

In each 2.0 km

<*ilab (7 & 8d)*

1

For each working day

<jT (i d)*

1

Core boring sample each 200 m

* Only for soil treated with cement.

Test codes and their designation as used Table 13.4:

w

Water content of soil and aggregates

%C

Percentage of crushed and broken broken surfaces in

Com

Organic matter content

aggregates

Cr

Compaction test

LA

“Los Angeles” test

Pd

Dry density in-situ

FR

Coefficient of fragmentability f

LL

Atterberg liquid limit

DR

Coefficient of degradability f

PL

Atterberg plastic limit

e

Void ratio

Table 13.4 (continued)

Test codes and their designation as used Table 13.4:

PSD

Grain/particle size distribution

&Tlab

Indirect tensile strength (Brasilian)

Seg

Sand equivalent

test, laboratory curing

PEAA

Particle density and water

aT (id)

Indirect tensile strength (Brasilian)

absorption

test, in-situ curing

CBR

California Bearing Ratio test

CBR-i

CBR test in place

(id)

after i days of curing

MB

Methylene blue test

(7d)

after 7 days of curing

PLT

Plate loading test

(7 & 8d)

after 7 and 8 days of curing

D<80pm

Fines content

t

of rocky material

Construction and Maintenance of Drainage Systems

13.7.1 Construction

When construction commences it is necessary to be responsive to the geological and geotechnical conditions encountered and not to adhere to those assumed at the de­sign stage. Therefore the in-situ conditions should be carefully inspected throughout the construction process. Also, care should be taken that the construction activities do not have a deleterious effect on drainage.

The planned drainage systems for a project can only be finalized during the work’s execution, when the local geotechnical conditions are fully understood. Thus, it is important that an adequate specification is produced for the anticipated
type of drainage system and for suitable materials, so that the implementation teams are able to deliver the best solutions.

The many phases which constitute the construction of a road are sometimes de­layed, and this can be drainage related, due to:

• Alteration in design flows;

• Obstruction of the surface and underground water flow path, due to earth moving and material placement;

• Possible surface and underground water contamination, due to earth moving, machine cleaning and associated incidents;

• Increase in the soil’s compaction in the areas where there is flow to or from an aquifer; and

• Alteration in the hydrological regime, as a consequence of the disturbed soil caused by the construction of the road structure.

Thus, it is necessary to plan the phases of project to adopt preventative measures so that there is:

• Adequate design flow, taking into account the future plans of the drainage area (land use) as well as current needs;

• Optimization of the programming of the earthworks and drainage activities, tak­ing into account the season in which they are to be performed;

• Adoption of a plan to control erosion and soil sedimentation; and

• A work phasing plan, so that the heavy trucks and machinery do not cross the water courses, and do not affect the infiltration and recharge of the aquifer.

Normally, the supplier is obliged to demonstrate the way in which he establishes, maintains and implements a Quality Management System (QMS) to control the construction. In Europe, this quality management system must comply with the re­quirements of the ISO 9001:2000 standard as well as with any national or European legislation that might be relevant. The system must account for regulations applica­ble to quality assurance as well as for the QMS and should be based on a Quality Plan assembled for the construction project that contains the procedures, inspec­tion and testing plans, work instructions, audit plan, training and information plan, as well as other plans containing the different specialist activities involved in the project.