AN OVERFLOWING TOILET

Some homeowners associate an overflowing toilet with a problem in their septic system. It is possible that the septic system is responsible for the toilet backing up, but this is not always the case. A stoppage either in the toilet trap or in the drainpipe can cause a backup.

If you get a call from a customer who has a toilet flooding their bathroom, there is a quick, simple test you can have the homeowner perform to tell you more about the problem. You know the toilet drain is stopped up, but will the kitchen sink drain properly? Will other toilets in the house drain? If other fix­tures drain just fine, the problem is not with the septic tank.

There are some special instructions that you should give your customers prior to having them test other fixtures. First, it is best if they use fixtures that are not in the same bathroom with the plugged-up toilet. Lavatories and bathing units often share the same main drain that a toilet uses. Testing a lava­tory that is near a stopped-up toilet can tell you if the toilet is the only fixture affected. It can, in fact, narrow the likelihood of the problem down to the toi­let’s trap. But, if the stoppage is some way down the drainpipe, it’s conceiv­able that the entire bathroom group will be affected. It is also likely that if the septic tank is the problem, water will back up in a bathtub.

When an entire plumbing system is unable to drain, water will rise to the lowest fixture, which is usually a bathtub or shower. so, if there is no backup in a bathing unit, there probably isn’t a problem with a septic tank. But, back­ups in bathing units can happen even when the major part of a plumbing sys­tem is working fine. A stoppage in a main drain could cause the liquids to back up into a bathing unit.

To determine if a total backup is being caused, have homeowners fill their kitchen sinks and then release all of the water at once. Get them to do this several times. A volume of water may be needed to expose a problem. Simply running the faucet for a short while might not show a problem with the kitchen drain. If the kitchen sink drains successfully after several attempts, it’s highly unlikely that there is a problem with the septic tank. This would mean that you should call your plumber, not your septic installer.

INTERIOR TRIM

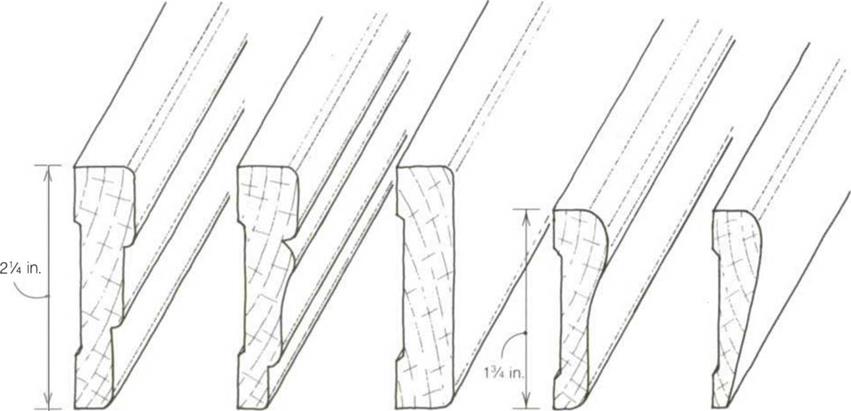
Once the drywall is up and the painters have sealed and finished the walls, the task of installing interior trim, window surrounds, casing, baseboard, and aprons can be started. Years ago we used to trim with wide baseboards, fancy casings, and elaborate crown moldings. While big-budget houses still often have these material – and labor-intensive trim details, the trend for more modest houses has been toward simpler and less expensive trim styles.

Trimming windows

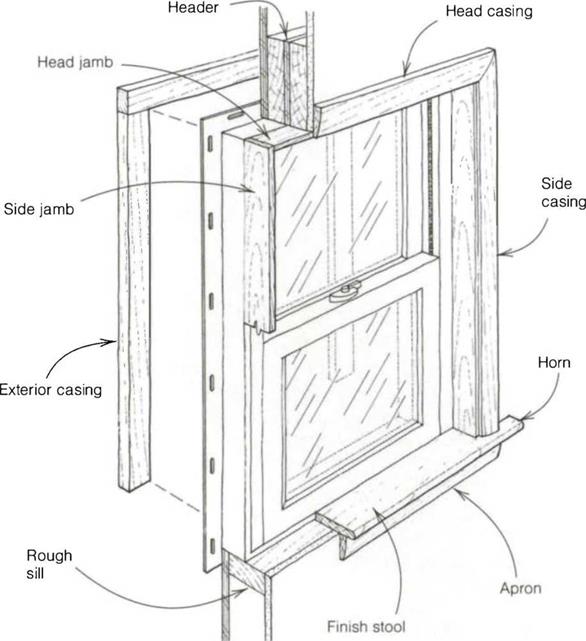
Unlike wood-framed windows, most vinyl-clad and aluminum-framed units don’t come with wood stools (often called sills) or wood jambs. Some people put in a wood stool and let drywall cover the wood trimmers and header. I like to make wood surrounds, or jambs, and

INTERIOR TRIM

case them with trim. I think the wood gives a home a bit more warmth and style, and it’s not hard to do. [10]

horns depends on the width of the side casings, plus the amount the horns extend beyond the casings, usually about Уд in. (see the drawing above).

As a general rule, stools are wide enough to protrude about 1 У2 in. beyond the wall plane. But this can vary, and the window stool I have by my writing desk sticks out beyond the wall ЗУ2 in. and is wide enough to hold an open book. Many folks like an even wider stool in the kitchen to set flower pots in the sun.

INTERIOR TRIM
After cutting the stool to length and laying out and cutting the horns, test fit it against the window. You want to make sure that the edge fits tightly against the window and that the horns fit tightly against the drywall; sometimes it takes some work with a block plane to get everything right. Although this is simple trim, every piece of trim in a house needs to fit just right to account for irregularities in the walls, floors, and ceilings.

Windows can often be ordered with jambs for specific wall thicknesses (for example, 2×4 or 2×6 construction), but sometimes you’ll need to cut and add jambs on the job. First, measure in from the face of the wall surface to the win­dow frame in several places around the window. If these measurements are close, you can rip stock to this uniform width. I generally use a table saw and clean up the cut with a block plane. If the measurements vary widely, cut to
length a head piece that is wider than the wall thickness, then hold it in place at the top of the window and scribe a cutline by running a pencil along the drywall. Repeat the procedure with the side jambs. Jambs can stick out past the drywall about 1/ie in. to make a tight joint with the casing. Once properly fitted, nail the jamb head and sides to the rough header and trimmers with 6d finish nails.

The Finished Room

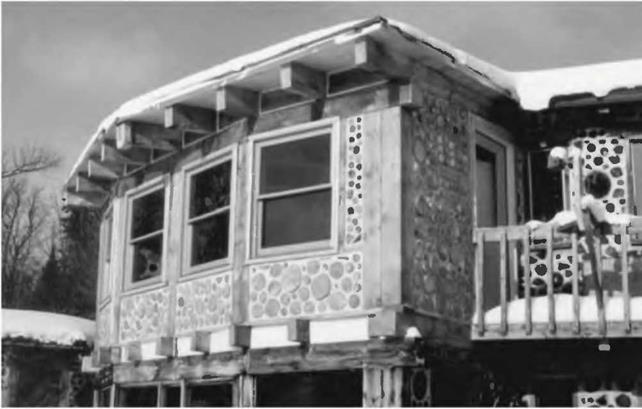
image149Following are some views (Figures 5.41-5.45) and details of the completed sunroom.

Подпись: Fig. 5.41a & b (detail, below): The completed sunroom at Earthwood. Only the cordwood snow-blocking in the lower solar room remains to be done. We also waited until the spring of 2003 to put the earth on the roof. image150Jaki and I are glad that we have gained a beautiful new room as a result of this book… realizing that we wouldn’t have built it otherwise! In case you’re curious, the materials cost was about $4,000, or $20 per square foot. We also spent $250 on labor. And we also renewed the downstairs solar room at the same time, another 200 square feet, so were quite pleased with the cost. Larger buildings could cost less per square foot, particularly as our sunroom is heavy on windows ($1,243 for five) and an exterior door ($338), expensive items. I believe that a timber-frame home, using techniques described in this book, combined with some sort of natural infilling (cob, cordwood, straw bale, wattle-and-daub, etc.) can still be built today for a materials cost of $15 to $25 per square foot, depending on where you build and how good you are at scrounging materials.

Now I hope that Timber Framing for the Rest of Us will inspire you to build with heavy timbers, joined by simple common-sense techniques and fasteners, and that your results will be every bit as satisfying as ours have been.

just think, “build quality!”

Fig. 5.44, near right: Ceiling and

Подпись: Fig. 5.42, near right: The west wall of the new sunroom. The double-wide four-by-eight lintel over the window carries the load down to the cordwood wall without placing pressure on the window itself. Fig. 5.43, far right: The "Easter Island" panel at the new Earthwood sunroom. I wish you could see this in color, as the bottle-ends are beautiful. image151rafter detail.

Fig. 5.45, far right: Joining two rafters with heavy metal plates can be quite attractive.

FAST DIAGRAMMING AND THE JOB PLAN

Function analysis system technique (FAST) is a diagramming technique to graphically show the logical relationships of the functions of an item, system, or procedure. FAST was developed in 1964 by Charles V. Bytheway at the UNIVAC Division of the Sperry Rand Corporation. Prior to the development of FAST, one had to perform a function analysis of an item by random identification of functions. The basic function had to be identified by trial and error, and one was never quite sure that all functions had been uncovered. FAST provides a system to do a better job in function analysis.

10.5.1 Purpose of the FAST Diagram

The FAST diagram should be created during the information phase of the VE job plan by the whole VE team. When used in conjunction with a value study, the FAST diagram serves the following purposes:

1. It helps organize random listing of functions. When answering the questions “What is it?”, “What does it do?”, “What must it do?”, the study team develops many verb – noun function solutions at all levels of activity, which the FAST diagram can help sort out and interrelate.

2. It helps check for missing functions that might be overlooked in the above random function identification process.

3. It aids in the identification of the basic function or scope of the study.

4. It deepens and guides the involvement, visualization, and understanding of the problem to be solved and the proposed changes.

5. It demonstrates that the task team has completely analyzed the subject or problem.

6. It tests the functions through the system of determinate logic.

7. It results in team consensus in defining the problem in function terms and aids in developing more creative valid alternatives.

8. It is particularly helpful in “selling” the resulting changes to the decision makers.

G eneral Guidelines for a Control System of Production Homogeneity

The guidelines for controlling production homogeneity are made up of the following two parts:

• Control of compliance with a recipe, accomplished by establishing an oper­ation compliance level (OCL), which is a variable index that estimates the production accuracy and indicates the appropriate mixture test frequencies

• Control of production variability through determining a running mean of the deviation from target (i. e., from a recipe).

Installing Strip Flooring

T&G strip flooring, %-in. thick and 2%-in. to 3%-in. wide, is by far the most commonly installed wood flooring. Installing it requires few specialized tools and, with a modest amount of prep work, it goes down fast and lasts long.

PREP STEPS

Wood absorbs water and swells, so don’t bring hardwood flooring on site till the building is closed-in and "wet work” (such as plumbing, tiling, drywalling, plastering, and painting) are complete. Allow paint, plaster, or joint compound several days to dry. If necessary, turn on the heat-

Subfloorin

is thin and would telegraph gaps or irreg­ularities underneath. So most resilient-flooring and carpet makers specify underlayment beneath their products. Particle­board, fiberboard, and hardboard are often used for underlayment, but they should never be used for subflooring. Lacking the cross-grain construction of plywood, these materials just aren’t as strong, and they tend to delaminate

when wet.

Post-Workshop Stage

Objective. The VE manager must ensure that approved recommendations are converted into actions. Until this is done, savings to offset will not be achieved. Three major objec­tives of this phase are:

1. To provide assistance, clear up misconceptions, and resolve problems that may develop in the implementation process

2. To minimize delays encountered by the proposal in the implementation process

3. To ensure that approved ideas are not modified during the implementation process in such a manner as would cause them to lose their cost-effectiveness or basis for original selection

Implementation Investment. The need to invest in order to save must be emphasized when submitting VEPs. Some degree of investment is usually required if a VE opportu­nity is to become a reality. Funds and/or personnel for implementation have to be pro­vided. The key to successful implementation lies in placing orders for the necessary actions into the normal routine of business. Progress should be reviewed periodically to ensure that any roadblocks that arise are overcome promptly.

Expediting Implementation. One of the fastest ways to achieve implementation of an idea is to effectively utilize the knowledge gained by those who originated it. Whenever possible, the VE team should be required to prepare first drafts of documents necessary to revise handbooks, specifications, change orders, drawings, and contract requirements. Such drafts will help to ensure proper translation of the idea into action and will serve as a baseline from which to monitor progress of final implementation. To further ensure proper communication and translation of the idea onto paper, the VE team should review all implementation actions prior to final release.

Monitoring Progress. Implementation progress must be monitored just as systematically as the VEP development. It is the responsibility of the management or the VE manager to ensure that implementation is actually achieved. A person should be designated by name with responsibility to monitor all deadline dates in the implementation plan.

Objective. The last phase of the job plan has several objectives; these might seem quite diverse, but when achieved in total, they will serve to foster and promote the success of subsequent VE efforts:

1. Obtain final copies of all completed implementation actions.

2. Compare actual results with original expectations.

3. Submit cost savings achievement reports to management. This will allow calculation of the total return on investment (ROI) of the VE effort.

4. Submit technical reports to management for possible use elsewhere.

5. Evaluate conduct of the project to identify problems that arose and recommend corrective action for the next project.

6. Initiate recommendations for potential VE study on ideas evolving from the study just completed.

7. Screen all contributors to the VEP for possible receipt of an award and initiate rec­ommendations for appropriate recognition.

Discussion. A VE project is not completed with implementation of an idea. Full benefit is not derived from a VEP until the follow-up phase is completed. Until then, the records on a project cannot be closed. It is the responsibility of the VE manager to designate some individual to complete this phase. Certain key questions must be answered to assess accomplishments:

1. Did the idea work?

2. Did it save money?

3. Would you do it again?

4. Could it benefit others?

5. Has it been forwarded properly?

6. Has it had proper publicity?

7. Should any awards be made?

Identifying Rehabilitation Needs

In road rehabilitation, it is important to design the drainage at the same time as the other rehabilitation measures (e. g. strengthening of the structure). The designer should aim to recognise locations where poor drainage is the major cause of road damage. In cold regions the springtime is usually the best time for field studies of the drainage system, since the water level is high, frost damage can be seen, vegetation is low and the bearing capacity and slope stability are lowest. Very wet/soft slopes can indicate a wet structure. There may even be water pressure inside the structure, as in Fig. 13.45 where water is pouring out from the slope of a highway just before a culvert (which is acting as a water barrier).

The appearance of certain vegetation (e. g. rushes and willow trees) on the slopes can also be a sign of excess moisture in the geotechnical structures, appearing typically on low permeability slopes. Video or photos can help to record the conditions. Ground radar surveys may also be used to identify extra moisture on

Fig. 13.45 Water exiting from an embankment slope where it has collected due to a culvert (in the background) acting as a barrier

road structures and in subsoil or on rock surfaces and the level of the groundwater. Bearing capacity measurements can be used to identify weak (moist) locations and rock locations (maybe channelling water) below the road. The designer should anal­yse available observations, measurements and the requirements for both the road and its surroundings.

Wood and plastic laminate floorings are very durable

When my family moved into our present home, the living room floor was covered with an ancient yellow shag carpet. There were things growing in that carpet that even our dog didn’t like. I replaced the carpeting with a nice, pre­finished floor made from bamboo. The cost for the floor, not counting my labor, was less than the cost for a decent carpet. We have a couple of area rugs that can be taken outside and given a good shaking now and then.

PREFINISHED WOOD FLOORING. In the old days, wood flooring was installed “in the raw,” one tongue-and-groove strip at a time. Then it was sanded and finished. The sanding process covered everything with fine sawdust, and the oil-varnish finish filled the air with unpleasant (and often hazardous) fumes. Although it’s still possible to install wood floors that way, more and more people are choosing prefinished wood flooring. The installed cost is about the same for both flooring treatments,
but you don’t have to deal with dust or fumes. You also don’t have to wait for the multiple coats of finish to be applied. In addition, the factory – applied finishes on better-quality flooring are very durable.

I love wood floors. I prefer them over carpet. They are attractive, affordable—the installation price of a wood floor is often lower than that of carpet—and easy to clean. So it’s great to see such a wide selection of wood flooring available at home-improvement centers and flooring deal­ers. Good instructions are also available from manufacturers and in-store experts for installing prefinished flooring. As with traditional solid – wood floors, prefinished flooring is made to fit together with tongue-and-groove joints.

Подпись: Install a “floating floor. Both plastic-laminate flooring (shown here) and engineered-wood flooring can be installed without nails. The individual sections of flooring “snap” together in an interlocking joint. The finished floor “floats” on a resilient pad laid over the subfloor. [Photo by Don Charles Blom]
Prefinished hardwood floors come in many styles and woods. Some of the more popular choices are oak, maple, cherry, ash, and fir. You can also select the stain or clear finish and the edge detail. Most prefinished wood flooring is made by gluing wood plies together. Referred to as engineered wood flooring, prefinished wood

flooring is manufactured in strip, plank, and parquet form. Strip flooring can be up to 3//2 in. wide, planks are wider, and parquet flooring comes in square pieces. The overall thickness is usually 1/2 in. or less. Some prefinished strips and planks have slightly eased or beveled edges to make handling and installation easier. Basic, square-edged flooring is also available.

Wood flooring can be installed with a pneumatic nailer, attached to the subfloor with adhesive, or simply “snapped” together with an interlocking tongue and groove system. These floors “float” on a resilient pad. Manufacturers have even developed flooring that simply snaps together without glue. If you want to do the in­stallation yourself, check with the manufacturer or with your flooring supplier to determine which type of installation is appropriate, and be sure to follow the installation instructions that come with the flooring material. PLASTIC-LAMINATE FLOORING. Like engineered-wood flooring, plastic-laminate flooring is a plywood construction, but the top, or “show,” layer is man-made rather than natural. Different colors and patterns are available, including some very realistic wood tones. The surface is extremely durable, though it can’t be sanded and refinished like some types of wood flooring. Shop around and you’ll find plastic-laminate flooring for about the same price as good-quality vinyl flooring. It’s easy to install, too. This type of flooring works well in kitchens and bathrooms. I have it in my writing room. The supplier taught me how to lay it by “snapping” the edges together. I installed about 100 sq. ft. without driving a single nail.

EXTERIOR BEVEL SIDING

Unlike framing, where you can leave a small gap now and then, siding needs to fit properly everywhere. If the horizontal boards are running out of level or don’t fit well at the corners, doors, and win­dows, it’s noticeable from the next county. Not only do gaps in siding look bad, but they also might allow water and cold air to enter the building.

While there are many different types of siding styles and materials available, in this section I’ll talk about how to apply bevel (or clapboard) siding. Years ago, clear redwood, cedar, and spruce siding were widely available. These were easy to work, free of knots, looked good, and stayed flat. Unfortunately, such quality siding isn’t readily available these days. Most of what we have to work with comes from second-, third-, or fourth – growth trees, often curls in the sun, and is spendy(aswe say in Oregon). Because of this, many builders use a wood or cement-base composite siding made of OSB. This manufactured siding is preprimed and 7/ie in. thick with no taper. It ranges from б in. to 12 in. wide and is available in lengths of 16 ft. and longer. If using composite siding, read and follow the manufacturer’s recom­mendations for specific application instructions.

Siding should be nailed into studs when­ever possible, rather than relying on Уг-іп. plywood or OSB sheathing to hold the nail. So the first thing to do is mark stud locations on the housewrap. The best way to do this is to mark the stud layout at the top and bottom of the wall, then snap vertical chalklines at these marks.
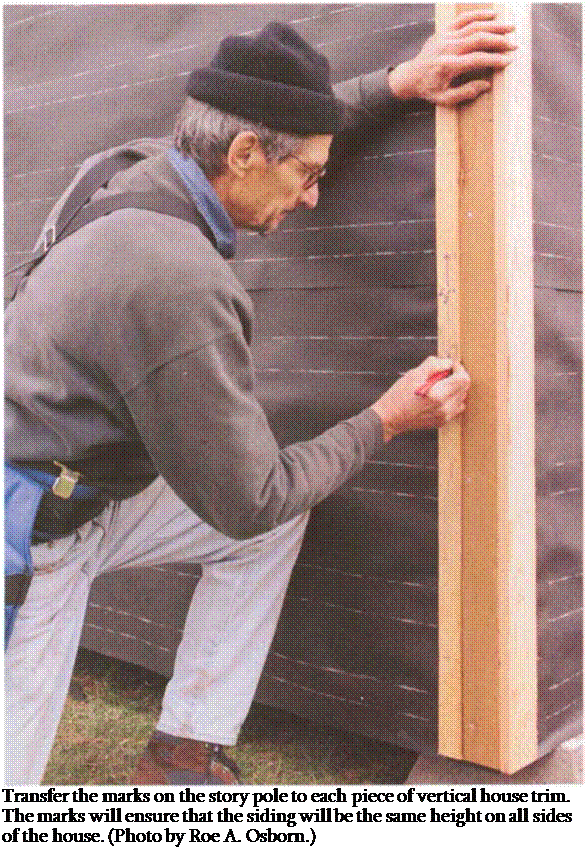
Подпись: Transfer the marks on the story pole to each piece of vertical house trim. The marks will ensure that the siding will be the same height on all sides of the house. (Photo by Roe A. Osborn.)

Laying out siding

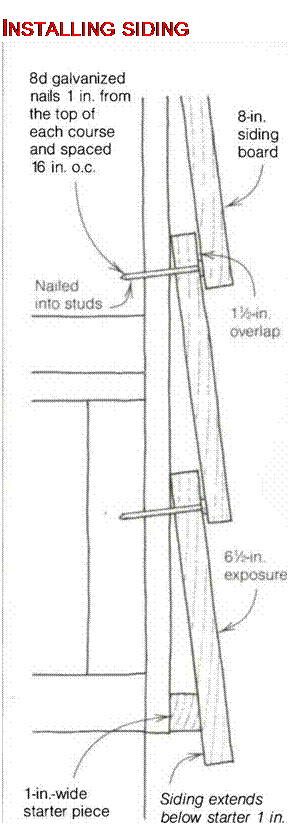
To ensure that each course (or row) of siding is the same height, make a story pole from a straight length of 1×2. Cut it to the same length as the corner trim that runs from the frieze blocks to У2 in. down onto the foundation. If you’re using 8-in.-wide lap siding, for example, each successive course of siding will overlap the previous course by at least
1У2 in., leaving а 6У2-ІП. exposure. This ensures that moisture won’t wick up behind the siding. So on the story pole, measure up 6У2 in. and mark across the 1×2. Then make a mark at every 6У2-ІП. point from there at 13 in., 1 9У2 in.,

26 in., and so on. These marks indicate the bottom of every course.

There is another consideration when lay­ing out siding. Frequently you can adjust the courses a bit so that the bottom of one course of siding fits directly on top of the window. Another course can be adjusted so that it lines up with the bottom of the window. This looks better to the eye and reduces the amount of cutting you have to do. So instead of a 1 У2-ІП. lap, you may need to lap a few of the bottom courses 1% in. Then you may need to change the lap to 13/s in. to come even with the top of the window. The story pole is a handy place to mark these adjustments. Make course changes gradually. The eyes rarely notice а У4-ІП. change in exposure from one course to the next.

With the layout on the story pole com­plete, transfer the marks on it to each piece of vertical house trim. Take it to the corner, hold it flush with the bottom of the trim, and transfer the marks (see the photo at left). Do the same at the side trim around doors and windows.

Installing siding

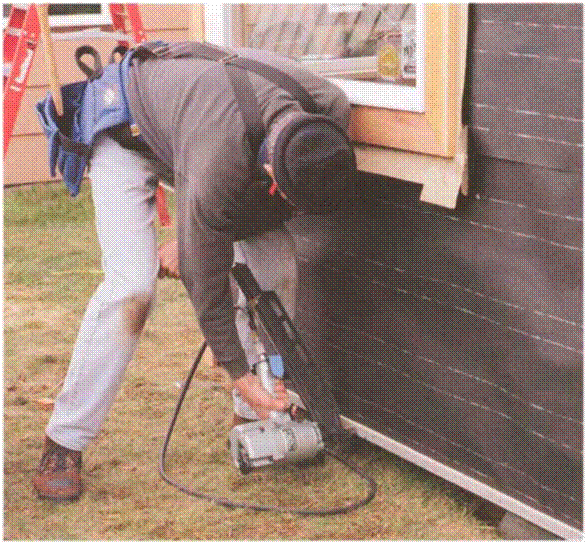
Composite siding has a single row of nails driven about 1 in. from the top, hidden by the second row. Other types of lap siding nail near the bottom of the course, about 1 in. from the butt. You have to be careful when using a pneu­matic nailer for this job. If the pressure is too high, the nail could be driven too deep, breaking the surface of the siding, compromising the nail’s holding power and leaving a place where water can enter. When installing siding with a hammer, use hot-dipped galva­nized nails or stainless-steel, ring-

Подпись: INSTALLING SIDING

EXTERIOR BEVEL SIDING

nail flush with the bottom sill plate and tip the first course of siding out so that it will match successive rows (see the drawing at left). Rip these strips from siding boards. They don’t have to be ripped perfectly because they will be hidden by the first course of siding. It’s a good idea to keep a paint bucket handy and cover all raw edges to protect them from moisture.

shanked nails. Other, thinner types of beveled wood siding can be nailed on with 4d or 5d nails.

Regardless of whether you use an air nailer or a hammer, the first step is the same. Install 7/iб-іn.-thick by 1-in.-wide strips along the bottom of the walls (see the photo above). These starter pieces

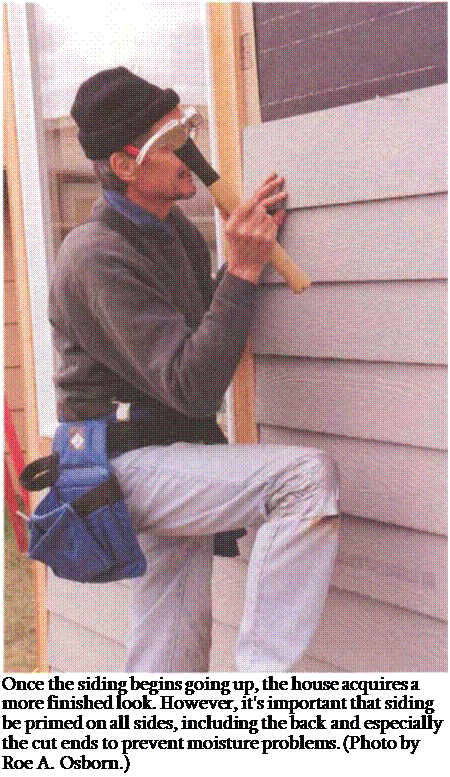
Actually cutting and nailing up the sid­ing is a process I always find exciting. The house is finally being closed in against the weather and begins to take on a finished look (see the left photo on p. 190). Composite-siding manufactur­ers recommend that both ends of the siding be held back 3/ie in. from the trim to allow for expansion and waterproof-

Подпись: Once the siding begins going up, the house acquires a more finished look. However, it's important that siding be primed on all sides, including the back and especially the cut ends to prevent moisture problems. (Photo by Roe A. Osborn.) EXTERIOR BEVEL SIDING

ing. This is a big gap for finish work, but it leaves enough room for a good bead of caulk to help keep water out.

A smooth bead of paintable, latex – silicone caulk will be hard to notice once it is painted.

In my experience, the expansion and contraction of composite siding in most parts of the country is minimal. You may be able to put a bead of caulk under­neath the siding and fit it tight to the
trim, which is what I sometimes do when installing wood bevel siding. In cases like this, take time to talk to builders and carpenters in your area and see whatthey recommend for the par­ticular type of siding that you are using.

Start on a side of the building where you can begin with full-length pieces. As a general rule (and this applies to studs, rafters, headers, siding, or any work that a carpenter does), always start with the

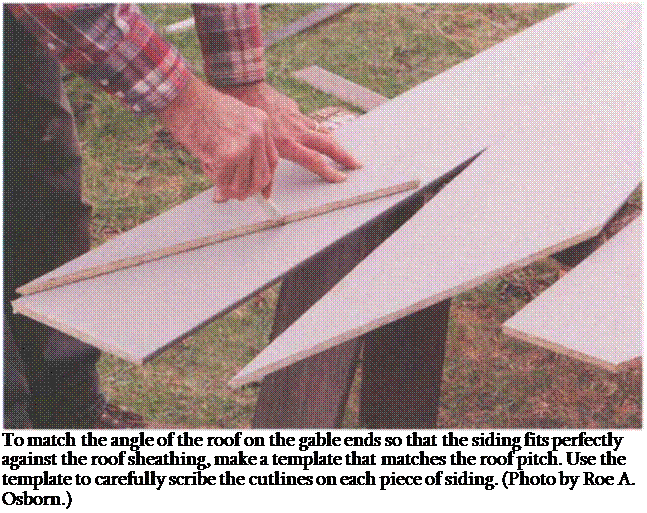
Подпись: To match the angle of the roof on the gable ends so that the siding fits perfectly against the roof sheathing, make a template that matches the roof pitch. Use the template to carefully scribe the cutlines on each piece of siding. (Photo by Roe A. Osborn.)

longest pieces first, because the cutoff ends can normally be used elsewhere.

If you cut the short pieces first, you may not have enough long stock left to complete the job. Remember to cut the siding so that the ends fall over studs for secure nailing.

Because these cuts need to be made accurately and cleanly, this is a good place to use a sliding compound miter saw. If you use a circular saw, cut from the back side to prevent tearout on the front side. Use a small rafter square as a guide for your circular saw to help make a square and accurate cut.

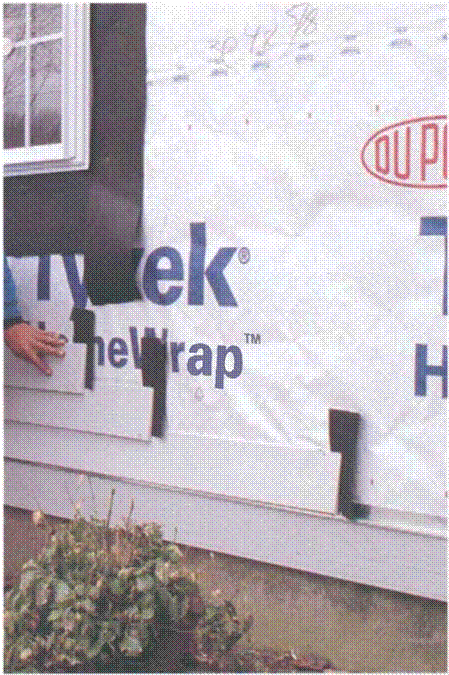
On sections longer than 16 ft., snap horizontal chalklines to keep the courses straight. While composite siding is quite uniform, wood siding can have crowns and twists that can be straightened by nailing them to a chalkline. In areas that get a lot of wind and rain, many builders
cut 4-in. by 12-in. strips of felt paper and slip one behind every joint where two pieces of siding abut (see the right photo on the facing page).

Cutting siding to fit the gable ends is a bit more difficult than sidewalls, because the cuts are no longer square. To mark these cuts, which are the same pitch as the roof, make a simple pattern from a piece of siding that’s cut to the roof pitch (see the photo above). Use a small trim sawfor making these cuts and clean them up with a block plane.

Working up the gable end, measure down 11/2 in. (the amount composite sid­ing laps) from the top of the last installed board at each end. A measure­ment with the tape held along these marks will give you the long point of the next board. An easier way to do this is to mark the lap on each board before it is nailed in place. Lay the next board on

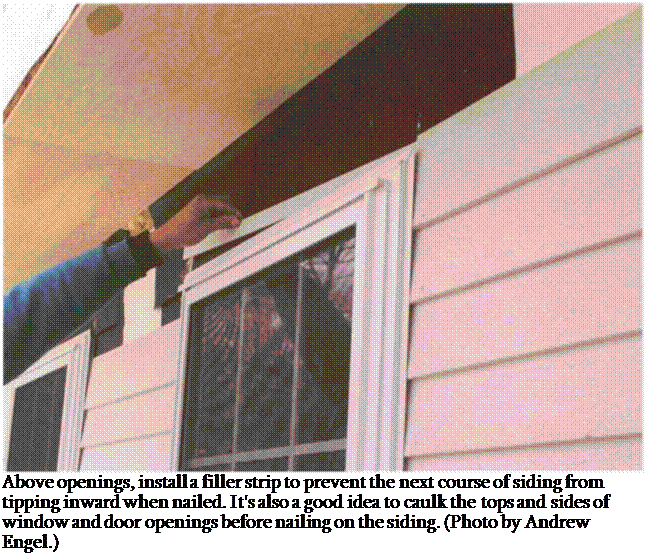
Подпись: Above openings, install a filler strip to prevent the next course of siding from tipping inward when nailed. It's also a good idea to caulk the tops and sides of window and door openings before nailing on the siding. (Photo by Andrew Engel.)

these lines and mark it to length, which eliminates the need to drag out your measuring tape. Nowyou can place the template on these points, scribe cut marks on the siding, make the cuts, and nail the piece in place. If you can’t get a perfect fit between siding and roof or eave soffit, you can cover this gap later with trim, which can be as simple as a 1×2 or 1×3 nailed on top of the siding.

Cutting around doors, windows, and gable-end vents needs to be done neatly and carefully. At the top of openings, install a filler strip to tip the lap siding out (see the photo above). And remem­ber to caulk joints around window and door openings. Caulk, unlike diamonds, is not forever, but it does help repel water. Caulk carefully at the tops and sides of windows and doors before nail­ing on siding.