|
Walls Create Sp
|
Posted by admin on 14/ 11/ 15
|
MANY CARPENTERS CUT BLOCKS with a
|
|
|
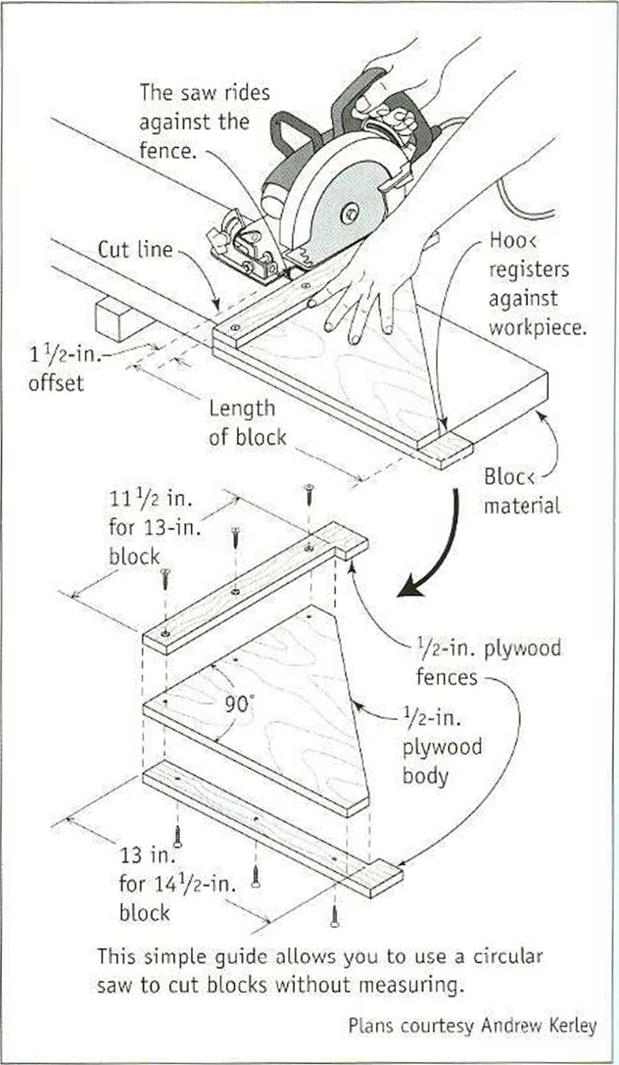
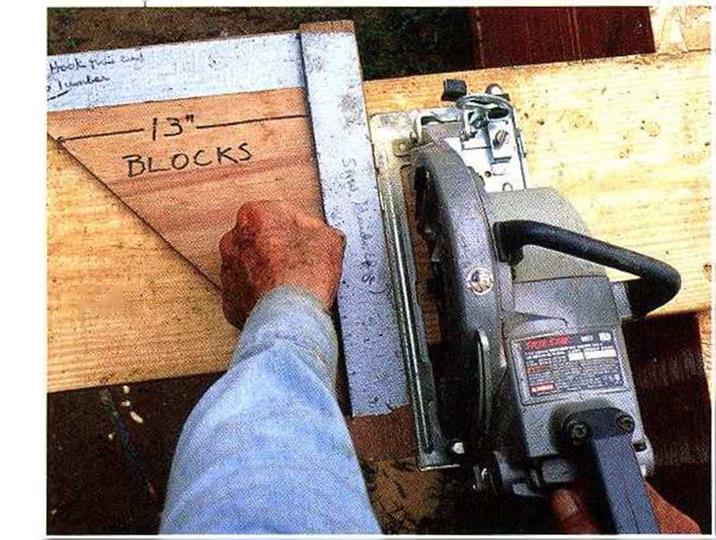
chopsaw, which is fine if you have one. But there is another easy way to cut blocks. Try making a simple block-cutting tool to use with a circular saw. Once you have the guide, simply hook it on a 2x and make the cut along the edge.
|
|
|
|
|
MAKE A JIG TO CUT BLOCKS QUICKLY. This simple jig can be made from scrap in just a few minutes. It eliminates all measuring and marking, which saves a great deal of time when cutting blocking.
|
|

job site, as I-joist width varies from manufacturer to manufacturer. T he most common width for residential 1-joists is 9’/ in., so you can cut blocking from scrap pieces of I – joists or from 2×10 lumber. Cut the blocking to lit snugly between the chords of adjacent I – joists, and nail the blocking to the chords.
When nailing blocking between joists, it’s best to begin at one end of the house and sim – plv work your way toward the opposite end. Sight down the length of the first joist (the one closest to the rim joist) and make sure it is running straight. Measure the first joist space and cut the block to length. Set the block on edge over a girder or a crib wall. Drive two 16d nails through the rim ioist into the block and two 16d nails through the floor joist into the block. Next, angle a I6d toenail through both sides of the joist into the girder. Nail lapping joists together with two I6d nails. Sink one 16d toenail through each joist into the girder and angle a 16d toenail down
through the block at each end into the joists they span.
Once you have a few blocks nailed in place, use a tape measure to make sure the joists are maintaining an accurate o. c. layout so that the sheathing will land mid-joist. 11 necessary, cut the blocks a bit short or long to maintain accurate spacing.
In many parts of the country, rough plumbing and heating ductwork are installed before the floor is sheathed, so be sure to check with those contractors before sheathing. Also, find out whether you need a floor joist inspection before you install the floor sheathing.
STEP8 Install the Floor Sheathing
Before plywood and OSB were readily available, we sheathed floors with softwood 1x6s that were cut and nailed diagonally across the joists. To make the joints between the 1×6
boards, the ends of each board were cut at a 45-degree angle. Frequently, the 1×6 lumber was of poor quality and had large knots. I still have scars on my lower legs from breaking through subfloors while working on job sites decades ago. The sheathing panels we use todav are much better than 1×6 boards—vet
4 4
another improvement over how houses were built in "the good old days.”
Sheathing with 4xtS sheets of tongue-and – groove plywood or OSB is not difficult, though the sheets can be awkward to handle. Carry them with a partner, if necessary, and take care not to damage the tongues or the grooves, which can make X more difficult to fit the sheets together. Be sure to use exterior – grade, л-in.- or %-in.-thick sheathing.
Snap a line to lay out the first sheathing course
  When laying out long rows of 4×8 sheathing, its best to start from a control, or reference, When laying out long rows of 4×8 sheathing, its best to start from a control, or reference,
Posted by admin on 14/ 11/ 15
ONE OF THE MOST important skills a carpenter learns over the years is training and trusting his or her eye.
And one of the best ways to develop this capability is to cut square by eye. Instead of using a square to mark a 90-degree cutoff line on a board, simply make a quick pencil mark for length on the board, line up a circular saw, and make the cut. Over the course of framing a floor or a wall, this method can save you plenty of time.
If you’re comfortable using a circular saw, it’s not difficult to master this technique. Position the saw with the blade aligned on the cutoff mark and the front of the saw’s base parallel with the edge of the board. As you make the cut, keep the base parallel with the board’s edge. Practice a few times on scrap, check each cut, and adjust the angle of the cut until you’ve got it right. Ir time, you’ll develop a "feel" for square.
  MAKE SQUARE CUTS BY EYE. To make a square cut, put the blade on the cut line and keep the front edge of the saw base parallel with the board. MAKE SQUARE CUTS BY EYE. To make a square cut, put the blade on the cut line and keep the front edge of the saw base parallel with the board.
between the rim joists and the interior girders or crib walls in the basement or crawl space of an old house. Stress tests have long shown that bridging provides little extra stability to a floor sheathed with plywood or OSB. My experience is that most midspan bridging docs little except increase floor squeaks.
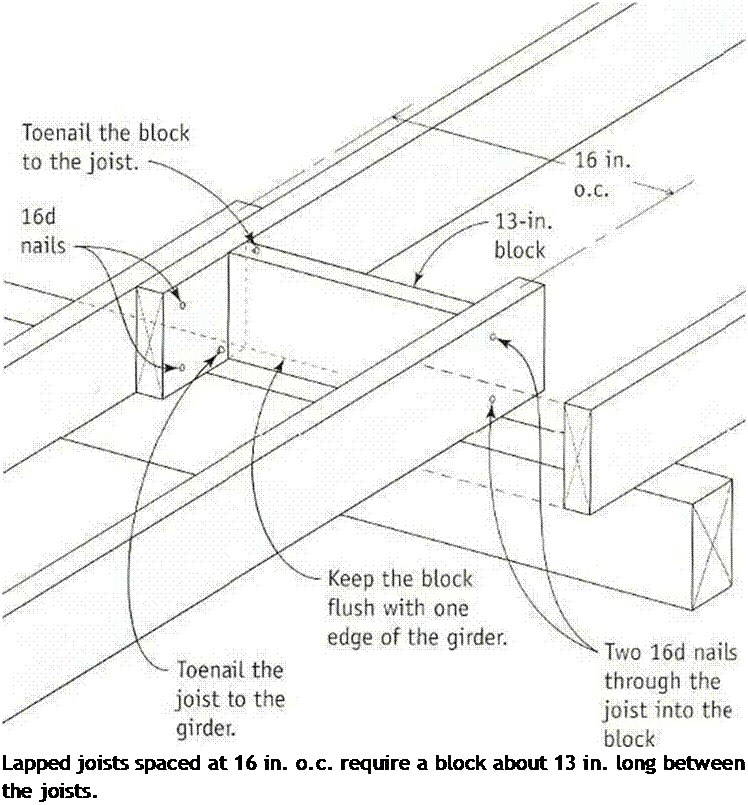
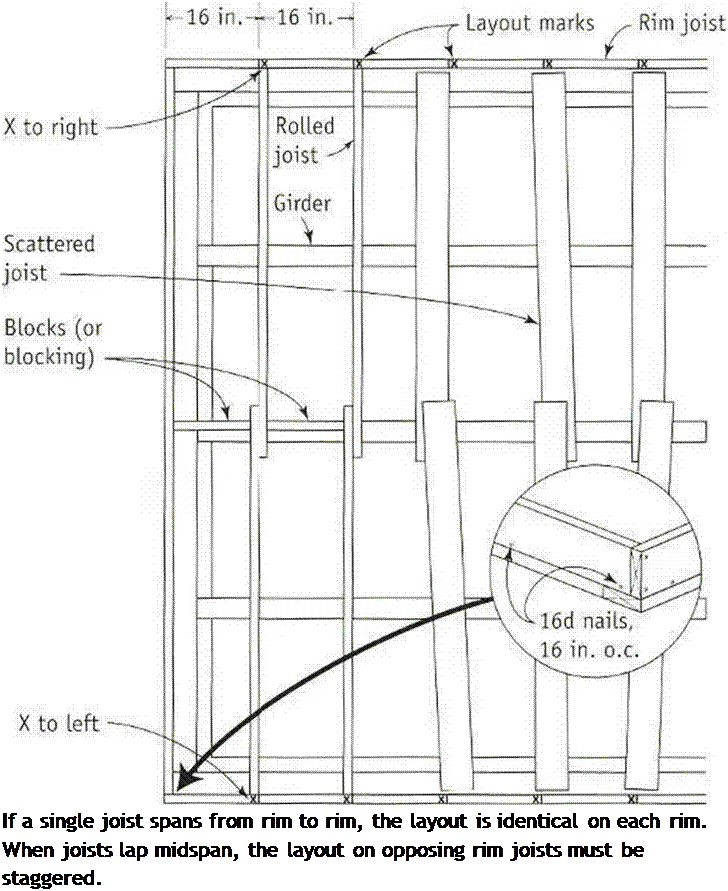
Blocking between joists, on the other hand, helps stabilize a building and keeps the joists from falling like dominoes under severe lateral stress, such as that generated by an earthquake or high winds. Blocking is installed at the bearing points where joists cross girders or crib walls. On many houses, this is also the spot where joists from opposite sides of the building lap against each other (see the illustration at right). To quickly cut dentical blocks with a circular saw, use a jig like the one shown in the sidebar on p. 70.
If you1 re building with I-joists, you’ll need to determine the length of the blocking on the
  і і
Helping Hand
Call for inspection. Don’t forget to call for an inspection of the joist system, the rough plumbing, and the ductwork once they are in place. Before the inspector arrives, remove all scraps of wood and other organic matter from the crawl space.
Posted by admin on 14/ 11/ 15
SIMPLE, SINGLE-STORY HOUSES are
not only inexpensive to build but also lend themselves well to barrier-free (handicap-аccessible) eonstruction.
In addition to the obvious differences that relate to wheelchair accessibility—
4
wider hallways and doorways, a ramp instead of a stairway at the entrvwav—
/ 4 4
many other smaller details help make these homes easier for their owners to use and enjoy.
The key to building or retrofitting a house for wheelchair accessibility is recognizing the modified reach of a seated person. You can start by raising the position of electrical outlets and
lowering the height of light switches, closet poles, shelves, and countertops. These easily made alterations help make day-to-day life more convenient for someone in a wheelchair.
Bathrooms and kitchens require special attention. Plenty of strategically placed grab bars are important; place them around the toilet and in and around the tub/shower. Extra space in the bathroom—so a wheelchair can get in and maneuver around—is essential, too. In the kitchen, lowered stovetop, sink, and cabinets help make it possible for someone in a wheelchair to prepare and serve meals and clean up.
Recognizing the increasing need for barrier-free housing, the Knoxville, Tennessee, Habitat affiliate sponsored a contest to design an adaptable, inexpensive, barrier-free house. Two designs were selected as winners; both are available to any affiliate through Habitat for Humanity Inter-
О 4
national. With the leading edge of the baby-boom population already past 55, and modern medicine keeping us alive ever longer, more and more of us may come to appreciate housing that’s flexible enough to adapt to our needs as the years go by.
-Vincent Laurence
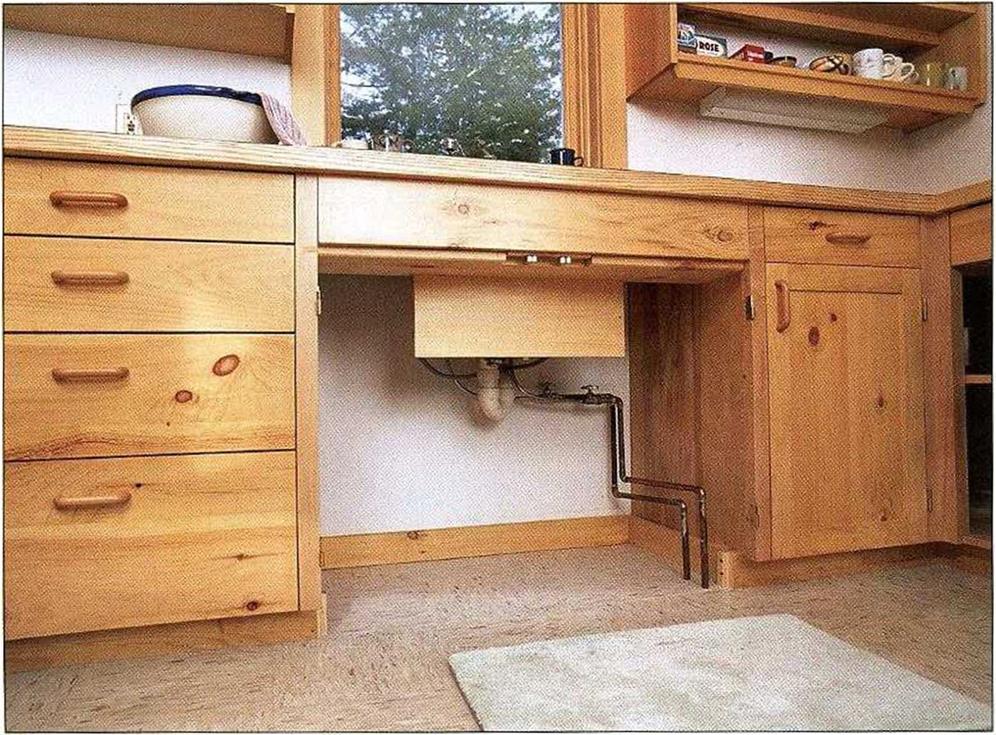
MODIFY CABINETS FOR WHEELCHAIR ACCESS.
Lower countertops and desk-type openings can make the kitchen much more accessible.
[Photo by Steve Culpepper, courtesy of Fine Homebuilding magazine The Taunton Press, Inc.|
Techniques FRAMING HEADOUTS
 
SOMETIMES JOISTS MUST be cut to allow room for a stairway, a heater vent in the floor, or a tub trap in the bathroom. Such an opening is called a headout. As shown in the illustration at right, regular 2x joists (not I-joists) can be cut and supported by a header joist that is fastened to parallel joists. If the opening is larger than 4 ft., double both the side and the header joists. Attach the doubles with 16d nails spaced 16 in. o. c.
A common mistake made by carpenters framing a headout is not taking into account the thickness of the header joists. Remember to factor in these joists when determining the size of your floor opening. If, for example, you need a 2-ft.-Long floor opening, cut the joists at 2 ft. 3 in. to leave room for the single-header joist at each end. For double-header joists, cut the joists at 2 ft. 6 in.
Roll and nail the joists
Once the joists arc cut to length and in position, carpenters say that it’s time to “roll” them. This just means setting the joists on edge, aligning them with their layout, and nailing them in place. If you are working with 2x joists, it’s important to sight down each joist to see whether there’s a how or a crown, and then set the joist with the crown facing up.
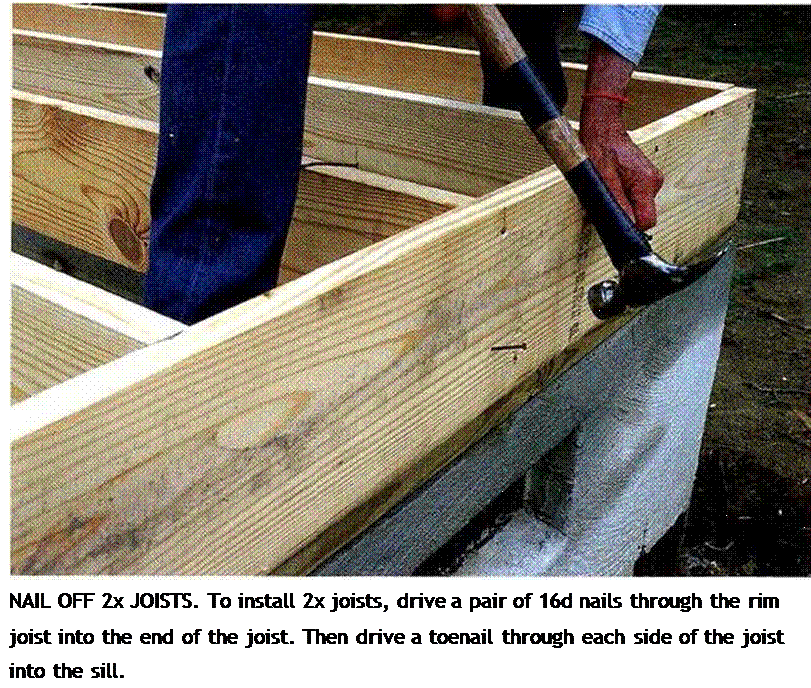
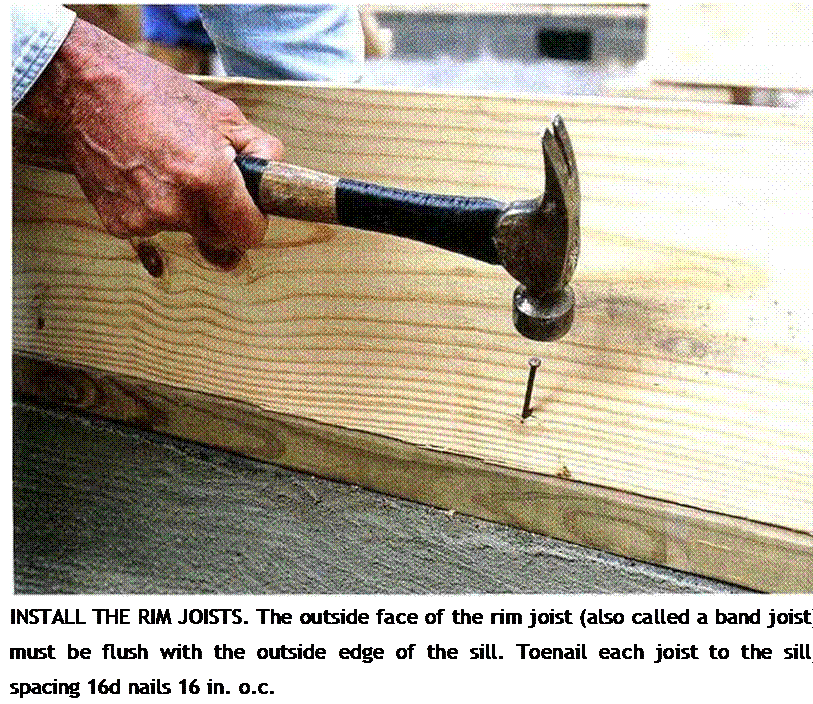
Drive two 16d nails through the rim joist directly into the end of the joist—one nail near the top and one near the bottom (see the photo at right). Most codes also require that joists be toenailed (one 16d on each side) to the sill plates and supporting girders. To nail off an 1-joist, drive a 16d nail through the rim joist and into each chord, then nail the chord to the sill on both sides of the web.
   Make sure that all the joists are nailec. securely. This is important for safety reasons, for quality workmanship, and for meeting the building inspection. Once all the joists are nailed upright, stop and check for symmetry— make sure the line of one joist is parallel with another. This is an easy way to spot layout mistakes. Take the time to check the framing against the details shown on the plans. Corrections are much easier to make now than after the floor sheathing is installed. Enjoy the moment. Joists on edge are beautiful in their own right, clearly and unmistakably showing the promise of a new building. Make sure that all the joists are nailec. securely. This is important for safety reasons, for quality workmanship, and for meeting the building inspection. Once all the joists are nailed upright, stop and check for symmetry— make sure the line of one joist is parallel with another. This is an easy way to spot layout mistakes. Take the time to check the framing against the details shown on the plans. Corrections are much easier to make now than after the floor sheathing is installed. Enjoy the moment. Joists on edge are beautiful in their own right, clearly and unmistakably showing the promise of a new building.
STEP7 Install Extra Joists and Blocking
Until recently, extra joists were often required under walls that ran parallel to the joists, because they helped support the roof structure. Most houses built these davs use roof
і
trusses, however, which are engineered to span from outside wall to outside wall without the need for interior support. There usually isn’t a need to install extra joists under walls, though some local codes still require them. Check with your town or city building department to make sure.
Similarly, wood or metal bridging is no longer required. Installed in crossed pairs between joists, bridging is often visible
Posted by admin on 13/ 11/ 15
Rim joists form the exterior of the building and are the first joists to he installed. The layout of other joist locations are marked on the top edges of the rim joists. Cut the rim joists to length and toenail each one flush with the outside of the sill. I drive one I6d nail every 16 in. around the perimeter (see the photo below). In earthquake and high-wind areas, code may require that the rim also be secured to the sill with framing anchors, so check with
your local building inspector. If there are no vents in the foundation, they can be cut into the rim joists. A standard screened vent fits in a 41^-in. by 14^-in. opening.
If you’re framing a floor with 1-joists, you’ll probably use the specially made OS В rim joists supplied with your I-joist order. Install rim joists along only one side of the house. Then lay the I-joists flat across the sills, butting the end of each joist fast against the installed rim joist. The opposite ends of the joists will extend over the sill at the other side of the house. You can now snap a line across the ends to establish where the I-joists need to be cut. A simple jig, explained in the sidebar on the facing page, makes it easy to cut the joists smoothly and accurately. After cutting the I-joists to length, complete the rim joist installation.
Joist layout goes quickly
When a single joist spans a house from edge to edge, the layout is identical on parallel rims, lust hook a long tape on the end of the rim joist and make a mark on top every 16 in.
(32 in., 4cS in., etc.) down the entire length. Put an “X” next to each mark to indicate which side of the line the ioist goes on.
When the joists la}-» over a central girder or wall, the layout on the opposing rim joists must be staggered. On one rim joist, mark the 16-in. o. c. locations with an “X" to the right; on the opposite side, lay out the joists with an “X" to the left. T his allows the joists to lap and nail over a girder or crib wall, where they will be stabilized with blocks (see the illustration on the facing page).
Your joist layout may include openings (called headouts) for a stairway or to provide clearance for plumbing or vents. Your plans
Tool Talk I-JOIST CUTTING GUIDE
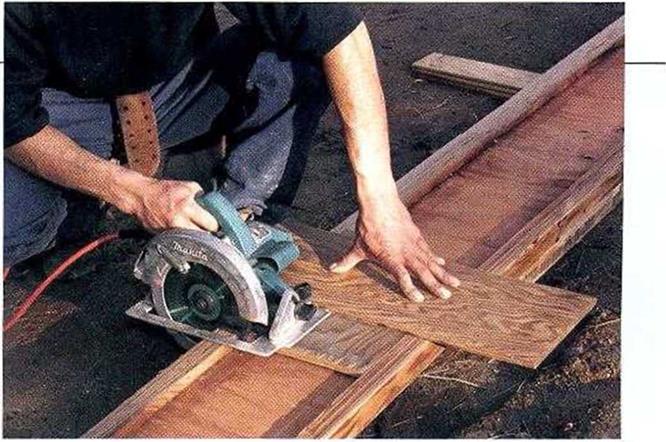
I-JOISTS ARE AWKWARD to cut because the top and bottom chords are wider than the web. To overcome this difficulty, make a simple jig with УИп.-thick plywood. Cut a rectangular piece of plywood to fit between the chords and serve as the base of the jig. Screw a longer piece to the first p’ece, positioning it to guide a 90-degree cut. The edge of the top piece guides the base of the circular saw, as shown in the photo. Lay the guide on the I-joist, set the saw on it, and make a square cut. It’s that simple.
CUT I-JOISTS WITH A GUIDE. Scrap sheathing that is nailed or screwed together creates an effective guide for cutting I-joists. [Photo by Roe A. Osborn, courtesy Fine Homebuilding magazine, The Taunton Press. Inc.]
should show these openings, but it s always a good idea (and it could save a lot of time and effort) to check with the plumber. A common mistake is leaving insufficient room between the joists for the tubs trap and the toilet’s
drain. You mav need to frame a headout to
і
make room for plumbing. For headout tram ing details, see the sidebar on p. 67. When framing with 1 joists, remember that, like any other type of engineered joist, they cannot be notched or cut midspan without destroying their structural integrity.
Cut the joists in place
If you trust your eye, try cutting 2x joists in place rather than measuring each one individually. As you become comfortable using a circular saw, you’ll be able make a square cut without using a square (see the sidebar on p.68). This technique is definitely worth learning. Over the course of framing a house, it will save a significant amount of time.
Posted by admin on 13/ 11/ 15

FOR THE MOST PART, volunteers who help build Habitat houses use only hammers to drive nails. But these days, buildings are often nailed together with all kinds of pneumatic nailers. These tools have been around for 40 years or so and are generally good, reliable tools. Models are available for framing, finish work, siding, and shingling. However, as with all power tools, there are basic safety considerations to keep in mind.
♦ Treat a pneumatic nailer with respect. Be mindful of what you are doing. Never point a nailer at yourself or at others.
♦ Read and follow the instruction manual regarding
its maintenance and use.
♦ Don’t walk around with your finger on the trigger. You could bump the nailer against your leg, releasing the safety and accidentally firing a nail.
♦ Adjust the air pressure as needed. Larger nails require more pressure.
♦ Wear safety glasses or goggles.
♦ Disconnect the nailer from the air compressor before clearing a jammed nail.
♦ When nailing on a sidewall, don’t hold the nailer in front of your face. Hitting a metal strap or other hardware beneath the surface could cause the nailer to recoil into your face with considerable force.
 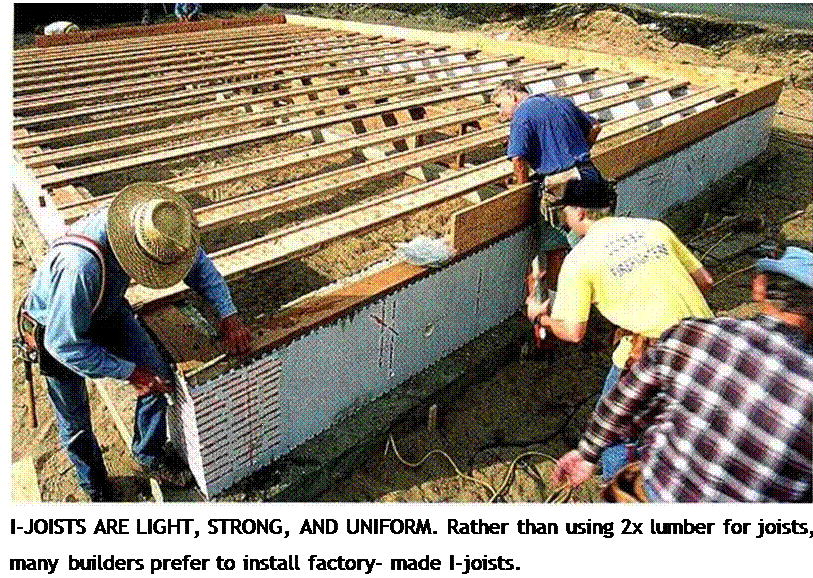
STEP6 Install the Joists
Joists span a house from edge to edge, providing support (and a nailing surface) for the subfloor and a platform for the walls. Many older houses were built with undersized joists that were unable to keep floors and ceilings from sagging. Building codes today help ensure that joist sizing and spacing are more than adequate to keep floors rock solid yet resilient. Joists are normally spaced to allow for the most efficient use of full-size (4-ft. by 8-ft.) sheets of OSB or plywood. Joists cut from 2x lumber are generally spaced 16 in. or 24 in. o. c. Engineered wood I-joists can be spaced on centers of 12 in., 16 in., 19.2 in., or 24 in.
Solid lumber vs. engineered I-joists
Up until 20 years ago, most of the floors in this country were built with standard 2x joists. These days, more floors are being built with engineered I-joists. So named because of their Tprofile, I-joists have plywood top and bot tom chords connected by an OSB web (see the
photo above). They offer several advantages over solid lumber. Being an engineered product, they are knot-free and can span long distances without interior support. I-joists don’t swell, shrink, crack, or warp the way solid lumber does. They are much lighter and easier to carry than 2x joists. And they’re uniform in size. In a load of 2x joists, you might find up to % in. of variation in joist width. I-joists don’t vary; once installed, they create a dead-
level floor. Nails driven through the sheathing into the top chord arc less likely to come loose and create a squeaky floor, especially when the sheathing is applied with adhesive. In terms of price, they are competitive with standard – dimension lumber. Installation details foil-joists are slightly different than those for 2x joists. I ‘ll cover those differences just ahead.
Posted by admin on 13/ 11/ 15
 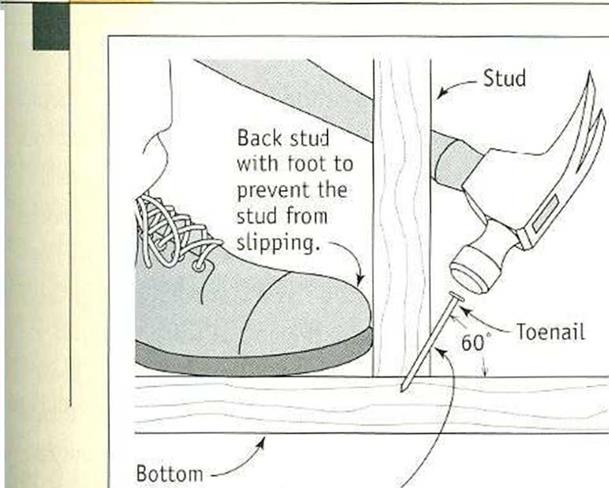  DRIVING A COUPLE of nails through the side of one 2x into the edge or face of another creates a strong connection. This is a good way to join two 2xs at a right angle. But sometimes this isn’t possible, either because the board is too thick or because its face is not exposed. That’s when you resort to driving a nail at an angle, or toenailing. DRIVING A COUPLE of nails through the side of one 2x into the edge or face of another creates a strong connection. This is a good way to join two 2xs at a right angle. But sometimes this isn’t possible, either because the board is too thick or because its face is not exposed. That’s when you resort to driving a nail at an angle, or toenailing.
To toenail two boards together, hold the nail at a 60-degree angle and start it about 1 in. from the end of the board. If the nail angle is not correct, the connection between the two pieces of wood will not be as strong. Back up the wood with your foot to hold the board in place as you toenail. With practice, you’ll soon gain skill, speed, and confidence.
|
|
MEASURING POST OR PONY-WALL STUD LENGTHS
|
|
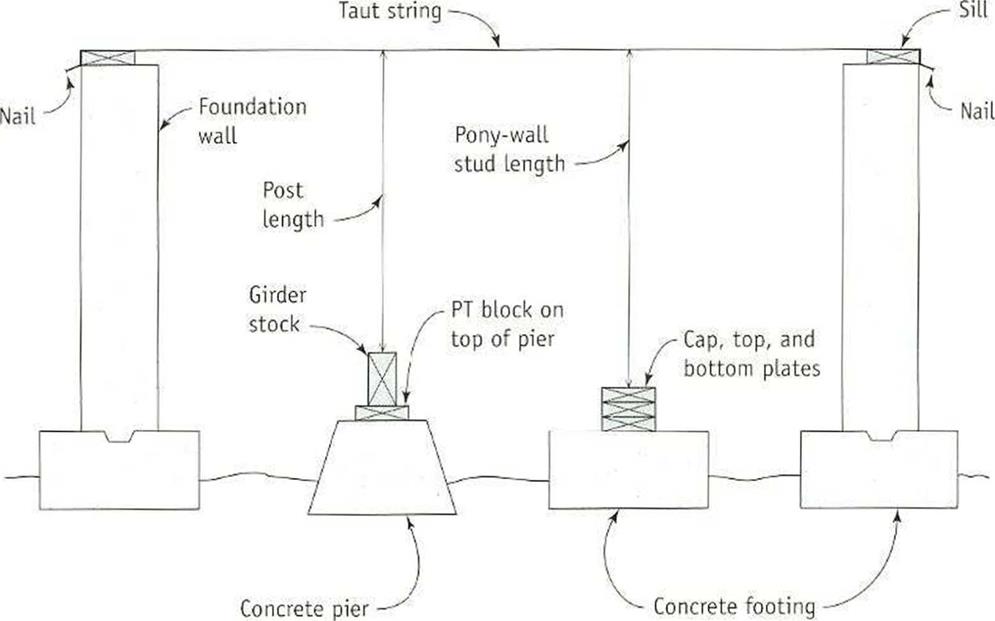
Stretch a string tightly from one sill to another. For the post length, measure from a oiece of girder stock to the taut string. To find the stud lengths for a pony wall, measure from the top of a stack of three wall plates to the string.
|
|
walls stticis, stretching a line above a piece of girder stock placed on the pier. Cut youi posts to length, then secure them directly to the piers or toenail them to the blocks attached to the piers. Make sure the posts arc plumb and parallel to one another.
Girders must butt together over a post. When the end of a girder fits into a pocket in the foundation, you’ll have to shim up the girder to get the top surface level with the top of the sill. The shims used beneath girders will hear the full weight of the floor, so they must he cut carefully from pressure-treated stock. Cut uniformly thick shims instead of tapered ones and make them large enough to fit in
the bottom of the foundation pocket. Because of concretes ability to absorb moisture, code requires that the end of the girder he held about V: in. away from the hack of the pocket when cutting the girder to 111. If you’re not using pressure-treated stock for the girder, you can wrap the end of the girder with builder’s felt or sheet metal to give it some protection against moisture damage. Toenail the girders to the posts with either four 8d or three 16d nails. Now brace the posts and splice the girders by nailing the plywood gussets on both sides of the joint (see the illustration on p. 44).
|
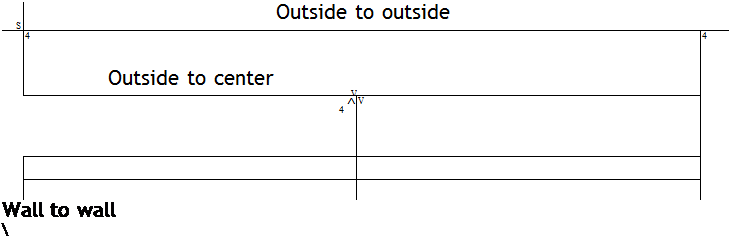
 12 ft. 7 in. from the outside comer of the house to the center of л partition wall. Add or subtract VA in. from that distance to snap the layout line for the partition wall. Remember to note how measurements are given on the plans. Layout long interior walls (such as hallways) first, then do the short walls (such as closets). There is no need to mark the door and wall openings.
 It’s best to plate the long, outside through walls first, then plate the outside butt walls that extend between the through walls. As shown in the illustration above, through walls have plates that run through them from corner to corner. Walls that ft between or intersect other walls are called butt walls. After vou finish plating the outside walls, you can move inside, beginning with the longest walls and working your way toward the shortest ones.


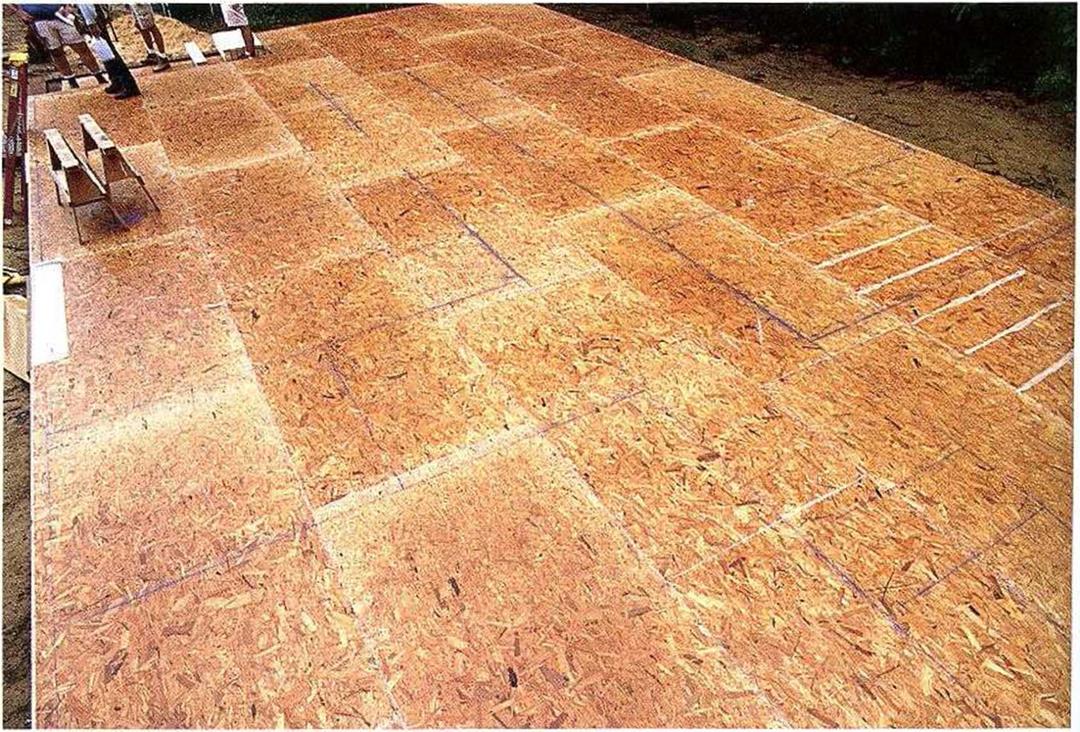 The floor deck is clear, but not for long. Snapped chalklines identify where the walls will be located.




 COAX PANELS INTO PLACE. A couple of good wallops with a sledge will usually seat even an ornery Sheet Of tongue-and-grOOVe Sheathing. [Photo by Roe л. Osborn, courtesy Fine Homebuilding magazine, The Taunton Press, Inc.]


 When laying out long rows of 4×8 sheathing, its best to start from a control, or reference,


 і
і


 Make sure that all the joists are nailec. securely. This is important for safety reasons, for quality workmanship, and for meeting the building inspection. Once all the joists are nailed upright, stop and check for symmetry— make sure the line of one joist is parallel with another. This is an easy way to spot layout mistakes. Take the time to check the framing against the details shown on the plans. Corrections are much easier to make now than after the floor sheathing is installed. Enjoy the moment. Joists on edge are beautiful in their own right, clearly and unmistakably showing the promise of a new building.


 DRIVING A COUPLE of nails through the side of one 2x into the edge or face of another creates a strong connection. This is a good way to join two 2xs at a right angle. But sometimes this isn’t possible, either because the board is too thick or because its face is not exposed. That’s when you resort to driving a nail at an angle, or toenailing.