Category Habitat for Humanity International

STEP 8 Install and Plumb Door and Window Trimmers

Many builders—even experienced ones— don’t like to spend time plumbing window and door trimmers. But Lve found that this step really makes a better building. If the door

1. Drive this nail first, then bend it over, embedding the shank and head in the adjacent board. [1]
trimmers are plumb, the doors hinge-side

jamb butts solidly against the trimmer along

its entire length. Thercs no need for shims on

this side of the door. That means vou save

/

time and obtain solid, continuous backing for the jamb that supports the full weight of the door. If the opposite trimmer is also plumb, the shims vou install can share the same thick-

г

ness. There’s no fussing to make shims of dif­ferent sizes. Similarly, window installation benefits from plumb trimmers.

Window trimmers were installed during step 3, when the window assemblies were built on the floor deck. Full-length window trim­mers are firmly attached at the bot:om corners

*

of the rough window opening, but each trim­mer can still be pried away from its king stud to get the trimmer as plumb and straight as possible. Use a straight claw on a framing hammer or a flat bar to pry and a 2-ft. level to test for plumb and straight. When the trim­mer is where vou want it to be, secure it by toenailing through the header with 8d nails. Make sure you toenail from both sides of the wall. To lock a trimmer in straight position, hammer a nail clip into each edge of the trim­mer, as shown in the illustration at left.

It’s best not to install door trimmers until after the walls have been raised and braced. This way, each trimmer can be measured and cut to tit snugly up against the bottom of the header. 1 carrv two straight studs to each opening, hold them in position under the header, and mark them to length. When the trimmer has been cut for a snug lit, secure it to the king stud with a single 16d nail driven near the center. Don’t drive any more nails, because you will need to tap the 2x in or pry it out slightly to get it plumb. Test for plumb with a 6-ft. level. When it is plumb, drive toenails through the header and і г to the

trimmer, then toenail the trimmer to the bottom plate.

Finish by getting the trimmer straight, using nail dips, if necessary. When the sheath­ing is installed, you can lock the trimmers in place by nailing through the sheathing and into the trimmers’ edges.

STEP9 Sheathe the Walls

Hived through the 6.8-magnitude earthquake that hit Northridge, California, in 1992.

Besides nearly scaring me to death, it made me believe in wall sheathing. A 6.8 quake is not even the big one predicted by most seis­mologists, yet a number of people lost their

ives. More lives would have been lost if criti­cal areas in buildings had not been sheathed with plywood or OSH. Serious damage occurred in those buildings, but they didn’t collapse. The buildings that held up best were small, single-story wood-frame houses, such as those built bv Habitat. iVIanv were knocked

‘ 4

several feet from their foundation, but they didn’t collapse on their occupants.

Unlike dryvvall, stucco, and most exterior siding, plywood and OSH wall sheathing pro­vide both lateral (horizontal) and vertical strength. Sheathing helps hold buildings together and makes a house wind proof, which is important if you live in an area where cold winds are a reality.

STEP 8 Install and Plumb Door and Window Trimmers

STEP 8 Install and Plumb Door and Window Trimmers

To get top plates straight

The bottom plates of your walls are straight because they’ve been nailed to chalklines. The top plates should be fairly straight if you used straight stock when plating. But walls can deviate from straight at the top plate, and that’s where we need to check them. The easi­est way to line a wall is to hop up on a ladder and look down the top plate to see if it’s straight. A lot of carpentry is done by eye.

Learn to trust vour eve. If something looks

* 4 C7

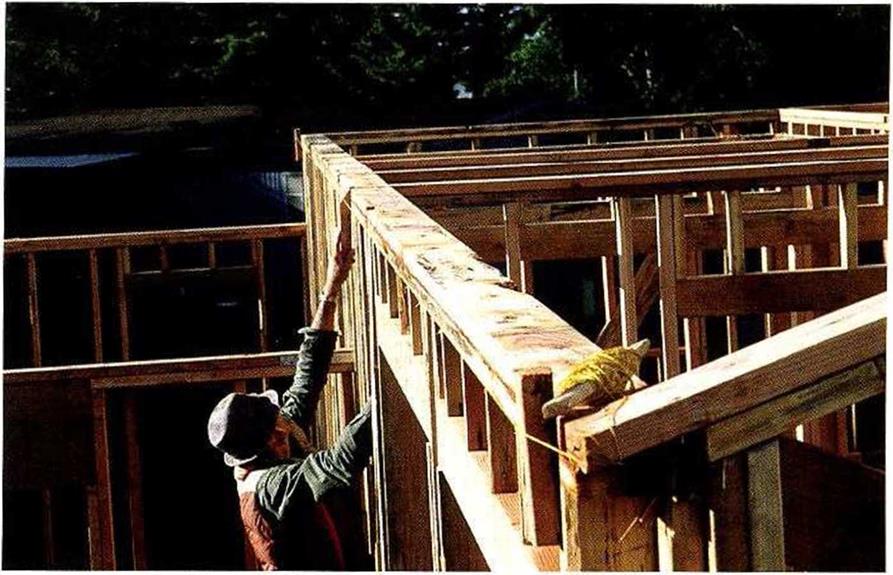
good, it is good. On long walls, it may be best to stretch a line (string) the length of the wall, as shown in the top photo at right. Nail a 2x block to each end of the wall and stretch the line tightly from one block to the other. Using another scrap of 2x as a gauge, slide it along the wall and check for a consistent 1 i^-in. space between the line and the wall.

To get top plates straightTo straighten a crooked walk you’ll need to move it in or out. To move a wall out, use two Шnails to secure a 2x brace to the nearest

Подпись:To get top plates straightПодпись: This pair of 8d nails clips one piece of wood next to another. Pairs of nails are frequently used to clip a trimmer stud plumb next to a king stud.

and bend the brace upward. As the brace Hexes upward, the top plate moves in. This works especially well on a wall that is badly out of line.

Make sure you use enough temporary – braces as you plumb and straighten the walls to keep every wall in place. Put braces on straight walls as well. Using plenty of braces ensures that the building will be held plumb and straight. Leave all the braces in place until the roof trusses and sheathing have been installed to prevent any frame movement.

Tool Talk MAKING A PLUMB STICK

Tool Talk MAKING A PLUMB STICK

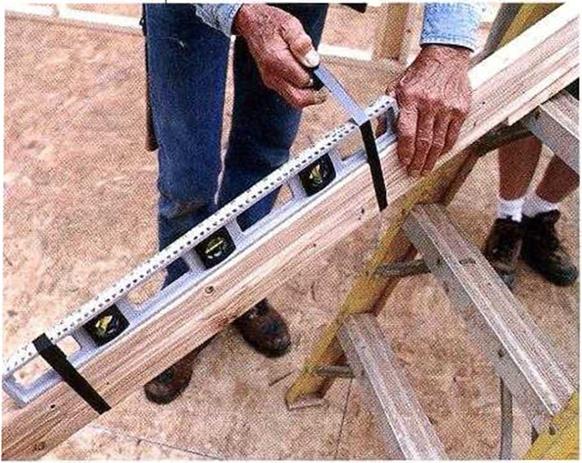
TO PLUMB WALLS, you can use a wall-high level that costs hundreds of dollars or you can make a plumb stick from any 2-ft. level and a straight 2×4 stud. Even a

battered, inaccu­rate level can be used. Select the straightest stud you can find and nail a 16-in. 1×2 strip onto each end, letting the strips overhang the stud ends by about 3 in. Use some duct tape to attach a 2-ft. level to the opposite edge of the 2×4 (near the center) and your plumb stick is nearly ready to use (see the photo above).

It’s important to check your plumb stick for accu­racy. To do so, hold it veilical and flat against a wall. Keep the bottom end fixed in place as you move the top end back and forth until the bubble is exactly cen­tered in the vial. Make pencil marks on the top and bottom of the wall along the lx extensions. Now turn the plumb stick side for side—not end for end—so that :he level is flat against the wall on the other side of ;he lines you marked. Carefully line up the extensions with the marks on the plates. If the bubble returns to the exact center of the vial, the plumb stick is accu­rate. (By the way, you can check the accuracy of any level with this method.)

If the bubble is not centered in the tube, the level needs to be adjusted. Stick a wooden shim, a “’olded piece of paper, or an 8d nail under one end of the level (between the level and the 2×4), and then check the plumb stick again. Keep adjusting the shim thickness until the bubble is centered both ways.

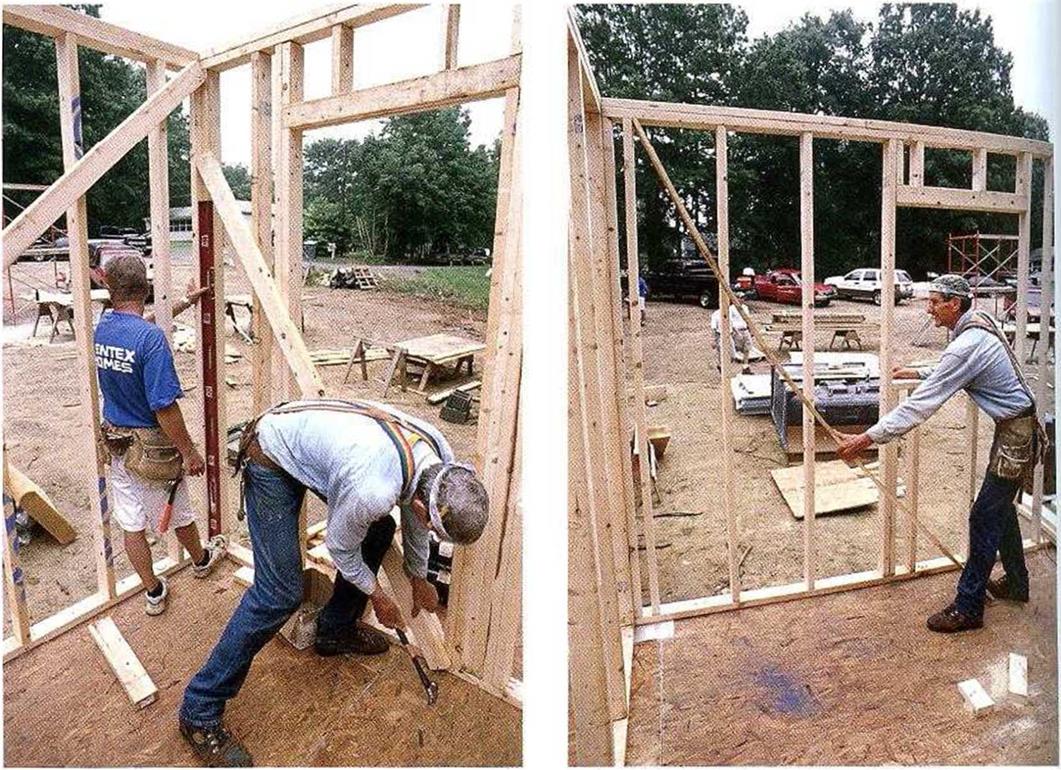
Tool Talk MAKING A PLUMB STICKPLUMB THE WALLS. While one person holds the level, another person can nudge the wall to get it plumb, then nail off a diagonal brace to keep it that way.
EXERT EXTRA PRESSURE WITH A PUSH STICK. When a wall needs extra coaxing to get it plumb, wedge a 1×4 or 1×6 push stick against the top of a stud. Your foot can anchor the bottom end of the stick. Flexing the stick upward pushes the wall outward.

the facing page). If you need more force, use a push stick, as shown in the bottom right photo on the facing page. Cut a push slick from a 1×4 or 1×6, making it about 116 in. long. Use the natural flex in the push stick to exert force on the wall. Position the top of the stick under the top plate and against a stud. Diagonally extend the stick down to the floor, as parallel as possible to the wall. Bend the stick down, holding the bottom end against the floor with one foot. Now pull the middle of the stick up. As the board straightens, the wall moves.

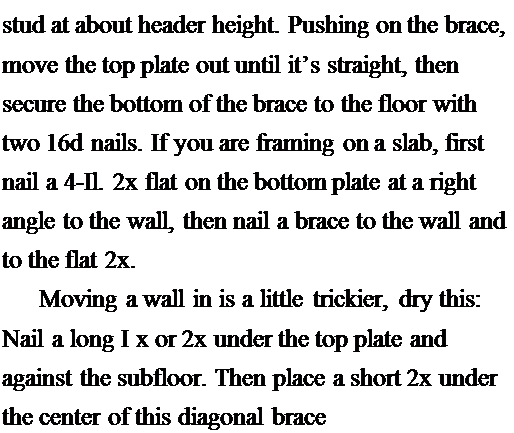
Tool Talk MAKING A PLUMB STICKПодпись:Подпись: SOME WALLS NEED TO BE PUSHED OUT. Walls that need to be moved out slightly can simply be pushed with a stud brace nailed to a wall stud. Nail the brace to the subfloor when the top plate is straight.Подпись: stud at about header height. Pushing on the brace, move the top plate out until it’s straight, then secure the bottom of the brace to the floor with two 16d nails. If you are framing on a slab, first nail a 4-Іl. 2x flat on the bottom plate at a right angle to the wall, then nail a brace to the wall and to the flat 2x. Moving a wall in is a little trickier, dry this: Nail a long I x or 2x under the top plate and against the subfloor. Then place a short 2x under the center of this diagonal brace After the wall is plumb, finish nailing in the metal braces or use temporary 2x stud braces nailed at an angle to hold the wall plumb until it is sheathed. When the exterior walls are plumb, proceed to the interior walls. You can’t straighten a wall until the walls that butt into it have been plumbed.

Techniques LOCKING WALLS TOGETHER

TO TIE JOINING walls together, the double top plate must overlap the top plate at each wall intersection.

1. If you’re nimble, you can perch on top of the framing to hammer overlapping joints together.

2• Otherwise, do the job on a ladder.

3. It’s good practice to drive a toenail (or two) into the overlapping plate. A toenail pulls the joining walls together before the top is nailed off.

Techniques LOCKING WALLS TOGETHER

STEP7 Plumb and Line the Walls

Theword “plumbing,” when used in the con – text of framing a house, means making sure that the walls are standing straight up and down.“Lining’’ means straightening the top plate along the length of each wall. It’s impor­tant that all the walls are plumbed and lined accurately. Anything else is unacceptable.

Badly plumbed or crooked walls cause sig­nificant problems later—cabinets won’t tit Щ properly, doors won’t close correctly, and fm – ishedsurfaces (both inside and outside) will be wavy.

If the exterior walls were squared and sheathed before being raised, they should

be plumb. Otherwise, plumb them now that they are upright. To lest for plumb, use an accurate level that is at least 4 ft. long or make a plumb stick, as shown in the sidebar on p. 106. Plumbing a wall is best done with two people: one to hold the level and one to move the wall and nail off the bracing.

О

Plumb the exterior walls first

Hold a level or plumb stick in a corner to see whether the bubble is centered in the vial.

If not, the wall must be moved laterally. Sometimes a wall can be moved a bit with a bodily shove. If you can pv. sh the wall plumb, install a temporary 2x diagonal brace to keep it that way (sec the bottom left photo on

FRAMING A PLATFORM FOR A FORCED-AIR HEATING UNIT

Подпись: SIDE VIEW

FRAMING A PLATFORM FOR A FORCED-AIR HEATING UNIT FRAMING A PLATFORM FOR A FORCED-AIR HEATING UNIT Подпись: І FRAMING A PLATFORM FOR A FORCED-AIR HEATING UNIT FRAMING A PLATFORM FOR A FORCED-AIR HEATING UNIT FRAMING A PLATFORM FOR A FORCED-AIR HEATING UNIT

FRONT VIEW

36 in.

Some furnace rooms need a platform so the heating unit can receive combustion air from below.

FRAMING A PLATFORM FOR A FORCED-AIR HEATING UNIT

FRAMING A PLATFORM FOR A FORCED-AIR HEATING UNIT

my carpenter-daughter, you can hop right up on the plates and start lying the walls together. Otherwise, it’s best to work on a sturdy ladder.

The corner marks you drew on the plates earlier now serve as guides when railing off the top plates. Make sure that the double top plate is on these lines and that the top plates of both walls are touching. If necessary, toe­nail a 16d nail up through the top plate of the through wall into the double top plate of the butt wall to draw everything together, as shown in the photo at left. Nail two I6d nails through the lap into the intersecting wall.

TOENAIL THE TOP PLATE. Draw intersecting walls together by nailing through the top plate of one and into the double top plate of the other.

Raise exterior butt walls next

Raise exterior butt walls next

Once you’ve finished with the exterior

Подпись: STEEL STRAPS PROVIDE EXTRA HOLDING POWER. Metal ties like this one are sometimes required by code. They anchor the wall framing to the floor andRaise exterior butt walls next

Подпись: foundation, keeping the house together under adverse conditions.
Подпись: TACK THE DOUBLE TOP PLATE. When raising interior walls, it often helps to tack part of the double top plate to the wall, as shown here, until after the wall has been raised. Later, this short section of double top plate can be positioned to overlap the top plate in an adjacent wall.

16d nail between each stud. Be sure to drive a 16d nail close to each king stud. Drive plate nails into the rim joist or into a floor joist. Nails driven through the subfloor alone don’t have nearly as much holding power as those

through walls, its time to raise the exterior butt walls. Remember that vou want the butt walls’ double top plates to be about 3/ in. longer than the Lop plates (5’A in. for 2×6 walls) so that they will lap over the through walls’ top plates. This can make it difficult to

Raise exterior butt walls next

Подпись: IT'S A HOUSE! When the last wall has been raised, something special happens. What was once just a jumble of framing lumber on the deck all of a sudden feels like a house with real rooms.

raise the butt walls, though, because the dou­bletop plate sticks out at both ends.

There are a couple of tricks for making it easier to raise these and other butt walls.

One approach is to double-plate the entire butt wall except for a short section— say, 4 ft. or5 ft.—at each end. Cut these short pieces and tack them to the wall to keep them close at hand (sec the bottom photo on the facing page). Then nail them on after raising the wall. Alternatively, vou can leave off a section

4 4

of the double top plate from one end of the walk then jockey the opposite end into position with a couple of helpers. With a little experience, you’ll learn these shortcuts.

Raise interior walls from the longest to the shortest

As you raise and position each wall, nail the jendstud of each intersecting butt wall flush with the comer or channel on the through kail. Use three Uxl nails: one 2 ft. up from the
bottom, one 2 ft. down from the top, and one in the center. After all the walls are raised, stop and admire your work. 1 ts like magic: As you stand in individual rooms, you can see the shape of the house.

In many areas of the country, a small room is often built to house the hot water heater and a furnace or forced-air heating unit (FAU). A platform must be built in this room so that the heating unit will have return air from below. The platform is often built 30 in. off the floor with a 20-in. by 20-in. opening in front, as shown in the illustration on p. 104. Check with your heating contractor for exact dimensions in your area.

Tie off the double top plates

Подпись:Подпись:Подпись:Nailing the lapped double plate into the adjoining top plates ties the entire framed structure together. This important task, when done accurately, makes it easy to plumb and straighten the walls. II you are a gymnast, like
STEP 6 Raise the Walls

STEP 6 Raise the WallsПодпись:
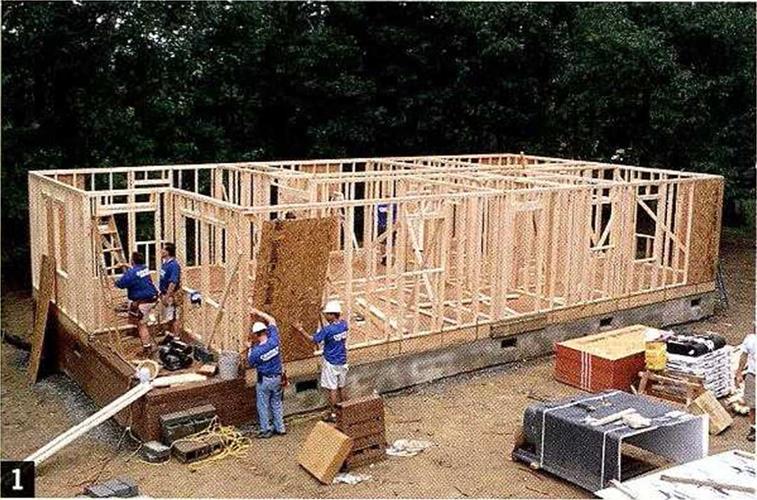
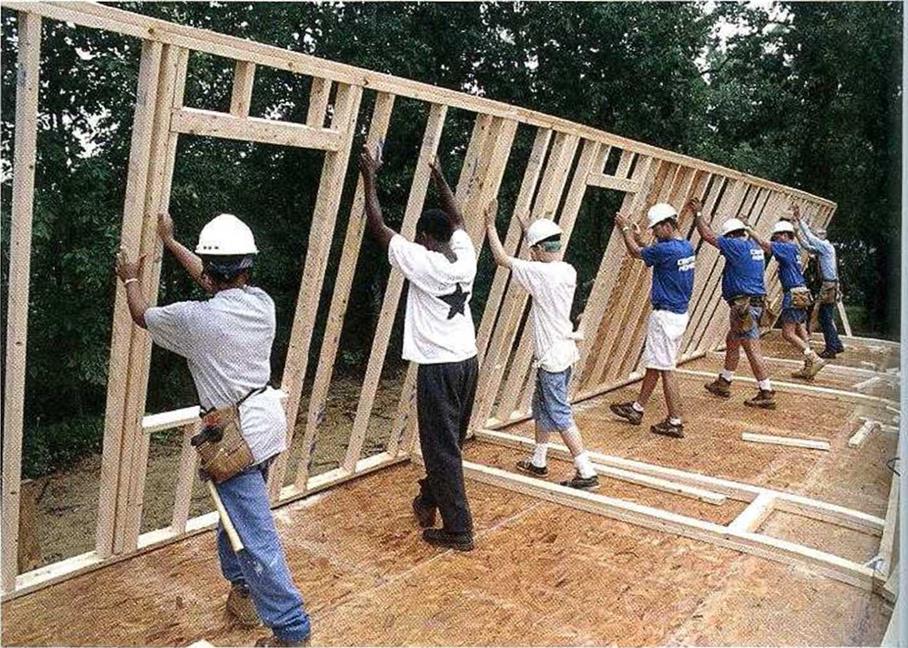
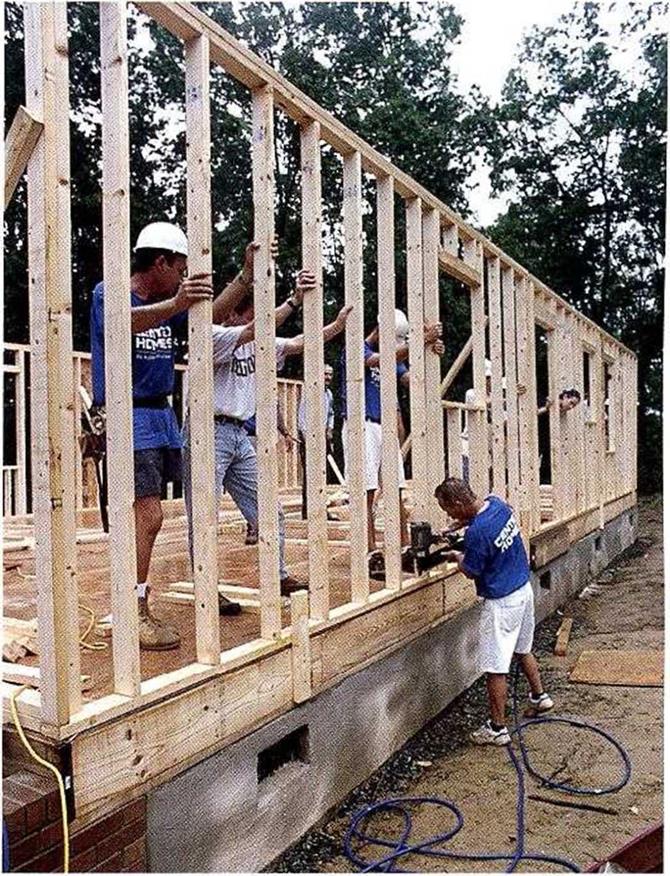
As with barn raisings of yore, it takes a few warm bodies to raise framed walls. Let one person be the team leader and encourage everyone to work together (see the photo below). Remind people to lift with their legs, not with their backs. In many areas, builders put a heavy bead of caulk or a roll of foam

(polystyrene) on the floor or slab under the bottom plate before raising a wall. This helps keep out cold air as well as any bugs that may want to migrate inside. To ensure that the wall wont slip over the outside edge of the build – ingas it’s being raised, nail pieces of 2x stock to the rim joist so they stick up a few inches above the floor to catch and hold the bottom plate (see the top photo at right ). On a slab, bolts hold the bottom plate in place.

Raise exterior through walls first

Start with one of the exterior through walls. Make sure there is no debris beneath the plates before nailing the walls to the floor. If the wall is flat on the deck, stick the claw of a hammer into the double top plate, lift the wall up a bit, and put a 2x block under the wall.

This way you can get your fingers under the wall to lift it. Keeping your back straight, use your legs to lift the wall to your waist, then take it overhead using your arms and upper body. Continue to raise the wall by pushing on the studs until it is fully upright. Once the wall is upright, hold it steady—especially if theres a good wind blowing—until the wall braces are nailed in place.

After the wall is in position, nail a stud to each end as a temporary brace, extending it diagonally from about 6 ft. up on the corner stud down to the rim joist. Drive a couple of 16d nails into each end of the brace. On long walls, nail other braces in the middle from a jtuddown to the subfloor. Make sure these temporary braces will hold the wall until the butt walls are built and raised against it.

STEP 6 Raise the WallsПодпись:STEP 6 Raise the WallsПодпись:Use a sledgehammer to move the wall until itisright on the chalkline and flush at the ends with the correct marks on the subfloor. After the wall is in position, nail through the bottom plate and into the subfloor, using one

STEP 6 Raise the Wallsembedded in framing lumber. Don l nail in donrwavs, Ьіч-aiise you’ll be cutting out the plate later when you set the door frame.

When working on a slab, lever the bottom plate into position over the bolts. S ip the end of a 2×4 under the bottom plate to use as a lever. While one person works the 2×4 lever, other crew members can move the bottom plate in or out to align the holes with the installation bolts. In some areas, bottom plates are attached to the slab with concrete nails. In other areas, steel hurricane straps are used to tie wall framing to the floor framing and foundation (see the photo at left). Now is the time to make sure that these framing connec­tors are nailed to the wall frame.

Brace the walls

The sudden, intense pressure exerted on a wall by a hurricane, tornado, or earthquake can be devastating. To withstand these forces, the walls must be well braced. As a novice carpen­ter, I used to cut 2.x stock with a handsaw and let it into the studs, running it diagonally from plate to plate. It was a good brace, but it took about an hour to make each one. These days, braces are much easier to install. You can attach L-shaped metal angle braces or nail ply­wood or OS В sheathing to the frame. Code requirements vary, so be sure to check with your building department to find out how the walls should be braced. In some areas, bracing is also required on certain interior walls.

USING METAL ANGLE BRACES. Metal angle braces are easy to install (see the photos on the facing page). In many areas, they can be used instead of plywood or OSB sheathing. If the finished siding you plan to install can be nailed directly to the studs or furring strips (clapboards and fiber-cement boa res are good examples), metal braces can save von the expense of plywood or OSB sheathing. Every exterior wall should receive a metal brace at every corner as well as every 25 It. between

4 і

corners. The typical metal brace has an

1. – shaped profile; it’s designed to be let into a kerf cut diagonally across the wall. Here’s how to install one:

1. Position the brace and mark the cut.

Lay the brace across a framed wall so that it extends at a 45-degree angle from the bottom plate to the double lop plate. Trace a pencil mark along one side, as shown in the top left photo on the facing page.

Brace the walls

Подпись: 2, Cut the kerf. With a circular saw, cut a 1 in. deep slot along the line into the plates and studs. Brace the wallsПодпись:

3. Nail off the bottom of the brace. Slip one flange of the brace into the slot and nail it to the bottom plate with three 8d nails. Drive one more 8d nail through the brace and into the first stud. At the double top plate, start an cSd nail alongside the brace and bend the nail over to hold the brace in place as the wall is raised.

4. Raise and plumb the wall. It’s important not to install the brace completely until after the wall has been raised and plumbed. See pp. 100-108 for details on raising and plumb­ing walls.

5. Finish nailing the brace to the studs and plates. Drive one 8d nail through the brace and into every stud it crosses. At the top of the wall, drive three nails through the brace and into the top and double top plates. If the top of the brace extends above the double top plate, trim it Hush with a hacksaw.

USING PLYWOOD AND OSB BRACING. When nailed properly to wall framing, plywood and OSB provide much stronger racking resistance than metal braces do. Wall sheathing is essen-

Подпись: Helping HandПодпись: Clear the deck. Before raising walls, be sure to clean up loose nails, lumber scraps, and other debris. If a small object lodges beneath the bottom plate of a wall, it can throw the wall plates out of level.

Подпись: 1

tial as a substrate for some types of exterior siding. It also acts as a wind and weather bar­rier. Many codes require that a full sheet of OSB be nailed at each exterior corner and every 25 ft. along the wall. The spaces between can be filled with sheets of rigid foam insula­tion. That’s the sheathing strategy we used on this house.

There are different wavs to install wood sheathing panels. Sometimes sheathing is positioned to extend over the wall and cover the rim joist. I try to keep OSB A in. away from concrete so it won’t absorb water. On a one-story building, my preference is to

sheathe the walls once thev are raised. This is

/

especially true when working on a slab that has plumbing pipes sticking up.

Other builders prefer to sheathe the walls

while thev are flat on the floor. One of the

і

problems with sheathing the walls before rais­ing them is that thev become heavy. To raise a long 2×6 wall fully sheathed with OSB or ply­wood, vou may have to call in the National Guard. Or you could use a wall jack, a device that hooks under a wall and slowly raises it up
(see Resources on p. 278). Sheathing a wall while it’s still flat on the subfloor also requires greater accuracy—the wall must be dead-on straight and square before it’s sheathed. You can do this by making sure the bottom plate is

directly on the chalkline and the end comer

*

studs are Hush with the outside of the build­ing. It doesn’t hurt to measure from corner to corner to check the wall for square. After the wall is ready, you can attach the required sheets of plywood or OSB (8d nails every 6 in. o. c. around the perimeter, 12 in. o. c. in the field, or middle of the sheet). Be sure to insu­late headers, corners, and channels before cov­ering them with sheathing.

Nail on the double top plate

In some parts of the country, carpenters raise the walls before cutting and nailing on the double top plate. In my opinion, the time to nail on the double top plate is now—while the wall is still flat on the floor. Otherwise, vou will have to use a ladder. The top plate is an important structural member. It ties the entire frame together. Without it, severe lateral stress from an earthquake or high winds could easily rip apart a building. If you frame with a single top plate, secure them together with metal plate straps.

On a 2×4 butt wall, the double top plate extends beyond I be top plate a bit less than 3k in. (cut it / in. short—about 3k in.—to make sure it doesn’t protrude beyond the
through wall), so that it can tie into the notch in the double top plate of a through wall.

On through walks, the double top plate has notches where it receives the double top plates extending from butt or intersecting walls.

Now you can see why it was important to mark the plates accurately while locating the corners and channels. You don’t need to mea­sure the length of double top plates. All you need to do is set the double top plate on a through wall above the top plate, with one end held back У/ in. (5k in. on 2×6 walls) from the end, then cut it to length.

Подпись: Helping HandПодпись: Remove all temporary nails. When prying loose wall plates and other parts that are temporarily tacked together, make sure you remove all "tacking" nails so that they don't cause injuries.Nail on the double top plateПодпись: CUT THE DOUBLE TOP PLATE. With the bottom plate nailed off, cut the double top plate in place, following the layout marks on the top plate.At channel marks, leave 3k-in. cutout so that an intersecting wall can comfortably lap over and tie in at that spot (see the photo on p. 98). When cutting and installing double top plates, leave about a 3k in. gap where the walls tie into each other. This makes it eas­ier for the overlapping double top plates to

Подпись: Helping HandПодпись: Alignment is important. As volunteers learn to nail studs, they often find it difficult to keep them aligned on their layout marks and to keep their edges flush with the edges of wall plates. For more accurate results, work in teams of two. Have one volunteer hold the stud on its layout while another drives the nails. Use a cat's paw to pry studs and nails loose when the alignment must be corrected. Подпись:Nail on the double top plateslip into place. This is another one of those times when it’s okav to be less than absolutely

4 4

accurate.

When von nail the double top plate to the top plate, it’s important to make sure that there are no gaps in the top plate. The top plate stock must butt tightly together, just as it did when you plated the walls in step 2. Nail the double top plate to the top plate with two 16d nails at each end of the wall and at each break in either the top plate or the double top plate. Elsewhere, nail one 16d nail over each stud. It is best not to nail between studs, because electricians and plumbers run w res and pipes through holes drilled in those loca­tions. Hitting a nail while drilling can dull the bit and give your arm a nasty twist.

Techniaues BUILDING CORNERS AND CHANNELS

LIKE HEADERS, OUTSIDE corners and channels can be built in a number of different ways, and pref­erences tend to be regional. The most common con­structions are shown in the illustration below. A two-stud outside corner works well in most cases, but if you are planning to install clapboard or fiber-cement siding directly to the studs (with no exterior sheathing), you’ll need more backing at the outside corners. A blocked-up corner provides more backing and makes good use of 2x offcuts.

In addition, all of these outside corner configura­tions provide backing on the inside of the wall for drywall or other wallboard.

Channels (sometimes called tees) are most easily made w;th a flat stud or blocks nailed between two regular studs. I place a crowned or knot-filled stud between two good studs. In some parts of the coun­try, framers build ladder-type channels to provide backing at intersecting walls. Building ladder back­ing doesn’t save a lot on materials, but it does allow more insulation to be inserted at those spots.

Both corners and channels are nailed together with one 16d nail every 2 ft. o. c. When nailing channels to the top and bottom plates, make sure that the flat stud is oriented correctly to provide backing for an intersecting wall. It’s not difficult to put in a channel upside-down.

BUILDING OUTSIDE CORNERS AND CHANNELS


Intersecting wall


Iwo*stud corner


Blocked-up corner


Ladder-backing channel


Three-stud channel


An outside corner can be made with two studs and three short blocks.


A channel can be made from three studs or from two studs and three short, flat blocks nailed between them.


A channel made with short 2x$ nailed between the studs allows the area to be well insulated.


Techniaues BUILDING CORNERS AND CHANNELS

Шcorner saves a 2x stud fallows for more insulation «the wall.

Techniaues BUILDING CORNERS AND CHANNELS

Techniaues BUILDING CORNERS AND CHANNELS

MAKE A CHANNEL.

A pneumatic nailer makes quick work of this assembly, which consists of two studs separated by 2×4 blocking.

Подпись: 'XV ГTechniaues BUILDING CORNERS AND CHANNELS

NAIL ON THE TOP PLATE. After separating the top plate from the bottom plate (visible in the background), the top plate can be nailed to the studs, channels, and window and door assemblies. Drive a pair of 16d nails into each stud.

from the bottom plate, removing the 8d tack nails as you go. Leave the bottom p ate tacked to the floor for now. Nail the top plate first, using the bottom plate to keep the studs aligned. Move the top plate straight up to the upper ends of the studs. Don’t turn a top plate end for end as you move it into position or you’ll have a real mess. The exterior walls am be framed over the interior walls rather than fiat on the deck or slab (see the pholo at left). This is okay. The most important element in wall framing is to keep the frame reasonably straight and square on the floor. This is not difficult to do. Take vour time until you get it right.

Begin nailing studs to the plate at an out­side comer, making it flush with the edge. Drive a pair of 16d nails through the plate into each stud. You will find that consistently working either from left to right or from right to left has a natural feel. Over time, von will develop a rhythm to nailing studs that involves not just your hands and arms but your entire bodv.

If you are using a pneumatic nailer, always drive the bottom nail first. Then remove your
hand from the stud and drive the top nail. If you keep your hand in place while driving the top naif sooner or later you will miss and drive a nail into your hand. Unfortunately» I

learned this the hard wav.

/

W hen you come to a door or window opening, be especially careful to nail each king stud on the“X” mark next to the header loca­tion. Once nil the wall, king, and top cripple studs arc nailed to the top plate, pull up the bottom plate and begin nailing it n place, always paying attention to your layout marks. Repeat the process. Nail all wall members to the bottom plate just like you did with the top plate.

I always nail the blocks for a recessed, or in-wall, medicine cabinet while the wall is flat on the floor. At the “MC marking, hook your tape on the bottom plate and measure up 4 ft. and 6 ft. on the two studs on each side. Nail a flat block below the 4-ii. marks and above the б-ft. marks. This leaves a clear space of 2 ft., which is the height of a standard recessed medicine cabinet.