Posted by admin on 13/ 11/ 15
When vou decide to build a house, there’s a
/
whole new vocabulary you have to master. Every part of a house has a name and, ns with most endeavors, learning the lingc will take you a long way toward getting the job done. There are plenty of terms that intuitively make sense, such as header, footing, cladding, brace, and sheathing. In other cases, you’ll find that some parts have several names. The illustration on the facing page, combined with the definitions on the following pages, will give you a good basic working vocabulary that we’ll build on in later chapters.
Sill or sole plates
These are generally pressure-treated (PT) 2x4s or 2x6s that are bolted to the concrete foundation and support the floor joists.

Posts, girders, and beams
Posts are vertical supports for horizontal pieces, which are called girders or beams. These major horizontal members support floor joists. Posts that sit on concrete piers are often made of PI’ wood.
the entire house, running from one outside sill, across any interior girders, to the other outside sill. Most often thev are made from 2x-dimension lumber (such as 2x8s, 2×1 Os, or 2x12s) or from manufactured, wooden I-beam joists.
Joists
Typically spaced 16 in. or 24 in. o. c., joists are installed parallel to each other and support the subfloor and rough plumbing. They span
Floor sheathing
Floors are usually sheathed with %-in.- or M-in.-thick, 4-fl. by 8-ft. sheets of tongue-and – groove plywood or oriented strand board
         (OSB). Better sheets have their edges treated with paint to inhibit moisture absorption in wet weather. (OSB). Better sheets have their edges treated with paint to inhibit moisture absorption in wet weather.
Wall plates
These are the 2×4 or 2×6 horizontal members that hold together the parts of a wall. Each wall has three plates—one on the bottom and two on the top. The two uppermost plates are called the top plate and the double top (or cap) plate. When framing on a concrete slab, the bottom plate is made of PT wood.
Studs
Studs are the vertical wall members nailed to the plates, and they are typically spaced either 16 in. or 24 in. o. c. The standard, precut stud
length in many parts of the country is 924 in. That stud, along with three 114-in.-thick wall plates, creates a framed wall that is 96% in. high. That leaves room for ’/-in. or /-in. dry – wall on the ceiling and full 8-ft. sheets on the walls. In addition lo solid 2x lumber, vou may also encounter finger-jointed studs, which are manufactured from shorter pieces of wood glued end to end. Increasingly, houses are being built with metal studs.
Headers, trimmers, and cripples
The weight from above a window or door opening is transferred around the hole by a header nailed horizontally between studs. Trimmers nailed to the studs at both ends of the header support the header. Cripples, or jack studs, extend from the top of a header to the top plate, as well as from the bottom plate to the underside of rough windowsills.
Roof trusses
Each of these factory-made assemblies typically consists of a bottom chord (or joist chord), a top chord (rafters or rafter chords), and interior webbing. Trusses areoflen engineered to carrv the entire weight of a roofs load, transferring it to the exterior walls. That load can be considerable in snowy parts of the country. Trusses allow roof construction to be
4
done quickly and easily. Most trusses for residential construction are spaced 24 in. o. c.
Fascia and gutter boards
These terms are often used interchangeably,
v «
but a gutter board is technically distinct from a fascia board. Both parts are installed over the ends of the rafter tails. Л gutter board is nailed directly to the rafter tails, and it is covered by aluminum or vinyl cladding or by a fascia board that serves as the finished exteriors trim surface, for more details, see chapter 6.
|

CONSTRUCTION BASICS. Joists are the framing members that lie across a foundation and support the subfloor (above left). The wall frame is made up of studs, plates, headers, and rough sills. Walls are usually framed on the subfloor, then tilted into position (above right).
|
|
Roof and wall sheathing
Roofs and walls arc usually sheathed with И-in.- or M-in.-thick OSB. In some parts of the country, exterior walls, along with their gable trusses, arc sheathed before they are raised upright.
Housewrap and felt paper
Housewrap or fell paper is placed under siding and shingles to prevent wind and water from entering stud cavities or the attic.
Sealants
 Construction adhesives, caulk, and other sealants are ever present on job sites. Most of those products come in cylindrical cartridges that fit inside a caulking gun, which is used to apply the caulk or sealant. Construction adhesives can be used to bond different materials together—floor sheathing to floor joists, for example. To prevent water leakage, caulks are used to seal around windows and doorframes, at siding joints, and where a bathtub meets the floor. They can be used under wall plates and around pipe holes to block out cold air. Gaps between baseboards and walls or door casings can be filled with caulk before painting. Construction adhesives, caulk, and other sealants are ever present on job sites. Most of those products come in cylindrical cartridges that fit inside a caulking gun, which is used to apply the caulk or sealant. Construction adhesives can be used to bond different materials together—floor sheathing to floor joists, for example. To prevent water leakage, caulks are used to seal around windows and doorframes, at siding joints, and where a bathtub meets the floor. They can be used under wall plates and around pipe holes to block out cold air. Gaps between baseboards and walls or door casings can be filled with caulk before painting.
Nails
The most commonlv used framing nails are 8d (the “d" stands for “penny”) and I6d sinkers, or vinvl-coated nails. The vinvl coat – ing makes the nails drive easier and hole better, but don’t hold them in your mouth. In wet areas or near the ocean, use hot-dipped galvanized or stainless-steel nails.
Screws are typically described by head type (main types include Hat, round, pan, and hex); length (given in inches); gauge, or shank, diameter (usually between *1 and 10); and typical use (drmall, wood, sheet metal, and so on). Although popular for general-purpose use, drvwall screws aren’t strong enough to support heavy loads, such as wall cabinets.
Screws
Drvwall screws are the most universally used
4 4
screws in house construction. But thanks to the popularity of cordless drill-drivers, all kinds of screws are now being used to build houses. Corrosion-resistant screws are available for deck construction and other outdooi
Other fasteners
Toggle bolts, molly bolts, hollow-wall anchors, and other fasteners are used to help secure items, such as wire shelving to drvwall panels. When something must be fastened to a masonry surla. ee, masonry expansion shields and bolts can be used.
applications. Other types of screws are used to install cabinets, built-ins, and hardware.
Materials DEALING WITH SUPPLIERS AND SCHEDULING DELIVERIES

ESTIMATING LUMBER AND MATERIALS for a small, affordable house is fairly simple, but it does take some experience to get it right. If you are building a Habitat house, you can call or e-mail affiliates and ask them to share their lists with you (check the Habitat Web site for the affiliate in your area). You can also take a set of plans to a local supplier. Most building-supply outlets will create a materials list and give you a bid on what everything will cost. Always get bids from more than one supplier. Just make sure every supplier understands the type and grade of each item.
If you don’t make your own list, take the opportunity to inspect the plans closely. Get acquainted with the house and all its parts before you start. Remember that a lumber list is only an estimate of material that will be needed for a particular job. You may need to order a few more items as you build, or
you may need to send some materials back to the supplier. Find out ahead of time whether your suppliers charge a restocking fee for returned materials.
Most builders have materials delivered as needed, rather than all at once. You should do the same. That way, you won’t have to worry as much about storage problems. Also, ask your supplier to stack the lumber load in the order in which it will be used.
Some materials (especially trim, doors, and unpainted siding) should be stored indoors. When storing material outside, set it on blocks above the ground and cover it with plastic to keep it dry. Be specific about where you want the lumber company to drop the wood, and pick a level, accessible location close to where it will be used. Hauling lumber by hand from any distance is hard, time – consuming work.
Posted by admin on 12/ 11/ 15
OLD DRILLS WERE MADE with enclosed trigger guards like those on firearms. Carpenters sometimes had their trigger fingers caught and broken from time to time, such as when a drill bit got hung up on a knot in a board and spun suddenly. For safety reasons, workers often used a hacksaw to cut out the trigger guards. These days, manufacturers have eliminated trigger guards, but that doesn’t mean drills can’t do you harm. To use a drill safely, follow these guidelines:
^ Use clean, sharp bits.
a Don’t force the drill; let it cut at its own pace.
a Use a slower speed when drilling harder materials, and coat the bit with wax or silicone to reduce resistance.
a When drilling thick material, hold the drill with both hands, and Lse the side handle if the drill comes with one.
a If you’re drilling a deep hole, pull the bit out of the hole from time to time to clear debris from the bit and the hole.
a Don’t rely on hand pressure alone to hold the workpiece in which you’re drilling. Instead, clamp the workpiece to a sawhorse or a workbench.
a Be especially careful when drilling from a ladder. Make sure you have proper balance.
a Release the trigger immediately if the bit begins to bind or catch.

 
chuck (bit holder). A %-in. model can handle a bit shank diameter ot up to % in. For general carpentry work, buy either a %-in. or a k?-in. drill. Look for a model with a reverse switch (so you can remove screws) and variable speed control. A good cordless drill will also have a clutch, which makes it easier to drive screws of different sizes. A low clutch setting (1 to 3) is good for driving small screws. Higher sellings are used for bigger screws.
Extension cords
Power tools need adequate power to operate properly, and that means you need good – quality extension cords. The smaller the gauge number marked on the cord, the heavier the wire. The three most common gauges are 12, 14, and 16 (12 is the heaviest). From time to time, I’ve seen carpenters run a circular saw with a 100-ft. ]6-gauge extension cord. That’s like watering a lawn with a hose the diameter of a drinking straw. Not much water
(or, in the case of an extension cord, electricity) comes through. With a light extension cord, you risk burning out the motor. To prevent that, always use the shortest cord that
4
will do the job. There’s no need to use a 50-ft. cord if you are working just 15 ft. from an outlet. Here’s a rule you can use for selecting the proper extension cord: Use 16-gauge wire for a 25-ft. (or shorter) cord, 14-gauge wire for a 50-ft. cord, and 12-gauge wire for a 100-ft. cord.
Proper care of cords is essential. Looping a cord into a daisy chain, or a simple crochet stitch, makes for easy storage (see. he photo below). If a cord is frayed or nicked, i cpaii it. A cord with exposed wires can be extremely dangerous. If that happens, the cord should he cut and rewired with new plugs. You can buy – cords equipped with a built-in ground-fault circuit interrupter (GFCl). In the event of a short, the GFCI automatically shu. s off power, preventing electrical shock.
  
Posted by admin on 12/ 11/ 15
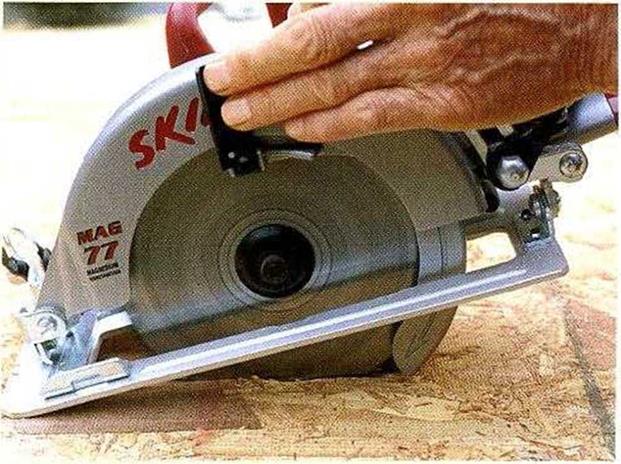
SOMETIMES IT’S NECESSARY to cut a hole in the middle of a board or a panel. You can do this with your circular saw if you know how to make a plunge cut. (Don’t attempt this unless you’re an experienced circular-saw user.) Start by leaning the saw forward over the cut line. Rest the front edge of the saw base on the wood, and hold the blade about 1 in. from the surface. Use the lever on the blade guard to lift the guard and expose the blade. Make sure that the blade is aligned over the cut line. Start the saw and use the front edge of the base as the pivot point. Lower the blade into the wood, using both hands to control the saw and complete the cut. When you are finished, turn off the saw and let the blade stop spinning before pulling it out. Another way to make a plunge cut is to loosen the lever that controls
the cutting depth and raise the blade completely above the board. Set the saw base in position over the cut line, loosen the depth adjustment lock, and slowly lower the blade into the material.
  WORM-DRIVE SAW. Larger and heavier than a sidewinder saw, a worm-drive saw has its motor in front of the blade. WORM-DRIVE SAW. Larger and heavier than a sidewinder saw, a worm-drive saw has its motor in front of the blade.
a Make sure the blade guard works (reelу before using the tool.
ж Use the right blade for the job, and replace dull blade with a new one. Carbide-tipped blades are best for most wood-cutting work.
^ To reduce friction when culling, apply paste wax lo both sides of the blade, or spray it with silicone.
^ Adjust the saw s cutting depth according to
the thickness of the material. If vou are cut-
/
ting /: in.-thick material, set the culling
depth at no more than >- in. (see the photo at left). The less amount of blade that’s exposed, the less potential for injury should something go wrong.
ж Always unplug your saw when changing blades and adjusting the cutting depth or angle.
a. Make sure the stock is adequately supported With proper support, the cut won’t bind on the blade and the cut-off end will fall free.
a To begin a cut, place the saw base on the stock with the blade about 1 in. from the edge of the wood, aligned with the cut line. Hold the saw with both hands, pull the switch, and slowly push the blade into the wood, following the cut line. Go slowly, guiding the saw, and let it do the work. Eventually, you will learn to cut with one hand on the saw and the other hand on the material.
a Don’t try to hold a short or small piece with one hand while guiding the saw with the other. Instead, use a clamp to secure the workpiece while you make the cut.
Reciprocating saws
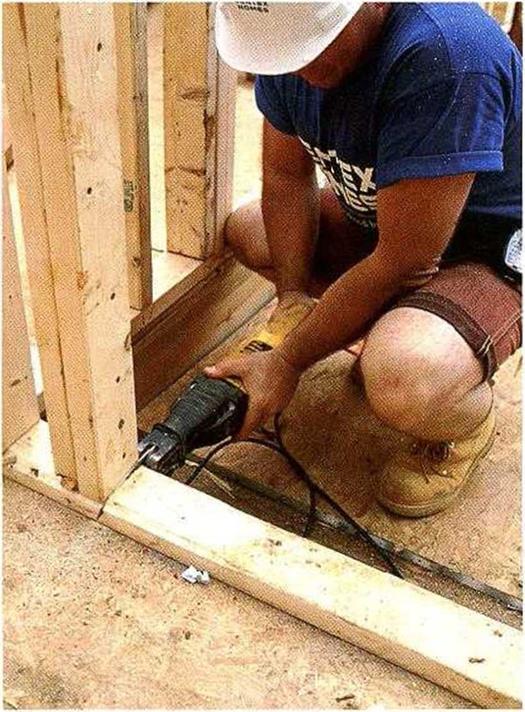
Another frequently used tool is the reciprocating saw, also called a sahersaw or a SawzalD— the name given to Milwaukee’s popular saw (see the photo at left). This tool allows you to cut in tight places and make curved cuts. Different blades are available for cutting through wood, metal, plaster, and plastic. For general use, I buy 6-in. bimetal blades, which cut through both wood and metal.
Chopsaws
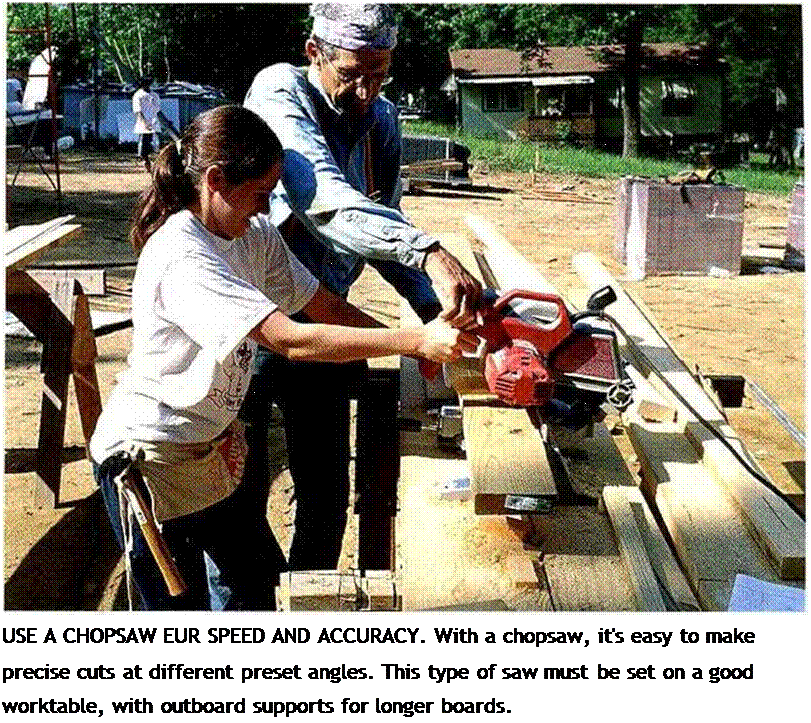
The power-miter saw (generally referred to as a chopsaw) has revolutionized finish carpentry іust as the circular saw revolutionized
4 *
rough-framing carpentry. With a chopsaw, you can make precise square and angled cuts in framing lumber, door and window casings,
and baseboard trim. These saws are rugged and easy to use. When equipped with a fine blade, thev can make glass-smooth cuts.
Drills
An electric drill is a versatile tool on any job site. It’s capable of boring holes in all sorts of material and can also be used for driving screws and mixing paint or dry-wall compound. Most carpenters have at least two drills on a jobsite. A corded drill is best for mixing paint and drywall compound and boring holes in concrete, framing lumber, and metal.
A cordless drill-driver is great for driving screws and light-duty boring.
 Whether corded or cordless, a drill is usually described by the maximum capacity of its Whether corded or cordless, a drill is usually described by the maximum capacity of its

Posted by admin on 12/ 11/ 15
WORKING ON A CONSTRUCTION SITE is not a * Don’t drink (or do drugs) while doing construe-
sunny stroll in lhe park. There are all kinds of tion work.
    
unusual, uncomfortable, and potentially hazardous conditions you may encounter—uneven ground, troublesome weather, boards with protruding nails, and sloped roof surfaces that challenge your balance. Learning how to work safely and effectively in a construction environment is just one more skill that you need to acquire, such as hammering a nail or sawing a board. Here are some basic suggestions to keep you safe and productive:
a Wear good shoes, clothes that fit well, long – sleeved shirts, long pants, a hat with a brim, and sunscreen. Protective clothing is also available for those who are particularly sensitive to the sun (see Resources on p. 278). Leave jewelry at home, and bunch up long hair, so it doesn’t get caught in a power tool.
^ Protect your eyes with safety glasses or goggles when sawing or nailing.
Protect your ears. Hearing damage is cumulative and permanent; once you’ve damaged your ears, you can’t undo it. I keep a few sponge earplugs in a 35mm film canister stored in my tool bucket. Place a set of good earplugs or earmuffs by the chopsaw and table saw if you have those tools on the job site.
a Protect your lungs with a dust mask, which will keep large particles from entering your lungs.
^ To prevent back injuries, remember to lift with your legs, not your back. If you’ll be working on your knees for a long period, wear kneepads.
* To reduce the risk of tripping or stepping on a nail, keep your work area clean.
a If you see any nails sticking out of boards, either bend the nails or remove them.
ж Never throw anything off a roof without looking to see whether anyone is below.
a Work with a clear head and pay attention to what you and others around you are doing. Be especially careful toward the end of the day, when you are physically tired.
a Pay attention to your inner voice. If you feel that something might be dangerous, ask for help or figure out a better way to do it.
^ Take care of your body. Don’t forget to rest and drink plenty of water. Your body can become dehydrated rapidly on a hot, dry day. If you aren’t visiting the Porta Potti® regularly, you aren’t drinking enough water.
a Keep your tools sharp and clean, take care of them, and Heal Lliem well.
* Take a course in basic first aid.
  
Power Tools
Although power tools can’t replace hand tools, they sure do make construction work easier. Power tools make work move along more efficiently. 1 wouldn’t want to be with- out them.
Circular saws
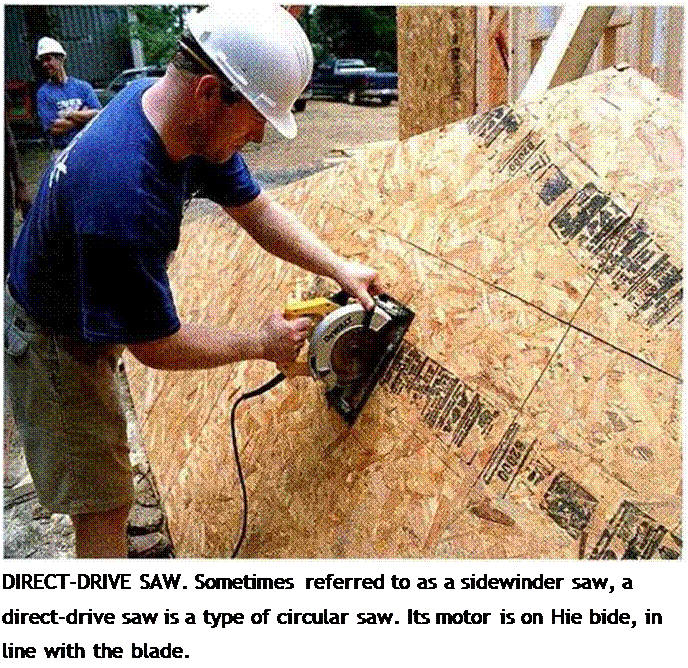
T he circular saw has been around since the 1920s, but it didn’t really catch on until the housing boom began after World War II. These davs, manv homeowners have one in the garage. For a builder, this portable power tool is indispensable. The most popular circular saws are designed to hold 7l4-in.-dia.
blades. In the eastern part of the U. S., most carpenters prefer direct-drive saws, often referred to as sidewinders (see the bottom left photo on the facing page). In the West, carpenters mainly use the heavier worm-drive models (see the bottom right photo on the lacing page). Check out both to see which one you prefer. Above all, buy quality. Light, low – priced homeowner models aren’t in the same league with professional models.
Tips for using your saw safely and accurately are listed on p. 34. Some of them apply to other power tools as well. As wit i any power tool, be sure to study and follow the instructions in the manual.
Safety on the Job AVOIDING KICKBACK
    
WHEN THE BLADE OF A CIRCULAR SAW gets pinched by the wood, the power of the motor can force the saw backward—a safety hazard called kickback. In extreme cases, the saw can jump away from the material with the blade still spinning, harming anything in its path. To prevent kickback when using a circular saw, follow these guidelines:
a Use a sharp, carbide-tipped blade. a Cut in a straight line.
^ Let the saw do the cutting—don’t force it. Forcing the cut can cause the blade to bind and kick back.
a Always provide proper support for the stock.
Avoid setups that allow the material being cut to pinch the blade (see the illustration at right).
* If a kickback does occur, release the saw trigger immediately and let the blade stop. As long as the blade guard is working properly, there is little danger of injury. Don’t resume cutting until the cause of the kickback is determined and corrected.
SUPPORTING STOCK PROPERLY WHEN CUTTING
WITH A CIRCULAR SAW
Not enough support
|
The stock sags at bon ends, pinching the blade.
|
Proper support
When you are cutting wood, support it properly. Unsupported wood can pinch the blade and cause the saw to kick back.
Posted by admin on 12/ 11/ 15
JUST LIKE HITTING A SOLID-LINE DRIVE or
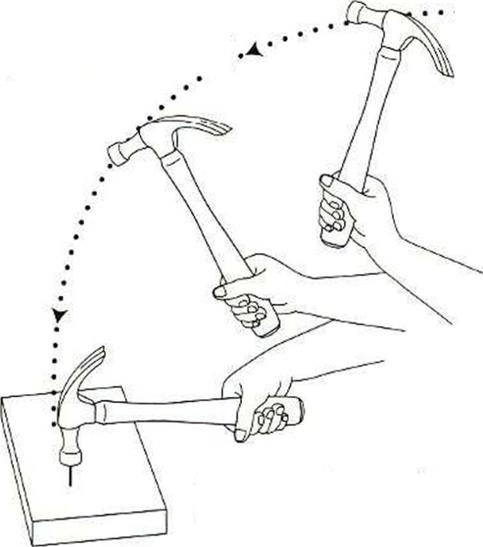
delivering a blazing tennis serve, driving nails quickly and accurately takes time and practice to master. Like most athletic endeavors, efficient nailing has at least as much to do with rhythm and coordination as it does with power and force. Learn to nail using your entire body; make a fluid shoulder, elbow, and forearm movement that ends with a decisive snap of the wrist (see the illustration at right). Practice your technique. Grasp the handle near the end with an easy, firm grip, making sure your thumb is wrapped around it. Buy a box of 8d or 16d framing nails, find a hunk of wood, and start driving nails. In time, you’ll be amazed at the speed and force with which you can drive nails.
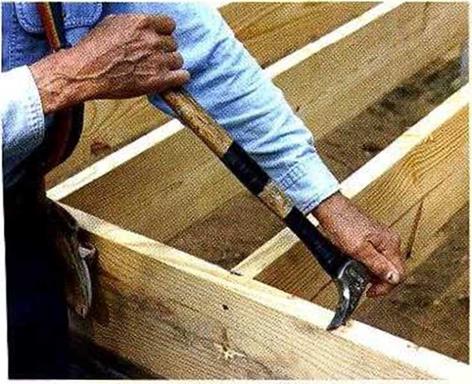
When pulling nails with a wooden-handled hammer, hook the nail and push the hammer to one side and then the other, rather than straight
back (see the photo at left). Otherwise, you could break the handle right at the hammer’s head. To pull nails with a metal-handled hammer, you can lever the hammer sideways or backward. To increase your leverage, put a block under the head of the hammer.
  і і
Helping Hand
Shrink-wrap strengthens a wooden handle. Available from electrical suppliers, plastic shrink-wrap can add strength to a wooden hammer handle right where it counts—where the handle meets the head. Slip a 6-in.-long piece of the plastic wrap onto the handle, then shrink it in place with a hair dryer.
strength, feel well balanced, and be comfortable in vour hand. When I brine a new ham – mer home, I usually reinforce the upper part of the wooden handle by wrapping it with electrical tape.
Utility knives and tinsnips
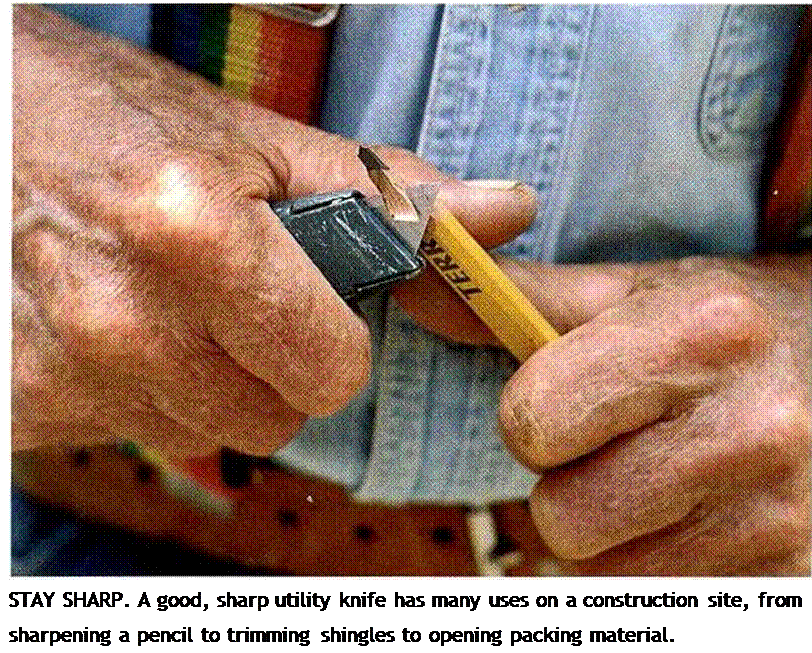
A few more essential tools round out a carpenter’s basic, must have kit. Perhaps foremost on this list is a utility knife. On the job site, a utility knife may be used to open packages or cut building paper, fiberglass insulation, shingles, vinyl, or drywall. You’ll also need it several times a day to sharpen a carpenter’s pencil (see the photo at right). 1 recommend using a knife with a retractable, replaceable blade and a handle with space inside to hold several replacement blades.
When a blade becomes dull, replace it or restore its edge with a whetstone. A dull blade doesn’t cut as neatly and is dangerous because of the extra force required to make it cut.
You’ll need a good pair of tinsnips to cut steel packaging bands around lumber. Snips are also essential when working with aluminum cladding and vinyl siding. Be careful
when using these cutting tools. Accidents with utilitv knives are common.
Cat’s paws and flat bars
These prying tools really come in handy during new construction and remodeling work. Your hammer’s claw vvi 1 generally work fine for removing exposed nails. When a nail is buried, though, a cat’s paw is the tool to use. With a couple of hammer blows, you can sink
     the cat’s paw into a board, grab the head of a nail, and lever it above the surface. From there, your hammer takes over to completely remove the nail. the cat’s paw into a board, grab the head of a nail, and lever it above the surface. From there, your hammer takes over to completely remove the nail.
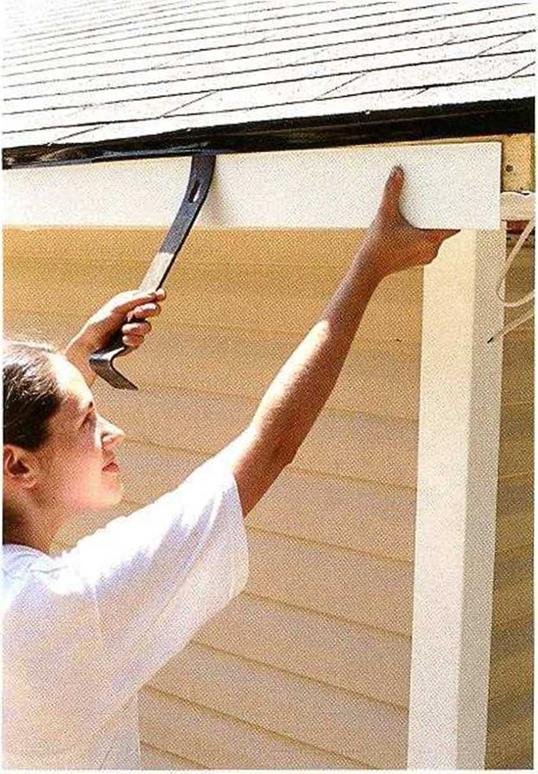
A flat bar can also be used to pull nails, or it can be used as a prybar. In new construction, I often use a flat bar to separate boards that have been temporarily nailed together and to slip aluminum or vinyl trim under a drip edge (see the photo above).
Tool Carriers
Once you have a few tools, you’ll need to carry them with you as you frame walls and install siding or shingles. It doesn’t work well to carry a measuring tape in your jeans and to fish nails from a shirt pocket. Fifty years ago, when I started working as a carpenter, we wore white carpenter’s overalls with a lot of little pockets for nails and tools. Those soon gave way to cloth aprons, which were replaced by heavy leather aprons with a wide leaner bclt. Today, nylon pouches seem to be taking over, and for good reason: The best versions are lighter than leather and just as durable.
As with tools, the selection of tool belts,
pouches, and holders can be confusing. There are good bell and pouch systems for both men and women. Inexpensive versions are available for novice and occasional builders.
If you’re serious about construction work, consider some of the tool belt systems that allow you to add pouches and holders as you need them.
For larger items, or for tools that are used only occasionally, the traditional carpenter’s toolbox has given way to the carpenter’s tool bucket (see the photo below). This is іust a 5-gal. bucket fitted with a bag insert that
allows vou to carry manv individual tools. For
/ * і
organizing specialized tools (collections of drill bits, chisels, or screwdrivers, for example), inexpensive storage boxes in many sizes are available from supply stores. Label the boxes so you know what’s inside.
|
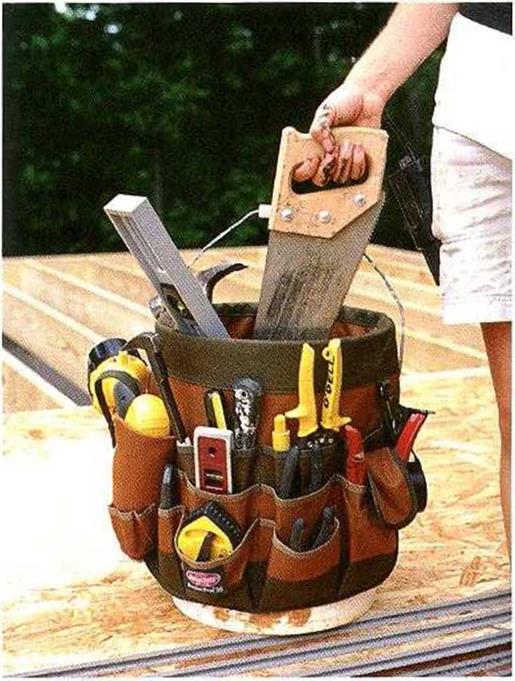
CREATE A TOTE FOR TOOLS. Fitted with a pouch – covered canvas or nylon insert, a 5-gal. plastic bucket replaces an old-fashioned carpenter’s toolbox.
|
Posted by admin on 12/ 11/ 15
 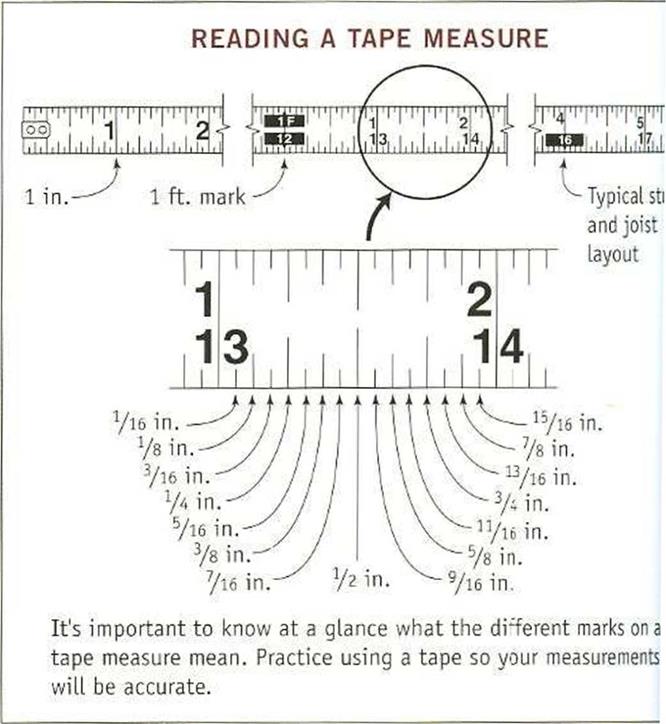
A MEASURING TAPE IS SIMPLY a long ruler in a convenient easy-to-use package. Just like a ruler, a tape is laid out in feet, inches, and fractions of inches. Knowing how to read a tape quickly and accurately is an essential skill for anyone involved in the building trades.
The key to being able to read a tape is learning and understanding all the subdivisions of an inch (see the illustration at right). Each inch is divided into halves, quarters, eighths, and sixteenths. Once you can discern the meaning of all these little marks, you’ll have no problem measuring 13 ft., 9}/is in., or any other odd dimension. Study the drawing and your own tape until you can rattle off accurate readings at a glance.
In addition to feet and inches, a tape also has special marks at 16 in., 32 in., and so on to indicate the layout of most floor joists and wall
studs. Some tapes also have decimal equivalents and a metric conversion scale on the back.
 
cause rust and friction, which can shorten the tape’s life span.
Levels
Checking for level (horizontal) and plumb (vertical) are construction tasks that carpenters do every day. both 2-ft. and 4-ft. levels are
4 4
good to have around. The 2-ft. model allows you to get into tighter spaces—to check a header or rough sill for level, for example. A 4-ft. or 6-ft. model provides greater accuracy across longer distances, such as when checking walls for plumb. More so than perhaps any other carpentry tool, a level must be treated with loving care to remain useful (an inaccurate level does you no favors). Check your
levels for accuracy before you put them to work (see the tip at left).
Squares
Most things a carpenter builds are either square or rectangular. With a good square or two, you can mark square lines exactly and make square cuts precisely. These days, the most useful square is a small rafter square, often called a Speed square™—the brand name of a popular model (see the top right photo on the facing page). This triangular square fits conveniently inside a nail hag. It’s rugged and easy to use and lets you lay out almost any desired angle, in addition to 45-degree and 90-degree angles.

|
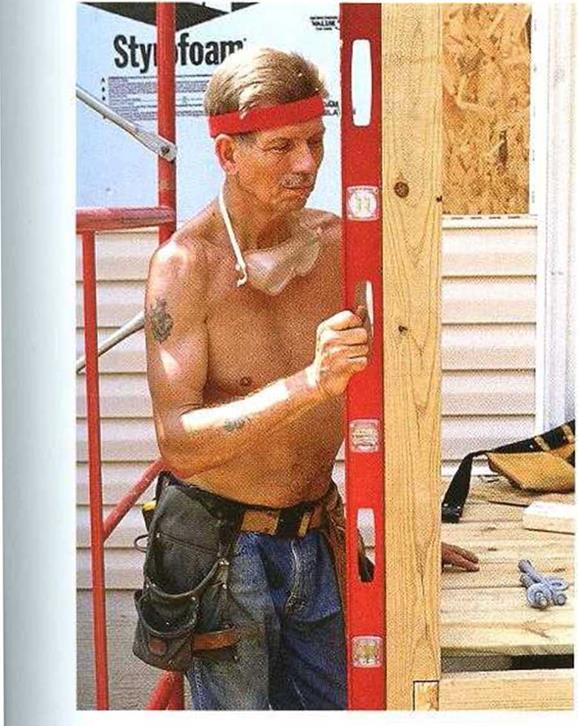
HORIZONTAL AND VERTICAL. Available in different lengths, levels can quickly test for plumb (vertical) and level (horizontal).
|
|
|
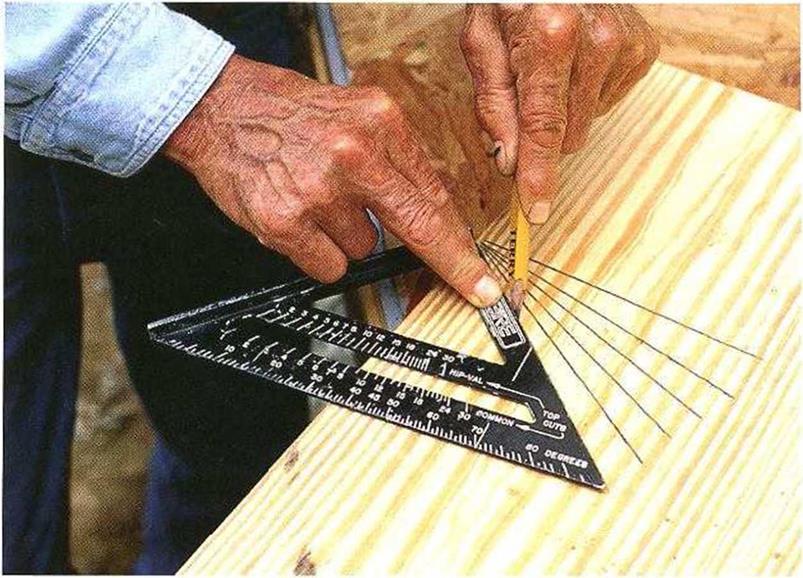
GET THE RIGHT ANGLE. A small, triangular rafter square is designed to lay out 90-degree and 45-degree angles quickly, but it’s also capable of laying out just about any angle you might need.
|
|
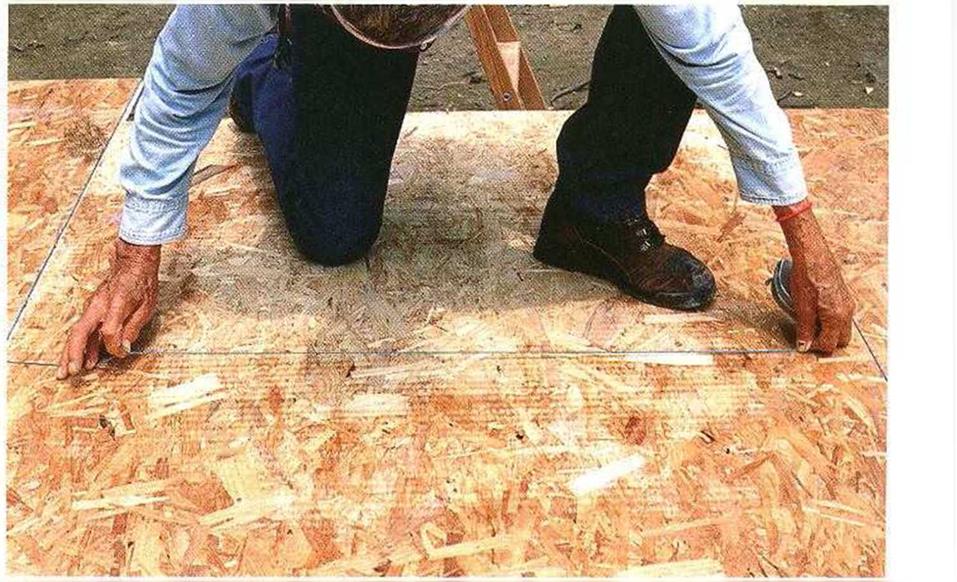
Marking tools
Once you’ve measured* its hire lo mark. A carpenters pencil and a lumber crayon, or keel, are the two most common marking tools you’ll need. A carpenter’s pencil is flat (so it won’t roll away if you set it down), and it’s less apt to break than a regular pencil. Keel marks easily where pencils can’t—on materials such as tarpaper, housewrap, and concrete. It’s waterproof, loo.
A chalkline is also essential. The first chalkline 1 used was simply a string pulled through a solid chunk of chalk. Today’s chalklines come in cases or reels that hold both a string and a supply of powdered chalk. You pull the chalk-covered string out of the case, snap your line, and then rewind the string inside the case, where it becomes covered in chalk again, ready for the next line. The chalk comes in many colors, including a few neon shades.
  Chalk that leaves a permanent line is good for working in rainy weather. Chalk that leaves a permanent line is good for working in rainy weather.
Hammers
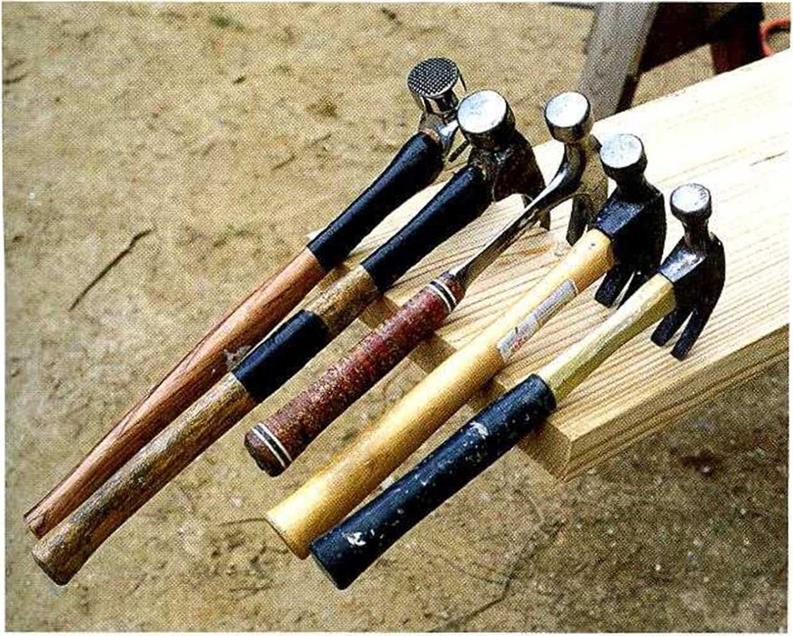
Carpenters can be a bit touchy about their hammers. You may have more luck borrowing a carpenters pickup truck than a favorite hammer. These days, most framers west of the Mississippi prefer a 21-oz. hammer with a serrated face and a 16-in.- or 18-in.-long wooden handle. My preference is the well-balanced Dalluge® hammer. Women friends in the trade tell me they like the Stiletto®, a 14-oz.
framing hammer made of titanium with a steel face. East of the Mississippi, Ї see carpenters mostly using smooth-faced hammers with metal or fiberglass handles.
Hammer faces and weights vary greatly (see the top photo on the facing page). The best advice I can give is to select a professional – grade hammer that feels good to you. Definitely check out a hammer in person before you buy it. It should match your pnysical
Posted by admin on 12/ 11/ 15
So what do you look for when buying a tool? Well, it helps to remember that tools are not like stretch socks, where one size tits all. A circular saw, for example, may have the right
combination of power and weight but still fed out of balance or awkward when vou hold it.
4
A tool that’s not comfortable is like a shoe that is one size too small. It’s never a bargain, regardless of price. A tool that feels good in your hands will most likclv be easvand safe to use. So, whenever possible, try before you buy. Visit home centers and tool dealers that have good selections of tools. Grip the tool to test its balance and feel. If you have small hands, rule out tools that aren’t easv to hold comfort-
4
ably. Try the controls and adjustments, too. Use this hands-on information to make vour
4
selections.
Get advice from the pros
Talk to carpenters, who use tools daily, and ask them for their preferences. Research magazines, such as Fine Homebuilding and the Journal of Light Construction, which evaluate tools. And always buy the best quality you can afford. Most of us know the experience of wishing we had bought quality rather than a piece of junk. Professional tools cost more initially, but they are more durable, more powerful, and easier and safer to use. Ironically, they make it easier to be a beginner.
Buy tools as you need them
if you’re intending to work professionally as a carpenter, you’ll eventually acquire quite a large collection of tools. If, however, you’re only planning to build one house or work with Habitat as a weekend volunteer, a small kit of essential tools should stand you in good stead. In addition to the basics described on the following pages, you can acquire more specialized tools as you need then:, which is the best way to do it anyway. Otherwise, you may wind up with unnecessary tools that clutter your tool belt, your storage bucket, and your life. You can also rent specialized tools if you plan to use them just a few times.
Essential Hand Tools
The fundamental tasks of carpentry are measuring, marking, cutting, and joining. And though circular saws and power drill-drivers have largely replaced handsaws, braces, and screwdrivers, many carpentry tasks can still be done with hand tools (see the photo at right). Like power tools, many hand tools have improved over the years.
Tape measures
Just as I sometimes enjoy writing letters on my old manual typewriter, it’s also fun to measure with my old 6-ft. wooden folding rule. Flexible steel tapes have replaced old – fashioned wooden rules, because they’re more compact and capable of measuring much longer distances quickly and accurately. Steel tapes come in many sizes and lengths, but the most common are 16-ft., 25-fit., and 30-ft. models. I prefer a 16-ft. tape, because it feels better in my hand. A 100-ft. tape is useful for checking building lines and squaring foundations. Tape measures have moving parts and receive heavy use, so use the following tips to treat them with special care:
a Don’t leave a tape extended open on the floor, where it could be stepped on and creased. A creased tape will never work properly.
a If a tape is allowed to retract too quickly, the hook can break off when it hits the case. Learn to slow the tape with your fingers as the hook approaches the case.
a Clean any tape that gets gummed with wood pitch, tar, or caulk. A soft rag dampened with mineral spirits works well to remove those materials.
     a When working in wet weather, wipe the tape dry with a cloth before reeling it into the case. Moisture inside the tape case can a When working in wet weather, wipe the tape dry with a cloth before reeling it into the case. Moisture inside the tape case can
Posted by admin on 12/ 11/ 15
|
THE CRAFT OF CARPENTRY HAS A LONG AND HONORABLE HERITAGE. Ages be Гоге we began recording our history, our ancestors were shaping and joining materials to create various types of shelters. Today, we are the fortunate inheritors of centuries of accumulated knowledge, experience, skills, and tools. Although carpentry continues to be transformed by technology (from computer-aided design programs to cordless tools and pneumatic nailers), many basic tools and techniques remain unchanged.
It still takes a human hand wrapped around a hammer handle to build a decent place to live.
Like basic carpentry tools, many parts of the house have stayed the same over the years. Technology has improved some of the parts, as well as created new ones. But the house is still the same basic structure it always was. Before you start building a house, it’s essential to learn the common language spoken on construction sites and in home centers, lumberyards, and building-supply stores.
Tool-Buying Tips
When 1 started working as a carpenter in the late ’40s, almost every task was done with hand tools. I remember spending hours cutting a pile of 2x4s to length with a crosscut saw. Floors were sheathed with 1x6s, both ends of which had to be cut at 45-degree angles. Cutting all the pieces of a house by hand was a big job, to say the least. In 1950, when I bought my first circular saw, my world as a carpenter changed forever.

 
But what began as a boon (the proliferation of new and better tools) has over the years also become downright bewildering. These da vs, the number of tools on the market can make buying tools a difficult task. Each time 1 walk into a tool center or receive a tool catalog in the mail, 1 am amazed by the dizzying array of carpentry tools offered for sale. When there are 50 different models, even buying something as basic as a hammer can be frustrating.
Posted by admin on 12/ 11/ 15
|
![Going Beyond the Call of Duty Подпись: [Photo : Anna Carter]](/img/1312/image146_0.gif)
![]()
 Build Midspan Support for Joists


![]()


![]()


 Construction adhesives, caulk, and other sealants are ever present on job sites. Most of those products come in cylindrical cartridges that fit inside a caulking gun, which is used to apply the caulk or sealant. Construction adhesives can be used to bond different materials together—floor sheathing to floor joists, for example. To prevent water leakage, caulks are used to seal around windows and doorframes, at siding joints, and where a bathtub meets the floor. They can be used under wall plates and around pipe holes to block out cold air. Gaps between baseboards and walls or door casings can be filled with caulk before painting.


 Whether corded or cordless, a drill is usually described by the maximum capacity of its


 і
і


 the cat’s paw into a board, grab the head of a nail, and lever it above the surface. From there, your hammer takes over to completely remove the nail.


 Chalk that leaves a permanent line is good for working in rainy weather.


 a When working in wet weather, wipe the tape dry with a cloth before reeling it into the case. Moisture inside the tape case can

