Category A HOUSE

Raise exterior butt walls next

Once you’ve finished with the exterior through walls, it’s time to raise the exterior butt walls. Remember that you want the butt walls’ double top plates to be about 3/4 in. longer than the top plates (5/4 in. for 2×6 walls) so that they will lap over the through walls’ top plates. This can make it difficult to raise the butt walls, though, because the double top plate sticks out at both ends.

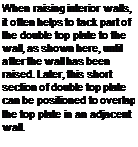
There are a couple of tricks for making it easier to raise these and other butt walls. One approach is to double-plate the entire butt wall except for a short section—say, 4 ft. or 5 ft.—at each end. Cut these short pieces and tack them to the wall to keep them close at hand (see the bottom right photo on p. 103). Then nail them on after raising the wall. Alternatively, you can leave off a section of the double top plate from one end of the wall, then jockey the opposite end into position with a couple of helpers. With a little experience, you’ll learn these shortcuts.

Raise exterior butt walls nextWhen the last wall has been raised, something special happens. What was once just a jumble of fram­ing lumber on the deck all of a sudden feels like a house with real rooms.

Raise exterior butt walls nextRaise interior walls from the longest to the shortest

As you raise and position each wall, nail the end stud of each intersecting butt wall flush with the corner or channel on the through wall. Use three 16d nails: one 2 ft. up from the bottom, one 2 ft. down from the top, and one in the center. After all the walls are raised, stop and admire your work. It’s like magic: As you stand in individual rooms, you can see the shape of the house.

Tie off the double top plates

Nailing the lapped double plate into the adjoining top plates ties the entire framed structure together. This important task, when done accurately, makes it easy to plumb and straighten the walls. If you are a gymnast, like my carpenter-daughter, you can hop right up on the plates and start tying the walls together. Otherwise, it’s best to work on a sturdy ladder.

The corner marks you drew on the plates earlier now serve as guides when nailing off the top plates. Make sure that the double top plate is on these lines and that the top plates of both walls are touching. If necessary, toenail a 16d nail up through the top plate of the through wall into the double top plate ol the butt wall to draw everything together, as shown in the bottom right photo. Nail two 16d nails through the lap into the intersecting wall.

STEP 7 PLUMB AND LINE THE WALLS

Подпись:Подпись: If you're nimble, you can perch on top of the framing to hammer overlapping joints together. Otherwise, do the job on a ladder. It's good practice to drive a toenail (or two) into the overlapping plate. A toenail pulls the joining walls together before the top is nailed off. The word “plumbing,” when used in the context of framing a house, means making sure that the walls are standing straight up and down. “Lining” means straightening the top plate along the length of each wall. It’s impor­tant that all the walls are plumbed and lined accurately. Anything else is unacceptable. Badly plumbed or crooked walls cause significant problems later—cabinets won’t fit properly, doors won’t close correctly, and finished surfaces

Подпись: Most walls can be held plumb and straight using 2x4 studs. Properly placed and nailed, a stud, rather than a longer piece of plate stock, will hold a wall in its proper position.

Raise exterior butt walls next

While one person holds the level, another person can nudge the wall to get it plumb, then nail off a diagonal brace to keep it that way. [Photo by Don Charles Blom]

(both inside and outside) will be wavy.

If the exterior walls were squared and sheathed before being raised, they should be plumb. Otherwise, plumb them now that they are upright. To test for plumb, use an accurate level that is at least 4 ft. long or make a plumb stick, as shown in the sidebar on the facing page. Plumbing a wall is best done with two people: one to hold the level and one to move the wall and nail off the bracing.

Raise exterior through walls first

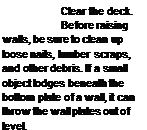
Start with one of the exterior through walls. Make sure there is no debris beneath the plates before raising the walls upright. If the wall is flat on the deck, stick the claw of a hammer into the double top plate, lift the wall up a bit, and put a 2x block under the wall. This way you can get your fingers under the wall to lift it. Keeping your back straight, use your legs to lift the wall to your waist, then take it overhead using your arms and upper body. Continue to raise the wall by pushing on the studs until it is fully upright. Once the wall is upright, hold

Remember that diagonal braces are important. Both exterior through walls are up; diagonal braces hold them securely while the other walls are raised. Use these temporary braces liberally where needed.

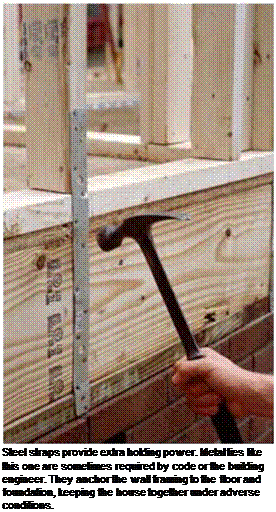
Подпись: Steel straps provide extra holding power. Metal ties like this one are sometimes required by code or the building engineer. They anchor the wall framing to the floor and foundation, keeping the house together under adverse conditions. Подпись:

Raise exterior through walls first

it steady—especially if there’s a good wind blowing—until the temporary wall braces are nailed in place.

After the wall is in position, nail a stud to each end as a temporary brace, extending it diagonally from about 6 ft. up on the corner stud down to the rim joist. Drive a couple of 16d nails into each end of the brace. On long walls, nail other braces in the middle from a stud down to the subfloor. Make sure these tem­porary braces will hold the wall until the butt walls are built and raised against it.

Use a sledgehammer to move the wall until it is right on the chalkline and flush at the ends with the correct marks on the subfloor. After

Подпись:the wall is in position, nail through the bottom plate and into the subfloor, using one 16d nail between each stud. Be sure to drive a 16d nail close to each king stud. Drive plate nails into the rim joist or into a floor joist. Nails driven through the subfloor alone don’t have nearly as much holding power as those embedded in framing lumber. Don’t nail in doorways, because you’ll be cutting out the plate later when you set the door frame.

When working on a slab, lever the bot­tom plate into position over the bolts. Slip the end of a 2×4 under the bottom plate to use as a lever. While one person works the 2×4 lever, other crew members can move the bot­tom plate in or out to align the holes with the installation bolts. In some areas, bottom plates are attached to the slab with concrete nails. In other areas, steel hurricane straps are used to tie wall framing to the floor framing and foun­dation (see the bottom left photo on p. 103). Now is the time to make sure that these fram­ing connectors are nailed to the wall frame.

STEP 6 RAISE THE WALLS

Подпись:

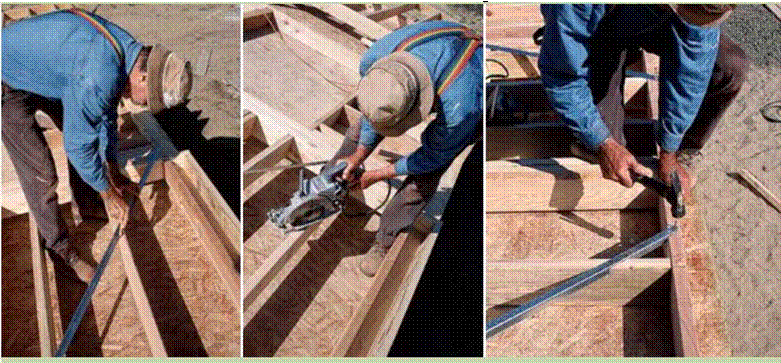
Подпись: 1. To mark the cut line, position the brace diagonally across the wall section from the bottom plate to the double top plate, and then pencil a line along one edge of every framing member the brace crosses. [Photo © Larry Haun] STEP 6 RAISE THE WALLS

As with barn raisings of yore, it takes a few warm bodies to raise framed walls. Let one per­son be the team leader and encourage everyone

Подпись: The first wall goes up! Make sure you have enough help when you're ready to raise the walls. Have one person take charge, and get everyone to lift in unison. [Photo by HFHI/Will Crocker] When you re­move the tem­porary blocks nailed to the rim joist, be sure to pull the nails or bend them over so that no one gets a nail in the foot!

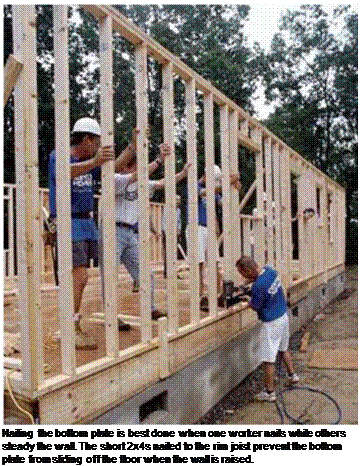
Подпись: Temporary braces are important. After raising a wall, make sure it is braced securely with 2x lumber that extends diagonally from the rim joist or the floor to the top of a stud in the wall. Secure bracing eliminates the serious injuries that can result from a falling wall. These braces also help keep walls plumb, straight, and ready for roof trusses.Подпись: Nailing the bottom plate is best done when one worker nails while others steady the wall. The short 2x4s nailed to the rim joist prevent the bottom plate from sliding off the floor when the wall is raised.

to work together (see the photo above). Remind people to lift with their legs, not with their backs. In many areas, builders put a heavy bead of caulk or a roll of foam (polystyrene) on the floor or slab under the bottom plate before rais­ing a wall. This helps keep out cold air as well as any bugs that may want to migrate inside. To ensure that the wall won’t slip over the outside edge of the building as it’s being raised, nail pieces of 2x stock to the rim joist so they stick up a few inches above the floor to catch and hold the bottom plate (see the photo at right). On a slab, bolts hold the bottom plate in place.

Nail on the double top plate

In some parts of the country, carpenters raise the walls before cutting and nailing on the double top plate. In my opinion, the time to nail on the double top plate is now—while the wall is still flat on the floor. Otherwise, you will have to use a ladder. The top plate is an impor­tant structural member. It ties the entire frame together. Without it, severe lateral stress from an

earthquake or high winds could easily rip apart a building. If you frame with a single top plate, secure them together with metal plate straps.

On a 2×4 butt wall, the double top plate ex­tends beyond the top plate a bit less than ЗУ2 in. (cut it /4 in. short—about 3/4 in.—to make sure it doesn’t protrude beyond the through wall), so that it can tie into the notch in the double top plate of a through wall. On through walls, the double top plate has notches where it receives the double top plates extending from butt or intersecting walls. Now you can see why it was important to mark the plates accurately while locating the corners and channels. You don’t need to measure the length of double top plates. All you need to do is set the double top plate on a through wall above the top plate, with one end held back З’А in. (5У2 in. on 2×6 walls) from the end, then cut it to length.

At channel marks, leave a 33/4-in. cutout so that an intersecting wall can comfortably lap over and tie in at that spot (see the photo on p. 100). When cutting and installing double top plates, leave about a 3/4-in. gap where the walls
tie into each other. This makes it easier for the overlapping double top plates to slip into place. This is another one of those times when it’s okay to be less than absolutely accurate.

When you nail the double top plate to the top plate, it’s important to make sure that there are no gaps in the top plate. The top plate stock must butt tightly together, just as it did when you plated the walls on the subfloor. Nail the double top plate to the top plate with two 16d nails at each end of the wall and at each break in either the top plate or the double top plate. Elsewhere, nail one 16d nail over each stud.

It is best not to nail between studs, because electricians and plumbers run wires and pipes through holes drilled in those locations. Hitting a nail while drilling can dull the bit and give your arm a nasty twist.

Brace the walls

Подпись:Подпись: With the bottom plate nailed off, cut the double top plate in place, following the layout marks on the top plate.

Подпись: Alignment is important. As volunteers learn to nail studs, they often find it difficult to keep them aligned on their layout marks and to keep their edges flush with the edges of wall plates. For more accurate results, work in teams of two. Have one volunteer hold the stud on its layout while another drives the nails. Use a cat's paw to pry studs and nails loose when the alignment must be corrected.

The sudden, intense pressure exerted on a wall by a hurricane, tornado, or earthquake can be devastating. To withstand these forces, the walls must be well braced. As a novice carpenter, I

Подпись:Подпись: Install the double top plate. Gaps in the double top plate allow those in a butt wall to overlap. used to cut 2x stock with a handsaw and nail them between the studs, running it diagonally from plate to plate. It was a good brace, but it took about an hour to make each one. These days, braces are much easier to install. You can attach L-shaped metal angle braces or nail plywood or OSB sheathing to the frame. Code requirements vary, so be sure to check with your building department to find out how the walls should be braced. In some areas, bracing is also required on certain interior walls.

USING METAL ANGLE BRACES. Metal angle braces are easy to install (see the photos on the facing page). In many areas, they can be used instead of plywood or OSB sheathing.

If the finished siding you plan to install can be nailed directly to the studs or furring strips (clapboards and fiber-cement boards are good examples), metal braces can save you the
expense of plywood or OSB sheathing. Every exterior wall should receive a metal brace at every corner as well as every 25 ft. between corners. The typical metal brace has an L – shaped profile; it’s designed to be set into a kerf cut diagonally across the wall. Here’s how to install one:

1. Position the brace and mark the cut. Lay

the brace across a framed wall so that it extends at a 45-degree angle from the bottom plate to the double top plate. Trace a pencil mark along one side, as shown in the far left photo on the facing page.

2. Cut the kerf. With a circular saw, cut a l-in.-deep slot along the line into the plates and studs.

3. Nail off the bottom of the brace. Slip one

flange of the brace into the slot and nail it to the bottom plate with three 8d nails. Drive one more 8d nail through the brace and into the first stud. At the double top plate, start an 8d nail alongside the brace and bend the nail over to hold the brace in place as the wall is raised.

Now you are ready to raise and plumb the wall. It’s important not to install the brace com­pletely until after the wall has been raised and plumbed. See pp. 101—108 for details on raising and plumbing walls.

Finish nailing the brace to the studs and plates by driving one 8d nail through the brace and into every stud it crosses. At the top of the wall, drive three nails through the brace and into the top and double top plates. If the top of the brace extends above the double top plate, trim it flush with a hacksaw.

USING PLYWOOD AND OSB BRACING. When nailed properly to wall framing, plywood and OSB provide much stronger racking resis­tance than metal braces do. Wall sheathing is essential as a substrate for some types of exterior siding. It also acts as a wind and weather bar­rier. Many codes require that a full sheet of OSB be nailed at each exterior corner and every 25 ft.

along the wall. The spaces between can be filled with sheets of rigid foam insulation. That’s the sheathing strategy we used on this house.

There are different ways to install wood sheathing panels. Sometimes sheathing is positioned to extend over the wall and cover the rim joist. I try to keep OSB V2 in. away from concrete so it won’t absorb water. On a one-story building, my preference is to sheathe the walls once they are raised. This is especially true when working on a slab that has plumbing pipes sticking up.

Other builders prefer to sheathe the walls while they are flat on the floor. One of the prob­lems with sheathing the walls before raising them is that they become heavy. To raise a long 2×6 wall fully sheathed with OSB or plywood, you may have to call in the National Guard.

Or you could use a wall jack, a device that hooks under a wall and slowly raises it up (see

Resources on p. 279). Sheathing a wall while it’s still flat on the subfloor also requires greater accuracy—the wall must be dead-on straight and square before it’s sheathed. You can do this by making sure the bottom plate is directly on the chalkline and the end corner studs are flush with the outside of the building. It doesn’t hurt to measure from corner to corner to check the wall for square. After the wall is ready, you can attach the required sheets of plywood or OSB (8d nails every 6 in. o. c. around the perimeter,

12 in. o. c. in the field, or middle of the sheet). Be sure to insulate headers, corners, and channels before covering them with sheathing.

BUILDING CORNERS AND CHANNELS

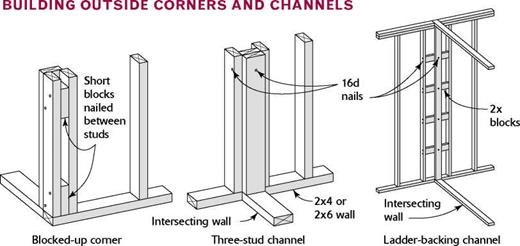
Like headers, outside corners and channels can be built in a number of different ways, and preferences tend to be regional. The most common constructions are shown in the illustration below. A two-stud outside corner works well in most cases, but if you are planning to install clapboard or fiber-cement siding directly to the studs (with no exterior sheathing), you’ll need more backing at the outside corners. A blocked-up corner provides more backing and mak es good use of 2x offcuts. In addition, all of these outside cor­ner configurations provide backing on the inside of the wall for drywall or other wallboard.

Channels (sometimes called tees) are most easily made with a flat stud or blocks nailed between two regular studs. I place a crowned or knot-filled stud between two good studs. In some parts of the country, framers build ladder-type chan­nels to provide backing at intersecting walls. Building ladder backing doesn’t save a lot on materials, but it does allow more insulation to be inserted at those spots.

Both corners and channels are nailed together with one 16d nail every 2 ft. o. c. When nailing channels to the top and bottom plates, make sure that the flat stud is oriented cor­rectly to provide backing for an intersecting wall. It’s not dif­ficult to put in a channel upside-down.

BUILDING CORNERS AND CHANNELS

This corner saves a 2x stud and allows for more insulation in the wall.


An outside corner can be made with two studs and three short blocks.


A channel can be made from three studs or from two studs and three short, flat blocks nailed between them.


A channel made with short 2xs nailed between the studs allows the area to be well insulated.


BUILDING CORNERS AND CHANNELS

BUILDING CORNERS AND CHANNELS

explains the main types of corners and channels. You can build corners and channels in place as you frame the walls, or you can build them all at once in a central location, then distribute them and insert them in the walls as needed.

Keep your eyes open for studs that are bowed, twisted, or crowned. Set them aside to use for blocking and roof braces. This ensures a more uniform finished wall and makes it easier for
finish carpenters to install cabinets, countertops, and interior trim. It’s always good to think about how to make future tasks easier. So take care to use straight studs in all walls that will hold kitchen cabinets.

Nail on the top and bottom plates

It’s finally time to pry apart the two wall plates that were tacked together on the subfloor.

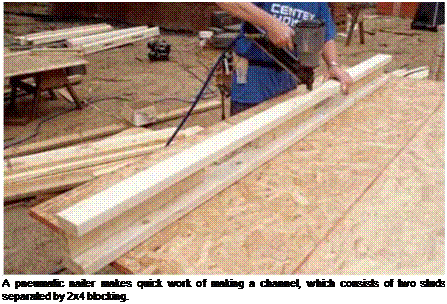
Подпись: A pneumatic nailer makes quick work of making a channel, which consists of two studs separated by 2x4 blocking. Подпись:BUILDING CORNERS AND CHANNELSПодпись: If possible, nail the blocks for cabinets, toilet fixtures, and even the closets to the wall before it has been positioned upright. It's much easier to install the blocks when the wall is flat on the deck.

Working on one wall at a time, separate the top wall plate from the bottom plate, removing the 8d tack nails as you go. Leave the bottom plate tacked to the floor for now. Nail the top plate first, using the bottom plate to keep the studs aligned. Move the top plate straight up to the upper ends of the studs. Don’t turn a top plate end for end as you move it into position or you’ll have a real mess. The exterior walls can be framed over the interior walls rather than flat on the deck or slab (see the top photo above). This is okay. The most important ele­ment in wall framing is to keep the frame reasonably straight and square on the floor.

This is not difficult to do. Take your time until you get it right.

Begin nailing studs to the plate at an outside corner. Make each stud flush with the edge of the plate. Drive a pair of 16d nails through the plate into each stud. You will find that consis­tently working either from left to right or from right to left has a natural feel. Over time, you will develop a rhythm to nailing studs that involves not just your hands and arms but your entire body.

If you are using a pneumatic nailer, always drive the bottom nail first. Then remove your hand from the stud and drive the top nail. If you keep your hand in place while driving the top nail, sooner or later you will miss and drive a nail into your hand. Unfortunately, I learned this the hard way.

When you come to a door or window open­ing, be especially careful to nail each king stud on the “X” mark next to the header location. Once all the wall, king, and top cripple studs are nailed to the top plate, pull up the bottom plate and begin nailing it in place, always pay­ing attention to your layout marks. Repeat the process. Nail all wall members to the bottom plate just like you did with the top plate.

I always nail the blocks for a recessed, or in-wall, medicine cabinet while the wall is flat on the floor. At the “MC” marking, hook your tape on the bottom plate and measure up 4 ft. and 6 ft. on the two studs on each side. Nail a flat block below the 4-ft. marks and above the 6-ft. marks. This leaves a clear space of 2 ft., which is the height of a standard recessed medicine cabinet.

Begin with door and window assemblies

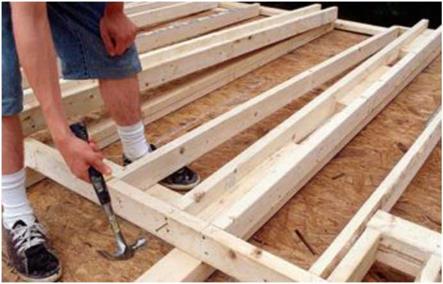
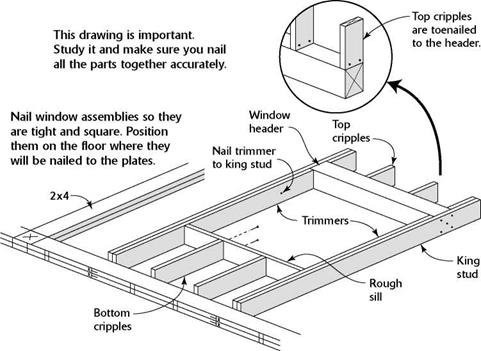
I begin framing by building the door and window assemblies. All window headers and most door headers need top cripples (sometimes called jacks) and all rough sills need bottom cripples (see the illustration on the facing page). A chopsaw worker has probably already cut these to size and grouped and labeled them. Grab an armload and carry them to their proper locations. Check to see that the cripples match the lengths written on each header. Every header takes a cripple on each end and one on each layout mark. Pay close attention! Place bottom cripples perpendicular to the wall plates, exactly where they will be nailed in place. I also place a trimmer and a king stud next to each window opening before I do any nailing.

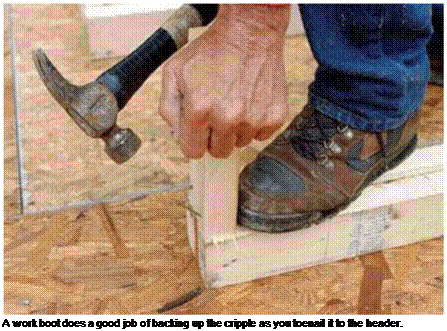
To make toenailing cripples to headers easier, back up the cripple with your foot before starting the first two 8d toenails (see the top photo at right). Make sure each 2x cripple is on its layout mark and flush with the sides of
the header, then drive the nails home. After nailing off one side, toenail two more 8d nails into the other side. Repeat the process until all the top cripples for each wall have been nailed to their headers.

Attaching the bottom cripples to rough win­dowsills is easier. Move the rough sill to the up­per ends of the cripples placed against the plates. There should be one cripple at each end of the sill and one at each layout mark. Drive two

Begin with door and window assembliesПодпись:Begin with door and window assemblies

Habitat

for Humanity’

16d nails about 3/4 in. from each edge of the rough sill into each cripple. When nailing near the end of 2x stock, set the nail back from the end and drive it at an angle or blunt the nail point to reduce your chances of splitting the board.

Finish the window-frame assemblies by nailing on the trimmers and king studs. This is easy to do now because you are working flat on the floor. Don’t move these units around. Keep them in place where they will be nailed to the plates. Nail the window trimmers flush with the ends of the bottom cripples. Secure the trimmers to the rough sill with just two 16d nails each. Then nail the king studs along­side them so they are flush with the top of the top cripples and with the bottom of the trim­mers. Secure the king studs on each side by driving two 16d nails into a 2x header or four or five 16d nails into a larger header. Finally, drive a nail near the top of the trimmer into the king stud. The trimmers will be perma­nently nailed later, before you install the exterior sheathing or set the windows. As for door trim­mers, wait to install them until after the walls have been raised.

With all the walls plated and the window and door frames nailed together, you’re ready to frame the walls. At this stage, it’s smart to check your work. Make sure that the framing mem­bers are flush with each other and nailed tightly together. Keep the door and window frames square. This makes for quality construction and you’ll have an easier time nailing the top and bottom plates to wall studs and door and window frames.

Distribute studs, corners, and channels

Ask your crew to distribute studs along one of the exterior through walls, with one stud per layout mark. Place the studs against the two tacked-down plates. Where corners and chan­nels are required, decide which corner style you want to use. The sidebar on the facing page

NAILING TOGETHER THE WINDOW FRAME ASSEMBLIES

NAILING TOGETHER THE WINDOW FRAME ASSEMBLIES

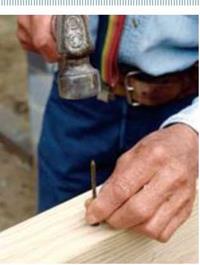
Dull tips are IIP useful! When you need to drive a nail near the end of a board, first blunt the tip of the nail. This helps prevent splitting the wood.


NAILING TOGETHER THE WINDOW FRAME ASSEMBLIES

Подпись: iiiiiiiiiiiiiiiiiiiiiiiiiiiiiiiiiiiiiiiiiiiiiiiiiiiiiiiiiiiiiiiiiiiiiiiiii

When you come to a door or window open­ing, just continue the stud layout, marking cripple locations on the headers and the rough sills. Lay out all exterior walls and then begin on the interior walls. The layout of interior walls is not as critical as that of exterior walls, because most drywall hangers use long sheets of drywall, which often run from corner to corner. Just put the stick in a corner against a through wall and start marking. Make sure you put the stud mark­ings on the same side of the plates as the header markings. When you encounter rough plumbing, don’t put a stud next to a pipe. Give the plumbers room to finish their work. Each intersecting wall automatically has a stud on each end, so there’s no need to mark those locations.

Old codes required that a stud be placed under every break in the top plate. Here in the West, this hasn’t been a requirement for nearly 40 years, but check with your local building inspector. My guess is that few, if any, areas in the country still require it. As long as you have
a double top plate, locating a stud under a plate break adds little to the structural integrity of the frame.

Because of the sheer number of marks re­quired on walls, it’s a good idea to walk through every “room” after you have finished marking all the plates. Visually check whether all of the wall plates, headers, rough sills, corners, and channels are properly marked. The time you take to inspect your work now can save you much more time later. It takes a lot longer to tear out studs and frame a door that was missed during layout than it does to take a leisurely but focused stroll through the house to make sure everything is in order.

STEP 5 BUILD THE WALLS

In addition to being a carpenter for the past 50 years, I’ve also been a gardener my entire life, and I see a lot of similarities between framing and gardening. If you take the time to prepare

Подпись:Подпись: Door and window assemblies are nailed together and ready to be installed between the top and bottom wall plates. [Photo © Larry Haun] the ground, add lots of compost, plant good seeds, mulch well, and nurture young plants, you can’t help but grow outstanding vegetables. The situation is similar when you’re framing walls. If you take the time to lay out, cut, and correctly position every part of every wall, then the actual framing will go smoothly and you’ll produce a quality building.

A Habitat volunteer once said to me, “Now the fun starts,” as we began to nail together all the wall pieces. I guess everything in life is relative. If you have to stand out in the blazing sun building walls day in and day out, the joy of framing does eventually wear off. On the other hand, when working as a team, a group of people building walls will see a lot of progress in one day, and that is satisfying.

Before I start building walls, I always begin by cleaning up the work area. Some scrap will have been generated as you cut the parts for the walls and there’s no need to leave it lying around for someone to trip over.

BLOCKING IN BATHROOMS AND CLOSETS

Nailed between studs, blocking provides solid backing for items such as towel racks, closet shelves, and safety grab bars. Blocking ensures that the mounting hardware for those devices can be anchored with screws driven into solid wood, so that you don’t have to worry about racks, bars, and shelves pulling loose.

It’s smart to include blocking when marking up wall plates. Cut blocking boards from 2x scraps. As shown in the illustration at right, blocking is installed so that the face of the 2x is flush with the edges of the studs. To help locate blocking, use these standard heights for common bath, kitchen, and storage fixtures:

■ Towel bars: Near the tub and vanity, center blocks 54 in. above the floor.

■ Toilet-paper holder: Near the toilet, center blocks 24 in. above the floor.

■ Toothbrush and soap holder: Above the sink, center blocks 40 in. above the floor.

■ Safety grab bars: Near the toilet and near (or in) the bathtub/ shower, center blocks 36 in. above the floor.

■ Closet shelf and pole: Block 66 in. above the floor; more blocking may be needed if you install wire shelves.

Подпись: WALL-BLOCK HEIGHTS FOR BATHROOM FIXTURES Подпись: All measurements are from the floor to the center of the blocking. Подпись: Many fixtures in a bathroom require solid blocking behind the drywall to ensure safe, secure mounting.Подпись:Linen-closet shelves: First block above the floor at 20 in., then block every 14 in. thereafter for above-floor measure­ments of 34 in., 48 in., 62 in., and 76 in. Don’t forget to block for a shelf or two in the utility room to hold detergent and other laundry items.

Подпись:

and hold door and window frames together.

On the other side of the line, underneath the header, make a long, straight line along both plates to indicate that there will be an open­ing at that location and that no studs should be nailed there.

No matter what the plans indicate, keep interior wall headers at least ІУ2 in. away from corners and channels so you’ll have space on which to nail door and window trim. In hurri­cane and earthquake zones, exterior walls must not have window or door openings less than 4 ft. from an exterior corner, so that these sec­tions of wall can be braced properly.

Above all, mark clearly. These plates will be pulled up and moved during framing. Clear marks improve the odds that all framing mem­bers will be attached accurately.

Use special markings to help other tradespeople

It’s important to remember that the framing must accommodate plumbing, heating, and electrical features. Talk to the subcontractors

BATHROOM STUD AND BACKING LAYOUT

2×6 wall 141/2-in. space for

BLOCKING IN BATHROOMS AND CLOSETS


In addition to regular studs, bathroom walls need special layouts for the tub backing, medicine cabinet, and access to the drain.

Подпись: MAKING A LAYOUT STICK Whether you use a store-bought layout stick or make your own, this tool will save you a lot of time when marking plates in preparation for wall construction. A stick like the one shown here can be used to lay out studs on 16-in. and 24-in. centers. To make your own layout stick, cut a series of 11/2-in.-wide strips from a panel of 3/4-in.-thick plywood. Cut one strip 49У2 in. long and five strips 9У2 in. long. Glue and nail the short pieces to the long piece at right angles and at the spacing shown in the illustration below.The 3-in. legs allow you to mark top and bottom plates at the same time.The 5-in. legs make it easy to mark two plates side by side and to mark headers and rough sills along with the plates. BLOCKING IN BATHROOMS AND CLOSETS

before you even start on the floor. Show them your plans and find out what you can do when it comes time to frame walls so that they can do their work without having to remodel your structure.

You can start by asking the plumber whether there’s anything you can do while laying out the bathroom to make it easier to install the pipes. The plate layout for a typical bathroom is shown in the illustration on p. 91. Code requires a mini­
mum of 31 in. from sidewall to sidewall for a toilet. The wall behind a toilet is usually І2У2 in. from the center of the waste drain. Standard bathtubs are usually 30 in. wide and 60 in. long. If building on a slab, you may need a 12-in. by 12-in. access hole in the wall so the plumber can hook up or repair the tub trap. Measure 15 in. from the wall to the center of the tub trap and make a mark. Then measure 6 in. to each side of the mark (for a 12-in. hole) and strike lines onto the plates. Mark an “X” on the outside of these lines on both plates to show the studs’ positions.

Once a tub/shower unit has been installed, the plumber will nail it in place to a backing stud. Measure 32 in. from the corner and mark both plates with a keel. The stud location falls away from this mark. Toward the inside, mark the lo­cation of a flat stud that will be nailed to the first stud. The flat stud provides backing for the tub.

Plans often show an in-wall medicine cabinet centered over the bathroom sink. The standard rough opening for an in-wall medicine cabinet is 14І/2 in. wide. To accommodate one, measure 71/4 in. in each direction from the center (directly over the sink’s drain pipe) and mark across both plates with a keel, making an “X” on the outside of each line to indicate the studs’ locations. This will give you a 14//2-in.-wide rough opening for the medicine cabinet. Write “MC” on the plates between the two stud locations.

Include blocking requirements when mark­ing up plates. As explained in the sidebar on p. 90, blocking between studs provides solid backing for important items, such as towel bars, built-in shelves, and so on, which will be installed after the interior walls are finished. If you’re building a porch, this is also the time to mark the location of any porch beams (see Chapter 6). Porch beams recess 3 in. inside the walls and re­quire two trimmers underneath to support them.

Mark stud locations last

I don’t know who made the first layout stick for marking stud locations, but I have been using one for almost 50 years. You can either make

Подпись: Stud layout is a quick process when you use a layout stick. Position the layout stick 34 in. beyond a corner on outside walls and mark stud (and cripple) locations every 16 in. or 24 in. o.c.
one (see the sidebar on the facing page) or buy one (see Resources on p. 279). I learned how to do stud layouts with a long tape and a small square, but I think it is faster and easier to use a layout stick.

Take a look at the building plans. Exterior walls generally have studs spaced 16 in. o. c. Interior wall studs may also be spaced 16 in. o. c. but are sometimes 24 in. o. c. When exterior walls are sheathed with plywood or OSB, the studs are spaced to fit these 4-ft. sheets.

BLOCKING IN BATHROOMS AND CLOSETSПодпись: Before we can nail the walls together, other parts (top and bottom plates, the studs, and any openings) must be assembled. Raising walls is hard work, but driving nails can be pretty satisfying, whether you use a good, old-fashioned hammer or a pneumatic nailer.Start the stud layout at one end of a long ex­terior wall. Place the layout stick on the outside edge of the plates, with the first tab 3/4 in. be­yond the end of the wall. This sets up a 16-in.- o. c. or a 24-in.-o. c. layout that will accommodate the 4-ft.-wide sheathing sheets (see the photo above). Mark both sides of the remaining tabs to note the locations of the next three studs. Move the layout stick, line up the end tab with the last mark, and mark again. If you’re nailing a sheet of OSB at the outside corners for bracing, make sure you lay out a stud 4 ft. from each corner in both directions.

STEP 4 MARK THE PLATES

Building walls is like baking a cake. Success depends on having all the right ingredients. When you mark the plates, you’re setting the exact locations for all of the headers, cripples, studs, corners, and wall intersections associated with each wall in the house.

Подпись: їм їм їм їм їм и їм їм їм їм їм їм їм и їм їм їм їм їм їм їм и їм їм їм їм їм їм їм и їм їм їм їм їм їм и їм їм їм їм їм їм їм и їм їм їм їм їм їм їм и їм їм їм їм і MARKING CORNERS AND CHANNELS STEP 4 MARK THE PLATESSTEP 4 MARK THE PLATESПодпись: The fastest, most accurate way to mark corners and channels is with a tool the same width as the butt walls. In less than a minute, you can cut and nail together such a tool from scrap. Select two pieces of 2x stock about 10 in. long. Turn one piece on end and place the second piece flat against it to form a "T." With the second piece protruding over the first by 3 in., nail the two together with 16d nails.

Mark corners and channels first

When marking up each plate, start with the loca­tions of corners and wall intersections, which are referred to as channels or tees (see the top illustra­tion at right). As we’ll see shortly, corners and channels require extra studs so that the walls can be properly nailed together once they are raised. The extra studs also provide backing for drywall on the inside and siding on the outside. Use a channel marker to mark corners and channels on the plates. Store-bought aluminum markers are available, as shown in the left photo on p. 90. It’s also easy to make your own (see the bottom illustration at right).

Take time to make accurate layout marks. Sloppy work at this stage means trouble after the walls have been raised and you begin to plumb and straighten them. Draw accurate lines along all edges of the marker, including the inside edges of the plates, where one wall inter­sects another. In other words, mark the inside, the outside, and the top surfaces of the through – wall plate. This is important. These corner and channel marks also indicate where the double top (or cap) plates will intersect, tying together through walls and butt walls. Use a keel to mark an “X” on the top plate to let the wall – builder know the location of a corner or chan­nel. Some carpenters write out the word “tee” to note the location of an intersecting channel.

Keep layout marks clean and simple

Methods of marking header locations on plates differ regionally. Whichever system you use, keep it simple. Check the floor plans for each header location, then position the header on the top plate, aligning the sides of the header with the edges of the plate. Mark down from both ends of the header, across both the top and the bottom plates. On outside walls, make these marks on the outside; on interior walls, make marks on the stud layout side.

Next to the end line, mark an “X” on both plates on the side away from the header to indi­cate the king-stud location (see the photo on p. 91). King studs are nailed alongside headers

Be sure to mark the inside, top, and outside of every through-wall plate with the locations of every intersecting wall, both channels and corners.

MAKING A CHANNEL MARKER

Mark joining walls with a channel marker. Be sure to make layout marks on all three exposed faces of the plates on the inside, the outside, and the top.


An “X” is easy to spot. Mark an “X” or the word “tee” on the top plate to indicate where one wall intersects another.


STEP 4 MARK THE PLATES

WALL FRAMING ANATOMY

WALL FRAMING ANATOMYSTUDS are spaced on 16-in. or 24-in. centers. The length of the stud determines the overall height of the wall. Stan­dard stud length is 92% in.

KING STUDS are full-length studs used on either side of a door or window opening. They back up trimmer studs and are nailed against the ends of the header and (for window openings) to rough sill.

TRIMMERS (also called trimmer studs) frame the sides of rough openings. They extend along king studs to support ends of headers.

CRIPPLES, often called jack studs, span the distance be­tween top plates and headers and between bottom plates and rough sills.

The BOTTOM PLATE is fastened to the floor deck or to a concrete slab floor.

The TOP PLATE is nailed to studs and cripples.

The DOUBLE TOP PLATE adds rigidity to the top of the wall and overlaps the top plate at wall intersections.

second is the height, and both are expressed in feet/inches. These dimensions are the actual door or window dimensions. To figure out your rough openings, you’ll have to add space for the jambs and trimmer studs. This is discussed in the following pages.

After you have a list of headers and all their dimensions for every opening in the house, you can cut and nail them together. Guidelines for sizing and building headers are explained in the sidebar on p. 84. If a door header requires cripples, mark their length on the header, then place the header along the plate where the doorway will be. On window headers, mark the length of the top and bottom cripples, then place each header near the plate location where it will be installed (see the photo at right).

Подпись: header height is 6 ft. 10//2 in.). Cut two trimmers for every window less than 8 ft. wide. For windows that are 8 ft. or wider, double up the trimmers on each side. Although you can cut door trimmers at this stage, I prefer to wait until the walls have been raised. The width of a rough window opening tells you how long to make the rough sill. Taking the Подпись: Label the grouped parts. Marked with the top and bottom cripple lengths, the rough sill for a window rests on the header. Both parts are placed on the wall plates where the window will be installed.Cut trimmers, rough sills, and cripples

Trimmers are cut and installed in pairs. The two trimmer studs set on the bottom plate support the ends of the header. Trimmers for 6/8 doors and windows are typically 801/2 in. long (81 in. in parts of the country where the

WALL FRAMING ANATOMY
Before the walls go up, we start with a bare floor deck and lots of lumber. Pretty soon there are 2x4s in all directions. Making cuts with a handsaw is no picnic, so be sure to have a good circular saw on hand.

Подпись: Laying out wall plates begins at the corners of the subfloor or slab. A piece of scrap that is the same width as the plates can be used to mark the corners quickly and accurately. Подпись: iiiiiiiiiiiiiiiiiiiiiiiiiiiiiiiiiiiiiiiiiiiiiiiiiiiiiiiiiiiiiiiiiiiiiiiiiПодпись: A chopsaw cuts parts quickly and accurately. To cut a number of framing members quickly and accurately, set up a chopsaw on a large work platform.

trimmers into account, the rough still for a win­dow is 3 in. shorter than the window header. A 36 in. window with a 39 in. header gets a 36 in. rough sill. Tack rough sills to the header with one 8d nail, and make sure that the sizes of the window and cripples are marked on the header or sill. For windows that are 6 ft. or wider, you’ll need to double up on the rough sills and shorten the cripples by 1 /6 in.

Cut the cripples after you have cut all the headers, trimmers, and rough sills. Use a story pole, and make sure that your head is clear and your mind is focused. Making a mistake in the cripple length can result in window frames not fitting inside their openings, but you may not know that until all the walls have been built and raised. I once cut all of a house’s top cripples 1 in. too long. As a result, I had to remove every door and window header and shorten all of the cripples. Not a good way to start the week.

Cut enough top and bottom cripples to nail one on each end of every header and rough sill and one every 16 in. or 24 in. o. c., depending on the stud spacing. A chopsaw set up on a good work platform is great for cutting cripples (see the photo at right). A stop block, secured to the worktable or to an extension attached to the chopsaw, will enable you to cut identical cripples quickly and precisely.