WORK SAFELY ON A ROOF
Keep your wits about you and pay extra attention to what you’re doing when you’re up on a roof—both to keep yourself safe and to ensure that the integrity of the roof is not compromised. To get on and off the roof, use a good, sturdy ladder that extends 3 ft. above the edge of the roof.
■ Keep the roof clean so that there won’t be anything to trip over.
■ Be careful when sawdust is on the roof. Sawdust on a sloped roof can be as slick as ice. To be safe, call out measurements to cutters on the ground and have them clear the board of sawdust before handing it up to you.
■ Never throw anything off a roof, not even a shingle, without first checking to see that no one is down below.
■ In the hot sun, asphalt shingles soften and tear.
Walk gently so you don’t damage the shingles. In hot weather, install shingles early in the morning or late in the afternoon.
■ In bitter cold weather, shingles become brittle and crack. Work carefully, and pray for sunshine.
■ Shinglers who nail off a roof by hand often sit on the roof as they work. In hot weather, try sitting on a piece of foam while nailing shingles. Otherwise, hot shingles can literally burn your backside.

 Unless the trusses were set on the walls at the time of delivery, they must be hoisted onto the walls by hand (see the photo on the facing page). One way to do this is to set good, strong ladders at both corners of the building. If you’re dealing with long trusses, place a 2x in the center, from the ground to the top plate, at the same angle as the ladders. This way, two people can lift a truss, lay it against the ladders and the center 2x, and walk it up to the top. Another person in the middle with a notched pole can push on the truss as needed.
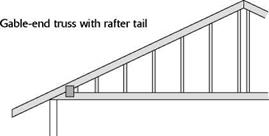
In preparation for installing the first truss (the gable-end truss), I nail a long, straight, temporary 2x brace on edge to the wall frame near the center of the end wall. This holds the gable – end truss stable until other braces are installed.
If the truss is not too large, one person on top can drag the truss to the opposite end and lift it up against the temporary brace. Make sure that the eave overhangs are correct and that the outside of the bottom chord is flush with the outside of the end wall’s top plate. Toenail the bottom chord to the double top plate, driving 16d nails every 16 in.

![]()

 |
Trusses take teamwork. A crew of four does a good job of getting roof trusses up on the walls. Using a long push stick, the ground worker helps elevate the truss.


 Rolling roof trusses. The first truss you should nail in place is the one for the gable end. Then it’s just a matter of rolling the remaining trusses in place, setting them on their layout marks, and nailing them down. You can do this while standing on the walls or by working off a ladder. [Photo by Don Charles Blom, courtesy Fine Homebuilding magazine © The Taunton Press, Inc.]
![. . Spreading the trusses Подпись: Making gable-end notches. Whether you're installing trusses (see the photo below) or traditional rafters and ridge boards (see the photo above), the gable-end rafters require notches every 4 ft. to hold the lookout boards that support the barge rafter. Each lookout butts against the face of the closest inboard rafter, where it's nailed fast. [Top photo © Larry Haun; bottom photo © Roger Turk]](/img/1312/image389.gif)


![COMMON TRUSSES FOR GABLED ROOFS Подпись: Delivery right on the walls. It saves time and energy to have the truss company deliver the trusses and lay them right on the top plate of the framed walls. [Photo © Elmer Griggs]](/img/1312/image374_0.gif)


 Make sure you spend some time cleaning up the job site at this point in your project. There are bound to be plenty of offcuts, such as 2x stock, plywood or OSB scraps, and stray fragments of foam sheathing. Remove the debris and get set to raise the roof.


![MAKING A PLUMB STICK Подпись: To create a straight reference line, stretch a string tightly around 2x spacer blocks positioned at op-posite ends of the wall's top plate. Use another 2x scrap to test for straightness along the top plate. Move the top plate in or out to get the wall straight. [Photo © Larry Haun]](/img/1312/image350_0.gif)

 Clip the first nail by bending a second nail over it. Hammer the clip until both nails are fully embedded in the wood.
