Category RENOVATION 3

PREPPING PAINTED SURFACES

Before you wallpaper painted surfaces, figure out what kind of paint you’ve got and what shape it’s in. In general, oil-based paints are stable surfaces for wallcovering because they aren’t water solu­ble. Yet some primer-sealers can stabilize even latex paint. You could scrape off a small patch of paint and have a paint store analyze it, but two simple tests should suffice.

Hot towel test. Soak a hand towel in hot water, wring it well, and then rub the paint vigorously for 20 seconds to 30 seconds. If paint comes off on the towel, you’ve probably got latex. Alterna­tively, you can use duct tape to hold a moist sponge next to a painted surface for 15 minutes before removing the sponge. If you see paint on the sponge, it’s latex.

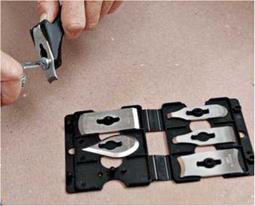
LOOKING Sharp

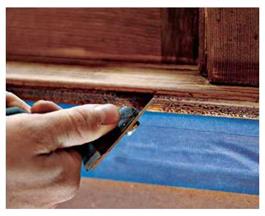
This clever magnetic bracelet keeps a single­edge razor blade handy. A sharp blade is essential, especially if you’re working with prepasted wallcoverings soaked in water. Wetted paper will snag a dull blade and rip easily. Blades are far cheaper than wasted wallcovering.

image950

X-tape test. If paint didn’t come off on your towel or sponge, it’s probably oil based. To see how well it’s adhered, use a razor blade to lightly score a 1-in. Xin the paint surface (don’t cut into the drywall or plaster). Press masking tape over the X, and then pull it off quickly: If there’s no paint on the tape, the paint is well adhered.

If paint does come off, scrape and sand it well before proceeding.

If the existing paint is well-adhered glossy or semigloss oil-based, sand it lightly with fine sand­paper, using a sanding block or an orbital sander. Then use a sponge mop, dampened with water, to remove the sanding dust. Or, instead of sanding, you can spray or wipe on paint deglosser to dull glossy and semigloss paint surfaces.

If the paint is well-adhered flat oil-based paint, you can begin hanging wallcovering. Simply rinse the surface with a mild detergent solution to remove grime, rinse with clear water, and allow to dry.

Подпись: ALERTПодпись: Shock hazards near electrical outlets include steam, wet paste, and metal tools. (^)So before repairing, stripping or covering walls and ceilings, shut off electricity to circuits powering the areas you'll be working on. Double-check that you've shut off those circuits by using a voltage tester on each fixture, switch, and outlet (see "Using a Voltage Tester," on p. 235).Подпись: IlllllПодпись: Primer-Sealers for Wallcoverings PRIMER-SEALER TYPE USES COMMENTS Pigmented acrylic Seals all surfaces, including existing wallpaper, vinyl covering, and latex paint; suitable base for all wall coverings. Also known as universal primer-sealer; cleans up with water; protects drywall when coverings are stripped; add pigment to hide existing wallpaper patterns. Clear acrylic Same uses as for pigmented acrylic; but can't bond latex paint; suitable base for all wall coverings. Cleans with water; won't protect drywall; can't hide patterns. Heavy-duty acrylic Mostly for weighty vinyl coverings used for commercial installations. Soaks into raw drywall, so won't protect it when covering is stripped away. Alkyd/oil-based Seals all surfaces except existing wallpaper or vinyl coverings; fast drying (2 hours to 4 hours); suitable base for all wall coverings. Thin with paint thinner to improve bond with existing paint; protects drywall; can be tinted. Stain sealer; pigmented shellac Hides or contains stains from water and smoke, wallpaper inks, grease, crayons, and more. Not a primer-sealer; when dry, apply acrylic primer-sealer top coat. Latex paint should be prepared by scraping lightly and sanding. You needn’t remove the entire coat of paint; just sand it enough so the primer-sealer can bond. Avoid gouging or ripping the surface underneath, especially if it’s drywall. When you’re done sanding, wipe the wall clean and apply a coat of pigmented acrylic primer-sealer.

image951image952Подпись:Подпись: 1. Stripping takes patience. Start at one end of a strip, pulling slowly and steadily so that the strip comes off in a single piece, if possible. This covering was peelable, meaning that its facing peeled off, but its paper backing stayed stuck to the substrate.image953

NEW WALLPAPER OVER OLD

You can wallpaper over an existing covering if:

► It is not highly textured, as lincrusta, stringcloth, and bamboo are.

► There are no prominent seams.

► There’s no more than one or two layers already on the wall.

► The old wallpaper is well adhered.

Check edges and seams first: If they’re peeling

or poorly adhered, strip the walllcovering. But if there are only a few isolated unadhered spots, use seam adhesive to reattach them. Or use a razor blade to cut out the loose seams. Then fill voids with spackling compound, allow it to dry, and sand it lightly with 180-grit or 220-grit sandpaper.

Another potential problem is bleed-through from metallic wallpaper inks. To test, dampen a cloth with diluted ammonia (1 part ammonia to 4 parts water) and rub the old wallpaper.

If inks change color (usually, they turn blue – green), they’ll bleed. To prevent this, seal the old wallpaper with pigmented shellac or a similar stain killer. Allow the sealer to dry thor­oughly before painting surfaces with a univer­sal primer-sealer.

Otherwise, if existing wallpaper is well adhered, wipe it with a damp sponge, let it dry, and then paint surfaces with pigmented acrylic primer-sealer. Tint the primer-sealer to match the background color of the new wallcovering.

Some pros recommend using a scarifying tool, such as Paper Tiger®, to perforate wallpaper so steam can penetrate. But such tools can also perforate drywall and scar its surface. Damage can also occur if you use metal-edged scrapers. So use such tools only as a last resort when the paste is especially tenacious, and use them with great care. Instead, try steaming the wallpaper, before scarifying or scraping it.

STRIPPING WALLPAPER

Strip existing wallcovering if it is tired or grimy and can’t be washed, poorly adhered or damaged, puckered or lumpy because there are too many layers, water stained or damaged, moldy, strongly textured, or you want to paint the walls instead. Before you apply new wallcovering, repair and prime the finish surfaces.

Before stripping, reconnoiter. Peel up a corner of the wallpaper in an out-of-the-way place. Then determine whether the walls are plaster or dry- wall. Plaster is harder and can survive a lot more steaming and scraping than drywall. Next, test how easily the wallpaper strips. Peelable and strip – pable types should be relatively easy to remove if the wall was properly sealed before it was papered. But if surfaces were not sized or primed first, you’re in for some work. Moreover, if the unsealed substrate is drywall, stripping the wall­paper may destroy the paper face of the drywall. In theory, you can patch and then seal damaged drywall with products like Allpro Seal ‘n Bond®; but removing the damaged drywall, or covering it with 14-in. drywall will yield far better results.

2. To remove the paper backing, spray it with a solution of hot water and a wallpaper-stripper such as DIF, which breaks down the paste. Allow the solution to soak in 3 minutes to 5 minutes. Because spraying is messy, place old towels or a tarp at the base of the wall.


4. A plastic wallpaper smoother – scraper will scrape off steamed paper backing without damaging drywall beneath. When all paper is off, use a soft-bristle nylon scrub brush to gently remove paste residue.


3. Applying steam will hasten the penetration of the stripper solution and soften the paste, making removal easier. On this wall, heat from a nearby register had baked the paste hard.


image954image955

Подпись: StrippaDle VS. PEELABLE Strippable wallcovering can be dry stripped (no spraying or steaming needed); both the facing and the backing material come off easily, with only a faint paste residue left on the wall. Peelable coverings usually require spraying with a wallpaper-removing solution or steaming to remove the wallpaper facing. If the paper backing is in good shape, it can stay on the wall as a wall liner for the new wallpaper. Otherwise, remove it, too.

Stripping wallpaper is messy, no matter what method you use. You’ll need painters’ tarps or old towels to protect floors from stripping solutions, condensed steam, and sticky wallpaper. Canvas tarps, or even old towels, are better than plastic tarps, which tend to be slippery. Have trash bags handy for stripped paper. О As noted earlier, turn off the electricity to areas you’re stripping, and use a voltage tester to be sure the power’s off.

Use the least disruptive stripping method.

Start stripping at the top or bottom of a strip. Use a putty knife or a plastic scraper to lift an edge. Then gently pull off the wallpaper, in the largest strips possible. This takes patience.

If you can’t pull off the covering or if it begins tearing into small pieces, try spraying a small area with a wallpaper-removing solution like Zinsser’s DIF®, which is also available as a gel, that you brush on. A time-tested alternative is 1 cup vinegar per gallon of hot water; sponge on or apply with a spray bottle. Allow either solution to soak in 5 minutes to 10 minutes, before trying to pull off the paper. If this method doesn’t work, chances are the paper is vinyl coated and the solution is not penetrating. In this case, instead
try a wallpaper steamer. Hold the steamer pan against the wallcovering long enough for the paste to soften—usually a minute or two—then pull or scrape the covering free.

If your wallcovering is peelable, chances are its facing layer will strip off, leaving its paper backing adhered to the wall. If you wish to strip it, either spray on or sponge on wallpaper – removing solution, and then apply steam. The backing should release easily; otherwise, use a plastic scraper or smoother to remove the back­ing. When the walls are stripped, wash them with a mild cleaning solution. Then rinse and let them

Подпись: Starting and I Finishing Points Подпись: Because a room's final strip of wallcovering usually needs to be trimmed narrower to fit, try to end a job where the final strip is inconspicuous. Here the job begins and ends in a corner.Подпись: 16 15 14 13 12 11Подпись: 10 9 8 Подпись: 4 3 2 1 image956

dry thoroughly before applying a primer-sealer. If paste lumps remain, remove them with a nylon-bristle scrub brush.

Preparing Surfaces

Surface prep determines how well coverings adhere, hence how good the job looks and how long it lasts. Ideally, surfaces should be clean, dry, flat, and stable. Before hanging wallcoverings, assess existing surfaces; remove, replace, or repair them as necessary; and then prime and seal them. Sealing surfaces improves adhesion and, just as important, allows you to remove coverings later without destroying the underlying drywall or plaster.

In the old days, a wall was sized, or brushed with a glutinous mixture to improve the adher­
ence of the wallpaper. But sizing is rarely done today because it’s chemically incompatible with many pastes, causing them to crystallize, lump, and bubble, creating voids where the covering is unattached. Instead, professionals use one of the primer-sealers described in "Primer-Sealers for Wallcoverings,” below.

Before you start prep work, move furniture from the room or move it to the room’s center and cover it with a tarp. That will allow you to work faster and be safer. О Speaking of safety, always use a voltage tester to be sure electrical power is off where you’re working. Also set up ladders and scaffolds so they don’t wobble. Wear a respirator mask when applying chemicals, and clean up waste as you go.

WALLCOVERINGS

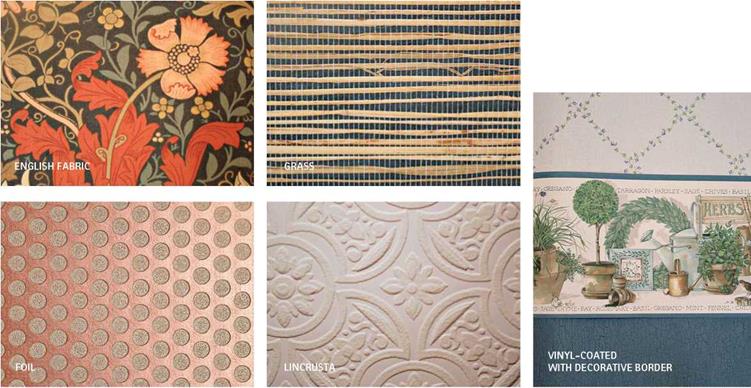
Wallpaper, actual paper, is most appropriate for historically accurate restoration and wherever you want fine detail. Although vinyl coverings are increasingly hard to distinguish from paper, vinyls tend to look glossier. Although paper may have an aesthetically pleasing flat finish, it is more vulnerable to grime and abuse.

Vinyl is today’s workhorse, available in a dizzy­ing range of patterns and in finishes ranging from flat to glossy. Vinyl is especially suitable for areas with traffic and moisture. Most vinyls are washable, and cloth-backed vinyls are usually strippable—that is, they are easily removable when you want to change them. Although no wallcovering is intended to conceal major cracks and irregularities, heavier vinyls can conceal minor ones.

Fabric coverings include cotton, linen, silk, stringcloth, and wool. They’re often chosen to match or coordinate with colors and textures in drapes and fabric-covered furniture. They come paper-backed, acrylic-backed, or unbacked (raw). And the backing largely determines the method of installation. Avoid slopping adhesive or water onto the fabric facing because some fabrics stain easily; delicate fabrics are usually dry hung, in which paste is applied to the wall and the dry wallcovering is smoothed onto it, as explained on p. 477.

Natural textures such as rice paper, grasses, and bamboo tend to be expensive, temperamental, and delicate. And because the thinner coverings reveal even minor flaws in wall surfaces, you first need to cover the walls with a lining paper. Still, natural textures are evolving, with vinyl-coated versions that are relatively durable and easy to install. Besides their beauty, most natural tex­tures have no pattern that needs matching.

Foils and Mylars also vary greatly in appearance and ease of handling. For example, heavier, vinyl-laminated foils are durable and easy to

A Wall OF YOUR OWN

Thanks to technology, you can have wall cover­ings fabricated with virtually any pattern

or image you want, including historical docu­ments or wall-size photos of family members.

The cost has come down a lot. Make sure that

such coverings are treated with a protective

coating, so they will wear well.

image946

install. However, some uncoated metallic cover­ings retain fingerprints, so you should wear gloves when hanging them, or perhaps avoid them altogether. That said, foils are well suited to small rooms because they reflect light, thus mak­ing the space appear larger.

Lincrusta, an embossed wallpaper similar to a fine cardboard, is making a comeback. The mod­ern version of Victorian lincrusta is called anaglypta.

Cork and wood-veneer wallcoverings are finely milled and manufactured to use cork and rare woods efficiently. Typical veneer dimensions: /64 in. thick, 1 ft. to 4 ft. wide, 12 ft. long. Such specialty coverings may be available through suppliers of professional paperhangers.

Borders are thin strips of wallcovering that run along the edges of walls where they meet ceilings, wainscoting, and trim. They can be installed over wallcovering or directly to drywall or plaster. The surface determines the adhesive.

PASTES

Like wallcoverings, pastes have evolved. Probably the best advice is to follow the manufacturer’s paste specifications, usually printed on the wall­covering label, along with the code and run num­bers. If the paste isn’t specified, ask your supplier to get that information from the manufacturer.

Wheat pastes were the standard for centuries, but that changed in the 1960s and 1970s, with the introduction of vinyl wallcoverings. Trapped behind an impervious skin of vinyl, wheat paste was an ideal medium for mold. Moreover, wheat
paste wasn’t strong enough to adhere many of the newer, thicker materials. Wheat pastes are occasionally specified for delicate wallpaper, but mostly they’ve been supplanted by clay – or starch-based adhesives with additives that increase grip and discourage mold.

WALLCOVERINGS
Pastes come premixed or as powders to be mixed with water. Premixed pastes are generally stronger, more consistent and more convenient. Once opened, however, such adhesives have a rel­atively short life. In general, the thicker the paste, the quicker it dries and the greater the weight it can support.

Ordering Wallcovering

Before ordering wallcovering, calculate the square footage of your walls and ceilings. Once you’ve determined the overall square footage, subtract 12 sq. ft. for each average-size door and window. To determine the total number of rolls you’ll need, divide each room’s square footage by

image947

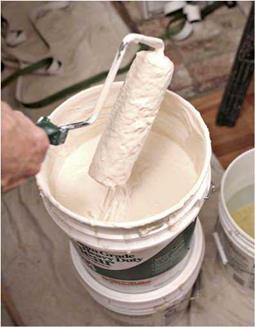
The wallcovering type determines which paste you need. Pastes come premixed, as shown, or as powders you mix with water. Many wallcoverings are prepasted and require that you either roll prepaste activator onto their backing or soak them in water trays.

How Much on a Roll?

Wallcovering rolls (also called bolts) are available in American single rolls, Euro rolls (metric), and commercial widths. At this writ­ing, Euro rolls dominate the market.

► American single rolls are 18 in. to 36 in. wide. (A 27-in. width is comfortable for most people.) The wider rolls generate fewer seams but are much more difficult to handle. Whatever the width of an American single roll, it will contain 36 sq. ft. of material.

► Euro rolls are 201/ in. to 28 in. wide, and are generally sold as double rolls (twice as long). Typically, there are 56 sq. ft. to 60 sq. ft. on a Euro roll.

► Commercial coverings are typically 48 in. to 54 in. wide, a width usually beyond the skills of nonprofessionals.

the square footage listed on the wallcovering rolls. If you’re using American single rolls (see "How Much on a Roll?,” below left), you could instead divide by 36 (the number of square feet on each roll). But dividing by 30 gives you an allowance for waste.

If the room has numerous recesses, difficult corners, or a lot of trim to cut around, order an extra roll or two. Also, if the pattern is large, you’ll waste more because you’ll need to match patterns along seams. On the back of most wall­covering, you’ll find the pattern repeat, usually stated in inches: The larger the pattern repeat, the greater the waste. Also, order an extra roll or two for repairs. You never know when a roof will leak or a child will bruise a wall.

Equipment

You’ll need some special tools and work surfaces to apply your wallcovering.

► A spirit level will tell you whether walls and wallcovering edges are plumb. Be sure to plumb the leading edge of the first strip of wallcovering. A 4-ft. level with metal edges can double as a straightedge when trimming selvage (manufactured edges).

► Your pasting table should have a washable top about 3 ft. by 6 ft. Avoid covering it with newspaper because newsprint may bleed. To protect the top from scarring during cutting, cover the tabletop with hardboard or use a zinc cutting-strip. (If you don’t have a suitable table, lay a sheet of smooth, void-free plywood over sawhorses.)

► Have a 16-ft. retractable tape measure for measuring and marking.

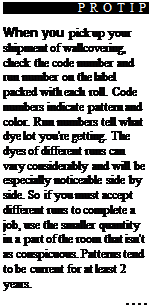
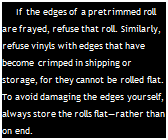
Подпись: PROTIP When you pick up your shipment of wallcovering, check the code number and run number on the label packed with each roll. Code numbers indicate pattern and color. Run numbers tell what dye lot you're getting. The dyes of different runs can vary considerably and will be especially noticeable side by side. So if you must accept different runs to complete a job, use the smaller quantity in a part of the room that isn't as conspicuous. Patterns tend to be current for at least 2 years. llll Подпись: LIFE ON THE Edge The edges of most wallcoverings are pretrimmed at the factory, allowing you simply to butt them after matching the patterns. If the edges aren't pretrimmed, do it yourself with a razor knife and long straightedge. Untrimmed edges are called selvage. Подпись: If the edges of a pretrimmed roll are frayed, refuse that roll. Similarly, refuse vinyls with edges that have become crimped in shipping or storage, for they cannot be rolled flat. To avoid damaging the edges yourself, always store the rolls flat—rather than on end.A razor knife with replaceable blades gives the cleanest cuts. Don’t be stingy about replacing blades during use because dull

image948

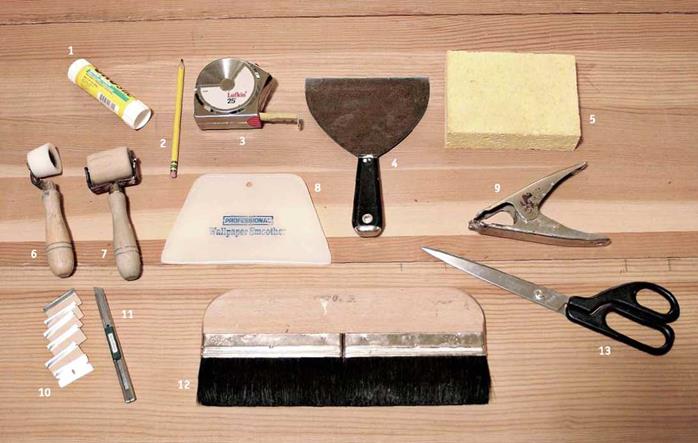
Подпись: Wallpapering tools. 1, Glue stick for touchups; 2, pencil; 3, tape measure; 4, 6-in. taping knife; 5, sponge; 6, beveled seam roller, used close to trim and in interior corners; 7, standard seam roller; 8, smoother- scraper; 9, spring clamp, to hold wallpaper while pasting; 10, singleedge razor blades; 11, razor knife with snap-off blades; 12, smoothing brush; 13, shears for rough-cutting strips. image949
blades can rip wallpaper. A professional may use 200 or 300 blades on a big job. Some pros prefer single-edge razor blades, though knives with snap-off blades are popular, too.

► Shears help you rough-cut from a roll.

► Paste brushes spread wheat paste on backing—or on walls, in some cases.

► A roller and pan are needed to spread vinyl paste, which is too heavy to brush on. Ask your supplier how long the nap of the roller cover should be.

► A smoothing brush, with soft bristles, will smooth out the wallcovering paste.

► A wallpaper smoother smooths vinyls, liners, and other heavy materials. It is also handy for flattening the occasional paste lump.

► A seam roller spreads glue along the edges of the strips to ensure that seams will stick well. Caution: Seam rollers are not generally recommended for delicate or finely textured papers or grasses.

► A 6-in. taping knife, also called a joint knife, is useful for filling low spots and scraping off high spots in a wall. Also use this knife to press the wallcovering snugly against the trim before cutting away excess paper.

► A sponge and water pail are handy for wiping excess paste off the pasting table, trim, and most wallcovering surfaces. In general, the sponge should be just damp. Change the water in your pail often. To avoid creating a sheen along the seams, wipe the entire strips rather than just their edges.

► Other useful equipment includes a sturdy fiberglass stepladder; a long, straight board for detecting irregularities in walls and ceilings; and a plenty of clean, soft rags. If you use a prepasted wallcovering, you’ll also need a water tray in which to soak the strips to activate their adhesives.

APPLYING EXTERIOR PAINT

Prep work done, it’s almost time to paint. Even if you’ve read this entire chapter, you might want to scan it one last time for tips about paint quality, tools, basic techniques, spray-painting, and so on.

Here’s a quick review of factors mentioned in greater detail earlier in this chapter: Regarding exterior coatings, the more opaque the finish, the better it will protect wood siding. Clear, oil-based sealers help siding shed water without obscuring the wood grain, but they must to be reapplied every 2 years to 4 years because they offer rela­tively little protection from UV rays. A second

Подпись:Подпись: llllimage938

option, semitransparent stains resemble thinned down-paints and represent a compromise that adds UV protection but reduces siding visibility, That is, you can see wood texture but not its grain. Third, there’s paint that completely hides and so protects wood the best, if correctly applied. Which brings us to acrylic latex.

Acrylic latex is king. What’s not to like? Simply called latex, it’s durable, flexible, virtually odor­less, and cleans up with soap and water. Use good-quality latex primer-sealer and paint on all exteriors, whether covering existing paint or unfinished siding. Oil-based primers are justified only if your siding is raw redwood or cedar, or if you’ve had problems with tannin bleed-through and so need to block stains before repainting. Latex is also best for masonry, stucco, aluminum, and vinyl siding because it’s the only coating flex­ible enough to expand and contract as siding heats and cools.

Optimal conditions. Check the weather before you start painting. Ideally, wait until several dry days are forecast. If possible, wait a week after a rain. Also allow morning mists to evaporate before painting. Humidity near 90 is risky, because it doesn’t allow the paint to cure. The best temperatures for curing range between 60°F and 85°F. Don’t paint when temperatures are 90°F or above, because surfaces that are too hot can cause paint to blister. Finally, stop painting 2 hours before sundown if nighttime tempera­tures could drop below 40°F.

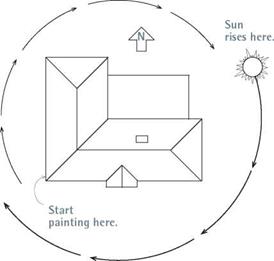
If possible, don’t paint in strong sun. Paint the west and south faces of the house early in the morning; the north face at noon; and the east face and any part of the south face still remaining in the afternoon.

Latex paint should flow on easily and dry slowly enough that brush marks level (disappear). To slow the rate of drying, add a dash of Flood’s Floetrol to latex, as indicated on the container.

To slow the rate of drying of oil-based paint, add Flood’s Penetrol.

A painting sequence. Paint the house from top to bottom. To minimize overlap marks on clap­boards, paint horizontal sections all the way across, till they end at window or door trim or at the end of a wall. After painting large sections, go back and paint the trim, windows, and doors, top to bottom. Last, paint gutters, porches, and decks. If you can remove shutters, doors, screens, and the like, do so; they are much easier to paint if placed across sawhorses. Don’t bother to mask trim or windows unless you’re spray-painting. Again, you can later scrap stray paint from win­dow glass with a razor tool.

Using a brush, paint the bottom edges of hori­zontal siding before applying paint to the flat face of each board. To distribute paint evenly along siding, after loading the brush with fresh paint, partially unload the brush by dabbing every foot or so; then spread out the dabs, brush­ing the paint in and smoothing it with the wood grain. For exteriors, a 4-in. brush is the work­horse for the big spaces. A 3-in. angled sash brush is handy for cutting in trim edges and corners. For a sequence of painting window parts, see p. 450.

If the house has a stucco exterior or some other flat expanse, roll the paint on—after using a brush to cut in the edges—or spray it. Exterior rolling is much the same as interior rolling: Roll on fat paint in a zigzag pattern, before rolling it out evenly. To minimize spatter, roll the first stroke up. In general, the smoother the exterior surface, the shorter the roller cover nap.

Apply primers and top coats full strength,

except when the paint seems to be drying too quickly. Latex dries quickly and adheres well, so you don’t need to sand between coats unless you wait several days or more. Consult the label on the paint container for drying times and maxi­mum intervals between coats. For a lasting paint job, apply one coat of primer and at least two top coats. Though it’s probably not imperative to

I Avoiding Direct Sun

Avoid the sun around the house as you paint, so that you apply paint in the shade if possible. Paint applied in full sunlight is more likely to blister later.

image939prime existing paint that’s in good shape and well prepped, it’s advisable. However, prime all siding that has been sanded or begun weathering down to bare wood.

Oil-based stains and semitransparent stains do not need thinning. Apply them full strength to bare wood. If you’ve stripped the house of its original paint and want to switch to stain, test a
small section first. Because a clear stain will probably look uneven, a semitransparent stain is likely the better bet. To apply stain, a paint pad will hold more stain than a brush but requires a little practice to avoid runs.

As with paint, apply stain to the undersides of the shingle or clapboard courses first. To avoid getting stain on your skin, wear a long-sleeved shirt, rubber gloves, a hat, and safety glasses.

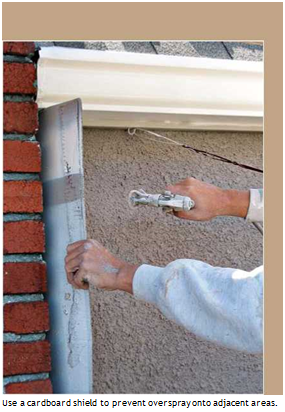
Подпись: Use a cardboard shield to prevent overspray onto adjacent areas. Подпись: OF TIPS

Spray

► Spray exterior trim first. Mask the siding, spray the trim, and let it dry before removing the first masking. Then mask over (cover) the trim so you can paint the siding.

► To mask-off windows, apply double-sided masking tape around the perimeter of the window. Press sheet plastic to the tape and trim off the excess plastic.

► To keep paint off features such as chimneys and roofing, use a cardboard shield to block the spray, as shown at left.

► Don’t spray when it’s windy. Even if the air is calm, move cars and lawn furniture away from the house, or cover them. If your house is close to a neighbor’s—ask the neighbors to do the same or, better, do it for them.

► After you spray a section, immediately brush the paint into the surface. Back-brushing helps sprayed paint adhere better, look great, and last longer.

But because latex dries so quickly, back-brush before spraying the next section.

After spraying a section of siding, immediately brush the paint into the wood—and into the building seams— using a 4-in. brush.

Подпись: Wallpapering

image942

Wallpaper has been popular for centuries, particularly in formal rooms where there’s less danger from little ones’ grimy fingers and rowdy ways. Paint has long been favored for rooms that get the most use and abuse because it’s durable and easy to clean and apply.

Today “wallpapers” are available in so many materials—including grasses, bamboo, rice paper, foil, and cork—that they are collectively called wallcoverings, and some of them are stronger, more durable, and easier to maintain than wallpapers and some paints. Many are backed with paper or cloth, with cloth being stronger. But by far the most popular are vinyl- coated wallcoverings, which are washable and grease resistant.

Today, most wallcoverings come prepasted. This makes them easier to apply and—years later—to strip from the wall. Because the manu­facturer has already pasted the covering, all you need do is unroll it, and soak it briefly in a water tray. But, as you’ll see in this chapter, many pros avoid the drips and mess of a water tray by rolling a prepaste activator onto the backing.

Selecting Materials

Choose a wallcovering whose pattern and color are appropriate for the room. There are no hard and fast rules on what works. But in general, lighter colors make rooms look larger, and darker colors make rooms look smaller. Smaller, sub­dued patterns are better for quiet rooms. Splashy floral prints tend to serve better in places such as front halls that bustle with activity. Delicate tex­tiles or grasses are best reserved for rooms with little traffic and little risk of bruising. Also, con­sider the age and energy level of the people in the room. For example, vinyl-coated murals of rock stars or sports themes will appeal to kids and endure abuse.

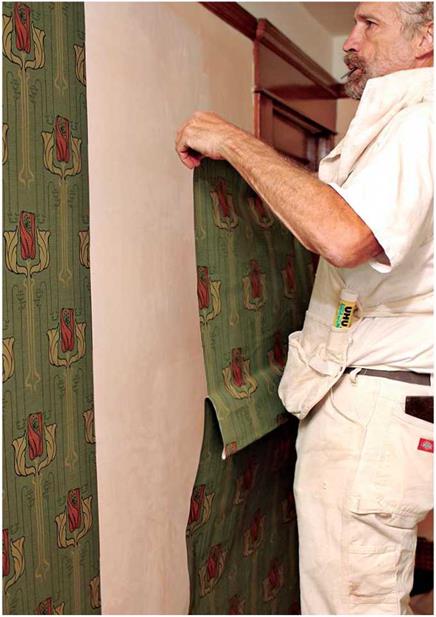
To hang wallcovering, first unfold the top half of a pasted strip and carefully align it to a plumbed line, or to the plumbed edge of the preceding strip.

Washable wallcoverings can be sponged clean occasionally with a mild soap or cleaning solu­tion. Scrubbable coverings can take a vigorous scouring with a nylon-bristled brush or a pad, as well as stronger cleaning agents. There are also strippable and peelable wallcoverings, discussed

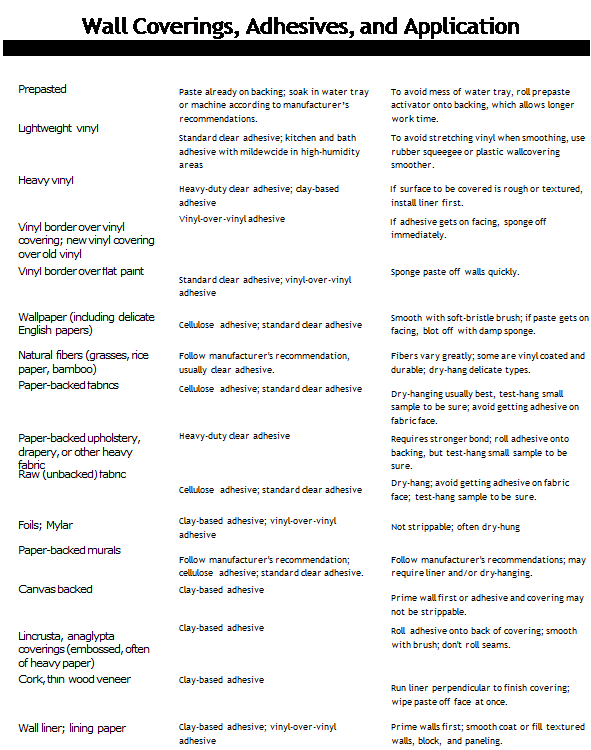
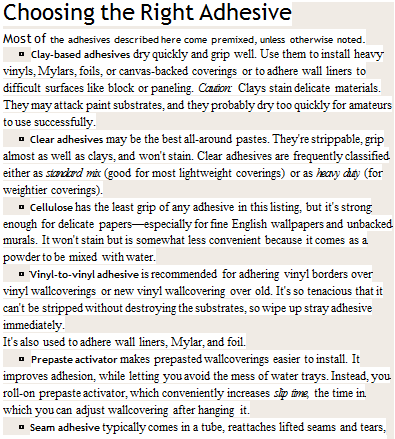
Подпись: g OVER DIFFERENCESimage943Подпись: Almost everybody still refers to wallcovering as 'wallpaper.' But in this chapter wallcovering, the noun, will be the general term for both paper and nonpaper coverings. However, when used as a verb, wallpaper refers to the act of hanging either type of covering. Last, you can assume that advice on papering or prep- ping walls also holds true for ceilings.Подпись: Choosing the Right Adhesive Most of the adhesives described here come premixed, unless otherwise noted. ► Clay-based adhesives dry quickly and grip well. Use them to install heavy vinyls, Mylars, foils, or canvas-backed coverings or to adhere wall liners to difficult surfaces like block or paneling. Caution: Clays stain delicate materials. They may attack paint substrates, and they probably dry too quickly for amateurs to use successfully. ► Clear adhesives may be the best all-around pastes. They're strippable, grip almost as well as clays, and won't stain. Clear adhesives are frequently classified either as standard mix (good for most lightweight coverings) or as heavy duty (for weightier coverings). ► Cellulose has the least grip of any adhesive in this listing, but it's strong enough for delicate papers—especially for fine English wallpapers and unbacked murals. It won't stain but is somewhat less convenient because it comes as a powder to be mixed with water. ► Vinyl-to-vinyl adhesive is recommended for adhering vinyl borders over vinyl wallcoverings or new vinyl wallcovering over old. It's so tenacious that it can't be stripped without destroying the substrates, so wipe up stray adhesive immediately. It's also used to adhere wall liners, Mylar, and foil. ► Prepaste activator makes prepasted wallcoverings easier to install. It improves adhesion, while letting you avoid the mess of water trays. Instead, you roll-on prepaste activator, which conveniently increases slip time, the time in which you can adjust wallcovering after hanging it. ► Seam adhesive typically comes in a tube, reattaches lifted seams and tears, and is compatible with all wallcoverings. After applying seam adhesive, roll the seam.

at greater length in “Stripping Wallpaper,” on p. 470.

For do-it-yourselfers, it’s smart to choose a covering that’s easy to hang. That is, textured coverings can be fragile and difficult to handle. The condition of existing walls should also affect your decision. For example, heavy coverings can conceal minor wall flaws; whereas lightweight papers will accentuate flaws and won’t conceal underlying bold paints or vivid patterns. If walls or trim are badly out of square, avoid coverings with large, bold patterns because slight mis­matches along their edges will be more obvious than if patterns are subdued.

Painting the Exterior

Exterior paint jobs can last 10 years or more if you’re fastidious about prep work and attentive to water-related building details. Key factors include proper flashing of windows, doors, and roof junctures; maintaining gutter systems; caulking gaps in exterior siding; and adequately venting excess moisture from interior spaces.

WHY PAINT FAILS

Before you sand or scrape anything, figure out why the paint is failing. . . and where.

Blistering is usually caused by painting over damp wood or an earlier coat of paint that isn’t dry. Blisters often contain water vapor, although "temperature blisters” are largely hot air, caused by painting a surface that was too hot. Scrape and sand blisters, allow the wood siding to dry thoroughly; then spot prime.

Peeling off in sheets, is blistering on a grand scale—sometimes an entire wall. Such peeling is most common on older homes lacking vapor barriers and occurs especially on siding outside bathrooms or kitchens, when excessive moisture migrates through the wall. If your old house has been retrofitted with insulation and a vapor barrier, peeling may indicate moisture trapped inside the walls and, possibly, rotted framing.

At the very least, add ventilator fans to exhaust water vapor. And on outside walls, drive thin plastic wedges behind the lap siding to help moisture escape.

Intercoat peeling, a new coat of paint separat­ing from the old, is a classic case of poor prep work. Typically, chalky old paint was not scrubbed or sanded, and thus new paint could not adhere. Or, less often, the painter waited too long between the prime and finish coats. Scrape failed paint, sand, and wash the surface well, letting it dry before repainting.

Wrinkling is caused by applying paint too thick­ly, painting an exterior that is too cold, failing to thin paint sufficiently, applying paint before earli­er coats are dry, or letting the paint get rained on before it cured adequately. Use a power sander to even out the surface before repainting.

Alligatoring or cross-grain cracking, is caused by too many layers of paint, usually old, oil-based paint. The thicker the paint, the less it can flex as siding expands and contracts. So the paint cracks—sometimes, all the way down to bare wood. Alligatoring may also be caused by paint­ing over an undercoat that didn’t dry completely. In either case, it’s big trouble, because you’ll need to strip the paint down to bare wood and seal it with a primer-sealer before repainting. It may be easier to replace the siding

Chalking is a normal occurrence and isn’t a problem unless it’s excessive, usually the result of cheap paint. Because new paint won’t adhere well to a powdery residue, you must scrub and rinse the old surface and allow it to dry before repainting.

Rusty nail stains are common where siding nails were not galvanized. The fastest fix is sand­ing each stain lightly and priming with a rust- inhibiting primer like Kilz® stain blocker. For a longer-lasting repair, sand till you expose each nail head, use a nail set to sink each one Уз in. below the surface, prime with stain blocker, and fill with wood filler. Then sand and spot-prime before painting.

Tannin bleed through, a widespread brown staining, occurs when waterborne resins in woods, such as cedar and redwood, bleed through porous latex primers. Scrub the surface well and prime it with one or two coats of an oil-based (alkyd) primer like Kilz or Benjamin Moore Fresh-Start®. Paint what you like—latex

Подпись: Although power washing is widely used to clean stucco, brick, aluminum, and vinyl siding, it's not appropriate for wood siding. It can gouge and even shred wood, force water into gaps around doors and windows, soak insulation inside walls, and inject water into wood that will take weeks to dry. Certainly, never use power washers to strip paint: They'll scar wood and scatter paint flecks to the ends of the earth. Подпись: 1111

or oil-based—over that. At this writing, stain­blocking acrylic latex primers show promise but don’t yet have the track record of oil-based stain-blocking primers. Get a second opinion from an up-to-date paint supplier.

Graying wood is a natural response to sunlight when siding is left unfinished or has been sealed with a clear finish that degrades. Never leave wood siding exposed to the elements—both because bare wood quickly degrades and because paint or clear finishes don’t adhere well to degraded wood. Sand and wash the surface, and reapply a clear finish with a UV-blocking agent. Clear finishes need to be reapplied every 2 years to 4 years. If that sounds like too much mainte­nance, prime the siding with an oil-based primer, and then switch to paint.

Mold and moss are common in damp climates, on north-facing and foliage-shaded walls and where lawn sprinklers hit the house. Siding that’s constantly damp can lead to structural rot. For starters, cut back foliage and the adjust sprin­klers. Scrub moss off by hand, using a wire brush. Remove mold by applying a cleaner/ mildewcide such as Zinsser Jomax® before scrubbing or power washing the surface (but see the cautions later in this section). After the exterior has dried for about a week, prime as needed, and repaint with a paint containing a mildewcide.

PREPARING THE EXTERIOR

Before you start prep work, be sure to review this chapter’s earlier sections on equipment and lead – paint safety. Even though you’re working outside, wear a respirator mask when sanding or scraping paint and when working with solvents or paints of any kind. Likewise, when applying cleaning solutions (which can be caustic), wear rubber gloves and eye protection.

Prep work is prodigiously messy, so spread dropcloths out 8 ft. from your house to protect your lawn and shrubs. Otherwise, you’ll be pick­ing paint scraps out of your grass for years or— even worse—exposing kids and pets to old lead-based paint. If it’s hot and sunny don’t cover your plants with plastic drop cloths; the plants will cook. Instead use fabric drop cloths, which shade plants, won’t tear, and are far less slippery to walk on. But if tests indicate lead paint, capture the debris in heavy 6-mil plastic tarps, which you can roll up and discard at the end of each day.

Washing surfaces. Before installing new wood siding, apply primer-sealer to front and back faces and to all edges. When that coat is dry, scuff-sand it with 100-grit sandpaper, and dust it
off with a whisk broom. Then install the siding before applying the top coats.

However, if the siding is already painted— even if the paint is in good shape—first wash it. Start by applying a house-cleaning solution, using a garden pump-sprayer. A dilute solution of TSP is often recommended, but urban houses may need a cleaning agent with a degreaser that will cut soot, automobile exhaust, and the like.

As noted earlier, if there’s mold present, use a cleaner with a mildewcide. Once the cleaner has had time to work, rinse it off with a garden hose and allow it to dry thoroughly for a week or so before painting. That’s a minimal wash.

To thoroughly wash and rinse an exterior, rent a pressure washer, which has a small boiler and a high-pressure electric pump. The rental company will recommend a detergent suitable for the unit and explain how to use it safely. For most clean­ing jobs, 1,800 psi to 2500 psi (pounds per square inch) is specified—for softwoods like cedar or redwood, 1,000 psi to 1,500 psi. Tip sizes range from 0° (concentrated pressure that can easily damage siding) to 40° (a wider fan of water favored for light cleaning). In general, start with a low-pressure setting till you are familiar with the machine, and keep the spray wand moving. Note: Always spray downward if you’re cleaning lapped siding. Otherwise, you’ll force water underneath.

Scraping, sanding, spot-priming, caulking.

Once the siding has dried, hand-scrape the loose paint. For this, use a large scraper with 3-in.-wide blade, preferably one with a forward grip over

image932

SAFETY

If you’re painting a whole house, the job will go much faster if you rent scaffolding. However, if you decide to use an extension ladder or two, follow these safety rules:

► Don’t place ladders near incoming electric service lines. When the air is moist, electricity can arc to nearby objects or people; so keep your distance.

► Securely position the ladder feet. Never ascend a ladder that lists to one side. On uneven ground, use a ladder with adjustable leveling feet, as shown on p. 36.

► Place the ladder bottom out from a building no more than one-quarter the ladder’s height.

► Wear hard-soled shoes so your feet won’t tire quickly on the ladder rungs.

image934

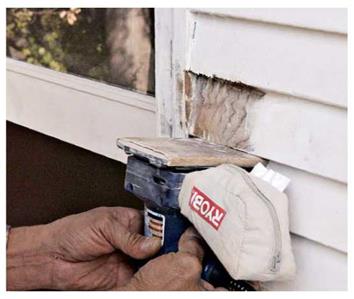
Where a random-orbit sander won’t fit, use a palm sander, as shown, with 60-grit or 80-grit sandpaper. A palm sander is also handy for scuff-sanding old paint in good condition so new paint will adhere better.


image933

Hand-scrape nooks and crannies that power tools can’t reach or could damage. Here, heat guns and chemical scrapers also make sense.


image935

Подпись:image936Подпись: M-

the blade. Be sure to scrape the lower edges of the clapboards and beneath the windowsills.

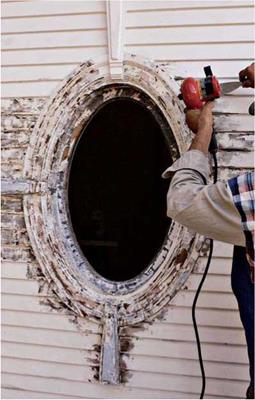
For hard-to-reach areas when siding abuts trim or where trim is curved or intricate, use a hand scraper with interchangeable blades. If paint doesn’t come off easily, that’s a good sign—it’s well adhered. However, if isolated areas of paint are too thick or obscure ornamental details, use a chemical stripper or a heat gun to remove more paint.

After scraping loose paint, use 80-grit sand­paper to feather out the edges of the remaining paint, smooth uneven surfaces, and scuff up surfaces so new paint will adhere well. For this work, an electric palm sander or random-orbit sander is a good tool, powerful yet light enough to use all day. If you’re prepping painted stucco, brick, or concrete, instead use a wire brush. When you’re done, brush off the dust with a hand broom.

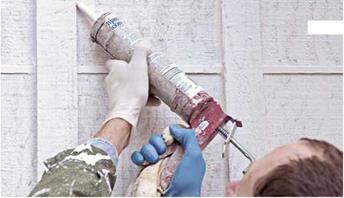
If the paint is largely intact, you may not need to prime it, but you should spot-prime all areas you’ve scraped down to bare wood; exposed nail heads; and cracks, gaps, and holes you intend to fill or caulk. Spot-priming blocks nail stains, seals wood from moisture, and provides a better surface for filler or caulk to adhere to. Use either an exterior-grade polyurethane, a paintable

acrylic, or a multipolymer caulk; don’t use silicone caulk because paint won’t stick to it.

This is also a good time to set and fill nail heads. Because wood filler shrinks as it dries, slightly overfill the holes. When the filler’s dry, sand it flush.

Where wood is badly deteriorated, you should replace it. If the trim has only localized rot and would be difficult to replace, scrape the loose matter away and impregnate the remaining area with an epoxy filler, such as the one shown in the photos on p. 134.

Stripping exterior paint. Stripping exterior paint is a nasty job. Fortunately, only a few paint conditions require stripping. One of those condi­tions is alligatoring, in which many layers of old,

cracked, oil-based paint resemble the skin of an alligator (see the photo on p. 457). In that case, before stripping to bare wood, get a bid to replace the siding. Labor costs should be less, to say nothing of the cost, mess, and health con­cerns of stripping lead-based paint. But if you decide to strip, wear a respirator mask, eye pro­tection, and other apparel related to lead safety

Basically, stripping exterior paint becomes a choice between mechanical scrapers and chemi­cals. Sandblasting is too dirty, damaging, and dangerous to be done by anyone but an expert. Sanding and hand scraping a whole house is impossibly slow. And whereas heat guns are okay for small areas, the snail’s pace of stripping a house and the real risk of starting a fire make it a distant third option. So, in the end, some combi­nation of mechanical scraping, chemicals, and limited hand scraping will probably serve best.

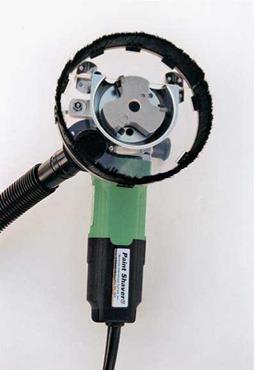
Mechanical scrapers such as AIT’s Paint Shaver® are serious, two-handed tools. Mechanical scrapers look somewhat like angle grinders, but have carbide-tipped rotary cutter – heads that shave paint from the clapboard faces and edges. The better models have vacuum attachments that collect most of the debris. Nonetheless, have tarps in place before starting; and to prevent cutter damage, set siding nails well below the surface. Thus, as you strip, you’ll need a hammer and a nail set to set the nails you missed. Also, be sure to install scaffolding so you can focus on the tool and not your footing.

To minimize damage to the siding, first set the tool’s depth adjustment so you need several passes to strip a surface. Finding the right cutting depth is largely a matter of trial and error, so first test the tool on an inconspicuous section. Beyond that, the real trick to mechanical scraping is keep­ing the steel shoe/guard flat to the surface so the tools strips evenly. Where a Paint Shaver won’t reach, use hand scrapers, a chemical stripper, or small mechanical scrapers like the Metabo™ Lf714S. When finished stripping, use a palm sander or a random-orbit sander with 50-grit to 80-grit sandpaper to smooth out the rough spots before washing, caulking, dusting, and priming.

Chemical strippers are most appropriate where trim is intricate or where you want to remove lead paint without dispersing particles into the air and soil. Strippers vary in strength, environmen­tal impact, working time (4 hours to 48 hours), and method of application. Most often, chemi­cals are brushed on ‘/ in. to І4 in. thick, but it’s possible to apply some strippers with modified paint-spraying equipment. (If you spray, wear a full-face mask, gloves, and disposable coveralls.)

image937

A mechanical scraper with a vacuum attachment is the tool of choice when you’ve got to strip exterior paint. But set the nail heads first, or you’ll chew up expensive scraper blades. Eye protection is a must.

Given enough time to work, chemical strip­pers should remove all paint layers in one appli­cation. To keep its stripper from drying out while working, Dumond Chemical’s Peel-Away® system comes with plasticized paper that’s pressed directly onto stripper-coated surfaces. Peel – Away’s active agent is lye, which is extremely caustic, so after stripping surfaces, you need to apply a special neutralizing solution before priming or painting. Another product, Back to Nature’s Multi-Strip™, is biodegradable, non­caustic, and water soluble. Thus it doesn’t need a neutralizing agent.

Staining and Sealing: A Sampler

There should be a Ph. D. in stains. There are all-pigment stains that won’t fade (a good choice for window trim), water – and oil-based stains, liquid stains, penetrat­ing stains that both stain and seal, and gel stains that won’t run on vertical surfaces. Plus, there are wood conditioners, sanding sealers, presealers, and a plethora of putties and wood fillers. If you want to learn more, excellent resources are Michael Dresdner’s Painting and Finishing and Finishes and Finishing Techniques (both The Taunton Press).

► To achieve an even stain on softwoods such as fir, preseal them with a thinned coat of whatever the clear finish will be, say, 1 part oil-based polyurethane to 4 parts mineral spirits. Presealer soaks into the softer parts of the wood and seals them slightly. But once dry, the surface should still feel like wood.

► Oil-based polyurethane over water-based stains is okay, but do not use water – based polyurethane over oil-based stains. The polyurethane won’t stick.

Подпись: You can usually apply oil-based penetrating stains over previously varnished surfaces, but they can be tricky to work with. Test-stain an inconspicuous section. If the penetrating stain is compatible with the old finish, it should dry hard overnight.Подпись: After brushing stain on, use a clean, dry rag to remove any excess. You may need to apply several coats—over several days—to match existing stains. So be patient.image929

PROTIP

If you’re using water-based finishes, use damp rags to wipe dust off surfaces, rather than tack rags. Because tack rags are typically a piece of cheesecloth treated with varnish to make it sticky, tack rags leave a faint, oily film that water-based coat­ings may have trouble adhering to. Tack rags are fine, however, if followed by oil – or solvent-based finishes.

1111

After stripping with hand scrapers and a heat gun, if you decide that your old trim is too beat up or too plain to look good under a clear finish, don’t bother with chemicals. Sand down the remaining paint edges, prime the trim, paint it, and call it a day. It’ll look great.

Подпись: Sheet-peeling is caused by excessive moisture migrating through a wall—in this case, an unvented bathroom wall. 1111

drain into the can, allowing the lid to seat tightly into the recess. If the finish skins over, strain the finish or discard it.

Polyurethanes are favored for wood in kitchens, bathrooms, hallways, and other busy areas. Once cured, they’re tough and water resistant. And they’re easy to apply. Oil-based and water-based polyurethanes are equally durable but require slightly different application methods. For both types, apply at least two coats, preferably three.

► Water-based polyurethanes: Because water-based polyurethanes dry clear, use them if you want light-colored wood to stay light. Seal woodwork before application. Thereafter, brush on full strength. Although water-based poly dries quickly, tempting you to apply two coats in a day, wait a full day between coats so it can harden. There’s no need to sand between coats unless a week passes, in which case, use a fine nylon abrasive pad. If you want to add a wax finish, wait a month after application, mindful of the several-week curing time.

► Oil-based polyurethanes: Oil-based poly­urethanes impart a rich, amber color to wood. So use them if you favor dark wood or an historic look. They don’t need a preliminary sealer coat, but they will flow on better if you thin each coat with 10 percent mineral spirits.

Oil-based polyurethanes dry slowly, so apply only one coat per day, unless the manufacturer recommends otherwise. Here again, sanding between coats is not imperative unless you wait a week between coats—or you need to sand down imperfections. Before waxing an oil-based poly, be sure to wait a week after the last coat dries.

Shellac doesn’t have the water-resistance of polyurethane, but it dries fast; has a wonderful old-fashioned sheen; and, as noted earlier, adheres well to earlier shellac coats and can be touched up repeatedly. If wood is new or recently stripped, apply a sealer coat of thinned-down shellac: If you’ll be staining the wood, brush on a

1 part shellac to 4 parts denatured alcohol sealer first, allowing it to dry. Otherwise, brush or wipe on a coat of 1 part shellac to 2 parts alcohol, wip­ing off the excess and allowing the coat to dry

2 hours before sanding lightly with 320-grit sand­paper. Thereafter, apply two or three shellac coat­ings, thinned with 10 percent denatured alcohol. If the surface is smooth, there’s no need to sand between coats. Wait 1 day between coats and

3 days before waxing. Because shellac dries so quickly, don’t attempt to rebrush it.

Oil finishes include boiled linseed oil, tung oil, and the so-called Danish oils like Watco. Using a nylon pad or a rag, rub a generous amount of oil

Подпись: Although white pigmented shellacs like B-I-N® are terrific for blocking stains on interior surfaces, they're not advisable for priming exteriors. Hot sun softens and degrades shellac. llll Подпись: Alligatoring, or cross-grain cracking, is caused by too many layers of old, inflexible paint.

onto the wood. Let that soak in for 10 minutes or 15 minutes before rubbing off the excess with a clean, dry cloth. With each coat, the wood will darken slightly. Allow each coat to dry 24 hours and reapply the oil till you get the look you like; usually, two or three coats do the trick. Oil finishes offer the least protection but are easiest to reapply.

Primers and Paints*

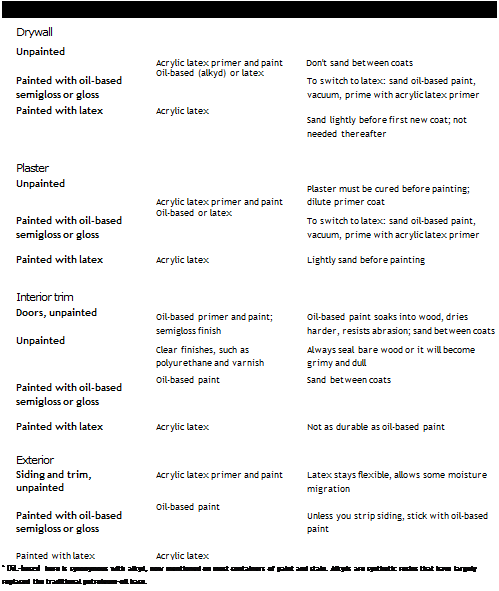
Подпись: SURFACE PRIMER AND PAINT COMMENTS Drywall Unpainted Acrylic latex primer and paint Don't sand between coats Painted with oil-based semigloss or gloss Oil-based (alkyd) or latex To switch to latex: sand oil-based paint, vacuum, prime with acrylic latex primer Painted with latex Acrylic latex Sand lightly before first new coat; not needed thereafter Plaster Unpainted Acrylic latex primer and paint Plaster must be cured before painting; dilute primer coat Painted with oil-based semigloss or gloss Oil-based or latex To switch to latex: sand oil-based paint, vacuum, prime with acrylic latex primer Painted with latex Acrylic latex Lightly sand before painting Interior trim Doors, unpainted Oil-based primer and paint; semigloss finish Oil-based paint soaks into wood, dries harder, resists abrasion; sand between coats Unpainted Clear finishes, such as polyurethane and varnish Always seal bare wood or it will become grimy and dull Painted with oil-based semigloss or gloss Oil-based paint Sand between coats Painted with latex Acrylic latex Not as durable as oil-based paint Exterior Siding and trim, unpainted Acrylic latex primer and paint Latex stays flexible, allows some moisture migration Painted with oil-based semigloss or gloss Oil-based paint Unless you strip siding, stick with oil-based paint Painted with latex Acrylic latex * OiL-based here is synonymous with alkyd, now mentioned on most containers of paint and stain. Alkyds are synthetic resins that have largely replaced the traditional petroleum-oil base.

As you paint, be methodical so you won’t need to touch up missed areas. Paint top to bottom: Do ceilings, walls, trim and baseboards before doing doors and windows. Paint back to front: Many painters go to the deepest recess of a room— often, a closet—and work methodically toward a
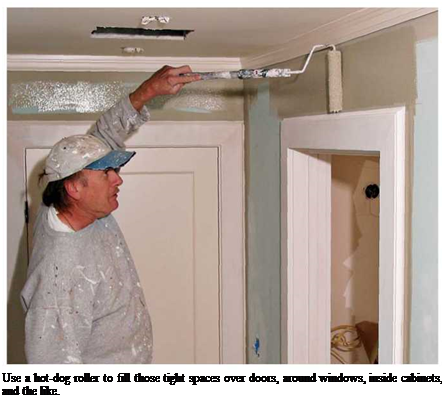
Подпись:image909Подпись: When cutting corners or trim, slightly overlap the paint on the adjacent surface: 1/s in. to V4 in. Overlapping prevents unpainted spots, fills minor irregularities, and ultimately produces a cleaner line. It's also faster. Remember: You don't need to paint a perfectly straight cut-line till you apply the finish coat to the trim.Подпись: 1111Подпись: Use a hot-dog roller to fill those tight spaces over doors, around windows, inside cabinets, and the like.

door. Paint inside to out: If you start painting in the backs of built-ins and cabinets, your final brushstrokes on the outermost edges will be clean and crisp.

Once you’ve prepped the surfaces, masked off baseboards, and spread your drop cloths, it’s time to paint.

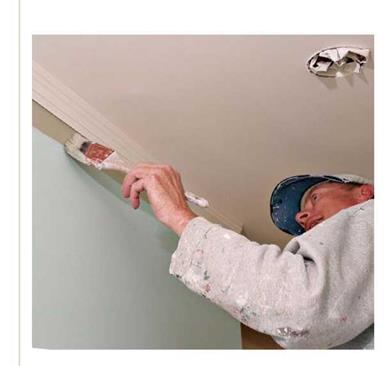
Painting the ceiling begins by using a brush to cut in a 2-in. to 3-in. border where the ceiling meets the walls and near all moldings. This cut-in border reaches where a roller can’t and thus allows you to roll out the rest of the ceiling with­out getting paint on the walls. Later, as you roll within h in. to 1 in. of the ceiling-wall intersec­tion, you’ll cover the brush marks, so the paint texture will look uniform. This operation goes much faster if one painter on a step bench cuts in, while the second painter rolls on paint, using an extension pole to reach the ceiling.

To avoid obvious lap marks, paint the ceiling in one session, working across the narrowest dimension of the room. Roll out paint in 3-ft. by 3-ft. sections—about one roller-load of paint. First roll the paint in a zigzag pattern, which distrib­utes most of the paint (fat paint) in three or fours strokes; then go back and roll the paint evenly. When the roller is almost unloaded, slightly over­lap adjacent areas already painted. Keep roller passes light, and don’t overwork an area. Once the paint is spread evenly and starting to dry, leave it alone so its nap marks can level out.

For a smooth finish, use a standard 9-in. roller cover with %-in. to И-in. nap. Thanks to the exten­sion pole, you can reach the ceiling easily, with­out needing to stand directly under the roller and its fine paint rain. To minimize mist and drips,
run the roller up and down the bucket ramp several times when loading. But don’t fret about small, stray spots on walls because you’ll cover them later when you roll the walls.

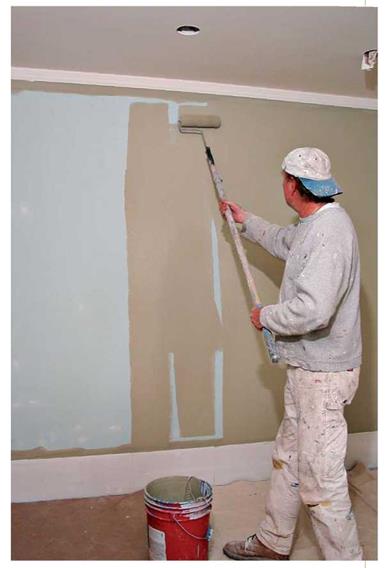
Painting the walls is nearly the same as painting ceilings— cutting in with a brush and rolling larger areas—except that you can load more paint on the roller. To reduce spatter, roll up on the first stroke; the excess will fall back to the roller. Continue rolling in a zigzag pattern to unload the roller before rolling out the paint. A 6-in. hot-dog roller can paint the areas over doors and windows that are too narrow for a standard 9-in. roller. Rolling is always faster than brushing because you don’t need to dip a roller in paint continually. If you’re careful around electrical outlets, you can also use a hot-dog roller there.

Подпись: Most amateurs fold sheets of sandpaper in half, then in quarters. But sheets will last longer if you fold them in thirds. Folding sandpaper in fourths places abrasive surfaces face to face, causing premature wear. 1111 Подпись: PROTIP Too often, amateurs dab paint on,which leaves crooked lines and uneven paint thickness. As you cut-in or paint trim, use long brush-strokes. Apply paint generously to the surface, and then smooth it out. For best brush control, hold the handle, not the ferrule, as if you were throwing a dart. llll image911Подпись:

After unloading most of the paint on the roller in a zigzig pattern, spread it out evenly, top to bottom.

With more paint on your roller, you can cover slightly larger expanses of wall, say, 3 ft. by 4 ft. If you start at the top of the wall and work down, you’ll roll over any drips from above. Cover brush marks by rolling within ’/2 in. to 1 in. of the ceiling; this is important when applying darker hues because rolled-on paint reflects light differently from brushed-on. Slightly overlap adjacent sec­tions. To avoid unloading excess paint along outside corners, lighten up as you roll.

Finally, sand lightly between coats when you apply oil-based paint, especially enamels on cabinets or trim. On walls, use 220-grit sandpaper or a dry sand­ing block. It’s not necessary to sand latex paint, unless you’ve waited several weeks between coats; until latex is 100% dry, new coats adhere easily.

Painting the interior trim

begins with the preparation tasks. Prepare the trim, window sashes, and doors by filling nail holes with nonshrinking wood filler, priming bare wood, caulk­ing gaps with acrylic latex caulk (letting it dry overnight), lightly sanding all trim with 180-grit sandpaper, and vacuuming dust and debris. Enamel paint—which dries to a hard, glossy finish—is best for trim, window sashes, and doors because it’s the most durable. By the way, there are both oil-based and latex enamels.

Painting straight edges requires a quality brush and a steady hand. If you can develop a steady hand, you won’t need to apply and remove masking tape, which takes a lot of time. In most cases, all you need is a 2/2-in. or 3-in. angled sash brush, unless your baseboards are exceptionally wide. Start with crown (ceiling) molding, pro­ceed to door and window trim, and finish with the baseboards. Always paint with the grain, cutting trim edges first, then filling in the field with steady back-and-forth strokes. To avoid lap marks, paint about 3 ft. of trim at a time, overlap­ping adjacent sections while they’re still wet. If the paint is drying too fast, add Flood’s Floetrol to latex paint or its Penetrol to oil-based paint.
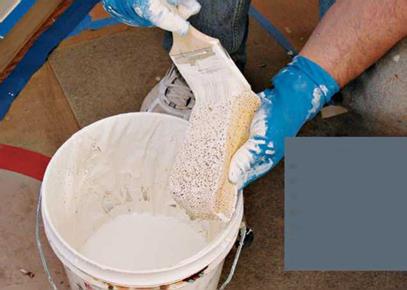
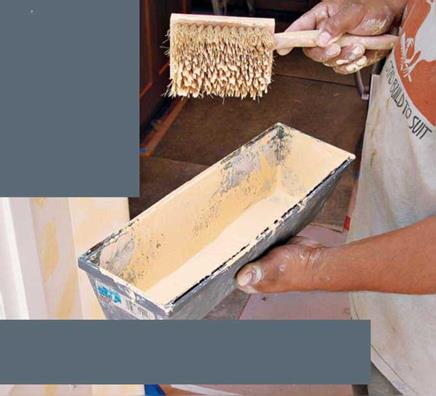
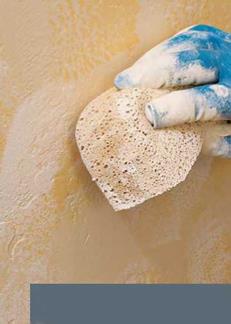
Подпись:Подпись: 3. Pat the second accent color on. Then flip the sponge to its dry side and gently move the color around, spreading paint, not removing it; the wet side of this sponge would have streaked the paint. Stand back periodically to check whether the faux effect looks consistent from wall to wall.

Primers and Paints*
Подпись: FAUX
Primers and Paints*
Подпись: 1. After pouring a small amount of the first accent color into a shallow container, load your stippling brush lightly. Then quickly jab the bristles at the wall to create a stippled effect. Follow with a dry rag, lightly patting the just-applied paint to flatten the stipple points. Just flatten the points, don't remove the paint itself.

image913image914image915If trim edges are thinner than Yu in., they’ll be difficult to cut-in without spreading trim paint on the wall. In that case, overlap the wall paint onto the trim edge so that it covers the edge completely, producing a clean, straight line. In other words, the thin edge of the trim will be covered with wall paint, not enamel, but your eye won’t notice.

Windows sashes vary greatly in design. But as a general rule, paint them from the inside of the sash out. That is, if sashes are divided into multi­ple panes by muntins (narrow wood sections between panes of glass), paint the muntins first. Then paint along the insides of sash rails and stiles where they meet glass. Finally, paint the faces of sashes. To develop a rhythm, paint all the

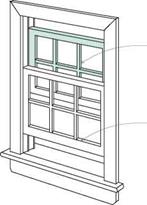
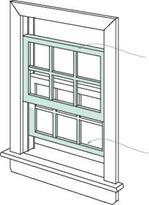
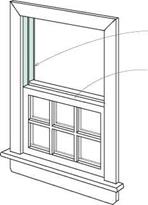
Подпись: I Painting a Double-Hung Window (Interior View)Подпись:Подпись: 2. Reverse the position of the sashes and paint the rest of the upper sash.Подпись: Raise outer sash.Подпись: Lower inner sash.image916Подпись: 3. Once the paint is dry enough to handle, lower both sashes completely and paint the upper half of the jambs. When that's dry, raise both sashes, and paint the lower half, and then the window trim.vertical muntins—one side at a time—then the horizontal muntins. By painting similar windows elements at the same time, rather than jumping around, you’ll be less likely to miss elements and the work will go faster.

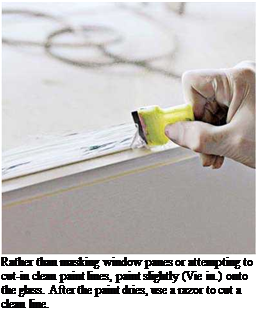
Don’t worry about cutting in clean edges at the glass. Instead, paint slightly onto the glass (Кб in.), even if unevenly, thus creating a tight seal. After the paint dries, use a razor to cut a clean line on the glazing.

image917

Raise inner sash.

Lower the outer sash and paint its lower half.

image918

Jambs

Lower and later raise both sashes to paint jambs and trim.

Open windows to paint their edges. When painting double-hung windows, follow the steps at left. If you are repainting the exterior of the house at the same time, go outside and paint the accessible parts of the window. Slide the window sashes back to their original position, and finish painting. To prevent binding, move the sashes as soon as the paint is dry.

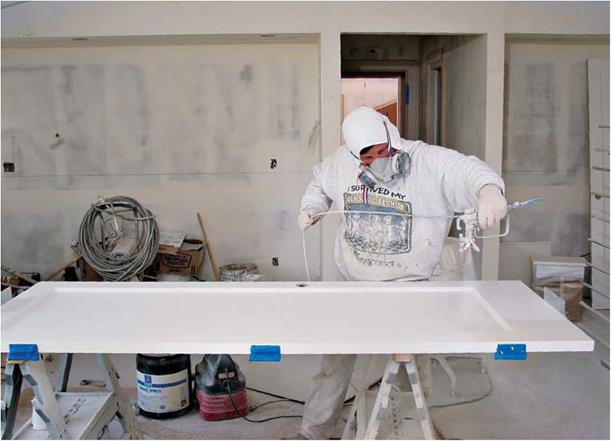
Painting a door is easiest if you pull its hinge pins and lay it across a pair of sawhorses. (If that’s not possible, shim beneath the door so it can’t move.) For the best-looking results, remove all door hardware except hinge leaves, especially if you’re spray-painting. Cover the hinges with masking tape. If you prefer not to remove the old latch mechanism and escutcheons, carefully mask them too.

If you’re brush-painting a flush door (flat sur­face), divide it into several imaginary rectangles, each half the width of the door. Apply paint with the grain and overlap the edges of adjacent sections. Work from top to bottom. Painting panel doors is similar, but work from the inside out: Paint the insides of the panels first, next the rails (horizontal pieces) top to bottom, and finally the vertical stiles.

Painting cabinets is faster if you remove and spray-paint drawers and doors, and brush-paint cabinet frames. You’ll need a spray room isolated from the house (a clean garage is ideal); a drying rack for doors; and a sprayer, which you can rent.

Be sure to read the earlier sections on paint­ing safety and spray-painting, which emphasize ventilation, using electric heat in spray and dry­ing rooms, and wearing a respirator mask.

Start by washing doors and drawer fronts, especially those near the kitchen stove. If your cleaner isn’t cutting the grease, try TSP or denatured alcohol, wearing goggles and gloves. That done, examine the cabinet parts and their hardware, and plan to replace the doors or drawer fronts that are warped or not repairable, as well as hardware that’s broken or outdated. Before dis­assembling cabinet parts for spraying, assign each door and drawer a number. Write these numbers just inside the cabinet frame, where they won’t be covered by paint. Number the doors on bottom edges (least visible) or behind the hinges.

If you’re reusing the hinges, use a utility knife to score the hinge locations into each door. Note: Tape over door-hinge mortises if you’ll reuse the hinges. Otherwise, paint buildup in the mortise may misalign the hinges and thus the doors. Either cover the mortises with tape or leave the hinges on the doors and mask off the hinges.

Remove hardware before prepping the doors. If existing paint is flaking or the doors are dented, start with 100-grit sandpaper in a random-orbit

image919

To spray-paint a door, first place it across sawhorses at a comfortable working height. Mask hinges to keep paint off and ensure that the doors will hang correctly when reinstalled. Then move the sprayer smoothly and continuously, maintaining a constant distance from the surface. Overlap preceding passes by about a third. On each pass, begin spraying before the spray tip is over the door, and don’t release the trigger till the paint fan is past the far edge. Use your free hand, as shown, to keep the hose out of the way.


sander, wipe off dust with a damp rag, and then fill cracks and holes with nonshrinking wood filler. Repeat the sequence as needed, ending with a 220-grit sanding by hand. However, if the old paint is in good condition, a single pass with 220-grit paper and a damp rag is all you’ll need to prep before painting.
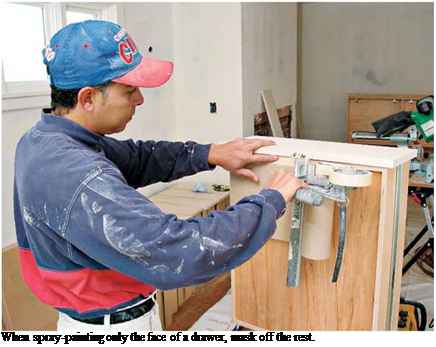
Подпись: When spray-painting only the face of a drawer, mask off the rest. For the most durable surface, apply a coat of primer-sealer, followed by three coats of enamel, which will hide well, even if you’re applying light paint over dark. Use acrylic-latex paint for the primer and finish coats, even if the cabinets are presently covered with oil-based enamel. Top – quality latex enamel is almost as tough as any oil – based enamel, it dries faster, and it’s much easier to clean up. To minimize runs, keep the doors horizontal during spraying and drying. Between coats, sand lightly with 320-grit garnet sand­paper. Painting drawer faces is essentially the same, except that you should mask off the drawer sides. Paint cabinet frames from the inside out, finishing with long, vertical strokes on the frame faces.
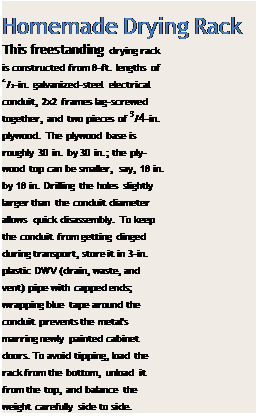
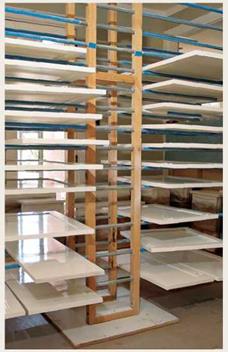
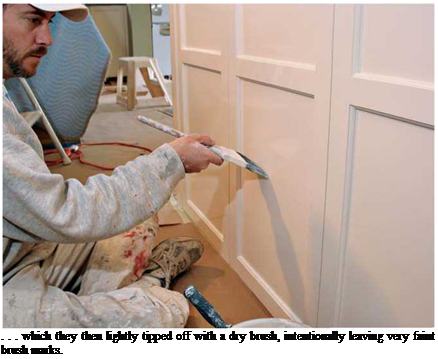
Подпись: Homemade Drying Rack This freestanding drying rack is constructed from 8-ft. lengths of ‘/2-in. galvanized-steel electrical conduit, 2x2 frames lag-screwed together, and two pieces of 3/4-in. plywood. The plywood base is roughly 30 in. by 30 in.; the ply-wood top can be smaller, say, 18 in. by 18 in. Drilling the holes slightly larger than the conduit diameter allows quick disassembly. To keep the conduit from getting dinged during transport, store it in 3-in. plastic DWV (drain, waste, and vent) pipe with capped ends; wrapping blue tape around the conduit prevents the metal's marring newly painted cabinet doors. To avoid tipping, load the rack from the bottom, unload it from the top, and balance the weight carefully side to side. image921Подпись: PROTiP To paint both sides of a door without waiting for the first painted side to dry, drive a pair of nails into the top and bottom of the door; then rest those nails on a pair of sawhorses. You and a helper can grab the nails and flip the door over. When both sides are dry, pull the nails; then fill and paint the holes. 1111 ^^PROTiP For some old-house purists, spray-painted finishes are too perfect. So, after spraying two finish coats, they use a 6-in. roller to apply a thinned (10 percent to 15 percent) final coat. They then tip off the surface with light strokes of a brush tip. Use a 3/8-in. mohair roller cover, which will not shed. Easy does it: Brush marks should be faint—barely visible, in fact. Подпись: 1111

Stripping and Refinishing Interior Trim

Natural wood can be handsome, but stripping layers of old paint or dulled finish is an enor­mously tedious, messy job. The following ques­tions and tests may give you easier options.

SIX QUESTIONS BEFORE STRIPPING

► What kind of wood? Builders often used plain or inferior-grade softwood for trim they intended to paint. Test-strip a small section to see if the wood is worth stripping. Common pine or spruce and badly gouged wood probably aren’t.

► How thick is the wood? If wood paneling is a Иб-in. veneer, it may be too thin to sand, let alone scrape and strip. © After turning off the electrical power, move panel battens (vertical pieces) or electrical outlet covers to see the edge of a panel.

► What kind of paint? Trim paint in houses built before I960 likely contains lead, which becomes hazardous if you sand it or heat-strip it. Yet it may be perfectly safe if it’s intact and well maintained. Analyze a paint sample, as explained on p. 443. Also, the more paint layers, the bigger the mess.

► Clear finishes that have become dull and grimy may just need a good washing. Using a damp rag, rub Murphy’s® Oil Soap onto a small section and wipe it dry quickly. If that clouds the surface, stop; but if it brightens the woodwork, keep going.

► If a clear finish remains dull after a test – wash or is worn looking, scuff-sanding and

a new application of the old finish may do the trick.

► If painted or clear finishes are cracking, peeling, or otherwise coming off, new coatings won’t stick. To test adherence, use a utility knife to lightly score a 1-in. by 1-in. area into nine smaller squares (like a tic-tac-toe array). Press a piece of duct tape onto the area and pull up sharply: If two or more little squares pull off, you should strip the paint or finish.

STRIPPING SAFELY

Before stripping woodwork, read "Painting Safely,” on p. 440, and "Lead-Paint Safety,” on p. 442. Many of the concerns when stripping are the same as those when painting. Most impor­tant, wear a respirator mask with replaceable filters. Also wear rubber gloves, goggles, and a long-sleeved shirt. Lay down plastic tarps (or lay­ers of newspaper) to protect floors and capture paint debris, mask off areas you’re not stripping, and ensure adequate ventilation. Even if a chemi­cal stripper is relatively odorless and claims to be eco-friendly—keep it off your skin and out of your lungs! Read instructions for all stripping chemicals before using them, and if you’re using a heat gun, have a fire extinguisher close by.

STRIPPING METHODS

Test-strip small sections of woodwork to see which method—or combination of methods— works best for you.

image922

Stains and clear finishes are thinner than paint and more inclined to run, so mask off adjacent areas before starting prep work.

Metal scrapers with straight edges work well on flat surfaces without too many layers of paint or clear finish. A scraper with changeable heads enables you to scrape varying contours. For best results, hold the scraper head roughly perpendi­cular to the surface and pull the tool toward you. Caution: Sharp scraper heads can easily gouge wood, especially softwoods like fir and pine, whose contours may obscured by thick paint.

Heat guns soften paint so you can scrape it off. Heat guns can remove many layers of paint, but stay alert when using them. Maintain a constant distance from the surface you’re stripping, and keep the gun moving so you don’t scorch one spot. Using a heat gun on shellac and varnish gets tricky because they have low kindling tem­peratures and tend to burn when heated; first, try stripping them with metal scrapers.

What’s That Finish?

To identify your woodwork’s finish, rub on a small amount of the test-solvents in this list, starting at the top of the list (the most benign) and working down till you’ve got your answer. When applying solvents, wear rubber gloves, open the windows, and wear a respirator mask.

► Oil. If a few drops of boiled linseed oil soak into the woodwork, you have an oil finish: tung oil, linseed, Watco® or the like. If the oil beads up on the surface, the woodwork has a hard finish, such as lacquer, varnish, or shellac. Keep investigating.

► Denatured alcohol. If the finish quickly gets gummy, congratulations! It’s shellac, which will readily accept a new coat of shellac after a modest sanding with an abrasive nylon pad or 220-grit sandpaper. Older woodwork with an orange tinge is often shellac-coated.

► Mineral spirits (paint thinner). This

will dissolve wax immediately. Dampen a rag and wipe once. If there’s a yellowish or light brown residue on the rag, it’s definitely wax.

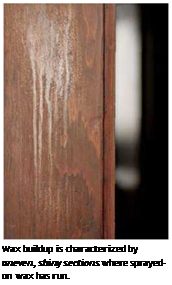
If your woodwork finish has an unevenly shiny, runny appearance, suspect spray-on wax.

► Lacquer thinner. This solvent dissolves both varnish and shellac, so try denatured alco­hol first. If alcohol doesn’t dissolve the finish but lacquer thinner does, it’s varnish.

► Acetone. This one will dissolve varnish, too, in about 30 seconds. But if acetone doesn’t affect the finish, it’s probably polyurethane.

Never use a heat gun next to glass—for exam­ple, on window muntins—because you could crack the glass. Heat guns can also ignite dry materials within walls, so stop using guns well before the end of the workday so woodwork can cool. Before you leave for the day, sniff around for smoke or "hot smells.”
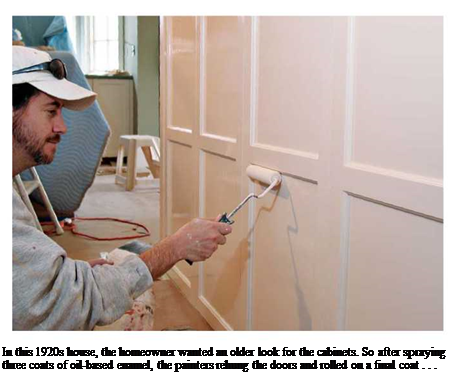
Подпись:Подпись: In this 1920s house, the homeowner wanted an older look for the cabinets. So after spraying three coats of oil-based enamel, the painters rehung the doors and rolled on a final coat . . . Подпись: . . . which they then lightly tipped off with a dry brush, intentionally leaving very faint brush marks. For chemical strippers, a rule of thumb is the stronger and smellier the chemical, the faster it

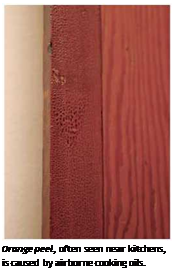
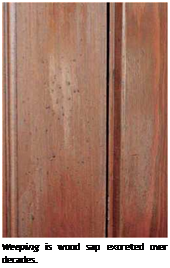
Подпись: COMMON CLEAR-FINISH PROBLEMS Подпись: Orange peel, often seen near kitchens, is caused by airborne cooking oils. Подпись: Weeping is wood sap excreted over decades. Подпись: Wax buildup is characterized by uneven, shiny sections where sprayed-on wax has run. will strip paint or finish. For example, methylene chloride will soften multiple layers in 10 minutes to 15 minutes; whereas “safe” DBE (dibasic ester) based strippers may need 24 hours. Given enough time to work, a stripper should soften all layers of paint or finish. Follow the stripping­time recommendations on the container label. By the way, semipaste strippers are best for vertical surfaces. Even when brushed on thickly, they won’t run.
Chemical strippers require patience and care. Use a rag to cover the cap before opening the container, so stripper won’t splash on you. Pour stripper slowly into a work pail, and close the container immediately so it won’t spill if the con­tainer is bumped or knocked over. As you apply stripper, brush away from yourself. To avoid tracking stripper throughout the site, replace plastic tarps as they become fouled with softened paint. Or lay down newspaper, which is cheap and easy to roll up before stuffing it into a garbage bag.

Once your tarps or newspaper are in place, brush on stripper liberally. A 18-in. to 14-in. coating of stripper should stay wet long enough to soften all the layers of paint or finish. To make sure that slower strippers stay moist, press a sheet of light­weight plastic (polyethylene) right onto the stripper-coated woodwork; the stripper won’t dis­solve the plastic. Periodically lift an edge of the plastic and try scraping off the paint. Be patient: Remove the plastic only when the softened paint scoops off easily. Till then, leave the plastic on.

Although renovators usually use a wide spack – ling knife or a putty knife to scoop off softened paint, a wooden spatula with a beveled edge is a near-perfect tool because it won’t gouge the chemically softened wood. Whatever tool you use, unload sludge from your scraper after each pass. Use a toothbrush, a nylon potato brush, or a handful of wood shavings to dislodge softened paint from detailed or hard-to-reach areas. Only occasional spots should need additional stripper.

When the woodwork is bare, scrub off the stripper residue with a solvent recommended by the manufacturer—typically, mineral spirits applied with a nylon abrasive pad, then blotted dry with paper towels. Follow that with a dilute solution (5 percent to 10 percent) of household cleaner in warm water and wipe that off with paper towels. Allow the wood to dry thorough­ly—at least a day or two—before filling holes or sanding. Note: Don’t use steel wool to scrub strip­per or remove paint. Otherwise, steel particles can stick in the wood and then rust, marring the new finish.

image928

This hand scraper comes with six interchangeable stainless-steel blades, which will fit most contours you’re likely to encounter.

REFINISHING WOODWORK

Once your stripped woodwork has dried, patch it with wood putty that dries to the same color as the unfinished wood. (Putty lightens as it dries.) Test a number of putty colors, allowing each to dry well before test-staining or finishing. When a patch is so hard that your thumbnail can’t gouge it, the putty’s dry enough to sand.

Sanding. If the woodwork is in good shape and doesn’t need filling, just scuff-sand it (sand it lightly) with 220- or 320-grit sandpaper before applying a clear finish. More likely, you’ll need to use several grades of sandpaper, starting with 80-grit or 100-grit to sand down tool marks or dings, moving on to 150-grit, and ending with 180-grit or 220-grit.

Sand sections completely with one grit before switching to another, even if you think an area is smooth enough. If you switch from 120-grit to 150-grit while sanding a baseboard, for example, it may have two different shades when you stain or finish it.

If there’s a lot of woodwork to sand, use a palm-size power sander (also called a block sander) for the first three sandings, and finish up by hand sanding with the wood grain, using 180-grit or 220-grit garnet paper. Wrap sand­paper around a standard blackboard eraser or a scrap of 2×4 to hand-sand flat areas; sandpaper wrapped around a dowel works well on concave areas. After sanding, wipe or vacuum the surfaces to remove the dust.

On Priming Painted Surfaces

Primers bond to substrates and provide a sta­ble base for finish coats. Thus it’s wise to prime previously painted surfaces in the following situations:

► You’re switching paint types—say, apply­ing latex over oil-based.

► The old paint is flaking, chalking, stained, or otherwise in bad shape.

► The old paint is glossy and thus would prevent the new paint from adhering well.

Before applying primer, scrape, fill, sand, wash, and rinse the surface and allow it to dry thoroughly.

In general, like bonds best to like. That is, latex paint bonds best to latex primer, oil-based to oil-based. But a quality acrylic latex primer is a good all-purpose choice because it bonds well and suppresses water stains, crayon marks, smoke, rust, and creosote. However, if you get severe bleed-through, switch to an oil-based sealer-primer instead.

Stickability test

Here’s how to test old paint before selecting a new paint, to ensure that the new paint will stick:

► Bend a paint chip that’s coming off.

If it cracks, it’s oil-based; if it flexes, it’s latex.

► Duct-tape a wet sponge to the wall; then wait 15 minutes. If there’s paint on the sponge or you can rub any off the wall, it’s latex.

► Put a few drops of latex solvent such as Goof-Off® on a painted windowsill; if the paint bubbles, it’s latex.

sashes off-site or in an on-site "stripping room” will isolate a major source of lead dust. Old trim can be relatively brittle and tedious to remove and reattach, so strip it in place. Finally, shut off the central heating system during demolition and lead-abatement so it won’t recirculate lead dust throughout the house

Contain and clean up the mess. Use sheet plastic to isolate and contain the mess. Duct tape it across door openings to seal off work areas from living space, and cover floors with a double layer of 6-mil plastic duct taped to baseboards to keep it in place. If two layers of plastic prove too slip­pery, protect the floor with rosin paper or heavy cardboard instead, and cover that with plastic.

The top layer of plastic will catch the debris and dust, so roll it up and discard it when demolition is done.

Outdoors, sheet plastic is also indispensable for lead abatement: Run a drop cloth of 6-mil plastic at least 8 ft. out from the building, to catch paint chips and the like. Duct-tape it to the foundation so it will stay put. Because it’s not feasible to physically isolate the outside of a building, you’ll need power tools with vacuum attachments to capture lead dust generated by a sander or power scraper. A HEPA-filtered vacuum will capture about 95 percent of the dust; the plastic drop cloth needs to catch the rest.

After stripping and vacuuming interior or exterior surfaces, hand wash contaminated areas to remove any residual lead dust. Don’t use a power washer, which can soak the walls and scatter the debris you’ve worked so hard to con­tain. Rather, use a three-bucket clean-up: (1) Spray on detergent, using either a spray bottle or a gardener’s pump sprayer before scrubbing the surface with a dampened sponge or a sponge mop. (2) Squeeze out the dirty water into the first bucket before dipping the sponge in a second rinse bucket and squeezing it again. (3) Dip a mop into a third bucket of clean water, squeeze, and you’re ready to repeat the process. Change the water in all three buckets often. Follow the NEPA’s NLIC suggestions for disposing of waste water.

Painting the Interior

If you see water stains, widespread peeling, mold, or large cracks that suggest structural movement, attend to the underlying causes first.

GETTING READY TO PAINT

When painting interiors, it’s best to move the fur­niture out. If that’s not possible, group it in the center of the room and cover it with a plastic tarp. Remove drapes, wall hangings, and mount-

Подпись: LINGERING PAINTimage906Подпись: As paint dries, it outgasses (gives off gases), releasing water vapor or mineral spirits and additives into the air. The warmer the room and the better the ventilation, the sooner the smells will dissipate. Labels on paint cans indicate drying times. Typically, in a room that is 60°F or warmer, acrylic latexes will be dry enough to recoat in 2 hours to 4 hours. Oil-based paints can be recoated in 24 hours. However, odors may linger because the paints need longer to cure: 8 days to 10 days for latex, 28 days to 30 days for oil-based paints.ing hardware, and fill holes. О Turn off electric power to the room—use a voltage tester to be sure it’s off—and remove the cover plates of electrical outlets and switches. Light fixtures or hardware left in place should be masked off or wrapped in plastic. Finally, cover the floor with canvas drop cloths—plastic is too slippery to work on.
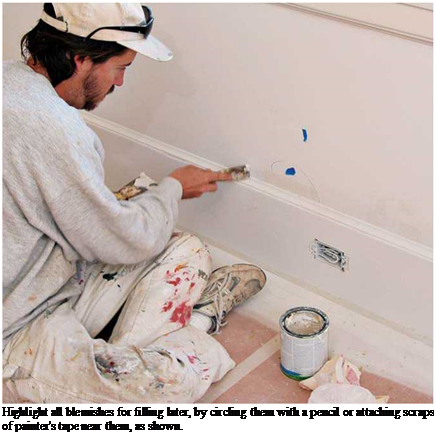
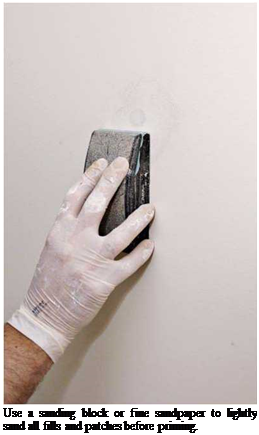
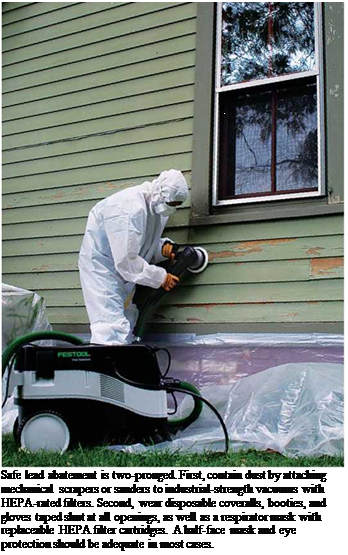
Previously painted surfaces don’t need much preparation if they are intact: Sand lightly with 150-grit sandpaper or a sanding block. If paint’s flaking or loose, remove it with a paint scraper or spackling knife. Then sand rough paint edges with 120-grit to 150-grit sandpaper. Use spackling compound to fill holes, and sand it when dry. Apply a bead of paintable caulk (acrylic latex) to fill gaps where the trim meets walls, smoothing it with a moist finger. Caulking makes the finished paint look much better.

Before you apply paint, lightly sand all painted surfaces so successive coats will adhere better. After sanding, dry mop or vacuum surfaces to remove dust. Then sponge wash them with a mild detergent solution and rinse with clear water. If the walls are especially greasy (kitchen walls, for example), use a more aggressive cleaner like TSP (trisodium phosphate). After rinsing, allow walls to dry thoroughly before painting.

A good test of dryness is to check whether a piece of transparent tape will stick or not.

Unpainted drywall and plaster must always be primed. You can prime drywall as soon as the final, top coat of joint compound has dried and has been sanded. Some pros still prefer an oil – based primer for drywall, but today’s acrylic latexes seal as well and are far easier to clean up.

Подпись: Highlight all blemishes for filling later, by circling them with a pencil or attaching scraps of painter's tape near them, as shown. Подпись: Use a sanding block or fine sandpaper to lightly sand all fills and patches before priming.

Plaster surfaces must be cured thoroughly before painting. Although latex primers can be applied as soon as the plaster is dry to the touch, it’s better to wait 3 weeks to 4 weeks. Latex paint allows some migration of moisture, so plaster can continue to "breathe off’ water vapor. Restorationists familiar with plaster recommend

diluting latex primer 15 percent with water so its coating is thinner and even more permeable.

Oil-based paints are another story. Because the alkali in plaster can remain "hot” for up to 3 months, wait that long before using oil-based paints. Otherwise, free alkali in the plaster will attack the paint. Akaline-resistant primers for­mulated for new plaster may shorten your wait somewhat, but they must be special ordered.

But before ordering, make sure that primer will be compatible with your final-coat paint.

PAINTING CEILINGS AND WALLS

Before painting, read this chapter’s earlier sec­tions on equipment (especially respirator masks), safety concerns, and painting basics. All offer tips that can save you hours and keep you safe.

SPRAY-PAINTING BASICS

The information in this section is generally true for all spray applications. You’ll find other sug­gestions later in this chapter.

Wear a respirator mask with two replaceable organic-vapor filters. If you’re spray-painting exteriors, a half-face mask should be adequate. For interiors, where paint concentrations build up quickly, wear a full-face respirator mask.

Never touch a spray tip while it’s spraying:

It will inject paint into your skin (and blood­stream), which requires immediate medical attention, including removing the affected skin.

Carefully mask off everything you don’t want painted—from ceilings to windows to shrubs. To protect large expanses, use 112-in. painter’s mask­ing tape to attach high-density plastic sheeting. To cover baseboards, windowsills, and the like, apply 12-in.-wide masking paper. Careful mask­ing takes time, but it’s crucial to ensure crisp spray-painted edges.

Before turning on the pump, make sure the spray-gun trigger is locked, the pump’s pressure control is turned to low, and the priming lever is turned off.

Test the sprayer on an inconspicuous area first, to make sure it’s operating correctly and to famil­iarize yourself with its fan pattern and volume. If the pressure is correct, paint will stick when the spray tip is 12 in. from the wall. But if the paint bounces back at that distance (coating the sprayer and your gloved hand), reduce the pressure.

If the sprayer clogs often, the paint may be contaminated and need straining. Buy strainer bags at a paint store or, in a pinch, strain paint through an old pair of panty hose or nylons.

Keep the sprayer moving in long, straight strokes. Hold the spray tip 12 in. away from the surface and overlap passes 30 percent to 50 per­cent. To prevent uneven paint buildup, move the spray tip parallel to the surface. If the surface you’re painting has distinct edges, start spraying just before the edge and don’t release the trigger until the paint fan is past the far edge. If you must start in the middle of a wall, begin moving your arm before pulling the trigger.

Use a hose that’s long enough so you can move freely around the work site. For exterior jobs you’ll need a 100-ft. hose; for most interior jobs, a 50-ft. one. As you spray, hold a loop of the hose in your free hand to keep it out of your foot path— and away from freshly painted surfaces. Sprayer hoses come in 50-ft. lengths with couplings on both ends.

Start at the top and work down as you spray. Because a fine paint rain falls when you spray, better that it falls on unpainted surfaces—which will be painted over for a uniform finish.

Use a cardboard painting shield to keep paint overspray off adjacent surfaces you have already painted or won’t paint at all, as shown in the top photo on p. 462.

Keep spray tips clean because they are easily clogged. So when you’re done painting for the day, soak them in the appropriate vehicle (solvent for oil-based paint, hot water for latex). If the tip is really gunky, soak it in lacquer thinner.

Replace the spray tip if, after cleaning it, its spray pattern is still blotchy or the spray unit seems to be guzzling paint. Solids in the paint actually abrade the inside of the tip, enlarging it over time.

Keep filters clean and replace them often.

Using a paint-appropriate thinner, clean filters every time you change paint colors, at the end of each day, and if you’re pumping a lot of paint— say, 40 gal. by lunchtime. A 100-mesh filter is minimum; coarser filters will admit debris that can clog the tip.

Lead-Paint Safety

The presence of lead paint in older houses is seri­ous, but it’s probably not a dire problem if your home is well maintained and old paint is well adhered. Lead is most dangerous when it becomes airborne, especially during sanding or heat stripping, for then it can be inhaled and easily absorbed into the bloodstream. So be

Подпись:

methodical: Postpone any demolition or paint removal, test to see if lead paint is present, and develop a plan for dealing with it. Then wear proper safety equipment, confine lead-paint debris, and clean up thoroughly.

Lead: Some background. Lead-based paint adheres to almost any surface and weathers well, so it’s not surprising that it can be found in 90 percent of houses built before 1940. However, as lead paints health hazards became known in the 1950s, paint manufacturers began to phase it out. It was banned altogether in 1978 by the U. S. government.

Because lead is a neurological toxin, it is par­ticularly damaging to children 6 and younger, who seem drawn to it because it’s slightly sweet. Breathing or eating it can cause mental retarda­tion in children. In people of all ages, lead can also cause headaches, anemia, lethargy, kidney damage, high blood pressure, and other ailments.

Because of its durability, lead paint was com­monly used on exteriors, glossy kitchen and bath­room walls, in closets (where a single coat would last forever), and as an enamel on interior doors, windows, stair treads, and woodwork. So each time a swollen window or sticking door was forced open, it ground lead paint into flakes and dust. Roof leaks, drainage problems, and inade­quate ventilation add to the problem because excessive moisture causes the paint to degrade and detach sooner.

DEALING WITH LEAD: FIRST STEPS

If you suspect that your house has lead paint, test it to be sure. There are several options:

► To test a cut-out chip, buy an inexpensive lead-testing kit from a hardware store.

► Or order a lead-testing kit from an accredited testing lab; some of these kits test paint chips, whereas others test for dust wiped from floors; the EPA’s National Lead Information Center (NLIC) lists testing labs at www. epa. gov/lead/nlic. htm.

► Or hire a certified lead-paint inspector to survey all the painted surfaces in your house. This will cost several hundred dollars, but you’ll get a written report.

If the home has lead paint, here’s an alterna­tive set of options:

► If the paint is intact and you don’t have small children, either leave the lead paint alone or paint over it to seal it in place.

► If you have construction experience, your renovation isn’t extensive, and you’re fastidious about cleanup, remove the affected materials yourself—or cover them with 14-in. drywall.

► Hire an experienced lead-abatement contractor. This makes sense if your renovation is extensive, there are small children at home, you can afford to hire someone, and local codes require it.

Finally, think through the project carefully even if you plan on hiring a contractor. Lead abatement will be very disruptive. During abate­ment, where will you live? (It’s unwise to stay in a house with airborne lead dust.) Where will you store your possessions? How will debris be contained and disposed? Start by consulting local building codes and visiting the EPA’s excellent NLIC site mentioned earlier in this section.

LEAD ABATEMENT: AN OVERVIEW

Although comprehensive guidance for removing lead is beyond the scope of this book, these sug­gestions will start you in the right direction.

Dress for the job. Wear a half-face respirator mask with replaceable HEPA filter cartridges and snug-fitting goggles; a full-face mask with HEPA filters is also appropriate but may be hot to work

Подпись: SAFETY ALERT Whenever you take a break, stop for lunch, or quit for the day, wash your hands well. Otherwise, you can easily ingest lead dust. At the very least, change out of your work clothes and take a sponge bath at the site before changing into clean clothes. This is definitely one time when you don't want to take work home with you. ими in. Workers occasionally exposed to lead dust should wear at least an N100 disposable respira­tor. Disposable coveralls, gloves, and booties are also a must; tape shut neck, wrist and ankle openings. Finally, change out of lead-dust – contaminated work clothes at work because wearing them home can endanger your family.

Minimize on-site dust. Use a spray bottle to wet areas before hand-scraping or wet-sanding them. A shop vacuum with a HEPA filter can capture fine lead dust and prevent it from recirculating into the room; standard vacuum filters aren’t fine enough for the job. Stripping doors and window

BRUSH BASICS

The pros work steadily and methodically and note what works and what doesn’t. The following tips will help you keep the job moving and get great results.

Подпись: As you load your brush, dip it only ’/> in. to 1 in. into the paint before tapping the tip sharply against both sides of the pail to remove the excess. Подпись: Smart painters recycle brushes. This one began life as a finish-coat brush. Then, as it got tired and splayed, it was used for primer coats. When its bristles became too crusty and its handle separated from the ferrule, it became a duster. Подпись: with an initial upstroke, excess falls back onto the roller cover.

Acclimate a new brush. Stand a new brush in 1 in. of oil-based paint for 5 minutes. After absorbing a bit of paint, the new bristles will release paint more readily when you start to work. Whereas thirsty new brushes may drag at first. It’s not necessary to acclimate brushes when using latex, which works into bristles within 20 seconds to 30 seconds.

Avoid overloading your brush. Most pros have only h in. to 1 in. of paint in the bottom of a paint pail when edging—and the same amount on the tip of the brush. With this small amount, you’ll cut a cleaner paint line and keep paint off the brush handle and your hands. And, should the bucket tip over, you’ll have less mess to clean up.

Retrieve loose bristles. If a bristle comes loose and sticks to the surface, pick it out by dabbing lightly with the tip of the brush. Quality brushes rarely lose bristles.

Paint with gravity. This is close to an absolute rule. Paint, as a liquid or mist, always falls or drips downward, so it’s better if it lands on unpainted surfaces—rather than painted ones. Best sequence: ceilings, walls, trim, baseboards.

Paint with the grain. When painting trim, brush paint in the direction of the wood grain. Painting cross-grain doesn’t help paint adhere better and will look terrible if brushstrokes dry quickly.

Steady hand, straight paint. Few pros use masking tape to achieve straight lines when brushing paint onto trim, window casing, and the like. Pros feel that tape takes too much time to apply and sometimes lets the paint seep under, leaving a ragged line. Besides, during removal, tape can pull off paint. Patience and a steady hand work better. With a little practice, it’s easier than you might think.

ROLLER BASICS

Acclimate roller covers to paint. Before using a new roller cover, work paint into it well. Load the cover with paint. Then roll it up and down the paint ramp to work the paint down to the base of its nap, and remove the excess.

Pros prefer ramps for paint rollers in 5-gal. buckets. Unlike roller pans, 5-gal. buckets don’t need frequent refilling, and there’s plenty of room to load the roller cover and roll off the excess.

The expanded metal ramp’s open grid also allows excess paint to fall directly into the reservoir of paint, rather than coating the side of the bucket.

Roll upward, after loading a roller with paint.

If you roll downward instead, you’ll be more likely spray excess paint onto walls and floors. Instead,

Roll paint in a zigzag. Roller covers contain the most paint during the first three to five passes, so first roll a Wor an Nto distribute "fat paint,” which you can then reroll to spread the paint evenly.

Lighten up with the roller once the paint is spread on the wall. This is especially important for outside corners (corners that project into a room). Too much pressure can make the roller skid or leave roller-edge marks.

Подпись: If there are two painters, divide the job: The first painter leads the way with a brush to "edge" the corners, trim, and other hard-to-roll areas. The second painter follows, rolling over the edging to hide brush marks, thereby giving the wall a uniform texture. The first painter should edge out 2 in. to 3 in. from the trim and corners, and the second painter rolls to within V2 in. 1111 Подпись: I Moving with Spray Gunimage904Подпись: To achieve uniform spray applications, move with the tool, as shown, rather than remaining in one spot and swinging the spray gun in an arc.