Category RENOVATION 3

Renting a Paint Sprayer

Don’t rent spraying equipment that isn’t well maintained. A first-rate rental company will size the pump to your job, recommend spray tips, and explain how everything works. For good measure, ask for an operator’s manual, too.

Finally, get satisfactory answers to these questions: (1) Is the equipment clean? Rental companies charge extra if equipment is returned uncleaned. (2) Was the last paint used in the sprayer oil-based paint or latex? (3) Can you show me how to use this model?

The last question is especially helpful if you’re a bit macho and don’t want to admit that you’ve never operated any sprayer before. Another face-saver is, "Say, run a little water and show me how to pressurize this, would you?" Don’t leave the rental yard without understanding how the equipment works.

Подпись: Amateurs mistakenly paint from a 1-gal. paint can instead of a painter's pail. Consequently, they dip into too much paint, which they then scrape off on the can lip. Better to dip into less paint and with two flicks of the wrist, Dip-tap-tap the brush on both sides of a pail. This removes excess paint that might drip, but leaves most of the paint on the brush, letting you paint farther.Подпись: 1111Подпись: PAINT FUMES AND OPEN FLAME: AN Explosive COMBINATION Volatile paint fumes build up quickly, especially during spray painting. Minimize the risk of explosion by choosing latex paint, increasing ventilation, and using electric heaters to maintain a 60°F drying temperature. (Forced hot-air systems will kick up dust.) Open-flame heaters are not acceptable because they can ignite concentrated fumes. Likewise, appliances with pilot lights can cause an explosion, so turn off the fuel to such appliances until paint fumes have dispersed. And, of course, never smoke in such a situation. (Theoretically, even a light switch spark could cause an explosion, if fumes were concentrated enough.)

Painting Basics

A quality paint job takes preparation, patience, and experience. In addition, professionals also learn how to streamline their moves. As one pro put it, "Any time you eliminate a move in paint­ing, you save time.”

PAINTING SAFELY

Almost all paints, including latex, contain volatile organic compounds (VOCs), which are hazardous. So although latex is relatively benign, the follow­ing advice is pertinent for all kinds of paints and stains.

Read the label. There’s valuable information on all paint containers: drying time, coverage, thin­ner data (what to use and how much), and safety instructions. Should an emergency arise—say, a child swallows some paint—the guidance you need may later be concealed under paint drip­pings. So read up before you open the can or, better, remove and save the label.

Don’t breathe paint fumes. Breathing paint or solvent fumes can make you dizzy; impair your judgment; and, over a sustained period, damage your brain, lungs, and kidneys. Set up a fan to blow fumes away from your work area, and always wear a half-face mask with replaceable cartridges. Rule of thumb: If you can smell fumes while wearing a snug mask, change the cartridge.

Ventilation is a particular problem when chemically stripping paints because the chemi­cals are strong and because heat guns, sanders, and scrapers increase airborne particles. The now banned lead-based paints are especially dan­gerous when inhaled or ingested, so if you sus­pect that you will be stripping lead paint, always test it before disturbing it. See "Lead-Paint Safety,” on p. 442, for more.

Avoid getting paint in eyes and on skin.

Although most water-based paints are innocuous,

Skin CARE

To minimize chemical contact with your skin, (1) wear goggles, especially when using chem­ical strippers; (2) use an extension pole so you don’t need to stand immediately beneath a roller; (3) don’t overload brushes and rollers; (4) brush or roll away from your face, espe­cially on the first few strokes after loading up with paint.

oil-based paints can be extremely irritating. In most cases, flush your eyes with water if you get paint in them, and visit a doctor immediately.

There are few things you can do to protect your skin. Before you start, apply lotion to your skin to reduce irritation and speed cleanup. Also, wear gloves, even when using latex, because any paint will irritate skin over time. Gloves are a must for oil-based paints.

When it comes to cleanup, painters have traditionally used paint thinner or turpentine to clean their hands and then washed with hot soapy water. However, hot water opens skin pores, causing them to absorb more solvent than otherwise. Instead of volatile solvents and hot water, it may be safer to use waterless hand cleaner and wipe it off with paper towels.

Store paint safely. Store paint where children can’t reach it. Solvents such as paint thinner, tur­pentine, and all paints—including latex—should be considered toxic and stored out of reach of children. (In fact, some "green” brands of latex such as Glidden’s 2000™ and AMF Safecoat® contain no VOCs, but you still wouldn’t want kids to drink them. So store these products safely, too.) Also, store paint where temperatures are moderate, because freezing ruins their bonding ability and heat increases their volatility. Close all containers completely so the paint doesn’t dry out and contaminants can’t get in. Never store rags or steel wool dirty with solvents, because of the danger of spontaneous combustion. Dispose of such articles safely: Most paint-can labels carry disposal suggestions, and many municipalities have annual curbside pickups of such materials.

SPRAY-PAINTING EQUIPMENT

In recent years, spray-painting equipment has become much easier to operate and maintain. Spraying is most appropriate where you’ve gota whole house to paint or where surfaces are ornate (gingerbread trim), multifaceted (shin­gles), textured (stucco), or otherwise difficult to cover with a brush or roller. Spraying is also smarter when you need to apply numerous thin, even applications, as on cabinet doors. The key to successful spray-painting, as with any painting, is thorough prep work. That is, begin by correcting moisture problems, removing loose paint and dirt, caulking and filling holes and gaps, and priming unfinished substrates.

Spray-painting safety begins with a respirator mask with two replaceable organic-vapor filters. If you’ll be spraying exteriors, a half-face mask should be adequate. For interiors, where paint concentrations build up quickly, wear a full-face respirator mask, gloves, a spray sock to keep paint mist off your head, and coveralls taped at the wrists and ankles. The greater the concen­tration of paint mist, the sooner filters will clog and cease filtering. Review additional comments on mask safety on p. 436.

Spraying equipment typically consists of a pump to pull paint out of a bucket, a connecting hose, and a spray gun. At this writing, you can

Подпись: Painting contractors overwhelmingly favor airless sprayers with reversible spray tips. Reversible tips allow you to clear clogs quickly—by turning the tip 180° and blowing out the obstruction—without needing to disassemble the spray gun. If you're concerned about applying too much paint with an airless sprayer, choose a smaller spray tip: say, a no. 511 or no. 611 tip for spraying cabinet doors and drawers.Подпись: ■ ill

image900

The right protective gear can keep paint mist off your skin and out of your lungs. This includes a respirator mask with replaceable vapor-filters, as well as a “spray sock" over your head, safety goggles, and disposable gloves.

rent contractor-grade equipment for $50 to $75 per day, or buy a quality setup for $1,200 to $1,500.

Compact, efficient airless sprayers have largely replaced the earlier units with their bulky com­

pressors, pressurized paint pots, and two hoses. Today, single-hose, airless sprayers deliver paint at up to 2000 lb. of pressure, atomizing paint at the spray tip. High-volume airless sprayers can apply coatings of varying viscosity, from thin to extra-heavy.

High-volume, low-pressure (HVLP) sprayers are usually recommended for novices because the lower pressure makes spray patterns easier to control and less likely to overspray. The disadvan­tage of HVLP sprayers is the risk of applying insufficient paint, resulting in a uneven, “orange – peel” paint texture.

Spray tips control paint volume and pattern, or fan. Fixed-size tips are coded with three-digit numbers: The first digit (2-9) indicates in inches half the width of the paint fan when you hold the tip 1 ft. from the surface being painted. The next two digits (00-99) indicate the size of the tip opening in thousandths of an inch. So a no. 518 tip will spray a 10-in.-wide fan (at 1 ft. away) and has an 0.018-in. opening.

A few manufacturers make adjustable spray tips, but they’re a specialty item. If, for example, you’ll be at the top of a 20-ft. ladder, need several different spray patterns, and don’t feel like climb­ing down the ladder to change tips, use an adjustable tip. But 99 percent of the time, fixed – size tips are the way to go: they cost less and maintain a precise aperture longer.

Tools and Equipment

Ladders and scaffolding are essential for many painting jobs. For more on them, see Chapter 3.

MASKS AND CARTRIDGES

Disposable paper masks will keep out sanding dust, but you need a filtered mask when spraying paints or applying chemical strippers. For any task involving leaded paint, wear a full-face respi­rator mask with replaceable HEPA (purple) car­tridges. For most paint applications, a half-face mask with replaceable organic vapor cartridges will be adequate. Masks vary, so pick one that fits your face snugly. To test the fit, when you cover cartridge openings and inhale, no air should enter the mask.

Cartridge life varies according to the chemical you’re using, the type of filter specified for that chemical, ventilation in your workspace, and the care you take to keep cartridges “alive” in stor­age. Change the cartridges whenever you smell fumes or whenever it becomes difficult to breath through the mask. Manufacturers suggest their own change schedules. For example, when filter­ing epoxy-based paints (very toxic) or urethanes, filters can become loaded in 8 hours. Whereas, filters for latex-based paints typically have a much longer change schedule—for example, 30 days or 40 working hours, whichever comes first.

BRUSHES

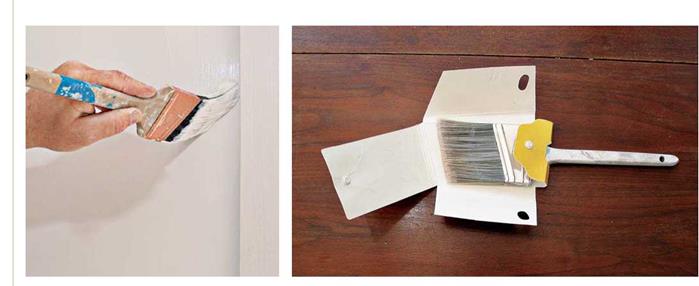
The bristles of high-quality brushes are flagged, meaning the bristle ends are split and of varying lengths, enabling them to hold more paint.

As you shop for brushes, pull lightly on bristles. Are they well attached to the metal ferrule on the handle? Then, when you gently press the bristles as though painting, they should spread evenly and have a springy, resilient feel. Avoid brushes with stiff bristles.

Bristle types. Bristles are either natural (hog bristles, for example) or synthetic (usually nylon). Use natural bristles for oil-based paints, varnishes, shellacs, and solvent-thinned polyurethanes. Use synthetic bristles for latexes. Nylon bristles may dissolve in oil-based paints; whereas natural bristles tend to swell and clog when used with the water-base of latex. Although some synthetic bristles work with either painting

Quality bristles fan out as you apply paint. Here, the tapered bristles of а 2’Л-іп. angled sash brush “cut" a straight edge where walls meet trim.


Heavy paper or cardboard covers help bristles keep their shape.


image897

Подпись: PROTIP Before storing brushes, wrap them in stiff paper to protect the original shape of the bristles. Never wrap damp brushes in foil or plastic bags: Damp natural bristles can rot, and paint thinner remaining in the bristles can dissolve plastic bags. llll

medium, once you’ve used a brush for a particu­lar type of paint, continue using it for that type.

The width of the brush should depend on the amount of paint to be applied. Because rollers and spray guns are best for large surfaces, spend your brush money on smaller, better brushes. Many pros praise the 21/2-in. angled sash brush as the most versatile brush in their arsenal; it’s wide enough to smooth out paint on baseboard trim, yet slim enough to "cut an edge” at corners and along window casings. If you own only one brush, this should be it. But if you’ll be painting many narrow window muntins, also buy a 1 ’/2-in. sash brush.

Brush care. Brush care begins with proper use. Don’t stab bristles into tight spots. Instead, stroke the paint on. When you take a coffee break, leave a moderate amount of paint on the bristles so your bristles don’t dry out.

Clean brushes immediately after you finish painting for the day. Remove excess paint from the bristles by drawing them over a straightedge, not over the edge of the paint can. Brush the remaining paint onto old newspapers. Clean the brush in an appropriate solution: paint thinner for oil-based paints, soap and water for latexes.

Wear disposable gloves during brush cleaning, and use your fingers to work the solution into bristles and all the way to the ferrule. After giving each brush a thorough initial wash, rinse it in a fresh batch of solution. When the brushes are clean, shake and brush out the excess solution. Rinse with warm water, shake out the excess, and comb the bristles. (Solvent-cleaned brushes require an intermediate cleaning with soap and warm water.) Don’t use hot water when cleaning brushes because it splits the bristles.

ROLLERS, PANS, POLES, AND PADS

Rollers enable you to paint large areas quickly and evenly. In addition to the familiar 9-in. cylin­der type, there are also 6-in. "hot-dog” rollers for tight spaces, such as inside cabinets, and beveled corner rollers that resemble a pointed wheel. There are also textured rollers, including stip­pled, faux finish, and distressed.

Choosing a roller cover. The surface and paint should determine the type of roller cover, also called a sleeve. For example, if you’re painting smooth walls, use a short-nap cover (/4 in. to И in.). Whereas, concrete block and stucco need a long nap (1 in. to 1й in.). Most covers are synthetic and work either with oil-based or latex paints. However, for fine finishes with glossy oil-based paints, use a fine-nap natural-fiber cover. For an ultra-smooth finish when rolling enamels, varnish, or polyurethane, use a fine-nap mohair cover.

Don’t buy cheap cardboard-backed roller cov­ers unless you intend to paint a single room with latex and throw the cover away. (Never use cheap roller covers with oil-based paint. The oil will pluck the fibers from the cylinders and leave them sticking to your wall.) Quality roller covers have plastic sleeves that survive repeated clean­ings. As you do with brushes, use a roller cover for only one type of paint, whether oil-based or latex.

Roller pans. Ramped metal or plastic roller pans are routinely sold in packages that include a roller frame and a cover or two, but pros rarely use roller pans. Occasionally, pros may use a pan to hold a small amount of paint for decorative painting. But when pros roll multiple rooms, they prefer a ramp of expanded-metal inside a 5-gal.

Подпись: Expanded metal ramps allow you to quickly load and roll excess paint into the bucket. Note the building paper protecting the flooring from paint spatters. paint bucket about half full. This ramp gives you room to load the roller and remove excess paint quickly—so you can keep painting, rather than repeatedly filling a roller pan.
Paint pads. Pads for paint are about the size of a small kitchen sponge and have a short nap. Generally, they are used to paint hard-to-reach spots such as insides of cabinets. They’re also

image899

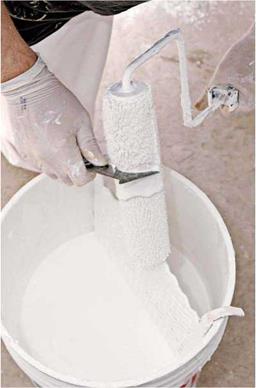
Before washing roller covers, use this painter’s 5-in-1 tool to remove the excess paint.

used for applying clear finishes such as polyurethanes to flat surfaces.

Extension poles. Whether sectioned or telescop­ing, extension poles are indispensable for reaching ceilings and upper parts of walls with rollers or pads. Because the poles tax mainly your shoulder and back, rather than your wrist and arm, they enable you to work longer with less fatigue. Another advantage: By painting with an exten­sion pole, you don’t need to stand immediately under the drizzle, known as "paint rain.”

Roller-cover care. If you buy quality roller covers, clean them as soon as you finish a job.

For this, wear disposable gloves. Before washing a cover, use a 5-in-1 painter’s tool shown below to remove excess paint. Then slide the cover off the metal roller frame and wash the cover in the paint-appropriate cleaner, working out the paint with your gloved fingers. Repeat the procedure with fresh cleaner. Then wash with soap and water. Blot the excess moisture with a paper towel or a clean rag. Air-dry the cover by sliding it onto a hanger somewhere; don’t let it lie on its nap while drying. Store the dried cover or pad in a paper bag or foil. If a cover or pad wasn’t cleaned properly and has become crusty, throw it away.

TIPS FOR THE PAINT STORE

Before heading for the paint store, calculate the square footage of surfaces to be painted. Then compare those figures with the coverage figures listed on the paint containers. Unless a wall is preponderantly glass, don’t bother to subtract the square footage of windows and glass doors from your total. You’ll eventually need the extra paint for touchups.

TIPS FOR THE PAINT STORE

Although some artists can hand – tint 5-gal. quantities to match existing paint, the rest of us should rely on paint-store mixologists. They have color charts, recipes, and accurate measuring tools.

The blue object at the lower right is a power-drill paint mixer.


image895

to Thin о

_____ •____ A. jlL*_____ »____ i_L

Подпись: OR NOT TO THIN?Подпись:Подпись: PROnP Less expensive than finish paints, tinted primers also hide more and therefore ensure a more uniform finish color. So you can save money by having your paint store tint the primer closer to the color of the finish coat. This is especially true if you're painting over existing paint that's darker than the new paint. 1111 Подпись: Predicting the coverage of stains is more difficult, especially if the wood is untreated. Add 15 percent to 25 percent if you need to special- order the stain and must wait more than a day or two for delivery. That way, you'll be ensured of enough stain to finish the job. If your paint job will be large, save money by buying 5-gal. rather than 1-gal. quantities. However, if it's more cost-effective to buy only a few 1-gal. cans, ensure uniform color by mixing their contents in a clean, empty 5-gal. bucket. This way, you'll avoid finishing one can in the middle of a wall and resuming with a noticeably different hue. Подпись: You may be able to extend the life of a filter cartridge by removing it from the mask, placing it in a sealed plastic bag, and putting it in the refrigerator. If you leave cartridges in a mask merely hanging in your shop or garage, they will be dead in about 3 weeks.Подпись: bntortnf tht cityПодпись:Подпись: Protect your lungs whenever you sand, scrape, or strip paint-even if there's plenty of fresh air. While heating old paint for scraping, this worker is wearing a lightweight dust mask with P100 particulate filters.image896Speaking of mixing, have your paint store mechanically shake the paint for you—unless, of course, the manufacturer’s instructions indicate it shouldn’t be shaken. For example, polyurethanes and varnishes trap air bubbles when shaken.

OIL-BASED VERSUS LATEX

Whether you’re painting exterior or interior sur­faces, latex paints are probably the best bet. The next sections explain why.

Two essential definitions.

► Oil-based paints and stains may contain linseed oil, tung oil, or synthetic resins called alkyds. Because alkyds are the most common "oil" in oil-based paints, professionals often use the term alkyd instead of oil-based. How­ever, oil-based is the broader, more inclusive term for products that must be thinned and cleaned up with solvents. Today only about 10 percent of house-paint sales are oil based.

► Latex paints and stains are water based and thus can be thinned with water and cleaned up with warm, soapy water. In recent

LANGUAGE: PRIMERS, PAINTS, AND STAINS

An important base coat, primer is applied to substrates such as raw wood, drywall, plaster, or previously painted surfaces. Above all, primers must stick to the substrate; they may also contain stain blockers, preservatives, pigments, or other additives to hide flaws and ensure more uniform top coats of paint.

► PAINT. If primer’s job is adhesion, paint’s is protection-protecting the primer and substrate from moisture, mild abuse, and (if it’s exterior paint) UV rays. Paint must also hold color, dry smoothly, and withstand weather, so its pig­ments, solvents, and additives must be carefully blended and held together by a binder, or resin.

► BINDER. Binders determine a paint’s pene­tration, adhesion, drying rate, flexibility, and durability. In relation to pigment, the more binder a paint has, the shinier and more durable its finish will be. Glossy paints tend to have high binder-to-pigment ratios.

► PIGMENT. Color is determined by pigment. The more pigment a paint has, the more intense its color and the better it hides what’s beneath.

► VEHICLE. A paint’s liquid component, the vehicle, is needed to suspend the pigments and binders. Oil-based vehicles (linseed oil, tung oil, or modified oils called alkyds) thin with mineral spirits, also known as paint thinner. Latex paints suspend polymer particles (plastic) in water.

► STAIN. Penetrating or semitransparent stains are most often pigmented oils that soak into wood and form a thin film on the wood’s surface; there are also water-based stains. You can see wood grain through stain. Although stains may contain water repellants, preservatives, and some UV blocking, they don’t protect wood as well as paint does and so must be reapplied periodically-say, every 2 years to 4 years.

► S0LID-C0l.0R STAIN. solid-color stain, a fast-growing group of exterior coatings, is more like thinned paint than stain. It’s popular because wood texture (but not wood grain) remains visible. However, solid-color stains have only about half the life span of painted surfaces. Acrylic latex solid-color stains are the most durable.

decades, latex paints have improved so dra­matically that they now account for about 90 percent of house-paint sales.

Oil-based: Advantages and disadvantages.

Oil-based paints are durable and tenacious, adhering even to glossy or chalky surfaces. Thus many pros still insist on an oil-based exterior primer, even if they’ll be applying latex top coats. Many old-school painters also favor oil-based paints for interior trim, because they dry slowly and level well, thus minimizing brush marks.

Problem is, oil-based paints never completely cure. Rather, they oxidize and, over the years, erode and crack. Any siding, especially wood, expands and contracts as temperatures fluctuate, so the inflexibility of oil-based paints leads to cracking and more commonly chalking, a pow­dery residue of oxidized oil and pigment. In addi­tion, mold feeds on the organic compounds in oil-based paints. But the biggest problem is their solvents: noxious, volatile, polluting, and tedious to clean off tools and equipment.

Latex: Advantages and disadvantages. Acrylic latex has almost everything a painter or a sub­strate could want: As the paint or stain dries, its water base evaporates with minimal odor, leaving a thin coat of polymer particles (plastic) that remains flexible and so rarely cracks, as oil-based paints often do. Latex is also semipermeable, so moisture generated inside the house can migrate, through the paint, to the outdoors. Because latex is synthetic, it’s inhospitable to mold. Finally, latex cleans up easily and dries quickly.

Inside, latex is the only paint to use on dry – wall, for it won’t raise the paper surface of panels.

Clear FINISHES

Clear finishes include polyurethane, varnish, lacquer, and shellac. Polyurethane, also called poly, is the most durable of the clear finishes and thus the most suitable for heavy-traffic surfaces, such as trim and stair parts. Although poly and varnish resist moisture, they may become cloudy with sustained exposure to wet conditions. Shellac also clouds up near water. Spar varnish—originally used on boats—has a hard finish that stands up well to water, if well maintained. For more about clear floor finishes, see Chapter 20.

Exterior latex is colorfast, durable, and easy to apply. However, its quick drying characteristic can be a problem if you’re painting an exterior in 90° heat, which causes the paint to dry on the brush. In that case, additives like Flood’s Floetrol® will slow drying time and so extend latex’s “brushability.”

Painting

Подпись: Sometimes art doesn't hang on a wall: It is the wall.

Painting is probably the most popular reno­vation task because its effects are immediate and striking. For not much money or effort, you can get a complete change of scenery and heart. If you own a few basic tools, your costs will be lim­ited to the few tools you’ll need to rent and the paint you choose.

This chapter covers both exterior and interior painting, including trim, doors, windows, and cabinets. For information on stripping and fin­ishing floors, refer to Chapter 20.

Essential Prep Work

If you want painted surfaces to look good and last long, the substrate—such as drywall, plaster, and wood—must be stable and dry before you start. Thus prep work (preparing surfaces) is crucial for a good paint job, vital advice that recurs in this chapter. Whether you’ll be painting a building’s interior or exterior, follow these guidelines:

► Correct structural or moisture-related problems.

► Scrape or sand down paint that’s poorly adhered or applied excessively.

► Sand surface irregularities.

► Choose primer that will adhere well and be compatible with the finish coats.

► Follow instructions on paint containers.

► Sand lightly between coats for better adhesion.

Choosing Paint

Manufacturers frequently reformulate their primers, paints, and stains, so look for a repu­table supplier who keeps up with changes. Before buying paint, examine the surfaces to be painted and think about the conditions it must endure. Then ask the following questions.

FOUR TELLING QUESTIONS

► Interior or exterior paint? Beware of any container labeled "interior/exterior.” It’s probably cheap. Quality exterior paints contain additives that repel moisture, block UV rays, and discourage mold. These additives are not substances you’d want to inhale indoors while the paint is curing. Thus never use exterior paints indoors and vice versa.

► Has the surface been painted before? Surfaces should be primed if they (1) have never been painted, (2) have been extensively scraped or sanded, or (3) are "chalky” or poorly prepped. However, if existing paint is

Подпись:Подпись: PROnP Buy the best paint and equipment you can afford. Good paint adheres better, dries smoother, and lasts longer. Generally, quality paint has higher percentages of solids (pigments and binders) that yield a thicker film of paint when dry. Using cheap paint is a waste of time and money. 1111 Подпись: ColorfulПодпись:well adhered, priming isn’t necessary; just paint over the old coat.

► What type of finish (sheen) do you want? Top-coat finishes range from flat (also called dull or matte) to semigloss (a. k.a. eggshell, velvet, satin) to gloss. Glossier finishes tend to be more durable and easier to clean, so they’re favored on doors and windows, on trim, and in high-use areas such as bathrooms and kitchens. Enamel, which dries to a hard, durable finish, is best for window sashes, doors, and casings.

► Is the surface unusual? There are spe­cialty paints for masonry; for hard, nonporous surfaces such as tile and glass; for often-damp areas; and for nonslip surfaces. There are even paints for acoustical tile that don’t reduce the tile’s sound-deadening properties. Check with your supplier.

FALSE BEAMS

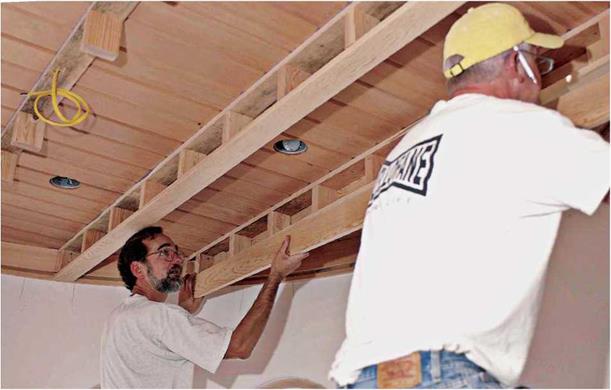
There are several ways to construct false beams. Two are shown here. The first is to make a ladder frame (imagine a ladder set horizontally) clad with finish boards. This type, shown below, runs perpendicular to ceiling joists so its top board can be screwed to them; end-nail "ladder rungs” to the top board before installing it. Once the top board is secured to joists, attach the bottom board and then the sides. A power nailer is a must because the assembly is shaky till all the boards are on.

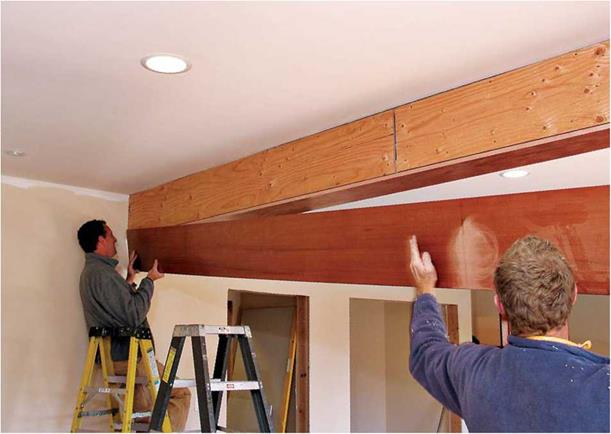
The second type, shown in the photos on the facing page, is more correctly called a box beam because there’s nothing false about the steel I-beam it’s disguising. You can order I-beams with bolt holes predrilled, making it easy to bolt plywood nailing blocks to them. The plywood shown was faced with clear fir on three sides and
stained to simulate redwood. Because the under­side of the box was most visible at eye level, the carpenters took pains to create an even reveal along the bottom of the beam. The gaps along the top of the beam were later covered by the crown molding shown in the top photo on p. 429.

WAINSCOTING

In the old days, when raised-panel wainscoting was constructed from solid wood, fancy joinery was required to accommodate the expansion and contraction of the panels. Today, thanks to the stability of MDF panels and readily available stock molding, you can create good-looking wainscoting with simple joinery (see p. 432). Once painted, this new wainscoting will be almost indistinguishable from that built with traditional materials and methods.

Construct the frame rails (horizontal pieces) and stiles (vertical pieces) from clear, straight 1 x4s; if you need more than one board to attain the length you need, use a biscuit joiner (see the

FALSE BEAMS

image888

Scan left to right on the ceiling, and you’ll see the evolution of a false beam. Preassemble the top board (which nails to the ceiling joists) and short nailer blocks. Install the bottom board, then the sides. Use a pneumatic nailer only, for hand nailing will loosen the assembly.


image889
BOXING IN A STEEL I-BEAM

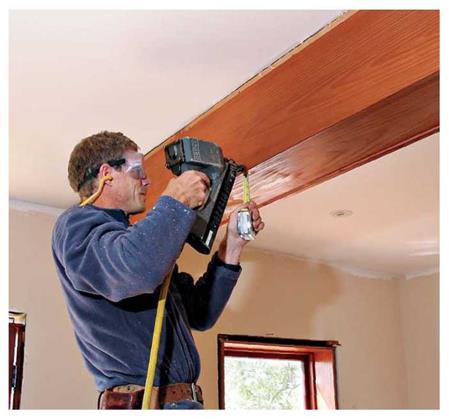
To provide nailing surfaces for the sides of the box beam, first bolt plywood strips to the predrilled I-beam. Attach the bottom panel of the box beam first, then the sides.

image890Because the underside is the most visible part of the box beam from eye level, measure to be sure the board reveals are consistent. Measuring also tells you exactly where the edge of the bottom board is—so nails don’t miss it. Cover gaps along the ceiling with crown molding.
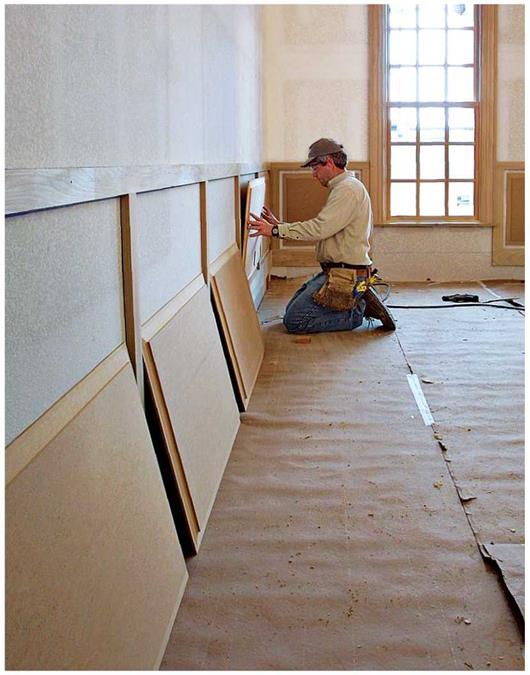
bottom photo on p. 407) to splice the board ends. Use this tool to strengthen the butt joints between rails and stiles, too. But first, snap chalklines onto the walls to indicate the position of rails and stiles; if any stiles coincide with elec­trical outlets, it may be easiest to relocate the outlets so that all the panels along a wall have a consistent width.

Assemble the frame on the floor. After allow­ing its glued and biscuited joints to cure, tilt the frame upright, and screw it to wall studs, using 15-gauge finish nails. To avoid stressing the frame joints, have a helper tilt it up and hold it atop spacer blocks as you nail it. The 54-in. MDF
panels are best routed in several passes to avoid frying the router and scorching the panel edges. Once you’re done routing, sand the panel edges lightly and nail them to the wall, leaving an even gap all around, between panel edges and frame elements.

Although you can use any type of stock mold­ing to cover the gaps around the panels, a shaped molding adds visual interest and has a traditional feel—bolection molding has a nice profile and a rabbeted back edge that seats neatly against frame edges. Cap the top of the top rail with molding too, to cover the slight gap between the frame and the wall.

After screwing the preassembled frame to the studs, insert shaped MDF panels, nailing them directly to the wall with 2-in. brads. Leave a 1-in. gap around each panel, which you’ll cover with stock molding.


image891

INSTALLING CROWN MOLDING

Crown molding dresses up the wall-ceiling joint, as do its fancy cousins cornices, which are formed from several boards. Crown molding can be as simple as a single piece of shaped trim angled along the corners of the ceiling, or you can pair it with a backing trim to ensure a solid nailing sur­face, which is not always present in an old houses with irregular framing and springy plaster.

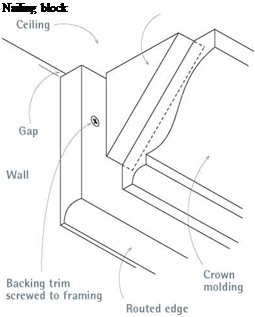
Start by locating and marking stud and joist centers on the walls and ceilings. Where joists run parallel to a wall or where you can’t find framing on a regular nailing interval, install a row of triangular nailing blocks along the tops of walls, as shown above. Predrill these blocks to avoid splitting them, and nail them with 8d finish nails to the top plates or studs, spacing the blocks every 24 in. to 32 in. Cut nailing blocks at the same angle as the crown molding, when correctly seated to wall and ceiling.

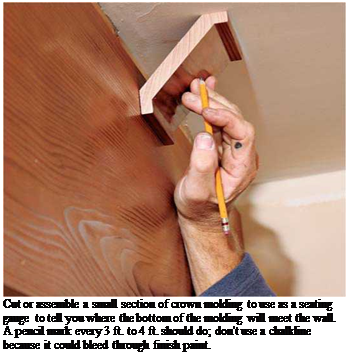
Подпись: Cut or assemble a small section of crown molding to use as a seating gauge to tell you where the bottom of the molding will meet the wall. A pencil mark every 3 ft. to 4 ft. should do; don't use a chalkline because it could bleed through finish paint. To determine that angle, cut a short section of crown mold­ing to use as a seating gauge.

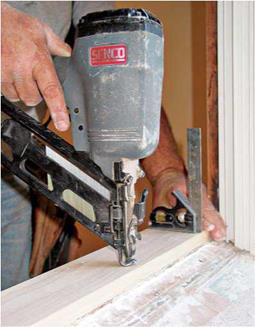
Hold the gauge so that trim edges seat solidly on both the ceiling and the wall. Using this gauge, make a light pencil mark every 3 ft. to 4 ft. so that when you nail up the molding you’ll have reference marks for its bottom edge. (Because crown molding is relatively thin, it easily twists and misaligns.) Nail molding roughly every 3 ft., or to every other 16-in. on-center stud and joist. If walls are too long for a single piece of mold­ing, splice boards over stud centers. Use a nailer to attach crown molding and cornices— hand-nailing is too erratic. If you’re nailing mold­ing to blocks, use 18-gauge brads to avoid splits; otherwise, use 6d finish nails. Nail the bottom edge first, then the top, keeping the nails back from edges by at least M in.

To install backing trim—basically, a flat board with a shaped bottom edge—snap a chalkline to line up the bottom edges of the trim. Backing trim is a godsend when you’ve got level upper cabinets but an unlevel ceiling. Install the back­ing trim level and the crown molding snug against the ceiling. The amount of backing trim revealed (exposed) will vary, but your eye won’t notice it. Use screws to attach the backing trim because they hold better and are less likely to fracture plaster. Before nailing up crown mold­ing, use a seating gauge to mark its position atop the backing trim.

As with baseboard molding, miter outside cor­ners, cope inside ones, and glue all joints before nailing them off. If the first piece of crown mold­ing is long enough to run from inside corner to inside corner, just cut both ends square, pop into place, and then cope the ends of adjacent pieces. Miter-cut the crown molding upside-down, with its bottom edge up—angled so that the molding’s lower edge rests against the back fence of the miter box, and the molding’s upper edge rests on the bottom of the miter box. (Inverting the mold­ing in the miter box is the only way to support both of the molding’s edges and re-create the same angle the crown molding will have when installed against the wall and ceiling. If you cut the molding right-side up in the miter box, the top edge of the molding would be unsupported.) Use the seating gauge you made earlier to estab­lish this angle on your miter saw: Screw a piece

of scrap to the saw bed to hold the molding stock in place as you cut it. When in doubt, test the joints by cutting and joining pieces of scrap.

And Crown Molding

As noted in "The Case for Not Leveling Trim,” on p. 415, baseboard and crown molding should follow floors and ceilings, rather than level lines projected across the walls. If floors and ceilings are level, fine. Otherwise, leveled trim next to out-of-level surfaces is glaringly obvious.

INSTALLING BASEBOARDS

Install the finish floors first, with a slight gap, typically i<2 in., between the wood flooring and the walls so that wood strips or planks can expand and contract seasonally. Baseboards thus cover that gap along the base of the walls. You should also install door casing before baseboards, so that baseboards can butt to side casing or plinth blocks. Back-cutting the baseboard slightly yields a tight butt joint against plinth blocks or casing, even if the trim boards are not perfectly square to each other.

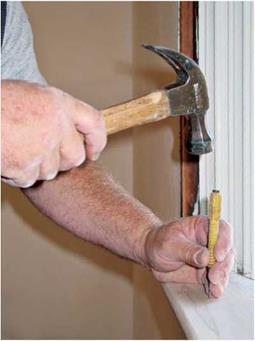
Locating studs beforehand will make installa­tion easier. If walls have been newly drywalled, look along the base of the walls for screws or nails where panels are secured to stud centers. Otherwise, rap the base of walls with your knuckle till you think you’ve found a stud. Then drive in a 6d finish nail to locate the stud exactly. Stud – finders work, but they are less reliable with plaster walls, whose lath nails meander all over the place.

Scribe the bottom of baseboards to follow the contour of the floor, especially if the floors are irregular. But first, shim the baseboard(s) up about 1 in. above the floor, butt one end of the board to a corner or a door casing, and tack the baseboard to a stud or two to keep it upright. Then run the scribe or compass along the bottom to transfer the floor contour to the baseboard.

Cut the scribed line with a fairly rigid jigsaw blade that can cut with the grain; a Bosch T1001D™, with 6 TPI works like a charm.

Baseboard joinery employs basic techniques described earlier. Miter outside corners, cope inside ones, and glue all joints before nailing

image878
CASING AN ARCHED WINDOW

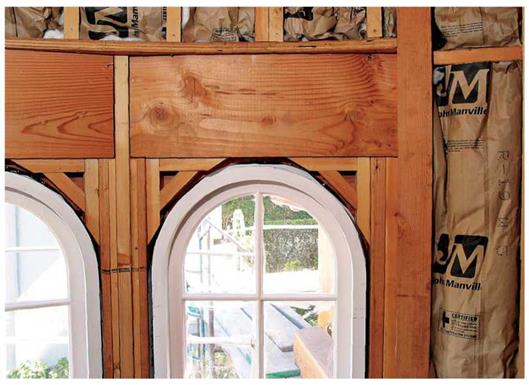
Arched windows require complex framing around the arch so you have something solid to nail finish walls and casing to.

image879

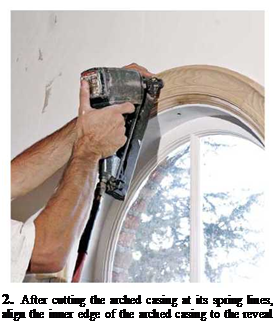
Подпись: 2. After cutting the arched casing at its spring lines, align the inner edge of the arched casing to the reveal line.

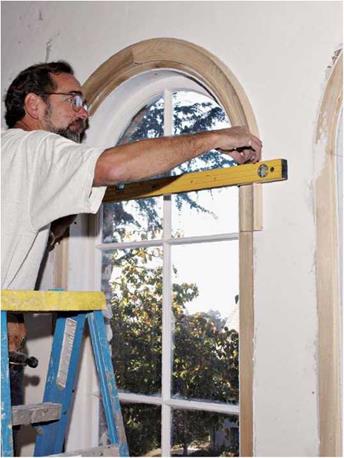
1. After scribing a reveal line along the edge of the arched head jamb, tack a finish nail at the apex of the line, and hang (balance) the arched head casing from it. Then level across the "spring lines" of the casing—the points at which the casing springs into its curve.

4. Work around the window, nailing the casing every 16 in. The thickness of the casing determines the nail size. In this case, the carpenter used 1-in. brads to nail the inside edge of casing to the frame edges, and 6d finish nails along the outside.


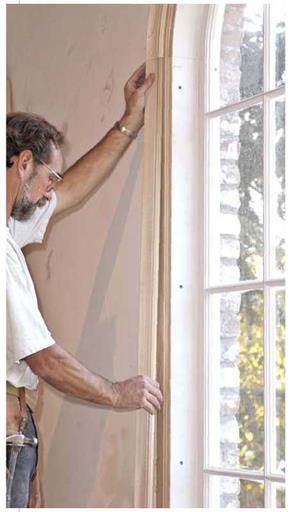
3. Next, install the straight side casing, cutting it a little long on the bottom and then trimming as needed till the casing fits tightly between the arched head casing and the window stool. After dry-fitting the side casing, apply glue, and tack it up.


5. If the casing is not wide or thick enough for biscuit joinery, angle 6d finish nails to draw the joint together. To avoid splitting the casing, you first need to snip off the nail points.


image881image882image883

Подпись: I Crown Molding and Blocking
Подпись: Nailing block

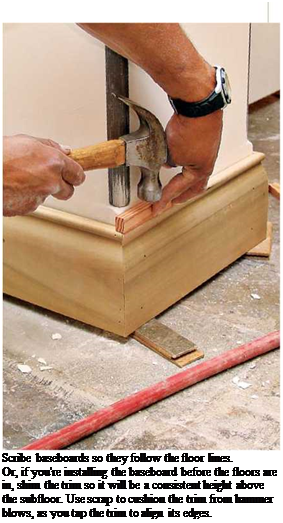
Подпись: Scribe baseboards so they follow the floor lines. Or, if you're installing the baseboard before the floors are in, shim the trim so it will be a consistent height above the subfloor. Use scrap to cushion the trim from hammer blows, as you tap the trim to align its edges. When installing nailing blocks without backing trim, nail the blocks directly to the wall plates. Keep a 1/16-in. space between the back of the molding and the face of the blocks to accommodate wall-ceiling irregularities.

Подпись: PROnP When ripping down a baseboard, keep the sawblade just off the scribed pencil line. After cutting, clamp the board to a bench and sand exactly to the line, using a belt sander held perpendicular to the board edge. In this case, 80-grit to 120-grit sandpaper is effective because it's not overly aggressive. 1111

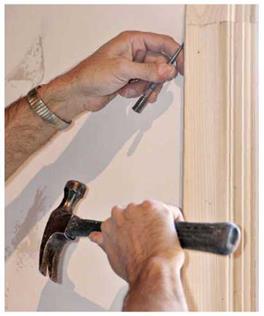
them off. Use two 8d nails (aligned vertically) at every other stud center, and use a single 4d finish nail top and bottom to draw mitered corners tight. Used as baseboard caps, standard mold­ings, such as quarter-rounds, can hide irregulari­ties between the top of the baseboard and the wall, and they dress up the top of the board. Where baseboards abut door casing and there’s no stud directly behind the end of the baseboard, nail the bottom of the board to the wall plate, and angle-nail the top to the side of the casing or plinth block, using an 18-gauge brad to avoid splitting the trim. Finally, set the nails, fill the holes, and caulk all seams before painting.

ATTACHING THE STOOL AND APRON

Lightly sand and prime the stool, including its underside and ends to prevent its absorbing moisture from condensation or driving rains. After the paint is thoroughly dry, apply water­proof glue to the underside of the stool, level it, and nail it to the rough sill using two or three 6d galvanized finish nails. Try not to lean on the only partially supported stool till it’s nailed to the top of the apron, which will steady the stool.

Next cut the apron, which is generally the same casing used for side and head casing, although here its thicker edge is butted to the underside of the stool. The apron should be as

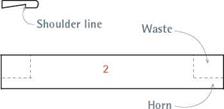
Подпись: 1. After transferring the interior dimensions of the window frame to the stool stock, cut across the stock till the sawblade reaches the stool shoulder.

long as the head casing so that it lines up visually with the outside edges of the side casing. If the apron is molded, cope each end to accentuate its profile or miter-cut it and glue on a return. If you’ll be painting the casing, caulk along the underside of the stool to prevent drafts. Then butt the apron to the underside of the stool. Nail up the apron, driving 6d finish nails into the rough opening beneath the sill. Finally, nail the

Cutting a Window Stool

INSTALLING A

WINDOW STOOL AND APRON


image870

Waste


image869

Start casing a window by installing its stool. Use a combination-square level or a torpedo level to level it, then 8d finish nails to secure it to the rough sill underneath. However, the stool won’t be stable till it is also nailed and glued to an apron under its inside edge.


2. Following the shoulder line, cut in from the ends of the stock to create horns.


3. Rip down the stock so its beveled portion butts the inner window sash, less Via in.


3


Final bevel width


Waste


4. Trim the horns of the stool so they protrude 3/4 in. beyond the side casings.


4


image871image872

Windowsills, STOOLS, AND APRONS

Windowsills have both an inner and outer life-one half is interior, and the other is exterior. It makes sense to pitch the outer portion of a sill so it can shed water.

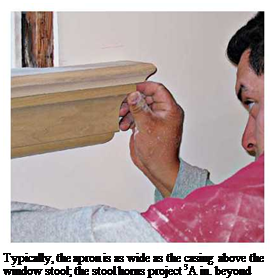
Подпись: Typically, the apron is as wide as the casing above the window stool; the stool horns project 3A in. beyond both. But in the old days, windowsills were pitched all the way, front to back, which created a uselessly pitched interior section that had to be covered with a stool piece, as shown in "Window Trim," on p. 421. To fit a pitched sill, usually set at 14° to 20°, the underside of a stool must be partially rabbeted at the same angle, so that when the stool is nailed on top of the sill, the top face of the stool will be level. It’s an archaic design but, surprisingly, it survives in some new window designs.
Many modern windows, however, have a sill whose interior portion is flat on top and flush to the insides of the window frame. Consequently, there’s no need for a stool or an apron. Such windows may be "picture framed." That is, the casing can be mitered around all four sides of the window frame.

If your windows have traditional stools and aprons, the trickiest part of casing the windows will be fitting the stools. Typically, a stool’s outer edge almost abuts the inside of the lower window sash (allow a 1/i6-in. space for the thickness of paint), and its interior edge overhangs the apron beneath it. And note that the stool’s "horns" extend 3/4 in. to 1V2 in. beyond the width of the side casings. You can still buy replacement stools for window renovations in older houses.

INSTALLING MITERED JAMB AND HEAD CASING

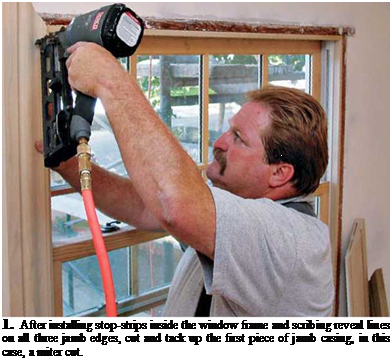
Подпись: 1. After installing stop-strips inside the window frame and scribing reveal lines on all three jamb edges, cut and tack up the first piece of jamb casing, in this case, a miter cut. image875
TIP

If yotlTe installing new or reattaching old door casing or baseboards, wait till the floors are finished. Otherwise, floor sanders and carpet knee kickers can bash the dickens out of trim.

ini

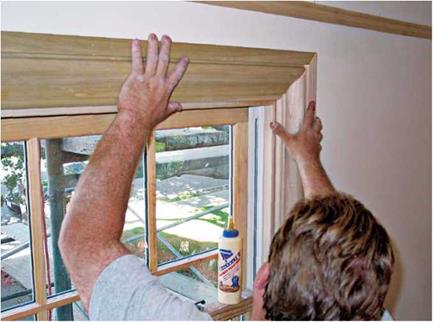
image876Подпись: 3. Set nails, fill holes, and touch-up sand all surfaces before finishing the wood casing. Generally, there won't be many nails to set if you've used a pneumatic nailer.2. Although many carpenters install both jamb casings before measuring the head casing, this carpenter chose to dry-fit the second jamb and head as a pair, so he could adjust the miter joint in place. An unglued biscuit held the pieces of casing together as he finessed the joint.
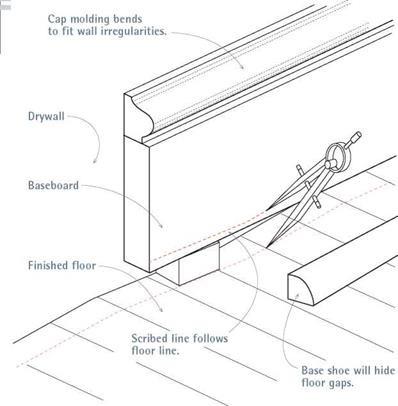
Подпись:image877Подпись: If you can't scribe and cut the bottom of the baseboard, use base shoe to cover gaps.Подпись: Arched Window Casing There's something inspiring about arched windows. Restoration carpenter Jim Spaulding (shown on the following pages) offers this advice: "Order all the casing from the same shop so that the same knives cut the arches and the legs (side casing). That way, all the profiles will sweep continuously around the frame." Arched casings are different from casings for other windows, and so installing them takes some flexibility. After setting the stool and apron, for example, you install its head casing next. Side casings are last. Although modern window makers offer a limited selection of prefab casing for the arched windows they sell, plan on custom-ordering casing for older arched windows. Correctly determining the radius of the arch is challenging: One method is to tack Vs-in.-thick plywood (also called doorskin) to the inside edge of the arched frame head-run it about 1 ft. below the "spring line" of the arch, where the frame becomes straight. Go outside and trace the arch, tracing lightly so you don't bow the plywood. Make templates for each arched window, and take them to a local shop that mills trim. Note: The inside edge of arched casing must be revealed (set back) from the arch you traced of the frame's inside edge.

stool to the top of apron, using three or four 6d galvanized finish nails. Set and fill those nails.

Install the side and head casing in the same order that you would case a door: side casing, head casing, and second side casing. The main difference is that window side casing sits on the stool horns. If you’re casing side-by-side windows with flat trim, you can run a single piece of head casing over both windows and butt the middle and side casings to the underside of the head casing, as shown, in in the top photo on p. 419.