Category RENOVATION 3

LAYOUT, STARTER ROWS, AND BEYOND

There are two places to install a starter row. The first and most obvious place is along a long wall. The second place is down the center of the room, which is recommended when rooms are wider than 15 ft., when rooms are complex, when several rooms converge, and when walls are out of parallel by 1 in. or more.

Flooring usually runs parallel to the length of a room, so start by measuring the width of the room at several points to see if the walls are par­allel. If the walls aren’t parallel, split the differ­ence eventually by ripping down the final row of boards on both sides of the room.

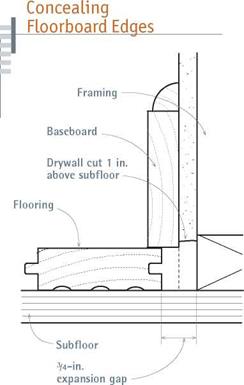
Use baseboards to conceal the expansion gaps. If baseboards aren’t thick enough to conceal the gaps, you may need to cut back the drywall as shown in "Concealing Floorboard Edges,” below.

Installing the starter row along a long wall. At

both ends of the room, measure out from the wall the width of a floorboard plus % in. for expansion. Snap a chalkline through those two points so you’ll have a straight line to align the starter row to. Place the groove edges of the first
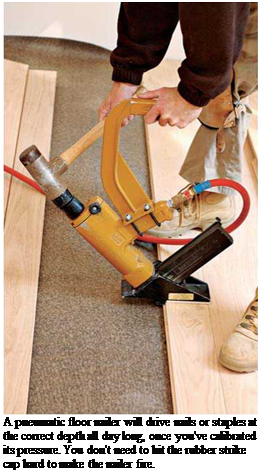
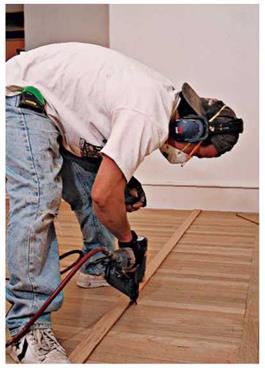
Подпись: A pneumatic floor nailer will drive nails or staples at the correct depth all day long, once you've calibrated its pressure. You don't need to hit the rubber strike cap hard to make the nailer fire.

image1011

When walls are out of square, baseboards or shoe molding may not be wide enough to cover the 3/4-in. gap wood floors require. In that case, trim the bottom of the drywall about 1 in. to gain additional space.
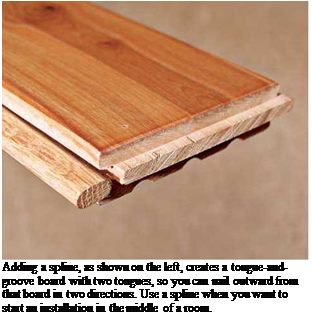
Подпись: Adding a spline, as shown on the left, creates a tongue-and-groove board with two tongues, so you can nail outward from that board in two directions. Use a spline when you want to start an installation in the middle of a room.

row toward the wall, so the boards’ tongues face into the room. If you pick straight boards for the starter row, successive rows will be more likely to stay straight. Face-nail the boards in the starter row, driving pairs of 6d or 8d nails every 10 in. to 12 in., and placing them in 1 in. from the boards’ edges.

If you use a pneumatic finish nailer to face – nail the boards, you’ll be unlikely to split them.

If you hand-drive the face nails, use a Me-in. bit to predrill for 6d spiral nails. In either case, sink the nail heads below the surface of the wood, and even­tually fill holes with wood putty. Next, use the pneumatic floor­ing nailer to blind-nail (nail through tongues) boards every 10 in. to 12 in. To further avoid splits, don’t nail within 2 in. to 3 in. of a board’s end. Once the starter row is secured, blind – nail subsequent floorboards till you reach the opposite wall and run out of room to use the pneumatic nailer.

Installing the starter row in the middle of the room. Measure out from both long walls to find the approximate center of the room. If walls aren’t parallel, the centerline should split the dif­ference of the measurements between the two walls. Snap a chalkline to indicate the centerline; line up the starter row to it. Because you don’t face-nail a starter course in the middle of a room, screw temporary blocks—scrap flooring is fine— along the chalkline to keep starter-row boards in place. Otherwise, they could drift as you drive nails through the tongues. Nail down five or six rows, before removing the temporary blocks.

Next, add wood splines (also called slip tongues) to the grooves of starter-row boards, which most flooring stores carry. Adding splines allows you to blind-nail toward the opposite wall as well. Glue splines to board’s grooves, using scrap flooring to drive the splines snug without damaging them.

Installing the rest is straightforward. To speed the installation and ensure that board ends are staggered at least 6 in. between rows, have a helper rack (spread out) floorboards so you can quickly tap boards into position with the flooring mallet and nail them down. Floorboards come in regular lengths from 12 in. to 36 in. So to create a random joint pattern, use board remnants with irregular lengths to start rows.

Continue blind-nailing boards every 10 in. to 12 in., checking periodically to make sure the
rows are straight. If milling irregularities or warping prevents boards from seating correctly, use a large flat screwdriver to lever the boards snug, as shown in the top left photo on the facing page. Set aside boards that are too irregular to use; professional installers typically order 5 per­cent extra to allow for warped or poorly milled boards and waste.

As you approach within a foot or two of the opposite wall or next to a base cabinet, you won’t have room to use the pneumatic flooring nailer, so switch to a pneumatic finish nailer. Nor will you have room to swing your flooring mallet, so use a pry bar to draw the boards’ edges snug. As you get within 6 in. to 8 in. of the wall, measure the distance remaining, including 3з4 in. for an expansion joint. In most cases, you’ll need to rip down the last row of floorboards. If they are less than 1 in. wide, first glue them to the next-to-the – last row and install the two rows as a unit. Or, if you’re installing floorboards of varying widths, rip down a wider board. The last row of boards should be face-nailed and glued to the subfloor as well. Finally, install prefinished transition pieces such as thresholds, reducer strips (strips that taper to accommodate differing floor heights) and so on. When you’ve sanded and finished the flooring, reinstall the baseboards.

Store extra flooring in a dry location. If the flooring has a warranty, file it in a safe place, along with the flooring’s code number and floor care information.

image1013

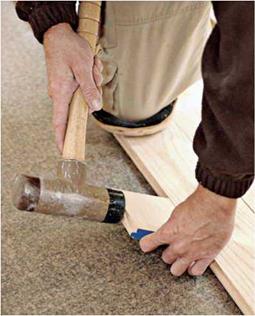
Using a piece of scrap to avoid damaging the tongues, drive the boards snug before nailing them. The friction between the tongues and the grooves will usually hold them during nailing.

image1014

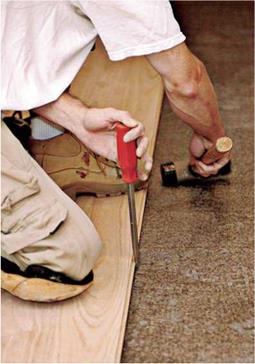
If boards are slightly warped or tongues and grooves are a bit swollen, use a thick screwdriver as a lever to draw them together. Hammer the screwdriver point into the subfloor to get some traction.


image1015

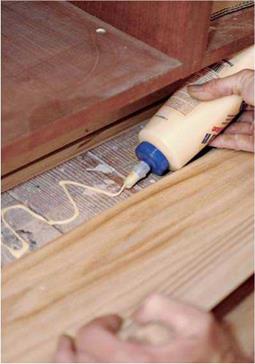
Glue the last row of boards, especially those at the base of a cabinet. Only one edge will engage the board next to it, and there’s often not enough room to drive nails.


image1016

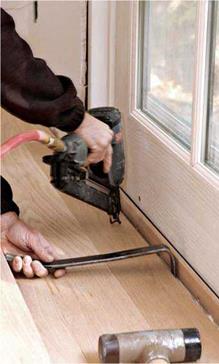
The first and last rows of tongue – and-groove floorboards are usually face-nailed, here with a pneumatic finish nailer. Draw boards tight with a flat board.


Floor Nailing Schedule*

Подпись: SIZE AND TYPE FLOORING SIZE NAIL TO USE SPACING T&G stripst (3/4 in. x К in., 27, in., 37, in.) 2-in. barbed flooring cleat,! 7d or 8d flooring nail, or 2-in. 15-gauge staples with 72-in. crowns! 10 in. to 12 in. apart; 8 in. to 10 in. preferred T&Gt strips (7 in. x 17 in., 2 in.) 17-in. barbed flooring cleat or 5d cut-steel or wire-casing nail 10 in. apart T&G strips (7 in. x 17 in., 2 in.) 17-in. barbed flooring cleat or 4d bright wire casing nail 8 in. apart Square-edge strips§ (5/i6 in. x 17 in., 2 in.) 1-in. 15-gauge barbed flooring brad 2 nails every 7 in. Square-edge strips§ (5/i6 in. x 17 in.) 1-in. 15-gauge barbed flooring brad 1 nail every 5 in. on alternate sides of strip Planks (4 in. to 8 in.) 2-in. barbed flooring cleat,!- 7d or 8d flooring nail, or 2-in. 15-gauge staples with 7-in. crowns! 8 in. apart Adapted, with permission, from NOFMA: The Wood Flooring Manufacturers Association, all rights reserved, © 2004. To see the chart in its entirety go to www.nofma.org/installation3.htm. Подпись: t Tongue-and-groove (T&G) flooring is blind-nailed on the tongue edge, with face-nailing required on the starting and finishing runs. t NOFMA Hardwood Flooring™ must be installed over a proper subfloor. Use 1 1/2-in. fasteners with a 3/4-in. plywood subfloor on a concrete slab. A concrete slab with sleepers every 12 in. on center does not always require a subfloor. § Square-edge flooring is face-nailed. ing or air-conditioning so indoor conditions will be close to normal (60°F to 70°F) for a week before installing flooring. Open the bundles of wood flooring and allow them to acclimate indoors for 72 hours before installing them.

Use a moisture meter to check interiors if your region has high humidity. Home centers and elec­tronics stores carry reliable, inexpensive meters. Ambient humidity indoors should be 35 percent to 55 percent; if readings are higher, consider installing a dehumidifier. Also check the moisture content (MC) of wood subfloors and flooring, using a moisture meter with probes. Typically, wood flooring’s MC is 6 percent to 10 percent.

The subfloor’s MC should not vary more than 4 percent from that of the flooring’s.

If you’re installing floors over a basement or crawl space, check the humidity of that area, too. If it’s too high, correct any contributing factors before installing wood floors; high humidity also encourages mold. Crawl spaces with dirt floors
should be covered with plastic and sealed to limit moisture and air infiltration, as described in Chapter 14.

Survey subfloors to make sure they’re solid, flat, and clean. If floors are excessively springy, stiffen them by adding blocking between the joists, adding plywood or OSB (oriented strand board) panels over existing subfloors, or sistering new joists to old ones, as described in Chapter 8. In older houses, floors are rarely level; so if they’re solid, it’s more important that they be flat—with­in 12 in. per 10 ft. Use a rental edging sander or a woodworker’s belt sander with coarse sandpaper to lower high spots; use strips of building paper (15-lb. felt paper rather than rosin paper) or wood shims to build up low spots. In general, masonry floor-leveling compound is too inflexible to use beneath wood flooring because flooring nails will fragment it and board flexion will frac­ture it.

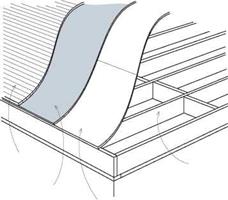
If you notice protruding nail heads, not enough nails, or squeaky spots, correct these con­ditions now. Squeaks can usually be silenced by screwing down subflooring to joists near the squeak or by nailing it down with ring-shank or spiral nails. Vacuum and sweep the floor well. If the floor is over an occasionally damp basement or crawl space, staple 15-lb. building paper to the subfloor, overlapping roll seams by 6 in. However, don’t bother with building paper if the subfloor areas are dry or if the floor is on an upper story.

Finally, remove the baseboard molding if you can do so without damaging it. Baseboards hide the expansion gap between the perimeter of the flooring and the base of the wall. At the very least, install a piece of quarter-round shoe mold­ing to cover the gap if you can’t remove the base­boards. If door casings are already installed, undercut (trim the bottoms of) each side jamb, by the thickness of the flooring; an undercut saw is specially designed for this task. Remove door­way thresholds if they’re nailed down. But if they’re glued down or set in mortar, simply butt the flooring to them.

EQUIPMENT

Sawdust or debris trapped under a board can mean uneven, loose, or squeaky floors later on, so be obsessive about keeping subfloors clean as you install flooring.

Installation tools include safety glasses, hearing protection, kneepads, radial-arm saw or small table saw, hammer, nail set, tape measure, chalk­line, flat pry bar to remove trim, large flat-bladed screwdriver to draw board edges tight to each other, flooring mallet, and a manual or pneumatic

Подпись: As you install strip flooring, use wood from several different bundles or cartons to ensure a varied mix of color and grain. If strips are noticeably lighter or darker, distribute them throughout the floor to avoid obvious, odd-color sections. Stagger board ends in adjacent rows by at least 6 in. because random joint patterns will be visually less intrusive. llll

flooring nailer. For the little bit of face-nailing to be done, use a pneumatic finish nailer; if you haven’t got one, use a Иб-in. bit to predrill holes for the face nails. You’ll need white glue to secure floorboards under toekicks and in other odd spaces where it’s difficult to reach with any nail­er. Finally, rent a shop vacuum if you don’t own one. And be sure to have a good-quality broom and a dustpan.

Pneumatic flooring nailers are more expensive than manual nailers, but they don’t depend on your strength to drive flooring nails to the correct depth. Nailers aren’t foolproof, though. Take a sample of the flooring to the rental company to ensure that the pneumatic nailer will correctly engage the flooring edge profile. That is, the tool may need an adapter-fitting or – plate to avoid damaging the boards’ tongues. On-site at the start of the job, calibrate the nailer’s pressure by nailing a "practice row” of flooring to the sub­floor. Typically, pneumatic nailers are set at 70 psi (pounds per square inch); adjust the pres­sure up or down till the tool sets nails correctly, as shown in "How Deep Can You Sand?,” on p. 488. Once the setting is correct, pull up the practice row.

Installing Strip Flooring

T&G strip flooring, %-in. thick and 2%-in. to 3%-in. wide, is by far the most commonly installed wood flooring. Installing it requires few specialized tools and, with a modest amount of prep work, it goes down fast and lasts long.

PREP STEPS

Wood absorbs water and swells, so don’t bring hardwood flooring on site till the building is closed-in and "wet work” (such as plumbing, tiling, drywalling, plastering, and painting) are complete. Allow paint, plaster, or joint compound several days to dry. If necessary, turn on the heat-

Subfloorin

is thin and would telegraph gaps or irreg­ularities underneath. So most resilient-flooring and carpet makers specify underlayment beneath their products. Particle­board, fiberboard, and hardboard are often used for underlayment, but they should never be used for subflooring. Lacking the cross-grain construction of plywood, these materials just aren’t as strong, and they tend to delaminate

when wet.

APPLYING A WATER-BASED FLOOR FINISH

Applying a water-based polyurethane does not differ much from applying an oil-based finish and, as noted in the preceding section, water – based finishes are more benign. Although "Finishes, Cleaning Solvents, and Applicators,” on p. 494, offers general guidance, consider the can label as the last word on drying times, recommended applicators, and so on.

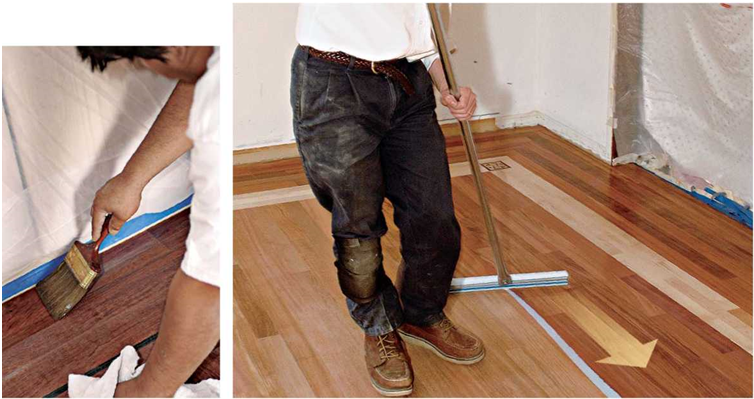
Cutting the edge is the first step when apply­ing any type of floor finish. Use a brush or paint pad to apply a 6-in. swath of finish around the perimeter of the room, along cabinet bases—in short, any place that would be difficult to edge with a large applicator. Pour finish into a sloping paint tray with a replaceable liner, so you can easily reload the paint pad, brush, or large applicator.

If you’re applying a slow-drying finish, you can edge the whole room before switching to a large applicator. However, because water-based finishes dry quickly, it’s best to edge one section

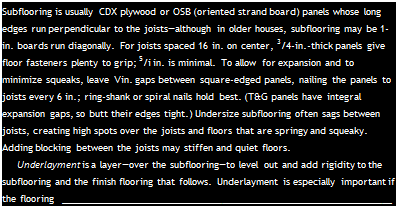
Подпись:Подпись: Subflooring is usually CDX plywood or OSB (oriented strand board) panels whose long edges run perpendicular to the joists—although in older houses, subflooring may be 1-in. boards run diagonally. For joists spaced 16 in. on center, 3/4-in.-thick panels give floor fasteners plenty to grip; 5/i in. is minimal. To allow for expansion and to minimize squeaks, leave Vin. gaps between square-edged panels, nailing the panels to joists every 6 in.; ring-shank or spiral nails hold best. (T&G panels have integral expansion gaps, so butt their edges tight.) Undersize subflooring often sags between joists, creating high spots over the joists and floors that are springy and squeaky. Adding blocking between the joists may stiffen and quiet floors. Underlayment is a layer—over the subflooring—to level out and add rigidity to the subflooring and the finish flooring that follows. Underlayment is especially important if the flooring image1007Подпись: JoistПодпись: Plywood subfloorimage1008Подпись: Finish floor Underlayment

of a wall at a time, so you can use a T-bar appli­cator to overlap edged borders while they’re still wet. Maintaining a wet edge is the key when applying water-based finishes: Edges that dry before they’re overlapped have a distinct lap mark.

Working the floor with a T-bar applicator is like a ballet with chemicals. After cutting the edge, pour a thin puddle of finish along one wall, paral­lel to the floorboards, but stop the puddle 3 ft. to 4 ft. shy of the far wall. Holding the applicator pad at a slight angle—somewhat like a snowplow blade—pull the applicator through the finish. Angle the applicator so that excess finish flows toward the inside of the room so you can spread it out on the return pass. The ballet comes at the end of each turn, as you sweep the applicator pad 180°, spread the finish evenly, and set up for the next pass. It’s easier to do than to describe.

Periodically pour more finish in a long puddle to maintain a wet edge. Having a second person to pour the finish and touch up missed spots is helpful but not essential. If you see a missed spot after the finish has started to set, let it dry and be sure to coat that area the following day, when you apply the next coat. Once each coat is dry, screen – sand it lightly, vacuum, and dry-mop it with a tack rag over the mop. Then apply the next coat.

image1009

Square-edge wood strip flooring is face-nailed, so use a straightedge to line up the nails for a neat, professional appearance. Because tongue – and-groove flooring is nailed through the tongues, those nails are hidden.

In general, don’t walk on the floor till the final coat has cured at least 3 days, and—because this finish is water based—do not damp-mop it for a month.

SELECTING A FLOOR FINISH

Floor finishes are often divided into two cate­gories: penetrating sealers (penetrants) and surface finishes. Penetrating sealers usually contain plant-based oils, such as tung oil or modified lin­seed oil, and soak into wood fiber. In time, they harden to seal and protect the wood. Because penetrating sealers form a hard outer shell, they can be easier to touch up by sanding lightly and adding more sealer if wood becomes scuffed or scratches—touched-up areas won’t be obvious. Wood stains penetrate and don’t really seal.

When they have dried, penetrating sealers are often waxed to make them more durable. But waxed floors are durable only if they’re regularly maintained, which takes time. Thus most floors today are sealed with surface finishes, which don’t require waxing.

Surface finishes, as their name implies, form a tough exterior shell to resist scuffs, scratches, and moisture. The earliest surface finishes were shellac and varnish, which have been largely replaced by oil-based and water-based poly­urethanes. Shellac has poor water resistance and chips easily, and varnishes tend to be strong smelling and slow to dry. Besides, both are extremely flammable. Although surface finishes require less maintenance, their disadvantage is that they can’t be touched up when they become worn, so you must refinish the whole floor. Surface-finish sheens range from matte (little shine) to satin to semigloss to gloss. In general, glossier finishes are harder, more durable, and more water resistant.

As you’ll see, polyurethanes vary greatly in ease of installation, drying time, and durability. Water-based polyurethanes are the stars of the show these days: tough, nonyellowing, relatively mild smelling, and fast drying (2 hours to 6 hours). And brush cleanup is easy with soap and water. Because they contain lower levels of
volatile organic compounds (VOCs), water based polyurethanes are also safer to use. Despite their volatility, oil-based polyurethanes are often applied by professional refinishers because they’re slower to dry and thus allow more time to even out coats. Though solvent based and stronger smelling, oil-based polys are more durable and water resistant, and they turn a handsome amber with age. Let them dry for 24 hours before recoating or walking on them. Moisture-cure polyurethanes are the most durable of the lot; but because they must absorb moisture from the air, they’re temperamental to apply, slow to dry, and best left to professionals.

Finally, there are surface finishes that require highly controlled environments and thus are factory applied to prefinished flooring. This group of finishes may include aluminum-oxide, titanium, or ceramic additives to resist abrasion and may require UV curing, rather than heat cur-

Подпись:image1006
ing. Some of the toughest of these finishes infuse acrylic into the wood cells in a modern version of a penetrating sealer.

Finishes, Cleaning Solvents, and Applicators

FINISH

CLEANS WITH

APPLICATOR

COMMENTS

Water-based

polyurethane

Soap and water

Synthetic brush; pad; round applicator

Probably best all-around finish for nonpro; tough, water-resistant finish; easy cleanup, low smell; work fast, overlapping edged areas before they dry

Oil-based

polyurethane

Mineral spirits

Natural-bristle brush; round solvent-resistant applicator

Tough, durable finish; favored by pros because dries slower than water-based; slightly stronger smell while drying

Penetrating sealers (tung and modified linseed oils )

Mineral spirits

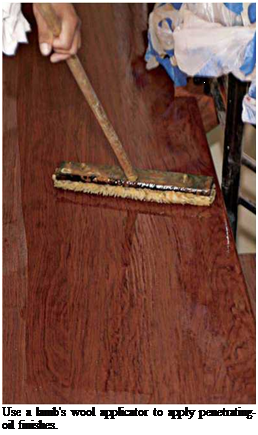
Lamb’s wool applicator, natural-bristle brush

Slow to dry; strong odor; scratches easily but can be touched up with new finish over old; usually waxed

Stain-sealers

Mineral spirits

Varies: natural-bristle brush to clean rags

Same profile as penetrating sealer; finish must be waxed to protect wood

Varnish

Turpentine

or paint thinner

Natural-bristle brush; lamb’s wool pads

Volatile; strong smelling; slow to dry; hard, amber finish gives historical appearance; often used to match older finish

Shellac

Denatured alcohol

Natural-bristle brush; lamb’s wool applicator

Poor water resistance; flammable; chips; rarely used for floors anymore

Various (acrylic – impregnated; acrylic – urethane; UV cured)

Proprietary solvents

Computer-monitored

sprayer

Factory applied in highly controlled environment; durable; water resistant coatings on prefinished wood flooring

Подпись: Filling HOLES AND GAPS Flooring stores carry color-matched spot fillers and trowel fillers. Spot filler is basically woodworker's putty, applied with a spackling knife to fill nail holes and obvious cracks. Trowel filler, which is thinner, is pored onto the floor in small amounts and worked into the narrow gaps between floorboards, using a large squeegee or a smooth-edge trowel. Done on your knees, applying trowel filler is hard work, requiring pressure to force the filler into gaps and to scrape off excess. Consequently, though spot-filling is common, trowel-filling is not. Note: If you've got wide pine planks, which expand and contract seasonally, don't fill the gaps between them. Brag about their rustic charm instead.

and sanding the floor a second time. If you need to fill holes or gaps in the floor, do it before the second sanding.

SCREENING FLOORS

After you’ve drum-sanded and edged the floor with 100-grit sandpaper and vacuumed it well, use a buffer with an abrasive screen to smooth out any remaining marks. Use a 100-grit or 120-grit buffer screen, which is held onto the buffer pad by friction. Because the buffer rotates slowly and the screen is flexible, you can buff
right next to the base of the wall. Start along a wall, moving the buffer from side to side (it rotates in a counterclockwise direction). As you did with the drum sander, overlap passes about one-half the width of the buffer pad. Buffer screens wear out quickly, so replace them when you’ve screened one-third to one-half the floor. Save at least one used screen, so you can fold it and use it to hand-screen the corners where the buffer couldn’t reach.

To achieve an even smoother finish, vacuum the floor and wet-sponge it with clear water the night before screening it (the moisture will raise the grain slightly). The next day, when the wood flooring is dry, screen it smooth. Wetting the wood and then screening it is called popping the grain. Popping is optional, but strongly recom­mended if you’ll be applying a water-based finish. After screening the floor and touching up corners by hand, vacuum the room thoroughly and use clean tack rags to remove dust from any horizon­tal surface. (A tack rag is a slightly sticky cheese­cloth pad that adheres dust.) Finally, dry-mop the floor, wrapping the mop in a clean cloth lightly dampened with the same solvent you used to thin the floor finish.

Подпись: Stirred, Don't shake clear floor NOTSHAKEN

finishes to mix them, as you do paint. Shaking will entrap air bubbles and leave blemishes—popped bubbles—when the finish dries. Instead, stir finishes thor­oughly from the bottom of the can. Don’t thin finishes. If stirring doesn’t dissolve the finish "skin” or other solids, strain the finish through a paint strainer.

SANDING FLOORS

A quick review: Shut off all pilot lights, seal off doorways, open windows for ventilation, wear a respirator mask and ear protection, start with the least aggressive sandpaper, and lower the sander drum only when the machine is moving.

Start sanding with the drum sander. Sanding with the direction of the wood grain cuts less aggressively and minimizes scratches that must be sanded out later. However, if there are high spots that need to be sanded down or if the floor is painted, sand diagonally to the wood grain on the first pass, then with the grain on all subse­quent passes. (The diagonal angle should be 15° to 30° from the direction of the floorboards.) If you must sand the first pass diagonally, use the same grit on the second pass, as you sand with the grain. Because a parquet floor has grain run­ning in various directions, sand it diagonally on the first pass, too.

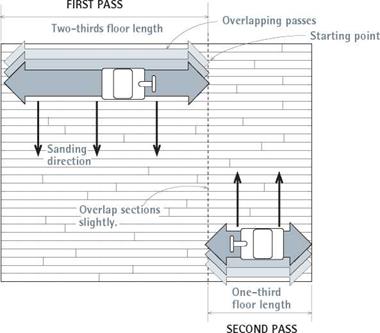
When sanding with the grain, start along a wall and sand about two-thirds the length of the

Replacing a Floorboard

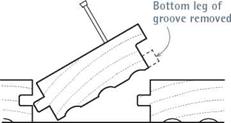
image999"image1000Подпись: Subfloor To insert a replacement board into an existing tongue-and-groove floor, use a table saw to remove the bottom of the groove. Slightly back-cut the ends of the new board so it will slide in easier. To remove a damaged board, drill holes across it so you can pry it out in splinters, using a hand chisel. Or you could cut into the damaged board by using a circular saw set to the depth of the flooring and then pry out pieces with a flat bar. To make this pocket cut, rest the heel of the saw on the floor, pull back the saw guard, and slowly lower the front of the saw sole until the turning blade engages the wood. Be careful: Holding a blade guard back is never advisable if you can avoid it, and the saw may jump when it engages the wood. Let the blade stop before you lift the saw.
Find a replacement board that’s similar in color and grain: Try to pull a board from a nearby closet or from floor section that’s usually covered by an appliance. Hold the board next to the hole and use a utility knife to mark off the appropriate length. To make the replacement fit more easily, slightly back-bevel its lower edges on a table saw. If the stock is tongue-and-groove, use a table saw to cut off the lower leg of the groove. Apply construction adhesive to the underside of the new board, and then drive it into the opening using a piece of scrap to cushion the hammer blows. It’s not possible to nail the board through its tongue, so predrill and face-nail two 6d finish nails at either end. Use a nail set to drive the nails below the surface. Fill the holes with wood putty.

Overlap Sanding Passes

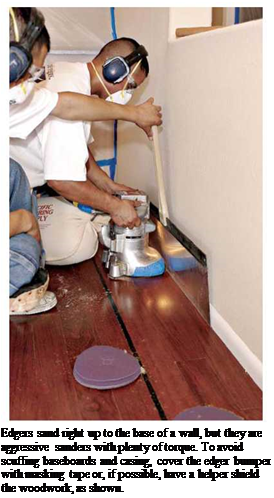
Подпись: Edgers sand right up to the base of a wall, but they are aggressive sanders with plenty of torque. To avoid scuffing baseboards and casing, cover the edger bumper with masking tape or, if possible, have a helper shield the woodwork, as shown.

image1002

Start along a wall and sand about two-thirds the floor length. Sand up and back. Then raise the drum, and roll the sander over so the next pass overlaps by roughly half a drum-width. Sand till you reach the opposite wall. Then turn the sander 180° and sand the remaining third of the floor.

SANDING FLOORS

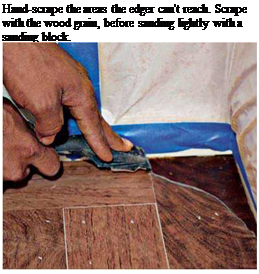
Подпись: Hand-scrape the areas the edger can't reach. Scrape with the wood grain, before sanding lightly with a sanding block.

floor. Then, with the drum lowered and sanding, pull the machine backward over the strip just sanded. Raise the sander’s drum toward the end of each backward pass and wheel the machine over about 6 in., so the next pass will overlap the first by roughly half the width of the drum.

Again, sand down about two-thirds the length of the room, and then pull the sander backward, as shown in "Overlap Sanding Passes,” above.

Continue sanding until you have reached the opposite wall (you will have sanded two-thirds of the room by then). Turn the machine 180° and start sanding the other end of the room (the third you haven’t yet sanded). Again, sand one pass up and one back. When you reach the edge of the portion already sanded, overlap it by 1 ft. or 2 ft. before starting the next pass. In this manner you can blend the sanding of the two sections of the room.

Using an edger. After completing each sanding pass with the drum sander, use the edger to sand along the perimeter of the room, as close to the base of the walls as you can get. Use the same grit sandpaper that you just used on the drum. When it’s upright, the sander disc moves in a
clockwise direction, so work from left to right, keeping the edger moving constantly to avoid scour marks. You don’t need to press down on the edger to make it work. If the edger is sanding too aggressively, switch to the next finer grit.

If it’s not sanding aggressively enough, change its sanding disks more often. Again, try to sand with the wood grain as much as possible.

Finish up by hand. Hand scraping and sanding take care of the areas the edger can’t reach, such as in corners and under cabinet toekicks. It’s hard, tedious work, but fortunately there’s not much of it. A sharp scraper will speed the job, scraping with the grain to remove the old finish. Then use a sanding block to smooth out the semicircular edger marks. (Note: If there are a lot of edger marks, use a random- orbital sander to feather them out.) Once you’ve drum-sanded, edged, and hand-scraped the room, vacuum it well before switching to the next-finer grit

PREPARING FOR SANDING

After testing floors to determine their finish, empty rooms of all movable items (don’t forget window blinds and shades). Then use 3-mil poly­ethylene sheeting to cover the cabinets, radiators, smoke detectors, doorways, and heating or air­conditioning openings, using painter’s tape to avoid pulling paint off the walls and trim. Dust migrates through the smallest openings, so use painter’s tape to seal the perimeters of closed doors and keyholes. Because baseboards will get bumped by edgers, remove them if possible— though often that’s not possible. Alternatively, you can use a metal shield to protect such trim, as shown in the top photo on p. 493.

Подпись:Vacuum the floor so you can survey it closely for nails sticking up, and floorboards that are split or uneven. Use a nail set to sink nails below the floor surface. If boards are uneven or cup­ping, you may be able to sand them down evenly if they are solid wood. If any boards are split or splintered, replace them now.

Floor-Sanding Materials*

Подпись: When sanding floors, follow the physician's creed, "First, do no harm." It can take hours to repair a trough cut by paper that's too coarse. In fact, you may have to replace the damaged section. So start with the least aggressive sandpaper grit that will do the job, whether it's removing old finish or leveling uneven boards. If that proves too gentle, you can easily switch to a more aggressive grit. llll Подпись: TYPE OF MATERIAL GRIT SIZE WHEN TO USE Sandpaper belts 36 Aggressive; use on first pass if boards cupped, uneven for large floor sander; disks for edger 36 open coat Use on first pass if floors coated with wax, paint 60 Try for first pass; switch to 36 if not enough cut 100 Second or third pass Buffer screen 100 Final screen before applying finish (use with backer pad) 220 Smooth between coats of finish Sandpaper strips 180 Smooth between coats of oil-based finish (attach to buffer backer pad) 220 Smooth between coats of water-based finish * Consult finish manufacturer's specs for sanding requirements.
Подпись: Buffer screens are held on with friction. Use them to fine sand a floor that's been stripped or to sand between finish coats.image995Подпись: Backpack vacuums are less likely to gouge flooring or bash woodwork, but their capacity is generally less than that of floor models. Empty vacuums when they're one-third full because the fuller they get, the less efficient they become.

put a lamb’s wool buffing pad on the buffer to bring up the sheen of a finish; thus it’s often used to buff out a new wax coat.

Hand scrapers and sanding blocks reach cor­ners, flooring under cabinet toekicks, and other places edgers can’t reach. Hand scraping is tedious, but it goes more quickly if you periodi­cally use a fine metal file known as a mill file (bastard file) to sharpen the scraper blade.

Other hand tools you’ll need include a nail set to sink nail heads below the surface of the wood before you begin sanding, a hammer, and wide – blade spackling knives or metal squeegees to apply wood filler. If you cut your own edger disks, you’ll need a pair of heavy scissors.

Brushes and applicators should be matched to specific finish types. You’ll find those tools dis­cussed and paired with finishes in "Finishes, Cleaning Solvents, and Applicators,” on p. 494.

Personal safety equipment is not optional. Get a close-fitting respirator mask with organic vapor filters. During the sanding phases, wear eye gog­gles with side vents; vented goggles admit a bit of sanding dust, but they won’t cloud up with water vapor. Drum sanders and edgers are noisy and tiresome; wearing hearing protection will keep you alert longer, so you’ll be less likely to gouge the floor because you’re punchy with fatigue. Wear disposable plastic gloves when applying fin­ishes or wood filler. If you can, buy latex-free nitrile plastic gloves, which auto mechanics, gar­deners, and postal workers swear by. Nitrile gloves are tough enough to withstand automotive

Подпись: Before you start sanding floors, cover cabinets, air registers, and other fixed elements with plastic sheeting. To seal edges, use blue painter's tape to avoid lifting off paint or cabinet finishes, but remove the tape as soon as possible.

solvents and garden grit, yet thin enough to sort mail with. You can easily find nitrile gloves at auto parts stores, typically sold in boxes of 50 to 100 in sizes ranging from small to extra large.

Edging and hand scraping are hard on your knees, so get a pair of kneepads comfortable enough to wear all day.

Rent a heavy-duty vacuum, since there’s no point in frying a home vac that’s really not up to the task. Ideally, the vacuum should have a HEPA (high-efficiency particulate air) filter to capture dust rather than recirculate it into the room, but not all rental companies carry them. A backpack vac, shown in the bottom photo on the facing page, is less likely to bash woodwork and has no wheels to compact sawdust, but most rental com­panies offer only wheeled canister types.

SANDPAPER AND BUFFER SCREENS

Sandpaper and buffer screens are rated accord­ing the concentration of grit per square inch. The lower the grit number, the larger, coarser, and more widely spaced the grit particles. Lower-grit papers cut more aggressively. Whereas, the high­er the grit number, the finer and more closely spaced the grit. Consequently, as you sand floors, each grit should be slightly finer than the preced­ing one, smoothing out scratches of the previous grits, till you arrive at the grit level specified on the label of your floor finish. Always read the fin­ish manufacturer’s sanding requirements before renting equipment and buying sanding material.

If you’re sanding floors to bare wood, you’ll typically need to make two or three passes with a large floor sander and an edger and one pass with a buffer with abrasive screen, before floors are smooth enough to apply finish. (Vacuum after each pass.) Get 36-grit, 60-grit, and 100-grit paper for the floor sander and the edger; both use the same grit on each pass. To screen the floor before finishing, buff with 100-grit screens backed by a nylon backing pad. To smooth between coats, use a 220-grit screen, or hook – and-loop sandpaper strips that attach to the buffer pad.

Note: If floors are coated with paint or wax— which gum up sandpaper quickly—use open-coat sandpaper for the first sanding pass. You can use regular closed-coat sandpaper (most sandpaper is closed coat) for subsequent passes.

If you’re simply recoating a finished floor, you probably won’t need a drum sander and an edger; a buffer with a nylon pad and two grades of screen (100 grit and 220 grit) should do the job. Again, check your floor finish’s label to see what grit sandpaper to use between coats. Finally, sandpaper wears out quickly, so get more than

you think you’ll need. Most rental companies will credit you for unused paper when you return the equipment.

Refinishing Floors Safely

As the Safety Maven of Wingdale notes, "The nice thing about working on floors is that you don’t have far to fall." Nonetheless, there are safety issues to consider when refinishing.

Electrical. Before renting sanders, examine their electrical cords and plugs, reject­ing any that are frayed or appear to have been sanded over. If you don’t have a heavy – duty extension cord, rent or buy one; lightweight household cords could overheat and start a fire. User’s manuals or labels on big sanders indicate minimum cord spec’s. Household circuits must be adequately sized for the equipment:

220-volt drum sanders often require 30-amp circuits; 110-volt sanders typically require 20-amp circuits. In most cases, a drum sander’s 30-amp plug will fit a home’s 30-amp dryer receptacle.

Volatile chemicals. Finish manufacturers have reduced the volatility and strong odors of their products, but you should always limit your exposure to them by wearing an organic-vapor respirator mask, long sleeves, and gloves when sanding old finishes or applying new ones. Even water-based polyurethane is unhealthful to breathe, so as soon as finishes are dry to the touch, open windows to let vapors disperse. And sleep elsewhere till they’re completely dry.

Fire and explosion hazards. Sparks or open flames can ignite chemical fumes or dust. So before you start sanding or applying finish, turn off pilot lights for water heaters, ranges, and furnace. Also tape light switches down so they can’t generate a spark. Trash bags of moist sawdust or covered garbage cans full of oily rags can gener­ate enough heat to combust spontaneously, so don’t allow debris to collect on site. Empty sander bags often into a metal container safely away from the house and other combustibles.

Lead paint and asbestos. Floors painted before 1978 may contain lead-based paints, so don’t sand them till you’ve had the paint tested, as suggested in Chapter 18. Lead paint is generally not a problem till it becomes airborne, unless it’s flaking in an area where small children might eat it. Old linoleum floors may have been adhered with asbestos adhesive, which wasn’t banned till 1977. Here again, asbestos is usually harmless if undisturbed, so first consult a local health department to get the name of a test lab.