Posted by admin on 25/ 11/ 15
Vinyl and linoleum are the two principal resilient materials, available in sheets 6 ft. to 12 ft. wide, or as tiles, typically 13 in. or 12 in. square. Linoleum is the older of the two materials, patented in 1863. It may surprise you to learn that linoleum is made from raw natural materials, including linseed oil (oleum lino, in Latin), powdered wood or cork, ground limestone, and resins; it’s backed with jute fiber. (Tiles may have polyester backing.) Because linoleum is comfortable underfoot, water resistant, and durable, it was a favorite in kitchens and baths from the beginning; but it fell into disfavor in the 1960s, when it was supplanted by vinyl flooring, which doesn’t need to be waxed.
However, linoleum has proven resilient in more ways than one by bouncing back from nearextinction, thanks to new presealed linoleums that don’t need waxing. In addition, linoleum (sometimes called Marmoleum®, after the longest continuously manufactured brand) has antistatic and antimicrobial qualities. It’s also possible to custom-design linoleum borders and such, which are then precisely cut with a water jet. Flooring suppliers can tell you more.
Vinyl has similar attributes to linoleum, though it is a child of chemistry. Its name is short for polyvinyl chloride (PVC). Vinyl flooring is also resilient, tough to damage, stain resistant, and easy to clean. It comes in many grades, principally differentiated by the thickness of its top layer—also known as its wear layer. The thicker the wear layer, the more durable the product.
The more economical grades have designs only in the wear layer; whereas inlaiddesigns are as deep as the vinyl is thick. If you’re thinking of installing vinyl yourself, tiles are generally easier, though their many joints can compromise the flooring’s water resistance to a degree.
STONE AND TILE
If stone and tile are properly bonded to a durable substrate, nothing outlasts them. However, handmade tiles or stones of irregular thickness should usually be installed in a mortar bed to adequately support them. And leveling a mortar bed is best done by a professional. Tile or stone that’s not adequately supported can crack, and its grout joints will break and dislodge. Chapter 16 has the full story.
 Tiles are rated by hardness: Group III and higher are suitable for floors. Slip resistance is also important. In general, unglazed tiles are less Tiles are rated by hardness: Group III and higher are suitable for floors. Slip resistance is also important. In general, unglazed tiles are less
 slippery than glazed ones, but all tile and stone— and their joints—must be sealed to resist staining and absorbing water. (Soapstone is the only exception. Leave it unsealed because most stone sealers won’t penetrate soapstone and the few that will make it look as if it had been oiled.) slippery than glazed ones, but all tile and stone— and their joints—must be sealed to resist staining and absorbing water. (Soapstone is the only exception. Leave it unsealed because most stone sealers won’t penetrate soapstone and the few that will make it look as if it had been oiled.)
Tile and stone suppliers can recommend sealants, and you’ll find a handful of good ones in "Countertop Choices,” on p. 313. If stone and tile floors are correctly sealed, they’re relatively easy to clean with hot water and a mild household cleaner.
CARPETING
Carpeting is favored in bedrooms, living rooms, and hallways because it’s soft and warm underfoot, and deadens sound. In general, the denser the pile (yarn), the better the carpet quality. Always install carpeting over padding; the denser or heavier the pad, the loftier the carpet will feel and the longer it will last. Wool tends to be the most luxurious and most expensive carpeting, but it’s more likely to stain than synthetics. Good-quality polyester carpeting is plush, stain resistant, and colorfast. Nylon is not quite as plush or as colorfast, though it wears well. Olefin and acrylic are generally not as soft or durable as other synthetics, although some acrylics look deceptively like wool.
Disadvantages: Carpeting can be hard to keep clean, and it harbors dust mites and pet dander, which can be a problem for people with allergies. In general, wall-to-wall carpet is a poor choice for below-grade installations that are not completely dry, because mold will grow on its underside. Far better to use throw rugs in finished basement rooms.
Posted by admin on 25/ 11/ 15
The materials in this group—bamboo, coconut palm, and cork—are engineered to make them easier to install and more durable. And their beauty is 100 percent natural.
Bamboo flooring sounds implausible to people who visualize a floor as bumpy as corduroy. However, bamboo flooring is perfectly smooth.
It is first milled into strips and then reassembled as multi-ply, tongue-in-groove boards. Available in the same widths and lengths as conventional hardwood, bamboo boards are commonly 58 in. to 58 in. thick. Bamboo flooring can be nailed or glued. But if you glue it, allow the adhesive to become tacky first so the bamboo doesn’t absorb moisture from it.
Bamboo flooring comes prefinished or unfinished, and can be sanded and refinished as often as hardwood floors. It’s a warm, beautiful sur
face, with distinctive peppered patterns where shoots were attached. Bamboo is hard and durable, with roughly the same maintenance profile as any natural wood product, so you must vacuum or mop it regularly to reduce abrasion. Avoid installing it in chronically moist areas.
 Coconut palm flooring, like bamboo, is plentiful and can be sustainably harvested. Its texture is fine pored, reminiscent of mahogany. Because coconut palm is a dark wood, its color range is limited, from a rich, mahogany red to a deep brown. And it is tough stuff: Smith & Fong™ offers a %-in.-thick, three-ply, tongue-and-groove strip flooring, called Durapalm®, which it claims to be 25 percent harder than red oak. Durapalm is available unfinished or prefinished. One of the finish options contains space-age ceramic particles for an even tougher surface. So if you’re thinking of installing a ballroom floor in your bungalow, this is definitely a material to consider. Coconut palm flooring, like bamboo, is plentiful and can be sustainably harvested. Its texture is fine pored, reminiscent of mahogany. Because coconut palm is a dark wood, its color range is limited, from a rich, mahogany red to a deep brown. And it is tough stuff: Smith & Fong™ offers a %-in.-thick, three-ply, tongue-and-groove strip flooring, called Durapalm®, which it claims to be 25 percent harder than red oak. Durapalm is available unfinished or prefinished. One of the finish options contains space-age ceramic particles for an even tougher surface. So if you’re thinking of installing a ballroom floor in your bungalow, this is definitely a material to consider.
Cork flooring is on the soft end of the hard-soft continuum. Soft underfoot, sound deadening, nonallergenic, and long lasting, cork is the ultimate “green” building material. Cork is the bark of the cork oak, which can be harvested every 10 years or 12 years without harming the tree (some cork trees live to be 500 years old). Traditionally sold as Мб-in. by 12-in. by 12-in. tiles, which are glued to a substrate, cork flooring now includes colorfully stained and prefinished squares and planks that interlock for less visible seams. Cork flexes, so many manufacturers use a flexible coating such as UV-cured acrylic to protect the surfaces and edges from water. Cork’s resilience comes from its 100 million air-filled cells per cubic inch; so it’s a naturally thirsty material. Wipe up spills immediately and avoid soaking a cork floor when mopping it: Damp mop instead and periodically refresh its finish.
Disadvantages: Avoid dragging heavy or sharp-edged objects across it, because it will abrade. Chair and table legs can leave permanent depressions.
Typically, engineered cork flooring has a three-ply, tongue-in-groove configuration. The surface layer is high-density cork, the middle layer is high-density fiberboard with precut edges that snap together, and the underlayment layer is low-density cork that cushions footsteps and absorbs sound. First developed in Europe, snap – together panels float above the substrate, so owners can easily replace damaged planks or, when it’s time to move, pack up the floor and take it with them. Many snap-together floors are glueless, but floors requiring glue usually need it to bond planks together, not to glue them to a substrate.
LAMINATE FLOORING
  Most engineered flooring is laminated to some degree, so here the term applies to a group of floorings whose surface layers are usually photographic images covered and protected by a clear melamine (plastic) layer. The photographic images often show wood grain, tile, or stone. Although plastic-laminate “wood” flooring may be a hard sell to traditionalists, the stuff wears like iron and every year captures a larger share of residential flooring. Moreover, as this category increases in popularity, manufacturers offer more and more colors and textures, including many that don’t mimic natural materials and are quite handsome on their own. Most engineered flooring is laminated to some degree, so here the term applies to a group of floorings whose surface layers are usually photographic images covered and protected by a clear melamine (plastic) layer. The photographic images often show wood grain, tile, or stone. Although plastic-laminate “wood” flooring may be a hard sell to traditionalists, the stuff wears like iron and every year captures a larger share of residential flooring. Moreover, as this category increases in popularity, manufacturers offer more and more colors and textures, including many that don’t mimic natural materials and are quite handsome on their own.
   Developed and first adopted in Europe, laminate flooring is most commonly snap-together planks that float above a substrate, speeding installation, repairs, and removal. Of all flooring materials, laminate is probably the most affordable; and as noted, it’s almost indestructible. Because it resists scratches, chemicals, burns, and water, it’s a good choice for high-use or high – moisture areas. It’s also colorfast, dimensionally stable, and easy to clean—though many manufacturers insist that you use proprietary cleaning solutions. For a good overview of installing laminates, see www. armstrong. com. Developed and first adopted in Europe, laminate flooring is most commonly snap-together planks that float above a substrate, speeding installation, repairs, and removal. Of all flooring materials, laminate is probably the most affordable; and as noted, it’s almost indestructible. Because it resists scratches, chemicals, burns, and water, it’s a good choice for high-use or high – moisture areas. It’s also colorfast, dimensionally stable, and easy to clean—though many manufacturers insist that you use proprietary cleaning solutions. For a good overview of installing laminates, see www. armstrong. com.
Disadvantages: Laminate flooring dents, exposing a fiberboard core, and you can’t refinish it, although damaged planks can be replaced.
Posted by admin on 25/ 11/ 15
In the old days,
building material to be installed and the first to show its age, as it was crushed by footsteps, swollen by moisture, and abraded by dirt. Foot traffic is as heavy and gritty as ever, but today’s crop of engineered flooring and floor finishes is far more durable—and varied.
However, flooring is only the top layer of a system that usually includes underlayment and subflooring, as well as structural members such as joists and girders. If finish floors are to be solid and long lasting, all parts of the flooring system must be sized and spaced correctly for the loads they will carry. Also, although some flooring materials can withstand moisture better than others, all will degrade in time if installed in chronically
damp locations. In other words, correct underlying problems before installing new flooring.
This chapter begins by introducing some of the more exciting flooring choices. Then it explains how to strip and refinish wood flooring and how to install wood flooring, resilient flooring, and carpeting. Tile floors are covered in Chapter 16.
Flooring Choices
These days, choosing flooring is almost as complicated as buying a car. The old standbys such as solid wood, tile, and linoleum have been joined by hundreds of ingenious hybrids, from snap – together laminates that mimic wood or tile to
bamboo planks to prefinished maple the color of plums. To make them tougher, floor finishes may include ceramics, aluminum oxides, or titanium.
Basically, you should try to choose flooring that’s right for the room. Some factors to consider:
► Compatibility with the house’s style or historical period
► Ease of installation
► Ease of cleaning and maintenance
► Scratch and water resistance
► Durability
► Comfort underfoot
► Sound absorption
► Anti-allergenic qualities
► "Green" practices for wood flooring, such as sustainable-forest harvesting
► Cost.
WOOD FLOORING
The revolution that produced engineered lumber has also transformed wood flooring. In addition to solid-wood strips and planks, there are laminated floorings, some of which can be sanded and refinished several times. There’s also a wide range of prefinished flooring.
Solid-wood flooring is solid wood, top to bottom. The most common type is tongue-and-groove (T&G) strip flooring, typically 3з4 in. thick by 2J4 in. wide, although it’s also available in h-in.-thick strips and widths that range from 1 h in. to 3J4 in. Hardwood plank flooring is most often installed as boards of varying widths (3 in. to 8 in.), random lengths, and 3з8 in. to M in. thickness. Parquet flooring comes in standard 18-in. by 6-in. by 6-in. squares, though some specialty patterns range up to 36-in. squares.
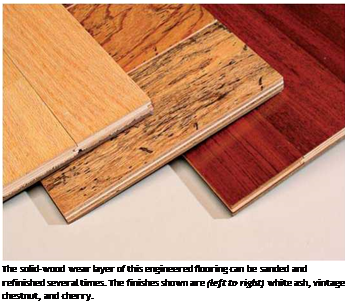
Because red and white oak look good and wear well, they account for roughly 90 percent of hardwood installations. Ash, maple, cherry, and walnut are also handsome and durable, if somewhat more expensive than oak. In older homes, softwood strip-flooring is most often fir, and wide-plank floors are usually pine. If you know where to search, you can find virtually any wood—old or new—which is a boon if you’re restoring an older home and want to maintain a certain look. On the Internet, you can find specialty mills, such as Carlisle Restoration Lumber™, that carry recycled wood that’s often rare or extinct, such as chestnut salvaged from barns or pecky cypress pulled from lake beds. There’s also new lumber made to look old, such as the hand-scraped cherry shown in the photo at right.
It’s not surprising that wood flooring is a sentimental favorite. It’s beautifully figured, warm
 hued, easy to work, and durable. Disadvantages: Wood scratches, dents, stains, and expands and contracts as temperatures vary. And, when exposed to water for sustained periods, it swells, splits, and eventually rots. Thus wood flooring needs a fair amount of maintenance, especially in high-use areas. In general, solid wood is a poor choice for rooms that tend to be chronically damp or occasionally wet. hued, easy to work, and durable. Disadvantages: Wood scratches, dents, stains, and expands and contracts as temperatures vary. And, when exposed to water for sustained periods, it swells, splits, and eventually rots. Thus wood flooring needs a fair amount of maintenance, especially in high-use areas. In general, solid wood is a poor choice for rooms that tend to be chronically damp or occasionally wet.
|
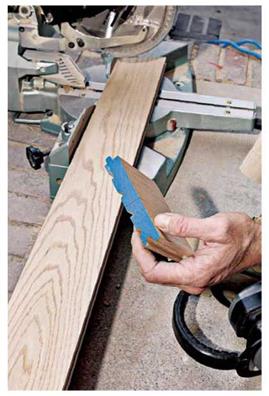
Here’s a typical cross section of solid-wood tongue-and-groove strip flooring.
|
  Prefinished wood flooring is stained and sealed with at least four coats at the factory, where it’s possible to apply finishes so precisely—to all sides of the wood—that manufacturers routinely offer 15-year to 25-year warranties on select finishes. Finishes are typically polyurethane, acrylic, or resin based, with additives that help flooring resist abrasion, moisture, UV rays, and so on. To its prefinished flooring, Lauzon® says it applies "a polymerized titanium coating [that is] solvent – free, VOC [volatile organic compound] and formaldehyde-free.” Harris Tarkett® coats its wood floors with an aluminum oxide-enhanced urethane. Another big selling point: These floors can be used as soon they’re installed. There’s no need to sand them or wait days for noxious coatings to dry. Prefinished wood flooring is stained and sealed with at least four coats at the factory, where it’s possible to apply finishes so precisely—to all sides of the wood—that manufacturers routinely offer 15-year to 25-year warranties on select finishes. Finishes are typically polyurethane, acrylic, or resin based, with additives that help flooring resist abrasion, moisture, UV rays, and so on. To its prefinished flooring, Lauzon® says it applies "a polymerized titanium coating [that is] solvent – free, VOC [volatile organic compound] and formaldehyde-free.” Harris Tarkett® coats its wood floors with an aluminum oxide-enhanced urethane. Another big selling point: These floors can be used as soon they’re installed. There’s no need to sand them or wait days for noxious coatings to dry.
Tough as prefinished floors are, however, manufacturers have very specific requirements for installing and maintaining them, so read their warranties closely. In many cases, you must use proprietary cleaners or "refreshers” to clean the floors and preserve the finish. Also, board ends cut during installation must be sealed with a finish compatible with that applied at the factory.
Engineered wood flooring is basically an upscale plywood, with a top layer of solid hardwood laminated to a three – to five-layer plywood base. Most types are prefinished, with tongue – and-groove edges and ends. This flooring is typically sold in boxes containing 20 sq. ft. of 212-in. or 354-in. widths, and assorted lengths.
Engineered wood flooring may be stapled to a plywood subfloor or glued to a concrete slab. Because it’s more dimensionally stable than solid wood, engineered wood is better suited to occasionally damp areas such as kitchens or finished basement rooms. And acrylic-impregnated varieties are even more moisture resistant.
There are many price points and quality levels of engineered wood flooring, and you get what you pay for. Better-quality flooring has a thicker hardwood layer—Mirage® engineered wood flooring touts its 582-in. hardwood layer on a five – ply board whose total thickness is 58 in. In general, a hardwood layer that is dry sawn will have richer, more varied grain patterns than wood that is rotary peeled or sliced.
Disadvantages: The thin top layer of engineered wood flooring can be refinished only a time or two. Mirage maintains that its 532-in. top layer can be sanded three to five times, but that seems optimistic, given the condition of most rental sanding equipment.
Posted by admin on 25/ 11/ 15
О Turn off electricity to the affected outlets and fixtures, and confirm that it’s off by using a voltage tester, as shown on p. 235. Remove the cover plates and other hardware from the outlets so the hardware protrudes as little as possible.
For an outlet relatively flush with the surface, simply position the strip over it. Then, over the center of the outlet, cut a small Xin the strip. Gradually extend the legs of the X until the strip lies flat. Even though the outlet’s cover plate will cover small imperfections in cutting, cut as close as you can to the edges of protruding hardware or the electrical box. Smooth the strip with a smoothing brush, and trim any excess paper. If the edges of the cutout aren’t adhering well, roll them with a seam roller.
It’s preferable to remove fixtures such as wall sconces, but that’s not always possible. For example, sometimes mounting screws will have rusted so badly that you would damage the fixture trying to remove them. In that case, after matching the wallcovering patterns, cut the strip to the approx
imate length. Then measure on the wall from the center of the fixture in two directions—say, from the baseboard and from the edge of the nearest strip of wallcovering. Transfer those dimensions to the strip you will hang. If you apply paste after cutting a small X, avoid fraying the edges of the cut with your paste brush or roller.
Hang the strip, and gradually enlarge the X until it fits over the base of the fixture. Smooth down the entire strip, trim closely around the fixture, and wipe away any paste that smeared onto the fixture.
PAPERING CEILINGS
In papered rooms, ceilings are usually painted. Even professionals find papering them challenging and time-consuming because you must fight gravity and neck cramps. So get a helper if possible, and paste only one strip at a time until you get the knack of it. Cover ceilings before walls, because it’s easier to conceal discrepancies with wall strips.
Because shorter strips are easier to handle, always hang across the ceiling’s shorter dimen-
 sion. Snap a line down the middle of the ceiling and work out from it. Cut strips for the ceiling in the same manner described for walls, leaving an inch or two extra at each end for trimming. However, folding the covering is slightly different. It’s best to use an accordion fold every V/2 ft. or so, which you unfold as you smooth the strips across the ceiling. (Be careful not to crease the folds.) sion. Snap a line down the middle of the ceiling and work out from it. Cut strips for the ceiling in the same manner described for walls, leaving an inch or two extra at each end for trimming. However, folding the covering is slightly different. It’s best to use an accordion fold every V/2 ft. or so, which you unfold as you smooth the strips across the ceiling. (Be careful not to crease the folds.)
With your smoothing brush, sweep from the center of the strip outward. Once you have unfolded the entire strip, make final adjustments to match seams, and smooth well. Roll seams after the strips have been in place for about 10 minutes.
ARCHES AND ALCOVES
Papering curved sections isn’t difficult, provided you allow enough extra wallcovering for overlaps and trimming, and for making pattern adjustments.
Before papering an arch, position wall strips so their edges don’t coincide with the vertical (side) edges of the arch. Just as it’s undesirable to have wallpaper seams coincide with an outside corner, seams that line up with an archway corner will wear poorly and look tacky. When hanging strips over an arch, let each strip drape over the opening; then use scissors to rough-cut the paper so it overhangs the opening by about 2 in. Make a series of small wedge-shaped relief cuts in the ends of those strips, and fold the remaining flaps into the arch. Then cover the flaps with two strips of wallpaper as wide as the arch wall is thick. Typically, these two strips meet at the top of the arch, in a double-cut seam. If possible, match patterns where they meet.
  Double-cutting is also useful around alcoves or window recesses, where it’s often necessary to wrap wall strips into the recessed area. Problem is, when you cut and wrap a wall strip into a recess, you interrupt the pattern on the wall. The best solution is to hang a new strip that slightly overlaps the first, match patterns, and double-cut through both strips. Peel away the waste pieces, smooth out the wallpaper, and roll the seams flat. Double-cutting is also useful around alcoves or window recesses, where it’s often necessary to wrap wall strips into the recessed area. Problem is, when you cut and wrap a wall strip into a recess, you interrupt the pattern on the wall. The best solution is to hang a new strip that slightly overlaps the first, match patterns, and double-cut through both strips. Peel away the waste pieces, smooth out the wallpaper, and roll the seams flat.
|
|
 |
 |
|
An accordion fold is easiest to unfold as you paper a ceiling and helps keep paste off the face of the wallcovering.
|
|
 
Posted by admin on 25/ 11/ 15
Installing wallcovering would be a snap if there were no corners, doors, windows, and electrical outlets, where you need to use extra care.
TILTING TRIM
AND COCKEYED CORNERS
In renovation, trim and corners are rarely perfectly plumb, but strips of wallcovering must be, regardless of tilting trim and corner walls out of plumb. If your first strip begins next to an out-of-plumb jamb casing, overlap it by the amount the casing is off plumb. After brushing

out the wallpaper, trim the overlapping edge.
Thus the leading edge of that strip will be plumb, as will the next strip’s. But always double-check for plumb before hanging subsequent strips.
Inside corners. If an inside corner is cockeyed, a strip of wallcovering wrapping the corner will be out of plumb when it emerges on the second wall. First use your spirit level to determine which way the walls are leaning. Then trim down the width of the strip so it is just wide enough to reach the second wall—plus a J/s-in. to!4-in. overlap. (Save the portion you trim off: If it’s wide enough, you may be able to paste it onto the second wall, thus attaining a closer pattern match in the corner.)
Now hang a strip of wallcovering on the second wall, plumbing its leading edge to a plumbed line you’ve marked on the wall first. Tuck the trailing edge of the strip into the corner so that it overlaps the first strip. There will be a slight mismatch of patterns, but in the corner, it won’t be noticeable. If you don’t like the small welt that results from the overlap, use a razor knife to double-cut the seam. However, if your walls are old and undulating, they’ll make it tough to cut a straight line. Ignoring a slight welt may spare you
a lot of frustration. In any event, don’t butt-join strips at corners because such seams almost always separate.
 Outside comers. Outside comers project into a room and so are very visible. So when laying out the job, never align the edge of a strip to the edge of an outside comer. Such edges look terrible initially and then usually fray. If the edge of a strip would occur precisely at a corner, cut it back h in. and wrap the corner with the edge of a full strip from the adjacent wall. Relief cut the top of the wallcovering where it turns the corner, as shown in the photo below, so the top of strip can lie flat. Remember to plumb the leading edge of the new strip. Outside comers. Outside comers project into a room and so are very visible. So when laying out the job, never align the edge of a strip to the edge of an outside comer. Such edges look terrible initially and then usually fray. If the edge of a strip would occur precisely at a corner, cut it back h in. and wrap the corner with the edge of a full strip from the adjacent wall. Relief cut the top of the wallcovering where it turns the corner, as shown in the photo below, so the top of strip can lie flat. Remember to plumb the leading edge of the new strip.
FITTING OVER OUTLETS AND FIXTURES
|
О Before hanging paper over an electrical outlet, switch, or fixture, turn off power to that outlet and check that it’s off by using a voltage tester.

Cutting option 1: Loosely hang the paper, locate the outlet, and cut a small X over the center of the outlet, extending the X until the paper lies flat.
Cutting option 2: Loosely hang the paper and cut around the outside of the outlet box. When the cutout is complete, brush the paper flat.
|
|

Posted by admin on 25/ 11/ 15
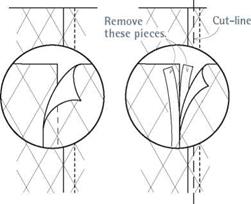
You can join strip edges in three ways: butt seam, overlap seam, or double-cut seams.
► The butt seam is the most common, its edges are simply butted together and rolled with a seam roller.
► An overlap seam is better where corners are out of sguare or when a butt seam might occur in a corner and not cover well. Keep the overlap as narrow as possible, thereby avoiding a noticeable welt and patterns that are grossly mismatched.
► Double-cut seams (also called through-cut seams) are the most complex of the three. They are used primarily where patterns are tough to match or surfaces are irregular; for example, where the walls of an alcove aren’t sguare.
How to Cut Seams________________________
|
OVERLAP SEAM DOUBLE-CUT SEAM
|
 covering are called straight match. Patterns that run diagonally are called drop match and waste somewhat more material during alignment. covering are called straight match. Patterns that run diagonally are called drop match and waste somewhat more material during alignment.
Unless you are working with a delicate covering, cut several strips at a time. But be careful not to crease them. Flop the entire pile of strips face down on the table so the piece cut first will be the first pasted and hung. The table must be perfectly clean; otherwise, the face of the bottom strip could become soiled.
PASTING
Unless you’re experienced, buy a premixed adhesive. But if mix you must, try to achieve a mixture that’s slightly tacky to the touch. Add paste powder or water slowly: Even small increments can change the consistency radically. Finally, mix thoroughly to remove lumps.
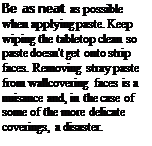
As you work, keep the pasting table clean, quickly sponging up stray paste so it won’t get on strip faces. Some coverings, such as vinyl, are not marred by stray paste on their face, but many others could be. Although the batch of paste you mix should last a working day, keep an eye on its consistency. Paste should glide on, never drag. Rinse the paste brush or roller when you break for lunch and when you quit for the day.
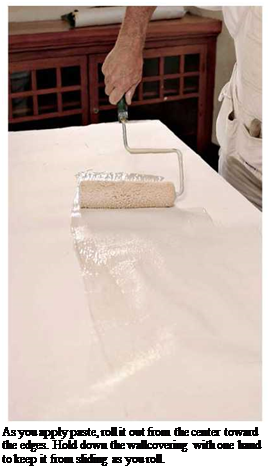
Until you become familiar with papering, apply paste to only one strip at a time. Using a roller, apply paste in the middle of the strip, toward the top. Spread the paste to the far edge and then to the near edge. For good measure, run the roller over strip edges twice because it’s often hard to see if the paste along the edges is evenly spread.
Prepasted Papers and Water Trays
Most wallcoverings come prepasted. Typically, manufacturers specify that individual strips be soaked for 30 seconds in a water tray filled with lukewarm water. But follow the directions printed on the back or supplied by the retailer. After soaking, pull each strip out of the tray and onto the work table, book (fold) it, and allow it to expand before hanging it on the wall. Precut the pieces before placing them in the water tray. Otherwise, if you try to trim soaked strips, they’ll snag or tear.
Many professional paperhangers will hang prepasted wallcoverings but hate water trays because (1) water and diluted paste drips everywhere; (2) the water in the tray must be changed often; (3) a thin film of paste also ends up on the front of the wallcovering; and (4) if the strips are soaked too long, they may not adhere well.
Instead, these pros roll prepaste activator onto the backing of strips, just as you’d apply standard paste. Rolling on an activator reduces mess and ensures good adherence to the wall.
 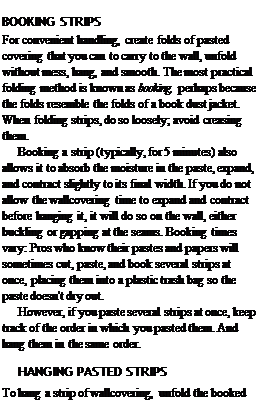 Last, pros sometimes roll thinned-down paste instead of activator. That may be okay, but first ask the wallcovering supplier if the two pastes will be compatible. Last, pros sometimes roll thinned-down paste instead of activator. That may be okay, but first ask the wallcovering supplier if the two pastes will be compatible.
  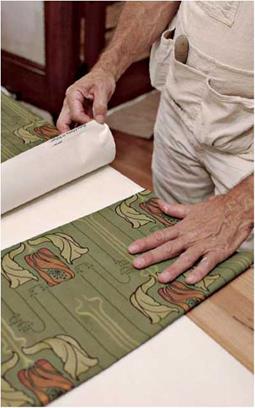  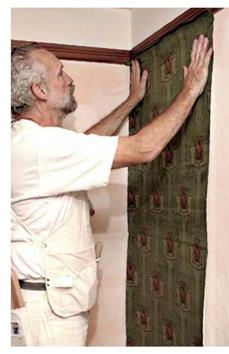 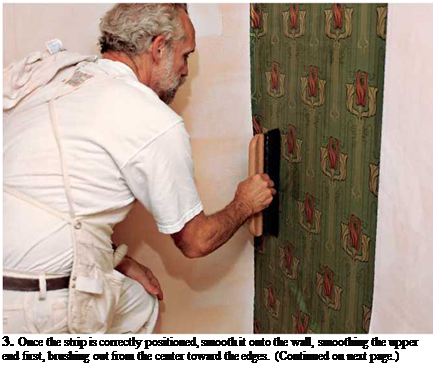
Position the upper end of the strip an inch or so above the ceiling line. Smooth the upper end of the strip first, by running a smoothing brush down the middle of the strip and out toward the edges. Working from the center outward, brush air bubbles, wrinkles, and excess paste from the middle to the edges. Align subsequent pieces to the leading edge of each preceding strip, checking periodically to make sure the strips are plumb.
If the upper half of the strip is adhering well, simply unfold the lower fold and smooth the paper down, again brushing down the center and out toward the edges with small strokes.
If a butt seam doesn’t meet exactly, you have three choices:
Move a strip slightly by raising one of its edges, and—palm on paper—using your other hand to slide the strip toward or away from the seam. Raising one edge of the strip reduces the grip between paper and wall.
Pull the strip off the wall, realign its patterns along the seam, and brush it down.
But you’ve got to move quickly: Don’t wait much more than a minute to pull the strip off.
Pull off the strip, quickly sponge clean the wall, and hang a new strip.
Don’t try pulling just one edge of the strip, however. At best, it will stretch, draw back when it dries, and open the seam. At worst, you’ll pucker or rip the strip.
SPONGING
It’s impossible to overstate the importance of gently wiping paste off the wallcovering and adjacent surfaces. Left on the wallcovering, paste can shrink and pull the ink off. If paste dries on a painted ceiling, it will pull the paint off. (If you see a brown crust along a ceiling-wall intersec-
Dry-HANGING
If handled too much, many fabrics, foils,
Mylars, and grasses will separate from their backing once they absorb the paste. For that reason, pros often dry-hang them. Here’s how: They roll paste onto the wall and smooth the dry covering onto it. However, leave this job to a pro because the paste must be applied impeccably even, and the strips placed exactly— there’s little chance to adjust them. Likewise, these materials can’t tolerate sponging, rubbing, or seam rolling. Pros sweep them on with a soft-bristle smoothing brush and let them be.
tion, that’s dried paste.) Paste will even pull the finish off wood trim. Vinyl-on-vinyl and clay adhesives are especially tenacious, so sponge off the excess immediately.
Equally important: Change your sponge water often so diluted paste doesn’t accumulate. Warm water is best. And wring the sponge almost dry before wiping. When you’ve wiped the surfaces
clean, come back with a soft, dry rag. But apply only light pressure so you don’t move the wallcovering, disturbing its seams.
Note: Don’t rub delicate wallpapers. Instead, blot them clean with a just-damp sponge. Before you commit to any wallcovering, ask your supplier if it can be wiped (or blotted clean) with a sponge. If not, consider other materials.
TRIMMING AND ROLLING
Where a strip of wallcovering meets borders such as woodwork, a ceiling line, or a baseboard, use a 6-in. taping knife to press the edges of the covering snug. Cut off the excess by running a razor knife along the blade of the taping knife. Because strips may cover door or window casing, you may want to rough-cut the ends of strips first so you don’t cut them too short. Then, using your taping knife to tuck the wallcovering snugly against the casing, trim it more precisely. For clean cuts, razor blades must be sharp.
Conventional wisdom suggests rolling wallcovering seams 10 minutes or 15 minutes after the strips are in place—that is, after the paste has set somewhat. But the master craftsman shown hanging wallpaper in photos here prefers to the roll seams before he brushes out the paper. If you position the strips correctly, roll the seams, and then smooth the covering, he asserts, you’re less likely to stretch the wallpaper. Also, if seams don’t align correctly, you want to know that sooner, rather than later, so you can adjust or remove the strip before the paste sets up.
In any case, rolling may cause paste to ooze from the seams. So, be sure to sponge wallcovering clean as you work, unless you’re installing delicate or embossed wallcovering, which shouldn’t be rolled or wiped at all. Finally, use a moderate pressure when rolling. After all, you’re trying to embed the wallcovering in the paste, not crush it.
Posted by admin on 25/ 11/ 15
О Before you start hanging wallcovering, turn off the electricity to affected outlets, switches, and fixtures, and check with a voltage tester to be sure the power’s off.
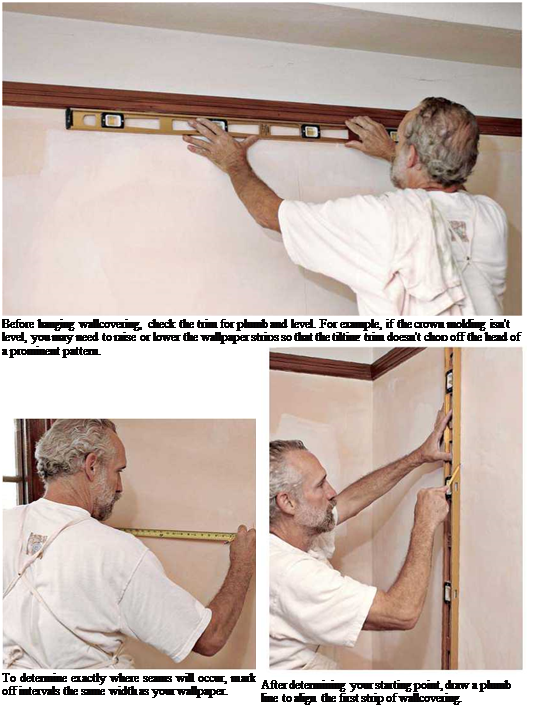
Measure out from the door casing, if that’s where you’ll begin, and draw a plumb line that will become the leading edge of the first strip.
If the casing is out of plumb, allow the trailing edge of the strip to overlap the casing enough to be trimmed with a razor knife without creating a space along the casing. If the casing is plumb, simply butt the trailing edge to the casing. As you progress, however, continually check for plumb.
CUTTING STRIPS TO LENGTH
Measure the height of the wall and cut several strips to length, leaving extra at each end for trimming and vertically matching patterns. Cut the first two strips extra long. Slide the first strip up and down the wall until most (or all) of its pattern shows near the ceiling line. Don’t show less than half the pattern. The pattern along the baseboard will be less visible and thus less important.
Place the second strip next to the first, and align the patterns along their edges. From the first two strips, you’ll have a sense of how much waste to allow for pattern matching. (A pattern – repeat interval is often printed on the label packaged with the wallpaper.) Depending on the size of the patterns, each succeeding strip can usually be rough-cut with an inch or two extra at each end and then trimmed after being pasted.
Do the rough-cutting at the table using shears. Do the trimming on the wall using a razor knife. Patterns that run horizontally across the face of a
|
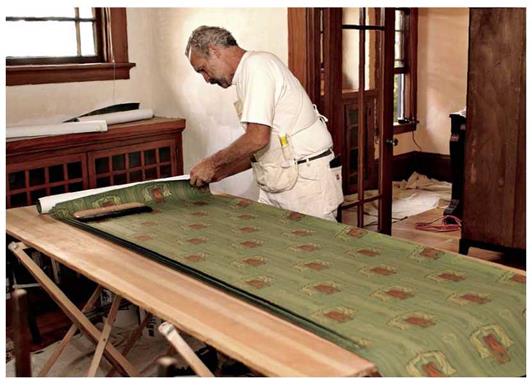
Use shears to rough-cut strips, leaving extra at each end for trimming and pattern matching. This pasting and layout table is a professional model, strong yet light, easily transported from job to job.
|
|
Posted by admin on 25/ 11/ 15
Newly installed drywall must be sealed before you hang wallcoverings. Otherwise, the drywall’s paper face will absorb paste, making it impossible to remove the covering at a future date without damaging the drywall face. To seal drywall, apply a coat of universal primer-sealer, which is an excellent base coat for papering and painting.
Plaster must be well cured before you apply either wallcovering or paint. Uncured plaster contains alkali that is still warm, causing the paint and paste to bubble. "Hot plaster” has a dull appearance, whereas cured plaster has a slight sheen. Curing time varies, but keeping the house warm will hasten it. Cured plaster can also be coated with universal primer-sealer.
Laying Out the Work
Before ordering materials, walk the room and determine if the walls are plumb and if the woodwork is plumb and level. Also, use a long, straight board or a 4-ft. spirit level to determine if the walls have mounds and dips. Use a pencil to circle irregularities so you can spot them easily later. You can hang almost any wallcovering type or pattern, but if door or window casing is markedly out of plumb, small patterns make plumb problems less noticeable than large, loud patterns.
Mold and Mildew
Mold is a discoloration caused by fungi growing on organic matter such as wood, paper, or paste. Mildew is essentially the same, but usually refers to fungi on paper or cloth. Note: Without sufficient moisture and something to eat, mold (and mildew) can’t grow. Mold can grow on the paper and adhesives in drywall; but, technically, mold can’t grow on plaster because plaster is inorganic. If your plaster walls are moldy, the fungi are growing on grease, soap, dirt, or some other organic film on the plaster.
Anyhow, if your walls or ceilings are moldy, first alleviate the moisture. To determine its source, duct-tape a 1-ft.-sq. piece of aluminum foil to a wall. Leave this up for a week. Upon removal, if there’s moisture on the back of the foil, the source is behind the walls. However, if the foil front is damp, there’s excessive moisture in the living space, which you might reduce by installing ventilator fans, for starters.
If the drywall or plaster is in good condition, clean off the mold by sponging on a mild detergent solution. (Though widely recommended, diluted bleach isn’t any more effective than a household cleaner.) The sponge should be damp, not wet. Rinse with clean water, and allow the surface to dry thoroughly. Then paint on a universal primer-sealer. If you’ll be wallpapering the room, use a mildew-resistant, kitchen-and-bath adhesive.
If mold or water stains are widespread and the drywall has deteriorated, there may be mold in the walls. Remove a section of drywall to be sure. If the framing is moldy, it may need to be replaced—a big job and one worth discussing with a mold-abatement specialist, especially if family members have asthma or chronic respiratory problems (for more, see Chapter 14).
Starting and finishing points. To decide where to hang the first strip, figure out where you want to end. The last strip of wall covering almost always needs to be cut narrower to fit, disrupting the strip’s full-width pattern. Thus avoid hanging the last strip where it will be conspicuous.
A common place to begin is one side of a main doorway. There, you won’t notice a narrower strip when you enter the room. And when you leave the room, you’ll usually be looking through the doorway. The last piece is normally a small one placed over the doorway.
Another common starting point is an inconspicuous corner. To determine exactly where wallcovering seams will occur, mark off intervals the same width as your wallcovering. Go around the room, using a ruler or a wrapped roll of wallcovering as your gauge. Try to avoid trimming and pasting very narrow strips of wallcovering in corners; this usually looks terrible, and the pieces don’t adhere well. You may want to move your starting point an inch or two to avoid that inconvenience.
 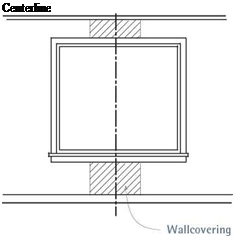  
PICTURE WINDOW
Centerline
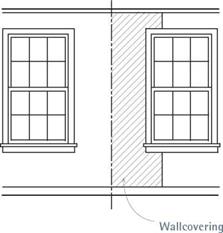
Where windows are the focal point of a room, position the wallcovering accordingly. If the window is a large picture window, center the middle of the strip on the middle of the window. If the focal point is two windows, center the edges of the two strips as shown.
However, if the pattern is conspicuous, you might start layout with a strip centered in a conspicuous part of a wall—over a mantel, over a sofa, or in the middle of a large wall. Determine such a visual center and mark off roll-widths from each side of the starting strip, until you have determined where the papering will terminate, again preferably in an inconspicuous place.
You may want to center the pattern at a window, if that’s indisputably the visual center of the room. In the case of a picture window, the middle of the strip should align with the middle of the window, as shown at left. If there are two windows, the edges of two strips should meet along a centered, plumbed line between the two windows, as shown, unless the distance between the windows is less than the width of a strip. If the distance is less, center a strip between the windows.
| |


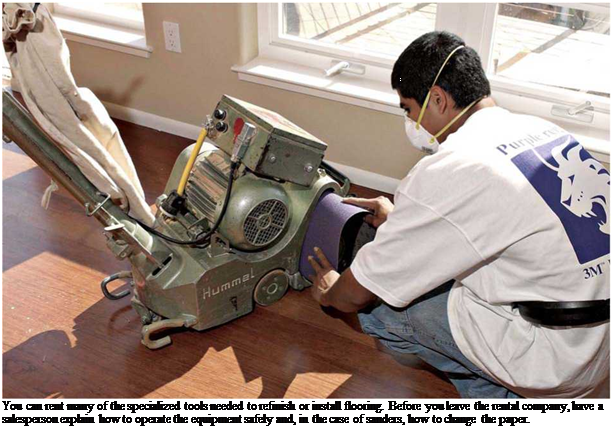
 An edger (disk sander) goes where drum or belt sanders can’t—along the perimeter of floors and into tight nooks. (Large floor sanders should not be used within 6 in. of walls.) Edgers may be smaller than floor sanders, but they can still gouge flooring quickly. So first practice on plywood. The edger’s paper is held in place against a rubber disk by a washered nut. To prevent gouging the floor with the edger, many professionals leave three or four used disks beneath the new one, which cushions the cutting edge of the sandpaper somewhat.


 Test 3: Polyurethane. In an inconspicuous place, brush on a small amount of paint stripper. If the finish bubbles, it’s polyurethane. If it doesn’t
 Tiles are rated by hardness: Group III and higher are suitable for floors. Slip resistance is also important. In general, unglazed tiles are less
 slippery than glazed ones, but all tile and stone— and their joints—must be sealed to resist staining and absorbing water. (Soapstone is the only exception. Leave it unsealed because most stone sealers won’t penetrate soapstone and the few that will make it look as if it had been oiled.)
 Coconut palm flooring, like bamboo, is plentiful and can be sustainably harvested. Its texture is fine pored, reminiscent of mahogany. Because coconut palm is a dark wood, its color range is limited, from a rich, mahogany red to a deep brown. And it is tough stuff: Smith & Fong™ offers a %-in.-thick, three-ply, tongue-and-groove strip flooring, called Durapalm®, which it claims to be 25 percent harder than red oak. Durapalm is available unfinished or prefinished. One of the finish options contains space-age ceramic particles for an even tougher surface. So if you’re thinking of installing a ballroom floor in your bungalow, this is definitely a material to consider.

 Developed and first adopted in Europe, laminate flooring is most commonly snap-together planks that float above a substrate, speeding installation, repairs, and removal. Of all flooring materials, laminate is probably the most affordable; and as noted, it’s almost indestructible. Because it resists scratches, chemicals, burns, and water, it’s a good choice for high-use or high – moisture areas. It’s also colorfast, dimensionally stable, and easy to clean—though many manufacturers insist that you use proprietary cleaning solutions. For a good overview of installing laminates, see
 hued, easy to work, and durable. Disadvantages: Wood scratches, dents, stains, and expands and contracts as temperatures vary. And, when exposed to water for sustained periods, it swells, splits, and eventually rots. Thus wood flooring needs a fair amount of maintenance, especially in high-use areas. In general, solid wood is a poor choice for rooms that tend to be chronically damp or occasionally wet.

 Prefinished wood flooring is stained and sealed with at least four coats at the factory, where it’s possible to apply finishes so precisely—to all sides of the wood—that manufacturers routinely offer 15-year to 25-year warranties on select finishes. Finishes are typically polyurethane, acrylic, or resin based, with additives that help flooring resist abrasion, moisture, UV rays, and so on. To its prefinished flooring, Lauzon® says it applies "a polymerized titanium coating [that is] solvent – free, VOC [volatile organic compound] and formaldehyde-free.” Harris Tarkett® coats its wood floors with an aluminum oxide-enhanced urethane. Another big selling point: These floors can be used as soon they’re installed. There’s no need to sand them or wait days for noxious coatings to dry.
 sion. Snap a line down the middle of the ceiling and work out from it. Cut strips for the ceiling in the same manner described for walls, leaving an inch or two extra at each end for trimming. However, folding the covering is slightly different. It’s best to use an accordion fold every V/2 ft. or so, which you unfold as you smooth the strips across the ceiling. (Be careful not to crease the folds.)
 Double-cutting is also useful around alcoves or window recesses, where it’s often necessary to wrap wall strips into the recessed area. Problem is, when you cut and wrap a wall strip into a recess, you interrupt the pattern on the wall. The best solution is to hang a new strip that slightly overlaps the first, match patterns, and double-cut through both strips. Peel away the waste pieces, smooth out the wallpaper, and roll the seams flat.


 Outside comers. Outside comers project into a room and so are very visible. So when laying out the job, never align the edge of a strip to the edge of an outside comer. Such edges look terrible initially and then usually fray. If the edge of a strip would occur precisely at a corner, cut it back h in. and wrap the corner with the edge of a full strip from the adjacent wall. Relief cut the top of the wallcovering where it turns the corner, as shown in the photo below, so the top of strip can lie flat. Remember to plumb the leading edge of the new strip.


 covering are called straight match. Patterns that run diagonally are called drop match and waste somewhat more material during alignment.
 Last, pros sometimes roll thinned-down paste instead of activator. That may be okay, but first ask the wallcovering supplier if the two pastes will be compatible.


